[fusion_builder_container hundred_percent=”yes” hundred_percent_height=”no” hundred_percent_height_scroll=”no” hundred_percent_height_center_content=”yes” equal_height_columns=”no” menu_anchor=”” hide_on_mobile=”small-visibility,medium-visibility,large-visibility” status=”published” publish_date=”” class=”” id=”” background_color=”” background_image=”” background_position=”center center” background_repeat=”no-repeat” fade=”no” background_parallax=”none” enable_mobile=”no” parallax_speed=”0.3″ video_mp4=”” video_webm=”” video_ogv=”” video_url=”” video_aspect_ratio=”16:9″ video_loop=”yes” video_mute=”yes” video_preview_image=”” border_size=”” border_color=”” border_style=”solid” margin_top=”35″ margin_bottom=”” padding_top=”” padding_right=”” padding_bottom=”” padding_left=””][fusion_builder_row][fusion_builder_column type=”1_1″ layout=”1_1″ spacing=”” center_content=”no” link=”” target=”_self” min_height=”” hide_on_mobile=”small-visibility,medium-visibility,large-visibility” class=”” id=”” background_color=”” background_image=”” background_image_id=”” background_position=”left top” background_repeat=”no-repeat” hover_type=”none” border_size=”0″ border_color=”” border_style=”solid” border_position=”all” padding_top=”” padding_right=”” padding_bottom=”” padding_left=”” margin_top=”” margin_bottom=”” animation_type=”” animation_direction=”left” animation_speed=”0.3″ animation_offset=”” last=”no”][fusion_text columns=”” column_min_width=”” column_spacing=”” rule_style=”default” rule_size=”” rule_color=”” hide_on_mobile=”small-visibility,medium-visibility,large-visibility” class=”” id=””]
Eaton Fuller Code Hybrid Fault 2 motor / Generator Temperatura sensor
[/fusion_text][/fusion_builder_column][/fusion_builder_row][/fusion_builder_container][fusion_builder_container hundred_percent=”no” hundred_percent_height=”no” hundred_percent_height_scroll=”no” hundred_percent_height_center_content=”yes” equal_height_columns=”no” menu_anchor=”” hide_on_mobile=”small-visibility,medium-visibility,large-visibility” status=”published” publish_date=”” class=”” id=”” background_color=”” background_image=”” background_position=”center center” background_repeat=”no-repeat” fade=”no” background_parallax=”none” enable_mobile=”no” parallax_speed=”0.3″ video_mp4=”” video_webm=”” video_ogv=”” video_url=”” video_aspect_ratio=”16:9″ video_loop=”yes” video_mute=”yes” video_preview_image=”” border_size=”” border_color=”” border_style=”solid” margin_top=”” margin_bottom=”” padding_top=”” padding_right=”” padding_bottom=”” padding_left=””][fusion_builder_row][fusion_builder_column type=”1_1″ layout=”1_1″ spacing=”” center_content=”no” link=”” target=”_self” min_height=”” hide_on_mobile=”small-visibility,medium-visibility,large-visibility” class=”” id=”” background_color=”” background_image=”” background_image_id=”” background_position=”left top” background_repeat=”no-repeat” hover_type=”none” border_size=”0″ border_color=”” border_style=”solid” border_position=”all” padding_top=”” padding_right=”” padding_bottom=”” padding_left=”” margin_top=”” margin_bottom=”” animation_type=”” animation_direction=”left” animation_speed=”0.3″ animation_offset=”” last=”no”][fusion_text columns=”” column_min_width=”” column_spacing=”” rule_style=”default” rule_size=”” rule_color=”” hide_on_mobile=”small-visibility,medium-visibility,large-visibility” class=”” id=””]
Faji Kodi për Eaton Hibrid Sistemet Drive modele EH-8E406A-U / p, EH-8E406A-UP, EH-8E406A-UPG, EH-8E406A-CD, EH-8E406A-CDG, EH-8E406A-CDR, EH-8E406A-T, EH-6E706B-CD, EH-6E706B-P dhe EH-6E706B-UPG. Controller Area Network (MUND) është një shpejtësi të lartë përdredhur palë 500K lidhje të pronarit të dhënave me një 120 om rezistencë në çdo fund të lidhjes. Hybrid Kontrolli Module (HCM) është e lidhur me të dhënat Link të mund në të 38-Way Connector. Kjo lidhje është përdorur për të përcjellë informacion të HCM si dhe të komunikojnë apo të marrin të dhëna nga modulet e tjera në rrjet si tufë actuator elektrike (ECA).
faj Kodin 19 – MUND ECA Mesazh Fault (HCM) Zbulim
Parakushtet e mëposhtme duhet të plotësohen para se sistemi zbulon defektin:
- HCM ndezjen tension është më i madh se 7 volt dhe më pak se 16 volt.
- HCM CAN Komunikimi Link faji nuk është aktive.
Kushtet për Set Kodi Fault Active
- FMN 9: Vendosni kur HCM nuk arrin të marrë të dhëna ECA (p.sh., Pozicioni tufë) për të paktën 30 mesazhet njëpasnjëshme, dhe ajo është ende komunikuar me modulet e tjera me radhë mund.
- FMN 2: Vetëm aktiv në PDM dhe është vendosur kur HCM nuk merr 3 mesazhe të njëpasnjëshme nga ECA.
Fallback Kur Code Fault 19 është vendosur ndodhin kushtet e mëposhtme:
- Red "Stop Hibrid" tregon lehta.
- Faji është i ruajtur në kujtesën HCM.
- mode operacion ndryshon për AutoShift vetëm modalitetin.
- Nëse faji vendos në pushtet deri, Motori nuk fiksime.
- motor elektrik / gjenerator ndihmuar dhe rigjenerimin janë me aftësi të kufizuara; megjithatë, relays e tensionit të lartë të mbetet powered.
- Nëse faji ndodh kur je në timon, ECA ose do të ruajë pozicionin aktual tufë ose të shkojë në pozitën e fundit urdhëruar nga HCM.
- defaults transmetimit fillojnë veshje deri më 1.
[/fusion_text][fusion_text columns=”” column_min_width=”” column_spacing=”” rule_style=”default” rule_size=”” rule_color=”” hide_on_mobile=”small-visibility,medium-visibility,large-visibility” class=”” id=””]
Ky kod faji mund të shkaktohet nga ndonjë nga këto:
- FMN 9, 2
- MUND Data Link
- Asnjë fuqi apo tokë për ECA
- ECA
[/fusion_text][/fusion_builder_column][/fusion_builder_row][/fusion_builder_container][fusion_builder_container hundred_percent=”no” hundred_percent_height=”no” hundred_percent_height_scroll=”no” hundred_percent_height_center_content=”yes” equal_height_columns=”no” menu_anchor=”” hide_on_mobile=”small-visibility,medium-visibility,large-visibility” status=”published” publish_date=”” class=”” id=”” background_color=”” background_image=”” background_position=”center center” background_repeat=”no-repeat” fade=”no” background_parallax=”none” enable_mobile=”no” parallax_speed=”0.3″ video_mp4=”” video_webm=”” video_ogv=”” video_url=”” video_aspect_ratio=”16:9″ video_loop=”yes” video_mute=”yes” video_preview_image=”” border_size=”” border_color=”” border_style=”solid” margin_top=”” margin_bottom=”” padding_top=”” padding_right=”” padding_bottom=”” padding_left=””][fusion_builder_row][fusion_builder_column type=”1_1″ layout=”1_1″ spacing=”” center_content=”no” link=”” target=”_self” min_height=”” hide_on_mobile=”small-visibility,medium-visibility,large-visibility” class=”” id=”” background_color=”” background_image=”” background_image_id=”” background_position=”left top” background_repeat=”no-repeat” hover_type=”none” border_size=”0″ border_color=”” border_style=”solid” border_position=”all” padding_top=”” padding_right=”” padding_bottom=”” padding_left=”” margin_top=”” margin_bottom=”” animation_type=”” animation_direction=”left” animation_speed=”0.3″ animation_offset=”” last=”no”][fusion_text columns=”” column_min_width=”” column_spacing=”” rule_style=”default” rule_size=”” rule_color=”” hide_on_mobile=”small-visibility,medium-visibility,large-visibility” class=”” id=””]
faj Kodin 19 – MUND ECA Mesazh Fault (HCM) provë
[/fusion_text][/fusion_builder_column][/fusion_builder_row][/fusion_builder_container][fusion_builder_container hundred_percent=”no” hundred_percent_height=”no” hundred_percent_height_scroll=”no” hundred_percent_height_center_content=”yes” equal_height_columns=”no” menu_anchor=”” hide_on_mobile=”small-visibility,medium-visibility,large-visibility” status=”published” publish_date=”” class=”” id=”” background_color=”” background_image=”” background_position=”center center” background_repeat=”no-repeat” fade=”no” background_parallax=”none” enable_mobile=”no” parallax_speed=”0.3″ video_mp4=”” video_webm=”” video_ogv=”” video_url=”” video_aspect_ratio=”16:9″ video_loop=”yes” video_mute=”yes” video_preview_image=”” border_size=”” border_color=”” border_style=”solid” margin_top=”” margin_bottom=”” padding_top=”” padding_right=”” padding_bottom=”” padding_left=””][fusion_builder_row][fusion_builder_column type=”1_1″ layout=”1_1″ spacing=”” center_content=”no” link=”” target=”_self” min_height=”” hide_on_mobile=”small-visibility,medium-visibility,large-visibility” class=”” id=”” background_color=”” background_image=”” background_image_id=”” background_position=”left top” background_repeat=”no-repeat” hover_type=”none” border_size=”0″ border_color=”” border_style=”solid” border_position=”all” padding_top=”” padding_right=”” padding_bottom=”” padding_left=”” margin_top=”” margin_bottom=”” animation_type=”” animation_direction=”left” animation_speed=”0.3″ animation_offset=”” last=”no”][fusion_text columns=”” column_min_width=”” column_spacing=”” rule_style=”default” rule_size=”” rule_color=”” hide_on_mobile=”small-visibility,medium-visibility,large-visibility” class=”” id=””]
Identifikimi Komponenti:
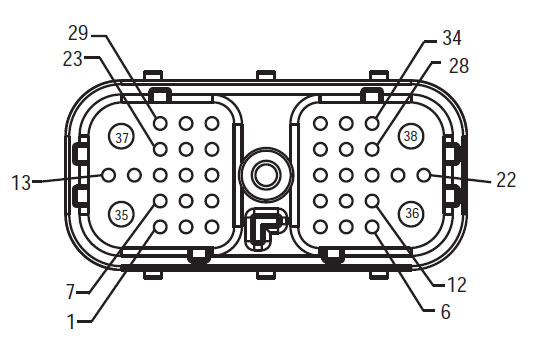
[/fusion_text][/fusion_builder_column][fusion_builder_column type=”2_3″ layout=”1_2″ spacing=”” center_content=”no” link=”” target=”_self” min_height=”” hide_on_mobile=”small-visibility,medium-visibility,large-visibility” class=”” id=”” background_color=”” background_image=”” background_image_id=”” background_position=”left top” background_repeat=”no-repeat” hover_type=”none” border_size=”0″ border_color=”” border_style=”solid” border_position=”all” padding_top=”” padding_right=”” padding_bottom=”” padding_left=”” margin_top=”” margin_bottom=”” animation_type=”” animation_direction=”left” animation_speed=”0.3″ animation_offset=”” last=”no”][fusion_imageframe image_id=”14061|full” max_width=”” style_type=”” blur=”” stylecolor=”” hover_type=”none” bordersize=”” bordercolor=”” borderradius=”” align=”center” lightbox=”no” gallery_id=”” lightbox_image=”” lightbox_image_id=”” alt=”Shaloni Front View (HCM – Automjeteve Interface Connector) transmetimit Fuller” link=”” linktarget=”_self” hide_on_mobile=”small-visibility,medium-visibility,large-visibility” class=”” id=”” animation_type=”” animation_direction=”left” animation_speed=”0.3″ animation_offset=””]https://www.globaltransmissionsupply.com/wp-content/uploads/Fuller-Front-Harness-View-HCM.jpg[/fusion_imageframe][fusion_text columns=”” column_min_width=”” column_spacing=”” rule_style=”default” rule_size=”” rule_color=”” hide_on_mobile=”small-visibility,medium-visibility,large-visibility” class=”” id=””]
Shaloni Front View
(HCM – Automjeteve Interface Connector)
[/fusion_text][/fusion_builder_column][fusion_builder_column type=”1_3″ layout=”1_2″ spacing=”” center_content=”no” link=”” target=”_self” min_height=”” hide_on_mobile=”small-visibility,medium-visibility,large-visibility” class=”” id=”” background_color=”” background_image=”” background_image_id=”” background_position=”left top” background_repeat=”no-repeat” hover_type=”none” border_size=”0″ border_color=”” border_style=”solid” border_position=”all” padding_top=”” padding_right=”” padding_bottom=”” padding_left=”” margin_top=”” margin_bottom=”” animation_type=”” animation_direction=”left” animation_speed=”0.3″ animation_offset=”” last=”no”][fusion_imageframe image_id=”14146|full” max_width=”” style_type=”” blur=”” stylecolor=”” hover_type=”none” bordersize=”” bordercolor=”” borderradius=”” align=”center” lightbox=”no” gallery_id=”” lightbox_image=”” lightbox_image_id=”” alt=”ECA 8-Way Connector” link=”” linktarget=”_self” hide_on_mobile=”small-visibility,medium-visibility,large-visibility” class=”” id=”” animation_type=”” animation_direction=”left” animation_speed=”0.3″ animation_offset=””]https://www.globaltransmissionsupply.com/wp-content/uploads/Fuller-ECA-8-Way-Harness-Connector.jpg[/fusion_imageframe][fusion_text columns=”” column_min_width=”” column_spacing=”” rule_style=”default” rule_size=”” rule_color=”” hide_on_mobile=”small-visibility,medium-visibility,large-visibility” class=”” id=””]
ECA 8-Way Connector
[/fusion_text][/fusion_builder_column][fusion_builder_column type=”1_1″ layout=”1_1″ spacing=”” center_content=”no” link=”” target=”_self” min_height=”” hide_on_mobile=”small-visibility,medium-visibility,large-visibility” class=”” id=”” background_image_id=”” background_color=”#000000″ background_image=”” background_position=”left top” undefined=”” background_repeat=”no-repeat” hover_type=”none” border_size=”0″ border_color=”” border_style=”solid” border_position=”all” padding_top=”” padding_right=”” padding_bottom=”” padding_left=”” margin_top=”” margin_bottom=”” animation_type=”” animation_direction=”left” animation_speed=”0.3″ animation_offset=”” last=”no”][fusion_text columns=”” column_min_width=”” column_spacing=”” rule_style=”default” rule_size=”” rule_color=”” hide_on_mobile=”small-visibility,medium-visibility,large-visibility” class=”” id=””]
SHËNIM: Referojuni Eaton Komponenti Hybrid dhe Connector Vendndodhja për Locations lidhës.
[/fusion_text][/fusion_builder_column][fusion_builder_column type=”1_1″ layout=”1_1″ spacing=”” center_content=”no” link=”” target=”_self” min_height=”” hide_on_mobile=”small-visibility,medium-visibility,large-visibility” class=”” id=”” background_color=”” background_image=”” background_image_id=”” background_position=”left top” background_repeat=”no-repeat” hover_type=”none” border_size=”0″ border_color=”” border_style=”solid” border_position=”all” padding_top=”” padding_right=”” padding_bottom=”” padding_left=”” margin_top=”” margin_bottom=”” animation_type=”” animation_direction=”left” animation_speed=”0.3″ animation_offset=”” last=”no”][fusion_imageframe image_id=”14153|800″ max_width=”” style_type=”” blur=”” stylecolor=”” hover_type=”none” bordersize=”” bordercolor=”” borderradius=”” align=”center” lightbox=”no” gallery_id=”” lightbox_image=”” lightbox_image_id=”” alt=”Eaton Fuller HCM ECA Connection” link=”” linktarget=”_self” hide_on_mobile=”small-visibility,medium-visibility,large-visibility” class=”” id=”” animation_type=”” animation_direction=”left” animation_speed=”0.3″ animation_offset=””]https://www.globaltransmissionsupply.com/wp-content/uploads/Eaton-Fuller-HCM-ECA-Connection-800×272.jpg[/fusion_imageframe][/fusion_builder_column][/fusion_builder_row][/fusion_builder_container][fusion_builder_container hundred_percent=”no” hundred_percent_height=”no” hundred_percent_height_scroll=”no” hundred_percent_height_center_content=”yes” equal_height_columns=”no” menu_anchor=”” hide_on_mobile=”small-visibility,medium-visibility,large-visibility” status=”published” publish_date=”” class=”” id=”” background_color=”” background_image=”” background_position=”center center” background_repeat=”no-repeat” fade=”no” background_parallax=”none” enable_mobile=”no” parallax_speed=”0.3″ video_mp4=”” video_webm=”” video_ogv=”” video_url=”” video_aspect_ratio=”16:9″ video_loop=”yes” video_mute=”yes” video_preview_image=”” border_size=”” border_color=”” border_style=”solid” margin_top=”” margin_bottom=”” padding_top=”” padding_right=”” padding_bottom=”” padding_left=””][fusion_builder_row][fusion_builder_column type=”1_1″ layout=”1_1″ spacing=”” center_content=”no” link=”” target=”_self” min_height=”” hide_on_mobile=”small-visibility,medium-visibility,large-visibility” class=”” id=”” background_color=”” background_image=”” background_image_id=”” background_position=”left top” background_repeat=”no-repeat” hover_type=”none” border_size=”0″ border_color=”” border_style=”solid” border_position=”all” padding_top=”” padding_right=”” padding_bottom=”” padding_left=”” margin_top=”” margin_bottom=”” animation_type=”” animation_direction=”left” animation_speed=”0.3″ animation_offset=”” last=”no”][fusion_modal name=”warnings_cautions” title=”Paralajmërimet & keshillon” size=”large” background=”” border_color=”” show_footer=”yes” class=”” id=””]rrezik: Rreziku tregon se do të plagoseni rëndë ose do të vriteni nëse nuk ndiqni procedurën e treguar.
paralajmërim: Warning tregon një rrezik të menjëhershëm, i cili mund të rezultojë në dëmtim të rëndë personal nëse nuk ndiqni procedurën e treguar.
Kujdes: Kujdes tregon që dëmtimi i automjetit ose pronës mund të ndodhë nëse nuk ndiqni procedurën e treguar.
shënim: Shënimi tregon detaje shtesë që do të ndihmojnë në diagnostikimin ose riparimin e një përbërësi / sistemi.
Ndjekin procedurat e përcaktuara në urdhrin e treguar për të shmangur dëmtimin personal:
1. Nëse kone e tensionit të lartë janë rreth automjetit dhe lokaut është i instaluar në PEC, i vetmi person që duhet të lejohet të fillojë të automjetit është personi që ka nënshkruar tag lokaut.
2. Para se të punuar në një automjet ose duke e lënë taksi, ndërsa motori është i rrjedhshëm, ju duhet të vendosni levë ndryshim në "N" të vendosur frenave parkimi, dhe bllokojnë rrotat.
3. Për arsye sigurie, gjithmonë të angazhuar frenat e shërbimit para se të zgjedhur pozicionet veshje nga "N."
4. Para fillimit të një automjeti gjithmonë të ulur në vendin e shoferit, zgjidhni "N" Për kontrollin shift, dhe të vendosur frenat e parkimit.
5. Në automjetet me ePTO, motor dhe / ose
Motor / Generator mund të fillojë në mënyrë të ePTO. Asnjëherë mos kryer ndonjë mirëmbajtjen ose punojnë në automjet, ndërsa në këtë mënyrë.
6. 12-Volt Battery pozitiv (+) dhe negative (-) duhet të jenë të shkyçur para çdo saldim në çdo makinë hibride pajisur.
Kujdes: Ndjekin procedurat e përcaktuara në urdhrin e treguar për të shmangur pajisjet keqfunksionim ose dëmtim.
Kujdes: Mos e lëshoni frenin e parkimit ose mos u përpiqni të zgjidhni një ingranazh derisa presioni i ajrit të jetë në nivelin e duhur.
Kujdes: Për të shmangur dëmtimin e transmisionit gjatë tërheqjes vendosni levën e ndërrimit në "N" dhe ngrini rrotat e makinës nga toka ose shkëputni vijën e makinës.
Paralajmërimet me tension të lartë & keshillon
- Përdorni CO2 apo të thatë kimike aparatet zjarr.
- Instalime elektrike të tensionit të lartë është e mbuluar në izolim portokalli ose tub ndërlikuar dhe të shënuara me etiketat paralajmërim në lidhje.
- Të gjitha Eaton® Hybrid Diesel / automjeteve elektrike do të shënohet "Hybrid’ në pjesën e jashtme të automjetit, së bashku me etiketën ndryshim në dash.
- Referojuni OEM për vend të veçantë e shasi montuar komponentëve hibride.
- A nuk e prerë në kabllot të tensionit të lartë portokalli.
- A nuk e prerë në ose hapni Pejës.
- A nuk e prerë në ose hapni Converter DC / DC.
- A nuk e prerë në ose të hapur inverter.
Një zonë tampon duhet të jenë të ngritur dhe të lartë të tensionit të izoluar doreza gome (klasë 0 me mbrojtës të lëkurës) janë të nevojshme para se të punojnë në tension të lartë. Dështimi për të ndjekur këto udhëzime mund të rezultojë në lëndime të rënda personale ose vdekje.
Të dorashka gome-izoluar që duhet të vishen duke punuar në sistemin e tensionit të lartë janë të klasit 0 me mbrojtës të lëkurës. Doreza gome duhet të testohet para çdo përdorimi pas procedurës gome doreza izoluese testimit gjendet në "Mjetet diagnostike / Publikime të Shërbimit" në faqen 6. Dështimi për të ndjekur këto udhëzime mund të rezultojë në lëndime të rënda personale ose vdekje.
Para inspektimin apo duke punuar në ndonjë kabllo të tensionit të lartë apo komponentëve të "High-Voltage Shërbimi Shutdown dhe Power-Up procedurës" në faqen 4 duhet të ndiqet. Dështimi për të ndjekur këto udhëzime mund të rezultojë në lëndime të rënda personale ose vdekje.
Pajisjet lokaut dhe Tagout duhet të hiqet vetëm nga tekniku që vendosen pajisjet Lokaut dhe Tagout në automjet. Dështimi për të ndjekur këto udhëzime mund të rezultojë në lëndime të rënda personale ose vdekje.
gome izoluar doreza të tensionit të lartë (klasë 0 me mbrojtës të lëkurës) duhet të jetë i veshur kur punojnë në ndonjë
kabllo të tensionit të lartë. E "High-Voltage Shërbimi Shutdown dhe Power-Up Procedura" në faqen 4 duhet të ndiqen para se të hequr ndonjë kabllo të tensionit të lartë. Dështimi për të ndjekur këto udhëzime mund të rezultojë në lëndime të rënda personale ose vdekje.
kabllo të tensionit të lartë dhe instalime elektrike janë portokalli dhe të përmbajë një etiketë paralajmëruese në lidhje. komponentëve të tensionit të lartë janë të shënuara me një etiketë. gome izoluar doreza të tensionit të lartë (klasë 0 me mbrojtës të lëkurës) duhet të përdoret kur punojnë në ndonjë nga këto komponente. Dështimi për të ndjekur këto udhëzime mund të rezultojë në lëndime të rënda personale ose vdekje.
Me tension të lartë Procedurat Shutdown Shërbimi

1. Follow "High-Voltage Work Area" Procedura.
2. Gjeni kuqe PEC Shërbimit të kaluar në pjesën e përparme të Pejës dhe të shtyjë kaloni off.
3. Hiqni kapakun Shërbimi Switch dhe instaloni Bracket lokaut (J48506).
4. tag kapem për lokaut Bracket.
5. Siguruar Switch PEC Shërbimit nuk mund të lëvizin nga pozicioni off.
6. Lejo sistemi për të vendosur për një minimum prej 5 minuta për shkarkimin tension të lartë.
7. Lidhu ServiceRanger dhe të parë të dhënat Monitor PID 116 quajtur "Potenciali High-Voltage Battery." Përdorimi SPN 520323 për lidhje J1939 "Battery Voltage RB" (Relay Box).
8. Tensioni duhet të jetë 30 volt ose më pak. Në qoftë se tensioni është më lart 30 volt, nuk punojnë në automjet dhe të kontaktoni Eaton® në 1-800-826-HELP (4357).
9. Kthehet kyç ndezjen off dhe të vazhdojë për të riparuar ose hap troubleshooting.
shënim: Tensioni bie në zero, kur çelësi është jashtë.
Procedura High-Voltage Shërbimi Power-Up
1. Instalo të gjitha lidhje të tensionit të lartë në pozicionet e tyre të mbyllura.
2. Nëse ju jeni personi punon në automjet, hiqni lokaut Bracket dhe tag.
3. Reinstall lokaut Bracket mbi Shërbimit Switch.
4. Pull Shërbimin Kaloni jashtë dhe le të vendosur automjetit për 2 minuta.
5. Start vehicle when appropriate.[/fusion_modal][fusion_modal name=”component_location” title=”Eaton Komponenti Hybrid dhe Connector Vendndodhja ” size=”large” background=”#ffffff” border_color=”” show_footer=”yes” class=”” id=””]

[/fusion_modal][fusion_modal name=”component_location2″ title=”Eaton Komponenti Hybrid dhe Connector Vendndodhja MY09 Systems” size=”large” background=”#ffffff” border_color=”” show_footer=”yes” class=”” id=””]

[/fusion_modal][/fusion_builder_column][/fusion_builder_row][/fusion_builder_container][fusion_builder_container hundred_percent=”no” hundred_percent_height=”no” hundred_percent_height_scroll=”no” hundred_percent_height_center_content=”yes” equal_height_columns=”no” menu_anchor=”” hide_on_mobile=”small-visibility,medium-visibility,large-visibility” status=”published” publish_date=”” class=”” id=”” background_color=”” background_image=”” background_position=”center center” background_repeat=”no-repeat” fade=”no” background_parallax=”none” enable_mobile=”no” parallax_speed=”0.3″ video_mp4=”” video_webm=”” video_ogv=”” video_url=”” video_aspect_ratio=”16:9″ video_loop=”yes” video_mute=”yes” video_preview_image=”” border_size=”” border_color=”” border_style=”solid” margin_top=”” margin_bottom=”” padding_top=”” padding_right=”” padding_bottom=”” padding_left=””][fusion_builder_row][fusion_builder_column type=”1_1″ layout=”1_1″ spacing=”” center_content=”no” link=”” target=”_self” min_height=”” hide_on_mobile=”small-visibility,medium-visibility,large-visibility” class=”” id=”” background_color=”” background_image=”” background_image_id=”” background_position=”left top” background_repeat=”no-repeat” hover_type=”none” border_size=”0″ border_color=”” border_style=”solid” border_position=”all” padding_top=”” padding_right=”” padding_bottom=”” padding_left=”” margin_top=”” margin_bottom=”” animation_type=”” animation_direction=”left” animation_speed=”0.3″ animation_offset=”” last=”no”][fusion_content_boxes layout=”clean-horizontal” columns=”1″ title_size=”18px” heading_size=”3″ title_color=”#ffffff” body_color=”#ffffff” backgroundcolor=”#4f4f4f” icon=”” iconflip=”” iconrotate=”” iconspin=”no” iconcolor=”” icon_circle=”” icon_circle_radius=”” circlecolor=”” circlebordersize=”” circlebordercolor=”” outercirclebordersize=”” outercirclebordercolor=”” icon_size=”” icon_hover_type=”” hover_accent_color=”” image=”” image_id=”” image_width=”” image_height=”” link_type=”” button_span=”” link_area=”” link_target=”” icon_align=”left” animation_type=”” animation_delay=”” animation_offset=”” animation_direction=”left” animation_speed=”0.3″ margin_top=”” margin_bottom=”” hide_on_mobile=”small-visibility,medium-visibility,large-visibility” class=”” id=””][fusion_content_box title=”HAPI 1. Kontrollo për statusin aktiv apo joaktiv kod faji dhe të kryejë pretest elektrike dhe hibride elektrike pretest.” backgroundcolor=”” icon=”” iconflip=”” iconrotate=”” iconspin=”no” iconcolor=”” circlecolor=”” circlebordersize=”” circlebordercolor=”” outercirclebordersize=”” outercirclebordercolor=”” image=”” image_id=”” image_width=”” image_height=”” link=”” linktext=”Lexo më shumë” link_target=”” animation_type=”” animation_direction=”left” animation_speed=”0.3″ animation_offset=””]
- Retrieve kodet aktive faj dhe SIMF me ServiceRanger përdorimin e 9-Way diagnostike Connector.
- Kryen pretest elektrike.
- Nëse ka çështje të gjetur gjatë pretest elektrike, shkoni në hapin 2.
- Nëse çështja është riparuar gjatë pretest elektrike, shkoni në hapin 7.
[/fusion_content_box][/fusion_content_boxes][fusion_content_boxes layout=”clean-horizontal” columns=”2″ title_size=”18px” heading_size=”3″ title_color=”#ffffff” body_color=”#ffffff” backgroundcolor=”#4f4f4f” icon=”” iconflip=”” iconrotate=”” iconspin=”no” iconcolor=”” icon_circle=”” icon_circle_radius=”” circlecolor=”” circlebordersize=”” circlebordercolor=”” outercirclebordersize=”” outercirclebordercolor=”” icon_size=”” icon_hover_type=”” hover_accent_color=”” image=”” image_id=”” image_width=”” image_height=”” link_type=”” button_span=”” link_area=”” link_target=”” icon_align=”left” animation_type=”” animation_delay=”” animation_offset=”” animation_direction=”left” animation_speed=”0.3″ margin_top=”” margin_bottom=”” hide_on_mobile=”small-visibility,medium-visibility,large-visibility” class=”” id=””][fusion_content_box title=”HAPI 2. Verifikoni vazhdimësinë e ECA circuitry.” backgroundcolor=”” icon=”” iconflip=”” iconrotate=”” iconspin=”no” iconcolor=”” circlecolor=”” circlebordersize=”” circlebordercolor=”” outercirclebordersize=”” outercirclebordercolor=”” image=”” image_id=”” image_width=”” image_height=”” link=”” linktext=”Lexo më shumë” link_target=”” animation_type=”” animation_direction=”left” animation_speed=”0.3″ animation_offset=””]
- off Key
- Disconnect ECA 8-Way Connector.
- Kontrolloni ECA 8-Way Konektor për ndërhyrje të ujit dhe korrozioni.
- Masa rezistencë midis ECA 8-Way lidhës pin A dhe B Pin.
shënim: Sigurohuni volt / metër om është në shkallën e duhur (rreth 200 shkallë om)-
- Nëse rezistencë midis Pin A dhe B Pin është në mes 50-70 ohms, shkoni në hapin 3.
- Në qoftë se rezistenca është jashtë varg, riparimi mund Data Link Shaloni, pastaj të shkojnë në hapin 7.
-
[/fusion_content_box][fusion_content_box title=”HAPI 3. Verifikoni vazhdimësinë e ECA circuitry.” backgroundcolor=”” icon=”” iconflip=”” iconrotate=”” iconspin=”” iconcolor=”” circlecolor=”” circlebordersize=”” circlebordercolor=”” outercirclebordersize=”” outercirclebordercolor=”” image=”” image_id=”” image_width=”” image_height=”” link=”” linktext=”” link_target=”” animation_type=”” animation_direction=”left” animation_speed=”0.3″ animation_offset=””]
- off Key.
- Disconnect ECA 8-Way Connector 2.
- Masa rezistencë midis Pin A në tokë dhe Pin B në tokë.
- Në qoftë se rezistenca është për ose pin është 7k, shkoni në hapin 4.
- Nëse rezultati është 0-100 ohms, riparimi mund Wire Shaloni. Pas riparimet janë bërë, shkoni në hapin 7.
[/fusion_content_box][/fusion_content_boxes][fusion_content_boxes layout=”clean-horizontal” columns=”2″ title_size=”18px” heading_size=”3″ title_color=”#ffffff” body_color=”#ffffff” backgroundcolor=”#4f4f4f” icon=”” iconflip=”” iconrotate=”” iconspin=”no” iconcolor=”” icon_circle=”” icon_circle_radius=”” circlecolor=”” circlebordersize=”” circlebordercolor=”” outercirclebordersize=”” outercirclebordercolor=”” icon_size=”” icon_hover_type=”” hover_accent_color=”” image=”” image_id=”” image_width=”” image_height=”” link_type=”” button_span=”” link_area=”” link_target=”” icon_align=”left” animation_type=”” animation_delay=”” animation_offset=”” animation_direction=”left” animation_speed=”0.3″ margin_top=”” margin_bottom=”” hide_on_mobile=”small-visibility,medium-visibility,large-visibility” class=”” id=””][fusion_content_box title=”HAPI 4. Verifiko CAN Wire Shaloni është Wired saktë.” backgroundcolor=”” icon=”” iconflip=”” iconrotate=”” iconspin=”no” iconcolor=”” circlecolor=”” circlebordersize=”” circlebordercolor=”” outercirclebordersize=”” outercirclebordercolor=”” image=”” image_id=”” image_width=”” image_height=”” link=”” linktext=”Lexo më shumë” link_target=”” animation_type=”” animation_direction=”left” animation_speed=”0.3″ animation_offset=””]
- off Key
- Disconnect ECA 8-Way Connector.
- Kontrolloni ECA 8-Way Konektor për ndërhyrje të ujit dhe korrozioni.
- Masa rezistencë midis këmbët e mëposhtme. Përcaktoni nëse rezistenca është brenda intervalit të listuara.
- Pin A e 9-mënyrë lidhës diagnostikuese të pin H (nën dash) duhet të jetë 0-0.3 ohms.
- Pin A i lidhës 9-mënyrë diagnostikuese (nën dash) të 19-mënyrë PEC Connector Pin 1 duhet të jetë 0-0.3 ohms.
- Pin B i lidhës 9-mënyrë diagnostikuese (nën dash) të pin J duhet të jetë 0-0.3 ohms.
- Pin B i lidhës 9-mënyrë diagnostikuese (nën dash) për Pin 2 duhet të jetë 19-mënyrë PEC Connector 0-0.3 ohms.
- Nëse matjet janë jashtë varg, riparimi mund instalime elektrike mbreh. Pas riparimet janë bërë, shkoni në hapin 7.
- Nëse matjet janë brenda intervalit, shkoni në hapin 5.
[/fusion_content_box][fusion_content_box title=”STEP 5.Verify tensionit të ECA.” backgroundcolor=”” icon=”” iconflip=”” iconrotate=”” iconspin=”” iconcolor=”” circlecolor=”” circlebordersize=”” circlebordercolor=”” outercirclebordersize=”” outercirclebordercolor=”” image=”” image_id=”” image_width=”” image_height=”” link=”” linktext=”” link_target=”” animation_type=”” animation_direction=”left” animation_speed=”0.3″ animation_offset=””]
- Key në.
- Kontrolluar për fuqisë 12-volt në ECA 8-mënyrë lidhës pin H me një volt digital / metër om.
- If voltage is present, skip to #4.
- If voltage is lower than 10 volt ose nuk ka tension, shkoni në hapin 6.
- Hiq ECA 3-rruga lidhës dhe kontrolloni për ndërhyrje të ujit dhe korrozioni.
- Kontrolluar për tensionit në EAQ 3-mënyrë lidhës pin C dhe pin B me një volt digital / metër om.
- Nëse Pin C dhe B Pin dy kanë tension, zëvendësojë ECA. Shih heqjen Electric Clutch actuator dhe procedurën e instalimit në TRSM2000. Pas riparimet janë bërë, shkoni në hapin 7.
- Nëse Pin C dhe Pin B kanë më pak se 10 volt ose jo të tensionit, skip to #5.
- Kontrolloni Pin C për tension të baterisë, përdorin postin negative bateri për tokë. Kontrolloni Pin B për tokë, përdorin postim pozitiv bateri për 12 volt.
- Nëse problemi gjendet duke përdorur postin e baterisë, riparimin e ECA instalime elektrike mbreh.
- Në qoftë se nuk ka problem gjetur, gjetur gabim në testim, shkoni në hapin 1.
[/fusion_content_box][/fusion_content_boxes][fusion_content_boxes layout=”clean-horizontal” columns=”2″ title_size=”18px” heading_size=”3″ title_color=”#ffffff” body_color=”#ffffff” backgroundcolor=”#4f4f4f” icon=”” iconflip=”” iconrotate=”” iconspin=”no” iconcolor=”” icon_circle=”” icon_circle_radius=”” circlecolor=”” circlebordersize=”” circlebordercolor=”” outercirclebordersize=”” outercirclebordercolor=”” icon_size=”” icon_hover_type=”” hover_accent_color=”#f41000″ image=”” image_id=”” image_width=”” image_height=”” link_type=”” button_span=”” link_area=”” link_target=”” icon_align=”left” animation_type=”” animation_delay=”” animation_offset=”” animation_direction=”left” animation_speed=”0.3″ margin_top=”” margin_bottom=”” hide_on_mobile=”small-visibility,medium-visibility,large-visibility” class=”” id=””][fusion_content_box title=”HAPI 6. Masa vazhdimësinë në mes të HCM dhe ECA” backgroundcolor=”” icon=”” iconflip=”” iconrotate=”” iconspin=”” iconcolor=”” circlecolor=”” circlebordersize=”” circlebordercolor=”” outercirclebordersize=”” outercirclebordercolor=”” image=”” image_id=”” image_width=”” image_height=”” link=”” linktext=”” link_target=”” animation_type=”” animation_direction=”left” animation_speed=”0.3″ animation_offset=””]
- off Key.
- Hiq lidhës tela HCM S2.
- Masa rezistencë midis HCM S2 lidhës pin 13 dhe ECA 8-mënyrë pin H.
- Në qoftë se rezistenca është 0-0,3, zëvendësojë HCM (shih Hybrid modulin e kontrollit (HCM) Shkarkimi dhe Instalimi). Pas riparimet janë bërë, shkoni në hapin 7.
- Në qoftë se rezistenca është varg jashtë, riparimin instalime elektrike mbreh.
[/fusion_content_box][fusion_content_box title=”HAPI 7. Verifikoni riparim.” backgroundcolor=”” icon=”” iconflip=”” iconrotate=”” iconspin=”no” iconcolor=”” circlecolor=”” circlebordersize=”” circlebordercolor=”” outercirclebordersize=”” outercirclebordercolor=”” image=”” image_id=”” image_width=”” image_height=”” link=”” linktext=”Lexo më shumë” link_target=”” animation_type=”” animation_direction=”left” animation_speed=”0.3″ animation_offset=””]
- off Key.
- Rilidhni të gjithë lidhësit dhe kabllon negative të baterisë.
- Key në.
- Kodet e qarta, Shiko Gabimet qarta Inactive.
- Drive automjetin dhe përpjekje për të rivendosur kodin.
- Kontrollo për kodet, Shiko Shiko gabimet aktive dhe jo aktive.
- Nëse jo kodet, Testi është i plotë.
- Nëse Code faji 19 duket, gjetur gabim në testim, shkoni në hapin 1.
- Nëse një kod tjetër përveç 19 duket, Shiko Faji Lista Code Indeksi.
[/fusion_content_box][/fusion_content_boxes][/fusion_builder_column][/fusion_builder_row][/fusion_builder_container][fusion_global id=”13788″]