[fusion_builder_container hundred_percent=”no” hundred_percent_height=”no” hundred_percent_height_scroll=”no” hundred_percent_height_center_content=”yes” equal_height_columns=”no” menu_anchor=”” hide_on_mobile=”small-visibility,medium-visibility,large-visibility” status=”published” publish_date=”” class=”” id=”” background_color=”” background_image=”” background_position=”center center” background_repeat=”no-repeat” fade=”no” background_parallax=”none” enable_mobile=”no” parallax_speed=”0.3″ video_mp4=”” video_webm=”” video_ogv=”” video_url=”” video_aspect_ratio=”16:9″ video_loop=”yes” video_mute=”yes” video_preview_image=”” border_size=”” border_color=”” border_style=”solid” margin_top=”35″ margin_bottom=”” padding_top=”” padding_right=”” padding_bottom=”” padding_left=””][fusion_builder_row][fusion_builder_column type=”1_1″ layout=”1_1″ spacing=”” center_content=”no” link=”” target=”_self” min_height=”” hide_on_mobile=”small-visibility,medium-visibility,large-visibility” class=”” id=”” background_color=”” background_image=”” background_image_id=”” background_position=”left top” background_repeat=”no-repeat” hover_type=”none” border_size=”0″ border_color=”” border_style=”solid” border_position=”all” padding_top=”” padding_right=”” padding_bottom=”” padding_left=”” margin_top=”” margin_bottom=”” animation_type=”” animation_direction=”left” animation_speed=”0.3″ animation_offset=”” last=”no”][fusion_text columns=”” column_min_width=”” column_spacing=”” rule_style=”default” rule_size=”” rule_color=”” hide_on_mobile=”small-visibility,medium-visibility,large-visibility” class=”” id=””]
อีตันฟูลเลอร์ไฮบริดเกียร์รหัสความผิดปกติ 63: ความผิดพลาดมอเตอร์เกียร์วงจร
[/fusion_text][/fusion_builder_column][/fusion_builder_row][/fusion_builder_container][fusion_builder_container hundred_percent=”no” hundred_percent_height=”no” hundred_percent_height_scroll=”no” hundred_percent_height_center_content=”yes” equal_height_columns=”no” menu_anchor=”” hide_on_mobile=”small-visibility,medium-visibility,large-visibility” status=”published” publish_date=”” class=”” id=”” background_color=”” background_image=”” background_position=”center center” background_repeat=”no-repeat” fade=”no” background_parallax=”none” enable_mobile=”no” parallax_speed=”0.3″ video_mp4=”” video_webm=”” video_ogv=”” video_url=”” video_aspect_ratio=”16:9″ video_loop=”yes” video_mute=”yes” video_preview_image=”” border_size=”” border_color=”” border_style=”solid” margin_top=”” margin_bottom=”” padding_top=”” padding_right=”” padding_bottom=”” padding_left=””][fusion_builder_row][fusion_builder_column type=”1_1″ layout=”1_1″ spacing=”” center_content=”no” link=”” target=”_self” min_height=”” hide_on_mobile=”small-visibility,medium-visibility,large-visibility” class=”” id=”” background_color=”” background_image=”” background_image_id=”” background_position=”left top” background_repeat=”no-repeat” hover_type=”none” border_size=”0″ border_color=”” border_style=”solid” border_position=”all” padding_top=”” padding_right=”” padding_bottom=”” padding_left=”” margin_top=”” margin_bottom=”” animation_type=”” animation_direction=”left” animation_speed=”0.3″ animation_offset=”” last=”no”][fusion_text columns=”” column_min_width=”” column_spacing=”” rule_style=”default” rule_size=”” rule_color=”” hide_on_mobile=”small-visibility,medium-visibility,large-visibility” class=”” id=””]
ความผิดปกติสำหรับอีตันไฮบริดรุ่นไดรฟ์ (MY09) EH-8E406A-U / P, EH-8E406A-UP, EH-8E406A-UPG, EH-8E406A-CD, EH-8E406A-CDG, EH-8E406A-CDR, EH-8E406A-T, EH-6E706B-CD, EH-6E706B-P และ EH-6E706B-UPG. อ่านด้านล่างเพื่อเรียนรู้วิธีการทดสอบ, ล้างและแก้ไขข้อผิดพลาดรหัสความผิดปกติสำหรับไลเนอร์ของคุณ, แม็ค, Peterbilt, Kenworth, วอลโว่, ระหว่างประเทศ, และรถบรรทุกหนักและอุปกรณ์. การส่งไฮบริดเป็นอุปกรณ์ที่มี Shifter X-Y ที่เลือกเกียร์. มอเตอร์ X-Y Shifter จะถูกควบคุมด้วยปัจจุบันที่จัดทำโดย TECU เพื่อย้ายไปด้านใดด้านหนึ่งไปอีกด้านหนึ่งกดปุ่ม Shift นิ้ว (เลือกรถไฟ) หรือด้านหน้าและท้ายเรือ (หมั้นเกียร์และหลุดพ้น). ความผิดพลาดรหัส 63 แสดงให้เห็นความล้มเหลวของวงจรควบคุมมอเตอร์เกียร์และด้านหน้าและด้านท้ายการเคลื่อนไหวของนิ้วมือกดปุ่ม Shift X-Y.
ความผิดพลาดรหัส 63: การตรวจหามอเตอร์เกียร์วงจรความผิดพลาด
ระบบสามารถแจ้งปัญหาเกี่ยวกับวงจร X-Y Shifter มอเตอร์เกียร์, TECU ควบคุมมอเตอร์เกียร์หรืออำนาจและพื้นดินที่เชื่อมต่อกับ TECU ภายใต้เงื่อนไขดังต่อไปนี้:
- กองทุนการเงินระหว่างประเทศ 1 และ 12 สามารถตรวจพบเมื่อ X-Y เกียร์มอเตอร์ลุ้น
- กองทุนการเงินระหว่างประเทศ 5 และ 6 สามารถตรวจพบเมื่อ X-Y มอเตอร์เกียร์ไม่ได้ลุ้น
บันทึก: เมื่อการแก้ไขปัญหาที่ไม่ใช้งานรหัสหมายถึง โหมดการวิเคราะห์สินค้า (PDM)
เงื่อนไขการตั้งค่าความผิดพลาดรหัสที่ใช้งานอยู่
- กองทุนการเงินระหว่างประเทศ 1 - ข้อมูลที่ถูกต้อง แต่ต่ำกว่าปกติ: เกียร์ล้มเหลวในการกรอกค่ากะและวาดปัจจุบันวัดของมอเตอร์เกียร์คาดว่าด้านล่าง.
- กองทุนการเงินระหว่างประเทศ 5 - ปัจจุบันต่ำกว่าปกติหรือเปิดวงจร: TECU ตรวจพบวงจรเปิดหรือสภาพสั้นสู่พื้นดินในวงจรมอเตอร์เกียร์สำหรับ 0.5 วินาทีที่กำลังขึ้นหรือก่อนที่จะมีการเปลี่ยนแปลง.
- กองทุนการเงินระหว่างประเทศ 6 - ปัจจุบันสูงกว่าปกติหรือ shorted วงจร: TECU ตรวจพบในระยะสั้นต่อการใช้พลังงานในวงจรมอเตอร์เกียร์สำหรับ 0.5 วินาทีที่กำลังขึ้นหรือก่อนที่จะมีการเปลี่ยนแปลง.
- กองทุนการเงินระหว่างประเทศ 12 - อุปกรณ์อัจฉริยะ Bad: เกียร์ล้มเหลวที่จะเสร็จสิ้นการเปลี่ยนแปลงและ TECU ตรวจพบความผันผวนต่อเนื่องในแรงดันจากการเชื่อมต่อที่ไม่ดี, shorted วงจรมอเตอร์เกียร์หรือล้มเหลวของฮาร์ดแวร์ของ TECU.
สำรองเมื่อความผิดพลาดรหัส 63 มีการตั้งเงื่อนไขต่อไปนี้เกิดขึ้น:
- “F” กะพริบในการแสดงผลเกียร์.
- ไฟกระพริบบริการ (ถ้ามีอุปกรณ์ครบครัน).
- เครื่องยนต์อาจไม่เหวี่ยง.
- กระปุกเกียร์อาจจะไม่ได้มีส่วนร่วมจากเกียร์เป็นกลาง.
- เกียร์ไม่เปลี่ยนขณะที่รถกำลังเคลื่อนที่.
- จนกระทั่งกลายเป็นความผิดพลาดที่ไม่ใช้งาน, คนขับอาจจะต้องปิดเครื่องยนต์ที่มีระบบเกียร์ในเกียร์.
[/fusion_text][fusion_text columns=”” column_min_width=”” column_spacing=”” rule_style=”default” rule_size=”” rule_color=”” hide_on_mobile=”small-visibility,medium-visibility,large-visibility” class=”” id=””]
เงื่อนไขการตั้งค่าความผิดพลาดที่ไม่ใช้งานรหัส
กองทุนการเงินระหว่างประเทศ 1, 12: ความผิดนี้ตั้งอยู่ไม่ได้ใช้งานเมื่อเปลี่ยนเป็นที่เรียบร้อยแล้ว.
กองทุนการเงินระหว่างประเทศ 5, 6: ความผิดนี้ตั้งอยู่ไม่ได้ใช้งานเมื่อเปิดหรือสั้นสภาพวงจรไม่ได้ตรวจพบ 0.5 วินาที.
รหัสความผิดปกตินี้สามารถเกิดจากสาเหตุใดต่อไปนี้:
กองทุนการเงินระหว่างประเทศ 1, 5
- เกียร์ Harness
- ความผิดนี้ตั้งอยู่ไม่ได้ใช้งานเมื่อเปลี่ยนเป็นที่เรียบร้อยแล้ว.
- นังอ, กระจาย, สึกกร่อนหรือหลวม
- การเดินสายไฟลัดวงจรลงไปที่พื้น, shorted สู่อำนาจหรือเปิด
- X-Y Shifter มอเตอร์เกียร์
- นังอ, กระจาย, สึกกร่อนหรือหลวม
- การเดินสายไฟลัดวงจรลงไปที่พื้น, shorted สู่อำนาจหรือเปิด
- รถไฟมอเตอร์ shorted กับพื้น, บางส่วนสั้นกับพื้น, shorted สู่อำนาจหรือเปิด
- รถไฟมอเตอร์ล้มเหลวภายใน
- TECU
- ความล้มเหลวภายใน
กองทุนการเงินระหว่างประเทศ 6
- เกียร์ Harness
- การเดินสายไฟสั้นลงสู่อำนาจ
- TECU
- ความล้มเหลวภายใน
กองทุนการเงินระหว่างประเทศ 12
- พาวเวอร์ซัพพลาย OEM
- พลังที่ไม่ดีหรืออุปทานพื้น TECU (อาจจะร่วมกับรหัสผิด 33 หรือ 34)
- ความล้มเหลวของแบตเตอรี่
- นังอ, กระจาย, สึกกร่อนหรือหลวม
- การเดินสายไฟลัดวงจรลงไปที่พื้น, shorted สู่อำนาจหรือเปิด
- แบตเตอรี่ OEM
- ความล้มเหลวภายใน
- OEM 30 แอมป์แบตเตอรี่ฟิวส์
- นังอ, กระจาย, สึกกร่อนหรือหลวม
- ฟิวส์ขาดหายไปหรือนั่งไม่ถูกต้อง
- TECU
- ความล้มเหลวภายใน
[/fusion_text][/fusion_builder_column][/fusion_builder_row][/fusion_builder_container][fusion_builder_container hundred_percent=”no” hundred_percent_height=”no” hundred_percent_height_scroll=”no” hundred_percent_height_center_content=”yes” equal_height_columns=”no” menu_anchor=”” hide_on_mobile=”small-visibility,medium-visibility,large-visibility” status=”published” publish_date=”” class=”” id=”” background_color=”” background_image=”” background_position=”center center” background_repeat=”no-repeat” fade=”no” background_parallax=”none” enable_mobile=”no” parallax_speed=”0.3″ video_mp4=”” video_webm=”” video_ogv=”” video_url=”” video_aspect_ratio=”16:9″ video_loop=”yes” video_mute=”yes” video_preview_image=”” border_size=”” border_color=”” border_style=”solid” margin_top=”” margin_bottom=”” padding_top=”” padding_right=”” padding_bottom=”” padding_left=””][fusion_builder_row][fusion_builder_column type=”1_1″ layout=”1_1″ spacing=”” center_content=”no” link=”” target=”_self” min_height=”” hide_on_mobile=”small-visibility,medium-visibility,large-visibility” class=”” id=”” background_color=”” background_image=”” background_image_id=”” background_position=”left top” background_repeat=”no-repeat” hover_type=”none” border_size=”0″ border_color=”” border_style=”solid” border_position=”all” padding_top=”” padding_right=”” padding_bottom=”” padding_left=”” margin_top=”” margin_bottom=”” animation_type=”” animation_direction=”left” animation_speed=”0.3″ animation_offset=”” last=”no”][fusion_text columns=”” column_min_width=”” column_spacing=”” rule_style=”default” rule_size=”” rule_color=”” hide_on_mobile=”small-visibility,medium-visibility,large-visibility” class=”” id=””]
ความผิดพลาดรหัส 63: มอเตอร์เกียร์ทดสอบความผิดพลาดวงจร
[/fusion_text][/fusion_builder_column][/fusion_builder_row][/fusion_builder_container][fusion_builder_container hundred_percent=”no” hundred_percent_height=”no” hundred_percent_height_scroll=”no” hundred_percent_height_center_content=”yes” equal_height_columns=”no” menu_anchor=”” hide_on_mobile=”small-visibility,medium-visibility,large-visibility” status=”published” publish_date=”” class=”” id=”” background_color=”” background_image=”” background_position=”center center” background_repeat=”no-repeat” fade=”no” background_parallax=”none” enable_mobile=”no” parallax_speed=”0.3″ video_mp4=”” video_webm=”” video_ogv=”” video_url=”” video_aspect_ratio=”16:9″ video_loop=”yes” video_mute=”yes” video_preview_image=”” border_size=”” border_color=”” border_style=”solid” margin_top=”” margin_bottom=”” padding_top=”” padding_right=”” padding_bottom=”” padding_left=””][fusion_builder_row][fusion_builder_column type=”1_1″ layout=”1_1″ spacing=”” center_content=”no” link=”” target=”_self” min_height=”” hide_on_mobile=”small-visibility,medium-visibility,large-visibility” class=”” id=”” background_color=”” background_image=”” background_image_id=”” background_position=”left top” background_repeat=”no-repeat” hover_type=”none” border_size=”0″ border_color=”” border_style=”solid” border_position=”all” padding_top=”” padding_right=”” padding_bottom=”” padding_left=”” margin_top=”” margin_bottom=”” animation_type=”” animation_direction=”left” animation_speed=”0.3″ animation_offset=”” last=”no”][fusion_text columns=”” column_min_width=”” column_spacing=”” rule_style=”default” rule_size=”” rule_color=”” hide_on_mobile=”small-visibility,medium-visibility,large-visibility” class=”” id=””]
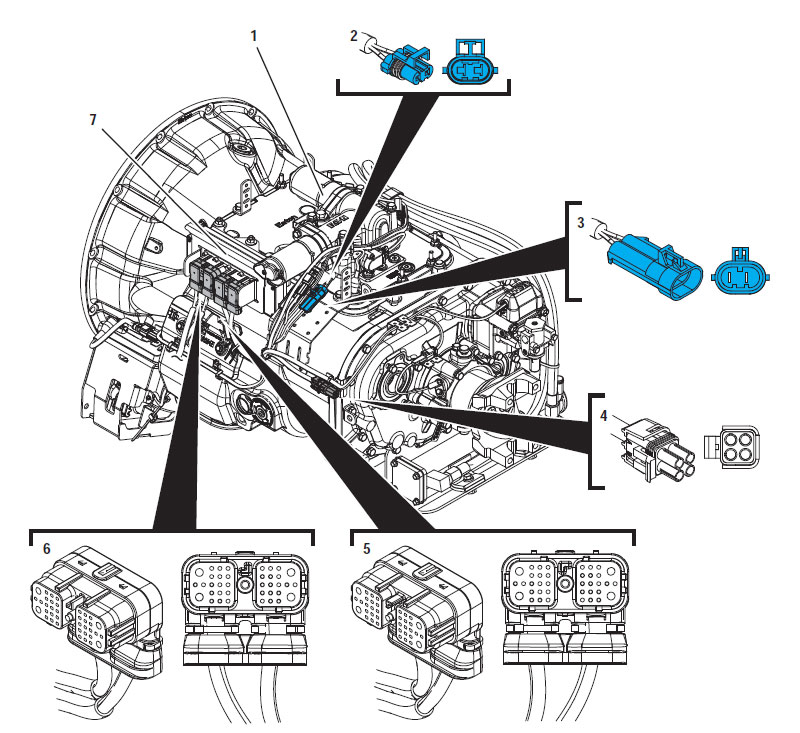
การระบุส่วนประกอบ:
[/fusion_text][/fusion_builder_column][fusion_builder_column type=”1_1″ layout=”1_2″ spacing=”” center_content=”no” link=”” target=”_self” min_height=”” hide_on_mobile=”small-visibility,medium-visibility,large-visibility” class=”” id=”” background_color=”” background_image=”” background_image_id=”” background_position=”left top” background_repeat=”no-repeat” hover_type=”none” border_size=”0″ border_color=”” border_style=”solid” border_position=”all” padding_top=”” padding_right=”” padding_bottom=”” padding_left=”” margin_top=”” margin_bottom=”” animation_type=”” animation_direction=”left” animation_speed=”0.3″ animation_offset=”” last=”no”][fusion_imageframe image_id=”14356|full” max_width=”” style_type=”” blur=”” stylecolor=”” hover_type=”none” bordersize=”” bordercolor=”” borderradius=”” align=”center” lightbox=”yes” gallery_id=”” lightbox_image=”https://www.globaltransmissionsupply.com/wp-content/uploads/Gear-motor-circuit-fault-component-identification.jpg” lightbox_image_id=”14356|full” alt=”เกียร์มอเตอร์วงจรประจำตัวองค์ประกอบความผิดพลาดในการส่งอีตันฟูลเลอร์” link=”” linktarget=”_self” hide_on_mobile=”small-visibility,medium-visibility,large-visibility” class=”” id=”” animation_type=”” animation_direction=”left” animation_speed=”0.3″ animation_offset=””]https://www.globaltransmissionsupply.com/wp-content/uploads/Gear-motor-circuit-fault-component-identification.jpg[/fusion_imageframe][fusion_text columns=”2″ column_min_width=”” column_spacing=”” rule_style=”default” rule_size=”” rule_color=”” hide_on_mobile=”small-visibility,medium-visibility,large-visibility” class=”” id=””]
1. X-Y Shifter
2. 2-วิธีเกียร์มอเตอร์เชื่อมต่อ (สีน้ำเงิน)
3. 2-วิธีที่ร่างกายเกียร์มอเตอร์เชื่อมต่อ (สีน้ำเงิน)
4. 4-เชื่อมต่อการวินิจฉัยวิธี
5. 38-วิธีการส่งสายรัดเชื่อมต่อ
6. 38-วิธี Harness เชื่อมต่อยานพาหนะ
7. การส่งหน่วยควบคุมอิเล็กทรอนิกส์ (TECU)
[/fusion_text][/fusion_builder_column][fusion_builder_column type=”1_1″ layout=”1_1″ spacing=”” center_content=”no” link=”” target=”_self” min_height=”” hide_on_mobile=”small-visibility,medium-visibility,large-visibility” class=”” id=”” background_image_id=”” background_color=”#000000″ background_image=”” background_position=”left top” undefined=”” background_repeat=”no-repeat” hover_type=”none” border_size=”0″ border_color=”” border_style=”solid” border_position=”all” padding_top=”” padding_right=”” padding_bottom=”” padding_left=”” margin_top=”20″ margin_bottom=”20″ animation_type=”” animation_direction=”left” animation_speed=”0.3″ animation_offset=”” last=”no”][fusion_text columns=”” column_min_width=”” column_spacing=”” rule_style=”default” rule_size=”” rule_color=”” hide_on_mobile=”small-visibility,medium-visibility,large-visibility” class=”” id=””]
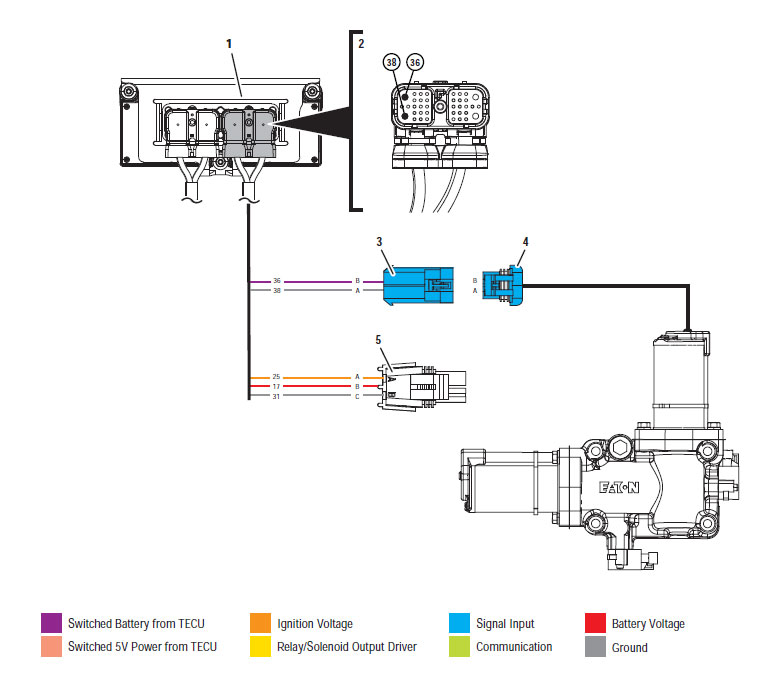
บันทึก: อ้างถึง Eaton ตัวแทนไฮบริดและเชื่อมต่อสถานที่ตั้ง สำหรับสถานที่เชื่อมต่อในระบบ MY09.
[/fusion_text][/fusion_builder_column][fusion_builder_column type=”1_1″ layout=”1_1″ spacing=”” center_content=”no” link=”” target=”_self” min_height=”” hide_on_mobile=”small-visibility,medium-visibility,large-visibility” class=”” id=”” background_color=”” background_image=”” background_image_id=”” background_position=”left top” background_repeat=”no-repeat” hover_type=”none” border_size=”0″ border_color=”” border_style=”solid” border_position=”all” padding_top=”” padding_right=”” padding_bottom=”” padding_left=”” margin_top=”” margin_bottom=”” animation_type=”” animation_direction=”left” animation_speed=”0.3″ animation_offset=”” last=”no”][fusion_imageframe image_id=”14360|full” max_width=”” style_type=”” blur=”” stylecolor=”” hover_type=”none” bordersize=”” bordercolor=”” borderradius=”” align=”center” lightbox=”yes” gallery_id=”” lightbox_image=”https://www.globaltransmissionsupply.com/wp-content/uploads/TECU-rail-motor-connector-locations.jpg” lightbox_image_id=”14320|full” alt=”สถานที่ตั้ง TECU สำหรับเกียร์มอเตอร์แก้ไขปัญหาความผิดวงจร” link=”” linktarget=”_self” hide_on_mobile=”small-visibility,medium-visibility,large-visibility” class=”” id=”” animation_type=”” animation_direction=”left” animation_speed=”0.3″ animation_offset=””]https://www.globaltransmissionsupply.com/wp-content/uploads/TECU-location.jpg[/fusion_imageframe][/fusion_builder_column][/fusion_builder_row][/fusion_builder_container][fusion_builder_container hundred_percent=”no” hundred_percent_height=”no” hundred_percent_height_scroll=”no” hundred_percent_height_center_content=”yes” equal_height_columns=”no” menu_anchor=”” hide_on_mobile=”small-visibility,medium-visibility,large-visibility” status=”published” publish_date=”” class=”” id=”” background_color=”” background_image=”” background_position=”center center” background_repeat=”no-repeat” fade=”no” background_parallax=”none” enable_mobile=”no” parallax_speed=”0.3″ video_mp4=”” video_webm=”” video_ogv=”” video_url=”” video_aspect_ratio=”16:9″ video_loop=”yes” video_mute=”yes” video_preview_image=”” border_size=”” border_color=”” border_style=”solid” margin_top=”” margin_bottom=”” padding_top=”” padding_right=”” padding_bottom=”” padding_left=””][fusion_builder_row][fusion_builder_column type=”1_1″ layout=”1_1″ spacing=”” center_content=”no” link=”” target=”_self” min_height=”” hide_on_mobile=”small-visibility,medium-visibility,large-visibility” class=”” id=”” background_color=”” background_image=”” background_image_id=”” background_position=”left top” background_repeat=”no-repeat” hover_type=”none” border_size=”0″ border_color=”” border_style=”solid” border_position=”all” padding_top=”” padding_right=”” padding_bottom=”” padding_left=”” margin_top=”” margin_bottom=”” animation_type=”” animation_direction=”left” animation_speed=”0.3″ animation_offset=”” last=”no”][fusion_modal name=”warnings_cautions” title=”คำเตือน & ข้อควรระวัง” size=”large” background=”” border_color=”” show_footer=”yes” class=”” id=””]อันตราย: อันตรายบ่งชี้ว่าคุณจะได้รับบาดเจ็บสาหัสหรือเสียชีวิตหากไม่ปฏิบัติตามขั้นตอนที่ระบุ.
การเตือน: คำเตือนบ่งชี้อันตรายทันที, ซึ่งอาจส่งผลให้ได้รับบาดเจ็บสาหัสถ้าคุณไม่ทำตามขั้นตอนที่ระบุ.
ความระมัดระวัง: ข้อควรระวังบ่งชี้ยานพาหนะหรือความเสียหายต่อทรัพย์สินที่อาจเกิดขึ้นถ้าคุณไม่ทำตามขั้นตอนที่ระบุ.
บันทึก: หมายเหตุแสดงให้เห็นรายละเอียดเพิ่มเติมที่จะช่วยในการวินิจฉัยหรือซ่อมแซมส่วนประกอบ / ระบบ.
ทำตามขั้นตอนที่ระบุไว้ในลำดับที่ระบุเพื่อหลีกเลี่ยงการบาดเจ็บส่วนบุคคล:
1. หากกรวยแรงดันสูงอยู่รอบรถและกิจการติดตั้งบน PEC, เพียงคนเดียวที่ควรจะได้รับอนุญาตให้เริ่มยานพาหนะเป็นคนที่เซ็นสัญญาแท็กกิจ.
2. ก่อนที่จะทำงานบนรถหรือออกจากรถแท็กซี่ในขณะที่เครื่องยนต์กำลังทำงาน, คุณควรวางคันเกียร์ใน“N” ตั้งเบรกจอดรถ, และป้องกันล้อ.
3. สำหรับเหตุผลด้านความปลอดภัย, มักจะมีส่วนร่วมบริการเบรกก่อนที่จะมีการเลือกตำแหน่งเกียร์จาก“เอ็น”
4. ก่อนที่จะเริ่มเป็นรถมักจะนั่งอยู่ในที่นั่งคนขับ, เลือก“N” ในการควบคุมการเปลี่ยนแปลง, และการตั้งค่าที่จอดรถเบรก.
5. ในรถยนต์ที่มี ePTO, เครื่องยนต์และ / หรือ
มอเตอร์ / เครื่องกำเนิดไฟฟ้าสามารถเริ่มต้นในโหมด ePTO. ไม่เคยดำเนินการบำรุงรักษาใด ๆ หรือทำงานเกี่ยวกับยานพาหนะ, ขณะที่อยู่ในโหมดนี้.
6. 12-โวลต์แบตเตอรี่บวก (+) และลบ (-) จะต้องมีการตัดการเชื่อมต่อก่อนที่จะมีการเชื่อมใด ๆ ในไฮบริดพร้อมอุปกรณ์ยานพาหนะใด ๆ.
ความระมัดระวัง: ทำตามขั้นตอนที่ระบุไว้ในลำดับที่ระบุเพื่อหลีกเลี่ยงความผิดปกติของอุปกรณ์หรือความเสียหาย.
ความระมัดระวัง: อย่าปล่อยเบรกจอดรถหรือพยายามที่จะเลือกเกียร์จนความดันอากาศอยู่ในระดับที่ถูกต้อง.
ความระมัดระวัง: เพื่อหลีกเลี่ยงความเสียหายให้กับการส่งผ่านระหว่างลากสถานที่คันเกียร์ใน“N” และยกล้อไดรฟ์ออกจากพื้นดินหรือตัดการเชื่อมต่อระบบขับเคลื่อน.
คำเตือนแรงดันสูง & ข้อควรระวัง
- ใช้ CO2 หรือเคมีแห้งดับเพลิง.
- สายไฟแรงดันสูงจะครอบคลุมในฉนวนกันความร้อนสีส้มหรือท่อที่ซับซ้อนและมีเครื่องหมายฉลากคำเตือนในการเชื่อมต่อ.
- ทั้งหมดEaton®ไฮบริดดีเซล / ยานพาหนะไฟฟ้าจะถูกทำเครื่องหมาย ‘ไฮบริด’ ด้านนอกของยานพาหนะ, พร้อมกับป้ายกะบนเส้นประ.
- อ้างถึง OEM สำหรับสถานที่เฉพาะของตัวถังที่ติดตั้งชิ้นส่วนไฮบริด.
- อย่าตัดเป็นสายไฟฟ้าแรงสูงสีส้ม.
- อย่าตัดเป็นหรือเปิด PEC.
- อย่าตัดเป็นหรือเปิด DC / DC converter.
- อย่าตัดเป็นหรือเปิดอินเวอร์เตอร์.
เขตกันชนจะต้องตั้งค่าและแรงดันสูงฉนวนถุงมือยาง (ชั้น 0 กับครอบหนัง) จะต้องก่อนที่จะทำงานเกี่ยวกับไฟฟ้าแรงสูง. ความล้มเหลวที่จะปฏิบัติตามคำแนะนำเหล่านี้อาจส่งผลให้ได้รับบาดเจ็บสาหัสหรือเสียชีวิต.
ถุงมือยางฉนวนที่ต้องสวมใส่ในขณะที่ทำงานบนระบบแรงดันสูงเป็นชั้น 0 กับครอบหนัง. ถุงมือยางควรจะทดสอบก่อนการใช้งานทุกขั้นตอนดังต่อไปนี้การทดสอบยางถุงมือฉนวนกันความร้อนที่พบใน“เครื่องมือวิเคราะห์ / บริการสิ่งพิมพ์” ที่หน้า 6. ความล้มเหลวที่จะปฏิบัติตามคำแนะนำเหล่านี้อาจส่งผลให้ได้รับบาดเจ็บสาหัสหรือเสียชีวิต.
ก่อนที่จะตรวจสอบหรือทำงานเกี่ยวกับสายไฟฟ้าแรงสูงหรือส่วนประกอบ“แรงดันสูงปิดระบบการให้บริการและเพิ่มพลังขั้นตอน” ที่หน้า 4 ควรจะปฏิบัติตาม. ความล้มเหลวที่จะปฏิบัติตามคำแนะนำเหล่านี้อาจส่งผลให้ได้รับบาดเจ็บสาหัสหรือเสียชีวิต.
กิจและ Tagout เฉพาะอุปกรณ์จะถูกลบออกโดยช่างที่วางอุปกรณ์ Lockout Tagout และบนยานพาหนะ. ความล้มเหลวที่จะปฏิบัติตามคำแนะนำเหล่านี้อาจส่งผลให้ได้รับบาดเจ็บสาหัสหรือเสียชีวิต.
ถุงมือยางฉนวนไฟฟ้าแรงสูง (ชั้น 0 กับครอบหนัง) ต้องสวมใส่เมื่อทำงานใด ๆ
สายไฟฟ้าแรงสูง. “การปิดระบบไฟฟ้าแรงสูงบริการและ Power-Up ขั้นตอน” ที่หน้า 4 จะต้องปฏิบัติตามก่อนที่จะถอดสายไฟฟ้าแรงสูงใด ๆ. ความล้มเหลวที่จะปฏิบัติตามคำแนะนำเหล่านี้อาจส่งผลให้ได้รับบาดเจ็บสาหัสหรือเสียชีวิต.
สายไฟฟ้าแรงสูงและสายไฟเป็นสีส้มและมีป้ายเตือนในการเชื่อมต่อ. ส่วนประกอบแรงดันสูงจะมีเครื่องหมายฉลาก. ถุงมือยางฉนวนไฟฟ้าแรงสูง (ชั้น 0 กับครอบหนัง) จะต้องใช้เมื่อทำงานใด ๆ ขององค์ประกอบเหล่านี้. ความล้มเหลวที่จะปฏิบัติตามคำแนะนำเหล่านี้อาจส่งผลให้ได้รับบาดเจ็บสาหัสหรือเสียชีวิต.
ไฟฟ้าแรงสูงขั้นตอนการบริการ Shutdown

1. ติดตาม“แรงดันสูงพื้นที่ทำงาน” ขั้นตอน.
2. ค้นหาสีแดงสลับ PEC บริการอยู่ด้านหน้าของ PEC และผลักดันปิด.
3. ถอดฝาครอบใช้บริการและติดตั้งขายึดกิจ (J48506).
4. แท็กยึดกับ Lockout Bracket.
5. ให้แน่ใจว่าสวิทช์ PEC บริการไม่สามารถย้ายจากตำแหน่งปิด.
6. ช่วยให้ระบบการตั้งค่าขั้นต่ำของ 5 นาทีเพื่อจำหน่ายไฟฟ้าแรงสูง.
7. เชื่อมต่อ ServiceRanger และดูข้อมูลการตรวจสอบ PID 116 เรียกว่า“แรงดันสูงที่มีศักยภาพแบตเตอรี่.” ใช้ SPN 520323 สำหรับการเชื่อมต่อ J1939“แบตเตอรี่แรงดันไฟฟ้า RB” (กล่องรีเลย์).
8. แรงดันไฟฟ้าที่ควรจะเป็น 30 โวลต์หรือน้อยกว่า. ถ้าแรงดันไฟฟ้าที่สูงกว่า 30 โวลต์, ไม่ได้ทำงานบนยานพาหนะและติดต่อEaton®ที่ 1-800-826-HELP (4357).
9. เปิดกุญแจออกและดำเนินการซ่อมแซมหรือขั้นตอนการแก้ไขปัญหา.
บันทึก: แรงดันไฟฟ้าที่ลดลงเป็นศูนย์เมื่อคีย์ถูกปิด.
ไฟฟ้าแรงสูงบริการ Power-Up ขั้นตอน
1. ติดตั้งทุกการเชื่อมต่อแรงดันสูงเข้าไปอยู่ในตำแหน่งล็อคของพวกเขา.
2. หากคุณเป็นคนที่ทำงานเกี่ยวกับยานพาหนะ, ลบ Lockout Bracket และแท็ก.
3. ติดตั้ง Lockout Bracket มากกว่าสวิทช์ให้บริการ.
4. ดึงบริการสลับออกและปล่อยให้ชุดยานพาหนะสำหรับ 2 นาที.
5. Start vehicle when appropriate.[/fusion_modal][fusion_modal name=”component_location” title=”Eaton ตัวแทนไฮบริดและเชื่อมต่อสถานที่ตั้ง ” size=”large” background=”#ffffff” border_color=”” show_footer=”yes” class=”” id=””]

[/fusion_modal][fusion_modal name=”component_location2″ title=”Eaton ตัวแทนไฮบริดและเชื่อมต่อสถานที่ตั้ง MY09 ระบบ” size=”large” background=”#ffffff” border_color=”” show_footer=”yes” class=”” id=””]

[/fusion_modal][/fusion_builder_column][/fusion_builder_row][/fusion_builder_container][fusion_builder_container hundred_percent=”no” hundred_percent_height=”no” hundred_percent_height_scroll=”no” hundred_percent_height_center_content=”yes” equal_height_columns=”no” menu_anchor=”” hide_on_mobile=”small-visibility,medium-visibility,large-visibility” status=”published” publish_date=”” class=”” id=”” background_color=”” background_image=”” background_position=”center center” background_repeat=”no-repeat” fade=”no” background_parallax=”none” enable_mobile=”no” parallax_speed=”0.3″ video_mp4=”” video_webm=”” video_ogv=”” video_url=”” video_aspect_ratio=”16:9″ video_loop=”yes” video_mute=”yes” video_preview_image=”” border_size=”” border_color=”” border_style=”solid” margin_top=”” margin_bottom=”” padding_top=”” padding_right=”” padding_bottom=”” padding_left=””][fusion_builder_row][fusion_builder_column type=”1_1″ layout=”1_1″ spacing=”” center_content=”no” link=”” target=”_self” min_height=”” hide_on_mobile=”small-visibility,medium-visibility,large-visibility” class=”” id=”” background_color=”” background_image=”” background_image_id=”” background_position=”left top” background_repeat=”no-repeat” hover_type=”none” border_size=”0″ border_color=”” border_style=”solid” border_position=”all” padding_top=”” padding_right=”” padding_bottom=”” padding_left=”” margin_top=”” margin_bottom=”” animation_type=”” animation_direction=”left” animation_speed=”0.3″ animation_offset=”” last=”no”][fusion_content_boxes layout=”clean-horizontal” columns=”1″ title_size=”18px” heading_size=”3″ title_color=”#ffffff” body_color=”#ffffff” backgroundcolor=”#4f4f4f” icon=”” iconflip=”” iconrotate=”” iconspin=”no” iconcolor=”” icon_circle=”” icon_circle_radius=”” circlecolor=”” circlebordersize=”” circlebordercolor=”” outercirclebordersize=”” outercirclebordercolor=”” icon_size=”” icon_hover_type=”” hover_accent_color=”” image=”” image_id=”” image_width=”” image_height=”” link_type=”” button_span=”” link_area=”” link_target=”” icon_align=”left” animation_type=”” animation_delay=”” animation_offset=”” animation_direction=”left” animation_speed=”0.3″ margin_top=”” margin_bottom=”” hide_on_mobile=”small-visibility,medium-visibility,large-visibility” class=”” id=””][fusion_content_box title=”ขั้นตอนที่ 1. ตรวจสอบการใช้งานรหัสผิดหรือไม่ได้ใช้งาน.” backgroundcolor=”” icon=”” iconflip=”” iconrotate=”” iconspin=”no” iconcolor=”” circlecolor=”” circlebordersize=”” circlebordercolor=”” outercirclebordersize=”” outercirclebordercolor=”” image=”” image_id=”” image_width=”” image_height=”” link=”” linktext=”อ่านเพิ่มเติม” link_target=”” animation_type=”” animation_direction=”left” animation_speed=”0.3″ animation_offset=””]
- ที่สำคัญเกี่ยวกับการดับเครื่องยนต์.
- เชื่อมต่อ ServiceRanger.
- ดึงภาพรวมและ VPA ข้อมูลโดยการสร้างกิจกรรมบริการรายงานภายใน ServiceRanger.
- อัปเดตซอฟต์แวร์ส่งให้อยู่ในระดับที่มีอยู่ล่าสุด.
ความระมัดระวัง: เพื่อหลีกเลี่ยงความเสียหายของ TECU, ใช้อะแดปเตอร์สื่อสารอีตันได้รับการอนุมัติและให้แน่ใจว่าทุกระบบดาวเทียมถูกปิดใช้งานก่อนที่จะอัปเดตซอฟต์แวร์. - ดึงข้อมูลและบันทึกรหัสผิดส่งและ FMIS, และเหตุการณ์ที่เกิดขึ้นและการประทับเวลาของพวกเขา.
- หากทั้งสองผิดพลาดรหัส 33 หรือ 34 มีใช้งานอยู่, แก้ไขปัญหามันเป็นครั้งแรกต่อความผิดประมวลกฎหมายวิธีการแยก.
- หากผิดพลาดรหัส 61 เป็นความผิดพลาดที่ใช้งานและรหัส 33 หรือความผิดพลาดรหัส 34 ไม่ได้ใช้งานหรือไม่ได้ตั้งค่า, ไปที่ขั้นตอน 4.
- หากผิดพลาดรหัส 61 คือไม่ได้ใช้งานและ ความผิดพลาดรหัส 33 หรือ ความผิดพลาดรหัส 34 ไม่ได้ใช้งานหรือไม่ได้ตั้งค่า, ไปที่ขั้นตอน 2.
[/fusion_content_box][/fusion_content_boxes][fusion_content_boxes layout=”clean-horizontal” columns=”1″ title_size=”18px” heading_size=”3″ title_color=”#ffffff” body_color=”#ffffff” backgroundcolor=”#4f4f4f” icon=”” iconflip=”” iconrotate=”” iconspin=”no” iconcolor=”” icon_circle=”” icon_circle_radius=”” circlecolor=”” circlebordersize=”” circlebordercolor=”” outercirclebordersize=”” outercirclebordercolor=”” icon_size=”” icon_hover_type=”” hover_accent_color=”” image=”” image_id=”” image_width=”” image_height=”” link_type=”” button_span=”” link_area=”” link_target=”” icon_align=”left” animation_type=”” animation_delay=”” animation_offset=”” animation_direction=”left” animation_speed=”0.3″ margin_top=”” margin_bottom=”” hide_on_mobile=”small-visibility,medium-visibility,large-visibility” class=”” id=””][fusion_content_box title=”ขั้นตอนที่ 2. ตรวจสอบสภาพของอำนาจและพื้นดินอุปทาน. ” backgroundcolor=”” icon=”” iconflip=”” iconrotate=”” iconspin=”no” iconcolor=”” circlecolor=”” circlebordersize=”” circlebordercolor=”” outercirclebordersize=”” outercirclebordercolor=”” image=”” image_id=”” image_width=”” image_height=”” link=”” linktext=”อ่านเพิ่มเติม” link_target=”” animation_type=”” animation_direction=”left” animation_speed=”0.3″ animation_offset=””]
- ดำเนินการไฟฟ้า Pretest Gen1 ECA. บันทึกการอ่าน(s) จากการทดสอบในขั้นตอนการโหลด 3 ของ Pretest ไฟฟ้า.
- ถ้าไฟฟ้า Pretest ล้มเหลว, ซ่อมแซมตามคำแนะนำไฟฟ้า Pretest. ดำเนินงานยานพาหนะสอบซ่อม.
- ถ้าไฟฟ้า Pretest ผ่าน, ไปที่ขั้นตอน 3.
[/fusion_content_box][/fusion_content_boxes][fusion_content_boxes layout=”clean-horizontal” columns=”1″ title_size=”18px” heading_size=”3″ title_color=”#ffffff” body_color=”#ffffff” backgroundcolor=”#4f4f4f” icon=”” iconflip=”” iconrotate=”” iconspin=”no” iconcolor=”” icon_circle=”” icon_circle_radius=”” circlecolor=”” circlebordersize=”” circlebordercolor=”” outercirclebordersize=”” outercirclebordercolor=”” icon_size=”” icon_hover_type=”” hover_accent_color=”” image=”” image_id=”” image_width=”” image_height=”” link_type=”” button_span=”” link_area=”” link_target=”” icon_align=”left” animation_type=”” animation_delay=”” animation_offset=”” animation_direction=”left” animation_speed=”0.3″ margin_top=”” margin_bottom=”” hide_on_mobile=”small-visibility,medium-visibility,large-visibility” class=”” id=””][fusion_content_box title=”ขั้นตอนที่ 3. ใช้การวิเคราะห์สินค้า (PD) โหมดเพื่อค้นหาความล้มเหลวเป็นระยะ ๆ.” backgroundcolor=”” icon=”” iconflip=”” iconrotate=”” iconspin=”no” iconcolor=”” circlecolor=”” circlebordersize=”” circlebordercolor=”” outercirclebordersize=”” outercirclebordercolor=”” image=”” image_id=”” image_width=”” image_height=”” link=”” linktext=”อ่านเพิ่มเติม” link_target=”” animation_type=”” animation_direction=”left” animation_speed=”0.3″ animation_offset=””]
- ตั้งเบรกจอดรถและล้อหนุน.
- ส่งสถานที่ใน PD (การวิเคราะห์สินค้า) โหมด.
- กระดิกสายไฟและการเชื่อมต่อระหว่าง 38- เชื่อมต่อสายรัด Way ยานพาหนะที่ TECU และแบตเตอรี่รถยนต์อุปทาน. มองหาสัญญาณของการถูหรือ chafing.
- การเดินสายไฟเลื้อยและการเชื่อมต่อระหว่าง 38-Way เกียร์ Harness เชื่อมต่อที่ TECU และสีดำ (X-Rail มอเตอร์) 2-วิธีการส่งสายรัดเชื่อมต่อ.
- การเดินสายไฟเลื้อยและการเชื่อมต่อระหว่าง 38-Way เชื่อมต่อที่ TECU และสีฟ้า (Y-มอเตอร์เกียร์) 2- วิธีการส่งสายรัดเชื่อมต่อ.
- ออกจากโหมด PD โดยเปิดเครื่องลง.
สำคัญ: อนุญาตให้ 2-3 นาทีสำหรับ TECU การต่อรูปแบบลำดับอำนาจลงเสร็จสมบูรณ์ก่อนที่จะดำเนินการต่อ.- หากความผิดพลาดใด ๆ ในขณะที่การตั้งค่าใช้งาน wiggling ยานพาหนะเทียม, ดูหลักเกณฑ์ OEM สำหรับการซ่อมแซมหรือการเปลี่ยนสายไฟ OEM. ไปยังขั้นตอน 13.
- หากความผิดใด ๆ ชุดที่ใช้งานอยู่ในขณะที่การส่ง wiggling เทียม, เปลี่ยนเกียร์ Harness. ไปยังขั้นตอน 13.
- หากไม่มีความผิดพลาดในขณะที่การตั้งค่าใช้งาน wiggling ทั้งเทียม, ไปที่ขั้นตอน 4.
[/fusion_content_box][/fusion_content_boxes][fusion_content_boxes layout=”clean-horizontal” columns=”1″ title_size=”18px” heading_size=”3″ title_color=”#ffffff” body_color=”#ffffff” backgroundcolor=”#4f4f4f” icon=”” iconflip=”” iconrotate=”” iconspin=”no” iconcolor=”” icon_circle=”” icon_circle_radius=”” circlecolor=”” circlebordersize=”” circlebordercolor=”” outercirclebordersize=”” outercirclebordercolor=”” icon_size=”” icon_hover_type=”” hover_accent_color=”” image=”” image_id=”” image_width=”” image_height=”” link_type=”” button_span=”” link_area=”” link_target=”” icon_align=”left” animation_type=”” animation_delay=”” animation_offset=”” animation_direction=”left” animation_speed=”0.3″ margin_top=”” margin_bottom=”” hide_on_mobile=”small-visibility,medium-visibility,large-visibility” class=”” id=””][fusion_content_box title=”ขั้นตอนที่ 4. ตรวจสอบซึ่ง FMI ชุด.” backgroundcolor=”” icon=”” iconflip=”” iconrotate=”” iconspin=”no” iconcolor=”” circlecolor=”” circlebordersize=”” circlebordercolor=”” outercirclebordersize=”” outercirclebordercolor=”” image=”” image_id=”” image_width=”” image_height=”” link=”” linktext=”อ่านเพิ่มเติม” link_target=”” animation_type=”” animation_direction=”left” animation_speed=”0.3″ animation_offset=””]
- ตรวจสอบว่า FMI ที่กำหนดไว้สำหรับความผิดพลาดรหัส 63.
- หาก FMI 1 หรือ 12 ชุด, ไปที่ขั้นตอน 5.
- หาก FMI 5 ตั้งค่าและใช้งานอยู่, ไปที่ขั้นตอน 5.
- หาก FMI 5 การตั้งค่าและไม่ได้ใช้งาน, ไปที่ขั้นตอน 11.
- หาก FMI 6 ชุด, แทนที่ TECU. ไปยังขั้นตอน 13.
[/fusion_content_box][/fusion_content_boxes][fusion_content_boxes layout=”clean-horizontal” columns=”1″ title_size=”18px” heading_size=”3″ title_color=”#ffffff” body_color=”#ffffff” backgroundcolor=”#4f4f4f” icon=”” iconflip=”” iconrotate=”” iconspin=”no” iconcolor=”” icon_circle=”” icon_circle_radius=”” circlecolor=”” circlebordersize=”” circlebordercolor=”” outercirclebordersize=”” outercirclebordercolor=”” icon_size=”” icon_hover_type=”” hover_accent_color=”” image=”” image_id=”” image_width=”” image_height=”” link_type=”” button_span=”” link_area=”” link_target=”” icon_align=”left” animation_type=”” animation_delay=”” animation_offset=”” animation_direction=”left” animation_speed=”0.3″ margin_top=”” margin_bottom=”” hide_on_mobile=”small-visibility,medium-visibility,large-visibility” class=”” id=””][fusion_content_box title=”ขั้นตอนที่ 5. ตรวจสอบความต้านทานที่เหมาะสมผ่านการส่งสายรัดและมอเตอร์เกียร์.” backgroundcolor=”” icon=”” iconflip=”” iconrotate=”” iconspin=”no” iconcolor=”” circlecolor=”” circlebordersize=”” circlebordercolor=”” outercirclebordersize=”” outercirclebordercolor=”” image=”” image_id=”” image_width=”” image_height=”” link=”” linktext=”อ่านเพิ่มเติม” link_target=”” animation_type=”” animation_direction=”left” animation_speed=”0.3″ animation_offset=””]
- ปิดกุญแจ.
- ยกเลิกการเชื่อมต่อ 38-Way เกียร์ Connector Harness จาก TECU.
- ตรวจสอบว่ามีการเชื่อมต่อ 38-Way เป็นอิสระจากการกัดกร่อน; ขั้วจะไม่งอ, กระจาย, หรือขั้วหลวม; และมีความเสียหายให้กับร่างกายของตัวเชื่อมต่อไม่มี.
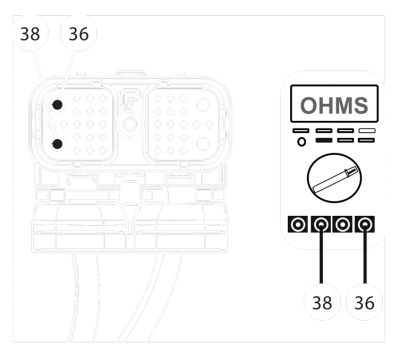
- วัดความต้านทานระหว่าง 38-Way เชื่อมต่อขา 36 และขา 38. อ่านบันทึก(s).
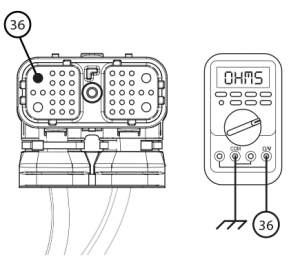
- วัดความต้านทานระหว่าง 38-Way เชื่อมต่อขา 36 และพื้นดิน. อ่านบันทึก(s).
- เปรียบเทียบการอ่าน(s) ในช่วงที่ระบุ:
- ถ้าอ่าน(s) อยู่ในช่วง, ไปที่ขั้นตอน 6.
- ถ้าอ่าน(s) อยู่นอกช่วง, ไปที่ขั้นตอน 8.
[/fusion_content_box][/fusion_content_boxes][fusion_content_boxes layout=”clean-horizontal” columns=”1″ title_size=”18px” heading_size=”3″ title_color=”#ffffff” body_color=”#ffffff” backgroundcolor=”#4f4f4f” icon=”” iconflip=”” iconrotate=”” iconspin=”no” iconcolor=”” icon_circle=”” icon_circle_radius=”” circlecolor=”” circlebordersize=”” circlebordercolor=”” outercirclebordersize=”” outercirclebordercolor=”” icon_size=”” icon_hover_type=”” hover_accent_color=”” image=”” image_id=”” image_width=”” image_height=”” link_type=”” button_span=”” link_area=”” link_target=”” icon_align=”left” animation_type=”” animation_delay=”” animation_offset=”” animation_direction=”left” animation_speed=”0.3″ margin_top=”” margin_bottom=”” hide_on_mobile=”small-visibility,medium-visibility,large-visibility” class=”” id=””][fusion_content_box title=”ขั้นตอนที่ 6. ตรวจสอบซึ่ง FMI ชุด.” backgroundcolor=”” icon=”” iconflip=”” iconrotate=”” iconspin=”no” iconcolor=”” circlecolor=”” circlebordersize=”” circlebordercolor=”” outercirclebordersize=”” outercirclebordercolor=”” image=”” image_id=”” image_width=”” image_height=”” link=”” linktext=”อ่านเพิ่มเติม” link_target=”” animation_type=”” animation_direction=”left” animation_speed=”0.3″ animation_offset=””]
- ตรวจสอบว่า FMI ที่กำหนดไว้สำหรับความผิดพลาดรหัส 63.
- หาก FMI 1 ชุด, แทนที่ X-Y Shifter และเกียร์ Harness. ไปยังขั้นตอน 13.
- หาก FMI 5 ชุด, ไปที่ขั้นตอน 7.
- หาก FMI 12 ชุด, ไปที่ขั้นตอน 8.
[/fusion_content_box][/fusion_content_boxes][fusion_content_boxes layout=”clean-horizontal” columns=”1″ title_size=”18px” heading_size=”3″ title_color=”#ffffff” body_color=”#ffffff” backgroundcolor=”#4f4f4f” icon=”” iconflip=”” iconrotate=”” iconspin=”no” iconcolor=”” icon_circle=”” icon_circle_radius=”” circlecolor=”” circlebordersize=”” circlebordercolor=”” outercirclebordersize=”” outercirclebordercolor=”” icon_size=”” icon_hover_type=”” hover_accent_color=”” image=”” image_id=”” image_width=”” image_height=”” link_type=”” button_span=”” link_area=”” link_target=”” icon_align=”left” animation_type=”” animation_delay=”” animation_offset=”” animation_direction=”left” animation_speed=”0.3″ margin_top=”” margin_bottom=”” hide_on_mobile=”small-visibility,medium-visibility,large-visibility” class=”” id=””][fusion_content_box title=”ขั้นตอนที่ 7. ตรวจสอบความต้านทานวงจรภายในของ TECU.” backgroundcolor=”” icon=”” iconflip=”” iconrotate=”” iconspin=”no” iconcolor=”” circlecolor=”” circlebordersize=”” circlebordercolor=”” outercirclebordersize=”” outercirclebordercolor=”” image=”” image_id=”” image_width=”” image_height=”” link=”” linktext=”อ่านเพิ่มเติม” link_target=”” animation_type=”” animation_direction=”left” animation_speed=”0.3″ animation_offset=””]
- เชื่อมต่อ 38-Way เกียร์ Harness เพื่อ TECU.
- ยกเลิกการเชื่อมต่อสีฟ้า 2-Way เกียร์มอเตอร์เชื่อมต่อจากเกียร์ Harness.
- ถอดฝาครอบขั้วต่อของ 4-Way เชื่อมต่อการวินิจฉัย.
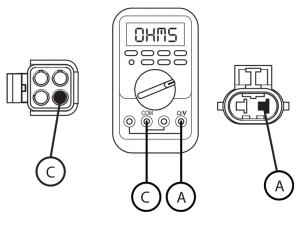
- วัดความต้านทานระหว่าง 2 ทางเชื่อมต่อขาและ 4-Way เชื่อมต่อขา C. อ่านบันทึก(s).
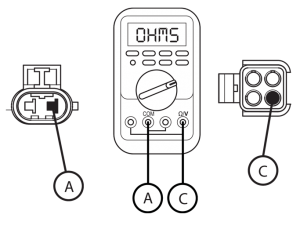
- ย้อนกลับนำไปสู่เมตรและใช้วัดเดียวกันระหว่าง 2 ทางเชื่อมต่อขาและ 4-Way เชื่อมต่อขา C. อ่านบันทึก(s).
- เปรียบเทียบการอ่าน(s) ในช่วงที่ระบุไว้ในบันทึก.
- ถ้าอ่าน(s) อยู่ในช่วง, แทนที่ X-Y Shifter. ไปยังขั้นตอน 13.
- ถ้าอ่าน(s) อยู่นอกช่วง, แทนที่ TECU. ไปยังขั้นตอน 13.
[/fusion_content_box][/fusion_content_boxes][fusion_content_boxes layout=”clean-horizontal” columns=”1″ title_size=”18px” heading_size=”3″ title_color=”#ffffff” body_color=”#ffffff” backgroundcolor=”#4f4f4f” icon=”” iconflip=”” iconrotate=”” iconspin=”no” iconcolor=”” icon_circle=”” icon_circle_radius=”” circlecolor=”” circlebordersize=”” circlebordercolor=”” outercirclebordersize=”” outercirclebordercolor=”” icon_size=”” icon_hover_type=”” hover_accent_color=”” image=”” image_id=”” image_width=”” image_height=”” link_type=”” button_span=”” link_area=”” link_target=”” icon_align=”left” animation_type=”” animation_delay=”” animation_offset=”” animation_direction=”left” animation_speed=”0.3″ margin_top=”” margin_bottom=”” hide_on_mobile=”small-visibility,medium-visibility,large-visibility” class=”” id=””][fusion_content_box title=”ขั้นตอนที่ 8. ตรวจสอบความต้านทานของ X-Y มอเตอร์เกียร์และตรวจสอบมอเตอร์ไม่ได้ shorted ไปที่พื้นดิน.” backgroundcolor=”” icon=”” iconflip=”” iconrotate=”” iconspin=”no” iconcolor=”” circlecolor=”” circlebordersize=”” circlebordercolor=”” outercirclebordersize=”” outercirclebordercolor=”” image=”” image_id=”” image_width=”” image_height=”” link=”” linktext=”อ่านเพิ่มเติม” link_target=”” animation_type=”” animation_direction=”left” animation_speed=”0.3″ animation_offset=””]
- ปิดกุญแจ.
- ยกเลิกการเชื่อมต่อสีฟ้า 2-Way เกียร์มอเตอร์เชื่อมต่อจากเกียร์ Harness.
- ตรวจสอบ 2 ทางเชื่อมต่อเป็นอิสระจากการกัดกร่อนใด ๆ; ขั้วจะไม่งอ, การแพร่กระจายหรือหลวม, และมีความเสียหายให้กับร่างกายของตัวเชื่อมต่อไม่มี.
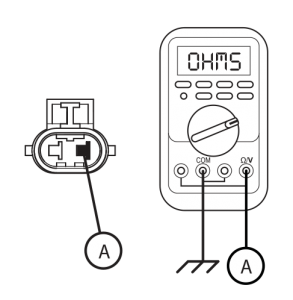
- วัดความต้านทานระหว่าง 2 ทางเชื่อมต่อขาและขา B. อ่านบันทึก(s).
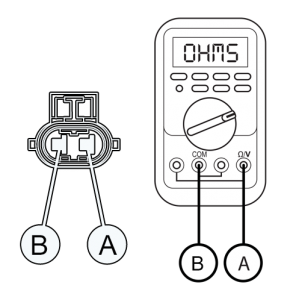
- ต้านทานวัดระหว่าง 2 ทางเชื่อมต่อขาและพื้นดิน. อ่านบันทึก.
- เปรียบเทียบการอ่าน(s) ในช่วงที่ระบุ.
- ถ้าอ่าน(s) อยู่ในช่วง, ไปที่ขั้นตอน 9.
- ถ้าอ่าน(s) อยู่นอกช่วง, แทนที่ X-Y Shifter. ไปยังขั้นตอน 13.
[/fusion_content_box][/fusion_content_boxes][fusion_content_boxes layout=”clean-horizontal” columns=”1″ title_size=”18px” heading_size=”3″ title_color=”#ffffff” body_color=”#ffffff” backgroundcolor=”#4f4f4f” icon=”” iconflip=”” iconrotate=”” iconspin=”no” iconcolor=”” icon_circle=”” icon_circle_radius=”” circlecolor=”” circlebordersize=”” circlebordercolor=”” outercirclebordersize=”” outercirclebordercolor=”” icon_size=”” icon_hover_type=”” hover_accent_color=”” image=”” image_id=”” image_width=”” image_height=”” link_type=”” button_span=”” link_area=”” link_target=”” icon_align=”left” animation_type=”” animation_delay=”” animation_offset=”” animation_direction=”left” animation_speed=”0.3″ margin_top=”” margin_bottom=”” hide_on_mobile=”small-visibility,medium-visibility,large-visibility” class=”” id=””][fusion_content_box title=”ขั้นตอนที่ 9. ตรวจสอบซึ่ง FMI ชุด.” backgroundcolor=”” icon=”” iconflip=”” iconrotate=”” iconspin=”no” iconcolor=”” circlecolor=”” circlebordersize=”” circlebordercolor=”” outercirclebordersize=”” outercirclebordercolor=”” image=”” image_id=”” image_width=”” image_height=”” link=”” linktext=”อ่านเพิ่มเติม” link_target=”” animation_type=”” animation_direction=”left” animation_speed=”0.3″ animation_offset=””]
- ตรวจสอบว่า FMI ที่กำหนดไว้สำหรับความผิดพลาดรหัส 63.
- หาก FMI 1 ชุด, เปลี่ยนเกียร์ Harness. ไปยังขั้นตอน 13.
- หาก FMI 5 ชุด, เปลี่ยนเกียร์ Harness. ไปยังขั้นตอน 13.
- หาก FMI 12 ชุด, ไปที่ขั้นตอน 10.
[/fusion_content_box][/fusion_content_boxes][fusion_content_boxes layout=”clean-horizontal” columns=”1″ title_size=”18px” heading_size=”3″ title_color=”#ffffff” body_color=”#ffffff” backgroundcolor=”#4f4f4f” icon=”” iconflip=”” iconrotate=”” iconspin=”no” iconcolor=”” icon_circle=”” icon_circle_radius=”” circlecolor=”” circlebordersize=”” circlebordercolor=”” outercirclebordersize=”” outercirclebordercolor=”” icon_size=”” icon_hover_type=”” hover_accent_color=”” image=”” image_id=”” image_width=”” image_height=”” link_type=”” button_span=”” link_area=”” link_target=”” icon_align=”left” animation_type=”” animation_delay=”” animation_offset=”” animation_direction=”left” animation_speed=”0.3″ margin_top=”” margin_bottom=”” hide_on_mobile=”small-visibility,medium-visibility,large-visibility” class=”” id=””][fusion_content_box title=”ขั้นตอนที่ 10. โหลดทดสอบแหล่งจ่ายไฟรถไป TECU.” backgroundcolor=”” icon=”” iconflip=”” iconrotate=”” iconspin=”no” iconcolor=”” circlecolor=”” circlebordersize=”” circlebordercolor=”” outercirclebordersize=”” outercirclebordercolor=”” image=”” image_id=”” image_width=”” image_height=”” link=”” linktext=”อ่านเพิ่มเติม” link_target=”” animation_type=”” animation_direction=”left” animation_speed=”0.3″ animation_offset=””]
- ปิดกุญแจ.
- ตรวจสอบการใช้พลังงานจากแบตเตอรี่ TECU และอุปทานพื้นดินจากยานพาหนะ Harness ถูกเชื่อมต่อและไม่สึกกร่อน, ได้รับความเสียหาย, หรือหลวม.
- ยกเลิกการเชื่อมต่อ 38-Way เชื่อมต่อสายรัดยานพาหนะที่ TECU.
- ตรวจสอบว่ามีการเชื่อมต่อ 38-Way เป็นอิสระจากการกัดกร่อน, ไม่มีงอ, กระจาย, หรือขั้วหลวม, และมีความเสียหายให้กับร่างกายของตัวเชื่อมต่อไม่มี.
- โหลดทดสอบเทียมรถแหล่งจ่ายไฟกับแหล่งโหลดภายนอก. ใช้ไฟลำแสงปิดผนึกหรือมอเตอร์พัดลมที่ติดอยู่กับขา 36 (อำนาจ) และขา 38 (พื้น). โหลดสำหรับการทดสอบ 5 นาทีเพื่อตรวจสอบสายรัดจะดำเนินการโหลดกับฟิวส์ 30 แอมป์ติดตั้ง.
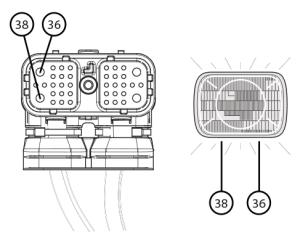
- กระดิกเทียมในระหว่างการทดสอบโหลดจากแบตเตอรี่รถไป TECU.
- ถ้ามีปัญหาจะพบกับยานพาหนะเทียมหรือการเชื่อมต่อ, ดูหลักเกณฑ์ OEM สำหรับการซ่อมแซมหรือการเปลี่ยนสายไฟ OEM และยังคงทดสอบโหลด.
- หากยานพาหนะเทียมไม่ได้พกโหลด, ดูหลักเกณฑ์ OEM สำหรับการซ่อมแซมหรือการเปลี่ยนสายไฟ OEM. ไปยังขั้นตอน 13.
- ถ้าไม่มีปัญหาจะพบกับยานพาหนะเทียมหรือการเชื่อมต่อและการจัดหาพลังงานดำเนินการโหลด, แทนที่ TECU. ไปยังขั้นตอน 13.
[/fusion_content_box][/fusion_content_boxes][fusion_content_boxes layout=”clean-horizontal” columns=”1″ title_size=”18px” heading_size=”3″ title_color=”#ffffff” body_color=”#ffffff” backgroundcolor=”#4f4f4f” icon=”” iconflip=”” iconrotate=”” iconspin=”no” iconcolor=”” icon_circle=”” icon_circle_radius=”” circlecolor=”” circlebordersize=”” circlebordercolor=”” outercirclebordersize=”” outercirclebordercolor=”” icon_size=”” icon_hover_type=”” hover_accent_color=”” image=”” image_id=”” image_width=”” image_height=”” link_type=”” button_span=”” link_area=”” link_target=”” icon_align=”left” animation_type=”” animation_delay=”” animation_offset=”” animation_direction=”left” animation_speed=”0.3″ margin_top=”” margin_bottom=”” hide_on_mobile=”small-visibility,medium-visibility,large-visibility” class=”” id=””][fusion_content_box title=”ขั้นตอนที่ 11. ตรวจสอบความต้านทานที่เหมาะสมผ่านการส่งสายรัดและมอเตอร์เกียร์.” backgroundcolor=”” icon=”” iconflip=”” iconrotate=”” iconspin=”no” iconcolor=”” circlecolor=”” circlebordersize=”” circlebordercolor=”” outercirclebordersize=”” outercirclebordercolor=”” image=”” image_id=”” image_width=”” image_height=”” link=”” linktext=”อ่านเพิ่มเติม” link_target=”” animation_type=”” animation_direction=”left” animation_speed=”0.3″ animation_offset=””]
- ปิดกุญแจ.
- ยกเลิกการเชื่อมต่อ 38-Way เกียร์ Connector Harness จาก TECU.
- ตรวจสอบว่ามีการเชื่อมต่อ 38-Way เป็นอิสระจากการกัดกร่อน, ไม่มีงอ, กระจาย, หรือขั้วหลวม, และมีความเสียหายให้กับร่างกายของตัวเชื่อมต่อไม่มี.
- วัดความต้านทานระหว่าง 38-Way เชื่อมต่อขา 36 และขา 38. อ่านบันทึก.
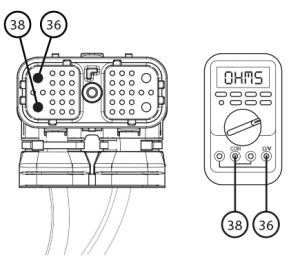
- วัดความต้านทานระหว่าง 38-Way เชื่อมต่อขา 36 และพื้นดิน. อ่านบันทึก.
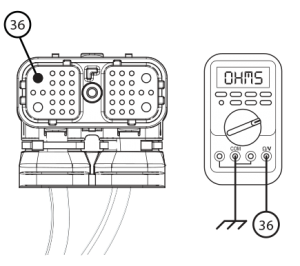
- เปรียบเทียบการอ่าน(s) ในช่วงที่ระบุไว้ในตาราง:
- ถ้าอ่าน(s) อยู่ในช่วง, แทนที่ X-Y Shifter. ไปยังขั้นตอน 13.
- ถ้าอ่าน(s) อยู่นอกช่วง, ไปที่ขั้นตอน 12.
[/fusion_content_box][/fusion_content_boxes][fusion_content_boxes layout=”clean-horizontal” columns=”1″ title_size=”18px” heading_size=”3″ title_color=”#ffffff” body_color=”#ffffff” backgroundcolor=”#4f4f4f” icon=”” iconflip=”” iconrotate=”” iconspin=”no” iconcolor=”” icon_circle=”” icon_circle_radius=”” circlecolor=”” circlebordersize=”” circlebordercolor=”” outercirclebordersize=”” outercirclebordercolor=”” icon_size=”” icon_hover_type=”” hover_accent_color=”” image=”” image_id=”” image_width=”” image_height=”” link_type=”” button_span=”” link_area=”” link_target=”” icon_align=”left” animation_type=”” animation_delay=”” animation_offset=”” animation_direction=”left” animation_speed=”0.3″ margin_top=”” margin_bottom=”” hide_on_mobile=”small-visibility,medium-visibility,large-visibility” class=”” id=””][fusion_content_box title=”ขั้นตอนที่ 12. ตรวจสอบความต้านทานภายในของ X-Y Shifter มอเตอร์เกียร์มอเตอร์และตรวจสอบไม่ได้ shorted ไปที่พื้นดิน.” backgroundcolor=”” icon=”” iconflip=”” iconrotate=”” iconspin=”no” iconcolor=”” circlecolor=”” circlebordersize=”” circlebordercolor=”” outercirclebordersize=”” outercirclebordercolor=”” image=”” image_id=”” image_width=”” image_height=”” link=”” linktext=”อ่านเพิ่มเติม” link_target=”” animation_type=”” animation_direction=”left” animation_speed=”0.3″ animation_offset=””]
- ปิดกุญแจ.
- ยกเลิกการเชื่อมต่อสีฟ้า 2-Way เกียร์มอเตอร์เชื่อมต่อจากเกียร์ Harness.
- ตรวจสอบว่ามีการเชื่อมต่อ 2 ทางเป็นอิสระจากการกัดกร่อน, ไม่มีงอ, กระจาย, หรือขั้วหลวม, และมีความเสียหายให้กับร่างกายของตัวเชื่อมต่อไม่มี.
- วัดความต้านทานระหว่าง 2 ทางเชื่อมต่อขาและขา B. อ่านบันทึกในตาราง.
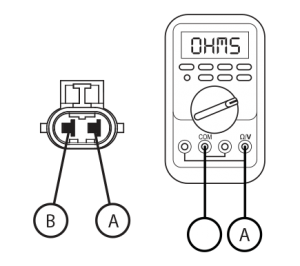
- วัดความต้านทานระหว่าง 2-Way เชื่อมต่อขาและพื้นดิน. อ่านบันทึก.
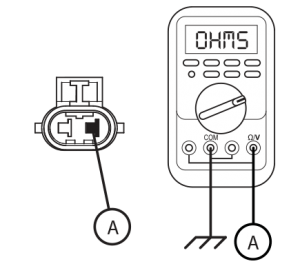
- เปรียบเทียบความต้านทานในช่วงที่ระบุไว้ในตาราง.
- หากทั้งสองต้านทานจะอยู่ในช่วง, เปลี่ยนเกียร์ Harness. ไปยังขั้นตอน 13.
- หากต้านทานอย่างใดอย่างหนึ่งอยู่นอกช่วง, แทนที่เอ็กซ์- Y Shifter. ไปยังขั้นตอน 13.
[/fusion_content_box][/fusion_content_boxes][fusion_content_boxes layout=”clean-horizontal” columns=”1″ title_size=”18px” heading_size=”3″ title_color=”#ffffff” body_color=”#ffffff” backgroundcolor=”#4f4f4f” icon=”” iconflip=”” iconrotate=”” iconspin=”no” iconcolor=”” icon_circle=”” icon_circle_radius=”” circlecolor=”” circlebordersize=”” circlebordercolor=”” outercirclebordersize=”” outercirclebordercolor=”” icon_size=”” icon_hover_type=”” hover_accent_color=”#f41000″ image=”” image_id=”” image_width=”” image_height=”” link_type=”” button_span=”” link_area=”” link_target=”” icon_align=”left” animation_type=”” animation_delay=”” animation_offset=”” animation_direction=”left” animation_speed=”0.3″ margin_top=”” margin_bottom=”” hide_on_mobile=”small-visibility,medium-visibility,large-visibility” class=”” id=””][fusion_content_box title=”ขั้นตอนที่ 13. ตรวจสอบซ่อมแซม.” backgroundcolor=”” icon=”” iconflip=”” iconrotate=”” iconspin=”no” iconcolor=”” circlecolor=”” circlebordersize=”” circlebordercolor=”” outercirclebordersize=”” outercirclebordercolor=”” image=”” image_id=”” image_width=”” image_height=”” link=”” linktext=”อ่านเพิ่มเติม” link_target=”” animation_type=”” animation_direction=”left” animation_speed=”0.3″ animation_offset=””]
- ปิดกุญแจ.
- เชื่อมต่อการเชื่อมต่อและสายเคเบิลขั้วลบของแบตเตอรี่.
- 3. ที่สำคัญเกี่ยวกับการดับเครื่องยนต์.
- รหัสที่ชัดเจน, ดู ความผิดพลาดที่ไม่ใช้งานที่ชัดเจน.
- ขับรถและพยายามที่จะรีเซ็ตรหัสหรือซ้ำปัญหา.
- ตรวจสอบรหัส, ดู ดูความผิดปกติที่ใช้งานและไม่ได้ใช้งาน.
- หากไม่มีรหัส, ทดสอบเสร็จสิ้น.
- ถ้ารหัสความผิด 63 ปรากฏ, พบข้อผิดพลาดในการทดสอบ, ไปที่ขั้นตอน 1.
- ถ้ารหัสอื่นที่ไม่ใช่ 63 ปรากฏ, ดู ความผิดปกติรายการดัชนีรหัส.
[/fusion_content_box][/fusion_content_boxes][/fusion_builder_column][/fusion_builder_row][/fusion_builder_container][fusion_global id=”13788″]