[fusion_builder_container hundred_percent=yeshundred_percent_height=nohundred_percent_height_scroll=nohundred_percent_height_center_content=yesequal_height_columns=nomenu_anchor=”” hide_on_mobile=small-visibility,medium-visibility,large-visibilitystatus=publishedpublish_date=”” class=”” id=”” background_color=”” background_image=https://www.globaltransmissionsupply.com/wp-content/uploads/gears-dark-overlay.jpgbackground_position=center centerbackground_repeat=no-repeatfade=nobackground_parallax=noneenable_mobile=noparallax_speed=”0.3″ video_mp4=”” video_webm=”” video_ogv=”” video_url=”” video_aspect_ratio=”16:9″ video_loop=yesvideo_mute=yesvideo_preview_image=”” border_size=”” border_color=”” border_style=solidmargin_top=”” margin_bottom=”” padding_top=”3%” padding_right=”” padding_bottom=”3%” padding_left=””][fusion_builder_row][fusion_builder_column type=”1_1layout=”1_1spacing=”” center_content=nolink=”” target=_selfmin_height=”” hide_on_mobile=small-visibility,medium-visibility,large-visibilityclass=”” id=”” background_image_id=”” background_color=rgba(0,0,0,0.4)” background_image=”” background_position=left topundefined=”” background_repeat=no-repeathover_type=noneborder_size=”0″ border_color=”” border_style=solidborder_position=allpadding_top=”” padding_right=”” padding_bottom=”” padding_left=”” margin_top=”” margin_bottom=”” animation_type=”” animation_direction=leftanimation_speed=”0.3″ animation_offset=”” last=no”][fusion_text columns=”” column_min_width=”” column_spacing=”” rule_style=defaultrule_size=”” rule_color=”” hide_on_mobile=small-visibility,medium-visibility,large-visibilityclass=”” id=””]

Eaton Fuller Getriebe Fehlercodes

[/fusion_text][/fusion_builder_column][/fusion_builder_row][/fusion_builder_container][fusion_builder_container hundred_percent=nohundred_percent_height=nohundred_percent_height_scroll=nohundred_percent_height_center_content=yesequal_height_columns=nomenu_anchor=”” hide_on_mobile=small-visibility,medium-visibility,large-visibilitystatus=publishedpublish_date=”” class=”” id=”” background_color=”” background_image=”” background_position=center centerbackground_repeat=no-repeatfade=nobackground_parallax=noneenable_mobile=noparallax_speed=”0.3″ video_mp4=”” video_webm=”” video_ogv=”” video_url=”” video_aspect_ratio=”16:9″ video_loop=yesvideo_mute=yesvideo_preview_image=”” border_size=”” border_color=”” border_style=solidmargin_top=”25″ margin_bottom=”” padding_top=”” padding_right=”” padding_bottom=”” padding_left=””][fusion_builder_row][fusion_builder_column type=”1_1layout=”1_1spacing=”” center_content=nolink=”” target=_selfmin_height=”” hide_on_mobile=small-visibility,medium-visibility,large-visibilityclass=”” id=”” background_color=”” background_image=”” background_image_id=”” background_position=left topbackground_repeat=no-repeathover_type=noneborder_size=”0″ border_color=”” border_style=solidborder_position=allpadding_top=”” padding_right=”” padding_bottom=”” padding_left=”” margin_top=”” margin_bottom=”” animation_type=”” animation_direction=leftanimation_speed=”0.3″ animation_offset=”” last=no”][fusion_text columns=”” column_min_width=”” column_spacing=”” rule_style=defaultrule_size=”” rule_color=”” hide_on_mobile=small-visibility,medium-visibility,large-visibilityclass=”” id=””]

Abrufen von Eaton Fuller Getriebe Fehlercodes manuell

[/fusion_text][fusion_separator style_type=defaulthide_on_mobile=small-visibility,medium-visibility,large-visibilityclass=”” id=”” sep_color=”#0038a0top_margin=”” bottom_margin=”20″ border_size=”” icon=”” icon_circle=”” icon_circle_color=”” width=”20%” alignment=left” /][fusion_text columns=”” column_min_width=”” column_spacing=”” rule_style=defaultrule_size=”” rule_color=”” hide_on_mobile=small-visibility,medium-visibility,large-visibilityclass=”” id=””]

Folgen Sie den Anweisungen auf dieser Seite zu finden, testen und erfahren, wie Fehlercode Fehler für Ihre Freight zu beheben, Mack, Peterbilt, Kenworth, Volvo und internationaler LKW. Rufen Sie Eaton Fuller Übertragungsfehlercodes durch das System der Selbstdiagnose-Modus ermöglicht. Sobald Sie Ihren Fehlercode, scrollen unten in der Tabelle die Beschreibung zu finden.

Fault code pointing to a failed unit? Überholte Eaton Fuller-Getriebe und replacement transmission parts Versand am selben Tag von Pro Gear & Übertragung — oder anrufen 877-776-4600.

Hinweis: Sie können auch einen PC verwenden- basiertes Service-Tool, wie Serviceranger Fehlercodes abzurufen.

[/fusion_text][/fusion_builder_column][fusion_builder_column type=”1_2layout=”1_2spacing=”” center_content=nolink=”” target=_selfmin_height=”” hide_on_mobile=small-visibility,medium-visibility,large-visibilityclass=”” id=”” background_color=”” background_image=”” background_image_id=”” background_position=left topbackground_repeat=no-repeathover_type=noneborder_size=”0″ border_color=”” border_style=solidborder_position=allpadding_top=”” padding_right=”” padding_bottom=”” padding_left=”” margin_top=”” margin_bottom=”” animation_type=”” animation_direction=leftanimation_speed=”0.3″ animation_offset=”” last=no”][fusion_text columns=”” column_min_width=”” column_spacing=”” rule_style=defaultrule_size=”” rule_color=”” hide_on_mobile=small-visibility,medium-visibility,large-visibilityclass=”” id=””]

    1. Platzieren Sie den Schalthebel in Neutral.
    2. Stellen Sie die Feststellbremse.
    3. Drehen Sie den Schlüssel auf mit Motor aus.
      Hinweis: Wenn der Motor bereits läuft, Sie können immer noch Codes abrufen; jedoch, greifen nicht in den Anlasser, wenn der Motor abstirbt.
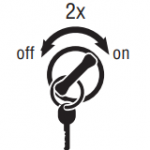
    4. Abrufen Aktive Codes: Key auf. Drehen Sie den Schlüssel ab und zu 2 Mal innerhalb von fünf Sekunden mit der Taste endet am. Nach dem 5 Sekunden, die Service-LED beginnt zweistelligen Fehlercodes zu blinken. Wenn keine Fehler aktiv, der Service Licht Code blinken 25 (keine Codes).
      Hinweis: Ein „88“ kann in dem Strich am Schlüssel, auf das zeigen ein normaler Start Test des Displays Fehlercode manuellen Tests
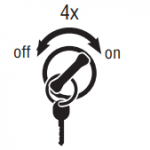
    5. Abrufen Inaktive Codes: Drehen Sie den Schlüssel auf. Drehen Sie den Schlüssel aus und 4 Mal innerhalb von fünf Sekunden mit dem Schlüssel in der Position endet. Nach dem 5 Sekunden, die Service-LED beginnt zweistelligen Fehlercodes zu blinken. Wenn keine Fehler aktiv, der Service Licht Code blinken 25 (keine Codes).Fehlercode manuell Retrieval
      • Zweistelligen Fehlercodes werden in der Ganganzeige angezeigt werden. Einige Fahrzeug kann mit einem Service-Licht ausgestattet werden.
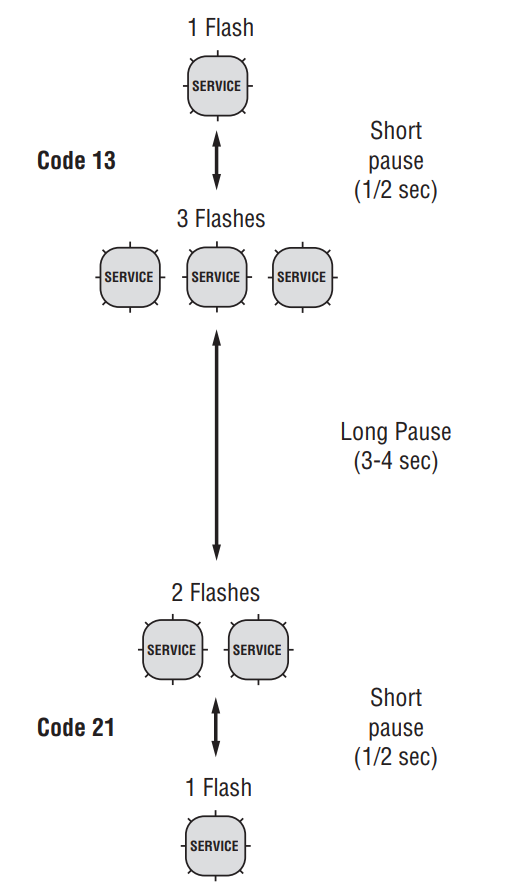
    6. Beachten Sie die Reihenfolge der Blitze auf dem Service-Licht und notieren Sie die Codes. EIN 1- Pause von 2 Sekunden trennt jeden gespeicherten Code, und die Sequenz wiederholt sich automatisch nach alle Codes geblitzt worden.
[/fusion_text][/fusion_builder_column][fusion_builder_column type=”1_2layout=”1_2spacing=”” center_content=nolink=”” target=_selfmin_height=”” hide_on_mobile=small-visibility,medium-visibility,large-visibilityclass=”” id=”” background_color=”” background_image=”” background_image_id=”” background_position=left topbackground_repeat=no-repeathover_type=noneborder_size=”0″ border_color=”” border_style=solidborder_position=allpadding_top=”” padding_right=”” padding_bottom=”” padding_left=”” margin_top=”” margin_bottom=”” animation_type=”” animation_direction=leftanimation_speed=”0.3″ animation_offset=”” last=no”][fusion_imageframe image_id=”13871|fullmax_width=”” style_type=”” blur=”” stylecolor=”” hover_type=nonebordersize=”” bordercolor=”” borderradius=”” align=nonelightbox=nogallery_id=”” lightbox_image=”” lightbox_image_id=”” alt=”Eaton Fuller Getriebe Fehlercodes- wie manuelle Fehlercodesequenz lesen ” link=”” linktarget=_selfhide_on_mobile=small-visibility,medium-visibility,large-visibilityclass=”” id=”” animation_type=”” animation_direction=leftanimation_speed=”0.3″ animation_offset=””]https://www.globaltransmissionsupply.com/wp-content/uploads/fault-code-sequence-flash-e1553099338337.png[/fusion_imageframe][/fusion_builder_column][fusion_builder_column type=”1_1layout=”1_1spacing=”” center_content=nolink=”” target=_selfmin_height=”” hide_on_mobile=small-visibility,medium-visibility,large-visibilityclass=”” id=”” background_color=”” background_image=”” background_image_id=”” background_position=left topbackground_repeat=no-repeathover_type=noneborder_size=”0″ border_color=”” border_style=solidborder_position=allpadding_top=”” padding_right=”” padding_bottom=”” padding_left=”” margin_top=”” margin_bottom=”” animation_type=”” animation_direction=leftanimation_speed=”0.3″ animation_offset=”” last=no”][fusion_text columns=”” column_min_width=”” column_spacing=”” rule_style=defaultrule_size=”” rule_color=”” hide_on_mobile=small-visibility,medium-visibility,large-visibilityclass=”” id=””]

Fehlercodes Löschen manuell

[/fusion_text][fusion_separator style_type=defaulthide_on_mobile=small-visibility,medium-visibility,large-visibilityclass=”” id=”” sep_color=”#0038a0top_margin=”” bottom_margin=”20″ border_size=”” icon=”” icon_circle=”” icon_circle_color=”” width=”20%” alignment=left” /][fusion_text columns=”” column_min_width=”” column_spacing=”” rule_style=defaultrule_size=”” rule_color=”” hide_on_mobile=small-visibility,medium-visibility,large-visibilityclass=”” id=””]

Das folgende Verfahren löscht alle Inaktive Fehlercodes aus dem TECU Speicher. Aktive Fehlercodes werden automatisch gelöscht, wenn der Fehler behoben.
Hinweis: Sie können ein PC-basierten Service-Tool verwenden, wie Serviceranger, Fehlercodes löschen.
1. Platz Schalthebel in Neutral.
2. Feststellbremse.
3. Drehen Sie den Schlüssel auf mit Motor aus.
4. Drehen Sie den Schlüssel ab und zu 6 mal innerhalb von 5 Sekunden mit der Taste endet am. Hinweis: Wenn die Codes wurden erfolgreich gelöscht, das Service-Licht leuchtet auf und Aufenthalt auf fünf Sekunden. Die Ganganzeige zeigt 25 (keine Codes).
5. Drehen Sie den Schlüssel ab und lassen Sie das System an die Macht
Nieder.

[/fusion_text][/fusion_builder_column][/fusion_builder_row][/fusion_builder_container][fusion_builder_container hundred_percent=nohundred_percent_height=nohundred_percent_height_scroll=nohundred_percent_height_center_content=yesequal_height_columns=nomenu_anchor=”” hide_on_mobile=small-visibility,medium-visibility,large-visibilitystatus=publishedpublish_date=”” class=”” id=”” background_color=”” background_image=”” background_position=center centerbackground_repeat=no-repeatfade=nobackground_parallax=noneenable_mobile=noparallax_speed=”0.3″ video_mp4=”” video_webm=”” video_ogv=”” video_url=”” video_aspect_ratio=”16:9″ video_loop=yesvideo_mute=yesvideo_preview_image=”” border_size=”” border_color=”” border_style=solidmargin_top=”” margin_bottom=”” padding_top=”” padding_right=”” padding_bottom=”” padding_left=””][fusion_builder_row][fusion_builder_column type=”1_1layout=”1_1spacing=”” center_content=nolink=”” target=_selfmin_height=”” hide_on_mobile=small-visibility,medium-visibility,large-visibilityclass=”” id=”” background_color=”” background_image=”” background_image_id=”” background_position=left topbackground_repeat=no-repeathover_type=noneborder_size=”0″ border_color=”” border_style=solidborder_position=allpadding_top=”” padding_right=”” padding_bottom=”” padding_left=”” margin_top=”” margin_bottom=”” animation_type=”” animation_direction=leftanimation_speed=”0.3″ animation_offset=”” last=no”][fusion_text columns=”” column_min_width=”” column_spacing=”” rule_style=defaultrule_size=”” rule_color=”” hide_on_mobile=small-visibility,medium-visibility,large-visibilityclass=”” id=””]

Fehlercode Retrieval und Clearing in Serviceranger

[/fusion_text][fusion_separator style_type=defaulthide_on_mobile=small-visibility,medium-visibility,large-visibilityclass=”” id=”” sep_color=”#0038a0top_margin=”” bottom_margin=”20″ border_size=”” icon=”” icon_circle=”” icon_circle_color=”” width=”20%” alignment=left” /][fusion_text columns=”” column_min_width=”” column_spacing=”” rule_style=defaultrule_size=”” rule_color=”” hide_on_mobile=small-visibility,medium-visibility,large-visibilityclass=”” id=””]

Um zu sehen, sie Fehlercodes oder löschen, Folgen Sie den Anweisungen unter.

[/fusion_text][/fusion_builder_column][fusion_builder_column type=”1_2layout=”1_2spacing=”” center_content=nolink=”” target=_selfmin_height=”” hide_on_mobile=small-visibility,medium-visibility,large-visibilityclass=”” id=”” background_color=”” background_image=”” background_image_id=”” background_position=left topbackground_repeat=no-repeathover_type=noneborder_size=”0″ border_color=”” border_style=solidborder_position=allpadding_top=”” padding_right=”” padding_bottom=”” padding_left=”” margin_top=”” margin_bottom=”” animation_type=”” animation_direction=leftanimation_speed=”0.3″ animation_offset=”” last=no”][fusion_text columns=”” column_min_width=”” column_spacing=”” rule_style=defaultrule_size=”” rule_color=”” hide_on_mobile=small-visibility,medium-visibility,large-visibilityclass=”” id=””]

Sehen Sie Aktive und inaktive Fehler

1. Verbinden Serviceranger an den 9-Wege-Diagnosestecker.
2. Gehen Sie auf das Menü „Extras“ und wählen Sie die Registerkarte „Kommunikation“.
3. Wählen Sie die entsprechende Kommunikationsvorrichtung für J1587 und J1939.
4. Wählen Sie „Connect“ auf der Hauptseite.
5. Wählen Sie die „Anzeigen des Fehlercodes“ Registerkarte.
Hinweis: Erste Anwendung erfordert, dass alle Schritte; jedoch nachfolgende Verwendungen erfordern nur Schritt 4 und Schritt 5.

[/fusion_text][/fusion_builder_column][fusion_builder_column type=”1_2layout=”1_2spacing=”” center_content=nolink=”” target=_selfmin_height=”” hide_on_mobile=small-visibility,medium-visibility,large-visibilityclass=”” id=”” background_color=”” background_image=”” background_image_id=”” background_position=left topbackground_repeat=no-repeathover_type=noneborder_size=”0″ border_color=”” border_style=solidborder_position=allpadding_top=”” padding_right=”” padding_bottom=”” padding_left=”” margin_top=”” margin_bottom=”” animation_type=”” animation_direction=leftanimation_speed=”0.3″ animation_offset=”” last=no”][fusion_text columns=”” column_min_width=”” column_spacing=”” rule_style=defaultrule_size=”” rule_color=”” hide_on_mobile=small-visibility,medium-visibility,large-visibilityclass=”” id=””]

Klar Inaktive Fehler

1. Verbinden Serviceranger an den 9-Wege-Diagnosestecker.
2. Gehen Sie auf das Menü „Extras“ und wählen Sie die Registerkarte „Kommunikation“.
3. Wählen Sie die entsprechende Kommunikationsvorrichtung für J1587 und J1939.
4. Wählen Sie „Connect“ auf der Hauptseite.
5. Wählen Sie die „Anzeigen des Fehlercodes“ Registerkarte.
6. Wählen Sie den „Fehler löschen“ -Schaltfläche.
Hinweis: Erste Anwendung erfordert, dass alle Schritte, jedoch, nachfolgende Verwendungen erfordern nur Schritt 4 und Schritt 5.

[/fusion_text][/fusion_builder_column][/fusion_builder_row][/fusion_builder_container][fusion_builder_container hundred_percent=nohundred_percent_height=nohundred_percent_height_scroll=nohundred_percent_height_center_content=yesequal_height_columns=nomenu_anchor=”” hide_on_mobile=small-visibility,medium-visibility,large-visibilitystatus=publishedpublish_date=”” class=”” id=”” background_color=”” background_image=”” background_position=center centerbackground_repeat=no-repeatfade=nobackground_parallax=noneenable_mobile=noparallax_speed=”0.3″ video_mp4=”” video_webm=”” video_ogv=”” video_url=”” video_aspect_ratio=”16:9″ video_loop=yesvideo_mute=yesvideo_preview_image=”” border_size=”” border_color=”” border_style=solidmargin_top=”” margin_bottom=”” padding_top=”” padding_right=”” padding_bottom=”” padding_left=””][fusion_builder_row][fusion_builder_column type=”1_1layout=”1_1spacing=”” center_content=nolink=”” target=_selfmin_height=”” hide_on_mobile=small-visibility,medium-visibility,large-visibilityclass=”” id=”” background_color=”” background_image=”” background_image_id=”” background_position=left topbackground_repeat=no-repeathover_type=noneborder_size=”0″ border_color=”” border_style=solidborder_position=allpadding_top=”” padding_right=”” padding_bottom=”” padding_left=”” margin_top=”” margin_bottom=”” animation_type=”” animation_direction=leftanimation_speed=”0.3″ animation_offset=”” last=no”][fusion_text columns=”” column_min_width=”” column_spacing=”” rule_style=defaultrule_size=”” rule_color=”” hide_on_mobile=small-visibility,medium-visibility,large-visibilityclass=”” id=””]

Produktdiagnosemodus (PDM)

[/fusion_text][fusion_text columns=”” column_min_width=”” column_spacing=”” rule_style=defaultrule_size=”” rule_color=”” hide_on_mobile=small-visibility,medium-visibility,large-visibilityclass=”” id=””]

Produktdiagnosemodus (PDM)
Produktdiagnosemodus (PDM) wird verwendet, Inaktive Codes zu diagnostizieren, die während des normalen Fahrens eingestellt worden sein. Diese Diagnose-Modus erhöht die Empfindlichkeit der Fehlererfassungsfähigkeiten.
Dieses Verfahren testet loses, abgebaut und intermittierende Verbindungen. Siehe „Ault-Code Isolierungsverfahren Index unten. Verwenden Sie den Index als Richtschnur für die Verdrahtung und die Anschlüsse, die mit dem inaktiven Fehlercodes zugeordnet sind,. Biegen Sie den Kabelbaum und Stecker und versuchen, den Fehler zu erstellen, nachdem PDM Aktivierung.
PDM ist nur von einem geschulten Servicetechniker in einem autorisierten Händler verwendet werden.
So geben Sie PDM-Modus:
Hinweis: Das Fahrzeug startet nicht in Produktdiagnosemodus.
(PDM). Schalten Fahrzeugschlüssel „OFF“ und lassen Sie das System herunterzufahren PDM zu beenden.

        1. Fahrzeug muss stationär, Motor darf nicht laufen, Fahrzeugfeststellbremse muß gesetzt werden.
        2. Verbinden Serviceranger an den 9-Wege-Diagnosestecker.
        3. Wählen Sie die „Ansicht Fehlercodes“ -Bildschirm.
        4. Führen Sie zwei Tastenklicks des Zündschalters mit dem Schlüssel ab, und endet mit dem Schlüssel auf.
          Hinweis: Ein “88” kann bei Schlüssel im Armaturenbrett zeigt sich auf, Das ist ein normaler Einschalt-Test des Anzeige.
        5. Die Ganganzeige blinkt einen soliden „PD“ (Produktdiagnosemodus) und der Modus wird aktiviert.
        6. Biegen Sie den Kabelbaum und Stecker und versuchen, den Fehler zu erstellen. Wenn ein Fehler wird aktiv bei PDM, Serviceranger wird die Störung mit dem Status Aktiv angezeigt.
        7. Wenn ein Fehler wird aktiv bei PDM, Serviceranger wird die Störung mit dem Status Aktiv angezeigt.
        8. Wird ein Fehler erkannt wird, Ausgang PDM-Modus und die entsprechende Fehlercode Fehlerbehebungsverfahren durchführen. Siehe Fehlercode Isolierungsverfahren Index unten.
          Hinweis:
          Aktive Codes während des PDM-Modus wird nicht als inaktiv gespeichert werden.
        9. Zum Verlassen der PDM-Modus, Machen Sie das System herunter, indem Sie die Taste ausschalten.

[/fusion_text][fusion_text columns=”” column_min_width=”” column_spacing=”” rule_style=defaultrule_size=”” rule_color=”” hide_on_mobile=small-visibility,medium-visibility,large-visibilityclass=”” id=””]

PDM wird nur mit den folgenden Inaktive Codes arbeiten

9, 10, 14, 16, 17, 18, 19, 22, 24, 32, 33, 34, 35, 36, 38, 39, 40, 48, 49, 50, 51, 52, 56, 58, 59, 60, 61, 63, 76, 87, 88, 89, 95, 118

[/fusion_text][/fusion_builder_column][/fusion_builder_row][/fusion_builder_container][fusion_builder_container hundred_percent=nohundred_percent_height=nohundred_percent_height_scroll=nohundred_percent_height_center_content=yesequal_height_columns=nomenu_anchor=”” hide_on_mobile=small-visibility,medium-visibility,large-visibilitystatus=publishedpublish_date=”” class=”” id=”” background_color=”” background_image=”” background_position=center centerbackground_repeat=no-repeatfade=nobackground_parallax=noneenable_mobile=noparallax_speed=”0.3″ video_mp4=”” video_webm=”” video_ogv=”” video_url=”” video_aspect_ratio=”16:9″ video_loop=yesvideo_mute=yesvideo_preview_image=”” border_size=”” border_color=”” border_style=solidmargin_top=”” margin_bottom=”” padding_top=”” padding_right=”” padding_bottom=”” padding_left=””][fusion_builder_row][fusion_builder_column type=”1_1layout=”1_1spacing=”” center_content=nolink=”” target=_selfmin_height=”” hide_on_mobile=small-visibility,medium-visibility,large-visibilityclass=”” id=”” background_color=”” background_image=”” background_image_id=”” background_position=left topbackground_repeat=no-repeathover_type=noneborder_size=”0″ border_color=”” border_style=solidborder_position=allpadding_top=”” padding_right=”” padding_bottom=”” padding_left=”” margin_top=”” margin_bottom=”” animation_type=”” animation_direction=leftanimation_speed=”0.3″ animation_offset=”” last=no”][fusion_text columns=”” column_min_width=”” column_spacing=”” rule_style=defaultrule_size=”” rule_color=”” hide_on_mobile=small-visibility,medium-visibility,large-visibilityclass=”” id=””]

die FMI (Fehler-Identifier)

[/fusion_text][fusion_text columns=”” column_min_width=”” column_spacing=”” rule_style=defaultrule_size=”” rule_color=”” hide_on_mobile=small-visibility,medium-visibility,large-visibilityclass=”” id=””]

die FMI (Fehler-Identifier) wird mit dem SPN verwendet entlang spezifische Informationen zu liefern, die zu einem Diagnose-Fehlercode beziehen (DTC). Die FMI kann darauf hindeuten, dass ein Problem mit einer elektronischen Schaltung oder einer elektronischen Komponente erfaßt worden ist. Die FMI kann auch anzeigen, dass ein abnormaler Betriebszustand erkannt wurde.

[/fusion_text][fusion_text columns=”” column_min_width=”” column_spacing=”” rule_style=defaultrule_size=”” rule_color=”” hide_on_mobile=small-visibility,medium-visibility,large-visibilityclass=”” id=””]

IWF – Beschreibung

[/fusion_text][fusion_text columns=”2″ column_min_width=”” column_spacing=”” rule_style=defaultrule_size=”” rule_color=”” hide_on_mobile=small-visibility,medium-visibility,large-visibilityclass=”” id=””]

0 Hoch - schwerwiegendsten
1 Low - schwerwiegendsten
2 erratisch, Wechselnd, oder falsch
3 Spannung Above Normal
4 Spannung unter normalen
5 Current Below normal
6 Aktuelle Above Normal
7 Reagiert nicht ordnungsgemäß
8 abnormal Frequenz, Impulsbreite, oder Period
9 Abnormal Aktualisierungsrate
10 Abnormal Rate of Change
11 Andere Fehler-Möglichkeits-
12 Fehler
13 Aus Kalibrierung
14 Spezielle Anleitung
15 Hoch - mildeste
16 Hoch - mittlere Schwere
17 Low - mildeste
18 Low - mittlere Schwere
19 Datenfehler
20 Daten Drifted Hoch
21 Daten Drifted Low
31 -

[/fusion_text][/fusion_builder_column][/fusion_builder_row][/fusion_builder_container][fusion_builder_container hundred_percent=nohundred_percent_height=nohundred_percent_height_scroll=nohundred_percent_height_center_content=yesequal_height_columns=nomenu_anchor=”” hide_on_mobile=small-visibility,medium-visibility,large-visibilitystatus=publishedpublish_date=”” class=”” id=”” background_color=”” background_image=”” background_position=center centerbackground_repeat=no-repeatfade=nobackground_parallax=noneenable_mobile=noparallax_speed=”0.3″ video_mp4=”” video_webm=”” video_ogv=”” video_url=”” video_aspect_ratio=”16:9″ video_loop=yesvideo_mute=yesvideo_preview_image=”” border_size=”” border_color=”” border_style=solidmargin_top=”” margin_bottom=”” padding_top=”” padding_right=”” padding_bottom=”” padding_left=””][fusion_builder_row][fusion_builder_column type=”1_1layout=”1_1spacing=”” center_content=nolink=”” target=_selfmin_height=”” hide_on_mobile=small-visibility,medium-visibility,large-visibilityclass=”” id=”” background_color=”” background_image=”” background_image_id=”” background_position=left topbackground_repeat=no-repeathover_type=noneborder_size=”0″ border_color=”” border_style=solidborder_position=allborder_radius=”” box_shadow=nodimension_box_shadow=”” box_shadow_blur=”0″ box_shadow_spread=”0″ box_shadow_color=”” box_shadow_style=”” padding_top=”” padding_right=”” padding_bottom=”” padding_left=”” margin_top=”” margin_bottom=”” animation_type=”” animation_direction=leftanimation_speed=”0.3″ animation_offset=”” last=no”][fusion_text columns=”” column_min_width=”” column_spacing=”” rule_style=defaultrule_size=”” rule_color=”” hide_on_mobile=small-visibility,medium-visibility,large-visibilityclass=”” id=””]

Ansicht Eaton Fuller Getriebe Fehlercodes Isolationsverfahren Index

[/fusion_text][/fusion_builder_column][fusion_builder_column type=”1_1layout=”1_1spacing=”” center_content=nolink=”” target=_selfmin_height=”” hide_on_mobile=small-visibility,medium-visibility,large-visibilityclass=”” id=”” background_image_id=”” background_color=”” background_image=”” background_position=left topundefined=”” background_repeat=no-repeathover_type=noneborder_size=”0″ border_color=”” border_style=solidborder_position=allpadding_top=”” padding_right=”” padding_bottom=”” padding_left=”” margin_top=”” margin_bottom=”” animation_type=”” animation_direction=leftanimation_speed=”0.3″ animation_offset=”” last=no”][fusion_separator style_type=nonehide_on_mobile=small-visibility,medium-visibility,large-visibilityclass=”” id=”” sep_color=”” top_margin=”20″ bottom_margin=”20″ border_size=”0″ icon=”” icon_circle=”” icon_circle_color=”” width=”” alignment=center” /][fusion_text columns=”” column_min_width=”” column_spacing=”” rule_style=defaultrule_size=”” rule_color=”” class=”” id=””]

Bauanleitungen und andere freie Ressourcen finden Sie auf unserer Download-Seite

Übertragungs Handbücher pdf

[/fusion_text][fusion_button link=https://globaltransmissionsupply.com/transmission-manualstext_transform=uppercasetitle=”Diagramme, Handbücher und Teil PDFs” target=_selflink_attributes=”Diagramme, Handbücher und Teil PDFs” alignment=centermodal=”” hide_on_mobile=small-visibility,medium-visibility,large-visibilityclass=”” id=”” color=custombutton_gradient_top_color=”#000000″ button_gradient_bottom_color=”#000000″ button_gradient_top_color_hover=”#f44336button_gradient_bottom_color_hover=”#f44336accent_color=”#ffffffaccent_hover_color=”#fffffftype=flatbevel_color=”” border_width=”” size=mediumstretch=defaultshape=squareicon=”” icon_position=lefticon_divider=noanimation_type=”” animation_direction=leftanimation_speed=”0.3″ animation_offset=””]Diagramme, Handbücher und Teile PDFs >>>[/fusion_button][fusion_separator style_type=nonehide_on_mobile=small-visibility,medium-visibility,large-visibilityclass=”” id=”” sep_color=”” top_margin=”20″ bottom_margin=”20″ border_size=”0″ icon=”” icon_circle=”” icon_circle_color=”” width=”” alignment=center” /][/fusion_builder_column][/fusion_builder_row][/fusion_builder_container][fusion_global id=”13788″]