[fusion_builder_container hundred_percent=nohundred_percent_height=nohundred_percent_height_scroll=nohundred_percent_height_center_content=yesequal_height_columns=nomenu_anchor=”” hide_on_mobile=small-visibility,medium-visibility,large-visibilitystatus=publishedpublish_date=”” class=”” id=”” background_color=”” background_image=”” background_position=center centerbackground_repeat=no-repeatfade=nobackground_parallax=noneenable_mobile=noparallax_speed=”0.3″ video_mp4=”” video_webm=”” video_ogv=”” video_url=”” video_aspect_ratio=”16:9″ video_loop=yesvideo_mute=yesvideo_preview_image=”” border_size=”” border_color=”” border_style=solidmargin_top=”35″ margin_bottom=”” padding_top=”” padding_right=”” padding_bottom=”” padding_left=””][fusion_builder_row][fusion_builder_column type=”1_1layout=”1_1spacing=”” center_content=nolink=”” target=_selfmin_height=”” hide_on_mobile=small-visibility,medium-visibility,large-visibilityclass=”” id=”” background_color=”” background_image=”” background_image_id=”” background_position=left topbackground_repeat=no-repeathover_type=noneborder_size=”0″ border_color=”” border_style=solidborder_position=allpadding_top=”” padding_right=”” padding_bottom=”” padding_left=”” margin_top=”” margin_bottom=”” animation_type=”” animation_direction=leftanimation_speed=”0.3″ animation_offset=”” last=no”][fusion_text columns=”” column_min_width=”” column_spacing=”” rule_style=defaultrule_size=”” rule_color=”” hide_on_mobile=small-visibility,medium-visibility,large-visibilityclass=”” id=””]

이튼 풀러 하이브리드 전송 오류 코드 116 – 고전압 릴레이 고장 – (MY09 시스템)

[/fusion_text][/fusion_builder_column][/fusion_builder_row][/fusion_builder_container][fusion_builder_container hundred_percent=nohundred_percent_height=nohundred_percent_height_scroll=nohundred_percent_height_center_content=yesequal_height_columns=nomenu_anchor=”” hide_on_mobile=small-visibility,medium-visibility,large-visibilitystatus=publishedpublish_date=”” class=”” id=”” background_color=”” background_image=”” background_position=center centerbackground_repeat=no-repeatfade=nobackground_parallax=noneenable_mobile=noparallax_speed=”0.3″ video_mp4=”” video_webm=”” video_ogv=”” video_url=”” video_aspect_ratio=”16:9″ video_loop=yesvideo_mute=yesvideo_preview_image=”” border_size=”” border_color=”” border_style=solidmargin_top=”” margin_bottom=”” padding_top=”” padding_right=”” padding_bottom=”” padding_left=””][fusion_builder_row][fusion_builder_column type=”1_1layout=”1_1spacing=”” center_content=nolink=”” target=_selfmin_height=”” hide_on_mobile=small-visibility,medium-visibility,large-visibilityclass=”” id=”” background_color=”” background_image=”” background_image_id=”” background_position=left topbackground_repeat=no-repeathover_type=noneborder_size=”0″ border_color=”” border_style=solidborder_position=allpadding_top=”” padding_right=”” padding_bottom=”” padding_left=”” margin_top=”” margin_bottom=”” animation_type=”” animation_direction=leftanimation_speed=”0.3″ animation_offset=”” last=no”][fusion_text columns=”” column_min_width=”” column_spacing=”” rule_style=defaultrule_size=”” rule_color=”” hide_on_mobile=small-visibility,medium-visibility,large-visibilityclass=”” id=””]

이튼 하이브리드 드라이브 시스템 모델에 대한 코드를 고장 (MY09) EH-8E406A-U / P, EH-8E406A-UP, EH-8E406A-UPG, EH-8E406A-CD, EH-8E406A-CDG, EH-8E406A-CDR, EH-8E406A-T, EH-6E706B-CD, EH-6E706B-P 및 EH-6E706B-UPG. 테스트하는 방법에 대한 자세한 내용은 아래 내용을 참조, 지우고 프라이트에 대한 오류 코드 오류를 수정, 맥, PETERBILT, 켄 월스, 볼보, 국제 노동자 동맹, 및 대형 트럭 및 장비. 고전압 릴레이는 전원 내부에 위치
전자 캐리어 (PEC) 릴레이 박스 단위. 하나의 프리 차지 릴레이는 긍정적 인 측면에있다, 정극에 추가 릴레이, 세 릴레이 총 부정적. 시스템이 꺼져있을 때이 릴레이는 일반적으로 열려. 릴레이는 인버터를 통해 제어된다.

코드 결함 116 – 높은 전압 릴레이 고장 검출

시스템이 오류를 감지하기 전에 다음과 같은 전제 조건이 충족되어야합니다:

  • 인버터 점화 전압보다 큰 7 볼트보다 작 16 볼트.

노트: 비활성 코드 문제를 해결할 때 참조 제품 진단 모드 (PDM)

조건은 오류 코드가 활성 세트

  • IMF 3 경우에 짧은 설정된 12 볼트는 고전압 릴레이의 제어 측에서 검출.
  • IMF 4 접지에 짧은 고전압 계전기의 제어 측에서 검출 될 때 설정된.
  • IMF 5 및 FMI 10 개방 회로는 고전압 릴레이의 제어 측에서 검출 될 때 설정된.
  • IMF 7 및 FMI 14 메인 릴레이 마이너스가되고, 인버터 커패시터 전압이 감소 미만 10 볼트 일 때 설정된 / 5 초 용량을 초기 전압보다 클 때 200 볼트.

대체 할 때 오류 코드 116 다음과 같은 조건이 발생 설정:

  • 앰버 "확인 하이브리드"빛 점등.
  • 오류가 하이브리드 제어 모듈에 저장됩니다 (HCM) 기억.
  • 하이브리드 시스템은 오프라인 될 것입니다.
  • 전송 기본값은 디젤 전용 모드 1로 기어를 시작합니다.

[/fusion_text][fusion_text columns=”” column_min_width=”” column_spacing=”” rule_style=defaultrule_size=”” rule_color=”” hide_on_mobile=small-visibility,medium-visibility,large-visibilityclass=”” id=””]

조건은 오류 코드 비활성을 설정하는

만 비활성 장애는 ServiceRanger를 사용하여 TECU 또는 HCM 역사에서 지울 수 있습니다. TECU은 후 자동으로 역사의 오류를 지 웁니다 200 시간. 그 오류가 비활성 된 후에 HCM 자동 역사에서 오류를 지 웁니다 200 시간.

이 오류 코드는 다음 중 하나에 의해 발생할 수 있습니다:

  • IMF 3, 4, 5, 7, 10, 14
    • HCM에 DC / DC 컨버터에서 전압 피드백 와이어
  • IMF 4
    • 릴레이 박스
    • 관성 스위치
    • 인버터
    • 인버터와 PEC 사이의 차량 배선 하네스
    • 홈페이지 고전압 서비스 퓨즈가 끊어되거나 누락
    • DC 고전압 케이블 인터록
    • PEC 레드 버튼 서비스 스위치

[/fusion_text][/fusion_builder_column][/fusion_builder_row][/fusion_builder_container][fusion_builder_container hundred_percent=nohundred_percent_height=nohundred_percent_height_scroll=nohundred_percent_height_center_content=yesequal_height_columns=nomenu_anchor=”” hide_on_mobile=small-visibility,medium-visibility,large-visibilitystatus=publishedpublish_date=”” class=”” id=”” background_color=”” background_image=”” background_position=center centerbackground_repeat=no-repeatfade=nobackground_parallax=noneenable_mobile=noparallax_speed=”0.3″ video_mp4=”” video_webm=”” video_ogv=”” video_url=”” video_aspect_ratio=”16:9″ video_loop=yesvideo_mute=yesvideo_preview_image=”” border_size=”” border_color=”” border_style=solidmargin_top=”” margin_bottom=”” padding_top=”” padding_right=”” padding_bottom=”” padding_left=””][fusion_builder_row][fusion_builder_column type=”1_1layout=”1_1spacing=”” center_content=nolink=”” target=_selfmin_height=”” hide_on_mobile=small-visibility,medium-visibility,large-visibilityclass=”” id=”” background_color=”” background_image=”” background_image_id=”” background_position=left topbackground_repeat=no-repeathover_type=noneborder_size=”0″ border_color=”” border_style=solidborder_position=allpadding_top=”” padding_right=”” padding_bottom=”” padding_left=”” margin_top=”” margin_bottom=”” animation_type=”” animation_direction=leftanimation_speed=”0.3″ animation_offset=”” last=no”][fusion_text columns=”” column_min_width=”” column_spacing=”” rule_style=defaultrule_size=”” rule_color=”” hide_on_mobile=small-visibility,medium-visibility,large-visibilityclass=”” id=””]

코드 결함 116 – 높은 전압 릴레이 오류 테스트

[/fusion_text][/fusion_builder_column][/fusion_builder_row][/fusion_builder_container][fusion_builder_container hundred_percent=nohundred_percent_height=nohundred_percent_height_scroll=nohundred_percent_height_center_content=yesequal_height_columns=nomenu_anchor=”” hide_on_mobile=small-visibility,medium-visibility,large-visibilitystatus=publishedpublish_date=”” class=”” id=”” background_color=”” background_image=”” background_position=center centerbackground_repeat=no-repeatfade=nobackground_parallax=noneenable_mobile=noparallax_speed=”0.3″ video_mp4=”” video_webm=”” video_ogv=”” video_url=”” video_aspect_ratio=”16:9″ video_loop=yesvideo_mute=yesvideo_preview_image=”” border_size=”” border_color=”” border_style=solidmargin_top=”” margin_bottom=”” padding_top=”” padding_right=”” padding_bottom=”” padding_left=””][fusion_builder_row][fusion_builder_column type=”1_1layout=”1_1spacing=”” center_content=nolink=”” target=_selfmin_height=”” hide_on_mobile=small-visibility,medium-visibility,large-visibilityclass=”” id=”” background_color=”” background_image=”” background_image_id=”” background_position=left topbackground_repeat=no-repeathover_type=noneborder_size=”0″ border_color=”” border_style=solidborder_position=allpadding_top=”” padding_right=”” padding_bottom=”” padding_left=”” margin_top=”” margin_bottom=”” animation_type=”” animation_direction=leftanimation_speed=”0.3″ animation_offset=”” last=no”][fusion_text columns=”” column_min_width=”” column_spacing=”” rule_style=defaultrule_size=”” rule_color=”” hide_on_mobile=small-visibility,medium-visibility,large-visibilityclass=”” id=””]

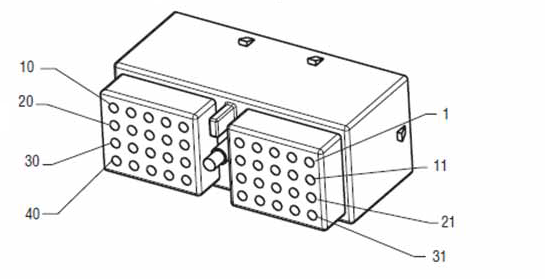
구성 요소 식별:

[/fusion_text][/fusion_builder_column][fusion_builder_column type=”1_2layout=”1_2spacing=”” center_content=nolink=”” target=_selfmin_height=”” hide_on_mobile=small-visibility,medium-visibility,large-visibilityclass=”” id=”” background_color=”” background_image=”” background_image_id=”” background_position=left topbackground_repeat=no-repeathover_type=noneborder_size=”0″ border_color=”” border_style=solidborder_position=allpadding_top=”” padding_right=”” padding_bottom=”” padding_left=”” margin_top=”” margin_bottom=”” animation_type=”” animation_direction=leftanimation_speed=”0.3″ animation_offset=”” last=no”][fusion_imageframe image_id=”14476|fullmax_width=”” style_type=”” blur=”” stylecolor=”” hover_type=nonebordersize=”” bordercolor=”” borderradius=”” align=centerlightbox=nogallery_id=”” lightbox_image=”” lightbox_image_id=”” alt=”Duetsch 40 방향 상대 커넥터 뷰 인버터 저전압 커넥터” link=”” linktarget=_selfhide_on_mobile=small-visibility,medium-visibility,large-visibilityclass=”” id=”” animation_type=”” animation_direction=leftanimation_speed=”0.3″ animation_offset=””]https://www.globaltransmissionsupply.com/wp-content/uploads/Duetsch-40-way-mating-connector-view.png[/fusion_imageframe][fusion_text columns=”” column_min_width=”” column_spacing=”” rule_style=defaultrule_size=”” rule_color=”” hide_on_mobile=small-visibility,medium-visibility,large-visibilityclass=”” id=””]

Duetsch 40 방향 상대 커넥터보기
(인버터 저전압 커넥터)

[/fusion_text][/fusion_builder_column][fusion_builder_column type=”1_2layout=”1_2spacing=”” center_content=nolink=”” target=_selfmin_height=”” hide_on_mobile=small-visibility,medium-visibility,large-visibilityclass=”” id=”” background_color=”” background_image=”” background_image_id=”” background_position=left topbackground_repeat=no-repeathover_type=noneborder_size=”0″ border_color=”” border_style=solidborder_position=allpadding_top=”” padding_right=”” padding_bottom=”” padding_left=”” margin_top=”” margin_bottom=”” animation_type=”” animation_direction=leftanimation_speed=”0.3″ animation_offset=”” last=no”][fusion_imageframe image_id=”14213|mediummax_width=”” style_type=”” blur=”” stylecolor=”” hover_type=nonebordersize=”” bordercolor=”” borderradius=”” align=centerlightbox=nogallery_id=”” lightbox_image=”” lightbox_image_id=”” alt=”상대 커넥터보기 독일어 19-방법 ” link=”” linktarget=_selfhide_on_mobile=small-visibility,medium-visibility,large-visibilityclass=”” id=”” animation_type=”” animation_direction=leftanimation_speed=”0.3″ animation_offset=””]https://www.globaltransmissionsupply.com/wp-content/uploads/Eaton-Fuller-Harness-Connector-View-300×289.jpg[/fusion_imageframe][fusion_text columns=”” column_min_width=”” column_spacing=”” rule_style=defaultrule_size=”” rule_color=”” hide_on_mobile=small-visibility,medium-visibility,large-visibilityclass=”” id=””]

상대 커넥터보기
(독일어 19 웨이 커넥터)

[/fusion_text][/fusion_builder_column][fusion_builder_column type=”1_1layout=”1_1spacing=”” center_content=nolink=”” target=_selfmin_height=”” hide_on_mobile=small-visibility,medium-visibility,large-visibilityclass=”” id=”” background_image_id=”” background_color=”#000000″ background_image=”” background_position=left topundefined=”” background_repeat=no-repeathover_type=noneborder_size=”0″ border_color=”” border_style=solidborder_position=allpadding_top=”” padding_right=”” padding_bottom=”” padding_left=”” margin_top=”20″ margin_bottom=”20″ animation_type=”” animation_direction=leftanimation_speed=”0.3″ animation_offset=”” last=no”][fusion_text columns=”” column_min_width=”” column_spacing=”” rule_style=defaultrule_size=”” rule_color=”” hide_on_mobile=small-visibility,medium-visibility,large-visibilityclass=”” id=””]

노트: 참고하여주십시오 이튼 하이브리드 구성 요소 및 커넥터 위치 MY09 시스템의 커넥터 위치.
[/fusion_text][/fusion_builder_column][fusion_builder_column type=”1_1layout=”1_1spacing=”” center_content=nolink=”” target=_selfmin_height=”” hide_on_mobile=small-visibility,medium-visibility,large-visibilityclass=”” id=”” background_color=”” background_image=”” background_image_id=”” background_position=left topbackground_repeat=no-repeathover_type=noneborder_size=”0″ border_color=”” border_style=solidborder_position=allpadding_top=”” padding_right=”” padding_bottom=”” padding_left=”” margin_top=”” margin_bottom=”” animation_type=”” animation_direction=leftanimation_speed=”0.3″ animation_offset=”” last=no”][fusion_imageframe image_id=”14672|fullmax_width=”” style_type=”” blur=”” stylecolor=”” hover_type=nonebordersize=”” bordercolor=”” borderradius=”” align=centerlightbox=nogallery_id=”” lightbox_image=”” lightbox_image_id=”” alt=”PEC MY09 시스템에 인버터” link=”” linktarget=_selfhide_on_mobile=small-visibility,medium-visibility,large-visibilityclass=”” id=”” animation_type=”” animation_direction=leftanimation_speed=”0.3″ animation_offset=””]https://www.globaltransmissionsupply.com/wp-content/uploads/Inverter-to-PEC-MY09.png[/fusion_imageframe][/fusion_builder_column][/fusion_builder_row][/fusion_builder_container][fusion_builder_container hundred_percent=nohundred_percent_height=nohundred_percent_height_scroll=nohundred_percent_height_center_content=yesequal_height_columns=nomenu_anchor=”” hide_on_mobile=small-visibility,medium-visibility,large-visibilitystatus=publishedpublish_date=”” class=”” id=”” background_color=”” background_image=”” background_position=center centerbackground_repeat=no-repeatfade=nobackground_parallax=noneenable_mobile=noparallax_speed=”0.3″ video_mp4=”” video_webm=”” video_ogv=”” video_url=”” video_aspect_ratio=”16:9″ video_loop=yesvideo_mute=yesvideo_preview_image=”” border_size=”” border_color=”” border_style=solidmargin_top=”” margin_bottom=”” padding_top=”” padding_right=”” padding_bottom=”” padding_left=””][fusion_builder_row][fusion_builder_column type=”1_1layout=”1_1spacing=”” center_content=nolink=”” target=_selfmin_height=”” hide_on_mobile=small-visibility,medium-visibility,large-visibilityclass=”” id=”” background_color=”” background_image=”” background_image_id=”” background_position=left topbackground_repeat=no-repeathover_type=noneborder_size=”0″ border_color=”” border_style=solidborder_position=allpadding_top=”” padding_right=”” padding_bottom=”” padding_left=”” margin_top=”” margin_bottom=”” animation_type=”” animation_direction=leftanimation_speed=”0.3″ animation_offset=”” last=no”][fusion_modal name=warnings_cautionstitle=”경고 & 주의 사항” size=largebackground=”” border_color=”” show_footer=yesclass=”” id=””]위험: 표시된 절차를 따르지 않을 경우 위험이 심각한 부상 또는 사망 할 것이다 나타냅니다.
경고: 경고는 즉각적인 위험을 나타냅니다, 당신이 표시된 절차를 따르지 않을 경우 심각한 부상으로 이어질 수있는.
주의: 주의는 표시된 절차를 따르지 않으면 차량이나 재산 피해가 발생할 수 있습니다 나타냅니다.

노트: 주 구성 요소 / 시스템의 진단 또는 수리에 도움이되는 추가 세부 사항을 표시.

부상을 방지하기 위해 지정된 순서로 지정된 절차를 따르십시오:

1. 고전압 콘은 차량 주위 및 잠금은 PEC에 설치되어있는 경우, 차량을 시작할 수 있어야 유일한 사람은 잠금 태그에 서명 한 사람이다.
2. 차량에 작업 또는 택시를 떠나기 전에 엔진이 실행되는 동안, 당신이 "N"에서 변속 레버를 배치해야합니다 주차 브레이크를 설정, 상기 바퀴를 차단.
3. 안전상의 이유로, 전에 항상 "N."에서 기어 위치를 선택에 서비스 브레이크를 참여
4. 차량은 항상 운전석에 착석 시작하기 전에, 변속 제어의 "N"을 선택, 및 주차 브레이크를 설정.
5. ePTO와 차량에서, 엔진 및 / 또는
모터 / 발전기는 ePTO 모드에서 시작할 수 있습니다. 유지 보수를 수행하거나 차량에 작동 마십시오, 이 모드에서.
6. 12-볼트 배터리 긍정적 (+) 음의 (-) 어떤 하이브리드 장착 차량에 모든 용접하기 전에 분리해야합니다.

주의: 장비의 고장 또는 손상을 방지하기 위해 지정된 순서로 지정된 절차를 따르십시오.
주의: 주차 브레이크를 해제하거나 공기 압력이 올바른 레벨이 될 때까지 기어를 선택하지 마십시오.
주의: "N"에서 개최에게 변속 레버를 견인하는 동안 변속기의 손상을 방지하고, 지상에서 구동 바퀴를 들거나 동력을 끊으려면.

고전압 경고 & 주의 사항

  • 이산화탄소 또는 드라이 화학 소화기를 사용하여.
  • 고전압 배선 오렌지 절연 또는 복잡한 튜브에 덮여와 커넥터에 경고 라벨에 표시되어.
  • 모든 Eaton® 하이브리드 디젤 / 전기 자동차가 표시됩니다 '하이브리드’ 차량의 외부에, 대시에 시프트 라벨과 함께.
  • 섀시 장착 복합 성분의 특정 위치를 참조 OEM.
  • 주황색 고전압 케이블로 절단하지 마십시오.
  • PEC를로 자르거나 열지 마십시오.
  • 로 절단 또는 DC / DC 컨버터를 열지 마십시오.
  • 로 절단 또는 인버터를 열지 마십시오.

버퍼 존이 설정되어야하며, 고압 고무 장갑을 (수업 0 가죽 보호와) 높은 전압에서 작업하기 전에 필요. 이 지침을 따르지 않을 경우 심각한 부상 또는 사망으로 이어질 수있는.
고전압 시스템에서 작업하는 동안 착용해야합니다 고무 절연 장갑 클래스입니다 0 가죽 보호와. 고무 장갑 페이지의 "진단 도구 / 서비스 간행물"에서 볼 수있는 고무 절연 장갑 테스트 절차에 따라 매주 사용하기 전에 테스트해야 6. 이 지침을 따르지 않을 경우 심각한 부상 또는 사망으로 이어질 수있는.
페이지의 "고전압 서비스 종료 및 전력 상승 절차"검사 또는 고전압 케이블 또는 구성 요소에서 작업하기 전에 4 따라야. 이 지침을 따르지 않을 경우 심각한 부상 또는 사망으로 이어질 수있는.
잠금 장치 및 꼬리표은 차량의 잠금 장치 및 꼬리표 배치 기술자에 의해 제거되어야. 이 지침을 따르지 않을 경우 심각한 부상 또는 사망으로 이어질 수있는.
고전압 고무 절연 장갑 (수업 0 가죽 보호와) 어떤 작업을 할 때 착용해야
고전압 케이블. 페이지의 "고전압 서비스 종료 및 전력 상승 절차" 4 어떤 고전압 케이블을 제거하기 전에 따라야합니다. 이 지침을 따르지 않을 경우 심각한 부상 또는 사망으로 이어질 수있는.
고전압 케이블과 배선은 주황색과 커넥터에 경고 라벨을 포함. 고전압 구성 요소는 레이블로 표시됩니다. 고전압 고무 절연 장갑 (수업 0 가죽 보호와) 이러한 구성 요소에 작업 할 때 사용되어야합니다. 이 지침을 따르지 않을 경우 심각한 부상 또는 사망으로 이어질 수있는.

고전압 서비스 종료 절차

고전압 서비스 종료 및 전력 상승 절차1. 에 따라 "고전압 작업 영역"절차.
2. PEC의 전면에있는 빨간색 PEC 서비스 스위치를 찾아 밀어 오프 스위치.
3. 서비스 스위치 커버를 제거하고 잠금 브래킷을 설치 (J48506).
4. 잠금 브래킷에 고정시킵니다 태그.
5. 오프 위치에서 움직이지 수 PEC 서비스 스위치를 확인하십시오.
6. 시스템이 최소 설정 허용 5 분 고전압 방전에.
7. ServiceRanger을 연결하고 데이터 모니터 PID를 볼 수 116 "고전압 배터리 잠재력."라고 사용 SPN 520323 J1939 연결을위한 "배터리 전압 RB" (릴레이 박스).
8. 전압은해야한다 30 볼트 이하. 전압이 이상이면 30 볼트, 차량에 작업하고 1-800-826-HELP에 Eaton® 연락하지 않습니다 (4357).
9. 시동 키를 끄고 수리 또는 문제 해결 단계로 진행.
노트: 전압은 키가 꺼져있을 때 제로로 떨어.

고전압 서비스 파워 업 절차

1. 자신의 고정 위치에 모든 고전압 커넥터를 설치.
2. 당신이 경우 사람이 차량에 작업, 잠금 브래킷 및 태그를 제거.
3. 서비스 스위치를 통해 잠금 브래킷을 다시 설치.
4. 서비스를 당겨 밖으로 전환하고 대한 차량 세트를하자 2 의사록.
5. Start vehicle when appropriate.[/fusion_modal][fusion_modal name=component_locationtitle=”이튼 하이브리드 구성 요소 및 커넥터 위치 ” size=largebackground=”#ffffffborder_color=”” show_footer=yesclass=”” id=””]

이튼 하이브리드 구성 요소 및 커넥터 위치 MY08 시스템

[/fusion_modal][fusion_modal name=component_location2title=”이튼 하이브리드 구성 요소 및 커넥터 위치 MY09 시스템” size=largebackground=”#ffffffborder_color=”” show_footer=yesclass=”” id=””]

이튼 하이브리드 구성 요소 및 커넥터 위치 MY09 시스템

[/fusion_modal][/fusion_builder_column][/fusion_builder_row][/fusion_builder_container][fusion_builder_container hundred_percent=nohundred_percent_height=nohundred_percent_height_scroll=nohundred_percent_height_center_content=yesequal_height_columns=nomenu_anchor=”” hide_on_mobile=small-visibility,medium-visibility,large-visibilitystatus=publishedpublish_date=”” class=”” id=”” background_color=”” background_image=”” background_position=center centerbackground_repeat=no-repeatfade=nobackground_parallax=noneenable_mobile=noparallax_speed=”0.3″ video_mp4=”” video_webm=”” video_ogv=”” video_url=”” video_aspect_ratio=”16:9″ video_loop=yesvideo_mute=yesvideo_preview_image=”” border_size=”” border_color=”” border_style=solidmargin_top=”” margin_bottom=”” padding_top=”” padding_right=”” padding_bottom=”” padding_left=””][fusion_builder_row][fusion_builder_column type=”1_1layout=”1_1spacing=”” center_content=nolink=”” target=_selfmin_height=”” hide_on_mobile=small-visibility,medium-visibility,large-visibilityclass=”” id=”” background_color=”” background_image=”” background_image_id=”” background_position=left topbackground_repeat=no-repeathover_type=noneborder_size=”0″ border_color=”” border_style=solidborder_position=allpadding_top=”” padding_right=”” padding_bottom=”” padding_left=”” margin_top=”” margin_bottom=”” animation_type=”” animation_direction=leftanimation_speed=”0.3″ animation_offset=”” last=no”][fusion_content_boxes layout=clean-horizontalcolumns=”2″ title_size=”18pxheading_size=”3″ title_color=”#ffffffbody_color=”#ffffffbackgroundcolor=”#4f4f4ficon=”” iconflip=”” iconrotate=”” iconspin=noiconcolor=”” icon_circle=”” icon_circle_radius=”” circlecolor=”” circlebordersize=”” circlebordercolor=”” outercirclebordersize=”” outercirclebordercolor=”” icon_size=”” icon_hover_type=”” hover_accent_color=”” image=”” image_id=”” image_width=”” image_height=”” link_type=”” button_span=”” link_area=”” link_target=”” icon_align=leftanimation_type=”” animation_delay=”” animation_offset=”” animation_direction=leftanimation_speed=”0.3″ margin_top=”” margin_bottom=”” hide_on_mobile=small-visibility,medium-visibility,large-visibilityclass=”” id=””][fusion_content_box title=STEP 1.Verify FMIS 존재.backgroundcolor=”” icon=”” iconflip=”” iconrotate=”” iconspin=noiconcolor=”” circlecolor=”” circlebordersize=”” circlebordercolor=”” outercirclebordersize=”” outercirclebordercolor=”” image=”” image_id=”” image_width=”” image_height=”” link=”” linktext=”자세히보기” link_target=”” animation_type=”” animation_direction=leftanimation_speed=”0.3″ animation_offset=””]

  1. 검토하고에 따라 경고 & 주의 사항.
  2. 9 방법 진단 커넥터를 사용하여 ServiceRanger 사용하여 Active 오류 코드와 FMIS 검색.
  3. ServiceRanger 사용, J1939 데이터 HV 배터리에서 "데이터 모니터"에 기록 측정: 매개 변수 520250 HV Battery1 잠재적 전압 및 매개 변수 520323 배터리 전압 RB. 어떤이있는 경우 기록 전압 단계에 키 동안 배터리 전압 RB에 전압을보기.
  4. 어떤 FMIS이 존재?
    • 오류 코드의 경우 116 IMF 3 목록에, 단계로 이동 2.
    • 오류 코드의 경우 116 IMF 4 목록에, 단계로 이동 4.
    • 오류 코드의 경우 116 IMF 5 또는 10 목록에, 단계로 이동 6.
    • 오류 코드의 경우 116 IMF 7 목록에, 단계로 이동 13.

[/fusion_content_box][fusion_content_box title=단계 2. 수리 확인.backgroundcolor=”” icon=”” iconflip=”” iconrotate=”” iconspin=”” iconcolor=”” circlecolor=”” circlebordersize=”” circlebordercolor=”” outercirclebordersize=”” outercirclebordercolor=”” image=”” image_id=”” image_width=”” image_height=”” link=”” linktext=”” link_target=”” animation_type=”” animation_direction=leftanimation_speed=”0.3″ animation_offset=””]

  1. 키 오프, 기다림 1 분.
  2. 40 웨이 인버터 커넥터를 분리.
  3. 키 (이것은 오류 코드를 설정합니다 88, 수리 후 명확한 결함).
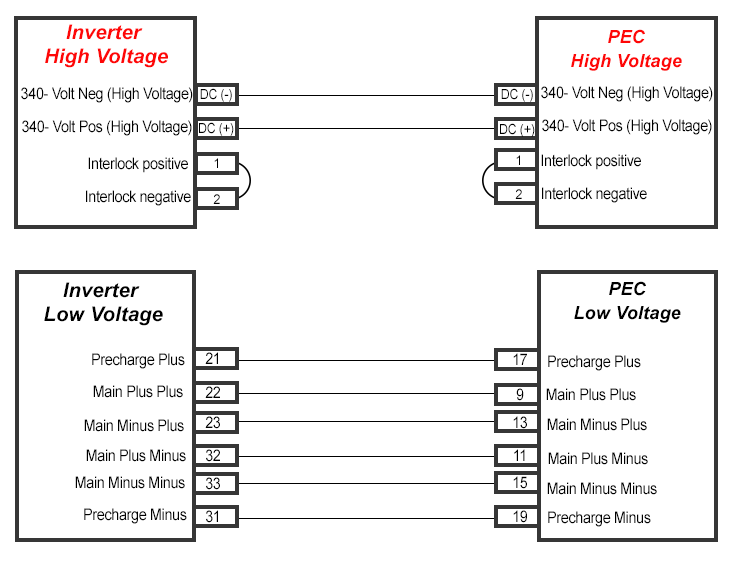
  4. 자동차 하네스, 핀에 임의의 전압을 확인 21, 31, 22, 32, 23 과 33 접지:
    • 어떤 전압이 발견되면, PEC에 19 웨이 커넥터를 제거하고 인버터 40 핀에서 전압 다시 확인, 다음 단계로 이동 3.
    • 전압이 여전히 존재하는 경우, 인버터와 40 핀 사이의 수리 차량, 다음 단계로 이동 3.
    • 전압이 사라 경우, 단계로 이동 3

[/fusion_content_box][/fusion_content_boxes][fusion_content_boxes layout=clean-horizontalcolumns=”2″ title_size=”18pxheading_size=”3″ title_color=”#ffffffbody_color=”#ffffffbackgroundcolor=”#4f4f4ficon=”” iconflip=”” iconrotate=”” iconspin=noiconcolor=”” icon_circle=”” icon_circle_radius=”” circlecolor=”” circlebordersize=”” circlebordercolor=”” outercirclebordersize=”” outercirclebordercolor=”” icon_size=”” icon_hover_type=”” hover_accent_color=”” image=”” image_id=”” image_width=”” image_height=”” link_type=”” button_span=”” link_area=”” link_target=”” icon_align=leftanimation_type=”” animation_delay=”” animation_offset=”” animation_direction=leftanimation_speed=”0.3″ margin_top=”” margin_bottom=”” hide_on_mobile=small-visibility,medium-visibility,large-visibilityclass=”” id=””][fusion_content_box title=단계 3. 접지 PEC 커넥터 회로의 연속성을 확인.backgroundcolor=”” icon=”” iconflip=”” iconrotate=”” iconspin=noiconcolor=”” circlecolor=”” circlebordersize=”” circlebordercolor=”” outercirclebordersize=”” outercirclebordercolor=”” image=”” image_id=”” image_width=”” image_height=”” link=”” linktext=”자세히보기” link_target=”” animation_type=”” animation_direction=leftanimation_speed=”0.3″ animation_offset=””]

  1. 1. 키 오프.
    2. PEC 19 웨이 커넥터를 분리 (빨간색 서비스 스위치는 여전히 꺼내해야).
    3. 다음 19 웨이 커넥터 단자에 저항을 측정:

    • 핀 9 핀을 꼽는 6 및 핀 9 핀을 꼽는 12
    • 핀 13 핀을 꼽는 6 및 핀 13 핀을 꼽는 12
    • 핀 17 핀을 꼽는 6 및 핀 17 핀을 꼽는 12
      • 개방 회로의 경우, 단계로 이동 2.
      • 어떤 저항이 발견되면, 릴레이 박스를 교체, 다음 단계로 이동 14.

[/fusion_content_box][fusion_content_box title=단계 4. 인버터 커넥터 회로의 연속성을 확인.backgroundcolor=”” icon=”” iconflip=”” iconrotate=”” iconspin=”” iconcolor=”” circlecolor=”” circlebordersize=”” circlebordercolor=”” outercirclebordersize=”” outercirclebordercolor=”” image=”” image_id=”” image_width=”” image_height=”” link=”” linktext=”” link_target=”” animation_type=”” animation_direction=leftanimation_speed=”0.3″ animation_offset=””]

  1. 키 오프.
  2. 인버터 40 웨이 커넥터를 분리 (19-PEC에서 웨이 커넥터가 빨간색 서비스 스위치에 연결되어야합니다 꺼내).
  3. 자동차 하네스, 핀에 접지 저항 확인 21 접지, 핀 22 지상과 핀에 23 접지:
    • 접지에 인버터 커넥터에서 어떤 저항이 발견되면, PEC 19 웨이 커넥터를 분리하고 OEM 40 웨이 커넥터를 다시 확인.
    • 저항은 여전히 ​​19 웨이로 발견되면 분리, 차량 하네스를 복구, 다음 단계로 이동 14.
    • 저항이 19 웨이로 간 경우 분리, 단계로 이동 5.
    • 미터는 OL 또는 개방 회로를 읽는 경우, 인버터를 교체, 다음 단계로 이동 14.

[/fusion_content_box][/fusion_content_boxes][fusion_content_boxes layout=clean-horizontalcolumns=”2″ title_size=”18pxheading_size=”3″ title_color=”#ffffffbody_color=”#ffffffbackgroundcolor=”#4f4f4ficon=”” iconflip=”” iconrotate=”” iconspin=noiconcolor=”” icon_circle=”” icon_circle_radius=”” circlecolor=”” circlebordersize=”” circlebordercolor=”” outercirclebordersize=”” outercirclebordercolor=”” icon_size=”” icon_hover_type=”” hover_accent_color=”” image=”” image_id=”” image_width=”” image_height=”” link_type=”” button_span=”” link_area=”” link_target=”” icon_align=leftanimation_type=”” animation_delay=”” animation_offset=”” animation_direction=leftanimation_speed=”0.3″ margin_top=”” margin_bottom=”” hide_on_mobile=small-visibility,medium-visibility,large-visibilityclass=”” id=””][fusion_content_box title=단계 5. 접지 PEC 커넥터 회로의 연속성을 확인.backgroundcolor=”” icon=”” iconflip=”” iconrotate=”” iconspin=noiconcolor=”” circlecolor=”” circlebordersize=”” circlebordercolor=”” outercirclebordersize=”” outercirclebordercolor=”” image=”” image_id=”” image_width=”” image_height=”” link=”” linktext=”자세히보기” link_target=”” animation_type=”” animation_direction=leftanimation_speed=”0.3″ animation_offset=””]

  1. 키 오프.
  2. PEC 19 웨이 커넥터를 분리.
  3. PEC 19 웨이 커넥터에, 법안:
    • 핀 9, 핀 13 및 핀 17 접지
    • 핀 9 핀을 꼽는 7, 핀 9 핀을 꼽는 10, 핀 9 PEC 장착 스터드에
    • 핀 13 핀을 꼽는 7, 핀 13 핀을 꼽는 14, 핀 13 PEC 장착 스터드에
    • 핀 17 핀을 꼽는 7, 핀 17 핀을 꼽는 14, 핀 17 PEC 장착 스터드에
      • 어떤 저항은 접지에 PEC 핀에서 발견 된 경우, 릴레이 박스를 교체. TRSM2000에서 MY09 PEC 고전압 릴레이 박스 제거 및 설치 절차를 참조하십시오, 다음 단계로 이동 14.
      • 미터는 OL을 읽는 경우, 재시험이 필요합니다, 단계로 이동 4.

[/fusion_content_box][fusion_content_box title=단계 6. PEC 커넥터 회로의 연속성을 확인.backgroundcolor=”” icon=”” iconflip=”” iconrotate=”” iconspin=”” iconcolor=”” circlecolor=”” circlebordersize=”” circlebordercolor=”” outercirclebordersize=”” outercirclebordercolor=”” image=”” image_id=”” image_width=”” image_height=”” link=”” linktext=”” link_target=”” animation_type=”” animation_direction=leftanimation_speed=”0.3″ animation_offset=””]

  1. 키 오프.
  2. PEC 19 웨이 커넥터를 분리. (PEC 레드 서비스 버튼 꺼내해야합니다.)(아직 "하이브리드 시스템 종료 절차"를 수행하지 마십시오.)
  3. PEC 커넥터에 대한 저항을 측정:
    • 핀 9 핀을 꼽는 11
    • 핀 13 핀을 꼽는 15
    • 핀 17 핀을 꼽는 19
      • 만약 핀 사이의 저항 9 및 핀 11, 및 핀 13 핀을 꼽는 15 각 33-37 옴의 저항 핀은 17 핀을 꼽는 19 112-122 옴, 단계로 이동 7.
      • 어떠한 저항 범위 밖에 있으면, 높은 전압 퓨즈에 의해 공기 필터 구멍 내부 또는 후면 액세스 패널에있는 관성 스위치를 재설정, 다음 단계로 이동 14.

[/fusion_content_box][/fusion_content_boxes][fusion_content_boxes layout=clean-horizontalcolumns=”2″ title_size=”18pxheading_size=”3″ title_color=”#ffffffbody_color=”#ffffffbackgroundcolor=”#4f4f4ficon=”” iconflip=”” iconrotate=”” iconspin=noiconcolor=”” icon_circle=”” icon_circle_radius=”” circlecolor=”” circlebordersize=”” circlebordercolor=”” outercirclebordersize=”” outercirclebordercolor=”” icon_size=”” icon_hover_type=”” hover_accent_color=”” image=”” image_id=”” image_width=”” image_height=”” link_type=”” button_span=”” link_area=”” link_target=”” icon_align=leftanimation_type=”” animation_delay=”” animation_offset=”” animation_direction=leftanimation_speed=”0.3″ margin_top=”” margin_bottom=”” hide_on_mobile=small-visibility,medium-visibility,large-visibilityclass=”” id=””][fusion_content_box title=단계 7. OEM이 케이블의 고전압 케이블 인터록을 확인.backgroundcolor=”” icon=”” iconflip=”” iconrotate=”” iconspin=noiconcolor=”” circlecolor=”” circlebordersize=”” circlebordercolor=”” outercirclebordersize=”” outercirclebordercolor=”” image=”” image_id=”” image_width=”” image_height=”” link=”” linktext=”자세히보기” link_target=”” animation_type=”” animation_direction=leftanimation_speed=”0.3″ animation_offset=””]

  1. 관성 스위치가 OK인지 확인.
  2. 은 OEM 케이블에 인터록 핀의 저항을 측정.
    위험: 만나다 고전압 서비스 종료 및 전력 상승 절차. 충격을 방지하기 위해 절차를 따르십시오, 잘못 취급 고전압에서 굽거나 사망.

    • 저항은 0-0.3 옴 경우, 릴레이 박스를 교체, 다음 단계로 이동 9.
    • 저항은 OL 인 경우, 고전압 DC 케이블을 교체, 다음 단계로 이동 8.

[/fusion_content_box][fusion_content_box title=단계 8. 접지 PEC 커넥터 회로의 연속성을 확인.backgroundcolor=”” icon=”” iconflip=”” iconrotate=”” iconspin=”” iconcolor=”” circlecolor=”” circlebordersize=”” circlebordercolor=”” outercirclebordersize=”” outercirclebordercolor=”” image=”” image_id=”” image_width=”” image_height=”” link=”” linktext=”” link_target=”” animation_type=”” animation_direction=leftanimation_speed=”0.3″ animation_offset=””]

  1. PEC 커넥터에 대한 저항을 측정 (빨간색 서비스 버튼 스위치를 빼낸다):
    • 핀 9 핀을 꼽는 11
    • 핀 17 핀을 꼽는 19
      • 어떤 저항 OL 인 경우, 릴레이 박스를 교체 (배선 교체하기 전에 릴레이 박스에 들어가는 검사), 다음 단계로 이동 9.

[/fusion_content_box][/fusion_content_boxes][fusion_content_boxes layout=clean-horizontalcolumns=”2″ title_size=”18pxheading_size=”3″ title_color=”#ffffffbody_color=”#ffffffbackgroundcolor=”#4f4f4ficon=”” iconflip=”” iconrotate=”” iconspin=noiconcolor=”” icon_circle=”” icon_circle_radius=”” circlecolor=”” circlebordersize=”” circlebordercolor=”” outercirclebordersize=”” outercirclebordercolor=”” icon_size=”” icon_hover_type=”” hover_accent_color=”” image=”” image_id=”” image_width=”” image_height=”” link_type=”” button_span=”” link_area=”” link_target=”” icon_align=leftanimation_type=”” animation_delay=”” animation_offset=”” animation_direction=leftanimation_speed=”0.3″ margin_top=”” margin_bottom=”” hide_on_mobile=small-visibility,medium-visibility,large-visibilityclass=”” id=””][fusion_content_box title=단계 9. backgroundcolor=”” icon=”” iconflip=”” iconrotate=”” iconspin=noiconcolor=”” circlecolor=”” circlebordersize=”” circlebordercolor=”” outercirclebordersize=”” outercirclebordercolor=”” image=”” image_id=”” image_width=”” image_height=”” link=”” linktext=”자세히보기” link_target=”” animation_type=”” animation_direction=leftanimation_speed=”0.3″ animation_offset=””]

  1. 키 오프.
  2. 차량은 수출 전원 PEC가 장착되어있는 경우, 페이지의 "고전압 서비스 종료 및 전력 상승 절차"를 수행 4, 다음 PEC에서 고전압 DC / DC 및 / 또는 APG 고전압 케이블을 제거. 인터 캡 가능한 경우 설치:
    • 차량은 수출 전원 장착되지 않은 경우, 단계로 이동 11.

[/fusion_content_box][fusion_content_box title=단계 10. backgroundcolor=”” icon=”” iconflip=”” iconrotate=”” iconspin=”” iconcolor=”” circlecolor=”” circlebordersize=”” circlebordercolor=”” outercirclebordersize=”” outercirclebordercolor=”” image=”” image_id=”” image_width=”” image_height=”” link=”” linktext=”” link_target=”” animation_type=”” animation_direction=leftanimation_speed=”0.3″ animation_offset=””]

  1. DC / DC 및 APG 고전압 케이블이 제거 된 후, 빨간색 서비스 스위치 및 연결을 꺼내 19- PEC에서 웨이 커넥터.
  2. 키:
    • 오류 코드 116 / FMI하는 경우 5 활성 상태, 단계로 이동 12.
    • 오류 코드 116 / FMI하는 경우 5 사라, 단계로 이동 14.

[/fusion_content_box][/fusion_content_boxes][fusion_content_boxes layout=clean-horizontalcolumns=”2″ title_size=”18pxheading_size=”3″ title_color=”#ffffffbody_color=”#ffffffbackgroundcolor=”#4f4f4ficon=”” iconflip=”” iconrotate=”” iconspin=noiconcolor=”” icon_circle=”” icon_circle_radius=”” circlecolor=”” circlebordersize=”” circlebordercolor=”” outercirclebordersize=”” outercirclebordercolor=”” icon_size=”” icon_hover_type=”” hover_accent_color=”” image=”” image_id=”” image_width=”” image_height=”” link_type=”” button_span=”” link_area=”” link_target=”” icon_align=leftanimation_type=”” animation_delay=”” animation_offset=”” animation_direction=leftanimation_speed=”0.3″ margin_top=”” margin_bottom=”” hide_on_mobile=small-visibility,medium-visibility,large-visibilityclass=”” id=””][fusion_content_box title=단계 11. backgroundcolor=”” icon=”” iconflip=”” iconrotate=”” iconspin=noiconcolor=”” circlecolor=”” circlebordersize=”” circlebordercolor=”” outercirclebordersize=”” outercirclebordercolor=”” image=”” image_id=”” image_width=”” image_height=”” link=”” linktext=”자세히보기” link_target=”” animation_type=”” animation_direction=leftanimation_speed=”0.3″ animation_offset=””]

  1. 키 오프.
  2. PEC로 다시 DC / DC 및 / 또는 APG 케이블을 연결하고 확인하는 오류 코드 116 / FMI 5 활성 상태:
    • 활성 계속하는 경우, 단계로 이동 12.
    • 비활성 상태 일 경우, PEC 내부 보조 릴레이는 용접. PEC 교체. MY09 전원 전기 캐리어를 참조하십시오 (PEC) 제거 및 설치, 대체 전원 전기 캐리어 (PEC) 제거 및 설치 또는 4- 배터리 전원 전기 캐리어 (PEC) TRSM2000에서 제거 및 설치 절차.
      또한, 부하 참조하에 중계 채팅을 일으키는 이른바 연동 연결을위한 보조 릴레이 회로 검사 코드 결함 118 – 보조 높은 전압 릴레이 제어 회로의 오류 회로 설명).
    • 수리 완료 후, 단계로 이동 14.

[/fusion_content_box][fusion_content_box title=단계 12. 인버터 커넥터 회로의 연속성을 확인. backgroundcolor=”” icon=”” iconflip=”” iconrotate=”” iconspin=”” iconcolor=”” circlecolor=”” circlebordersize=”” circlebordercolor=”” outercirclebordersize=”” outercirclebordercolor=”” image=”” image_id=”” image_width=”” image_height=”” link=”” linktext=”” link_target=”” animation_type=”” animation_direction=leftanimation_speed=”0.3″ animation_offset=””]

  1. PEC 19 웨이 커넥터를 연결합니다.
  2. 인버터 40 웨이 커넥터를 분리.
  3. 다음 핀에 인버터 (40)-방법 OEM 커넥터 터미널에서 저항을 측정:
    • 핀 21 핀을 꼽는 31
    • 핀 22 핀을 꼽는 32
    • 핀 23 핀을 꼽는 33
      • 만약 핀 사이의 저항 21 및 핀 31 112-122 옴 핀의 저항 22 핀을 꼽는 32, 및 핀 23 핀을 꼽는 33 각각 33 ~ 37 개 옴은, 인버터를 교체 (MY09 인버터 제거 및 설치를 참조하십시오), 다음 단계로 이동 14.
      • 저항이 범위를 벗어나면, 인버터와 PEC 사이의 차량 하네스를 복구, 다음 단계로 이동 14.

[/fusion_content_box][/fusion_content_boxes][fusion_content_boxes layout=clean-horizontalcolumns=”2″ title_size=”18pxheading_size=”3″ title_color=”#ffffffbody_color=”#ffffffbackgroundcolor=”#4f4f4ficon=”” iconflip=”” iconrotate=”” iconspin=noiconcolor=”” icon_circle=”” icon_circle_radius=”” circlecolor=”” circlebordersize=”” circlebordercolor=”” outercirclebordersize=”” outercirclebordercolor=”” icon_size=”” icon_hover_type=”” hover_accent_color=”#f41000image=”” image_id=”” image_width=”” image_height=”” link_type=”” button_span=”” link_area=”” link_target=”” icon_align=leftanimation_type=”” animation_delay=”” animation_offset=”” animation_direction=leftanimation_speed=”0.3″ margin_top=”” margin_bottom=”” hide_on_mobile=small-visibility,medium-visibility,large-visibilityclass=”” id=””][fusion_content_box title=단계 13. 측정 배터리 전압.backgroundcolor=”” icon=”” iconflip=”” iconrotate=”” iconspin=”” iconcolor=”” circlecolor=”” circlebordersize=”” circlebordercolor=”” outercirclebordersize=”” outercirclebordercolor=”” image=”” image_id=”” image_width=”” image_height=”” link=”” linktext=”” link_target=”” animation_type=”” animation_direction=leftanimation_speed=”0.3″ animation_offset=””]

  1. 택시에서 9 방법 진단 커넥터에 ServiceRanger 연결.
  2. "데이터 모니터"옵션을 선택합니다.
  3. 고전압 배터리 목록에 다음과 같은 매개 변수를보기:
    • HV 배터리 J1939 데이터 HV 배터리:
      매개 변수 520250 HV Battery1 잠재적 전압 및 매개 변수 520323 배터리 전압 RB
    • 빨간색 서비스 버튼에 밀어 넣습니다.
    • Battery1 잠재적 전압 및 배터리 전압 RB의 전압 판독 내에있는 경우 10 서로 볼트 (배터리 전압 RB는 드롭한다 30 빨간색 서비스 스위치를 밀어 때 볼트), 릴레이 박스를 교체. TRSM2000에서 MY09 PEC 고전압 릴레이 박스 제거 및 설치 절차를 참조하십시오, 다음 단계로 이동 14.
      노트: "고전압 서비스 종료 및
      만나다 고전압 서비스 종료 및 전력 상승 절차 고전압 케이블을 제거하기 전에 수행해야합니다. (주요 만약
      고전압 릴레이 용접, 수리를 시도하기 전에 뒤쪽 패널에있는 높은 전압 퓨즈를 제거).
    • Battery1 잠재적 전압 및 배터리 전압 RB의 전압 측정 값은보다 큰 경우 10 서로 볼트 (배터리 전압 RB는 드롭한다 30 빨간색 서비스 스위치를 밀어 때 볼트), 인버터를 교체, 다음 단계로 이동 14.

[/fusion_content_box][fusion_content_box title=단계 14. 수리 확인.backgroundcolor=”” icon=”” iconflip=”” iconrotate=”” iconspin=noiconcolor=”” circlecolor=”” circlebordersize=”” circlebordercolor=”” outercirclebordersize=”” outercirclebordercolor=”” image=”” image_id=”” image_width=”” image_height=”” link=”” linktext=”자세히보기” link_target=”” animation_type=”” animation_direction=leftanimation_speed=”0.3″ animation_offset=””]

  1. 키 오프.
  2. 모든 커넥터와 배터리의 마이너스 케이블을 다시 연결.
  3. 키.
  4. 클리어 코드, 만나다 클리어 비활성 오류.
  5. 차량을 운전하고 코드를 다시 시도.
  6. 코드 확인, 만나다 활성 및 비활성 오류보기.
    • 어떤 코드의 경우, 테스트가 완료.
    • 만약 오류 코드 116 표시, 테스트에서 오류를 찾아, 단계로 이동 1.
    • 보다 코드가 다른 경우 116 표시, 만나다 코드 색인 목록 고장.

[/fusion_content_box][/fusion_content_boxes][/fusion_builder_column][/fusion_builder_row][/fusion_builder_container][fusion_global id=”13788″]