[fusion_builder_container hundred_percent=nohundred_percent_height=nohundred_percent_height_scroll=nohundred_percent_height_center_content=yesequal_height_columns=nomenu_anchor=”” hide_on_mobile=small-visibility,medium-visibility,large-visibilitystatus=publishedpublish_date=”” class=”” id=”” background_color=”” background_image=”” background_position=center centerbackground_repeat=no-repeatfade=nobackground_parallax=noneenable_mobile=noparallax_speed=”0.3″ video_mp4=”” video_webm=”” video_ogv=”” video_url=”” video_aspect_ratio=”16:9″ video_loop=yesvideo_mute=yesvideo_preview_image=”” border_size=”” border_color=”” border_style=solidmargin_top=”35″ margin_bottom=”” padding_top=”” padding_right=”” padding_bottom=”” padding_left=””][fusion_builder_row][fusion_builder_column type=”1_1layout=”1_1spacing=”” center_content=nolink=”” target=_selfmin_height=”” hide_on_mobile=small-visibility,medium-visibility,large-visibilityclass=”” id=”” background_color=”” background_image=”” background_image_id=”” background_position=left topbackground_repeat=no-repeathover_type=noneborder_size=”0″ border_color=”” border_style=solidborder_position=allpadding_top=”” padding_right=”” padding_bottom=”” padding_left=”” margin_top=”” margin_bottom=”” animation_type=”” animation_direction=leftanimation_speed=”0.3″ animation_offset=”” last=no”][fusion_text columns=”” column_min_width=”” column_spacing=”” rule_style=defaultrule_size=”” rule_color=”” hide_on_mobile=small-visibility,medium-visibility,large-visibilityclass=”” id=””]

อีตันฟูลเลอร์ไฮบริดเกียร์รหัสความผิดปกติ 88 – สามารถอินเวอร์เตอร์ข้อความ (HCM)

[/fusion_text][/fusion_builder_column][/fusion_builder_row][/fusion_builder_container][fusion_builder_container hundred_percent=nohundred_percent_height=nohundred_percent_height_scroll=nohundred_percent_height_center_content=yesequal_height_columns=nomenu_anchor=”” hide_on_mobile=small-visibility,medium-visibility,large-visibilitystatus=publishedpublish_date=”” class=”” id=”” background_color=”” background_image=”” background_position=center centerbackground_repeat=no-repeatfade=nobackground_parallax=noneenable_mobile=noparallax_speed=”0.3″ video_mp4=”” video_webm=”” video_ogv=”” video_url=”” video_aspect_ratio=”16:9″ video_loop=yesvideo_mute=yesvideo_preview_image=”” border_size=”” border_color=”” border_style=solidmargin_top=”” margin_bottom=”” padding_top=”” padding_right=”” padding_bottom=”” padding_left=””][fusion_builder_row][fusion_builder_column type=”1_1layout=”1_1spacing=”” center_content=nolink=”” target=_selfmin_height=”” hide_on_mobile=small-visibility,medium-visibility,large-visibilityclass=”” id=”” background_color=”” background_image=”” background_image_id=”” background_position=left topbackground_repeat=no-repeathover_type=noneborder_size=”0″ border_color=”” border_style=solidborder_position=allpadding_top=”” padding_right=”” padding_bottom=”” padding_left=”” margin_top=”” margin_bottom=”” animation_type=”” animation_direction=leftanimation_speed=”0.3″ animation_offset=”” last=no”][fusion_text columns=”” column_min_width=”” column_spacing=”” rule_style=defaultrule_size=”” rule_color=”” hide_on_mobile=small-visibility,medium-visibility,large-visibilityclass=”” id=””]

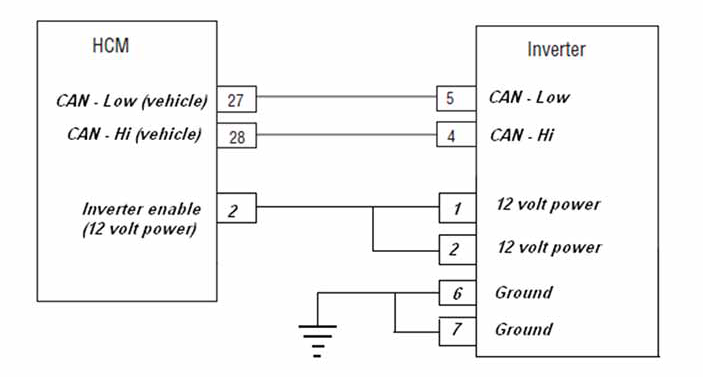
ความผิดปกติสำหรับอีตันไฮบริดรุ่นไดรฟ์ (MY09) EH-8E406A-U / P, EH-8E406A-UP, EH-8E406A-UPG, EH-8E406A-CD, EH-8E406A-CDG, EH-8E406A-CDR, EH-8E406A-T, EH-6E706B-CD, EH-6E706B-P และ EH-6E706B-UPG. อ่านด้านล่างเพื่อเรียนรู้วิธีการทดสอบ, ล้างและแก้ไขข้อผิดพลาดรหัสความผิดปกติสำหรับไลเนอร์ของคุณ, แม็ค, Peterbilt, Kenworth, วอลโว่, ระหว่างประเทศ, และรถบรรทุกหนักและอุปกรณ์. อินเวอร์เตอร์สื่อสารกับหน่วยควบคุมแบตเตอรี่ (BCU) ตั้งอยู่ใน Power Electronics Carrier (PEC) และชุดควบคุมไฮบริด (HCM) ในเขตควบคุมเครือข่าย (สามารถ) การเชื่อมโยงข้อมูลที่เป็นกรรมสิทธิ์ความเร็วสูง. การเชื่อมโยงข้อมูลที่เป็นสองสายคู่บิดสอง 120 ต้านทานโอห์มอยู่ในการเชื่อมโยง. ความผิดพลาดรหัส 88 จะถูกตั้งค่าด้วยโมดูลควบคุมไฮบริดเท่านั้น (HCM) ซอฟต์แวร์ระดับ 663 และล่าง. ซอฟต์แวร์ HCM 671 และมากขึ้นจะตั้งค่ารหัสผิด 111 สำหรับข้อผิดพลาดข้อความ CAN ของอินเวอร์เตอร์.

ความผิดพลาดรหัส 88 – อินเวอร์เตอร์สามารถส่งข้อความตรวจสอบความผิด

ปัจจัยพื้นฐานต่อไปนี้จะต้องพบก่อนที่ระบบจะตรวจพบความผิดปกติ:

  • แรงดันไฟฟ้าจุดระเบิด HCM มีค่ามากกว่า 7 โวลต์และน้อยกว่า 16 โวลต์.
  • ความผิด HCM การเชื่อมโยงข้อมูลได้คือไม่ได้ใช้งาน.

บันทึก: เมื่อการแก้ไขปัญหาที่ไม่ใช้งานรหัสหมายถึง โหมดการวิเคราะห์สินค้า (PDM)

เงื่อนไขการตั้งค่าความผิดพลาดรหัสที่ใช้งานอยู่

  • กองทุนการเงินระหว่างประเทศ 9 เมื่อมีการตั้งค่า HCM ยังไม่ได้รับข้อความอินเวอร์เตอร์สำหรับ 30 รอบข้อความติดต่อกัน.
  • กองทุนการเงินระหว่างประเทศ 2 ใช้งานได้ในโหมดวินิจฉัยผลิตภัณฑ์เท่านั้น (PDM) และชุดถ้า 3 อินเวอร์เตอร์ข้อความติดต่อกันไม่ได้ที่ได้รับจาก HCM.

สำรองเมื่อความผิดพลาดรหัส 88 มีการตั้งเงื่อนไขต่อไปนี้เกิดขึ้น:

  • อำพัน“เช็คไฮบริด” สว่างแสง.
  • ความผิดจะถูกเก็บไว้ในโมดูลควบคุมไฮบริด (HCM) หน่วยความจำ.
  • มอเตอร์ไฟฟ้า / เครื่องกำเนิดไฟฟ้า Assist และฟื้นฟูถูกปิดใช้งาน; อย่างไรก็ตาม, รีเลย์แรงดันสูงยังคงขับเคลื่อน.
  • HCM ยังคงควบคุมรถไฮบริดในโหมดดีเซลเท่านั้น.
  • ค่าเริ่มต้นของการส่งเริ่มต้นเกียร์ 1.

[/fusion_text][fusion_text columns=”” column_min_width=”” column_spacing=”” rule_style=defaultrule_size=”” rule_color=”” hide_on_mobile=small-visibility,medium-visibility,large-visibilityclass=”” id=””]

เงื่อนไขการตั้งค่าความผิดพลาดที่ไม่ใช้งานรหัส

เฉพาะความผิดพลาดที่ไม่ใช้งานสามารถลบออกจากหน่วยควบคุมการรับส่งอิเล็กทรอนิกส์ (TECU) หรือประวัติ HCM ใช้ ServiceRanger. TECU โดยอัตโนมัติล้างความผิดพลาดจากประวัติศาสตร์หลัง 200 ชั่วโมงและ HCM โดยอัตโนมัติล้างความผิดพลาดจากประวัติศาสตร์หลังจากความผิดพลาดที่ไม่ได้ใช้งาน 200 ชั่วโมง.

รหัสความผิดปกตินี้สามารถเกิดจากสาเหตุใดต่อไปนี้:

  • กองทุนการเงินระหว่างประเทศ 9, 2
    • อินเวอร์เตอร์
    • สามารถเชื่อมโยงข้อมูล

[/fusion_text][/fusion_builder_column][/fusion_builder_row][/fusion_builder_container][fusion_builder_container hundred_percent=nohundred_percent_height=nohundred_percent_height_scroll=nohundred_percent_height_center_content=yesequal_height_columns=nomenu_anchor=”” hide_on_mobile=small-visibility,medium-visibility,large-visibilitystatus=publishedpublish_date=”” class=”” id=”” background_color=”” background_image=”” background_position=center centerbackground_repeat=no-repeatfade=nobackground_parallax=noneenable_mobile=noparallax_speed=”0.3″ video_mp4=”” video_webm=”” video_ogv=”” video_url=”” video_aspect_ratio=”16:9″ video_loop=yesvideo_mute=yesvideo_preview_image=”” border_size=”” border_color=”” border_style=solidmargin_top=”” margin_bottom=”” padding_top=”” padding_right=”” padding_bottom=”” padding_left=””][fusion_builder_row][fusion_builder_column type=”1_1layout=”1_1spacing=”” center_content=nolink=”” target=_selfmin_height=”” hide_on_mobile=small-visibility,medium-visibility,large-visibilityclass=”” id=”” background_color=”” background_image=”” background_image_id=”” background_position=left topbackground_repeat=no-repeathover_type=noneborder_size=”0″ border_color=”” border_style=solidborder_position=allpadding_top=”” padding_right=”” padding_bottom=”” padding_left=”” margin_top=”” margin_bottom=”” animation_type=”” animation_direction=leftanimation_speed=”0.3″ animation_offset=”” last=no”][fusion_text columns=”” column_min_width=”” column_spacing=”” rule_style=defaultrule_size=”” rule_color=”” hide_on_mobile=small-visibility,medium-visibility,large-visibilityclass=”” id=””]

ความผิดพลาดรหัส 88 – อินเวอร์เตอร์สามารถทดสอบความผิดพลาดข้อความ

[/fusion_text][/fusion_builder_column][/fusion_builder_row][/fusion_builder_container][fusion_builder_container hundred_percent=nohundred_percent_height=nohundred_percent_height_scroll=nohundred_percent_height_center_content=yesequal_height_columns=nomenu_anchor=”” hide_on_mobile=small-visibility,medium-visibility,large-visibilitystatus=publishedpublish_date=”” class=”” id=”” background_color=”” background_image=”” background_position=center centerbackground_repeat=no-repeatfade=nobackground_parallax=noneenable_mobile=noparallax_speed=”0.3″ video_mp4=”” video_webm=”” video_ogv=”” video_url=”” video_aspect_ratio=”16:9″ video_loop=yesvideo_mute=yesvideo_preview_image=”” border_size=”” border_color=”” border_style=solidmargin_top=”” margin_bottom=”” padding_top=”” padding_right=”” padding_bottom=”” padding_left=””][fusion_builder_row][fusion_builder_column type=”1_1layout=”1_1spacing=”” center_content=nolink=”” target=_selfmin_height=”” hide_on_mobile=small-visibility,medium-visibility,large-visibilityclass=”” id=”” background_color=”” background_image=”” background_image_id=”” background_position=left topbackground_repeat=no-repeathover_type=noneborder_size=”0″ border_color=”” border_style=solidborder_position=allpadding_top=”” padding_right=”” padding_bottom=”” padding_left=”” margin_top=”” margin_bottom=”” animation_type=”” animation_direction=leftanimation_speed=”0.3″ animation_offset=”” last=no”][fusion_text columns=”” column_min_width=”” column_spacing=”” rule_style=defaultrule_size=”” rule_color=”” hide_on_mobile=small-visibility,medium-visibility,large-visibilityclass=”” id=””]

ตัวแทนระบบ MY09 ประจำตัวประชาชน:

[/fusion_text][/fusion_builder_column][fusion_builder_column type=”1_2layout=”1_2spacing=”” center_content=nolink=”” target=_selfmin_height=”” hide_on_mobile=small-visibility,medium-visibility,large-visibilityclass=”” id=”” background_color=”” background_image=”” background_image_id=”” background_position=left topbackground_repeat=no-repeathover_type=noneborder_size=”0″ border_color=”” border_style=solidborder_position=allpadding_top=”” padding_right=”” padding_bottom=”” padding_left=”” margin_top=”” margin_bottom=”” animation_type=”” animation_direction=leftanimation_speed=”0.3″ animation_offset=”” last=no”][fusion_imageframe image_id=”14061|fullmax_width=”” style_type=”” blur=”” stylecolor=”” hover_type=nonebordersize=”” bordercolor=”” borderradius=”” align=centerlightbox=nogallery_id=”” lightbox_image=”” lightbox_image_id=”” alt=”HCM – ไฮบริดระบบเชื่อมต่อการเชื่อมต่อ” link=”” linktarget=_selfhide_on_mobile=small-visibility,medium-visibility,large-visibilityclass=”” id=”” animation_type=”” animation_direction=leftanimation_speed=”0.3″ animation_offset=””]https://www.globaltransmissionsupply.com/wp-content/uploads/Fuller-Front-Harness-View-HCM.jpg[/fusion_imageframe][fusion_text columns=”” column_min_width=”” column_spacing=”” rule_style=defaultrule_size=”” rule_color=”” hide_on_mobile=small-visibility,medium-visibility,large-visibilityclass=”” id=””]

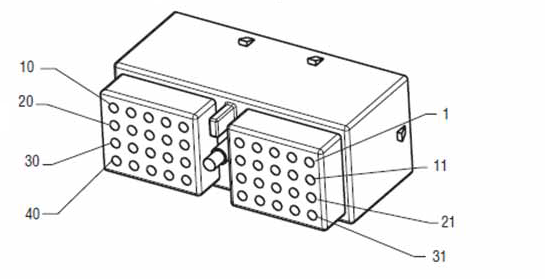
สายรัดมุมมองด้านหน้า
(HCM – ไฮบริดระบบเชื่อมต่อการเชื่อมต่อ)
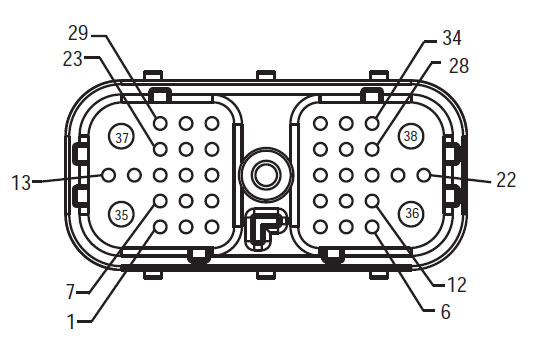
[/fusion_text][/fusion_builder_column][fusion_builder_column type=”1_2layout=”1_2spacing=”” center_content=nolink=”” target=_selfmin_height=”” hide_on_mobile=small-visibility,medium-visibility,large-visibilityclass=”” id=”” background_color=”” background_image=”” background_image_id=”” background_position=left topbackground_repeat=no-repeathover_type=noneborder_size=”0″ border_color=”” border_style=solidborder_position=allpadding_top=”” padding_right=”” padding_bottom=”” padding_left=”” margin_top=”” margin_bottom=”” animation_type=”” animation_direction=leftanimation_speed=”0.3″ animation_offset=”” last=no”][fusion_imageframe image_id=”14476|fullmax_width=”” style_type=”” blur=”” stylecolor=”” hover_type=nonebordersize=”” bordercolor=”” borderradius=”” align=centerlightbox=nogallery_id=”” lightbox_image=”” lightbox_image_id=”” alt=”Duetsch 40 ทางมุมมองเชื่อมต่อการผสมพันธุ์” link=”” linktarget=_selfhide_on_mobile=small-visibility,medium-visibility,large-visibilityclass=”” id=”” animation_type=”” animation_direction=leftanimation_speed=”0.3″ animation_offset=””]https://www.globaltransmissionsupply.com/wp-content/uploads/Duetsch-40-way-mating-connector-view.png[/fusion_imageframe][fusion_text columns=”” column_min_width=”” column_spacing=”” rule_style=defaultrule_size=”” rule_color=”” hide_on_mobile=small-visibility,medium-visibility,large-visibilityclass=”” id=””]

Duetsch 40 ทางมุมมองเชื่อมต่อการผสมพันธุ์

[/fusion_text][/fusion_builder_column][fusion_builder_column type=”1_1layout=”1_1spacing=”” center_content=nolink=”” target=_selfmin_height=”” hide_on_mobile=small-visibility,medium-visibility,large-visibilityclass=”” id=”” background_image_id=”” background_color=”#000000″ background_image=”” background_position=left topundefined=”” background_repeat=no-repeathover_type=noneborder_size=”0″ border_color=”” border_style=solidborder_position=allpadding_top=”” padding_right=”” padding_bottom=”” padding_left=”” margin_top=”20″ margin_bottom=”20″ animation_type=”” animation_direction=leftanimation_speed=”0.3″ animation_offset=”” last=no”][fusion_text columns=”” column_min_width=”” column_spacing=”” rule_style=defaultrule_size=”” rule_color=”” hide_on_mobile=small-visibility,medium-visibility,large-visibilityclass=”” id=””]

บันทึก: อ้างถึง Eaton ตัวแทนไฮบริดและเชื่อมต่อสถานที่ตั้ง สำหรับสถานที่เชื่อมต่อในระบบ MY09.
[/fusion_text][/fusion_builder_column][fusion_builder_column type=”1_1layout=”1_1spacing=”” center_content=nolink=”” target=_selfmin_height=”” hide_on_mobile=small-visibility,medium-visibility,large-visibilityclass=”” id=”” background_color=”” background_image=”” background_image_id=”” background_position=left topbackground_repeat=no-repeathover_type=noneborder_size=”0″ border_color=”” border_style=solidborder_position=allpadding_top=”” padding_right=”” padding_bottom=”” padding_left=”” margin_top=”” margin_bottom=”” animation_type=”” animation_direction=leftanimation_speed=”0.3″ animation_offset=”” last=no”][fusion_imageframe image_id=”14477|fullmax_width=”” style_type=”” blur=”” stylecolor=”” hover_type=nonebordersize=”” bordercolor=”” borderradius=”” align=centerlightbox=nogallery_id=”” lightbox_image=”” lightbox_image_id=”” alt=”HCM ที่ตั้งเชื่อมต่ออินเวอร์เตอร์” link=”” linktarget=_selfhide_on_mobile=small-visibility,medium-visibility,large-visibilityclass=”” id=”” animation_type=”” animation_direction=leftanimation_speed=”0.3″ animation_offset=””]https://www.globaltransmissionsupply.com/wp-content/uploads/HCM-Inverter-MY09.png[/fusion_imageframe][/fusion_builder_column][/fusion_builder_row][/fusion_builder_container][fusion_builder_container hundred_percent=nohundred_percent_height=nohundred_percent_height_scroll=nohundred_percent_height_center_content=yesequal_height_columns=nomenu_anchor=”” hide_on_mobile=small-visibility,medium-visibility,large-visibilitystatus=publishedpublish_date=”” class=”” id=”” background_color=”” background_image=”” background_position=center centerbackground_repeat=no-repeatfade=nobackground_parallax=noneenable_mobile=noparallax_speed=”0.3″ video_mp4=”” video_webm=”” video_ogv=”” video_url=”” video_aspect_ratio=”16:9″ video_loop=yesvideo_mute=yesvideo_preview_image=”” border_size=”” border_color=”” border_style=solidmargin_top=”” margin_bottom=”” padding_top=”” padding_right=”” padding_bottom=”” padding_left=””][fusion_builder_row][fusion_builder_column type=”1_1layout=”1_1spacing=”” center_content=nolink=”” target=_selfmin_height=”” hide_on_mobile=small-visibility,medium-visibility,large-visibilityclass=”” id=”” background_color=”” background_image=”” background_image_id=”” background_position=left topbackground_repeat=no-repeathover_type=noneborder_size=”0″ border_color=”” border_style=solidborder_position=allpadding_top=”” padding_right=”” padding_bottom=”” padding_left=”” margin_top=”” margin_bottom=”” animation_type=”” animation_direction=leftanimation_speed=”0.3″ animation_offset=”” last=no”][fusion_modal name=warnings_cautionstitle=”คำเตือน & ข้อควรระวัง” size=largebackground=”” border_color=”” show_footer=yesclass=”” id=””]อันตราย: อันตรายบ่งชี้ว่าคุณจะได้รับบาดเจ็บสาหัสหรือเสียชีวิตหากไม่ปฏิบัติตามขั้นตอนที่ระบุ.
การเตือน: คำเตือนบ่งชี้อันตรายทันที, ซึ่งอาจส่งผลให้ได้รับบาดเจ็บสาหัสถ้าคุณไม่ทำตามขั้นตอนที่ระบุ.
ความระมัดระวัง: ข้อควรระวังบ่งชี้ยานพาหนะหรือความเสียหายต่อทรัพย์สินที่อาจเกิดขึ้นถ้าคุณไม่ทำตามขั้นตอนที่ระบุ.

บันทึก: หมายเหตุแสดงให้เห็นรายละเอียดเพิ่มเติมที่จะช่วยในการวินิจฉัยหรือซ่อมแซมส่วนประกอบ / ระบบ.

ทำตามขั้นตอนที่ระบุไว้ในลำดับที่ระบุเพื่อหลีกเลี่ยงการบาดเจ็บส่วนบุคคล:

1. หากกรวยแรงดันสูงอยู่รอบรถและกิจการติดตั้งบน PEC, เพียงคนเดียวที่ควรจะได้รับอนุญาตให้เริ่มยานพาหนะเป็นคนที่เซ็นสัญญาแท็กกิจ.
2. ก่อนที่จะทำงานบนรถหรือออกจากรถแท็กซี่ในขณะที่เครื่องยนต์กำลังทำงาน, คุณควรวางคันเกียร์ใน“N” ตั้งเบรกจอดรถ, และป้องกันล้อ.
3. สำหรับเหตุผลด้านความปลอดภัย, มักจะมีส่วนร่วมบริการเบรกก่อนที่จะมีการเลือกตำแหน่งเกียร์จาก“เอ็น”
4. ก่อนที่จะเริ่มเป็นรถมักจะนั่งอยู่ในที่นั่งคนขับ, เลือก“N” ในการควบคุมการเปลี่ยนแปลง, และการตั้งค่าที่จอดรถเบรก.
5. ในรถยนต์ที่มี ePTO, เครื่องยนต์และ / หรือ
มอเตอร์ / เครื่องกำเนิดไฟฟ้าสามารถเริ่มต้นในโหมด ePTO. ไม่เคยดำเนินการบำรุงรักษาใด ๆ หรือทำงานเกี่ยวกับยานพาหนะ, ขณะที่อยู่ในโหมดนี้.
6. 12-โวลต์แบตเตอรี่บวก (+) และลบ (-) จะต้องมีการตัดการเชื่อมต่อก่อนที่จะมีการเชื่อมใด ๆ ในไฮบริดพร้อมอุปกรณ์ยานพาหนะใด ๆ.

ความระมัดระวัง: ทำตามขั้นตอนที่ระบุไว้ในลำดับที่ระบุเพื่อหลีกเลี่ยงความผิดปกติของอุปกรณ์หรือความเสียหาย.
ความระมัดระวัง: อย่าปล่อยเบรกจอดรถหรือพยายามที่จะเลือกเกียร์จนความดันอากาศอยู่ในระดับที่ถูกต้อง.
ความระมัดระวัง: เพื่อหลีกเลี่ยงความเสียหายให้กับการส่งผ่านระหว่างลากสถานที่คันเกียร์ใน“N” และยกล้อไดรฟ์ออกจากพื้นดินหรือตัดการเชื่อมต่อระบบขับเคลื่อน.

คำเตือนแรงดันสูง & ข้อควรระวัง

  • ใช้ CO2 หรือเคมีแห้งดับเพลิง.
  • สายไฟแรงดันสูงจะครอบคลุมในฉนวนกันความร้อนสีส้มหรือท่อที่ซับซ้อนและมีเครื่องหมายฉลากคำเตือนในการเชื่อมต่อ.
  • ทั้งหมดEaton®ไฮบริดดีเซล / ยานพาหนะไฟฟ้าจะถูกทำเครื่องหมาย ‘ไฮบริด’ ด้านนอกของยานพาหนะ, พร้อมกับป้ายกะบนเส้นประ.
  • อ้างถึง OEM สำหรับสถานที่เฉพาะของตัวถังที่ติดตั้งชิ้นส่วนไฮบริด.
  • อย่าตัดเป็นสายไฟฟ้าแรงสูงสีส้ม.
  • อย่าตัดเป็นหรือเปิด PEC.
  • อย่าตัดเป็นหรือเปิด DC / DC converter.
  • อย่าตัดเป็นหรือเปิดอินเวอร์เตอร์.

เขตกันชนจะต้องตั้งค่าและแรงดันสูงฉนวนถุงมือยาง (ชั้น 0 กับครอบหนัง) จะต้องก่อนที่จะทำงานเกี่ยวกับไฟฟ้าแรงสูง. ความล้มเหลวที่จะปฏิบัติตามคำแนะนำเหล่านี้อาจส่งผลให้ได้รับบาดเจ็บสาหัสหรือเสียชีวิต.
ถุงมือยางฉนวนที่ต้องสวมใส่ในขณะที่ทำงานบนระบบแรงดันสูงเป็นชั้น 0 กับครอบหนัง. ถุงมือยางควรจะทดสอบก่อนการใช้งานทุกขั้นตอนดังต่อไปนี้การทดสอบยางถุงมือฉนวนกันความร้อนที่พบใน“เครื่องมือวิเคราะห์ / บริการสิ่งพิมพ์” ที่หน้า 6. ความล้มเหลวที่จะปฏิบัติตามคำแนะนำเหล่านี้อาจส่งผลให้ได้รับบาดเจ็บสาหัสหรือเสียชีวิต.
ก่อนที่จะตรวจสอบหรือทำงานเกี่ยวกับสายไฟฟ้าแรงสูงหรือส่วนประกอบ“แรงดันสูงปิดระบบการให้บริการและเพิ่มพลังขั้นตอน” ที่หน้า 4 ควรจะปฏิบัติตาม. ความล้มเหลวที่จะปฏิบัติตามคำแนะนำเหล่านี้อาจส่งผลให้ได้รับบาดเจ็บสาหัสหรือเสียชีวิต.
กิจและ Tagout เฉพาะอุปกรณ์จะถูกลบออกโดยช่างที่วางอุปกรณ์ Lockout Tagout และบนยานพาหนะ. ความล้มเหลวที่จะปฏิบัติตามคำแนะนำเหล่านี้อาจส่งผลให้ได้รับบาดเจ็บสาหัสหรือเสียชีวิต.
ถุงมือยางฉนวนไฟฟ้าแรงสูง (ชั้น 0 กับครอบหนัง) ต้องสวมใส่เมื่อทำงานใด ๆ
สายไฟฟ้าแรงสูง. “การปิดระบบไฟฟ้าแรงสูงบริการและ Power-Up ขั้นตอน” ที่หน้า 4 จะต้องปฏิบัติตามก่อนที่จะถอดสายไฟฟ้าแรงสูงใด ๆ. ความล้มเหลวที่จะปฏิบัติตามคำแนะนำเหล่านี้อาจส่งผลให้ได้รับบาดเจ็บสาหัสหรือเสียชีวิต.
สายไฟฟ้าแรงสูงและสายไฟเป็นสีส้มและมีป้ายเตือนในการเชื่อมต่อ. ส่วนประกอบแรงดันสูงจะมีเครื่องหมายฉลาก. ถุงมือยางฉนวนไฟฟ้าแรงสูง (ชั้น 0 กับครอบหนัง) จะต้องใช้เมื่อทำงานใด ๆ ขององค์ประกอบเหล่านี้. ความล้มเหลวที่จะปฏิบัติตามคำแนะนำเหล่านี้อาจส่งผลให้ได้รับบาดเจ็บสาหัสหรือเสียชีวิต.

ไฟฟ้าแรงสูงขั้นตอนการบริการ Shutdown

ไฟฟ้าแรงสูงปิดระบบการให้บริการและขั้นตอนการเพิ่มพลัง1. ติดตาม“แรงดันสูงพื้นที่ทำงาน” ขั้นตอน.
2. ค้นหาสีแดงสลับ PEC บริการอยู่ด้านหน้าของ PEC และผลักดันปิด.
3. ถอดฝาครอบใช้บริการและติดตั้งขายึดกิจ (J48506).
4. แท็กยึดกับ Lockout Bracket.
5. ให้แน่ใจว่าสวิทช์ PEC บริการไม่สามารถย้ายจากตำแหน่งปิด.
6. ช่วยให้ระบบการตั้งค่าขั้นต่ำของ 5 นาทีเพื่อจำหน่ายไฟฟ้าแรงสูง.
7. เชื่อมต่อ ServiceRanger และดูข้อมูลการตรวจสอบ PID 116 เรียกว่า“แรงดันสูงที่มีศักยภาพแบตเตอรี่.” ใช้ SPN 520323 สำหรับการเชื่อมต่อ J1939“แบตเตอรี่แรงดันไฟฟ้า RB” (กล่องรีเลย์).
8. แรงดันไฟฟ้าที่ควรจะเป็น 30 โวลต์หรือน้อยกว่า. ถ้าแรงดันไฟฟ้าที่สูงกว่า 30 โวลต์, ไม่ได้ทำงานบนยานพาหนะและติดต่อEaton®ที่ 1-800-826-HELP (4357).
9. เปิดกุญแจออกและดำเนินการซ่อมแซมหรือขั้นตอนการแก้ไขปัญหา.
บันทึก: แรงดันไฟฟ้าที่ลดลงเป็นศูนย์เมื่อคีย์ถูกปิด.

ไฟฟ้าแรงสูงบริการ Power-Up ขั้นตอน

1. ติดตั้งทุกการเชื่อมต่อแรงดันสูงเข้าไปอยู่ในตำแหน่งล็อคของพวกเขา.
2. หากคุณเป็นคนที่ทำงานเกี่ยวกับยานพาหนะ, ลบ Lockout Bracket และแท็ก.
3. ติดตั้ง Lockout Bracket มากกว่าสวิทช์ให้บริการ.
4. ดึงบริการสลับออกและปล่อยให้ชุดยานพาหนะสำหรับ 2 นาที.
5. Start vehicle when appropriate.[/fusion_modal][fusion_modal name=component_locationtitle=”Eaton ตัวแทนไฮบริดและเชื่อมต่อสถานที่ตั้ง ” size=largebackground=”#ffffffborder_color=”” show_footer=yesclass=”” id=””]

Eaton ตัวแทนไฮบริดและสถานที่เชื่อมต่อระบบ MY08

[/fusion_modal][fusion_modal name=component_location2title=”Eaton ตัวแทนไฮบริดและเชื่อมต่อสถานที่ตั้ง MY09 ระบบ” size=largebackground=”#ffffffborder_color=”” show_footer=yesclass=”” id=””]

Eaton ตัวแทนไฮบริดและสถานที่เชื่อมต่อระบบ MY09

[/fusion_modal][/fusion_builder_column][/fusion_builder_row][/fusion_builder_container][fusion_builder_container hundred_percent=nohundred_percent_height=nohundred_percent_height_scroll=nohundred_percent_height_center_content=yesequal_height_columns=nomenu_anchor=”” hide_on_mobile=small-visibility,medium-visibility,large-visibilitystatus=publishedpublish_date=”” class=”” id=”” background_color=”” background_image=”” background_position=center centerbackground_repeat=no-repeatfade=nobackground_parallax=noneenable_mobile=noparallax_speed=”0.3″ video_mp4=”” video_webm=”” video_ogv=”” video_url=”” video_aspect_ratio=”16:9″ video_loop=yesvideo_mute=yesvideo_preview_image=”” border_size=”” border_color=”” border_style=solidmargin_top=”” margin_bottom=”” padding_top=”” padding_right=”” padding_bottom=”” padding_left=””][fusion_builder_row][fusion_builder_column type=”1_1layout=”1_1spacing=”” center_content=nolink=”” target=_selfmin_height=”” hide_on_mobile=small-visibility,medium-visibility,large-visibilityclass=”” id=”” background_color=”” background_image=”” background_image_id=”” background_position=left topbackground_repeat=no-repeathover_type=noneborder_size=”0″ border_color=”” border_style=solidborder_position=allpadding_top=”” padding_right=”” padding_bottom=”” padding_left=”” margin_top=”” margin_bottom=”” animation_type=”” animation_direction=leftanimation_speed=”0.3″ animation_offset=”” last=no”][fusion_content_boxes layout=clean-horizontalcolumns=”2″ title_size=”18pxheading_size=”3″ title_color=”#ffffffbody_color=”#ffffffbackgroundcolor=”#4f4f4ficon=”” iconflip=”” iconrotate=”” iconspin=noiconcolor=”” icon_circle=”” icon_circle_radius=”” circlecolor=”” circlebordersize=”” circlebordercolor=”” outercirclebordersize=”” outercirclebordercolor=”” icon_size=”” icon_hover_type=”” hover_accent_color=”” image=”” image_id=”” image_width=”” image_height=”” link_type=”” button_span=”” link_area=”” link_target=”” icon_align=leftanimation_type=”” animation_delay=”” animation_offset=”” animation_direction=leftanimation_speed=”0.3″ margin_top=”” margin_bottom=”” hide_on_mobile=small-visibility,medium-visibility,large-visibilityclass=”” id=””][fusion_content_box title=ขั้นตอนที่ 1. ตรวจสอบสถานะรหัสที่ใช้งานอยู่หรือไม่ได้ใช้งานและดำเนินการ Pretest ไฟฟ้า.backgroundcolor=”” icon=”” iconflip=”” iconrotate=”” iconspin=noiconcolor=”” circlecolor=”” circlebordersize=”” circlebordercolor=”” outercirclebordersize=”” outercirclebordercolor=”” image=”” image_id=”” image_width=”” image_height=”” link=”” linktext=”อ่านเพิ่มเติม” link_target=”” animation_type=”” animation_direction=leftanimation_speed=”0.3″ animation_offset=””]

  1. ดึงรหัสผิดใช้งานอยู่และ FMIS กับ ServiceRanger ที่ใช้เชื่อมต่อการวินิจฉัย 9-Way หรือด้วยตนเอง.
  2. ดำเนินการ Pretest ไฟฟ้าและไฮบริด Pretest ไฟฟ้า.
    • ถ้าไม่มีปัญหาที่พบในช่วงไฮบริดไฟฟ้า Pretest, ไปที่ขั้นตอน 2.
    • หากปัญหาได้รับการซ่อมแซมในช่วงไฮบริดไฟฟ้า Pretest, ไปที่ขั้นตอน 8.

[/fusion_content_box][fusion_content_box title=ขั้นตอนที่ 2. ตรวจสอบความต่อเนื่องของวงจรอินเวอร์เตอร์.backgroundcolor=”” icon=”” iconflip=”” iconrotate=”” iconspin=”” iconcolor=”” circlecolor=”” circlebordersize=”” circlebordercolor=”” outercirclebordersize=”” outercirclebordercolor=”” image=”” image_id=”” image_width=”” image_height=”” link=”” linktext=”” link_target=”” animation_type=”” animation_direction=leftanimation_speed=”0.3″ animation_offset=””]

  1. ปิดกุญแจ.
  2. ยกเลิกการเชื่อมต่ออินเวอร์เตอร์ 40-Way เชื่อมต่อ.
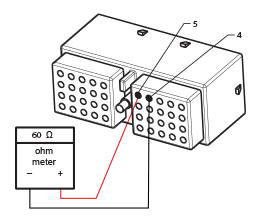
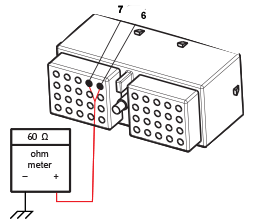
  3. วัดความต้านทานระหว่างอินเวอร์เตอร์เชื่อมต่อ 40-Way Pin 5 และขา 4.40 เชื่อมต่ออินเวอร์เตอร์ Way
    • หากต้านทาน OL หรือภายนอก 50-70 โอห์ม, ซ่อมแซม OEM สามารถเชื่อมโยงเทียม. ไปที่ขั้นตอน 8.
    • หากต้านทานอยู่ระหว่าง 50-70 โอห์ม, ไปที่ขั้นตอน 3.

[/fusion_content_box][/fusion_content_boxes][fusion_content_boxes layout=clean-horizontalcolumns=”2″ title_size=”18pxheading_size=”3″ title_color=”#ffffffbody_color=”#ffffffbackgroundcolor=”#4f4f4ficon=”” iconflip=”” iconrotate=”” iconspin=noiconcolor=”” icon_circle=”” icon_circle_radius=”” circlecolor=”” circlebordersize=”” circlebordercolor=”” outercirclebordersize=”” outercirclebordercolor=”” icon_size=”” icon_hover_type=”” hover_accent_color=”” image=”” image_id=”” image_width=”” image_height=”” link_type=”” button_span=”” link_area=”” link_target=”” icon_align=leftanimation_type=”” animation_delay=”” animation_offset=”” animation_direction=leftanimation_speed=”0.3″ margin_top=”” margin_bottom=”” hide_on_mobile=small-visibility,medium-visibility,large-visibilityclass=”” id=””][fusion_content_box title=ขั้นตอนที่ 3. ตรวจสอบวงจร CAN สำหรับระยะสั้นกับพื้น.backgroundcolor=”” icon=”” iconflip=”” iconrotate=”” iconspin=noiconcolor=”” circlecolor=”” circlebordersize=”” circlebordercolor=”” outercirclebordersize=”” outercirclebordercolor=”” image=”” image_id=”” image_width=”” image_height=”” link=”” linktext=”อ่านเพิ่มเติม” link_target=”” animation_type=”” animation_direction=leftanimation_speed=”0.3″ animation_offset=””]

  1. วัด CAN กับพื้นต้านทานในการเชื่อมต่ออินเวอร์เตอร์ OEM:
    • หมุด 1 เพื่อ INVERTER กรณี
    • หมุด 2 เพื่อ INVERTER กรณี
      • หากต้านทานอย่างใดอย่างหนึ่งคือ 0-100 โอห์ม, ซ่อมแซม shorted สามารถเชื่อมโยงวงจร. ไปที่ขั้นตอน 8.
      • หากทั้งสองมีความต้านทานโอห์ม 7k, ไปที่ขั้นตอน 4.

[/fusion_content_box][fusion_content_box title=ขั้นตอนที่ 4. ตรวจสอบ CAN เป็นประชากรใน PIN เชื่อมต่อที่ถูกต้อง.backgroundcolor=”” icon=”” iconflip=”” iconrotate=”” iconspin=”” iconcolor=”” circlecolor=”” circlebordersize=”” circlebordercolor=”” outercirclebordersize=”” outercirclebordercolor=”” image=”” image_id=”” image_width=”” image_height=”” link=”” linktext=”” link_target=”” animation_type=”” animation_direction=leftanimation_speed=”0.3″ animation_offset=””]

  1. วัดความต้านทานระหว่างอินเวอร์เตอร์ 40-Way Pin 4 และรีบ 9-Way วินิจฉัยขา H. (ถ้าขา H ไม่ได้ประชากร, พบ 3 ทางเชื่อมต่อที่อยู่ใกล้กับ
    9- วิธีการหรือการยุติ Pin ต้านทาน 1 ซึ่งอยู่ใกล้กับ 9-Way)

    • ถ้าความต้านทานโอห์ม 0-0.3, ไปที่ขั้นตอน 5.
    • ถ้าความต้านทาน 60 โอห์ม, สามารถซ่อมสายไฟ (สวัสดีและต่ำจะมีสายที่ไม่ถูกต้อง). ไปที่ขั้นตอน 8.

[/fusion_content_box][/fusion_content_boxes][fusion_content_boxes layout=clean-horizontalcolumns=”2″ title_size=”18pxheading_size=”3″ title_color=”#ffffffbody_color=”#ffffffbackgroundcolor=”#4f4f4ficon=”” iconflip=”” iconrotate=”” iconspin=noiconcolor=”” icon_circle=”” icon_circle_radius=”” circlecolor=”” circlebordersize=”” circlebordercolor=”” outercirclebordersize=”” outercirclebordercolor=”” icon_size=”” icon_hover_type=”” hover_accent_color=”” image=”” image_id=”” image_width=”” image_height=”” link_type=”” button_span=”” link_area=”” link_target=”” icon_align=leftanimation_type=”” animation_delay=”” animation_offset=”” animation_direction=leftanimation_speed=”0.3″ margin_top=”” margin_bottom=”” hide_on_mobile=small-visibility,medium-visibility,large-visibilityclass=”” id=””][fusion_content_box title=ขั้นตอนที่ 5. ตรวจสอบอำนาจและพื้นดินที่จะอินเวอร์เตอร์.backgroundcolor=”” icon=”” iconflip=”” iconrotate=”” iconspin=noiconcolor=”” circlecolor=”” circlebordersize=”” circlebordercolor=”” outercirclebordersize=”” outercirclebordercolor=”” image=”” image_id=”” image_width=”” image_height=”” link=”” linktext=”อ่านเพิ่มเติม” link_target=”” animation_type=”” animation_direction=leftanimation_speed=”0.3″ animation_offset=””]

  1. ที่สำคัญเกี่ยวกับ, กับอินเวอร์เตอร์ 40-Way ยังตัดการเชื่อมต่อ.
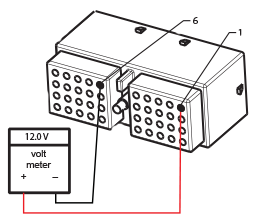
  2. วัดแรงดันไฟฟ้า 40-Way เชื่อมต่อ:
    • หมุด 1 ปักหมุด 640 วิธีพินอินเวอร์เตอร์เชื่อมต่อ 1 ปักหมุด 6
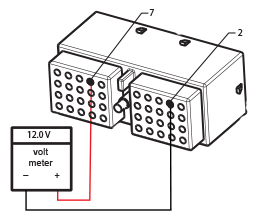
  3. 3. วัดแรงดันไฟฟ้า 40-Way เชื่อมต่อ:
    • หมุด 2 ปักหมุด 740 วิธีพินอินเวอร์เตอร์เชื่อมต่อ 1 ปักหมุด 6
      • ถ้าความต้านทานโอห์ม 0-0.3, แทนที่ HCM. ไปที่ขั้นตอน 8.
      • หากต้านทาน OL หรือมากกว่า 0.3 โอห์ม, ซ่อมแซมเทียม OEM ระหว่าง HCM และอินเวอร์เตอร์. ไปที่ขั้นตอน 8.

[/fusion_content_box][fusion_content_box title=ขั้นตอนที่ 6. ตรวจสอบวงจรอินเวอร์เตอร์พื้นดิน.backgroundcolor=”” icon=”” iconflip=”” iconrotate=”” iconspin=”” iconcolor=”” circlecolor=”” circlebordersize=”” circlebordercolor=”” outercirclebordersize=”” outercirclebordercolor=”” image=”” image_id=”” image_width=”” image_height=”” link=”” linktext=”” link_target=”” animation_type=”” animation_direction=leftanimation_speed=”0.3″ animation_offset=””]

  1. วัดความต้านทานระหว่างอินเวอร์เตอร์ 40-Way เชื่อมต่อขา 6 และพื้นดินหรืออินเวอร์เตอร์ 40-Way เชื่อมต่อขา 7 และพื้นดิน.40 วิธีพินอินเวอร์เตอร์เชื่อมต่อ 1 ปักหมุด 6
    • ถ้าความต้านทานโอห์ม 0-0.3, ไปที่ขั้นตอน 7.
    • หากต้านทานมีค่ามากกว่า 0.3 โอห์ม, ซ่อมแซมวงจรพื้น OEM ให้กับอินเวอร์เตอร์. ไปที่ขั้นตอน 8.

[/fusion_content_box][/fusion_content_boxes][fusion_content_boxes layout=clean-horizontalcolumns=”2″ title_size=”18pxheading_size=”3″ title_color=”#ffffffbody_color=”#ffffffbackgroundcolor=”#4f4f4ficon=”” iconflip=”” iconrotate=”” iconspin=noiconcolor=”” icon_circle=”” icon_circle_radius=”” circlecolor=”” circlebordersize=”” circlebordercolor=”” outercirclebordersize=”” outercirclebordercolor=”” icon_size=”” icon_hover_type=”” hover_accent_color=”#f41000image=”” image_id=”” image_width=”” image_height=”” link_type=”” button_span=”” link_area=”” link_target=”” icon_align=leftanimation_type=”” animation_delay=”” animation_offset=”” animation_direction=leftanimation_speed=”0.3″ margin_top=”” margin_bottom=”” hide_on_mobile=small-visibility,medium-visibility,large-visibilityclass=”” id=””][fusion_content_box title=ขั้นตอนที่ 7. วัดความต้านทานระหว่าง HCM และอินเวอร์เตอร์.backgroundcolor=”” icon=”” iconflip=”” iconrotate=”” iconspin=”” iconcolor=”” circlecolor=”” circlebordersize=”” circlebordercolor=”” outercirclebordersize=”” outercirclebordercolor=”” image=”” image_id=”” image_width=”” image_height=”” link=”” linktext=”” link_target=”” animation_type=”” animation_direction=leftanimation_speed=”0.3″ animation_offset=””]

  1. ปิดกุญแจ.
  2. นำ 38 วิธีไฮบริดยานพาหนะการเชื่อมต่อการเชื่อมต่อ.
  3. วัดความต้านทาน 38-Way ไฮบริดยานพาหนะการเชื่อมต่อการเชื่อมต่อ (S2) หมุด 2 ไปยังอินเวอร์เตอร์ 40-Way Pin 1. 38-วิธีไฮบริดยานพาหนะการเชื่อมต่อการเชื่อมต่อไปยังอินเวอร์เตอร์ 40-Way Pin 1
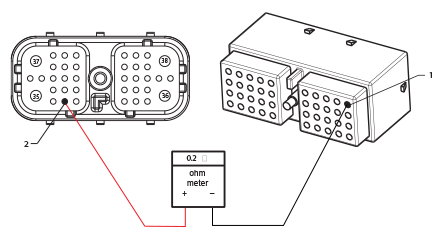
    • ถ้าความต้านทานโอห์ม 0-0.3, แทนที่ HCM. ไปที่ขั้นตอน 8.
    • หากต้านทาน OL หรือมากกว่า 0.3 โอห์ม, ซ่อมแซมเทียม OEM ระหว่าง HCM และอินเวอร์เตอร์. ไปที่ขั้นตอน 8.

[/fusion_content_box][fusion_content_box title=ขั้นตอนที่ 8. ตรวจสอบซ่อมแซม.backgroundcolor=”” icon=”” iconflip=”” iconrotate=”” iconspin=noiconcolor=”” circlecolor=”” circlebordersize=”” circlebordercolor=”” outercirclebordersize=”” outercirclebordercolor=”” image=”” image_id=”” image_width=”” image_height=”” link=”” linktext=”อ่านเพิ่มเติม” link_target=”” animation_type=”” animation_direction=leftanimation_speed=”0.3″ animation_offset=””]

  1. ปิดกุญแจ.
  2. เชื่อมต่อเชื่อมต่อทั้งหมด.
  3. ที่สำคัญเกี่ยวกับ.
  4. รหัสที่ชัดเจน, ดู ความผิดพลาดที่ไม่ใช้งานที่ชัดเจน.
  5. ขับรถและพยายามที่จะรีเซ็ตรหัส.
  6. ตรวจสอบรหัส, ดู ดูความผิดปกติที่ใช้งานและไม่ได้ใช้งาน.
    • หากไม่มีรหัส, ทดสอบเสร็จสิ้น.
    • ถ้ารหัสความผิด 88 ปรากฏ, พบข้อผิดพลาดในการทดสอบ, ไปที่ขั้นตอน 1.
    • ถ้ารหัสอื่นที่ไม่ใช่ 88 ปรากฏ, ดู ความผิดปกติรายการดัชนีรหัส.

[/fusion_content_box][/fusion_content_boxes][/fusion_builder_column][/fusion_builder_row][/fusion_builder_container][fusion_global id=”13788″]