[fusion_builder_container hundred_percent=nohundred_percent_height=nohundred_percent_height_scroll=nohundred_percent_height_center_content=yesequal_height_columns=nomenu_anchor=”” hide_on_mobile=small-visibility,medium-visibility,large-visibilitystatus=publishedpublish_date=”” class=”” id=”” background_color=”” background_image=”” background_position=center centerbackground_repeat=no-repeatfade=nobackground_parallax=noneenable_mobile=noparallax_speed=”0.3″ video_mp4=”” video_webm=”” video_ogv=”” video_url=”” video_aspect_ratio=”16:9″ video_loop=yesvideo_mute=yesvideo_preview_image=”” border_size=”” border_color=”” border_style=solidmargin_top=”35″ margin_bottom=”” padding_top=”” padding_right=”” padding_bottom=”” padding_left=””][fusion_builder_row][fusion_builder_column type=”1_1layout=”1_1spacing=”” center_content=nolink=”” target=_selfmin_height=”” hide_on_mobile=small-visibility,medium-visibility,large-visibilityclass=”” id=”” background_color=”” background_image=”” background_image_id=”” background_position=left topbackground_repeat=no-repeathover_type=noneborder_size=”0″ border_color=”” border_style=solidborder_position=allpadding_top=”” padding_right=”” padding_bottom=”” padding_left=”” margin_top=”” margin_bottom=”” animation_type=”” animation_direction=leftanimation_speed=”0.3″ animation_offset=”” last=no”][fusion_text columns=”” column_min_width=”” column_spacing=”” rule_style=defaultrule_size=”” rule_color=”” hide_on_mobile=small-visibility,medium-visibility,large-visibilityclass=”” id=””]

อีตันฟูลเลอร์ไฮบริดเกียร์รหัสความผิดปกติ 52 – เกียร์เซนเซอร์จับตำแหน่ง

[/fusion_text][/fusion_builder_column][/fusion_builder_row][/fusion_builder_container][fusion_builder_container hundred_percent=nohundred_percent_height=nohundred_percent_height_scroll=nohundred_percent_height_center_content=yesequal_height_columns=nomenu_anchor=”” hide_on_mobile=small-visibility,medium-visibility,large-visibilitystatus=publishedpublish_date=”” class=”” id=”” background_color=”” background_image=”” background_position=center centerbackground_repeat=no-repeatfade=nobackground_parallax=noneenable_mobile=noparallax_speed=”0.3″ video_mp4=”” video_webm=”” video_ogv=”” video_url=”” video_aspect_ratio=”16:9″ video_loop=yesvideo_mute=yesvideo_preview_image=”” border_size=”” border_color=”” border_style=solidmargin_top=”” margin_bottom=”” padding_top=”” padding_right=”” padding_bottom=”” padding_left=””][fusion_builder_row][fusion_builder_column type=”1_1layout=”1_1spacing=”” center_content=nolink=”” target=_selfmin_height=”” hide_on_mobile=small-visibility,medium-visibility,large-visibilityclass=”” id=”” background_color=”” background_image=”” background_image_id=”” background_position=left topbackground_repeat=no-repeathover_type=noneborder_size=”0″ border_color=”” border_style=solidborder_position=allpadding_top=”” padding_right=”” padding_bottom=”” padding_left=”” margin_top=”” margin_bottom=”” animation_type=”” animation_direction=leftanimation_speed=”0.3″ animation_offset=”” last=no”][fusion_text columns=”” column_min_width=”” column_spacing=”” rule_style=defaultrule_size=”” rule_color=”” hide_on_mobile=small-visibility,medium-visibility,large-visibilityclass=”” id=””]

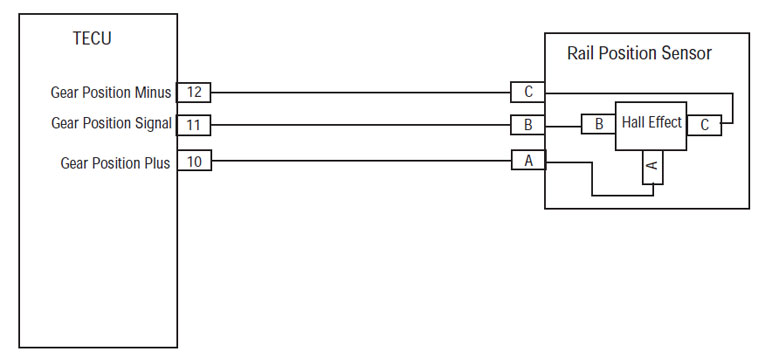
ความผิดปกติสำหรับอีตันไฮบริดรุ่นไดรฟ์ (MY08) EH-8E306A-U, EH-8E306A-UPG, EH-8E306A-UP, EH-8E306A-CD, EH-8E306A-T, EH-6E606B-CD, (MY09) EH-8E406A-U / P, EH-8E406A-UP, EH-8E406A-UPG, EH-8E406A-CD, EH-8E406A-CDG, EH-8E406A-CDR, EH-8E406A-T, EH-6E706B-CD, EH-6E706B-P และ EH-6E706B-UPG. อ่านด้านล่างเพื่อเรียนรู้วิธีการทดสอบ, ล้างและแก้ไขข้อผิดพลาดรหัสความผิดปกติสำหรับไลเนอร์ของคุณ, แม็ค, Peterbilt, Kenworth, วอลโว่, และรถบรรทุกระหว่างประเทศ. รถไฟเซนเซอร์จับตำแหน่งเป็นเซ็นเซอร์ตำแหน่ง Hall Effect ที่ให้ความคิดเห็นเกี่ยวกับตำแหน่งของนิ้วกะ. หน่วยควบคุมการรับส่งอิเล็กทรอนิกส์ (TECU) ให้คงที่อ้างอิง 5 โวลต์ 1 ขั้วของรถไฟเซนเซอร์จับตำแหน่ง. เอาท์พุทสัญญาณจากเซ็นเซอร์ให้สัญญาณแรงดันไฟฟ้าที่มีการควบคุม 0.5-4.5 โวลต์. ขั้วที่ผ่านมาให้พื้นดินสำหรับรถไฟเซนเซอร์จับตำแหน่งไป TECU.

ความผิดพลาดรหัส 52 – การตรวจหาเกียร์เซนเซอร์จับตำแหน่ง

ปัจจัยพื้นฐานต่อไปนี้จะต้องพบก่อนที่ระบบจะตรวจพบความผิดปกติ:

  • แรงดันไฟฟ้าจุดระเบิด TECU มีค่ามากกว่า 7 โวลต์และน้อยกว่า 16 โวลต์.
  • กองทุนการเงินระหว่างประเทศ 3, 4 ไม่ได้ตั้งค่าถ้าความผิด TECU ระบบแบตเตอรี่แรงดันต่ำที่ใช้งานอยู่. กองทุนการเงินระหว่างประเทศ 2 ไม่ได้ตั้งค่าถ้า FMI 3, 4 เป็นที่ใช้งานอยู่.

บันทึก: เมื่อการแก้ไขปัญหาที่ไม่ใช้งานรหัสหมายถึง โหมดการวิเคราะห์สินค้า (PDM)

เงื่อนไขการตั้งค่าความผิดพลาดรหัสที่ใช้งานอยู่

  • กองทุนการเงินระหว่างประเทศ 2 ชุดควบคุมการส่งเมื่อตรวจพบแรงดันรถไฟเซนเซอร์อยู่เหนือ 4.5 โวลต์หรือต่ำกว่า 0.5 โวลต์สำหรับ 1 ที่สองของอีกต่อไป.
  • กองทุนการเงินระหว่างประเทศ 3 ชุดควบคุมการส่งเมื่อตรวจพบแรงดันรถไฟเซนเซอร์คือ 5% ดังกล่าวข้างต้นแรงดันที่คาดไว้สำหรับ 1 วินาทีหรือนานกว่า.
  • กองทุนการเงินระหว่างประเทศ 4 ตั้งค่าเมื่อตัวควบคุมการส่งตรวจจับแรงดันรถไฟเซนเซอร์คือ 5% ดังต่อไปนี้แรงดันที่คาดไว้สำหรับ 1 วินาทีหรือนานกว่า.

สำรองเมื่อความผิดพลาดรหัส 52 มีการตั้งเงื่อนไขต่อไปนี้เกิดขึ้น:

  • สีแดง“บริการ” สว่างแสงและ“F” กะพริบในหน้าจอเกียร์.
  • ความผิดจะถูกเก็บไว้ในหน่วยความจำ TECU.
  • หากความผิดพลาดนี้เกิดขึ้นขณะที่การย้าย, ส่งยังคงอยู่ในปัจจุบันและเกียร์คลัทช์เปิดเมื่อรถหยุด.
  • โหมดการทำงานเปลี่ยนแปลงไปยังโหมด“AutoShift สำรอง”.

[/fusion_text][fusion_text columns=”” column_min_width=”” column_spacing=”” rule_style=defaultrule_size=”” rule_color=”” hide_on_mobile=small-visibility,medium-visibility,large-visibilityclass=”” id=””]

เงื่อนไขการตั้งค่าความผิดพลาดที่ไม่ใช้งานรหัส

เฉพาะความผิดพลาดที่ไม่ใช้งานสามารถลบออกจากหน่วยควบคุมการรับส่งอิเล็กทรอนิกส์ (TECU) หรือประวัติ HCM ใช้ ServiceRanger. TECU โดยอัตโนมัติล้างความผิดพลาดจากประวัติศาสตร์หลัง 200 ชั่วโมงและ HCM โดยอัตโนมัติล้างความผิดพลาดจากประวัติศาสตร์หลังจากความผิดพลาดที่ไม่ได้ใช้งาน 200 ชั่วโมง.

รหัสความผิดปกตินี้สามารถเกิดจากสาเหตุใดต่อไปนี้:

  • กองทุนการเงินระหว่างประเทศ 2
    • เกียร์ Harness
    • รถไฟเซนเซอร์จับตำแหน่ง
    • TECU
  • กองทุนการเงินระหว่างประเทศ 3, 4
    • TECU

[/fusion_text][/fusion_builder_column][/fusion_builder_row][/fusion_builder_container][fusion_builder_container hundred_percent=nohundred_percent_height=nohundred_percent_height_scroll=nohundred_percent_height_center_content=yesequal_height_columns=nomenu_anchor=”” hide_on_mobile=small-visibility,medium-visibility,large-visibilitystatus=publishedpublish_date=”” class=”” id=”” background_color=”” background_image=”” background_position=center centerbackground_repeat=no-repeatfade=nobackground_parallax=noneenable_mobile=noparallax_speed=”0.3″ video_mp4=”” video_webm=”” video_ogv=”” video_url=”” video_aspect_ratio=”16:9″ video_loop=yesvideo_mute=yesvideo_preview_image=”” border_size=”” border_color=”” border_style=solidmargin_top=”” margin_bottom=”” padding_top=”” padding_right=”” padding_bottom=”” padding_left=””][fusion_builder_row][fusion_builder_column type=”1_1layout=”1_1spacing=”” center_content=nolink=”” target=_selfmin_height=”” hide_on_mobile=small-visibility,medium-visibility,large-visibilityclass=”” id=”” background_color=”” background_image=”” background_image_id=”” background_position=left topbackground_repeat=no-repeathover_type=noneborder_size=”0″ border_color=”” border_style=solidborder_position=allpadding_top=”” padding_right=”” padding_bottom=”” padding_left=”” margin_top=”” margin_bottom=”” animation_type=”” animation_direction=leftanimation_speed=”0.3″ animation_offset=”” last=no”][fusion_text columns=”” column_min_width=”” column_spacing=”” rule_style=defaultrule_size=”” rule_color=”” hide_on_mobile=small-visibility,medium-visibility,large-visibilityclass=”” id=””]

ความผิดพลาดรหัส 52 – เกียร์ทดสอบเซนเซอร์ตำแหน่ง

[/fusion_text][/fusion_builder_column][/fusion_builder_row][/fusion_builder_container][fusion_builder_container hundred_percent=nohundred_percent_height=nohundred_percent_height_scroll=nohundred_percent_height_center_content=yesequal_height_columns=nomenu_anchor=”” hide_on_mobile=small-visibility,medium-visibility,large-visibilitystatus=publishedpublish_date=”” class=”” id=”” background_color=”” background_image=”” background_position=center centerbackground_repeat=no-repeatfade=nobackground_parallax=noneenable_mobile=noparallax_speed=”0.3″ video_mp4=”” video_webm=”” video_ogv=”” video_url=”” video_aspect_ratio=”16:9″ video_loop=yesvideo_mute=yesvideo_preview_image=”” border_size=”” border_color=”” border_style=solidmargin_top=”” margin_bottom=”” padding_top=”” padding_right=”” padding_bottom=”” padding_left=””][fusion_builder_row][fusion_builder_column type=”1_1layout=”1_1spacing=”” center_content=nolink=”” target=_selfmin_height=”” hide_on_mobile=small-visibility,medium-visibility,large-visibilityclass=”” id=”” background_color=”” background_image=”” background_image_id=”” background_position=left topbackground_repeat=no-repeathover_type=noneborder_size=”0″ border_color=”” border_style=solidborder_position=allpadding_top=”” padding_right=”” padding_bottom=”” padding_left=”” margin_top=”” margin_bottom=”” animation_type=”” animation_direction=leftanimation_speed=”0.3″ animation_offset=”” last=no”][fusion_text columns=”” column_min_width=”” column_spacing=”” rule_style=defaultrule_size=”” rule_color=”” hide_on_mobile=small-visibility,medium-visibility,large-visibilityclass=”” id=””]

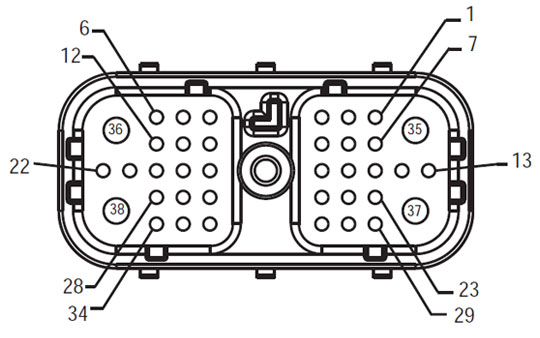
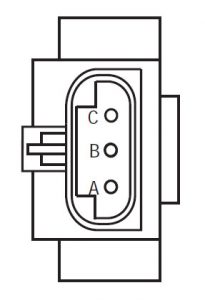
การระบุส่วนประกอบ:

[/fusion_text][/fusion_builder_column][fusion_builder_column type=”2_3layout=”1_2spacing=”” center_content=nolink=”” target=_selfmin_height=”” hide_on_mobile=small-visibility,medium-visibility,large-visibilityclass=”” id=”” background_color=”” background_image=”” background_image_id=”” background_position=left topbackground_repeat=no-repeathover_type=noneborder_size=”0″ border_color=”” border_style=solidborder_position=allpadding_top=”” padding_right=”” padding_bottom=”” padding_left=”” margin_top=”” margin_bottom=”” animation_type=”” animation_direction=leftanimation_speed=”0.3″ animation_offset=”” last=no”][fusion_imageframe image_id=”14126|fullmax_width=”” style_type=”” blur=”” stylecolor=”” hover_type=nonebordersize=”” bordercolor=”” borderradius=”” align=centerlightbox=nogallery_id=”” lightbox_image=”” lightbox_image_id=”” alt=”สายรัดด้านหน้า TECU – อินเตอร์เฟซการเชื่อมต่อยานพาหนะ” link=”” linktarget=_selfhide_on_mobile=small-visibility,medium-visibility,large-visibilityclass=”” id=”” animation_type=”” animation_direction=leftanimation_speed=”0.3″ animation_offset=””]https://www.globaltransmissionsupply.com/wp-content/uploads/Harness-Front-View-TECU.jpg[/fusion_imageframe][fusion_text columns=”” column_min_width=”” column_spacing=”” rule_style=defaultrule_size=”” rule_color=”” hide_on_mobile=small-visibility,medium-visibility,large-visibilityclass=”” id=””]

สายรัดมุมมองด้านหน้า
(TECU – ระบบเชื่อมต่อการเชื่อมต่อ)
[/fusion_text][/fusion_builder_column][fusion_builder_column type=”1_3layout=”1_2spacing=”” center_content=nolink=”” target=_selfmin_height=”” hide_on_mobile=small-visibility,medium-visibility,large-visibilityclass=”” id=”” background_color=”” background_image=”” background_image_id=”” background_position=left topbackground_repeat=no-repeathover_type=noneborder_size=”0″ border_color=”” border_style=solidborder_position=allpadding_top=”” padding_right=”” padding_bottom=”” padding_left=”” margin_top=”” margin_bottom=”” animation_type=”” animation_direction=leftanimation_speed=”0.3″ animation_offset=”” last=no”][fusion_imageframe image_id=”14264|mediummax_width=”” style_type=”” blur=”” stylecolor=”” hover_type=nonebordersize=”” bordercolor=”” borderradius=”” align=centerlightbox=nogallery_id=”” lightbox_image=”” lightbox_image_id=”” alt=”เกียร์เซนเซอร์จับตำแหน่ง Pins” link=”” linktarget=_selfhide_on_mobile=small-visibility,medium-visibility,large-visibilityclass=”” id=”” animation_type=”” animation_direction=leftanimation_speed=”0.3″ animation_offset=””]https://www.globaltransmissionsupply.com/wp-content/uploads/Gear-position-sensor-pins-205×300.jpg[/fusion_imageframe][fusion_text columns=”” column_min_width=”” column_spacing=”” rule_style=defaultrule_size=”” rule_color=”” hide_on_mobile=small-visibility,medium-visibility,large-visibilityclass=”” id=””]

เซ็นเซอร์อุณหภูมิ
(harness ดู – ด้านหน้า)

[/fusion_text][/fusion_builder_column][fusion_builder_column type=”1_1layout=”1_1spacing=”” center_content=nolink=”” target=_selfmin_height=”” hide_on_mobile=small-visibility,medium-visibility,large-visibilityclass=”” id=”” background_image_id=”” background_color=”#000000″ background_image=”” background_position=left topundefined=”” background_repeat=no-repeathover_type=noneborder_size=”0″ border_color=”” border_style=solidborder_position=allpadding_top=”” padding_right=”” padding_bottom=”” padding_left=”” margin_top=”” margin_bottom=”” animation_type=”” animation_direction=leftanimation_speed=”0.3″ animation_offset=”” last=no”][fusion_text columns=”” column_min_width=”” column_spacing=”” rule_style=defaultrule_size=”” rule_color=”” hide_on_mobile=small-visibility,medium-visibility,large-visibilityclass=”” id=””]

บันทึก: อ้างถึง Eaton ตัวแทนไฮบริดและเชื่อมต่อสถานที่ตั้ง สำหรับสถานที่เชื่อมต่อในระบบ MY08

[/fusion_text][/fusion_builder_column][fusion_builder_column type=”1_1layout=”1_1spacing=”” center_content=nolink=”” target=_selfmin_height=”” hide_on_mobile=small-visibility,medium-visibility,large-visibilityclass=”” id=”” background_image_id=”” background_color=”#000000″ background_image=”” background_position=left topundefined=”” background_repeat=no-repeathover_type=noneborder_size=”0″ border_color=”” border_style=solidborder_position=allpadding_top=”” padding_right=”” padding_bottom=”” padding_left=”” margin_top=”20″ margin_bottom=”20″ animation_type=”” animation_direction=leftanimation_speed=”0.3″ animation_offset=”” last=no”][fusion_text columns=”” column_min_width=”” column_spacing=”” rule_style=defaultrule_size=”” rule_color=”” hide_on_mobile=small-visibility,medium-visibility,large-visibilityclass=”” id=””]

บันทึก: อ้างถึง Eaton ตัวแทนไฮบริดและเชื่อมต่อสถานที่ตั้ง สำหรับสถานที่เชื่อมต่อในระบบ MY09.
[/fusion_text][/fusion_builder_column][fusion_builder_column type=”1_1layout=”1_1spacing=”” center_content=nolink=”” target=_selfmin_height=”” hide_on_mobile=small-visibility,medium-visibility,large-visibilityclass=”” id=”” background_color=”” background_image=”” background_image_id=”” background_position=left topbackground_repeat=no-repeathover_type=noneborder_size=”0″ border_color=”” border_style=solidborder_position=allpadding_top=”” padding_right=”” padding_bottom=”” padding_left=”” margin_top=”” margin_bottom=”” animation_type=”” animation_direction=leftanimation_speed=”0.3″ animation_offset=”” last=no”][fusion_imageframe image_id=”14266|fullmax_width=”” style_type=”” blur=”” stylecolor=”” hover_type=nonebordersize=”” bordercolor=”” borderradius=”” align=centerlightbox=nogallery_id=”” lightbox_image=”” lightbox_image_id=”” alt=”TECU ตำแหน่งทางรถไฟเชื่อมต่อที่ตั้งเซ็นเซอร์” link=”” linktarget=_selfhide_on_mobile=small-visibility,medium-visibility,large-visibilityclass=”” id=”” animation_type=”” animation_direction=leftanimation_speed=”0.3″ animation_offset=””]https://www.globaltransmissionsupply.com/wp-content/uploads/TECU-rail-position-sensor-connection-location.jpg[/fusion_imageframe][/fusion_builder_column][/fusion_builder_row][/fusion_builder_container][fusion_builder_container hundred_percent=nohundred_percent_height=nohundred_percent_height_scroll=nohundred_percent_height_center_content=yesequal_height_columns=nomenu_anchor=”” hide_on_mobile=small-visibility,medium-visibility,large-visibilitystatus=publishedpublish_date=”” class=”” id=”” background_color=”” background_image=”” background_position=center centerbackground_repeat=no-repeatfade=nobackground_parallax=noneenable_mobile=noparallax_speed=”0.3″ video_mp4=”” video_webm=”” video_ogv=”” video_url=”” video_aspect_ratio=”16:9″ video_loop=yesvideo_mute=yesvideo_preview_image=”” border_size=”” border_color=”” border_style=solidmargin_top=”” margin_bottom=”” padding_top=”” padding_right=”” padding_bottom=”” padding_left=””][fusion_builder_row][fusion_builder_column type=”1_1layout=”1_1spacing=”” center_content=nolink=”” target=_selfmin_height=”” hide_on_mobile=small-visibility,medium-visibility,large-visibilityclass=”” id=”” background_color=”” background_image=”” background_image_id=”” background_position=left topbackground_repeat=no-repeathover_type=noneborder_size=”0″ border_color=”” border_style=solidborder_position=allpadding_top=”” padding_right=”” padding_bottom=”” padding_left=”” margin_top=”” margin_bottom=”” animation_type=”” animation_direction=leftanimation_speed=”0.3″ animation_offset=”” last=no”][fusion_modal name=warnings_cautionstitle=”คำเตือน & ข้อควรระวัง” size=largebackground=”” border_color=”” show_footer=yesclass=”” id=””]อันตราย: อันตรายบ่งชี้ว่าคุณจะได้รับบาดเจ็บสาหัสหรือเสียชีวิตหากไม่ปฏิบัติตามขั้นตอนที่ระบุ.
การเตือน: คำเตือนบ่งชี้อันตรายทันที, ซึ่งอาจส่งผลให้ได้รับบาดเจ็บสาหัสถ้าคุณไม่ทำตามขั้นตอนที่ระบุ.
ความระมัดระวัง: ข้อควรระวังบ่งชี้ยานพาหนะหรือความเสียหายต่อทรัพย์สินที่อาจเกิดขึ้นถ้าคุณไม่ทำตามขั้นตอนที่ระบุ.

บันทึก: หมายเหตุแสดงให้เห็นรายละเอียดเพิ่มเติมที่จะช่วยในการวินิจฉัยหรือซ่อมแซมส่วนประกอบ / ระบบ.

ทำตามขั้นตอนที่ระบุไว้ในลำดับที่ระบุเพื่อหลีกเลี่ยงการบาดเจ็บส่วนบุคคล:

1. หากกรวยแรงดันสูงอยู่รอบรถและกิจการติดตั้งบน PEC, เพียงคนเดียวที่ควรจะได้รับอนุญาตให้เริ่มยานพาหนะเป็นคนที่เซ็นสัญญาแท็กกิจ.
2. ก่อนที่จะทำงานบนรถหรือออกจากรถแท็กซี่ในขณะที่เครื่องยนต์กำลังทำงาน, คุณควรวางคันเกียร์ใน“N” ตั้งเบรกจอดรถ, และป้องกันล้อ.
3. สำหรับเหตุผลด้านความปลอดภัย, มักจะมีส่วนร่วมบริการเบรกก่อนที่จะมีการเลือกตำแหน่งเกียร์จาก“เอ็น”
4. ก่อนที่จะเริ่มเป็นรถมักจะนั่งอยู่ในที่นั่งคนขับ, เลือก“N” ในการควบคุมการเปลี่ยนแปลง, และการตั้งค่าที่จอดรถเบรก.
5. ในรถยนต์ที่มี ePTO, เครื่องยนต์และ / หรือ
มอเตอร์ / เครื่องกำเนิดไฟฟ้าสามารถเริ่มต้นในโหมด ePTO. ไม่เคยดำเนินการบำรุงรักษาใด ๆ หรือทำงานเกี่ยวกับยานพาหนะ, ขณะที่อยู่ในโหมดนี้.
6. 12-โวลต์แบตเตอรี่บวก (+) และลบ (-) จะต้องมีการตัดการเชื่อมต่อก่อนที่จะมีการเชื่อมใด ๆ ในไฮบริดพร้อมอุปกรณ์ยานพาหนะใด ๆ.

ความระมัดระวัง: ทำตามขั้นตอนที่ระบุไว้ในลำดับที่ระบุเพื่อหลีกเลี่ยงความผิดปกติของอุปกรณ์หรือความเสียหาย.
ความระมัดระวัง: อย่าปล่อยเบรกจอดรถหรือพยายามที่จะเลือกเกียร์จนความดันอากาศอยู่ในระดับที่ถูกต้อง.
ความระมัดระวัง: เพื่อหลีกเลี่ยงความเสียหายให้กับการส่งผ่านระหว่างลากสถานที่คันเกียร์ใน“N” และยกล้อไดรฟ์ออกจากพื้นดินหรือตัดการเชื่อมต่อระบบขับเคลื่อน.

คำเตือนแรงดันสูง & ข้อควรระวัง

  • ใช้ CO2 หรือเคมีแห้งดับเพลิง.
  • สายไฟแรงดันสูงจะครอบคลุมในฉนวนกันความร้อนสีส้มหรือท่อที่ซับซ้อนและมีเครื่องหมายฉลากคำเตือนในการเชื่อมต่อ.
  • ทั้งหมดEaton®ไฮบริดดีเซล / ยานพาหนะไฟฟ้าจะถูกทำเครื่องหมาย ‘ไฮบริด’ ด้านนอกของยานพาหนะ, พร้อมกับป้ายกะบนเส้นประ.
  • อ้างถึง OEM สำหรับสถานที่เฉพาะของตัวถังที่ติดตั้งชิ้นส่วนไฮบริด.
  • อย่าตัดเป็นสายไฟฟ้าแรงสูงสีส้ม.
  • อย่าตัดเป็นหรือเปิด PEC.
  • อย่าตัดเป็นหรือเปิด DC / DC converter.
  • อย่าตัดเป็นหรือเปิดอินเวอร์เตอร์.

เขตกันชนจะต้องตั้งค่าและแรงดันสูงฉนวนถุงมือยาง (ชั้น 0 กับครอบหนัง) จะต้องก่อนที่จะทำงานเกี่ยวกับไฟฟ้าแรงสูง. ความล้มเหลวที่จะปฏิบัติตามคำแนะนำเหล่านี้อาจส่งผลให้ได้รับบาดเจ็บสาหัสหรือเสียชีวิต.
ถุงมือยางฉนวนที่ต้องสวมใส่ในขณะที่ทำงานบนระบบแรงดันสูงเป็นชั้น 0 กับครอบหนัง. ถุงมือยางควรจะทดสอบก่อนการใช้งานทุกขั้นตอนดังต่อไปนี้การทดสอบยางถุงมือฉนวนกันความร้อนที่พบใน“เครื่องมือวิเคราะห์ / บริการสิ่งพิมพ์” ที่หน้า 6. ความล้มเหลวที่จะปฏิบัติตามคำแนะนำเหล่านี้อาจส่งผลให้ได้รับบาดเจ็บสาหัสหรือเสียชีวิต.
ก่อนที่จะตรวจสอบหรือทำงานเกี่ยวกับสายไฟฟ้าแรงสูงหรือส่วนประกอบ“แรงดันสูงปิดระบบการให้บริการและเพิ่มพลังขั้นตอน” ที่หน้า 4 ควรจะปฏิบัติตาม. ความล้มเหลวที่จะปฏิบัติตามคำแนะนำเหล่านี้อาจส่งผลให้ได้รับบาดเจ็บสาหัสหรือเสียชีวิต.
กิจและ Tagout เฉพาะอุปกรณ์จะถูกลบออกโดยช่างที่วางอุปกรณ์ Lockout Tagout และบนยานพาหนะ. ความล้มเหลวที่จะปฏิบัติตามคำแนะนำเหล่านี้อาจส่งผลให้ได้รับบาดเจ็บสาหัสหรือเสียชีวิต.
ถุงมือยางฉนวนไฟฟ้าแรงสูง (ชั้น 0 กับครอบหนัง) ต้องสวมใส่เมื่อทำงานใด ๆ
สายไฟฟ้าแรงสูง. “การปิดระบบไฟฟ้าแรงสูงบริการและ Power-Up ขั้นตอน” ที่หน้า 4 จะต้องปฏิบัติตามก่อนที่จะถอดสายไฟฟ้าแรงสูงใด ๆ. ความล้มเหลวที่จะปฏิบัติตามคำแนะนำเหล่านี้อาจส่งผลให้ได้รับบาดเจ็บสาหัสหรือเสียชีวิต.
สายไฟฟ้าแรงสูงและสายไฟเป็นสีส้มและมีป้ายเตือนในการเชื่อมต่อ. ส่วนประกอบแรงดันสูงจะมีเครื่องหมายฉลาก. ถุงมือยางฉนวนไฟฟ้าแรงสูง (ชั้น 0 กับครอบหนัง) จะต้องใช้เมื่อทำงานใด ๆ ขององค์ประกอบเหล่านี้. ความล้มเหลวที่จะปฏิบัติตามคำแนะนำเหล่านี้อาจส่งผลให้ได้รับบาดเจ็บสาหัสหรือเสียชีวิต.

ไฟฟ้าแรงสูงขั้นตอนการบริการ Shutdown

ไฟฟ้าแรงสูงปิดระบบการให้บริการและขั้นตอนการเพิ่มพลัง1. ติดตาม“แรงดันสูงพื้นที่ทำงาน” ขั้นตอน.
2. ค้นหาสีแดงสลับ PEC บริการอยู่ด้านหน้าของ PEC และผลักดันปิด.
3. ถอดฝาครอบใช้บริการและติดตั้งขายึดกิจ (J48506).
4. แท็กยึดกับ Lockout Bracket.
5. ให้แน่ใจว่าสวิทช์ PEC บริการไม่สามารถย้ายจากตำแหน่งปิด.
6. ช่วยให้ระบบการตั้งค่าขั้นต่ำของ 5 นาทีเพื่อจำหน่ายไฟฟ้าแรงสูง.
7. เชื่อมต่อ ServiceRanger และดูข้อมูลการตรวจสอบ PID 116 เรียกว่า“แรงดันสูงที่มีศักยภาพแบตเตอรี่.” ใช้ SPN 520323 สำหรับการเชื่อมต่อ J1939“แบตเตอรี่แรงดันไฟฟ้า RB” (กล่องรีเลย์).
8. แรงดันไฟฟ้าที่ควรจะเป็น 30 โวลต์หรือน้อยกว่า. ถ้าแรงดันไฟฟ้าที่สูงกว่า 30 โวลต์, ไม่ได้ทำงานบนยานพาหนะและติดต่อEaton®ที่ 1-800-826-HELP (4357).
9. เปิดกุญแจออกและดำเนินการซ่อมแซมหรือขั้นตอนการแก้ไขปัญหา.
บันทึก: แรงดันไฟฟ้าที่ลดลงเป็นศูนย์เมื่อคีย์ถูกปิด.

ไฟฟ้าแรงสูงบริการ Power-Up ขั้นตอน

1. ติดตั้งทุกการเชื่อมต่อแรงดันสูงเข้าไปอยู่ในตำแหน่งล็อคของพวกเขา.
2. หากคุณเป็นคนที่ทำงานเกี่ยวกับยานพาหนะ, ลบ Lockout Bracket และแท็ก.
3. ติดตั้ง Lockout Bracket มากกว่าสวิทช์ให้บริการ.
4. ดึงบริการสลับออกและปล่อยให้ชุดยานพาหนะสำหรับ 2 นาที.
5. Start vehicle when appropriate.[/fusion_modal][fusion_modal name=component_locationtitle=”Eaton ตัวแทนไฮบริดและเชื่อมต่อสถานที่ตั้ง ” size=largebackground=”#ffffffborder_color=”” show_footer=yesclass=”” id=””]

Eaton ตัวแทนไฮบริดและสถานที่เชื่อมต่อระบบ MY08

[/fusion_modal][fusion_modal name=component_location2title=”Eaton ตัวแทนไฮบริดและเชื่อมต่อสถานที่ตั้ง MY09 ระบบ” size=largebackground=”#ffffffborder_color=”” show_footer=yesclass=”” id=””]

Eaton ตัวแทนไฮบริดและสถานที่เชื่อมต่อระบบ MY09

[/fusion_modal][/fusion_builder_column][/fusion_builder_row][/fusion_builder_container][fusion_builder_container hundred_percent=nohundred_percent_height=nohundred_percent_height_scroll=nohundred_percent_height_center_content=yesequal_height_columns=nomenu_anchor=”” hide_on_mobile=small-visibility,medium-visibility,large-visibilitystatus=publishedpublish_date=”” class=”” id=”” background_color=”” background_image=”” background_position=center centerbackground_repeat=no-repeatfade=nobackground_parallax=noneenable_mobile=noparallax_speed=”0.3″ video_mp4=”” video_webm=”” video_ogv=”” video_url=”” video_aspect_ratio=”16:9″ video_loop=yesvideo_mute=yesvideo_preview_image=”” border_size=”” border_color=”” border_style=solidmargin_top=”” margin_bottom=”” padding_top=”” padding_right=”” padding_bottom=”” padding_left=””][fusion_builder_row][fusion_builder_column type=”1_1layout=”1_1spacing=”” center_content=nolink=”” target=_selfmin_height=”” hide_on_mobile=small-visibility,medium-visibility,large-visibilityclass=”” id=”” background_color=”” background_image=”” background_image_id=”” background_position=left topbackground_repeat=no-repeathover_type=noneborder_size=”0″ border_color=”” border_style=solidborder_position=allpadding_top=”” padding_right=”” padding_bottom=”” padding_left=”” margin_top=”” margin_bottom=”” animation_type=”” animation_direction=leftanimation_speed=”0.3″ animation_offset=”” last=no”][fusion_content_boxes layout=clean-horizontalcolumns=”1″ title_size=”18pxheading_size=”3″ title_color=”#ffffffbody_color=”#ffffffbackgroundcolor=”#4f4f4ficon=”” iconflip=”” iconrotate=”” iconspin=noiconcolor=”” icon_circle=”” icon_circle_radius=”” circlecolor=”” circlebordersize=”” circlebordercolor=”” outercirclebordersize=”” outercirclebordercolor=”” icon_size=”” icon_hover_type=”” hover_accent_color=”” image=”” image_id=”” image_width=”” image_height=”” link_type=”” button_span=”” link_area=”” link_target=”” icon_align=leftanimation_type=”” animation_delay=”” animation_offset=”” animation_direction=leftanimation_speed=”0.3″ margin_top=”” margin_bottom=”” hide_on_mobile=small-visibility,medium-visibility,large-visibilityclass=”” id=””][fusion_content_box title=ขั้นตอนที่ 1. ตรวจสอบสถานะการใช้งานรหัสความผิดปกติหรือไม่ได้ใช้งาน.backgroundcolor=”” icon=”” iconflip=”” iconrotate=”” iconspin=noiconcolor=”” circlecolor=”” circlebordersize=”” circlebordercolor=”” outercirclebordersize=”” outercirclebordercolor=”” image=”” image_id=”” image_width=”” image_height=”” link=”” linktext=”อ่านเพิ่มเติม” link_target=”” animation_type=”” animation_direction=leftanimation_speed=”0.3″ animation_offset=””]

  1. ดึงรหัสผิดใช้งานอยู่และ FMIS กับ ServiceRanger ที่ใช้เชื่อมต่อการวินิจฉัย 9-Way.
  2. ปิดกุญแจ.
  3. ซึ่ง FMIS ที่มีอยู่?
    • หาก FMI 3 หรือ 4 เป็น บริษัท จดทะเบียน, แทนที่หน่วยควบคุมการรับส่งอิเล็กทรอนิกส์ (TECU), จากนั้นไปที่ขั้นตอน 5.
    • หาก FMI 2 เป็น บริษัท จดทะเบียน, ไปที่ขั้นตอน 2.

[/fusion_content_box][/fusion_content_boxes][fusion_content_boxes layout=clean-horizontalcolumns=”2″ title_size=”18pxheading_size=”3″ title_color=”#ffffffbody_color=”#ffffffbackgroundcolor=”#4f4f4ficon=”” iconflip=”” iconrotate=”” iconspin=noiconcolor=”” icon_circle=”” icon_circle_radius=”” circlecolor=”” circlebordersize=”” circlebordercolor=”” outercirclebordersize=”” outercirclebordercolor=”” icon_size=”” icon_hover_type=”” hover_accent_color=”” image=”” image_id=”” image_width=”” image_height=”” link_type=”” button_span=”” link_area=”” link_target=”” icon_align=leftanimation_type=”” animation_delay=”” animation_offset=”” animation_direction=leftanimation_speed=”0.3″ margin_top=”” margin_bottom=”” hide_on_mobile=small-visibility,medium-visibility,large-visibilityclass=”” id=””][fusion_content_box title=ขั้นตอนที่ 2. ตรวจสอบความต่อเนื่องของวงจรเซ็นเซอร์เกียร์ Harness.backgroundcolor=”” icon=”” iconflip=”” iconrotate=”” iconspin=noiconcolor=”” circlecolor=”” circlebordersize=”” circlebordercolor=”” outercirclebordersize=”” outercirclebordercolor=”” image=”” image_id=”” image_width=”” image_height=”” link=”” linktext=”อ่านเพิ่มเติม” link_target=”” animation_type=”” animation_direction=leftanimation_speed=”0.3″ animation_offset=””]

  1. ปิดกุญแจ.
  2. ถอดสายแบตเตอรี่เชิงลบ.
  3. ปลดเกียร์ Harness 38- เชื่อมต่อวิธี.
  4. วัดความต้านทานระหว่างเกียร์ Harness 38-Way เชื่อมต่อ Pins:
    • 18 และ 19
    • 18 และ 20
      บันทึก: อัตโนมัติตั้งแต่โวลต์ดิจิตอล / โอห์มเมตรจะต้องใช้.

      • ถ้าขา 18 และขา 19 ความต้านทานโอห์ม 100-200 และถ้าขา 18 และขา 20 ต้านทาน 5K-7K โอห์ม, ไปที่ขั้นตอน 3.
      • หากเงื่อนไขใด ๆ ดังกล่าวข้างต้นจะไม่ได้พบ, ไปที่ขั้นตอน 4.

[/fusion_content_box][fusion_content_box title=ขั้นตอนที่ 3. ตรวจสอบความต่อเนื่องของวงจรเซ็นเซอร์เกียร์ Harness กับพื้น.backgroundcolor=”” icon=”” iconflip=”” iconrotate=”” iconspin=”” iconcolor=”” circlecolor=”” circlebordersize=”” circlebordercolor=”” outercirclebordersize=”” outercirclebordercolor=”” image=”” image_id=”” image_width=”” image_height=”” link=”” linktext=”” link_target=”” animation_type=”” animation_direction=leftanimation_speed=”0.3″ animation_offset=””]

  1. Measure resistance between Transmission Harness 38- วิธีการเชื่อมต่อขา 18 ลงไปที่พื้น.
    • หากต้านทาน 10K โอห์มหรือมากกว่า, แทนที่หน่วยควบคุมการรับส่งอิเล็กทรอนิกส์ (TECU) (เฉพาะในกรณีที่ความผิดพลาดเป็นรหัสที่ใช้งานอยู่), จากนั้นไปที่ขั้นตอน 5.
    • ถ้าความต้านทานน้อยกว่า 10K โอห์ม, ไปที่ขั้นตอน 4.

[/fusion_content_box][/fusion_content_boxes][fusion_content_boxes layout=clean-horizontalcolumns=”2″ title_size=”18pxheading_size=”3″ title_color=”#ffffffbody_color=”#ffffffbackgroundcolor=”#4f4f4ficon=”” iconflip=”” iconrotate=”” iconspin=noiconcolor=”” icon_circle=”” icon_circle_radius=”” circlecolor=”” circlebordersize=”” circlebordercolor=”” outercirclebordersize=”” outercirclebordercolor=”” icon_size=”” icon_hover_type=”” hover_accent_color=”#f41000image=”” image_id=”” image_width=”” image_height=”” link_type=”” button_span=”” link_area=”” link_target=”” icon_align=leftanimation_type=”” animation_delay=”” animation_offset=”” animation_direction=leftanimation_speed=”0.3″ margin_top=”” margin_bottom=”” hide_on_mobile=small-visibility,medium-visibility,large-visibilityclass=”” id=””][fusion_content_box title=ขั้นตอนที่ 4. ตรวจสอบความต่อเนื่องของการส่งสายรัดเกียร์เซนเซอร์จับตำแหน่งวงจร.backgroundcolor=”” icon=”” iconflip=”” iconrotate=”” iconspin=”” iconcolor=”” circlecolor=”” circlebordersize=”” circlebordercolor=”” outercirclebordersize=”” outercirclebordercolor=”” image=”” image_id=”” image_width=”” image_height=”” link=”” linktext=”” link_target=”” animation_type=”” animation_direction=leftanimation_speed=”0.3″ animation_offset=””]

  1. ตัดการเชื่อมต่อจากเกียร์ Harness รถไฟเลือกเซนเซอร์.
  2. วัดความต้านทานระหว่างรถไฟต่อไปเลือกเซนเซอร์ Pins:
    • A และ C
    • A และ B
      บันทึก: อัตโนมัติตั้งแต่โวลต์ดิจิตอล / โอห์มเมตรจะต้องใช้.

      • หากหมุดและความต้านทานขาซีเป็น 5K-7K และถ้าหมุดและความต้านทานขา B เป็น 100-200 โอห์ม, เปลี่ยนเกียร์ Harness, จากนั้นไปที่ขั้นตอน 5.
      • ถ้าใด ๆ กับเงื่อนไขข้างต้นจะไม่ได้พบ, แทนที่ไฟฟ้า Shifter, จากนั้นไปที่ขั้นตอน 5.

[/fusion_content_box][fusion_content_box title=ขั้นตอนที่ 5. ตรวจสอบซ่อมแซม.backgroundcolor=”” icon=”” iconflip=”” iconrotate=”” iconspin=noiconcolor=”” circlecolor=”” circlebordersize=”” circlebordercolor=”” outercirclebordersize=”” outercirclebordercolor=”” image=”” image_id=”” image_width=”” image_height=”” link=”” linktext=”อ่านเพิ่มเติม” link_target=”” animation_type=”” animation_direction=leftanimation_speed=”0.3″ animation_offset=””]

  1. ปิดกุญแจ.
  2. เชื่อมต่อทุกการเชื่อมต่อและสายเคเบิลขั้วลบของแบตเตอรี่.
  3. ที่สำคัญเกี่ยวกับ.
  4. รหัสที่ชัดเจน, ดู ความผิดพลาดที่ไม่ใช้งานที่ชัดเจน.
  5. ขับรถและพยายามที่จะรีเซ็ตรหัส.
  6. ตรวจสอบรหัส, ดู ดูความผิดปกติที่ใช้งานและไม่ได้ใช้งาน.
    • หากไม่มีรหัส, ทดสอบเสร็จสิ้น.
    • ถ้ารหัสความผิด 52 ปรากฏ, พบข้อผิดพลาดในการทดสอบ, ไปที่ขั้นตอน 1.
    • ถ้ารหัสอื่นที่ไม่ใช่ 52 ปรากฏ, ดู ความผิดปกติรายการดัชนีรหัส.

[/fusion_content_box][/fusion_content_boxes][/fusion_builder_column][/fusion_builder_row][/fusion_builder_container][fusion_global id=”13788″]