[fusion_builder_container hundred_percent=”yes” hundred_percent_height=”no” hundred_percent_height_scroll=”no” hundred_percent_height_center_content=”yes” equal_height_columns=”no” menu_anchor=”” hide_on_mobile=”small-visibility,medium-visibility,large-visibility” status=”published” publish_date=”” class=”” id=”” background_color=”” background_image=”” background_position=”center center” background_repeat=”no-repeat” fade=”no” background_parallax=”none” enable_mobile=”no” parallax_speed=”0.3″ video_mp4=”” video_webm=”” video_ogv=”” video_url=”” video_aspect_ratio=”16:9″ video_loop=”yes” video_mute=”yes” video_preview_image=”” border_size=”” border_color=”” border_style=”solid” margin_top=”35″ margin_bottom=”” padding_top=”” padding_right=”” padding_bottom=”” padding_left=””][fusion_builder_row][fusion_builder_column type=”1_1″ layout=”1_1″ spacing=”” center_content=”no” link=”” target=”_self” min_height=”” hide_on_mobile=”small-visibility,medium-visibility,large-visibility” class=”” id=”” background_color=”” background_image=”” background_image_id=”” background_position=”left top” background_repeat=”no-repeat” hover_type=”none” border_size=”0″ border_color=”” border_style=”solid” border_position=”all” padding_top=”” padding_right=”” padding_bottom=”” padding_left=”” margin_top=”” margin_bottom=”” animation_type=”” animation_direction=”left” animation_speed=”0.3″ animation_offset=”” last=”no”][fusion_text columns=”” column_min_width=”” column_spacing=”” rule_style=”default” rule_size=”” rule_color=”” hide_on_mobile=”small-visibility,medium-visibility,large-visibility” class=”” id=””]
อีตันฟูลเลอร์ไฮบริดรหัสความผิดปกติ 3 – มอเตอร์ปั่นไฟอุณหภูมิ
[/fusion_text][/fusion_builder_column][/fusion_builder_row][/fusion_builder_container][fusion_builder_container hundred_percent=”no” hundred_percent_height=”no” hundred_percent_height_scroll=”no” hundred_percent_height_center_content=”yes” equal_height_columns=”no” menu_anchor=”” hide_on_mobile=”small-visibility,medium-visibility,large-visibility” status=”published” publish_date=”” class=”” id=”” background_color=”” background_image=”” background_position=”center center” background_repeat=”no-repeat” fade=”no” background_parallax=”none” enable_mobile=”no” parallax_speed=”0.3″ video_mp4=”” video_webm=”” video_ogv=”” video_url=”” video_aspect_ratio=”16:9″ video_loop=”yes” video_mute=”yes” video_preview_image=”” border_size=”” border_color=”” border_style=”solid” margin_top=”” margin_bottom=”” padding_top=”” padding_right=”” padding_bottom=”” padding_left=””][fusion_builder_row][fusion_builder_column type=”1_1″ layout=”1_1″ spacing=”” center_content=”no” link=”” target=”_self” min_height=”” hide_on_mobile=”small-visibility,medium-visibility,large-visibility” class=”” id=”” background_color=”” background_image=”” background_image_id=”” background_position=”left top” background_repeat=”no-repeat” hover_type=”none” border_size=”0″ border_color=”” border_style=”solid” border_position=”all” padding_top=”” padding_right=”” padding_bottom=”” padding_left=”” margin_top=”” margin_bottom=”” animation_type=”” animation_direction=”left” animation_speed=”0.3″ animation_offset=”” last=”no”][fusion_text columns=”” column_min_width=”” column_spacing=”” rule_style=”default” rule_size=”” rule_color=”” hide_on_mobile=”small-visibility,medium-visibility,large-visibility” class=”” id=””]
ความผิดปกติสำหรับอีตันไฮบริดรุ่นไดรฟ์ (MY08) EH-8E306A-U, EH-8E306A-UPG, EH-8E306A-UP, EH-8E306A-CD, EH-8E306A-T, EH-6E606B-CD, (MY09) EH-8E406A-U / P, EH-8E406A-UP, EH-8E406A-UPG, EH-8E406A-CD, EH-8E406A-CDG, EH-8E406A-CDR, EH-8E406A-T, EH-6E706B-CD, EH-6E706B-P และ EH-6E706B-UPG. อุณหภูมิของมอเตอร์ / เครื่องกำเนิดไฟฟ้าเป็นวัดผ่านเซ็นเซอร์เทอร์มิสเตอร์, ซึ่งตั้งอยู่ภายในหน่วย. มูลค่าการเปลี่ยนแปลงเซ็นเซอร์ขึ้นอยู่กับอุณหภูมิ. อินเวอร์เตอร์วัสดุแรงดันอ้างอิง 5 โวลต์เซ็นเซอร์ขนาดลดลงโวลต์ในวงจร.
เมื่ออุณหภูมิของมอเตอร์ / เครื่องกำเนิดไฟฟ้าเป็นความอบอุ่นต้านทานเซ็นเซอร์อยู่ในระดับต่ำและอินเวอร์เตอร์ตรวจจับแรงดันต่ำ (0.2 โวลต์เท่ากับ 536 ° F [280 ° C]). เมื่อมอเตอร์ / เครื่องกำเนิดไฟฟ้ามีอากาศหนาวเย็น, ต้านทานเซ็นเซอร์อยู่ในระดับสูงและอินเวอร์เตอร์ตรวจจับแรงดันสูง (4.1 โวลต์เท่ากับ 32 ° F [0 ° C]).
ความผิดพลาดรหัส 3 มอเตอร์ / เครื่องกำเนิดไฟฟ้าตรวจจับอุณหภูมิ
แรงดันไฟฟ้าอินเวอร์เตอร์จุดระเบิดมีค่ามากกว่า 7 โวลต์และน้อยกว่า 16 โวลต์ (MY08)
ความผิดปกติที่ตรวจพบเมื่อแรงดันไฟฟ้าจุดระเบิดอินเวอร์เตอร์ที่มีค่ามากกว่า 7 โวลต์และน้อยกว่า 16 โวลต์ (MY09)
เงื่อนไขการตั้งค่าความผิดพลาดรหัสที่ใช้งานอยู่
เมื่ออุณหภูมิของมอเตอร์ / เครื่องกำเนิดไฟฟ้าเป็นความอบอุ่นต้านทานเซ็นเซอร์อยู่ในระดับต่ำและอินเวอร์เตอร์ตรวจจับแรงดันต่ำ (0.2 โวลต์เท่ากับ 536 ° F [280 ° C]). เมื่อมอเตอร์ / เครื่องกำเนิดไฟฟ้ามีอากาศหนาวเย็นต้านทานเซ็นเซอร์อยู่ในระดับสูงและอินเวอร์เตอร์ตรวจจับแรงดันสูง (4.1 โวลต์เท่ากับ 32 ° F [0 ° C ]). (MY08)
เมื่อค่าเซ็นเซอร์อุณหภูมิมากกว่า 365 ° F (185 ° C) สำหรับ 1 ที่สอง. (MY09)
สำรองเมื่อความผิดพลาดรหัส 3 มีการตั้งเงื่อนไขต่อไปนี้เกิดขึ้น:
•แอมเบอร์“เช็คไฮบริด” สว่างแสง.
•ความผิดพลาดจะถูกเก็บไว้ในโมดูลควบคุมไฮบริด (HCM) หน่วยความจำ.
•มอเตอร์ไฟฟ้า / เครื่องกำเนิดไฟฟ้า Assist และฟื้นฟูถูกปิดใช้งาน; อย่างไรก็ตาม, รีเลย์แรงดันสูงยังคงขับเคลื่อน.
• HCM ยังคงควบคุมรถไฮบริดในโหมดดีเซลเท่านั้น.
•ค่าเริ่มต้นเริ่มต้นเกียร์เกียร์ 1.
[/fusion_text][fusion_text columns=”” column_min_width=”” column_spacing=”” rule_style=”default” rule_size=”” rule_color=”” hide_on_mobile=”small-visibility,medium-visibility,large-visibility” class=”” id=””]
เงื่อนไขการตั้งค่าความผิดพลาดที่ไม่ใช้งานรหัส
เฉพาะความผิดพลาดที่ไม่ใช้งานสามารถลบออกจากหน่วยควบคุมการรับส่งอิเล็กทรอนิกส์ (TECU) หรือประวัติ HCM ใช้ ServiceRanger. TECU โดยอัตโนมัติล้างความผิดพลาดจากประวัติศาสตร์หลัง 200 ชั่วโมงและ HCM โดยอัตโนมัติล้างความผิดพลาดจากประวัติศาสตร์หลังจากที่พวกเขาได้รับการใช้งานสำหรับ 200 ชั่วโมง.
รหัสความผิดปกตินี้สามารถเกิดจากสาเหตุใดต่อไปนี้:
- กองทุนการเงินระหว่างประเทศ 0 (กองทุนการเงินระหว่างประเทศ 0 มีการตั้งค่าเมื่อค่าเซ็นเซอร์อุณหภูมิมากกว่า 365 ° F [185 ° C] สำหรับ 1 ที่สอง):
- อินเวอร์เตอร์
- มอเตอร์ / เครื่องกำเนิดไฟฟ้า
- ระบบระบายความร้อนเหลว (น้ำหล่อเย็นต่ำ, ไม่มีการไหลของน้ำหล่อเย็น, ปั๊มน้ำหล่อเย็น, หม้อน้ำรถยนต์, หม้อน้ำพัดลม, อ่างเก็บน้ำ)
[/fusion_text][/fusion_builder_column][/fusion_builder_row][/fusion_builder_container][fusion_builder_container hundred_percent=”no” hundred_percent_height=”no” hundred_percent_height_scroll=”no” hundred_percent_height_center_content=”yes” equal_height_columns=”no” menu_anchor=”” hide_on_mobile=”small-visibility,medium-visibility,large-visibility” status=”published” publish_date=”” class=”” id=”” background_color=”” background_image=”” background_position=”center center” background_repeat=”no-repeat” fade=”no” background_parallax=”none” enable_mobile=”no” parallax_speed=”0.3″ video_mp4=”” video_webm=”” video_ogv=”” video_url=”” video_aspect_ratio=”16:9″ video_loop=”yes” video_mute=”yes” video_preview_image=”” border_size=”” border_color=”” border_style=”solid” margin_top=”” margin_bottom=”” padding_top=”” padding_right=”” padding_bottom=”” padding_left=””][fusion_builder_row][fusion_builder_column type=”1_1″ layout=”1_1″ spacing=”” center_content=”no” link=”” target=”_self” min_height=”” hide_on_mobile=”small-visibility,medium-visibility,large-visibility” class=”” id=”” background_color=”” background_image=”” background_image_id=”” background_position=”left top” background_repeat=”no-repeat” hover_type=”none” border_size=”0″ border_color=”” border_style=”solid” border_position=”all” padding_top=”” padding_right=”” padding_bottom=”” padding_left=”” margin_top=”” margin_bottom=”” animation_type=”” animation_direction=”left” animation_speed=”0.3″ animation_offset=”” last=”no”][fusion_text columns=”” column_min_width=”” column_spacing=”” rule_style=”default” rule_size=”” rule_color=”” hide_on_mobile=”small-visibility,medium-visibility,large-visibility” class=”” id=””]
ความผิดพลาดรหัส 3 – มอเตอร์ / ทดสอบอุณหภูมิเครื่องปั่นไฟ
[/fusion_text][/fusion_builder_column][/fusion_builder_row][/fusion_builder_container][fusion_builder_container hundred_percent=”no” hundred_percent_height=”no” hundred_percent_height_scroll=”no” hundred_percent_height_center_content=”yes” equal_height_columns=”no” menu_anchor=”” hide_on_mobile=”small-visibility,medium-visibility,large-visibility” status=”published” publish_date=”” class=”” id=”” background_color=”” background_image=”” background_position=”center center” background_repeat=”no-repeat” fade=”no” background_parallax=”none” enable_mobile=”no” parallax_speed=”0.3″ video_mp4=”” video_webm=”” video_ogv=”” video_url=”” video_aspect_ratio=”16:9″ video_loop=”yes” video_mute=”yes” video_preview_image=”” border_size=”” border_color=”” border_style=”solid” margin_top=”” margin_bottom=”” padding_top=”” padding_right=”” padding_bottom=”” padding_left=””][fusion_builder_row][fusion_builder_column type=”1_1″ layout=”1_1″ spacing=”” center_content=”no” link=”” target=”_self” min_height=”” hide_on_mobile=”small-visibility,medium-visibility,large-visibility” class=”” id=”” background_color=”” background_image=”” background_image_id=”” background_position=”left top” background_repeat=”no-repeat” hover_type=”none” border_size=”0″ border_color=”” border_style=”solid” border_position=”all” padding_top=”” padding_right=”” padding_bottom=”” padding_left=”” margin_top=”” margin_bottom=”” animation_type=”” animation_direction=”left” animation_speed=”0.3″ animation_offset=”” last=”no”][fusion_text columns=”” column_min_width=”” column_spacing=”” rule_style=”default” rule_size=”” rule_color=”” hide_on_mobile=”small-visibility,medium-visibility,large-visibility” class=”” id=””]
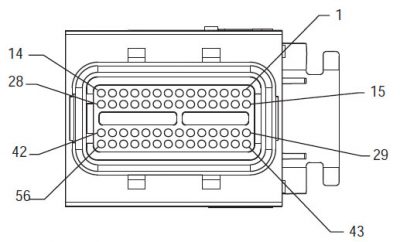
ตัวแทนระบบ MY08 ประจำตัวประชาชน:
[/fusion_text][/fusion_builder_column][fusion_builder_column type=”2_3″ layout=”1_2″ spacing=”” center_content=”no” link=”” target=”_self” min_height=”” hide_on_mobile=”small-visibility,medium-visibility,large-visibility” class=”” id=”” background_color=”” background_image=”” background_image_id=”” background_position=”left top” background_repeat=”no-repeat” hover_type=”none” border_size=”0″ border_color=”” border_style=”solid” border_position=”all” padding_top=”” padding_right=”” padding_bottom=”” padding_left=”” margin_top=”” margin_bottom=”” animation_type=”” animation_direction=”left” animation_speed=”0.3″ animation_offset=”” last=”no”][fusion_imageframe image_id=”13934|400″ max_width=”” style_type=”” blur=”” stylecolor=”” hover_type=”none” bordersize=”” bordercolor=”” borderradius=”” align=”center” lightbox=”no” gallery_id=”” lightbox_image=”” lightbox_image_id=”” alt=”Delphi 56-Way ผสมพันธุ์ดูการเชื่อมต่อ” link=”” linktarget=”_self” hide_on_mobile=”small-visibility,medium-visibility,large-visibility” class=”” id=”” animation_type=”” animation_direction=”left” animation_speed=”0.3″ animation_offset=””]https://www.globaltransmissionsupply.com/wp-content/uploads/Delphi-56-Way-Mating-Connector-View-400×242.jpg[/fusion_imageframe][fusion_text columns=”” column_min_width=”” column_spacing=”” rule_style=”default” rule_size=”” rule_color=”” hide_on_mobile=”small-visibility,medium-visibility,large-visibility” class=”” id=””]
Delphi 56-Way ผสมพันธุ์ดูการเชื่อมต่อ
[/fusion_text][/fusion_builder_column][fusion_builder_column type=”1_3″ layout=”1_2″ spacing=”” center_content=”no” link=”” target=”_self” min_height=”” hide_on_mobile=”small-visibility,medium-visibility,large-visibility” class=”” id=”” background_color=”” background_image=”” background_image_id=”” background_position=”left top” background_repeat=”no-repeat” hover_type=”none” border_size=”0″ border_color=”” border_style=”solid” border_position=”all” padding_top=”” padding_right=”” padding_bottom=”” padding_left=”” margin_top=”” margin_bottom=”” animation_type=”” animation_direction=”left” animation_speed=”0.3″ animation_offset=”” last=”no”][fusion_imageframe image_id=”13935|full” max_width=”” style_type=”” blur=”” stylecolor=”” hover_type=”none” bordersize=”” bordercolor=”” borderradius=”” align=”center” lightbox=”no” gallery_id=”” lightbox_image=”” lightbox_image_id=”” alt=”เซ็นเซอร์อุณหภูมิ” link=”” linktarget=”_self” hide_on_mobile=”small-visibility,medium-visibility,large-visibility” class=”” id=”” animation_type=”” animation_direction=”left” animation_speed=”0.3″ animation_offset=””]https://www.globaltransmissionsupply.com/wp-content/uploads/Temperature-Sensor.jpg[/fusion_imageframe][fusion_text columns=”” column_min_width=”” column_spacing=”” rule_style=”default” rule_size=”” rule_color=”” hide_on_mobile=”small-visibility,medium-visibility,large-visibility” class=”” id=””]
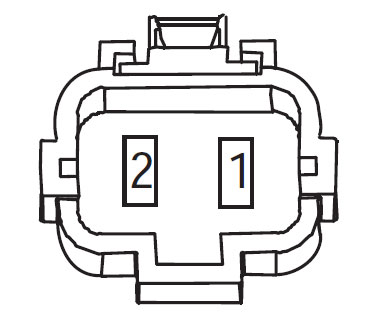
เซ็นเซอร์อุณหภูมิ
(harness ดู – ด้านหน้า)
[/fusion_text][/fusion_builder_column][fusion_builder_column type=”1_1″ layout=”1_1″ spacing=”” center_content=”no” link=”” target=”_self” min_height=”” hide_on_mobile=”small-visibility,medium-visibility,large-visibility” class=”” id=”” background_image_id=”” background_color=”#000000″ background_image=”” background_position=”left top” undefined=”” background_repeat=”no-repeat” hover_type=”none” border_size=”0″ border_color=”” border_style=”solid” border_position=”all” padding_top=”” padding_right=”” padding_bottom=”” padding_left=”” margin_top=”” margin_bottom=”10″ animation_type=”” animation_direction=”left” animation_speed=”0.3″ animation_offset=”” last=”no”][fusion_text columns=”” column_min_width=”” column_spacing=”” rule_style=”default” rule_size=”” rule_color=”” hide_on_mobile=”small-visibility,medium-visibility,large-visibility” class=”” id=””]
บันทึก: อ้างถึง Eaton ตัวแทนไฮบริดและเชื่อมต่อสถานที่ตั้ง สำหรับสถานที่เชื่อมต่อในระบบ MY08
[/fusion_text][/fusion_builder_column][fusion_builder_column type=”1_1″ layout=”1_1″ spacing=”” center_content=”no” link=”” target=”_self” min_height=”” hide_on_mobile=”small-visibility,medium-visibility,large-visibility” class=”” id=”” background_color=”” background_image=”” background_image_id=”” background_position=”left top” background_repeat=”no-repeat” hover_type=”none” border_size=”0″ border_color=”” border_style=”solid” border_position=”all” padding_top=”” padding_right=”” padding_bottom=”” padding_left=”” margin_top=”” margin_bottom=”” animation_type=”” animation_direction=”left” animation_speed=”0.3″ animation_offset=”” last=”no”][fusion_imageframe image_id=”13904|800″ max_width=”” style_type=”” blur=”” stylecolor=”” hover_type=”none” bordersize=”” bordercolor=”” borderradius=”” align=”center” lightbox=”no” gallery_id=”” lightbox_image=”” lightbox_image_id=”” alt=”เชื่อมต่อองค์ประกอบ” link=”” linktarget=”_self” hide_on_mobile=”small-visibility,medium-visibility,large-visibility” class=”” id=”” animation_type=”” animation_direction=”left” animation_speed=”0.3″ animation_offset=””]https://www.globaltransmissionsupply.com/wp-content/uploads/eaton-component-connector-800×380.jpg[/fusion_imageframe][/fusion_builder_column][/fusion_builder_row][/fusion_builder_container][fusion_builder_container hundred_percent=”no” hundred_percent_height=”no” hundred_percent_height_scroll=”no” hundred_percent_height_center_content=”yes” equal_height_columns=”no” menu_anchor=”” hide_on_mobile=”small-visibility,medium-visibility,large-visibility” status=”published” publish_date=”” class=”” id=”” background_color=”” background_image=”” background_position=”center center” background_repeat=”no-repeat” fade=”no” background_parallax=”none” enable_mobile=”no” parallax_speed=”0.3″ video_mp4=”” video_webm=”” video_ogv=”” video_url=”” video_aspect_ratio=”16:9″ video_loop=”yes” video_mute=”yes” video_preview_image=”” border_size=”” border_color=”” border_style=”solid” margin_top=”” margin_bottom=”” padding_top=”” padding_right=”” padding_bottom=”” padding_left=””][fusion_builder_row][fusion_builder_column type=”1_1″ layout=”1_1″ spacing=”” center_content=”no” link=”” target=”_self” min_height=”” hide_on_mobile=”small-visibility,medium-visibility,large-visibility” class=”” id=”” background_color=”” background_image=”” background_image_id=”” background_position=”left top” background_repeat=”no-repeat” hover_type=”none” border_size=”0″ border_color=”” border_style=”solid” border_position=”all” padding_top=”” padding_right=”” padding_bottom=”” padding_left=”” margin_top=”” margin_bottom=”” animation_type=”” animation_direction=”left” animation_speed=”0.3″ animation_offset=”” last=”no”][fusion_text columns=”” column_min_width=”” column_spacing=”” rule_style=”default” rule_size=”” rule_color=”” hide_on_mobile=”small-visibility,medium-visibility,large-visibility” class=”” id=””]
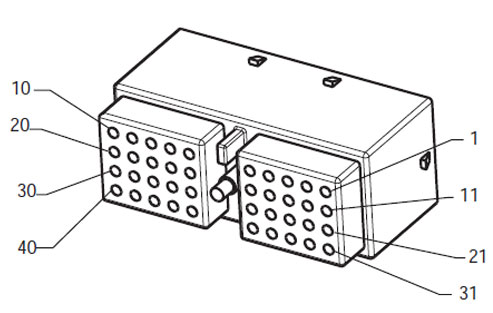
ตัวแทนระบบ MY09 ประจำตัวประชาชน:
[/fusion_text][/fusion_builder_column][fusion_builder_column type=”2_3″ layout=”1_2″ spacing=”” center_content=”no” link=”” target=”_self” min_height=”” hide_on_mobile=”small-visibility,medium-visibility,large-visibility” class=”” id=”” background_color=”” background_image=”” background_image_id=”” background_position=”left top” background_repeat=”no-repeat” hover_type=”none” border_size=”0″ border_color=”” border_style=”solid” border_position=”all” padding_top=”” padding_right=”” padding_bottom=”” padding_left=”” margin_top=”” margin_bottom=”” animation_type=”” animation_direction=”left” animation_speed=”0.3″ animation_offset=”” last=”no”][fusion_imageframe image_id=”14000|full” max_width=”” style_type=”” blur=”” stylecolor=”” hover_type=”none” bordersize=”” bordercolor=”” borderradius=”” align=”center” lightbox=”no” gallery_id=”” lightbox_image=”” lightbox_image_id=”” alt=”Deutsch 40-Way ผสมพันธุ์ดูการเชื่อมต่อ” link=”” linktarget=”_self” hide_on_mobile=”small-visibility,medium-visibility,large-visibility” class=”” id=”” animation_type=”” animation_direction=”left” animation_speed=”0.3″ animation_offset=””]https://www.globaltransmissionsupply.com/wp-content/uploads/Deutsch-40-Way-Mating-Connector-View.jpg[/fusion_imageframe][fusion_text columns=”” column_min_width=”” column_spacing=”” rule_style=”default” rule_size=”” rule_color=”” hide_on_mobile=”small-visibility,medium-visibility,large-visibility” class=”” id=””]
Delphi 40-Way ผสมพันธุ์ดูการเชื่อมต่อ
[/fusion_text][/fusion_builder_column][fusion_builder_column type=”1_3″ layout=”1_2″ spacing=”” center_content=”no” link=”” target=”_self” min_height=”” hide_on_mobile=”small-visibility,medium-visibility,large-visibility” class=”” id=”” background_color=”” background_image=”” background_image_id=”” background_position=”left top” background_repeat=”no-repeat” hover_type=”none” border_size=”0″ border_color=”” border_style=”solid” border_position=”all” padding_top=”” padding_right=”” padding_bottom=”” padding_left=”” margin_top=”” margin_bottom=”” animation_type=”” animation_direction=”left” animation_speed=”0.3″ animation_offset=”” last=”no”][fusion_imageframe image_id=”14001|full” max_width=”” style_type=”” blur=”” stylecolor=”” hover_type=”none” bordersize=”” bordercolor=”” borderradius=”” align=”center” lightbox=”no” gallery_id=”” lightbox_image=”” lightbox_image_id=”” alt=”ด้านเทอร์มิ – เซนเซอร์จับอุณหภูมิ Harness เชื่อมต่อ” link=”” linktarget=”_self” hide_on_mobile=”small-visibility,medium-visibility,large-visibility” class=”” id=”” animation_type=”” animation_direction=”left” animation_speed=”0.3″ animation_offset=””]https://www.globaltransmissionsupply.com/wp-content/uploads/Eaton-Fuller-Terminal-Side-Harness-Connector.jpg[/fusion_imageframe][fusion_text columns=”” column_min_width=”” column_spacing=”” rule_style=”default” rule_size=”” rule_color=”” hide_on_mobile=”small-visibility,medium-visibility,large-visibility” class=”” id=””]
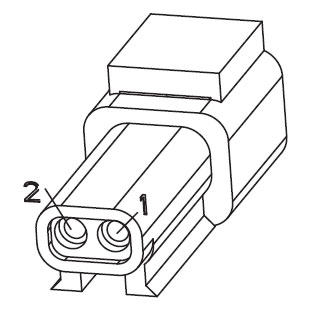
ด้านเทอร์มิ – เซนเซอร์จับอุณหภูมิ Harness เชื่อมต่อ
[/fusion_text][/fusion_builder_column][fusion_builder_column type=”1_1″ layout=”1_1″ spacing=”” center_content=”no” link=”” target=”_self” min_height=”” hide_on_mobile=”small-visibility,medium-visibility,large-visibility” class=”” id=”” background_image_id=”” background_color=”#000000″ background_image=”” background_position=”left top” undefined=”” background_repeat=”no-repeat” hover_type=”none” border_size=”0″ border_color=”” border_style=”solid” border_position=”all” padding_top=”” padding_right=”” padding_bottom=”” padding_left=”” margin_top=”10″ margin_bottom=”” animation_type=”” animation_direction=”left” animation_speed=”0.3″ animation_offset=”” last=”no”][fusion_text columns=”” column_min_width=”” column_spacing=”” rule_style=”default” rule_size=”” rule_color=”” hide_on_mobile=”small-visibility,medium-visibility,large-visibility” class=”” id=””]
บันทึก: อ้างถึง Eaton ตัวแทนไฮบริดและเชื่อมต่อสถานที่ตั้ง สำหรับสถานที่เชื่อมต่อในระบบ MY09.
[/fusion_text][/fusion_builder_column][fusion_builder_column type=”1_1″ layout=”1_1″ spacing=”” center_content=”no” link=”” target=”_self” min_height=”” hide_on_mobile=”small-visibility,medium-visibility,large-visibility” class=”” id=”” background_color=”” background_image=”” background_image_id=”” background_position=”left top” background_repeat=”no-repeat” hover_type=”none” border_size=”0″ border_color=”” border_style=”solid” border_position=”all” padding_top=”” padding_right=”” padding_bottom=”” padding_left=”” margin_top=”” margin_bottom=”” animation_type=”” animation_direction=”left” animation_speed=”0.3″ animation_offset=”” last=”no”][fusion_imageframe image_id=”14002|600″ max_width=”” style_type=”” blur=”” stylecolor=”” hover_type=”none” bordersize=”” bordercolor=”” borderradius=”” align=”center” lightbox=”no” gallery_id=”” lightbox_image=”” lightbox_image_id=”” alt=”อีตันฟูลเลอร์อินเวอร์เตอร์มอเตอร์ / เครื่องกำเนิดไฟฟ้า” link=”” linktarget=”_self” hide_on_mobile=”small-visibility,medium-visibility,large-visibility” class=”” id=”” animation_type=”” animation_direction=”left” animation_speed=”0.3″ animation_offset=””]https://www.globaltransmissionsupply.com/wp-content/uploads/Inverter-motor-generator-MY09-600×271.jpg[/fusion_imageframe][/fusion_builder_column][/fusion_builder_row][/fusion_builder_container][fusion_builder_container hundred_percent=”no” hundred_percent_height=”no” hundred_percent_height_scroll=”no” hundred_percent_height_center_content=”yes” equal_height_columns=”no” menu_anchor=”” hide_on_mobile=”small-visibility,medium-visibility,large-visibility” status=”published” publish_date=”” class=”” id=”” background_color=”” background_image=”” background_position=”center center” background_repeat=”no-repeat” fade=”no” background_parallax=”none” enable_mobile=”no” parallax_speed=”0.3″ video_mp4=”” video_webm=”” video_ogv=”” video_url=”” video_aspect_ratio=”16:9″ video_loop=”yes” video_mute=”yes” video_preview_image=”” border_size=”” border_color=”” border_style=”solid” margin_top=”” margin_bottom=”” padding_top=”” padding_right=”” padding_bottom=”” padding_left=””][fusion_builder_row][fusion_builder_column type=”1_1″ layout=”1_1″ spacing=”” center_content=”no” link=”” target=”_self” min_height=”” hide_on_mobile=”small-visibility,medium-visibility,large-visibility” class=”” id=”” background_color=”” background_image=”” background_image_id=”” background_position=”left top” background_repeat=”no-repeat” hover_type=”none” border_size=”0″ border_color=”” border_style=”solid” border_position=”all” padding_top=”” padding_right=”” padding_bottom=”” padding_left=”” margin_top=”” margin_bottom=”” animation_type=”” animation_direction=”left” animation_speed=”0.3″ animation_offset=”” last=”no”][fusion_modal name=”warnings_cautions” title=”คำเตือน & ข้อควรระวัง” size=”large” background=”” border_color=”” show_footer=”yes” class=”” id=””]
อันตราย: อันตรายบ่งชี้ว่าคุณจะได้รับบาดเจ็บสาหัสหรือเสียชีวิตหากไม่ปฏิบัติตามขั้นตอนที่ระบุ.
การเตือน: คำเตือนบ่งชี้อันตรายทันที, ซึ่งอาจส่งผลให้ได้รับบาดเจ็บสาหัสถ้าคุณไม่ทำตามขั้นตอนที่ระบุ.
ความระมัดระวัง: ข้อควรระวังบ่งชี้ยานพาหนะหรือความเสียหายต่อทรัพย์สินที่อาจเกิดขึ้นถ้าคุณไม่ทำตามขั้นตอนที่ระบุ.
บันทึก: หมายเหตุแสดงให้เห็นรายละเอียดเพิ่มเติมที่จะช่วยในการวินิจฉัยหรือซ่อมแซมส่วนประกอบ / ระบบ.
ทำตามขั้นตอนที่ระบุไว้ในลำดับที่ระบุเพื่อหลีกเลี่ยงการบาดเจ็บส่วนบุคคล:
1. หากกรวยแรงดันสูงอยู่รอบรถและกิจการติดตั้งบน PEC, เพียงคนเดียวที่ควรจะได้รับอนุญาตให้เริ่มยานพาหนะเป็นคนที่เซ็นสัญญาแท็กกิจ.
2. ก่อนที่จะทำงานบนรถหรือออกจากรถแท็กซี่ในขณะที่เครื่องยนต์กำลังทำงาน, คุณควรวางคันเกียร์ใน“N” ตั้งเบรกจอดรถ, และป้องกันล้อ.
3. สำหรับเหตุผลด้านความปลอดภัย, มักจะมีส่วนร่วมบริการเบรกก่อนที่จะมีการเลือกตำแหน่งเกียร์จาก“เอ็น”
4. ก่อนที่จะเริ่มเป็นรถมักจะนั่งอยู่ในที่นั่งคนขับ, เลือก“N” ในการควบคุมการเปลี่ยนแปลง, และการตั้งค่าที่จอดรถเบรก.
5. ในรถยนต์ที่มี ePTO, เครื่องยนต์และ / หรือ
มอเตอร์ / เครื่องกำเนิดไฟฟ้าสามารถเริ่มต้นในโหมด ePTO. ไม่เคยดำเนินการบำรุงรักษาใด ๆ หรือทำงานเกี่ยวกับยานพาหนะ, ขณะที่อยู่ในโหมดนี้.
6. 12-โวลต์แบตเตอรี่บวก (+) และลบ (-) จะต้องมีการตัดการเชื่อมต่อก่อนที่จะมีการเชื่อมใด ๆ ในไฮบริดพร้อมอุปกรณ์ยานพาหนะใด ๆ.
ความระมัดระวัง: ทำตามขั้นตอนที่ระบุไว้ในลำดับที่ระบุเพื่อหลีกเลี่ยงความผิดปกติของอุปกรณ์หรือความเสียหาย.
ความระมัดระวัง: อย่าปล่อยเบรกจอดรถหรือพยายามที่จะเลือกเกียร์จนความดันอากาศอยู่ในระดับที่ถูกต้อง.
ความระมัดระวัง: เพื่อหลีกเลี่ยงความเสียหายให้กับการส่งผ่านระหว่างลากสถานที่คันเกียร์ใน“N” และยกล้อไดรฟ์ออกจากพื้นดินหรือตัดการเชื่อมต่อระบบขับเคลื่อน.
คำเตือนแรงดันสูง & ข้อควรระวัง
- ใช้ CO2 หรือเคมีแห้งดับเพลิง.
- สายไฟแรงดันสูงจะครอบคลุมในฉนวนกันความร้อนสีส้มหรือท่อที่ซับซ้อนและมีเครื่องหมายฉลากคำเตือนในการเชื่อมต่อ.
- ทั้งหมดEaton®ไฮบริดดีเซล / ยานพาหนะไฟฟ้าจะถูกทำเครื่องหมาย ‘ไฮบริด’ ด้านนอกของยานพาหนะ, พร้อมกับป้ายกะบนเส้นประ.
- อ้างถึง OEM สำหรับสถานที่เฉพาะของตัวถังที่ติดตั้งชิ้นส่วนไฮบริด.
- อย่าตัดเป็นสายไฟฟ้าแรงสูงสีส้ม.
- อย่าตัดเป็นหรือเปิด PEC.
- อย่าตัดเป็นหรือเปิด DC / DC converter.
- อย่าตัดเป็นหรือเปิดอินเวอร์เตอร์.
เขตกันชนจะต้องตั้งค่าและแรงดันสูงฉนวนถุงมือยาง (ชั้น 0 กับครอบหนัง) จะต้องก่อนที่จะทำงานเกี่ยวกับไฟฟ้าแรงสูง. ความล้มเหลวที่จะปฏิบัติตามคำแนะนำเหล่านี้อาจส่งผลให้ได้รับบาดเจ็บสาหัสหรือเสียชีวิต.
ถุงมือยางฉนวนที่ต้องสวมใส่ในขณะที่ทำงานบนระบบแรงดันสูงเป็นชั้น 0 กับครอบหนัง. ถุงมือยางควรจะทดสอบก่อนการใช้งานทุกขั้นตอนดังต่อไปนี้การทดสอบยางถุงมือฉนวนกันความร้อนที่พบใน“เครื่องมือวิเคราะห์ / บริการสิ่งพิมพ์” ที่หน้า 6. ความล้มเหลวที่จะปฏิบัติตามคำแนะนำเหล่านี้อาจส่งผลให้ได้รับบาดเจ็บสาหัสหรือเสียชีวิต.
ก่อนที่จะตรวจสอบหรือทำงานเกี่ยวกับสายไฟฟ้าแรงสูงหรือส่วนประกอบ“แรงดันสูงปิดระบบการให้บริการและเพิ่มพลังขั้นตอน” ที่หน้า 4 ควรจะปฏิบัติตาม. ความล้มเหลวที่จะปฏิบัติตามคำแนะนำเหล่านี้อาจส่งผลให้ได้รับบาดเจ็บสาหัสหรือเสียชีวิต.
กิจและ Tagout เฉพาะอุปกรณ์จะถูกลบออกโดยช่างที่วางอุปกรณ์ Lockout Tagout และบนยานพาหนะ. ความล้มเหลวที่จะปฏิบัติตามคำแนะนำเหล่านี้อาจส่งผลให้ได้รับบาดเจ็บสาหัสหรือเสียชีวิต.
ถุงมือยางฉนวนไฟฟ้าแรงสูง (ชั้น 0 กับครอบหนัง) ต้องสวมใส่เมื่อทำงานใด ๆ
สายไฟฟ้าแรงสูง. “การปิดระบบไฟฟ้าแรงสูงบริการและ Power-Up ขั้นตอน” ที่หน้า 4 จะต้องปฏิบัติตามก่อนที่จะถอดสายไฟฟ้าแรงสูงใด ๆ. ความล้มเหลวที่จะปฏิบัติตามคำแนะนำเหล่านี้อาจส่งผลให้ได้รับบาดเจ็บสาหัสหรือเสียชีวิต.
สายไฟฟ้าแรงสูงและสายไฟเป็นสีส้มและมีป้ายเตือนในการเชื่อมต่อ. ส่วนประกอบแรงดันสูงจะมีเครื่องหมายฉลาก. ถุงมือยางฉนวนไฟฟ้าแรงสูง (ชั้น 0 กับครอบหนัง) จะต้องใช้เมื่อทำงานใด ๆ ขององค์ประกอบเหล่านี้. ความล้มเหลวที่จะปฏิบัติตามคำแนะนำเหล่านี้อาจส่งผลให้ได้รับบาดเจ็บสาหัสหรือเสียชีวิต.
ไฟฟ้าแรงสูงขั้นตอนการบริการ Shutdown

1. ติดตาม“แรงดันสูงพื้นที่ทำงาน” ขั้นตอน.
2. ค้นหาสีแดงสลับ PEC บริการอยู่ด้านหน้าของ PEC และผลักดันปิด.
3. ถอดฝาครอบใช้บริการและติดตั้งขายึดกิจ (J48506).
4. แท็กยึดกับ Lockout Bracket.
5. ให้แน่ใจว่าสวิทช์ PEC บริการไม่สามารถย้ายจากตำแหน่งปิด.
6. ช่วยให้ระบบการตั้งค่าขั้นต่ำของ 5 นาทีเพื่อจำหน่ายไฟฟ้าแรงสูง.
7. เชื่อมต่อ ServiceRanger และดูข้อมูลการตรวจสอบ PID 116 เรียกว่า“แรงดันสูงที่มีศักยภาพแบตเตอรี่.” ใช้ SPN 520323 สำหรับการเชื่อมต่อ J1939“แบตเตอรี่แรงดันไฟฟ้า RB” (กล่องรีเลย์).
8. แรงดันไฟฟ้าที่ควรจะเป็น 30 โวลต์หรือน้อยกว่า. ถ้าแรงดันไฟฟ้าที่สูงกว่า 30 โวลต์, ไม่ได้ทำงานบนยานพาหนะและติดต่อEaton®ที่ 1-800-826-HELP (4357).
9. เปิดกุญแจออกและดำเนินการซ่อมแซมหรือขั้นตอนการแก้ไขปัญหา.
บันทึก: แรงดันไฟฟ้าที่ลดลงเป็นศูนย์เมื่อคีย์ถูกปิด.
ไฟฟ้าแรงสูงบริการ Power-Up ขั้นตอน
1. ติดตั้งทุกการเชื่อมต่อแรงดันสูงเข้าไปอยู่ในตำแหน่งล็อคของพวกเขา.
2. หากคุณเป็นคนที่ทำงานเกี่ยวกับยานพาหนะ, ลบ Lockout Bracket และแท็ก.
3. ติดตั้ง Lockout Bracket มากกว่าสวิทช์ให้บริการ.
4. ดึงบริการสลับออกและปล่อยให้ชุดยานพาหนะสำหรับ 2 นาที.
5. เริ่มต้นเมื่อยานพาหนะที่เหมาะสม.
[/fusion_modal][fusion_modal name=”component_location” title=”Eaton ตัวแทนไฮบริดและเชื่อมต่อสถานที่ตั้ง ” size=”large” background=”#ffffff” border_color=”” show_footer=”yes” class=”” id=””]

[/fusion_modal][fusion_modal name=”component_location2″ title=”Eaton ตัวแทนไฮบริดและเชื่อมต่อสถานที่ตั้ง MY09 ระบบ” size=”large” background=”#ffffff” border_color=”” show_footer=”yes” class=”” id=””]

[/fusion_modal][/fusion_builder_column][/fusion_builder_row][/fusion_builder_container][fusion_builder_container hundred_percent=”no” hundred_percent_height=”no” hundred_percent_height_scroll=”no” hundred_percent_height_center_content=”yes” equal_height_columns=”no” menu_anchor=”” hide_on_mobile=”small-visibility,medium-visibility,large-visibility” status=”published” publish_date=”” class=”” id=”” background_color=”” background_image=”” background_position=”center center” background_repeat=”no-repeat” fade=”no” background_parallax=”none” enable_mobile=”no” parallax_speed=”0.3″ video_mp4=”” video_webm=”” video_ogv=”” video_url=”” video_aspect_ratio=”16:9″ video_loop=”yes” video_mute=”yes” video_preview_image=”” border_size=”” border_color=”” border_style=”solid” margin_top=”” margin_bottom=”” padding_top=”” padding_right=”” padding_bottom=”” padding_left=””][fusion_builder_row][fusion_builder_column type=”1_1″ layout=”1_1″ spacing=”” center_content=”no” link=”” target=”_self” min_height=”” hide_on_mobile=”small-visibility,medium-visibility,large-visibility” class=”” id=”” background_color=”” background_image=”” background_image_id=”” background_position=”left top” background_repeat=”no-repeat” hover_type=”none” border_size=”0″ border_color=”” border_style=”solid” border_position=”all” padding_top=”” padding_right=”” padding_bottom=”” padding_left=”” margin_top=”” margin_bottom=”” animation_type=”” animation_direction=”left” animation_speed=”0.3″ animation_offset=”” last=”no”][fusion_content_boxes layout=”clean-horizontal” columns=”1″ title_size=”18px” heading_size=”3″ title_color=”#ffffff” body_color=”#ffffff” backgroundcolor=”#4f4f4f” icon=”” iconflip=”” iconrotate=”” iconspin=”no” iconcolor=”” icon_circle=”” icon_circle_radius=”” circlecolor=”” circlebordersize=”” circlebordercolor=”” outercirclebordersize=”” outercirclebordercolor=”” icon_size=”” icon_hover_type=”” hover_accent_color=”#f41000″ image=”” image_id=”” image_width=”” image_height=”” link_type=”” button_span=”” link_area=”” link_target=”” icon_align=”left” animation_type=”” animation_delay=”” animation_offset=”” animation_direction=”left” animation_speed=”0.3″ margin_top=”” margin_bottom=”” hide_on_mobile=”small-visibility,medium-visibility,large-visibility” class=”” id=””][fusion_content_box title=”ขั้นตอนที่ 1. ตรวจสอบสถานะการใช้งานรหัสความผิดปกติหรือไม่ได้ใช้งาน.” backgroundcolor=”” icon=”” iconflip=”” iconrotate=”” iconspin=”no” iconcolor=”” circlecolor=”” circlebordersize=”” circlebordercolor=”” outercirclebordersize=”” outercirclebordercolor=”” image=”” image_id=”” image_width=”” image_height=”” link=”” linktext=”อ่านเพิ่มเติม” link_target=”” animation_type=”” animation_direction=”left” animation_speed=”0.3″ animation_offset=””]
- ตรวจสอบและปฏิบัติตาม คำเตือน & ข้อควรระวัง.
- ดึงรหัสผิดใช้งานอยู่และ FMIS กับ ServiceRanger ที่ใช้เชื่อมต่อการวินิจฉัย 9-Way.
การเตือน: ดู ไฟฟ้าแรงสูงปิดระบบการให้บริการและขั้นตอนการเพิ่มพลัง. ทำตามขั้นตอนเพื่อหลีกเลี่ยงการช็อต, การเผาไหม้หรือการเสียชีวิตจากการจัดการไม่ถูกต้องแรงดันสูง. - ที่สำคัญเกี่ยวกับ.
- ค้นหาอุณหภูมิเริ่มต้นโดยการเลือก“ตรวจสอบข้อมูลตัวเลือก” และมุมมอง PID 113 “มอเตอร์ / เครื่องกำเนิดไฟฟ้าอุณหภูมิ” ใน“Power Electronics รายการ”.
- ดู PID 113 อีกครั้งหลังจากที่ 20 นาที:
- หาก PID 113 “มอเตอร์ / เครื่องกำเนิดไฟฟ้าอุณหภูมิ” ลดลงจากการอ่านครั้งแรก, ไปที่ขั้นตอน 2.
- หาก PID 113 “มอเตอร์ / เครื่องกำเนิดไฟฟ้าอุณหภูมิ” ยังคงเหมือนเดิม, ไปที่ขั้นตอน 8.
[/fusion_content_box][/fusion_content_boxes][fusion_content_boxes layout=”clean-horizontal” columns=”2″ title_size=”18px” heading_size=”3″ title_color=”#ffffff” body_color=”#ffffff” backgroundcolor=”#4f4f4f” icon=”” iconflip=”” iconrotate=”” iconspin=”no” iconcolor=”” icon_circle=”” icon_circle_radius=”” circlecolor=”” circlebordersize=”” circlebordercolor=”” outercirclebordersize=”” outercirclebordercolor=”” icon_size=”” icon_hover_type=”” hover_accent_color=”” image=”” image_id=”” image_width=”” image_height=”” link_type=”” button_span=”” link_area=”” link_target=”” icon_align=”left” animation_type=”” animation_delay=”” animation_offset=”” animation_direction=”left” animation_speed=”0.3″ margin_top=”” margin_bottom=”” hide_on_mobile=”small-visibility,medium-visibility,large-visibility” class=”” id=””][fusion_content_box title=”ขั้นตอนที่ 2. ตรวจสอบระดับน้ำหล่อเย็นของระบบไฮบริด.” backgroundcolor=”” icon=”” iconflip=”” iconrotate=”” iconspin=”no” iconcolor=”” circlecolor=”” circlebordersize=”” circlebordercolor=”” outercirclebordersize=”” outercirclebordercolor=”” image=”” image_id=”” image_width=”” image_height=”” link=”” linktext=”อ่านเพิ่มเติม” link_target=”” animation_type=”” animation_direction=”left” animation_speed=”0.3″ animation_offset=””]
- ปิดกุญแจ.
- สังเกตระดับน้ำหล่อเย็นหลังจากที่ระบบเย็นลงเพื่อให้แน่ใจว่าถ้าจะถูกเติมเต็มให้อยู่ในระดับที่เหมาะสม:
- หากน้ำหล่อเย็นอยู่ภายในขีด จำกัด ที่แนะนำ, ไปที่ขั้นตอน 3.
- หากน้ำหล่อเย็นต่ำกว่าขีด จำกัด ที่แนะนำ, อ้างถึง OEM สำหรับชนิดน้ำหล่อเย็นและปฏิบัติตามขั้นตอน. ตรวจสอบแหล่งที่มาของน้ำหล่อเย็นรั่วไหล. เมื่อเติมระบบก็ควรจะมีแรงดันหรือเลือดออกในสูญญากาศของอากาศเพื่อให้แน่ใจว่าน้ำหล่อเย็นไหลอย่างถูกต้องในระหว่างการดำเนินการตามปกติ.
[/fusion_content_box][fusion_content_box title=”ขั้นตอนที่ 3. ตรวจสอบความสมบูรณ์ของส่วนประกอบของระบบไฮบริดระบายความร้อน.” backgroundcolor=”” icon=”” iconflip=”” iconrotate=”” iconspin=”no” iconcolor=”” circlecolor=”” circlebordersize=”” circlebordercolor=”” outercirclebordersize=”” outercirclebordercolor=”” image=”” image_id=”” image_width=”” image_height=”” link=”” linktext=”อ่านเพิ่มเติม” link_target=”” animation_type=”” animation_direction=”left” animation_speed=”0.3″ animation_offset=””]
- ปิดกุญแจ
- สายตาตรวจสอบของเหลวหม้อน้ำระบบระบายความร้อนไฮบริดสำหรับเศษ, การอุดตันการไหลของอากาศ, หรือโค้งคมชัดในเส้นน้ำหล่อเย็น:
- ถ้าหม้อน้ำที่เป็นอิสระของเศษและเส้นน้ำหล่อเย็นไม่ได้ก้มลงอย่างรวดเร็ว, ไปที่ขั้นตอน 4.
- ถ้าหม้อน้ำมีเศษ, การไหลของอากาศถูกกีดขวาง, หรือเส้นน้ำหล่อเย็นจะงออย่างรวดเร็ว, ซ่อมแซมความกังวล, จากนั้นไปที่ขั้นตอน 10.
[/fusion_content_box][/fusion_content_boxes][fusion_content_boxes layout=”clean-horizontal” columns=”2″ title_size=”18px” heading_size=”3″ title_color=”#ffffff” body_color=”#ffffff” backgroundcolor=”#4f4f4f” icon=”” iconflip=”” iconrotate=”” iconspin=”no” iconcolor=”” icon_circle=”” icon_circle_radius=”” circlecolor=”” circlebordersize=”” circlebordercolor=”” outercirclebordersize=”” outercirclebordercolor=”” icon_size=”” icon_hover_type=”” hover_accent_color=”” image=”” image_id=”” image_width=”” image_height=”” link_type=”” button_span=”” link_area=”” link_target=”” icon_align=”left” animation_type=”” animation_delay=”” animation_offset=”” animation_direction=”left” animation_speed=”0.3″ margin_top=”” margin_bottom=”” hide_on_mobile=”small-visibility,medium-visibility,large-visibility” class=”” id=””][fusion_content_box title=”ขั้นตอนที่ 4. ตรวจสอบการทำงานของปั๊มน้ำหล่อเย็นไฮบริด.” backgroundcolor=”” icon=”” iconflip=”” iconrotate=”” iconspin=”no” iconcolor=”” circlecolor=”” circlebordersize=”” circlebordercolor=”” outercirclebordersize=”” outercirclebordercolor=”” image=”” image_id=”” image_width=”” image_height=”” link=”” linktext=”อ่านเพิ่มเติม” link_target=”” animation_type=”” animation_direction=”left” animation_speed=”0.3″ animation_offset=””]
- ที่สำคัญเกี่ยวกับ.
- เชื่อมต่อ ServiceRanger เพื่อการเชื่อมต่อ 9-Way ในรถแท็กซี่.
- เลือกสินค้าขั้นสูงตัวเลือกฟังก์ชั่นและเลือก“ปั๊มคูลลิ่ง” ตัวเลือก.
- เปิดใช้งาน“คูลลิ่งปั๊มตัวเลือก”:
- ถ้าน้ำหล่อเย็นปั๊มเปิด, ไปที่ขั้นตอน 5.
- ถ้าน้ำหล่อเย็นปั๊มไม่เปิด, ไปที่ขั้นตอน 6.
[/fusion_content_box][fusion_content_box title=”ขั้นตอนการดำเนินงานของไฮบริด 5.Verify แลกเปลี่ยนความร้อนพัดลม.” backgroundcolor=”” icon=”” iconflip=”” iconrotate=”” iconspin=”no” iconcolor=”” circlecolor=”” circlebordersize=”” circlebordercolor=”” outercirclebordersize=”” outercirclebordercolor=”” image=”” image_id=”” image_width=”” image_height=”” link=”” linktext=”อ่านเพิ่มเติม” link_target=”” animation_type=”” animation_direction=”left” animation_speed=”0.3″ animation_offset=””]
- เลือกสินค้าขั้นสูงตัวเลือกฟังก์ชั่นและเลือก“แลกเปลี่ยนความร้อนพัดลมตัวเลือก”.
- เปิดใช้งานตัวเลือกแลกเปลี่ยนความร้อนพัดลม:
- หากแลกเปลี่ยนความร้อนพัดลมเปิด, ระบบจะต้องมีการกำจัดของอากาศ, ปล่อยให้น้ำหล่อเย็นจะไหล. Bleed อากาศโดยใช้เครื่องมืออัดความดันระบบน้ำหล่อเย็นหรือเครื่องมือสูญญากาศ, จากนั้นไปที่ขั้นตอน 10.
- หากแลกเปลี่ยนความร้อนพัดลมไม่เปิด, ไปที่ขั้นตอน 8.
[/fusion_content_box][/fusion_content_boxes][fusion_content_boxes layout=”clean-horizontal” columns=”2″ title_size=”18px” heading_size=”3″ title_color=”#ffffff” body_color=”#ffffff” backgroundcolor=”#4f4f4f” icon=”” iconflip=”” iconrotate=”” iconspin=”no” iconcolor=”” icon_circle=”” icon_circle_radius=”” circlecolor=”” circlebordersize=”” circlebordercolor=”” outercirclebordersize=”” outercirclebordercolor=”” icon_size=”” icon_hover_type=”” hover_accent_color=”” image=”” image_id=”” image_width=”” image_height=”” link_type=”” button_span=”” link_area=”” link_target=”” icon_align=”left” animation_type=”” animation_delay=”” animation_offset=”” animation_direction=”left” animation_speed=”0.3″ margin_top=”” margin_bottom=”” hide_on_mobile=”small-visibility,medium-visibility,large-visibility” class=”” id=””][fusion_content_box title=”ขั้นตอนที่ 6. ตรวจสอบแรงดันไฟฟ้าที่ปั๊มน้ำหล่อเย็นไฮบริด.” backgroundcolor=”” icon=”” iconflip=”” iconrotate=”” iconspin=”no” iconcolor=”” circlecolor=”” circlebordersize=”” circlebordercolor=”” outercirclebordersize=”” outercirclebordercolor=”” image=”” image_id=”” image_width=”” image_height=”” link=”” linktext=”อ่านเพิ่มเติม” link_target=”” animation_type=”” animation_direction=”left” animation_speed=”0.3″ animation_offset=””]
- ที่สำคัญเกี่ยวกับ.
- ถอดหล่อเย็นปั๊ม 2 Way-เชื่อมต่อ.
- เลือก“ผลิตภัณฑ์ทุกประเภทฟังก์ชั่นตัวเลือก” และเลือก“คูลลิ่งปั๊ม.”
- เปิดใช้งาน“คูลลิ่งปั๊มตัวเลือก”:
- วัดแรงดันไฟฟ้าที่ 2-Way เชื่อมต่อจาก PIN เพื่อ Pin B:
- ถ้าแรงดันระหว่างขาและขา B เป็น± 0.2 โวลต์แรงดันแบตเตอรี่, อ้างถึงความกังวล OEM สำหรับหล่อเย็นปั๊ม.
- ถ้าแรงดันระหว่างขาและขา B เป็นนอกช่วง, อ้างถึง OEM สำหรับขั้นตอนการซ่อมคูลลิ่งปั๊มเพาเวอร์เทียมหรือฟิวส์เสียหาย.
[/fusion_content_box][fusion_content_box title=”ขั้นตอนที่แรงดันไฟฟ้าไฮบริดที่ 7.Verify แลกเปลี่ยนความร้อนพัดลม.” backgroundcolor=”” icon=”” iconflip=”” iconrotate=”” iconspin=”no” iconcolor=”” circlecolor=”” circlebordersize=”” circlebordercolor=”” outercirclebordersize=”” outercirclebordercolor=”” image=”” image_id=”” image_width=”” image_height=”” link=”” linktext=”อ่านเพิ่มเติม” link_target=”” animation_type=”” animation_direction=”left” animation_speed=”0.3″ animation_offset=””]
- ที่สำคัญเกี่ยวกับ.
- ถอดพัดลมแลกเปลี่ยนความร้อน 2- เชื่อมต่อทาง.
- เลือก“ผลิตภัณฑ์ทุกประเภทฟังก์ชั่นตัวเลือก” และเลือก“แลกเปลี่ยนความร้อนพัดลม.”
- เปิดใช้งานตัวเลือกแลกเปลี่ยนความร้อนพัดลม:
- วัดแรงดันไฟฟ้าที่ 2-Way เชื่อมต่อจาก PIN เพื่อ Pin B:
- ถ้าแรงดันระหว่างขาและขา B เป็น± 0.2 โวลต์แรงดันแบตเตอรี่, อ้างถึงความกังวล OEM สำหรับแลกเปลี่ยนความร้อนพัดลม.
- ถ้าแรงดันระหว่างขาและขา B เป็นนอกช่วง, อ้างถึง OEM สำหรับขั้นตอนการซ่อมอุปกรณ์แลกเปลี่ยนความร้อนพัดลมไฟฟ้าสายรัดหรือฟิวส์เสียหาย.
[/fusion_content_box][/fusion_content_boxes][fusion_content_boxes layout=”clean-horizontal” columns=”2″ title_size=”18px” heading_size=”3″ title_color=”#ffffff” body_color=”#ffffff” backgroundcolor=”#4f4f4f” icon=”” iconflip=”” iconrotate=”” iconspin=”no” iconcolor=”” icon_circle=”” icon_circle_radius=”” circlecolor=”” circlebordersize=”” circlebordercolor=”” outercirclebordersize=”” outercirclebordercolor=”” icon_size=”” icon_hover_type=”” hover_accent_color=”” image=”” image_id=”” image_width=”” image_height=”” link_type=”” button_span=”” link_area=”” link_target=”” icon_align=”left” animation_type=”” animation_delay=”” animation_offset=”” animation_direction=”left” animation_speed=”0.3″ margin_top=”” margin_bottom=”” hide_on_mobile=”small-visibility,medium-visibility,large-visibility” class=”” id=””][fusion_content_box title=”ขั้นตอนที่ 8. ตรวจสอบความต่อเนื่องของอินเวอร์เตอร์วงจร.” backgroundcolor=”” icon=”” iconflip=”” iconrotate=”” iconspin=”no” iconcolor=”” circlecolor=”” circlebordersize=”” circlebordercolor=”” outercirclebordersize=”” outercirclebordercolor=”” image=”” image_id=”” image_width=”” image_height=”” link=”” linktext=”อ่านเพิ่มเติม” link_target=”” animation_type=”” animation_direction=”left” animation_speed=”0.3″ animation_offset=””]
- ปิดกุญแจ.
- ถอดอินเวอร์เตอร์ 56-Way เชื่อมต่อ.
- เลือก“ผลิตภัณฑ์ทุกประเภทฟังก์ชั่นตัวเลือก” และเลือก“คูลลิ่งปั๊ม.”
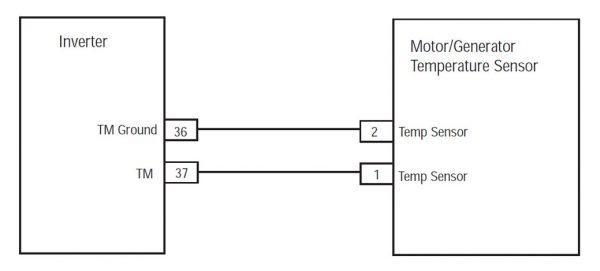
- วัดความต้านทานระหว่างขา 38 และขา 50(MY08) / 36 & 37 (MY09) และขา 50 (MY08) / 37 (MY09) ไปที่พื้นดินของอินเวอร์เตอร์ 56-Way เชื่อมต่อ.
- หากต้านทาน 0.8K-301.7K โอห์มระหว่างขา 50 และขา 38 และต้านทานระหว่างขา 50 และพื้นดินเป็น 10K โอห์มหรือมากกว่า, แทนที่อินเวอร์เตอร์, จากนั้นไปที่ขั้นตอน 10.
- หากต้านทานอยู่นอกช่วง, ไปที่ขั้นตอน 9.
[/fusion_content_box][fusion_content_box title=”ขั้นตอนที่ต่อเนื่อง 9.Verify อุณหภูมิเซนเซอร์วงจร.” backgroundcolor=”” icon=”” iconflip=”” iconrotate=”” iconspin=”no” iconcolor=”” circlecolor=”” circlebordersize=”” circlebordercolor=”” outercirclebordersize=”” outercirclebordercolor=”” image=”” image_id=”” image_width=”” image_height=”” link=”” linktext=”อ่านเพิ่มเติม” link_target=”” animation_type=”” animation_direction=”left” animation_speed=”0.3″ animation_offset=””]
- ปิดกุญแจ.
- ถอดมอเตอร์ / เครื่องกำเนิดไฟฟ้าเซนเซอร์จับอุณหภูมิ 2 ทางเชื่อมต่ออยู่บนฝั่งขวาของมอเตอร์ / เครื่องกำเนิดไฟฟ้า.
- ต้านทานวัดระหว่าง 2-Way อุณหภูมิเซนเซอร์เชื่อมต่อจาก PIN เพื่อ Pin B (MY08) / หมุด 1 ปักหมุด 2 (MY09) :
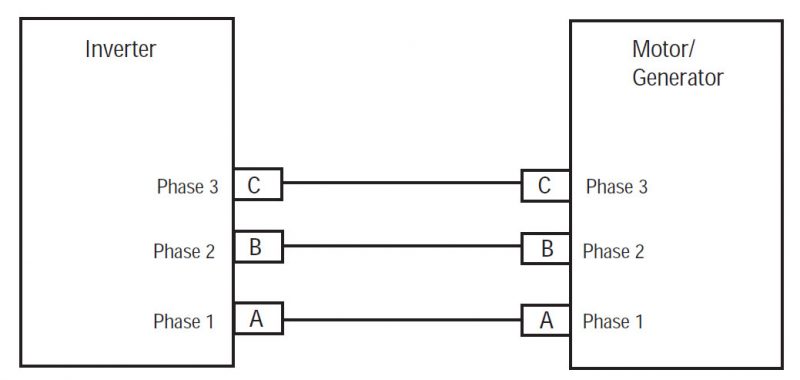
- หากต้านทาน 0.8K-301.7K โอห์ม, ซ่อมแซม shorted HCM ระบบสายรัดระหว่างเครื่องกำเนิดไฟฟ้าอินเวอร์เตอร์เชื่อมต่อและมอเตอร์ / 2-Way เชื่อมต่อ.
- หากต้านทานอยู่นอกช่วง, แทนที่มอเตอร์ / เครื่องกำเนิดไฟฟ้า, จากนั้นไปที่ขั้นตอน 10.
[/fusion_content_box][/fusion_content_boxes][fusion_content_boxes layout=”clean-horizontal” columns=”1″ title_size=”18px” heading_size=”3″ title_color=”#ffffff” body_color=”#ffffff” backgroundcolor=”#4f4f4f” icon=”” iconflip=”” iconrotate=”” iconspin=”no” iconcolor=”” icon_circle=”” icon_circle_radius=”” circlecolor=”” circlebordersize=”” circlebordercolor=”” outercirclebordersize=”” outercirclebordercolor=”” icon_size=”” icon_hover_type=”” hover_accent_color=”#f41000″ image=”” image_id=”” image_width=”” image_height=”” link_type=”” button_span=”” link_area=”” link_target=”” icon_align=”left” animation_type=”” animation_delay=”” animation_offset=”” animation_direction=”left” animation_speed=”0.3″ margin_top=”” margin_bottom=”” hide_on_mobile=”small-visibility,medium-visibility,large-visibility” class=”” id=””][fusion_content_box title=”ขั้นตอนการซ่อมแซม 10.Verify.” backgroundcolor=”” icon=”” iconflip=”” iconrotate=”” iconspin=”no” iconcolor=”” circlecolor=”” circlebordersize=”” circlebordercolor=”” outercirclebordersize=”” outercirclebordercolor=”” image=”” image_id=”” image_width=”” image_height=”” link=”” linktext=”อ่านเพิ่มเติม” link_target=”” animation_type=”” animation_direction=”left” animation_speed=”0.3″ animation_offset=””]
- ปิดกุญแจ.
- เชื่อมต่อทุกการเชื่อมต่อและสายเคเบิลขั้วลบของแบตเตอรี่.
- ที่สำคัญเกี่ยวกับ.
- รหัสที่ชัดเจน, ดู ความผิดพลาดที่ไม่ใช้งานที่ชัดเจน.
- ขับรถและพยายามที่จะรีเซ็ตรหัส.
- ตรวจสอบรหัส, ดู ดูความผิดปกติที่ใช้งานและไม่ได้ใช้งาน.
- หากไม่มีรหัส, ทดสอบเสร็จสิ้น.
- ถ้ารหัสความผิด 3 ปรากฏ, พบข้อผิดพลาดในการทดสอบ, ไปที่ขั้นตอน 1.
- ถ้ารหัสอื่นที่ไม่ใช่ 3 ปรากฏ, ดู ความผิดปกติรายการดัชนีรหัส.
[/fusion_content_box][/fusion_content_boxes][/fusion_builder_column][/fusion_builder_row][/fusion_builder_container][fusion_global id=”13788″]