[fusion_builder_container hundred_percent=nohundred_percent_height=nohundred_percent_height_scroll=nohundred_percent_height_center_content=yesequal_height_columns=nomenu_anchor=”” hide_on_mobile=small-visibility,medium-visibility,large-visibilitystatus=publishedpublish_date=”” class=”” id=”” background_color=”” background_image=”” background_position=center centerbackground_repeat=no-repeatfade=nobackground_parallax=noneenable_mobile=noparallax_speed=”0.3″ video_mp4=”” video_webm=”” video_ogv=”” video_url=”” video_aspect_ratio=”16:9″ video_loop=yesvideo_mute=yesvideo_preview_image=”” border_size=”” border_color=”” border_style=solidmargin_top=”35″ margin_bottom=”” padding_top=”” padding_right=”” padding_bottom=”” padding_left=””][fusion_builder_row][fusion_builder_column type=”1_1layout=”1_1spacing=”” center_content=nolink=”” target=_selfmin_height=”” hide_on_mobile=small-visibility,medium-visibility,large-visibilityclass=”” id=”” background_color=”” background_image=”” background_image_id=”” background_position=left topbackground_repeat=no-repeathover_type=noneborder_size=”0″ border_color=”” border_style=solidborder_position=allpadding_top=”” padding_right=”” padding_bottom=”” padding_left=”” margin_top=”” margin_bottom=”” animation_type=”” animation_direction=leftanimation_speed=”0.3″ animation_offset=”” last=no”][fusion_text columns=”” column_min_width=”” column_spacing=”” rule_style=defaultrule_size=”” rule_color=”” hide_on_mobile=small-visibility,medium-visibility,large-visibilityclass=”” id=””]

Eaton Fuller hibridna prijenosa greške kod 116 – High Voltage releji -(MY08 Systems)

[/fusion_text][/fusion_builder_column][/fusion_builder_row][/fusion_builder_container][fusion_builder_container hundred_percent=nohundred_percent_height=nohundred_percent_height_scroll=nohundred_percent_height_center_content=yesequal_height_columns=nomenu_anchor=”” hide_on_mobile=small-visibility,medium-visibility,large-visibilitystatus=publishedpublish_date=”” class=”” id=”” background_color=”” background_image=”” background_position=center centerbackground_repeat=no-repeatfade=nobackground_parallax=noneenable_mobile=noparallax_speed=”0.3″ video_mp4=”” video_webm=”” video_ogv=”” video_url=”” video_aspect_ratio=”16:9″ video_loop=yesvideo_mute=yesvideo_preview_image=”” border_size=”” border_color=”” border_style=solidmargin_top=”” margin_bottom=”” padding_top=”” padding_right=”” padding_bottom=”” padding_left=””][fusion_builder_row][fusion_builder_column type=”1_1layout=”1_1spacing=”” center_content=nolink=”” target=_selfmin_height=”” hide_on_mobile=small-visibility,medium-visibility,large-visibilityclass=”” id=”” background_color=”” background_image=”” background_image_id=”” background_position=left topbackground_repeat=no-repeathover_type=noneborder_size=”0″ border_color=”” border_style=solidborder_position=allpadding_top=”” padding_right=”” padding_bottom=”” padding_left=”” margin_top=”” margin_bottom=”” animation_type=”” animation_direction=leftanimation_speed=”0.3″ animation_offset=”” last=no”][fusion_text columns=”” column_min_width=”” column_spacing=”” rule_style=defaultrule_size=”” rule_color=”” hide_on_mobile=small-visibility,medium-visibility,large-visibilityclass=”” id=””]

Kod pogreške za Eaton Hybrid Drive Systems modeli (MY08) EH-8E306A-U, EH-8E306A-UPG, EH-8E306A-UP, EH-8E306A-CD, EH-8E306A-T, EH-6E606B-CD. Pročitajte u nastavku kako biste saznali kako da testirate, očistiti i popraviti kvar kod greške za Freightliner, Mack, PETERBILT, KENWORTH, volvo, međunarodni, i heavy-duty kamiona i opreme. The High-Voltage Relays are located inside the Power Electronics Carrier (PEC) u kutije s relejima jedinice. There is 1 precharge relay on the positive side, dodatnog releja na pozitivnoj, i 1 on the negative for a total of 3. Ovi releji su obično otvoren kada je sistem isključen. Releja se upravlja kroz Inverter.

Kod pogreške 116 – High Voltage Relays Detection

Sljedeće pretpostavke moraju biti ispunjeni prije nego što sistem detektuje greške:

  • Inverter Napon paljenja je veći od 7 volta i manje od 16 volti.

Bilješka: Kada rješavanje problema neaktivan kod odnose na Proizvod Dijagnostički Mode (PDM)

Uslovi za Set Fault Kod Active

  • MMF 10 is set when the Inverter detects the input voltage measured at the capacitor is less than 210 volts within 3 seconds after the sub-relay closed in the Relay Box.
  • MMF 14 is set when only the negative relay in the Relay Box is on and capacitor voltage decreases less than 10 volts/5 seconds when initial capacitor voltage was greater than 200 volts and motor speed less than 500 min-1, or there is a detect error in the initial check.

Fallback Kada Kod pogreške 116 je postavljen dođe do sledećeg:

  • Amber "hibrida" svjetlo treperi FMI 10 and remains solid for FMI 14.
  • Greška se čuva u HCM memoriji.
  • Inverter isključuje visokog napona sistem off.
  • HCM zadrži kontrolu nad hibridno vozilo u režimu dizel-samo.
  • Prenos default početi brzinu do 1..

[/fusion_text][fusion_text columns=”” column_min_width=”” column_spacing=”” rule_style=defaultrule_size=”” rule_color=”” hide_on_mobile=small-visibility,medium-visibility,large-visibilityclass=”” id=””]

Uslovi za Set Fault Kod Neaktivni

Samo Neaktivni greške mogu biti izbrisani iz Jedinice za Transmission Electronic Control (TECU) ili HCM povijest koristeći ServiceRanger. U TECU automatski briše greške iz istorije nakon 200 sati, a HCM automatski briše greške iz istorije nakon kvara nije aktivan 200 sati.

Ovaj kod kvara može biti uzrokovan bilo koji od sljedećeg:

  • MMF 10
    • PEC
    • APG
    • inverter
    • DC high-voltage cable
    • DC cable interlock loops
    • inercija Switch
    • usluga Switch
  • MMF 14
    • inverter
    • PEC

[/fusion_text][/fusion_builder_column][/fusion_builder_row][/fusion_builder_container][fusion_builder_container hundred_percent=nohundred_percent_height=nohundred_percent_height_scroll=nohundred_percent_height_center_content=yesequal_height_columns=nomenu_anchor=”” hide_on_mobile=small-visibility,medium-visibility,large-visibilitystatus=publishedpublish_date=”” class=”” id=”” background_color=”” background_image=”” background_position=center centerbackground_repeat=no-repeatfade=nobackground_parallax=noneenable_mobile=noparallax_speed=”0.3″ video_mp4=”” video_webm=”” video_ogv=”” video_url=”” video_aspect_ratio=”16:9″ video_loop=yesvideo_mute=yesvideo_preview_image=”” border_size=”” border_color=”” border_style=solidmargin_top=”” margin_bottom=”” padding_top=”” padding_right=”” padding_bottom=”” padding_left=””][fusion_builder_row][fusion_builder_column type=”1_1layout=”1_1spacing=”” center_content=nolink=”” target=_selfmin_height=”” hide_on_mobile=small-visibility,medium-visibility,large-visibilityclass=”” id=”” background_color=”” background_image=”” background_image_id=”” background_position=left topbackground_repeat=no-repeathover_type=noneborder_size=”0″ border_color=”” border_style=solidborder_position=allpadding_top=”” padding_right=”” padding_bottom=”” padding_left=”” margin_top=”” margin_bottom=”” animation_type=”” animation_direction=leftanimation_speed=”0.3″ animation_offset=”” last=no”][fusion_text columns=”” column_min_width=”” column_spacing=”” rule_style=defaultrule_size=”” rule_color=”” hide_on_mobile=small-visibility,medium-visibility,large-visibilityclass=”” id=””]

Kod pogreške 116 – High Voltage Relays Test

[/fusion_text][/fusion_builder_column][/fusion_builder_row][/fusion_builder_container][fusion_builder_container hundred_percent=nohundred_percent_height=nohundred_percent_height_scroll=nohundred_percent_height_center_content=yesequal_height_columns=nomenu_anchor=”” hide_on_mobile=small-visibility,medium-visibility,large-visibilitystatus=publishedpublish_date=”” class=”” id=”” background_color=”” background_image=”” background_position=center centerbackground_repeat=no-repeatfade=nobackground_parallax=noneenable_mobile=noparallax_speed=”0.3″ video_mp4=”” video_webm=”” video_ogv=”” video_url=”” video_aspect_ratio=”16:9″ video_loop=yesvideo_mute=yesvideo_preview_image=”” border_size=”” border_color=”” border_style=solidmargin_top=”” margin_bottom=”” padding_top=”” padding_right=”” padding_bottom=”” padding_left=””][fusion_builder_row][fusion_builder_column type=”1_1layout=”1_1spacing=”” center_content=nolink=”” target=_selfmin_height=”” hide_on_mobile=small-visibility,medium-visibility,large-visibilityclass=”” id=”” background_color=”” background_image=”” background_image_id=”” background_position=left topbackground_repeat=no-repeathover_type=noneborder_size=”0″ border_color=”” border_style=solidborder_position=allpadding_top=”” padding_right=”” padding_bottom=”” padding_left=”” margin_top=”” margin_bottom=”” animation_type=”” animation_direction=leftanimation_speed=”0.3″ animation_offset=”” last=no”][fusion_text columns=”” column_min_width=”” column_spacing=”” rule_style=defaultrule_size=”” rule_color=”” hide_on_mobile=small-visibility,medium-visibility,large-visibilityclass=”” id=””]

Komponenta Identifikacija MY08 Systems:
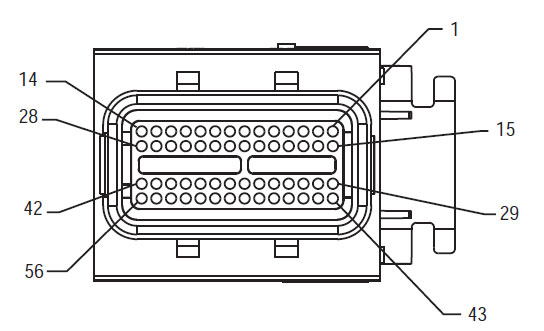
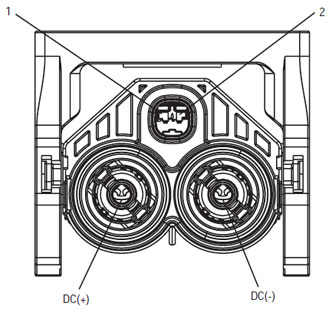
[/fusion_text][/fusion_builder_column][/fusion_builder_row][/fusion_builder_container][fusion_builder_container hundred_percent=yeshundred_percent_height=nohundred_percent_height_scroll=nohundred_percent_height_center_content=yesequal_height_columns=nomenu_anchor=”” hide_on_mobile=small-visibility,medium-visibility,large-visibilitystatus=publishedpublish_date=”” class=”” id=”” background_color=”” background_image=”” background_position=center centerbackground_repeat=no-repeatfade=nobackground_parallax=noneenable_mobile=noparallax_speed=”0.3″ video_mp4=”” video_webm=”” video_ogv=”” video_url=”” video_aspect_ratio=”16:9″ video_loop=yesvideo_mute=yesvideo_preview_image=”” border_size=”” border_color=”” border_style=solidmargin_top=”” margin_bottom=”” padding_top=”” padding_right=”10%” padding_bottom=”” padding_left=”10%”][fusion_builder_row][fusion_builder_column type=”1_3layout=”1_3spacing=”” center_content=nolink=”” target=_selfmin_height=”” hide_on_mobile=small-visibility,medium-visibility,large-visibilityclass=”” id=”” background_color=”” background_image=”” background_image_id=”” background_position=left topbackground_repeat=no-repeathover_type=noneborder_size=”0″ border_color=”” border_style=solidborder_position=allpadding_top=”” padding_right=”” padding_bottom=”” padding_left=”” margin_top=”” margin_bottom=”” animation_type=”” animation_direction=leftanimation_speed=”0.3″ animation_offset=”” last=no”][fusion_imageframe image_id=”14474|fullmax_width=”” style_type=”” blur=”” stylecolor=”” hover_type=nonebordersize=”” bordercolor=”” borderradius=”” align=centerlightbox=nogallery_id=”” lightbox_image=”” lightbox_image_id=”” alt=”Delphi 56-Way Mating Pregled priključaka” link=”” linktarget=_selfhide_on_mobile=small-visibility,medium-visibility,large-visibilityclass=”” id=”” animation_type=”” animation_direction=leftanimation_speed=”0.3″ animation_offset=””]https://www.globaltransmissionsupply.com/wp-content/uploads/Inverter-56-Way-Mating-Connector-View.jpg[/fusion_imageframe][fusion_text columns=”” column_min_width=”” column_spacing=”” rule_style=defaultrule_size=”” rule_color=”” hide_on_mobile=small-visibility,medium-visibility,large-visibilityclass=”” id=””]

56-Način Parenje Pregled priključaka

[/fusion_text][/fusion_builder_column][fusion_builder_column type=”1_3layout=”1_3spacing=”” center_content=nolink=”” target=_selfmin_height=”” hide_on_mobile=small-visibility,medium-visibility,large-visibilityclass=”” id=”” background_color=”” background_image=”” background_image_id=”” background_position=left topbackground_repeat=no-repeathover_type=noneborder_size=”0″ border_color=”” border_style=solidborder_position=allpadding_top=”” padding_right=”” padding_bottom=”” padding_left=”” margin_top=”” margin_bottom=”” animation_type=”” animation_direction=leftanimation_speed=”0.3″ animation_offset=”” last=no”][fusion_imageframe image_id=”14635|fullmax_width=”” style_type=”” blur=”” stylecolor=”” hover_type=nonebordersize=”” bordercolor=”” borderradius=”” align=centerlightbox=nogallery_id=”” lightbox_image=”” lightbox_image_id=”” alt=”High Voltage DC Pregled priključaka Yazaki konektor” link=”” linktarget=_selfhide_on_mobile=small-visibility,medium-visibility,large-visibilityclass=”” id=”” animation_type=”” animation_direction=leftanimation_speed=”0.3″ animation_offset=””]https://www.globaltransmissionsupply.com/wp-content/uploads/High-Voltage-DC-Connector-View.jpg[/fusion_imageframe][fusion_text columns=”” column_min_width=”” column_spacing=”” rule_style=defaultrule_size=”” rule_color=”” hide_on_mobile=small-visibility,medium-visibility,large-visibilityclass=”” id=””]

High Voltage DC Pregled priključaka Yazaki konektor

[/fusion_text][/fusion_builder_column][fusion_builder_column type=”1_3layout=”1_3spacing=”” center_content=nolink=”” target=_selfmin_height=”” hide_on_mobile=small-visibility,medium-visibility,large-visibilityclass=”” id=”” background_color=”” background_image=”” background_image_id=”” background_position=left topbackground_repeat=no-repeathover_type=noneborder_size=”0″ border_color=”” border_style=solidborder_position=allpadding_top=”” padding_right=”” padding_bottom=”” padding_left=”” margin_top=”” margin_bottom=”” animation_type=”” animation_direction=leftanimation_speed=”0.3″ animation_offset=”” last=no”][fusion_imageframe image_id=”14213|mediummax_width=”” style_type=”” blur=”” stylecolor=”” hover_type=nonebordersize=”” bordercolor=”” borderradius=”” align=centerlightbox=nogallery_id=”” lightbox_image=”” lightbox_image_id=”” alt=Mating Connector View Deutsch 19 – način” link=”” linktarget=_selfhide_on_mobile=small-visibility,medium-visibility,large-visibilityclass=”” id=”” animation_type=”” animation_direction=leftanimation_speed=”0.3″ animation_offset=””]https://www.globaltransmissionsupply.com/wp-content/uploads/Eaton-Fuller-Harness-Connector-View-300×289.jpg[/fusion_imageframe][fusion_text columns=”” column_min_width=”” column_spacing=”” rule_style=defaultrule_size=”” rule_color=”” hide_on_mobile=small-visibility,medium-visibility,large-visibilityclass=”” id=””]

Mating Connector View Deutsch 19 – način

[/fusion_text][/fusion_builder_column][/fusion_builder_row][/fusion_builder_container][fusion_builder_container hundred_percent=nohundred_percent_height=nohundred_percent_height_scroll=nohundred_percent_height_center_content=yesequal_height_columns=nomenu_anchor=”” hide_on_mobile=small-visibility,medium-visibility,large-visibilitystatus=publishedpublish_date=”” class=”” id=”” background_color=”” background_image=”” background_position=center centerbackground_repeat=no-repeatfade=nobackground_parallax=noneenable_mobile=noparallax_speed=”0.3″ video_mp4=”” video_webm=”” video_ogv=”” video_url=”” video_aspect_ratio=”16:9″ video_loop=yesvideo_mute=yesvideo_preview_image=”” border_size=”” border_color=”” border_style=solidmargin_top=”” margin_bottom=”” padding_top=”” padding_right=”” padding_bottom=”” padding_left=””][fusion_builder_row][fusion_builder_column type=”1_1layout=”1_1spacing=”” center_content=nolink=”” target=_selfmin_height=”” hide_on_mobile=small-visibility,medium-visibility,large-visibilityclass=”” id=”” background_image_id=”” background_color=”#000000″ background_image=”” background_position=left topundefined=”” background_repeat=no-repeathover_type=noneborder_size=”0″ border_color=”” border_style=solidborder_position=allpadding_top=”” padding_right=”” padding_bottom=”” padding_left=”” margin_top=”” margin_bottom=”” animation_type=”” animation_direction=leftanimation_speed=”0.3″ animation_offset=”” last=no”][fusion_text columns=”” column_min_width=”” column_spacing=”” rule_style=defaultrule_size=”” rule_color=”” hide_on_mobile=small-visibility,medium-visibility,large-visibilityclass=”” id=””]

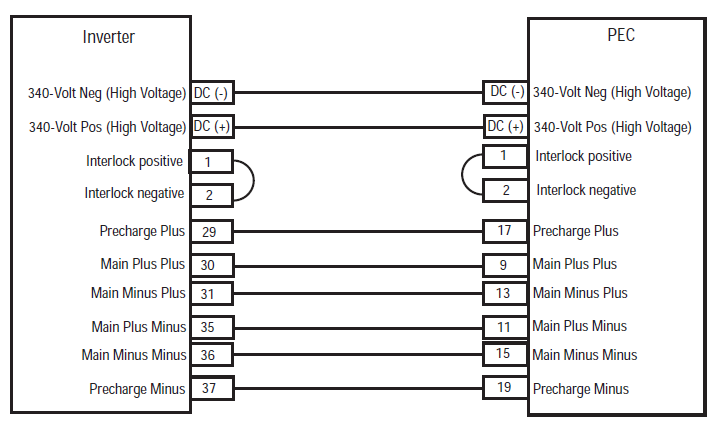
BILJEŠKA: Odnose se na Eaton hibridna komponenti i konektor Lokacija za priključak lokacije u MY08 Systems
[/fusion_text][/fusion_builder_column][fusion_builder_column type=”1_1layout=”1_1spacing=”” center_content=nolink=”” target=_selfmin_height=”” hide_on_mobile=small-visibility,medium-visibility,large-visibilityclass=”” id=”” background_color=”” background_image=”” background_image_id=”” background_position=left topbackground_repeat=no-repeathover_type=noneborder_size=”0″ border_color=”” border_style=solidborder_position=allpadding_top=”” padding_right=”” padding_bottom=”” padding_left=”” margin_top=”” margin_bottom=”” animation_type=”” animation_direction=leftanimation_speed=”0.3″ animation_offset=”” last=no”][fusion_imageframe image_id=”14666|fullmax_width=”” style_type=”” blur=”” stylecolor=”” hover_type=nonebordersize=”” bordercolor=”” borderradius=”” align=centerlightbox=nogallery_id=”” lightbox_image=”” lightbox_image_id=”” alt=Inverter PEC connectors Eaton Fuller Hybrid transmissionlink=”” linktarget=_selfhide_on_mobile=small-visibility,medium-visibility,large-visibilityclass=”” id=”” animation_type=”” animation_direction=leftanimation_speed=”0.3″ animation_offset=””]https://www.globaltransmissionsupply.com/wp-content/uploads/Inverter-PEC-connectors.png[/fusion_imageframe][/fusion_builder_column][/fusion_builder_row][/fusion_builder_container][fusion_builder_container hundred_percent=nohundred_percent_height=nohundred_percent_height_scroll=nohundred_percent_height_center_content=yesequal_height_columns=nomenu_anchor=”” hide_on_mobile=small-visibility,medium-visibility,large-visibilitystatus=publishedpublish_date=”” class=”” id=”” background_color=”” background_image=”” background_position=center centerbackground_repeat=no-repeatfade=nobackground_parallax=noneenable_mobile=noparallax_speed=”0.3″ video_mp4=”” video_webm=”” video_ogv=”” video_url=”” video_aspect_ratio=”16:9″ video_loop=yesvideo_mute=yesvideo_preview_image=”” border_size=”” border_color=”” border_style=solidmargin_top=”” margin_bottom=”” padding_top=”” padding_right=”” padding_bottom=”” padding_left=””][fusion_builder_row][fusion_builder_column type=”1_1layout=”1_1spacing=”” center_content=nolink=”” target=_selfmin_height=”” hide_on_mobile=small-visibility,medium-visibility,large-visibilityclass=”” id=”” background_color=”” background_image=”” background_image_id=”” background_position=left topbackground_repeat=no-repeathover_type=noneborder_size=”0″ border_color=”” border_style=solidborder_position=allpadding_top=”” padding_right=”” padding_bottom=”” padding_left=”” margin_top=”” margin_bottom=”” animation_type=”” animation_direction=leftanimation_speed=”0.3″ animation_offset=”” last=no”][fusion_modal name=warnings_cautionstitle=”upozorenja & Oprez” size=largebackground=”” border_color=”” show_footer=yesclass=”” id=””]opasnost: Opasnost pokazuje da će biti teško povrijeđen ili ubijeni ako ne prate navedene postupak.
upozorenje: Upozorenje ukazuje na neposrednu opasnost, što bi moglo dovesti do ozbiljne povrede ako ne pratite naznačeno postupak.
oprez: Oprez pokazuje vozila ili oštećenja imovine može doći ako se ne pridržavate navedenih postupak.

Bilješka: NAPOMENA ukazuje na dodatni detalj koji će pomoći u dijagnostici ili popravku komponente / system.

Pratite navedene procedure u naznačenom kako bi izbjegli povrede:

1. Ako je visokog napona čunjeva oko vozila i lockout instaliran na PEC, jedina osoba koja treba omogućiti da pokrenete vozilo je osoba koja je potpisala lockout tag.
2. Prije rada na vozilu ili napuštanja kabine dok motor radi, treba staviti ručica mjenjača u "N" povucite ručnu kočnicu, i blokirati točkove.
3. Iz sigurnosnih razloga, Uvijek se uključe uslugu kočnice prije izbora poluolivom iz "N."
4. Prije početka vozilo uvijek biti postavljen u vozača, odaberite "N" na kontrolnoj smjeni, i postaviti kočnice.
5. Kod vozila sa ePTO, motora i / ili
Motor / generator može početi u ePTO modu. Nikada obavljati održavanje ili rad na vozilu, U ovom režimu.
6. 12-Volt baterija pozitivan (+) i negativne (-) mora biti isključen prije bilo kakvih zavarivanja na bilo hibridna opremljeno vozilo.

oprez: Pratite navedene procedure u naznačenom kako bi izbjegli kvar opreme ili oštećenje.
oprez: Ne otpustite ručnu kočnicu ili pokušaj izbora u brzinu dok se tlak zraka je na pravoj razini.
oprez: Da biste izbjegli oštećenje mjenjača tokom vuče mjesto menjač u "N" i podignite pogonskih točkova od zemlje ili isključite pogonski sklop.

Visokog napona Upozorenja & Oprez

  • Koristite CO2 ili Kemijski Vatrogasni aparati.
  • Visoke struje je prekriven narandžastim izolaciju ili zamršena cijevi i označeni oznakama upozorenja na konektore.
  • Svi Eaton® Hybrid Diesel / Električna vozila će biti označeno 'Hybrid’ na vanjskoj strani vozila, uz pomak etiketa na tablu.
  • Odnose na OEM za određenu lokaciju šasija s hibridne komponente.
  • Ne prekidajte u narandžasto visokonaponskih kablova.
  • NEMOJTE cut u ili otvorite PEC.
  • NEMOJTE cut u ili otvorite DC / DC Converter.
  • NEMOJTE cut u ili otvorite Inverter.

A tampon zona mora biti postavljen i visokog napona izolirane gumene rukavice (razred 0 sa kožnim zaštitnici) su potrebne prije radi na visokom naponu. Nepridržavanje ovih uputa može dovesti do ozbiljne ozljede ili smrt.
Rukavice gumene izolacijom koja se mora nositi dok je radio na visokog napona sistema su klase 0 sa kožnim zaštitnici. Gumene rukavice treba ispitati prije svake upotrebe u skladu sa procedurom gumene izolacije rukavice testiranje naći u "Dijagnostički alati / usluge publikacije" na stranici 6. Nepridržavanje ovih uputa može dovesti do ozbiljne ozljede ili smrt.
Pre pregleda ili rade na bilo koji visokonaponskih kablova ili komponente "High-Voltage Service Gašenje i Power-Up postupku" na stranici 4 treba pratiti. Nepridržavanje ovih uputa može dovesti do ozbiljne ozljede ili smrt.
U Lockout i Tagout uređaja treba ukloniti samo tehničar koji je plasirao Lockout i Tagout uređaja na vozilu. Nepridržavanje ovih uputa može dovesti do ozbiljne ozljede ili smrt.
Visokonaponskih gumene izolirane rukavice (razred 0 sa kožnim zaštitnici) moraju se nositi kada se radi o bilo
visokonaponskih kablova. Na "High-Voltage Service Gašenje i Power-Up postupku" na stranici 4 moraju poštovati prije uklanjanja bilo visokonaponskih kablova. Nepridržavanje ovih uputa može dovesti do ozbiljne ozljede ili smrt.
Visokonaponskih kablova i žica su narandžaste i sadrže oznaku upozorenja na konektore. komponente visokog napona su označeni sa oznakom. Visokonaponskih gumene izolirane rukavice (razred 0 sa kožnim zaštitnici) mora se koristiti prilikom rada na bilo kojem od ovih komponenti. Nepridržavanje ovih uputa može dovesti do ozbiljne ozljede ili smrt.

Visokonaponskih Service Gašenje Procedure

Visokog napona Service Gašenje i Power-Up postupku1. Pratite "High-Voltage područja rada" postupak.
2. Locirati crveni PEC servisni prekidač na prednjem PEC i gurnuti isključiti.
3. Uklonite servisni poklopac prekidača i instalirati Lockout nosač (J48506).
4. Pričvrstite oznaku na Lockout nosač.
5. Osigurati PEC servisni prekidač ne može da se kreće od off položaja.
6. Dozvolite sistemu da postavi za najmanje 5 minuta do pražnjenja visokog napona.
7. Spojite ServiceRanger i pregled podataka monitora PID 116 pod nazivom "High-Voltage potencijal baterije." Upotreba SPN 520323 za J1939 vezu "napona baterije RB" (relej Box).
8. Napon bi trebao biti 30 volti ili manje. Ako je napon iznad 30 volti, ne rade na vozilo i obratite Eaton® na 1-800-826-HELP (4357).
9. Okrenite ključ za paljenje isključen i nastaviti da popravi ili korak za rješavanje problema.
Bilješka: Napon pada na nulu kada je ključ isključen.

Visokonaponskih servis Power-Up postupku

1. Instalirajte sve visokonaponskih konektora u svoj zaključan pozicije.
2. Ako ste vi osoba koja radi na vozilu, ukloniti Lockout nosača i citat.
3. Ponovo instalirajte Lockout nosač preko servisni prekidač.
4. Izvucite servisni prekidač napolje i pustiti set vozila za 2 zapisnik.
5. Start vehicle when appropriate.[/fusion_modal][fusion_modal name=component_locationtitle=”Eaton hibridna komponenti i konektor Lokacija ” size=largebackground=”#ffffffborder_color=”” show_footer=yesclass=”” id=””]

Eaton hibridna komponenta i konektora MY08 Systems

[/fusion_modal][fusion_modal name=component_location2title=”Eaton hibridna komponenti i konektor Lokacija MY09 Systems” size=largebackground=”#ffffffborder_color=”” show_footer=yesclass=”” id=””]

Eaton hibridna komponenta i konektora MY09 Systems

[/fusion_modal][/fusion_builder_column][/fusion_builder_row][/fusion_builder_container][fusion_builder_container hundred_percent=nohundred_percent_height=nohundred_percent_height_scroll=nohundred_percent_height_center_content=yesequal_height_columns=nomenu_anchor=”” hide_on_mobile=small-visibility,medium-visibility,large-visibilitystatus=publishedpublish_date=”” class=”” id=”” background_color=”” background_image=”” background_position=center centerbackground_repeat=no-repeatfade=nobackground_parallax=noneenable_mobile=noparallax_speed=”0.3″ video_mp4=”” video_webm=”” video_ogv=”” video_url=”” video_aspect_ratio=”16:9″ video_loop=yesvideo_mute=yesvideo_preview_image=”” border_size=”” border_color=”” border_style=solidmargin_top=”” margin_bottom=”” padding_top=”” padding_right=”” padding_bottom=”” padding_left=””][fusion_builder_row][fusion_builder_column type=”1_1layout=”1_1spacing=”” center_content=nolink=”” target=_selfmin_height=”” hide_on_mobile=small-visibility,medium-visibility,large-visibilityclass=”” id=”” background_color=”” background_image=”” background_image_id=”” background_position=left topbackground_repeat=no-repeathover_type=noneborder_size=”0″ border_color=”” border_style=solidborder_position=allpadding_top=”” padding_right=”” padding_bottom=”” padding_left=”” margin_top=”” margin_bottom=”” animation_type=”” animation_direction=leftanimation_speed=”0.3″ animation_offset=”” last=no”][fusion_content_boxes layout=clean-horizontalcolumns=”2″ title_size=”18pxheading_size=”3″ title_color=”#ffffffbody_color=”#ffffffbackgroundcolor=”#4f4f4ficon=”” iconflip=”” iconrotate=”” iconspin=noiconcolor=”” icon_circle=”” icon_circle_radius=”” circlecolor=”” circlebordersize=”” circlebordercolor=”” outercirclebordersize=”” outercirclebordercolor=”” icon_size=”” icon_hover_type=”” hover_accent_color=”” image=”” image_id=”” image_width=”” image_height=”” link_type=”” button_span=”” link_area=”” link_target=”” icon_align=leftanimation_type=”” animation_delay=”” animation_offset=”” animation_direction=leftanimation_speed=”0.3″ margin_top=”” margin_bottom=”” hide_on_mobile=small-visibility,medium-visibility,large-visibilityclass=”” id=””][fusion_content_box title=KORAK 1. Provjerite FMIS prisutan.backgroundcolor=”” icon=”” iconflip=”” iconrotate=”” iconspin=noiconcolor=”” circlecolor=”” circlebordersize=”” circlebordercolor=”” outercirclebordersize=”” outercirclebordercolor=”” image=”” image_id=”” image_width=”” image_height=”” link=”” linktext=”Čitaj više” link_target=”” animation_type=”” animation_direction=leftanimation_speed=”0.3″ animation_offset=””]

  1. Pregled i pratite upozorenja & Oprez.
  2. Povrat aktivnog kodova grešaka i FMIS sa ServiceRanger pomoću 9-Way dijagnostički konektor.
    opasnost: vidjeti Visokog napona Service Gašenje i Power-Up Procedure. Pratite procedure izbjegli udar, izgorjeti ili smrt od nepravilno rukuje visokog napona.
  3. Koji FMIS su prisutni
    • Ako Kod pogreške 116 MMF 14 je naveden, idite na korak 9.
    • Ako Kod pogreške 116 MMF 10 je naveden, idite na korak 2.
    • If no Fault Codes are listed, The Service Switch was pushed in. Idite na korak 10.

[/fusion_content_box][fusion_content_box title=KORAK 2. Verify Data Monitor parameters.backgroundcolor=”” icon=”” iconflip=”” iconrotate=”” iconspin=noiconcolor=”” circlecolor=”” circlebordersize=”” circlebordercolor=”” outercirclebordersize=”” outercirclebordercolor=”” image=”” image_id=”” image_width=”” image_height=”” link=”” linktext=”Čitaj više” link_target=”” animation_type=”” animation_direction=leftanimation_speed=”0.3″ animation_offset=””]

  1. tipku na.
  2. Povežite ServiceRanger do 9-Way dijagnostički konektor u kabini.
  3. Odaberite "Data Monitor" opciju.
  4. View the Battery Pack Voltage (BCU1) PID 118 in the high- voltage Battery list:
    • If the Battery Pack Voltage (BCU1) PID 118 is greater than 200 volti, idite na korak 3.
    • If the Battery Pack Voltage (BCU1) PID 118 je manji od 200 volti, zamijeniti Energetska elektronika prijevoznik (PEC), onda idite na korak 10.

[/fusion_content_box][/fusion_content_boxes][fusion_content_boxes layout=clean-horizontalcolumns=”2″ title_size=”18pxheading_size=”3″ title_color=”#ffffffbody_color=”#ffffffbackgroundcolor=”#4f4f4ficon=”” iconflip=”” iconrotate=”” iconspin=noiconcolor=”” icon_circle=”” icon_circle_radius=”” circlecolor=”” circlebordersize=”” circlebordercolor=”” outercirclebordersize=”” outercirclebordercolor=”” icon_size=”” icon_hover_type=”” hover_accent_color=”” image=”” image_id=”” image_width=”” image_height=”” link_type=”” button_span=”” link_area=”” link_target=”” icon_align=leftanimation_type=”” animation_delay=”” animation_offset=”” animation_direction=leftanimation_speed=”0.3″ margin_top=”” margin_bottom=”” hide_on_mobile=small-visibility,medium-visibility,large-visibilityclass=”” id=””][fusion_content_box title=KORAK 3. Verify continuity of Inverter connector circuits.backgroundcolor=”” icon=”” iconflip=”” iconrotate=”” iconspin=noiconcolor=”” circlecolor=”” circlebordersize=”” circlebordercolor=”” outercirclebordersize=”” outercirclebordercolor=”” image=”” image_id=”” image_width=”” image_height=”” link=”” linktext=”Čitaj više” link_target=”” animation_type=”” animation_direction=leftanimation_speed=”0.3″ animation_offset=””]

  1. kljuc.
  2. If the vehicle is not equipped with a DC/DC Converter or APG, skip this step.
  3. Using ASTM Class 0 electrical insulating rubber gloves with leather protectors, disconnect the DC cable for the DC/DC Converter and APG at the PEC.
  4. With the key off, temporarily remove the Lockout Bracket and pull the Service Switch out.
  5. tipku na.
  6. Je Kod pogreške 116 MMF 10 still Active in ServiceRanger?
    • Ako Kod pogreške 116 MMF 10 is Active with the DC/DC Converter and APG disconnected, idite na korak 4.
    • Ako Kod pogreške 116 MMF 10 is no longer Active with the DC/DC Converter and APG disconnected, key off and reinstall the Lockout Bracket on the PEC. Replace the Power Electronics Carrier (PEC), onda idite na korak 10.

[/fusion_content_box][fusion_content_box title=KORAK 4. Verify continuity of PEC connector circuits to ground.backgroundcolor=”” icon=”” iconflip=”” iconrotate=”” iconspin=”” iconcolor=”” circlecolor=”” circlebordersize=”” circlebordercolor=”” outercirclebordersize=”” outercirclebordercolor=”” image=”” image_id=”” image_width=”” image_height=”” link=”” linktext=”” link_target=”” animation_type=”” animation_direction=leftanimation_speed=”0.3″ animation_offset=””]

  1. kljuc.
  2. Isključite PEC 19-pinski konektor.
  3. Temporarily remove the Lockout Bracket and pull the Service Switch out.
    Bilješka: Ensure the Key Switch is off.
  4. Measure resistance at the PEC 19-Way Connector Terminal at the following pins:
    • igla 17 na Pin 19
    • igla 9 na Pin 11
    • igla 13 na Pin 15
      • If the resistance between Pins 17 i Pin 19 je 112-122 oma i otpor od Pin 9 na Pin 11 i Pin 13 na Pin 15 su svaki 33-37 oma, idite na korak 5.
      • Ako je otpor je izvan opsega, idite na korak 6.

[/fusion_content_box][/fusion_content_boxes][fusion_content_boxes layout=clean-horizontalcolumns=”2″ title_size=”18pxheading_size=”3″ title_color=”#ffffffbody_color=”#ffffffbackgroundcolor=”#4f4f4ficon=”” iconflip=”” iconrotate=”” iconspin=noiconcolor=”” icon_circle=”” icon_circle_radius=”” circlecolor=”” circlebordersize=”” circlebordercolor=”” outercirclebordersize=”” outercirclebordercolor=”” icon_size=”” icon_hover_type=”” hover_accent_color=”” image=”” image_id=”” image_width=”” image_height=”” link_type=”” button_span=”” link_area=”” link_target=”” icon_align=leftanimation_type=”” animation_delay=”” animation_offset=”” animation_direction=leftanimation_speed=”0.3″ margin_top=”” margin_bottom=”” hide_on_mobile=small-visibility,medium-visibility,large-visibilityclass=”” id=””][fusion_content_box title=KORAK 5. Verify continuity of Inverter connector circuits to ground.backgroundcolor=”” icon=”” iconflip=”” iconrotate=”” iconspin=noiconcolor=”” circlecolor=”” circlebordersize=”” circlebordercolor=”” outercirclebordersize=”” outercirclebordercolor=”” image=”” image_id=”” image_width=”” image_height=”” link=”” linktext=”Čitaj više” link_target=”” animation_type=”” animation_direction=leftanimation_speed=”0.3″ animation_offset=””]

  1. kljuc.
  2. Reconnect the PEC 19-Way Connector.
  3. Isključite Inverter 56-pinski konektor.
  4. Inspect the connector pins for damaged, corroded and/or loose wires.
  5. Measure resistance between the Inverter 56-Way Connector at the following pins:
    • igla 29 na Pin 37
    • igla 30 na Pin 35
    • igla 31 na Pin 36 Bilješka: Lagano savijte Inverter 56-pinski konektor pojas u blizini priključka, dok praćenje vrijednosti otpora.
      • Ako je otpor između Pin 29 i Pin 37 je 112-122 oma i otpor od Pin 30 na Pin 35 i Pin 31 na Pin 36 su svaki 33-37 oma, push the Service Switch on the PEC and reinstall the Lockout Bracket. Idite na korak 8.
      • Ako je otpor je izvan opsega, repair the Hybrid Harness between the PEC and Inverter, onda idite na korak 10.

[/fusion_content_box][fusion_content_box title=KORAK 6. Verify continuity of PEC connector circuits.backgroundcolor=”” icon=”” iconflip=”” iconrotate=”” iconspin=”” iconcolor=”” circlecolor=”” circlebordersize=”” circlebordercolor=”” outercirclebordersize=”” outercirclebordercolor=”” image=”” image_id=”” image_width=”” image_height=”” link=”” linktext=”” link_target=”” animation_type=”” animation_direction=leftanimation_speed=”0.3″ animation_offset=””]

  1. kljuc.
  2. Remove the Air Filter Cover and Air Filter from the PEC. Refer to TRSM1000 for procedures.*
  3. An Inertia Switch is located at the front of the PEC inside the box and viewable when the Air Filter is removed.
  4. Using ASTM Class 0 electrical insulating rubber gloves with leather protectors, press the button on the top of the Inertia Switch until heard or felt a click. This switch must be depressed a set distance to reset the switch.
  5. Measure resistance at the PEC 19-Way Connector Terminal at the following pins:
    • igla 17 na Pin 19
    • igla 9 na Pin 11
    • igla 13 na Pin 15
      • qIf the resistance between Pin 17 i Pin 19 je 112-122 oma i otpor od Pin 9 na Pin 11 i Pin 13 na Pin 15 su svaki 33-37 oma, the Inertia Switch was tripped. Test is complete. Idite na korak 10.
      • Ako je otpor je izvan opsega, push in the Service Switch on the PEC and reinstall the Lockout Bracket, onda idite na korak 7.

[/fusion_content_box][/fusion_content_boxes][fusion_content_boxes layout=clean-horizontalcolumns=”2″ title_size=”18pxheading_size=”3″ title_color=”#ffffffbody_color=”#ffffffbackgroundcolor=”#4f4f4ficon=”” iconflip=”” iconrotate=”” iconspin=noiconcolor=”” icon_circle=”” icon_circle_radius=”” circlecolor=”” circlebordersize=”” circlebordercolor=”” outercirclebordersize=”” outercirclebordercolor=”” icon_size=”” icon_hover_type=”” hover_accent_color=”” image=”” image_id=”” image_width=”” image_height=”” link_type=”” button_span=”” link_area=”” link_target=”” icon_align=leftanimation_type=”” animation_delay=”” animation_offset=”” animation_direction=leftanimation_speed=”0.3″ margin_top=”” margin_bottom=”” hide_on_mobile=small-visibility,medium-visibility,large-visibilityclass=”” id=””][fusion_content_box title=KORAK 7. Verify continuity of Inverter connector circuits.backgroundcolor=”” icon=”” iconflip=”” iconrotate=”” iconspin=noiconcolor=”” circlecolor=”” circlebordersize=”” circlebordercolor=”” outercirclebordersize=”” outercirclebordercolor=”” image=”” image_id=”” image_width=”” image_height=”” link=”” linktext=”Čitaj više” link_target=”” animation_type=”” animation_direction=leftanimation_speed=”0.3″ animation_offset=””]

  1. kljuc.
  2. Disconnect the DC High-Voltage Cable at the PEC Bulkhead and at the Inverter Bulkhead.
  3. Measure resistance between the Low-Voltage Interlock Pins on the PEC side of the DC High-Voltage Cable:
    Bilješka: The Interlock Pins are the two small spade terminals located in the same opening.

    • If the resistance is 0–0.3 ohms between the Interlock Loop Pins, zamijeniti Energetska elektronika prijevoznik (PEC), onda idite na korak 10.
    • Ako je otpor je izvan opsega, zamijeniti DC visokonaponskog kabla, onda idite na korak 10.

[/fusion_content_box][fusion_content_box title=KORAK 8. Verify continuity of DC Cable from PEC to Inverter Connector circuits.backgroundcolor=”” icon=”” iconflip=”” iconrotate=”” iconspin=”” iconcolor=”” circlecolor=”” circlebordersize=”” circlebordercolor=”” outercirclebordersize=”” outercirclebordercolor=”” image=”” image_id=”” image_width=”” image_height=”” link=”” linktext=”” link_target=”” animation_type=”” animation_direction=leftanimation_speed=”0.3″ animation_offset=””]

  1. kljuc.
  2. Disconnect the DC High-Voltage Cable at the PEC Bulkhead and the Inverter Bulkhead.
  3. Measure the resistance of each high-voltage circuit on the cable:
    • If the resistance of each high-voltage circuit in the cable is 1 oma ili manje, zamijeniti Inverter, onda idite na korak 10.
    • Ako je otpor je izvan opsega, replace the DC High-Voltage Cable, onda idite na korak 10.

[/fusion_content_box][/fusion_content_boxes][fusion_content_boxes layout=clean-horizontalcolumns=”2″ title_size=”18pxheading_size=”3″ title_color=”#ffffffbody_color=”#ffffffbackgroundcolor=”#4f4f4ficon=”” iconflip=”” iconrotate=”” iconspin=noiconcolor=”” icon_circle=”” icon_circle_radius=”” circlecolor=”” circlebordersize=”” circlebordercolor=”” outercirclebordersize=”” outercirclebordercolor=”” icon_size=”” icon_hover_type=”” hover_accent_color=”#f41000image=”” image_id=”” image_width=”” image_height=”” link_type=”” button_span=”” link_area=”” link_target=”” icon_align=leftanimation_type=”” animation_delay=”” animation_offset=”” animation_direction=leftanimation_speed=”0.3″ margin_top=”” margin_bottom=”” hide_on_mobile=small-visibility,medium-visibility,large-visibilityclass=”” id=””][fusion_content_box title=KORAK 9. Verify Data Monitor parameters.backgroundcolor=”” icon=”” iconflip=”” iconrotate=”” iconspin=”” iconcolor=”” circlecolor=”” circlebordersize=”” circlebordercolor=”” outercirclebordersize=”” outercirclebordercolor=”” image=”” image_id=”” image_width=”” image_height=”” link=”” linktext=”” link_target=”” animation_type=”” animation_direction=leftanimation_speed=”0.3″ animation_offset=””]

  1. Povežite ServiceRanger do 9-Way dijagnostički konektor u kabini.
  2. Odaberite "Data Monitor" opciju.
  3. View the following parameters in the High-Voltage Battery list.
    • Battery Pack Voltage (BCU1) PID 118
    • Battery Voltage PID 116
      • If the voltage readings on PID 116 i PID 118 are within 10 volti jedni od drugih, zamijeniti Energetska elektronika prijevoznik (PEC), onda idite na korak 10.
      • If the voltage readings on PID 116 i PID 118 are greater than 10 volti jedni od drugih, zamijeniti Inverter, onda idite na korak 10.

[/fusion_content_box][fusion_content_box title=KORAK 10. provjerite popravak.backgroundcolor=”” icon=”” iconflip=”” iconrotate=”” iconspin=noiconcolor=”” circlecolor=”” circlebordersize=”” circlebordercolor=”” outercirclebordersize=”” outercirclebordercolor=”” image=”” image_id=”” image_width=”” image_height=”” link=”” linktext=”Čitaj više” link_target=”” animation_type=”” animation_direction=leftanimation_speed=”0.3″ animation_offset=””]

  1. kljuc.
  2. Ponovo priključite sve konektore i negativni kabel akumulatora.
  3. tipku na.
  4. jasno kodovi, vidjeti Jasno Neaktivni Smetnje.
  5. Vozite vozilo i pokušati resetirati kod.
  6. Provjerite za kodova, vidjeti Pogledaj aktivnih i neaktivnih Greške.
    • Ako nema oznake, test dovrši.
    • Ako Kod pogreške 116 pojavljuje, kontaktirati Eaton na 1- 800-826-HELP (4357). Repeat this Step (Korak 10).
    • Ako se kod osim 116 pojavljuje, vidjeti Kod pogreške Indeks List.

[/fusion_content_box][/fusion_content_boxes][/fusion_builder_column][/fusion_builder_row][/fusion_builder_container][fusion_global id=”13788″]