[fusion_builder_container hundred_percent=”no” hundred_percent_height=”no” hundred_percent_height_scroll=”no” hundred_percent_height_center_content=”yes” equal_height_columns=”no” menu_anchor=”” hide_on_mobile=”small-visibility,medium-visibility,large-visibility” status=”published” publish_date=”” class=”” id=”” background_color=”” background_image=”” background_position=”center center” background_repeat=”no-repeat” fade=”no” background_parallax=”none” enable_mobile=”no” parallax_speed=”0.3″ video_mp4=”” video_webm=”” video_ogv=”” video_url=”” video_aspect_ratio=”16:9″ video_loop=”yes” video_mute=”yes” video_preview_image=”” border_size=”” border_color=”” border_style=”solid” margin_top=”35″ margin_bottom=”” padding_top=”” padding_right=”” padding_bottom=”” padding_left=””][fusion_builder_row][fusion_builder_column type=”1_1″ layout=”1_1″ spacing=”” center_content=”no” link=”” target=”_self” min_height=”” hide_on_mobile=”small-visibility,medium-visibility,large-visibility” class=”” id=”” background_color=”” background_image=”” background_image_id=”” background_position=”left top” background_repeat=”no-repeat” hover_type=”none” border_size=”0″ border_color=”” border_style=”solid” border_position=”all” padding_top=”” padding_right=”” padding_bottom=”” padding_left=”” margin_top=”” margin_bottom=”” animation_type=”” animation_direction=”left” animation_speed=”0.3″ animation_offset=”” last=”no”][fusion_text columns=”” column_min_width=”” column_spacing=”” rule_style=”default” rule_size=”” rule_color=”” hide_on_mobile=”small-visibility,medium-visibility,large-visibility” class=”” id=””]
קוד היברידי איטון פולר הילוכים Fault 116 – תקלת מתח ממסר גבוהה – (מערכות MY09)
[/fusion_text][/fusion_builder_column][/fusion_builder_row][/fusion_builder_container][fusion_builder_container hundred_percent=”no” hundred_percent_height=”no” hundred_percent_height_scroll=”no” hundred_percent_height_center_content=”yes” equal_height_columns=”no” menu_anchor=”” hide_on_mobile=”small-visibility,medium-visibility,large-visibility” status=”published” publish_date=”” class=”” id=”” background_color=”” background_image=”” background_position=”center center” background_repeat=”no-repeat” fade=”no” background_parallax=”none” enable_mobile=”no” parallax_speed=”0.3″ video_mp4=”” video_webm=”” video_ogv=”” video_url=”” video_aspect_ratio=”16:9″ video_loop=”yes” video_mute=”yes” video_preview_image=”” border_size=”” border_color=”” border_style=”solid” margin_top=”” margin_bottom=”” padding_top=”” padding_right=”” padding_bottom=”” padding_left=””][fusion_builder_row][fusion_builder_column type=”1_1″ layout=”1_1″ spacing=”” center_content=”no” link=”” target=”_self” min_height=”” hide_on_mobile=”small-visibility,medium-visibility,large-visibility” class=”” id=”” background_color=”” background_image=”” background_image_id=”” background_position=”left top” background_repeat=”no-repeat” hover_type=”none” border_size=”0″ border_color=”” border_style=”solid” border_position=”all” padding_top=”” padding_right=”” padding_bottom=”” padding_left=”” margin_top=”” margin_bottom=”” animation_type=”” animation_direction=”left” animation_speed=”0.3″ animation_offset=”” last=”no”][fusion_text columns=”” column_min_width=”” column_spacing=”” rule_style=”default” rule_size=”” rule_color=”” hide_on_mobile=”small-visibility,medium-visibility,large-visibility” class=”” id=””]
תקלת קוד עבור דגמי מערכות כונן היברידי איטון (MY09) EH-8E406A-U / P, EH-8E406A-UP, EH-8E406A-UPG, EH-8E406A-CD, EH-8E406A-CDG, EH-8E406A-CDR, EH-8E406A-T, EH-6E706B-CD, EH-6E706B-P ו- EH-6E706B-UPG. בהמשך תוכלו ללמוד כיצד לבדוק, לנקות ולתקן שגיאות קוד תקלה עבור Freightliner שלך, מאק, משאית, Kenworth, וולוו, בינלאומי, ו משאית כבדה-חובה וציוד. ממסר המתח הגבוה ממוקם בתוך Power
Carrier אלקטרוניקה (PEC) ביחידת תיבת הממסר. יש ממסר אחד מראש על הצד החיובי, ממסר נוסף על החיובי, ועל השלילי בסך הכל שלוש ממסרים. ממסרים אלה הם בדרך כלל פתוחים כאשר המערכת כבויה. הממסרים נשלטים באמצעות המהפך.
תקלת קוד 116 – איתור תקלת ממסר מתח גבוה
התנאים המוקדמים הבאים חייבים להתקיים לפני שהמערכת מזהה את התקלה:
- מתח מהפך הצתה עולה 7 וולט פחות 16 וולט.
הערה: בעת פתרון קוד פעיל עיין מצב אבחון מוצרים (PDM)
תנאים כדי להגדיר קוד תקלת Active
- קרן המטבע הבינלאומית 3 מוגדר כאשר קצר 12 הוולט מזוהה בצד המלא של ממסר מתח גבוה.
- קרן המטבע הבינלאומית 4 מוגדר כאשר קצר לקרקע מזוהית בצד המלא של ממסר מתח גבוה.
- קרן המטבע הבינלאומית 5 ו FMI 10 נקבעים כאשר מעגל פתוח מזוהה בצד המלא של ממסר מתח גבוה.
- קרן המטבע הבינלאומית 7 ו FMI 14 נקבעים כאשר הממסר השלילי העיקרי הוא על וירידת קבל המהפך היא פחות מ 10 וולטים / 5 שניות כאשר הקבל הראשוני היה גדול מ 200 וולט.
כאשר חלופי קוד תקלה 116 מוגדר מהתנאים הבאים:
- "בדוק היברידי" אמבר, נדלקת נורית.
- תקלה מאוחסנת מודול בקרה ההיברידי (HCM) זיכרון.
- המערכת ההיברידית תהיה מחוברת.
- ברירת מחדל של שידור התחלה את ציוד ה- 1 במצב דיזל בלבד.
[/fusion_text][fusion_text columns=”” column_min_width=”” column_spacing=”” rule_style=”default” rule_size=”” rule_color=”” hide_on_mobile=”small-visibility,medium-visibility,large-visibility” class=”” id=””]
תנאים כדי להגדיר קוד תקלה פעיל
רק תקלות פעילות ניתן למחוק מהיסטורית TECU או HCM באמצעות ServiceRanger. TECU אוטומטי מנקה את הפגמים מההיסטוריה לאחר 200 שעות. HCM אוטומטי מנקה תקלה מההיסטוריה לאחר אשמתו כי כבר לא פעילה 200 שעות.
קוד תקלה זו יכולה להיגרם על ידי כל אחת מהפעולות הבאות:
- קרן המטבע הבינלאומית 3, 4, 5, 7, 10, 14
- חוט משוב מתח מ- DC / DC ממיר ל HCM
- קרן המטבע הבינלאומית 4
- תיבת ממסר
- חלף אינרציה
- ממיר מתח
- רתם חיווט רכב בין מהפך ואת PEC
- מתח גבוה ראשי שירות Fuse הוא מפוצץ או חסר
- DC מתח גבוה משתלב בכבלים
- חלף שירות האדום לחצן PEC
[/fusion_text][/fusion_builder_column][/fusion_builder_row][/fusion_builder_container][fusion_builder_container hundred_percent=”no” hundred_percent_height=”no” hundred_percent_height_scroll=”no” hundred_percent_height_center_content=”yes” equal_height_columns=”no” menu_anchor=”” hide_on_mobile=”small-visibility,medium-visibility,large-visibility” status=”published” publish_date=”” class=”” id=”” background_color=”” background_image=”” background_position=”center center” background_repeat=”no-repeat” fade=”no” background_parallax=”none” enable_mobile=”no” parallax_speed=”0.3″ video_mp4=”” video_webm=”” video_ogv=”” video_url=”” video_aspect_ratio=”16:9″ video_loop=”yes” video_mute=”yes” video_preview_image=”” border_size=”” border_color=”” border_style=”solid” margin_top=”” margin_bottom=”” padding_top=”” padding_right=”” padding_bottom=”” padding_left=””][fusion_builder_row][fusion_builder_column type=”1_1″ layout=”1_1″ spacing=”” center_content=”no” link=”” target=”_self” min_height=”” hide_on_mobile=”small-visibility,medium-visibility,large-visibility” class=”” id=”” background_color=”” background_image=”” background_image_id=”” background_position=”left top” background_repeat=”no-repeat” hover_type=”none” border_size=”0″ border_color=”” border_style=”solid” border_position=”all” padding_top=”” padding_right=”” padding_bottom=”” padding_left=”” margin_top=”” margin_bottom=”” animation_type=”” animation_direction=”left” animation_speed=”0.3″ animation_offset=”” last=”no”][fusion_text columns=”” column_min_width=”” column_spacing=”” rule_style=”default” rule_size=”” rule_color=”” hide_on_mobile=”small-visibility,medium-visibility,large-visibility” class=”” id=””]
תקלת קוד 116 – מבחן תקלת ממסר מתח גבוה
[/fusion_text][/fusion_builder_column][/fusion_builder_row][/fusion_builder_container][fusion_builder_container hundred_percent=”no” hundred_percent_height=”no” hundred_percent_height_scroll=”no” hundred_percent_height_center_content=”yes” equal_height_columns=”no” menu_anchor=”” hide_on_mobile=”small-visibility,medium-visibility,large-visibility” status=”published” publish_date=”” class=”” id=”” background_color=”” background_image=”” background_position=”center center” background_repeat=”no-repeat” fade=”no” background_parallax=”none” enable_mobile=”no” parallax_speed=”0.3″ video_mp4=”” video_webm=”” video_ogv=”” video_url=”” video_aspect_ratio=”16:9″ video_loop=”yes” video_mute=”yes” video_preview_image=”” border_size=”” border_color=”” border_style=”solid” margin_top=”” margin_bottom=”” padding_top=”” padding_right=”” padding_bottom=”” padding_left=””][fusion_builder_row][fusion_builder_column type=”1_1″ layout=”1_1″ spacing=”” center_content=”no” link=”” target=”_self” min_height=”” hide_on_mobile=”small-visibility,medium-visibility,large-visibility” class=”” id=”” background_color=”” background_image=”” background_image_id=”” background_position=”left top” background_repeat=”no-repeat” hover_type=”none” border_size=”0″ border_color=”” border_style=”solid” border_position=”all” padding_top=”” padding_right=”” padding_bottom=”” padding_left=”” margin_top=”” margin_bottom=”” animation_type=”” animation_direction=”left” animation_speed=”0.3″ animation_offset=”” last=”no”][fusion_text columns=”” column_min_width=”” column_spacing=”” rule_style=”default” rule_size=”” rule_color=”” hide_on_mobile=”small-visibility,medium-visibility,large-visibility” class=”” id=””]
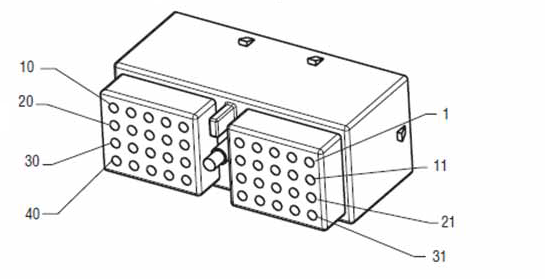
זיהוי רכיב:
[/fusion_text][/fusion_builder_column][fusion_builder_column type=”1_2″ layout=”1_2″ spacing=”” center_content=”no” link=”” target=”_self” min_height=”” hide_on_mobile=”small-visibility,medium-visibility,large-visibility” class=”” id=”” background_color=”” background_image=”” background_image_id=”” background_position=”left top” background_repeat=”no-repeat” hover_type=”none” border_size=”0″ border_color=”” border_style=”solid” border_position=”all” padding_top=”” padding_right=”” padding_bottom=”” padding_left=”” margin_top=”” margin_bottom=”” animation_type=”” animation_direction=”left” animation_speed=”0.3″ animation_offset=”” last=”no”][fusion_imageframe image_id=”14476|full” max_width=”” style_type=”” blur=”” stylecolor=”” hover_type=”none” bordersize=”” bordercolor=”” borderradius=”” align=”center” lightbox=”no” gallery_id=”” lightbox_image=”” lightbox_image_id=”” alt=”Duetsch 40-דרך מהפך נוף ההזדווגות במחבר מתח נמוך” link=”” linktarget=”_self” hide_on_mobile=”small-visibility,medium-visibility,large-visibility” class=”” id=”” animation_type=”” animation_direction=”left” animation_speed=”0.3″ animation_offset=””]https://www.globaltransmissionsupply.com/wp-content/uploads/Duetsch-40-way-mating-connector-view.png[/fusion_imageframe][fusion_text columns=”” column_min_width=”” column_spacing=”” rule_style=”default” rule_size=”” rule_color=”” hide_on_mobile=”small-visibility,medium-visibility,large-visibility” class=”” id=””]
Duetsch 40-דרך נוף מחבר ההזדווגות
(מחבר מתח נמוך מהפך)

[/fusion_text][/fusion_builder_column][fusion_builder_column type=”1_2″ layout=”1_2″ spacing=”” center_content=”no” link=”” target=”_self” min_height=”” hide_on_mobile=”small-visibility,medium-visibility,large-visibility” class=”” id=”” background_color=”” background_image=”” background_image_id=”” background_position=”left top” background_repeat=”no-repeat” hover_type=”none” border_size=”0″ border_color=”” border_style=”solid” border_position=”all” padding_top=”” padding_right=”” padding_bottom=”” padding_left=”” margin_top=”” margin_bottom=”” animation_type=”” animation_direction=”left” animation_speed=”0.3″ animation_offset=”” last=”no”][fusion_imageframe image_id=”14213|medium” max_width=”” style_type=”” blur=”” stylecolor=”” hover_type=”none” bordersize=”” bordercolor=”” borderradius=”” align=”center” lightbox=”no” gallery_id=”” lightbox_image=”” lightbox_image_id=”” alt=”מזווג למחבר נוף דויטש 19 סטרי ” link=”” linktarget=”_self” hide_on_mobile=”small-visibility,medium-visibility,large-visibility” class=”” id=”” animation_type=”” animation_direction=”left” animation_speed=”0.3″ animation_offset=””]https://www.globaltransmissionsupply.com/wp-content/uploads/Eaton-Fuller-Harness-Connector-View-300×289.jpg[/fusion_imageframe][fusion_text columns=”” column_min_width=”” column_spacing=”” rule_style=”default” rule_size=”” rule_color=”” hide_on_mobile=”small-visibility,medium-visibility,large-visibility” class=”” id=””]
הזדווגות נוף מחבר
(מחבר 19-דרך דויטש)
[/fusion_text][/fusion_builder_column][fusion_builder_column type=”1_1″ layout=”1_1″ spacing=”” center_content=”no” link=”” target=”_self” min_height=”” hide_on_mobile=”small-visibility,medium-visibility,large-visibility” class=”” id=”” background_image_id=”” background_color=”#000000″ background_image=”” background_position=”left top” undefined=”” background_repeat=”no-repeat” hover_type=”none” border_size=”0″ border_color=”” border_style=”solid” border_position=”all” padding_top=”” padding_right=”” padding_bottom=”” padding_left=”” margin_top=”20″ margin_bottom=”20″ animation_type=”” animation_direction=”left” animation_speed=”0.3″ animation_offset=”” last=”no”][fusion_text columns=”” column_min_width=”” column_spacing=”” rule_style=”default” rule_size=”” rule_color=”” hide_on_mobile=”small-visibility,medium-visibility,large-visibility” class=”” id=””]
הערה: עיין רכיב איטון היברידי ואת מיקום Connector עבור מיקומים Connector במערכות MY09.
[/fusion_text][/fusion_builder_column][fusion_builder_column type=”1_1″ layout=”1_1″ spacing=”” center_content=”no” link=”” target=”_self” min_height=”” hide_on_mobile=”small-visibility,medium-visibility,large-visibility” class=”” id=”” background_color=”” background_image=”” background_image_id=”” background_position=”left top” background_repeat=”no-repeat” hover_type=”none” border_size=”0″ border_color=”” border_style=”solid” border_position=”all” padding_top=”” padding_right=”” padding_bottom=”” padding_left=”” margin_top=”” margin_bottom=”” animation_type=”” animation_direction=”left” animation_speed=”0.3″ animation_offset=”” last=”no”][fusion_imageframe image_id=”14672|full” max_width=”” style_type=”” blur=”” stylecolor=”” hover_type=”none” bordersize=”” bordercolor=”” borderradius=”” align=”center” lightbox=”no” gallery_id=”” lightbox_image=”” lightbox_image_id=”” alt=”מהפך אל מערכות PEC MY09” link=”” linktarget=”_self” hide_on_mobile=”small-visibility,medium-visibility,large-visibility” class=”” id=”” animation_type=”” animation_direction=”left” animation_speed=”0.3″ animation_offset=””]https://www.globaltransmissionsupply.com/wp-content/uploads/Inverter-to-PEC-MY09.png[/fusion_imageframe][/fusion_builder_column][/fusion_builder_row][/fusion_builder_container][fusion_builder_container hundred_percent=”no” hundred_percent_height=”no” hundred_percent_height_scroll=”no” hundred_percent_height_center_content=”yes” equal_height_columns=”no” menu_anchor=”” hide_on_mobile=”small-visibility,medium-visibility,large-visibility” status=”published” publish_date=”” class=”” id=”” background_color=”” background_image=”” background_position=”center center” background_repeat=”no-repeat” fade=”no” background_parallax=”none” enable_mobile=”no” parallax_speed=”0.3″ video_mp4=”” video_webm=”” video_ogv=”” video_url=”” video_aspect_ratio=”16:9″ video_loop=”yes” video_mute=”yes” video_preview_image=”” border_size=”” border_color=”” border_style=”solid” margin_top=”” margin_bottom=”” padding_top=”” padding_right=”” padding_bottom=”” padding_left=””][fusion_builder_row][fusion_builder_column type=”1_1″ layout=”1_1″ spacing=”” center_content=”no” link=”” target=”_self” min_height=”” hide_on_mobile=”small-visibility,medium-visibility,large-visibility” class=”” id=”” background_color=”” background_image=”” background_image_id=”” background_position=”left top” background_repeat=”no-repeat” hover_type=”none” border_size=”0″ border_color=”” border_style=”solid” border_position=”all” padding_top=”” padding_right=”” padding_bottom=”” padding_left=”” margin_top=”” margin_bottom=”” animation_type=”” animation_direction=”left” animation_speed=”0.3″ animation_offset=”” last=”no”][fusion_modal name=”warnings_cautions” title=”אזהרות & זהיר” size=”large” background=”” border_color=”” show_footer=”yes” class=”” id=””]Danger: Danger מציין שאתה תיפגע באופן חמור או נהרג אם לא פעל לפי הנוהל המצוין.
אזהרה: אזהרה מצביעה על סכנה מיידית, אשר עלול לגרום לפציעה חמורה אם לא פעל לפי הנוהל המצוין.
זהיר: זהירות מציינת נזק לרכב או רכוש יכול להתרחש אם אתה לא מבין את ההליך שצוין.
הערה: הערה מציינת פרט נוסף שיסייע אבחנה או תיקון של רכיב / מערכת.
פעל על פי ההליכים המפורטים בסדר המצוין כדי למנוע פציעה:
1. אם הקונוסים המתח הגבוה הם סביב הרכב ואת ההשבתה מותקנת על PEC, האדם היחיד שיש לאפשר להפעיל את הרכב הוא מי שחתם על תג ההשבתה.
2. לפני תחילת העבודה על רכב או השארת מונית כאשר המנוע פועל, כדאי למקם את משמרת מנוף ב "N" להגדיר את בלם החניה, ולחסום את הגלגלים.
3. בשביל סיבות ביטחוניות, תמיד להעסיק את בלמי השירות לקראת בחירת תפקידי הילוך מ "נ"
4. לפני שמתחיל ברכב תמיד לשבת במושב הנהג, בחר "N" בשלט המשמרת, ולהגדיר את בלמי החניה.
5. ברכבים עם ePTO, המנוע ו / או
מנוע / מחולל יכול להתחיל במצב ePTO. לעולם לבצע כל תחזוקה או לעבוד על הרכב, כשהוא במצב זה.
6. 12-וולט סוללה חיובית (+) ושלילי (-) יש לנתק קודם כל ריתוך על כל רכב מצויד היברידי.
זהיר: פעל על פי ההליכים המפורטים בסדר המצוין כדי למנוע תקלה בציוד או נזק.
זהיר: אין לשחרר את בלם החנייה או לנסות לבחור הילוך עד שלחץ האוויר הוא ברמה הנכונה.
זהיר: כדי למנוע ניזק השידור במהלך גרירה במקום מנוף השינוי "N" ולהרים את הגלגלים המניעים מהקרקע או לנתק את מערכת ההינע.
אזהרות מתח גבוה & זהיר
- השתמש CO2 או מטפים כימיים יבשים.
- חיווט המתח הגבוה מכוסה בידוד כתום או צינורות מפותלים ומסומן עם תוויות אזהרה על המחברים.
- כל דיזל היברידי Eaton® / כלי רכב חשמליים יסומנו "היברידי’ על החלק החיצוני של הרכב, יחד עם התווית המשמרת על לוח השעונים.
- עיין OEM עבור מיקום ספציפי של רכיבים היברידיים רכוב מארז.
- אין לחתוך לתוך כבלי מתח גבוה תפוז.
- אין לחתוך לתוך או לפתוח את PEC.
- אין לחתוך לתוך או לפתוח את ממיר DC / DC.
- אין לחתוך לתוך או לפתוח את המהפך.
אזור חיץ יש להגדיר ו-מתח גבוה מבודד כפפות גומי (מעמד 0 עם מגיני עור) נדרשים קודם עובדים על מתח גבוה. אי ציות להוראות אלה עלול לגרום לפציעה חמורה או מוות.
הכפפות בידוד הגומי כי יש ללבוש תוך כדי עבודה על מערכת המתח הגבוה הן בכיתה 0 עם מגיני עור. כפפות הגומי צריכות להיבדק לפני כל שימוש לאחר הליך בדיקת כפפות בידוד גומי נמצא "כלי אבחון / פרסומי שירות" בעמוד 6. אי ציות להוראות אלה עלול לגרום לפציעה חמורה או מוות.
לפני הבדיקה או עובדים על כל כבלי מתח גבוה או רכיבים "נוהל מתח גבוה שירות כיבוי ואת הכח-Up" בעמוד 4 יש לפעול. אי ציות להוראות אלה עלול לגרום לפציעה חמורה או מוות.
המכשירים הנעולים ו Tagout להסירו רק על ידי הטכנאי כי הניח את התקני הנעילה ו Tagout על הרכב. אי ציות להוראות אלה עלול לגרום לפציעה חמורה או מוות.
כפפות במתח גבוה מבודד גומי (מעמד 0 עם מגיני עור) חייב להיות משוחק כאשר עובדים על כל
כבלי מתח גבוה. את "כיבוי שירות במתח גבוה Power-Up נוהל" בעמוד 4 חייב להיות מלווה לפני הסרת כל כבלי מתח גבוה. אי ציות להוראות אלה עלול לגרום לפציעה חמורה או מוות.
כבלי חיווט מתח גבוה הם כתומים המכילים תווית אזהרה על המחברים. רכיבי מתח גבוה מסומנים בתווית. כפפות במתח גבוה מבודד גומי (מעמד 0 עם מגיני עור) יש להשתמש בעת עבודה על כל אחד מהמרכיבים הללו. אי ציות להוראות אלה עלול לגרום לפציעה חמורה או מוות.
נהלי כיבוי שירות מתח גבוה

1. עקוב "פינת עבודה מתח-גבוה" נוהל.
2. אתר את מתג PEC השירות האדום בחזית של PEC ולדחוף לכבות.
3. הסר את כיסוי חלף השירות ולהתקין את תושבת Lockout (J48506).
4. תג שנדבק תושבת Lockout.
5. ודא חלף שירות PEC לא יכול לעבור למצב הכבוי.
6. אפשר המערכת להגדיר עבור מינימום של 5 דקות כדי לפרוק מתח גבוה.
7. חבר ServiceRanger ולהציג את PID צג נתונים 116 שנקרא "פוטנציאל סוללה מתח גבוה." השתמש SPN 520323 עבור חיבור J1939 "RB מתח סוללה" (תיבת ממסר).
8. המתח צריך להיות 30 וולט או פחות. אם המתח הוא מעל 30 וולט, לא עובדים על הרכב ולפנות Eaton® ב 1-800-826-HELP (4357).
9. הפעל מפתח ההצתה כבוי ולהמשיך לתקן או צעד לפתרון בעיות.
הערה: המתח יורד לאפס כאשר המפתח הוא כבוי.
נוהל מתח גבוה חשמל-השכמה
1. התקן את כל המחברים במתח גבוה לעמדות הנעולות שלהם.
2. אם אתה האדם לעבוד על הרכב, הסר את תושבת ותגית Lockout.
3. התקן מחדש את תושבת Lockout על מתג השירות.
4. משוך את שירות חלף החוצה ולתת סט רכב 2 דקות.
5. Start vehicle when appropriate.[/fusion_modal][fusion_modal name=”component_location” title=”רכיב איטון היברידי ואת מיקום Connector ” size=”large” background=”#ffffff” border_color=”” show_footer=”yes” class=”” id=””]

[/fusion_modal][fusion_modal name=”component_location2″ title=”רכיב איטון היברידי ואת מיקום Connector Systems MY09” size=”large” background=”#ffffff” border_color=”” show_footer=”yes” class=”” id=””]

[/fusion_modal][/fusion_builder_column][/fusion_builder_row][/fusion_builder_container][fusion_builder_container hundred_percent=”no” hundred_percent_height=”no” hundred_percent_height_scroll=”no” hundred_percent_height_center_content=”yes” equal_height_columns=”no” menu_anchor=”” hide_on_mobile=”small-visibility,medium-visibility,large-visibility” status=”published” publish_date=”” class=”” id=”” background_color=”” background_image=”” background_position=”center center” background_repeat=”no-repeat” fade=”no” background_parallax=”none” enable_mobile=”no” parallax_speed=”0.3″ video_mp4=”” video_webm=”” video_ogv=”” video_url=”” video_aspect_ratio=”16:9″ video_loop=”yes” video_mute=”yes” video_preview_image=”” border_size=”” border_color=”” border_style=”solid” margin_top=”” margin_bottom=”” padding_top=”” padding_right=”” padding_bottom=”” padding_left=””][fusion_builder_row][fusion_builder_column type=”1_1″ layout=”1_1″ spacing=”” center_content=”no” link=”” target=”_self” min_height=”” hide_on_mobile=”small-visibility,medium-visibility,large-visibility” class=”” id=”” background_color=”” background_image=”” background_image_id=”” background_position=”left top” background_repeat=”no-repeat” hover_type=”none” border_size=”0″ border_color=”” border_style=”solid” border_position=”all” padding_top=”” padding_right=”” padding_bottom=”” padding_left=”” margin_top=”” margin_bottom=”” animation_type=”” animation_direction=”left” animation_speed=”0.3″ animation_offset=”” last=”no”][fusion_content_boxes layout=”clean-horizontal” columns=”2″ title_size=”18px” heading_size=”3″ title_color=”#ffffff” body_color=”#ffffff” backgroundcolor=”#4f4f4f” icon=”” iconflip=”” iconrotate=”” iconspin=”no” iconcolor=”” icon_circle=”” icon_circle_radius=”” circlecolor=”” circlebordersize=”” circlebordercolor=”” outercirclebordersize=”” outercirclebordercolor=”” icon_size=”” icon_hover_type=”” hover_accent_color=”” image=”” image_id=”” image_width=”” image_height=”” link_type=”” button_span=”” link_area=”” link_target=”” icon_align=”left” animation_type=”” animation_delay=”” animation_offset=”” animation_direction=”left” animation_speed=”0.3″ margin_top=”” margin_bottom=”” hide_on_mobile=”small-visibility,medium-visibility,large-visibility” class=”” id=””][fusion_content_box title=”נוכח STEP 1.Verify FMIs.” backgroundcolor=”” icon=”” iconflip=”” iconrotate=”” iconspin=”no” iconcolor=”” circlecolor=”” circlebordersize=”” circlebordercolor=”” outercirclebordersize=”” outercirclebordercolor=”” image=”” image_id=”” image_width=”” image_height=”” link=”” linktext=”קרא עוד” link_target=”” animation_type=”” animation_direction=”left” animation_speed=”0.3″ animation_offset=””]
- קרא ופעל על פי אזהרות & זהיר.
- לאחזר קודי תקלות פעילים FMIs עם ServiceRanger באמצעות מחבר אבחון 9-Way.
- שימוש ServiceRanger, קריאות שיא "צג נתונים" תחת סוללת J1939 נתוני HV: פרמטר 520250 מתח פרמטר פוטנציאל HV Battery1 520323 מתח הסוללה RB. צפה מתח על RB מתח הסוללה במהלך מפתח על צעדי שיא מתח אם בכלל קיימים.
- איזה FMIs נוכח?
- אם תקלת קוד 116 קרן המטבע הבינלאומית 3 רשום, עבור אל שלב 2.
- אם תקלת קוד 116 קרן המטבע הבינלאומית 4 רשום, עבור אל שלב 4.
- אם תקלת קוד 116 קרן המטבע הבינלאומית 5 אוֹ 10 רשום, עבור אל שלב 6.
- אם תקלת קוד 116 קרן המטבע הבינלאומית 7 רשום, עבור אל שלב 13.
[/fusion_content_box][fusion_content_box title=”שלב 2. ודא תיקון.” backgroundcolor=”” icon=”” iconflip=”” iconrotate=”” iconspin=”” iconcolor=”” circlecolor=”” circlebordersize=”” circlebordercolor=”” outercirclebordersize=”” outercirclebordercolor=”” image=”” image_id=”” image_width=”” image_height=”” link=”” linktext=”” link_target=”” animation_type=”” animation_direction=”left” animation_speed=”0.3″ animation_offset=””]
- את המפתח, לחכות 1 דק.
- ניתקתי את המחבר מהפך 40-Way.
- מפתח על (זה יהיה להגדיר קוד תקלה 88, פגם ברור לאחר התיקון).
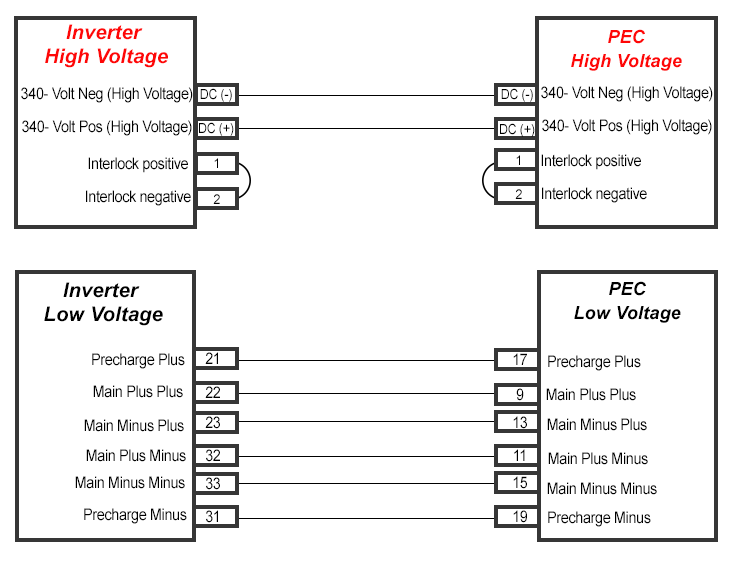
- על הרכב רתם, לבדוק מתח כלשהו על סיכות 21, 31, 22, 32, 23 ו 33 לקרקע:
- אם כל מתח נמצא, להסיר מחבר 19-Way על PEC ולבדוק עבור מתח בבית מהפך 40-פין, ולאחר מכן עבור לשלב 3.
- אם המתח הוא עדיין נוכח, רכב תיקון בין מהפך ואת 40-פין, ולאחר מכן עבור לשלב 3.
- אם מתח הוא נעלם, עבור אל שלב 3
[/fusion_content_box][/fusion_content_boxes][fusion_content_boxes layout=”clean-horizontal” columns=”2″ title_size=”18px” heading_size=”3″ title_color=”#ffffff” body_color=”#ffffff” backgroundcolor=”#4f4f4f” icon=”” iconflip=”” iconrotate=”” iconspin=”no” iconcolor=”” icon_circle=”” icon_circle_radius=”” circlecolor=”” circlebordersize=”” circlebordercolor=”” outercirclebordersize=”” outercirclebordercolor=”” icon_size=”” icon_hover_type=”” hover_accent_color=”” image=”” image_id=”” image_width=”” image_height=”” link_type=”” button_span=”” link_area=”” link_target=”” icon_align=”left” animation_type=”” animation_delay=”” animation_offset=”” animation_direction=”left” animation_speed=”0.3″ margin_top=”” margin_bottom=”” hide_on_mobile=”small-visibility,medium-visibility,large-visibility” class=”” id=””][fusion_content_box title=”שלב 3. ודא משכיות של מעגלי מחבר PEC לקרקע.” backgroundcolor=”” icon=”” iconflip=”” iconrotate=”” iconspin=”no” iconcolor=”” circlecolor=”” circlebordersize=”” circlebordercolor=”” outercirclebordersize=”” outercirclebordercolor=”” image=”” image_id=”” image_width=”” image_height=”” link=”” linktext=”קרא עוד” link_target=”” animation_type=”” animation_direction=”left” animation_speed=”0.3″ animation_offset=””]
- 1. את המפתח.
2. נתק את PEC 19-Way Connector (חלף השירות אדום עדיין צריך להיות שלף).
3. מדוד את ההתנגדות על מסוף 19-Way Connector הבא:- פין 9 לנעוץ 6 ו פין 9 לנעוץ 12
- פין 13 לנעוץ 6 ו פין 13 לנעוץ 12
- פין 17 לנעוץ 6 ו פין 17 לנעוץ 12
- אם מעגל פתוח, עבור אל שלב 2.
- אם כל התנגדות נמצאת, להחליף את תיבת ממסר, ולאחר מכן עבור לשלב 14.
[/fusion_content_box][fusion_content_box title=”שלב 4. ודא משכיות של מעגלי מחבר מהפך.” backgroundcolor=”” icon=”” iconflip=”” iconrotate=”” iconspin=”” iconcolor=”” circlecolor=”” circlebordersize=”” circlebordercolor=”” outercirclebordersize=”” outercirclebordercolor=”” image=”” image_id=”” image_width=”” image_height=”” link=”” linktext=”” link_target=”” animation_type=”” animation_direction=”left” animation_speed=”0.3″ animation_offset=””]
- את המפתח.
- ניתקתי את המהפך 40-Way Connector (19-מחבר הדרך אל PEC צריך להיות מחובר עם מתג שירות אדום שלף).
- על הרכב רתם, לבדוק עמידות הקרקע על פין 21 לקרקע, פין 22 כדי קרקע פין 23 לקרקע:
- אם כל התנגדות מהמחברים מהפכים לקרקע נמצאת, לנתק PEC 19-Way Connector ובדוק שנית את OEM 40-Way Connector.
- אם ההתנגדות נמצא עדיין עם 19-Way מנותק, לתקן את רתם הרכב, ולאחר מכן עבור לשלב 14.
- אם ההתנגדות נעלמה עם 19-Way מנותק, עבור אל שלב 5.
- אם מטר קורא OL או מעגל פתוח, להחליף את מהפך, ולאחר מכן עבור לשלב 14.
[/fusion_content_box][/fusion_content_boxes][fusion_content_boxes layout=”clean-horizontal” columns=”2″ title_size=”18px” heading_size=”3″ title_color=”#ffffff” body_color=”#ffffff” backgroundcolor=”#4f4f4f” icon=”” iconflip=”” iconrotate=”” iconspin=”no” iconcolor=”” icon_circle=”” icon_circle_radius=”” circlecolor=”” circlebordersize=”” circlebordercolor=”” outercirclebordersize=”” outercirclebordercolor=”” icon_size=”” icon_hover_type=”” hover_accent_color=”” image=”” image_id=”” image_width=”” image_height=”” link_type=”” button_span=”” link_area=”” link_target=”” icon_align=”left” animation_type=”” animation_delay=”” animation_offset=”” animation_direction=”left” animation_speed=”0.3″ margin_top=”” margin_bottom=”” hide_on_mobile=”small-visibility,medium-visibility,large-visibility” class=”” id=””][fusion_content_box title=”שלב 5. ודא משכיות של מעגלי מחבר PEC לקרקע.” backgroundcolor=”” icon=”” iconflip=”” iconrotate=”” iconspin=”no” iconcolor=”” circlecolor=”” circlebordersize=”” circlebordercolor=”” outercirclebordersize=”” outercirclebordercolor=”” image=”” image_id=”” image_width=”” image_height=”” link=”” linktext=”קרא עוד” link_target=”” animation_type=”” animation_direction=”left” animation_speed=”0.3″ animation_offset=””]
- את המפתח.
- נתק את PEC 19-Way Connector.
- על 19-Way PEC Connector, למדוד:
- פין 9, פין 13 ו פין 17 לקרקע
- פין 9 לנעוץ 7, פין 9 לנעוץ 10, פין 9 כדי Stud הרכבת PEC
- פין 13 לנעוץ 7, פין 13 לנעוץ 14, פין 13 כדי Stud הרכבת PEC
- פין 17 לנעוץ 7, פין 17 לנעוץ 14, פין 17 כדי Stud הרכבת PEC
- אם התנגדות כלשהי נמצאת מפיני PEC לקרקע, להחליף את תיבת ממסר. ראה הסרת MY09 PEC מתח גבוה ממסר תיבת הליך התקנה ב TRSM2000, ולאחר מכן עבור לשלב 14.
- אם מטר קורא OL, retesting נדרש, עבור אל שלב 4.
[/fusion_content_box][fusion_content_box title=”שלב 6. ודא משכיות של מעגלי מחבר PEC.” backgroundcolor=”” icon=”” iconflip=”” iconrotate=”” iconspin=”” iconcolor=”” circlecolor=”” circlebordersize=”” circlebordercolor=”” outercirclebordersize=”” outercirclebordercolor=”” image=”” image_id=”” image_width=”” image_height=”” link=”” linktext=”” link_target=”” animation_type=”” animation_direction=”left” animation_speed=”0.3″ animation_offset=””]
- את המפתח.
- נתק את PEC 19-Way Connector. (לחצן שירות אדום על PEC צריך להיות שלף.)(אל תבצע "Hybrid הליך הכיבוי" עדיין.)
- למדוד התנגדות על Connector PEC:
- פין 9 לנעוץ 11
- פין 13 לנעוץ 15
- פין 17 לנעוץ 19
- אם ההתנגדות בין הפין 9 ו פין 11, ו פין 13 לנעוץ 15 33-37 אוהם ואת ההתנגדות היא כל מן הפין 17 לנעוץ 19 הוא 112-122 אוהם, עבור אל שלב 7.
- אם כל התנגדות חורגת מטווח, לאפס את מתג האינרציה הממוקם בתוך פתיחת מסנן אוויר או אחורי לגשת ללוח ידי Fuse המתח הגבוה, ולאחר מכן עבור לשלב 14.
[/fusion_content_box][/fusion_content_boxes][fusion_content_boxes layout=”clean-horizontal” columns=”2″ title_size=”18px” heading_size=”3″ title_color=”#ffffff” body_color=”#ffffff” backgroundcolor=”#4f4f4f” icon=”” iconflip=”” iconrotate=”” iconspin=”no” iconcolor=”” icon_circle=”” icon_circle_radius=”” circlecolor=”” circlebordersize=”” circlebordercolor=”” outercirclebordersize=”” outercirclebordercolor=”” icon_size=”” icon_hover_type=”” hover_accent_color=”” image=”” image_id=”” image_width=”” image_height=”” link_type=”” button_span=”” link_area=”” link_target=”” icon_align=”left” animation_type=”” animation_delay=”” animation_offset=”” animation_direction=”left” animation_speed=”0.3″ margin_top=”” margin_bottom=”” hide_on_mobile=”small-visibility,medium-visibility,large-visibility” class=”” id=””][fusion_content_box title=”שלב 7. בדוק את משתלבים כבל במתח גבוה על בכבלים OEM.” backgroundcolor=”” icon=”” iconflip=”” iconrotate=”” iconspin=”no” iconcolor=”” circlecolor=”” circlebordersize=”” circlebordercolor=”” outercirclebordersize=”” outercirclebordercolor=”” image=”” image_id=”” image_width=”” image_height=”” link=”” linktext=”קרא עוד” link_target=”” animation_type=”” animation_direction=”left” animation_speed=”0.3″ animation_offset=””]
- ודא כי מתג האינרציה בסדר.
- למדוד התנגדות של סיכות משתלבים על בכבלים OEM.
Danger: ראה כיבוי שירות גבוה מתח ונהלי Power-Up. בצע את ההליכים כדי למנוע זעזועים, לשרוף או מוות מן מתח גבוה מטופל כראוי.- אם ההתנגדות היא 0-0.3 אוהם, להחליף את תיבת ממסר, ולאחר מכן עבור לשלב 9.
- אם ההתנגדות היא OL, להחליף את כבל במתח גבוה DC, ולאחר מכן עבור לשלב 8.
[/fusion_content_box][fusion_content_box title=”שלב 8. ודא משכיות של מעגלי מחבר PEC לקרקע.” backgroundcolor=”” icon=”” iconflip=”” iconrotate=”” iconspin=”” iconcolor=”” circlecolor=”” circlebordersize=”” circlebordercolor=”” outercirclebordersize=”” outercirclebordercolor=”” image=”” image_id=”” image_width=”” image_height=”” link=”” linktext=”” link_target=”” animation_type=”” animation_direction=”left” animation_speed=”0.3″ animation_offset=””]
- למדוד התנגדות על Connector PEC (כפתור בורר שירות אדום נשלף):
- פין 9 לנעוץ 11
- פין 17 לנעוץ 19
- אם כל התנגדות היא OL, להחליף את תיבת ממסר (בדוק חיווט להיכנס ממסר Box לפני ההחלפה), ולאחר מכן עבור לשלב 9.
[/fusion_content_box][/fusion_content_boxes][fusion_content_boxes layout=”clean-horizontal” columns=”2″ title_size=”18px” heading_size=”3″ title_color=”#ffffff” body_color=”#ffffff” backgroundcolor=”#4f4f4f” icon=”” iconflip=”” iconrotate=”” iconspin=”no” iconcolor=”” icon_circle=”” icon_circle_radius=”” circlecolor=”” circlebordersize=”” circlebordercolor=”” outercirclebordersize=”” outercirclebordercolor=”” icon_size=”” icon_hover_type=”” hover_accent_color=”” image=”” image_id=”” image_width=”” image_height=”” link_type=”” button_span=”” link_area=”” link_target=”” icon_align=”left” animation_type=”” animation_delay=”” animation_offset=”” animation_direction=”left” animation_speed=”0.3″ margin_top=”” margin_bottom=”” hide_on_mobile=”small-visibility,medium-visibility,large-visibility” class=”” id=””][fusion_content_box title=”שלב 9. ” backgroundcolor=”” icon=”” iconflip=”” iconrotate=”” iconspin=”no” iconcolor=”” circlecolor=”” circlebordersize=”” circlebordercolor=”” outercirclebordersize=”” outercirclebordercolor=”” image=”” image_id=”” image_width=”” image_height=”” link=”” linktext=”קרא עוד” link_target=”” animation_type=”” animation_direction=”left” animation_speed=”0.3″ animation_offset=””]
- את המפתח.
- אם המכונית מצוידת ייצוא כוח PEC, לבצע "כיבוי שירות במתח גבוה נוהל Power-Up" בעמוד 4, ולאחר מכן להסיר-מתח גבוה DC / DC ו / או APG מתח גבוה כבל מן PEC. תקן Caps משתלב אם זמין:
- אם הרכב אינו מצויד כוח היצוא, עבור אל שלב 11.
[/fusion_content_box][fusion_content_box title=”שלב 10. ” backgroundcolor=”” icon=”” iconflip=”” iconrotate=”” iconspin=”” iconcolor=”” circlecolor=”” circlebordersize=”” circlebordercolor=”” outercirclebordersize=”” outercirclebordercolor=”” image=”” image_id=”” image_width=”” image_height=”” link=”” linktext=”” link_target=”” animation_type=”” animation_direction=”left” animation_speed=”0.3″ animation_offset=””]
- לאחר DC / DC וכבלים במתח גבוה APG מוסרים, שלף את מתג השירות האדום והתחבר 19- מחבר הדרך אל PEC.
- מפתח על:
- אם תקלת קוד 116 / FMI 5 הוא עדיין פעיל, עבור אל שלב 12.
- אם תקלת קוד 116 / FMI 5 נעלם, עבור אל שלב 14.
[/fusion_content_box][/fusion_content_boxes][fusion_content_boxes layout=”clean-horizontal” columns=”2″ title_size=”18px” heading_size=”3″ title_color=”#ffffff” body_color=”#ffffff” backgroundcolor=”#4f4f4f” icon=”” iconflip=”” iconrotate=”” iconspin=”no” iconcolor=”” icon_circle=”” icon_circle_radius=”” circlecolor=”” circlebordersize=”” circlebordercolor=”” outercirclebordersize=”” outercirclebordercolor=”” icon_size=”” icon_hover_type=”” hover_accent_color=”” image=”” image_id=”” image_width=”” image_height=”” link_type=”” button_span=”” link_area=”” link_target=”” icon_align=”left” animation_type=”” animation_delay=”” animation_offset=”” animation_direction=”left” animation_speed=”0.3″ margin_top=”” margin_bottom=”” hide_on_mobile=”small-visibility,medium-visibility,large-visibility” class=”” id=””][fusion_content_box title=”שלב 11. ” backgroundcolor=”” icon=”” iconflip=”” iconrotate=”” iconspin=”no” iconcolor=”” circlecolor=”” circlebordersize=”” circlebordercolor=”” outercirclebordersize=”” outercirclebordercolor=”” image=”” image_id=”” image_width=”” image_height=”” link=”” linktext=”קרא עוד” link_target=”” animation_type=”” animation_direction=”left” animation_speed=”0.3″ animation_offset=””]
- את המפתח.
- חבר DC / DC ו / או כבלים APG בחזרה PEC ולוודא כי קוד תקלת 116 / FMI 5 הוא עדיין פעיל:
- אם עדיין פעיל, עבור אל שלב 12.
- אם לא פעיל, והמשדר עזר בתוך PEC מרותך. החלף את PEC. ראה מוביל אלקטריק פאוור MY09 (PEC) הסרת התקנה, Carrier אלטרנטיבי אלקטריק פאוור (PEC) הסרה והתקנה או 4- Carrier אלקטריק פאוור סוללה (PEC) הסרה ונהלי התקנה ב TRSM2000.
כמו כן, בדוק את מעגל ממסר העזר לחיבורי משתלבים רופפים וגורם לפטפט ממסר תחת עומס ראה תקלת קוד 118 – אשמת מעגל בקרת ממסר מתח גבוה עזר תיאור המעגל). - לאחר סיום התיקונים, עבור אל שלב 14.
[/fusion_content_box][fusion_content_box title=”שלב 12. ודא משכיות של מעגלי מחבר מהפך. ” backgroundcolor=”” icon=”” iconflip=”” iconrotate=”” iconspin=”” iconcolor=”” circlecolor=”” circlebordersize=”” circlebordercolor=”” outercirclebordersize=”” outercirclebordercolor=”” image=”” image_id=”” image_width=”” image_height=”” link=”” linktext=”” link_target=”” animation_type=”” animation_direction=”left” animation_speed=”0.3″ animation_offset=””]
- חברו את PEC 19-Way Connector.
- ניתקתי את המהפך 40-Way Connector.
- למדוד התנגדות על מהפך 40-Way OEM מחבר טרמינל על הפינים הבאים:
- פין 21 לנעוץ 31
- פין 22 לנעוץ 32
- פין 23 לנעוץ 33
- אם ההתנגדות בין הפין 21 ו פין 31 112-122 אוהם ואת ההתנגדות הוא מ- פין 22 לנעוץ 32, ו פין 23 לנעוץ 33 הם כל 33-37 אוהם, להחליף את מהפך (לראות את תהליך הסרה והתקנה מהפך MY09), ולאחר מכן עבור לשלב 14.
- אם ההתנגדות היא מחוץ לטווח, לתקן את רתם הרכב בין מהפך ואת PEC, ולאחר מכן עבור לשלב 14.
[/fusion_content_box][/fusion_content_boxes][fusion_content_boxes layout=”clean-horizontal” columns=”2″ title_size=”18px” heading_size=”3″ title_color=”#ffffff” body_color=”#ffffff” backgroundcolor=”#4f4f4f” icon=”” iconflip=”” iconrotate=”” iconspin=”no” iconcolor=”” icon_circle=”” icon_circle_radius=”” circlecolor=”” circlebordersize=”” circlebordercolor=”” outercirclebordersize=”” outercirclebordercolor=”” icon_size=”” icon_hover_type=”” hover_accent_color=”#f41000″ image=”” image_id=”” image_width=”” image_height=”” link_type=”” button_span=”” link_area=”” link_target=”” icon_align=”left” animation_type=”” animation_delay=”” animation_offset=”” animation_direction=”left” animation_speed=”0.3″ margin_top=”” margin_bottom=”” hide_on_mobile=”small-visibility,medium-visibility,large-visibility” class=”” id=””][fusion_content_box title=”שלב 13. מתח סוללה מדוד.” backgroundcolor=”” icon=”” iconflip=”” iconrotate=”” iconspin=”” iconcolor=”” circlecolor=”” circlebordersize=”” circlebordercolor=”” outercirclebordersize=”” outercirclebordercolor=”” image=”” image_id=”” image_width=”” image_height=”” link=”” linktext=”” link_target=”” animation_type=”” animation_direction=”left” animation_speed=”0.3″ animation_offset=””]
- חבר ServiceRanger למחבר אבחון 9-Way למונית.
- בחר באפשרות "Monitor הנתונים".
- הצג את הפרמטרים הבאים ברשימת הסוללה במתח הגבוה:
- סוללת HV סוללת J1939 נתוני HV:
פרמטר 520250 מתח ו פרמטר פוטנציאל HV Battery1 520323 מתח הסוללה RB - לחץ על לחצן שירות האדום.
- אם קריאות המתח על מתח פוטנציאל Battery1 ו סוללת המתח RB נמצאות במרחק 10 וולט אחד של השני (מתח הסוללה RB צריך לרדת ל 30 וולט כאשר מתג השירות האדום נדחף), להחליף את תיבת ממסר. ראה הסרת MY09 PEC מתח גבוה ממסר תיבת הליך התקנה ב TRSM2000, ולאחר מכן עבור לשלב 14.
הערה: "כיבוי שירות במתח גבוה
ראה כיבוי שירות גבוה מתח ונהלי Power-Up חייבת להתבצע לפני הסרת כבל במתח גבוה. (אם ראשי
ממסר מתח גבוה מרותך, להסיר פיוז מתח גבוה הממוקם אחורי לגשת ללוח לפני שתנסה כל תיקונים). - אם קריאות המתח על מתח Battery1 פוטנציאלי סוללת המתח RB גבוהות מ 10 וולט אחד של השני (מתח הסוללה RB צריך לרדת ל 30 וולט כאשר מתג השירות האדום נדחף), להחליף את מהפך, ולאחר מכן עבור לשלב 14.
- סוללת HV סוללת J1939 נתוני HV:
[/fusion_content_box][fusion_content_box title=”שלב 14. ודא תיקון.” backgroundcolor=”” icon=”” iconflip=”” iconrotate=”” iconspin=”no” iconcolor=”” circlecolor=”” circlebordersize=”” circlebordercolor=”” outercirclebordersize=”” outercirclebordercolor=”” image=”” image_id=”” image_width=”” image_height=”” link=”” linktext=”קרא עוד” link_target=”” animation_type=”” animation_direction=”left” animation_speed=”0.3″ animation_offset=””]
- את המפתח.
- חבר מחדש את כל המחברים את כבל הסוללה השלילי.
- מפתח על.
- קודים ברורים, לראות ליקויים פעילים נקו.
- לנהוג ברכב ולנסות לאפס את הקוד.
- בדקו קודים, לראות צג ליקויים פעילים או לא פעילים.
- אם אין קודים, השלמת הבדיקה.
- אם קוד תקלה 116 נראה, למצוא שגיאה בבדיקה, עבור אל שלב 1.
- אם קוד שאינו 116 נראה, לראות תקלת רשימת אינדקס קוד.
[/fusion_content_box][/fusion_content_boxes][/fusion_builder_column][/fusion_builder_row][/fusion_builder_container][fusion_global id=”13788″]