[fusion_builder_container hundred_percent=nohundred_percent_height=nohundred_percent_height_scroll=nohundred_percent_height_center_content=yesequal_height_columns=nomenu_anchor=”” hide_on_mobile=small-visibility,medium-visibility,large-visibilitystatus=publishedpublish_date=”” class=”” id=”” background_color=”” background_image=”” background_position=center centerbackground_repeat=no-repeatfade=nobackground_parallax=noneenable_mobile=noparallax_speed=”0.3″ video_mp4=”” video_webm=”” video_ogv=”” video_url=”” video_aspect_ratio=”16:9″ video_loop=yesvideo_mute=yesvideo_preview_image=”” border_size=”” border_color=”” border_style=solidmargin_top=”35″ margin_bottom=”” padding_top=”” padding_right=”” padding_bottom=”” padding_left=””][fusion_builder_row][fusion_builder_column type=”1_1layout=”1_1spacing=”” center_content=nolink=”” target=_selfmin_height=”” hide_on_mobile=small-visibility,medium-visibility,large-visibilityclass=”” id=”” background_color=”” background_image=”” background_image_id=”” background_position=left topbackground_repeat=no-repeathover_type=noneborder_size=”0″ border_color=”” border_style=solidborder_position=allpadding_top=”” padding_right=”” padding_bottom=”” padding_left=”” margin_top=”” margin_bottom=”” animation_type=”” animation_direction=leftanimation_speed=”0.3″ animation_offset=”” last=no”][fusion_text columns=”” column_min_width=”” column_spacing=”” rule_style=defaultrule_size=”” rule_color=”” hide_on_mobile=small-visibility,medium-visibility,large-visibilityclass=”” id=””]

Eaton Fuller Hybrid Overføring Hybrid Elektrisk Forprøvekontroll

[/fusion_text][/fusion_builder_column][/fusion_builder_row][/fusion_builder_container][fusion_builder_container hundred_percent=nohundred_percent_height=nohundred_percent_height_scroll=nohundred_percent_height_center_content=yesequal_height_columns=nomenu_anchor=”” hide_on_mobile=small-visibility,medium-visibility,large-visibilitystatus=publishedpublish_date=”” class=”” id=”” background_color=”” background_image=”” background_position=center centerbackground_repeat=no-repeatfade=nobackground_parallax=noneenable_mobile=noparallax_speed=”0.3″ video_mp4=”” video_webm=”” video_ogv=”” video_url=”” video_aspect_ratio=”16:9″ video_loop=yesvideo_mute=yesvideo_preview_image=”” border_size=”” border_color=”” border_style=solidmargin_top=”” margin_bottom=”” padding_top=”” padding_right=”” padding_bottom=”” padding_left=””][fusion_builder_row][fusion_builder_column type=”1_1layout=”1_1spacing=”” center_content=nolink=”” target=_selfmin_height=”” hide_on_mobile=small-visibility,medium-visibility,large-visibilityclass=”” id=”” background_color=”” background_image=”” background_image_id=”” background_position=left topbackground_repeat=no-repeathover_type=noneborder_size=”0″ border_color=”” border_style=solidborder_position=allpadding_top=”” padding_right=”” padding_bottom=”” padding_left=”” margin_top=”” margin_bottom=”” animation_type=”” animation_direction=leftanimation_speed=”0.3″ animation_offset=”” last=no”][fusion_text columns=”” column_min_width=”” column_spacing=”” rule_style=defaultrule_size=”” rule_color=”” hide_on_mobile=small-visibility,medium-visibility,large-visibilityclass=”” id=””]

Denne testen må utføres før diagnostisering av visse spesifikke hybrid forkastninger. hans testen kontrollerer strømforsyningen for Inverter og Power Electric Carrier (PEC).
Merk: Du må utføre elektrisk Forprøvekontroll før du utfører Hybrid Elektrisk Forprøvekontroll.
Merk: Denne testen er kalt ut i prosedyrene der det er nødvendig

Electrical Pretest Detection

There is no detection process specifically for the basic electrical supply; derimot, failures of this type are generally detected by the hybrid system or driver as some other type of fault code or symptom.

Hybrid Elektrisk Forprøvekontroll Reserve

Tap av tenning kraft fører til at hybridsystemet for å være ubrukelig. I denne situasjonen, kjøretøyet skal kjøre under dieseldrift bare.

[/fusion_text][fusion_text columns=”” column_min_width=”” column_spacing=”” rule_style=defaultrule_size=”” rule_color=”” hide_on_mobile=small-visibility,medium-visibility,large-visibilityclass=”” id=””]

Mulige årsaker angitt med Eaton Fuller Hybrid Overføring Hybrid Elektrisk Forprøvekontroll

(MY08) Low-voltage can be caused by Power Harness connections from Inverter or BCU.

(MY09) Lavspente kan være forårsaket av makt ledningsnettet fra Inverter eller PEC.

[/fusion_text][/fusion_builder_column][/fusion_builder_row][/fusion_builder_container][fusion_builder_container hundred_percent=nohundred_percent_height=nohundred_percent_height_scroll=nohundred_percent_height_center_content=yesequal_height_columns=nomenu_anchor=”” hide_on_mobile=small-visibility,medium-visibility,large-visibilitystatus=publishedpublish_date=”” class=”” id=”” background_color=”” background_image=”” background_position=center centerbackground_repeat=no-repeatfade=nobackground_parallax=noneenable_mobile=noparallax_speed=”0.3″ video_mp4=”” video_webm=”” video_ogv=”” video_url=”” video_aspect_ratio=”16:9″ video_loop=yesvideo_mute=yesvideo_preview_image=”” border_size=”” border_color=”” border_style=solidmargin_top=”” margin_bottom=”” padding_top=”” padding_right=”” padding_bottom=”” padding_left=””][fusion_builder_row][fusion_builder_column type=”1_1layout=”1_1spacing=”” center_content=nolink=”” target=_selfmin_height=”” hide_on_mobile=small-visibility,medium-visibility,large-visibilityclass=”” id=”” background_color=”” background_image=”” background_image_id=”” background_position=left topbackground_repeat=no-repeathover_type=noneborder_size=”0″ border_color=”” border_style=solidborder_position=allpadding_top=”” padding_right=”” padding_bottom=”” padding_left=”” margin_top=”” margin_bottom=”” animation_type=”” animation_direction=leftanimation_speed=”0.3″ animation_offset=”” last=no”][fusion_text columns=”” column_min_width=”” column_spacing=”” rule_style=defaultrule_size=”” rule_color=”” hide_on_mobile=small-visibility,medium-visibility,large-visibilityclass=”” id=””]

MY08 Identifikasjon av komponenter for Eaton Fuller hybridtransmisjon Hybrid Elektrisk Forprøvekontroll:
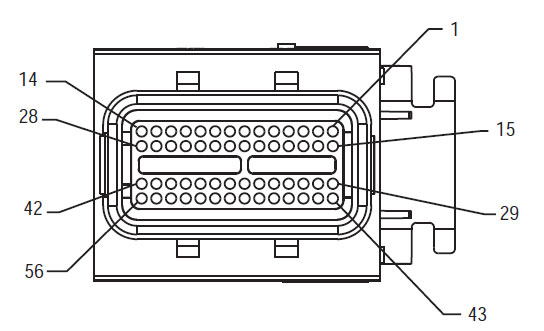
[/fusion_text][/fusion_builder_column][fusion_builder_column type=”1_2layout=”1_2spacing=”” center_content=nolink=”” target=_selfmin_height=”” hide_on_mobile=small-visibility,medium-visibility,large-visibilityclass=”” id=”” background_color=”” background_image=”” background_image_id=”” background_position=left topbackground_repeat=no-repeathover_type=noneborder_size=”0″ border_color=”” border_style=solidborder_position=allpadding_top=”” padding_right=”” padding_bottom=”” padding_left=”” margin_top=”” margin_bottom=”” animation_type=”” animation_direction=leftanimation_speed=”0.3″ animation_offset=”” last=no”][fusion_imageframe image_id=”14474|fullmax_width=”” style_type=”” blur=”” stylecolor=”” hover_type=nonebordersize=”” bordercolor=”” borderradius=”” align=centerlightbox=nogallery_id=”” lightbox_image=”” lightbox_image_id=”” alt=”Inverter 56-Way Parring Connector Vis” link=”” linktarget=_selfhide_on_mobile=small-visibility,medium-visibility,large-visibilityclass=”” id=”” animation_type=”” animation_direction=leftanimation_speed=”0.3″ animation_offset=””]https://www.globaltransmissionsupply.com/wp-content/uploads/Inverter-56-Way-Mating-Connector-View.jpg[/fusion_imageframe][fusion_text columns=”” column_min_width=”” column_spacing=”” rule_style=defaultrule_size=”” rule_color=”” hide_on_mobile=small-visibility,medium-visibility,large-visibilityclass=”” id=””]

Inverter 56-Way Parring Connector Vis
(inverter – Low Voltage Connector)

[/fusion_text][/fusion_builder_column][fusion_builder_column type=”1_2layout=”1_2spacing=”” center_content=nolink=”” target=_selfmin_height=”” hide_on_mobile=small-visibility,medium-visibility,large-visibilityclass=”” id=”” background_color=”” background_image=”” background_image_id=”” background_position=left topbackground_repeat=no-repeathover_type=noneborder_size=”0″ border_color=”” border_style=solidborder_position=allpadding_top=”” padding_right=”” padding_bottom=”” padding_left=”” margin_top=”” margin_bottom=”” animation_type=”” animation_direction=leftanimation_speed=”0.3″ animation_offset=”” last=no”][fusion_imageframe image_id=”14213|mediummax_width=”” style_type=”” blur=”” stylecolor=”” hover_type=nonebordersize=”” bordercolor=”” borderradius=”” align=centerlightbox=nogallery_id=”” lightbox_image=”” lightbox_image_id=”” alt=”Deutsch 19 – Way Parring Connector Vis” link=”” linktarget=_selfhide_on_mobile=small-visibility,medium-visibility,large-visibilityclass=”” id=”” animation_type=”” animation_direction=leftanimation_speed=”0.3″ animation_offset=””]https://www.globaltransmissionsupply.com/wp-content/uploads/Eaton-Fuller-Harness-Connector-View-300×289.jpg[/fusion_imageframe][fusion_text columns=”” column_min_width=”” column_spacing=”” rule_style=defaultrule_size=”” rule_color=”” hide_on_mobile=small-visibility,medium-visibility,large-visibilityclass=”” id=””]

Deutsch 19 – Way Parring Connector Vis
(PEC – Low Voltage Connector)
[/fusion_text][/fusion_builder_column][fusion_builder_column type=”1_1spacing=”” center_content=nolink=”” target=_selfmin_height=”” hide_on_mobile=small-visibility,medium-visibility,large-visibilityclass=”” id=”” background_image_id=”” background_color=”” background_image=”” background_position=left topundefined=”” background_repeat=no-repeathover_type=noneborder_size=”0″ border_color=”” border_style=solidborder_position=allborder_radius_top_left=”” border_radius_top_right=”” border_radius_bottom_left=”” border_radius_bottom_right=”” box_shadow=nobox_shadow_vertical=”” box_shadow_horizontal=”” box_shadow_blur=”0″ box_shadow_spread=”0″ box_shadow_color=”” box_shadow_style=”” padding_top=”” padding_right=”” padding_bottom=”10″ padding_left=”” margin_top=”” margin_bottom=”” animation_type=”” animation_direction=leftanimation_speed=”0.3″ animation_offset=”” last=no”][fusion_imageframe image_id=”14906|800″ max_width=”” style_type=”” blur=”” stylecolor=”” hover_type=nonebordersize=”” bordercolor=”” borderradius=”” align=centerlightbox=nogallery_id=”” lightbox_image=”” lightbox_image_id=”” alt=”Inverter til PEC steder Eaton Fuller overføring hybrid elektrisk pretest” link=”” linktarget=_selfhide_on_mobile=small-visibility,medium-visibility,large-visibilityclass=”” id=”” animation_type=”” animation_direction=leftanimation_speed=”0.3″ animation_offset=””]https://www.globaltransmissionsupply.com/wp-content/uploads/Inverter-to-PEC-locations-Eaton-Fuller-transmission-hybrid-electrical-pretest-800×363.jpg[/fusion_imageframe][/fusion_builder_column][fusion_builder_column type=”1_2layout=”1_1spacing=”” center_content=nolink=”” target=_selfmin_height=”” hide_on_mobile=small-visibility,medium-visibility,large-visibilityclass=”” id=”” background_color=”” background_image=”” background_image_id=”” background_position=left topbackground_repeat=no-repeathover_type=noneborder_size=”0″ border_color=”” border_style=solidborder_position=allpadding_top=”” padding_right=”” padding_bottom=”” padding_left=”” margin_top=”” margin_bottom=”” animation_type=”” animation_direction=leftanimation_speed=”0.3″ animation_offset=”” last=no”][fusion_imageframe image_id=”14907|400″ max_width=”” style_type=”” blur=”” stylecolor=”” hover_type=nonebordersize=”” bordercolor=”” borderradius=”” align=centerlightbox=nogallery_id=”” lightbox_image=”” lightbox_image_id=”” alt=”Eaton Fiuller overføring DC Converter til gods” link=”” linktarget=_selfhide_on_mobile=small-visibility,medium-visibility,large-visibilityclass=”” id=”” animation_type=”” animation_direction=leftanimation_speed=”0.3″ animation_offset=””]https://www.globaltransmissionsupply.com/wp-content/uploads/DC-converter-to-ground-400×410.jpg[/fusion_imageframe][/fusion_builder_column][fusion_builder_column type=”1_2layout=”1_1spacing=”” center_content=nolink=”” target=_selfmin_height=”” hide_on_mobile=small-visibility,medium-visibility,large-visibilityclass=”” id=”” background_color=”” background_image=”” background_image_id=”” background_position=left topbackground_repeat=no-repeathover_type=noneborder_size=”0″ border_color=”” border_style=solidborder_position=allpadding_top=”” padding_right=”” padding_bottom=”” padding_left=”” margin_top=”” margin_bottom=”” animation_type=”” animation_direction=leftanimation_speed=”0.3″ animation_offset=”” last=no”][fusion_imageframe image_id=”14279|fullmax_width=”” style_type=”” blur=”” stylecolor=”” hover_type=nonebordersize=”” bordercolor=”” borderradius=”” align=centerlightbox=nogallery_id=”” lightbox_image=”” lightbox_image_id=”” alt=”Deutsch 4-veis OEM kontakten” link=”” linktarget=_selfhide_on_mobile=small-visibility,medium-visibility,large-visibilityclass=”” id=”” animation_type=”” animation_direction=leftanimation_speed=”0.3″ animation_offset=””]https://www.globaltransmissionsupply.com/wp-content/uploads/Deutsch-4-way-OEM-connector.jpg[/fusion_imageframe][fusion_text columns=”” column_min_width=”” column_spacing=”” rule_style=defaultrule_size=”” rule_color=”” hide_on_mobile=small-visibility,medium-visibility,large-visibilityclass=”” id=””]

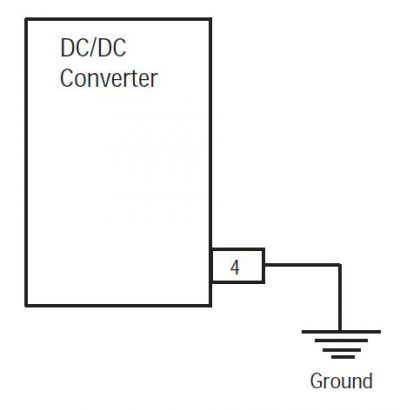
DC / DC Converter
4-Way OEM Connector

[/fusion_text][/fusion_builder_column][fusion_builder_column type=”1_1layout=”1_1spacing=”” center_content=nolink=”” target=_selfmin_height=”” hide_on_mobile=small-visibility,medium-visibility,large-visibilityclass=”” id=”” background_image_id=”” background_color=”#000000″ background_image=”” background_position=left topundefined=”” background_repeat=no-repeathover_type=noneborder_size=”0″ border_color=”” border_style=solidborder_position=allpadding_top=”” padding_right=”” padding_bottom=”” padding_left=”” margin_top=”” margin_bottom=”” animation_type=”” animation_direction=leftanimation_speed=”0.3″ animation_offset=”” last=no”][fusion_text columns=”” column_min_width=”” column_spacing=”” rule_style=defaultrule_size=”” rule_color=”” hide_on_mobile=small-visibility,medium-visibility,large-visibilityclass=”” id=””]

MERK: Referere til Eaton Hybrid Component og Connector Location for Connector Steder i MY08 Systems

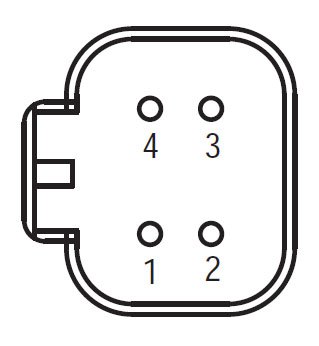
[/fusion_text][/fusion_builder_column][/fusion_builder_row][/fusion_builder_container][fusion_builder_container hundred_percent=nohundred_percent_height=nohundred_percent_height_scroll=nohundred_percent_height_center_content=yesequal_height_columns=nomenu_anchor=”” hide_on_mobile=small-visibility,medium-visibility,large-visibilitystatus=publishedpublish_date=”” class=”” id=”” background_color=”” background_image=”” background_position=center centerbackground_repeat=no-repeatfade=nobackground_parallax=noneenable_mobile=noparallax_speed=”0.3″ video_mp4=”” video_webm=”” video_ogv=”” video_url=”” video_aspect_ratio=”16:9″ video_loop=yesvideo_mute=yesvideo_preview_image=”” border_size=”” border_color=”” border_style=solidmargin_top=”” margin_bottom=”” padding_top=”” padding_right=”” padding_bottom=”” padding_left=””][fusion_builder_row][fusion_builder_column type=”1_1layout=”1_1spacing=”” center_content=nolink=”” target=_selfmin_height=”” hide_on_mobile=small-visibility,medium-visibility,large-visibilityclass=”” id=”” background_color=”” background_image=”” background_image_id=”” background_position=left topbackground_repeat=no-repeathover_type=noneborder_size=”0″ border_color=”” border_style=solidborder_position=allpadding_top=”” padding_right=”” padding_bottom=”” padding_left=”” margin_top=”” margin_bottom=”” animation_type=”” animation_direction=leftanimation_speed=”0.3″ animation_offset=”” last=no”][fusion_text columns=”” column_min_width=”” column_spacing=”” rule_style=defaultrule_size=”” rule_color=”” hide_on_mobile=small-visibility,medium-visibility,large-visibilityclass=”” id=””]

Årsmodell 09 Identifikasjon av komponenter for Eaton Fuller hybridtransmisjon Hybrid Elektrisk Forprøvekontroll:

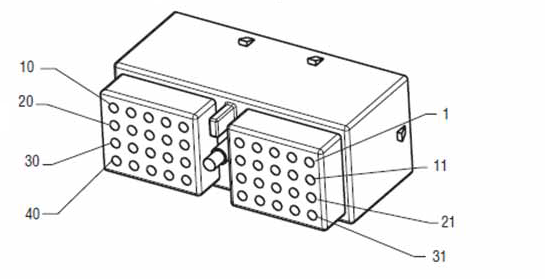
[/fusion_text][/fusion_builder_column][fusion_builder_column type=”1_2layout=”1_2spacing=”” center_content=nolink=”” target=_selfmin_height=”” hide_on_mobile=small-visibility,medium-visibility,large-visibilityclass=”” id=”” background_color=”” background_image=”” background_image_id=”” background_position=left topbackground_repeat=no-repeathover_type=noneborder_size=”0″ border_color=”” border_style=solidborder_position=allpadding_top=”” padding_right=”” padding_bottom=”” padding_left=”” margin_top=”” margin_bottom=”” animation_type=”” animation_direction=leftanimation_speed=”0.3″ animation_offset=”” last=no”][fusion_imageframe image_id=”14476|fullmax_width=”” style_type=”” blur=”” stylecolor=”” hover_type=nonebordersize=”” bordercolor=”” borderradius=”” align=centerlightbox=nogallery_id=”” lightbox_image=”” lightbox_image_id=”” alt=”Deutsch 40-Way Parring Connector Vis” link=”” linktarget=_selfhide_on_mobile=small-visibility,medium-visibility,large-visibilityclass=”” id=”” animation_type=”” animation_direction=leftanimation_speed=”0.3″ animation_offset=””]https://www.globaltransmissionsupply.com/wp-content/uploads/Duetsch-40-way-mating-connector-view.png[/fusion_imageframe][fusion_text columns=”” column_min_width=”” column_spacing=”” rule_style=defaultrule_size=”” rule_color=”” hide_on_mobile=small-visibility,medium-visibility,large-visibilityclass=”” id=””]

Deutsch 40-Way Parring Connector Vis
(inverter – Low Voltage Connector)

[/fusion_text][/fusion_builder_column][fusion_builder_column type=”1_2layout=”1_2spacing=”” center_content=nolink=”” target=_selfmin_height=”” hide_on_mobile=small-visibility,medium-visibility,large-visibilityclass=”” id=”” background_color=”” background_image=”” background_image_id=”” background_position=left topbackground_repeat=no-repeathover_type=noneborder_size=”0″ border_color=”” border_style=solidborder_position=allpadding_top=”” padding_right=”” padding_bottom=”” padding_left=”” margin_top=”” margin_bottom=”” animation_type=”” animation_direction=leftanimation_speed=”0.3″ animation_offset=”” last=no”][fusion_imageframe image_id=”14213|mediummax_width=”” style_type=”” blur=”” stylecolor=”” hover_type=nonebordersize=”” bordercolor=”” borderradius=”” align=centerlightbox=nogallery_id=”” lightbox_image=”” lightbox_image_id=”” alt=”Deutsch 19 – Way Parring Connector Vis” link=”” linktarget=_selfhide_on_mobile=small-visibility,medium-visibility,large-visibilityclass=”” id=”” animation_type=”” animation_direction=leftanimation_speed=”0.3″ animation_offset=””]https://www.globaltransmissionsupply.com/wp-content/uploads/Eaton-Fuller-Harness-Connector-View-300×289.jpg[/fusion_imageframe][fusion_text columns=”” column_min_width=”” column_spacing=”” rule_style=defaultrule_size=”” rule_color=”” hide_on_mobile=small-visibility,medium-visibility,large-visibilityclass=”” id=””]

Deutsch 19 – Way Parring Connector Vis
(PEC – Low Voltage Connector)
[/fusion_text][/fusion_builder_column][fusion_builder_column type=”1_1spacing=”” center_content=nolink=”” target=_selfmin_height=”” hide_on_mobile=small-visibility,medium-visibility,large-visibilityclass=”” id=”” background_image_id=”” background_color=”” background_image=”” background_position=left topundefined=”” background_repeat=no-repeathover_type=noneborder_size=”0″ border_color=”” border_style=solidborder_position=allborder_radius_top_left=”” border_radius_top_right=”” border_radius_bottom_left=”” border_radius_bottom_right=”” box_shadow=nobox_shadow_vertical=”” box_shadow_horizontal=”” box_shadow_blur=”” box_shadow_spread=”” box_shadow_color=”” box_shadow_style=”” padding_top=”” padding_right=”” padding_bottom=”10″ padding_left=”” margin_top=”” margin_bottom=”” animation_type=”” animation_direction=leftanimation_speed=”0.3″ animation_offset=”” last=no”][fusion_imageframe image_id=”14908|800″ max_width=”” style_type=”” blur=”” stylecolor=”” hover_type=nonebordersize=”” bordercolor=”” borderradius=”” align=centerlightbox=nogallery_id=”” lightbox_image=”” lightbox_image_id=”” alt=Inverter to PEC locations Eaton Fuller MY009 for Eaton Fuller Hybrid Transmission Electrical Pretestlink=”” linktarget=_selfhide_on_mobile=small-visibility,medium-visibility,large-visibilityclass=”” id=”” animation_type=”” animation_direction=leftanimation_speed=”0.3″ animation_offset=””]https://www.globaltransmissionsupply.com/wp-content/uploads/Inverter-to-PEC-locations-Eaton-Fuller-MY009-transmission-hybrid-electrical-pretest-800×385.jpg[/fusion_imageframe][/fusion_builder_column][fusion_builder_column type=”1_2layout=”1_1spacing=”” center_content=nolink=”” target=_selfmin_height=”” hide_on_mobile=small-visibility,medium-visibility,large-visibilityclass=”” id=”” background_color=”” background_image=”” background_image_id=”” background_position=left topbackground_repeat=no-repeathover_type=noneborder_size=”0″ border_color=”” border_style=solidborder_position=allpadding_top=”” padding_right=”” padding_bottom=”” padding_left=”” margin_top=”” margin_bottom=”” animation_type=”” animation_direction=leftanimation_speed=”0.3″ animation_offset=”” last=no”][fusion_imageframe image_id=”14907|400″ max_width=”” style_type=”” blur=”” stylecolor=”” hover_type=nonebordersize=”” bordercolor=”” borderradius=”” align=centerlightbox=nogallery_id=”” lightbox_image=”” lightbox_image_id=”” alt=”Eaton Fiuller overføring DC Converter til gods” link=”” linktarget=_selfhide_on_mobile=small-visibility,medium-visibility,large-visibilityclass=”” id=”” animation_type=”” animation_direction=leftanimation_speed=”0.3″ animation_offset=””]https://www.globaltransmissionsupply.com/wp-content/uploads/DC-converter-to-ground-400×410.jpg[/fusion_imageframe][/fusion_builder_column][fusion_builder_column type=”1_2layout=”1_1spacing=”” center_content=nolink=”” target=_selfmin_height=”” hide_on_mobile=small-visibility,medium-visibility,large-visibilityclass=”” id=”” background_color=”” background_image=”” background_image_id=”” background_position=left topbackground_repeat=no-repeathover_type=noneborder_size=”0″ border_color=”” border_style=solidborder_position=allpadding_top=”” padding_right=”” padding_bottom=”” padding_left=”” margin_top=”” margin_bottom=”” animation_type=”” animation_direction=leftanimation_speed=”0.3″ animation_offset=”” last=no”][fusion_imageframe image_id=”14279|fullmax_width=”” style_type=”” blur=”” stylecolor=”” hover_type=nonebordersize=”” bordercolor=”” borderradius=”” align=centerlightbox=nogallery_id=”” lightbox_image=”” lightbox_image_id=”” alt=”Deutsch 4-veis OEM kontakten” link=”” linktarget=_selfhide_on_mobile=small-visibility,medium-visibility,large-visibilityclass=”” id=”” animation_type=”” animation_direction=leftanimation_speed=”0.3″ animation_offset=””]https://www.globaltransmissionsupply.com/wp-content/uploads/Deutsch-4-way-OEM-connector.jpg[/fusion_imageframe][fusion_text columns=”” column_min_width=”” column_spacing=”” rule_style=defaultrule_size=”” rule_color=”” hide_on_mobile=small-visibility,medium-visibility,large-visibilityclass=”” id=””]

DC / DC Converter
4-Way OEM Connector

[/fusion_text][/fusion_builder_column][fusion_builder_column type=”1_1layout=”1_1spacing=”” center_content=nolink=”” target=_selfmin_height=”” hide_on_mobile=small-visibility,medium-visibility,large-visibilityclass=”” id=”” background_image_id=”” background_color=”#000000″ background_image=”” background_position=left topundefined=”” background_repeat=no-repeathover_type=noneborder_size=”0″ border_color=”” border_style=solidborder_position=allpadding_top=”” padding_right=”” padding_bottom=”” padding_left=”” margin_top=”20″ margin_bottom=”20″ animation_type=”” animation_direction=leftanimation_speed=”0.3″ animation_offset=”” last=no”][fusion_text columns=”” column_min_width=”” column_spacing=”” rule_style=defaultrule_size=”” rule_color=”” hide_on_mobile=small-visibility,medium-visibility,large-visibilityclass=”” id=””]

MERK: Referere til Eaton Hybrid Component og Connector Location for Connector Steder i MY09 Systems.

[/fusion_text][/fusion_builder_column][/fusion_builder_row][/fusion_builder_container][fusion_builder_container hundred_percent=nohundred_percent_height=nohundred_percent_height_scroll=nohundred_percent_height_center_content=yesequal_height_columns=nomenu_anchor=”” hide_on_mobile=small-visibility,medium-visibility,large-visibilitystatus=publishedpublish_date=”” class=”” id=”” background_color=”” background_image=”” background_position=center centerbackground_repeat=no-repeatfade=nobackground_parallax=noneenable_mobile=noparallax_speed=”0.3″ video_mp4=”” video_webm=”” video_ogv=”” video_url=”” video_aspect_ratio=”16:9″ video_loop=yesvideo_mute=yesvideo_preview_image=”” border_size=”” border_color=”” border_style=solidmargin_top=”” margin_bottom=”” padding_top=”” padding_right=”” padding_bottom=”” padding_left=””][fusion_builder_row][fusion_builder_column type=”1_1layout=”1_1spacing=”” center_content=nolink=”” target=_selfmin_height=”” hide_on_mobile=small-visibility,medium-visibility,large-visibilityclass=”” id=”” background_color=”” background_image=”” background_image_id=”” background_position=left topbackground_repeat=no-repeathover_type=noneborder_size=”0″ border_color=”” border_style=solidborder_position=allpadding_top=”” padding_right=”” padding_bottom=”” padding_left=”” margin_top=”” margin_bottom=”” animation_type=”” animation_direction=leftanimation_speed=”0.3″ animation_offset=”” last=no”][fusion_modal name=warnings_cautionstitle=”advarsler & Forsiktighetsregler” size=largebackground=”” border_color=”” show_footer=yesclass=”” id=””]Fare: Fare indikerer at du vil bli alvorlig skadet eller drept hvis ikke følger den angitte prosedyren.
Advarsel: Advarsel indikerer en umiddelbar fare, noe som kan føre til alvorlig personskade hvis du ikke følger den angitte prosedyren.
Forsiktighet: Forsiktig indikerer kjøretøy eller materielle skader kan oppstå hvis du ikke følger den angitte prosedyren.

Merk: Merk indikerer ytterligere detalj som vil understøtte diagnostisering eller reparasjon av en komponent / system.

Følg de angitte prosedyrene i angitt for å unngå personskader:

1. Ved høy spenning membranene er omkring kjøretøyet og sperren er montert på den anvendte PEF, den eneste personen som skal få lov til å starte bilen er den personen som signerte lockout tag.
2. Før du arbeider på et kjøretøy eller forlate førerhuset mens motoren er i gang, du bør plassere girspaken i “N” sett på parkeringsbremsen, og blokkere hjulene.
3. Av sikkerhetsmessige grunner, alltid i inngrep med bremser før velge girstillingene fra “N.”
4. Før du starter et kjøretøy alltid sitte i førersetet, velg “N” på girspaken, og sett på parkeringsbrems.
5. I biler med ePTO, motoren og / eller
Motor / Generator kan starte i ePTO modus. Utfør aldri vedlikehold eller arbeid på kjøretøy, mens i denne modusen.
6. 12-Volt Battery positiv (+) og negative (-) må koples fra før enhver sveising på en hvilken som helst hybrid utstyrt kjøretøy.

Forsiktighet: Følg de angitte prosedyrene i angitt for å unngå feil på utstyr eller skade.
Forsiktighet: Ikke slipp parkeringsbremsen eller forsøke å velge et gir til lufttrykket er på riktig nivå.
Forsiktighet: For å unngå skade på transmisjonen under slep sted girspaken i “N” og løfte drivhjulene av bakken eller frakoble drivlinjen.

Høyspent advarsler & Forsiktighetsregler

  • Bruk CO2 eller kjemisk brannslukkere.
  • Den høyspente ledninger er dekket i oransje isolasjon eller korrugert slange og merket med advarsler på kontaktene.
  • Alle Eaton® Hybrid Diesel / elektriske biler vil bli merket med ‘Hybrid’ på utsiden av kjøretøyet, sammen med skift etiketten på dashbordet.
  • Referer til OEM for en bestemt plassering av chassismontert hybrid komponenter.
  • IKKE kutt i de oransje høyspenningskabler.
  • IKKE kutt i eller åpne PEC.
  • IKKE kutt i eller åpne DC / DC Converter.
  • IKKE kutt i eller åpne Inverter.

En buffersone må settes opp og høy spenning isoleres gummihansker (klasse 0 med skinn beskyttere) Det kreves før arbeider på høy spenning. Hvis du ikke følger disse instruksjonene kan føre til alvorlig personskade eller død.
Gummiisolerte hansker som må brukes ved arbeid med høy spenning system er klasse 0 med skinn beskyttere. Gummihansker bør testes før hver bruk etter gummi isolasjonshansker testprosedyren finnes i “Diagnostic Tools / tjeneste Publikasjoner” på side 6. Hvis du ikke følger disse instruksjonene kan føre til alvorlig personskade eller død.
Før inspeksjon eller arbeider på noen høyspentkabler eller komponenter “High-Voltage service Shutdown og Power-Up Prosedyre” på side 4 bør følges. Hvis du ikke følger disse instruksjonene kan føre til alvorlig personskade eller død.
Låsingen og Tagout enheter skal bare fjernes av teknikeren som plasseres på låse og Tagout anordninger på kjøretøyet. Hvis du ikke følger disse instruksjonene kan føre til alvorlig personskade eller død.
Høyspente gummiisolerte hansker (klasse 0 med skinn beskyttere) må brukes når du arbeider på noen
høyspenningskabler. “High-Voltage service Shutdown og Power-Up Prosedyre” på side 4 må følges før fjerning av eventuelle høyspenningskabler. Hvis du ikke følger disse instruksjonene kan føre til alvorlig personskade eller død.
Høyspentkabler og ledninger er oransje og inneholder en advarsel etikett på kontaktene. Høyspente komponenter er markert med en etikett. Høyspente gummiisolerte hansker (klasse 0 med skinn beskyttere) må brukes når du arbeider på noen av disse komponentene. Hvis du ikke følger disse instruksjonene kan føre til alvorlig personskade eller død.

Høyspent service avslåingsprosedyrer

Høyspent service Shutdown og Power-Up Prosedyre1. Følg “High-Voltage Work Area” prosedyre.
2. Finn den røde PEC servicebryter på forsiden av PEC og presse slå av.
3. Fjern Tjenesten Switch Cover og installere Lockout Bracket (J48506).
4. Fest tag til Lockout Bracket.
5. Sørg for at PEC servicebryter kan ikke flytte fra seg stillingen.
6. La systemet for å sette i minst 5 minutter for å løsne høyspennings.
7. Koble ServiceRanger og vise data Monitor PID 116 kalt “High-Voltage Batteri Potential”. Bruk SPN 520323 for J1939-tilkobling “Battery Voltage RB” (Relay Box).
8. Spenningen skal være 30 volt eller mindre. Hvis spenningen er over 30 volt, fungerer ikke på kjøretøyet og ta kontakt Eaton® på 1-800-826-HELP (4357).
9. Vri tenningsnøkkelen av og fortsette å reparere eller trinn i feilsøkingen.
Merk: Spenningen faller til null når nøkkelen er off.

Høyspent service Strøm-Up Prosedyre

1. Installer alle høyspente kontakter inn i deres låste posisjoner.
2. Hvis du er den personen som arbeider på kjøretøyet, fjerne låsingen brakett og tag.
3. Sett på Lockout Bracket over servicebryter.
4. Trekk Tjenesten Bytt ut og la bilen satt for 2 minutter.
5. Start vehicle when appropriate.[/fusion_modal][fusion_modal name=component_locationtitle=”Eaton Hybrid Component og Connector Location ” size=largebackground=”#ffffffborder_color=”” show_footer=yesclass=”” id=””]

Eaton Hybrid komponent og plasseringen av kontaktene MY08 Systems

[/fusion_modal][fusion_modal name=component_location2title=”Eaton Hybrid Component og Connector Location MY09 Systems” size=largebackground=”#ffffffborder_color=”” show_footer=yesclass=”” id=””]

Eaton Hybrid komponent og plasseringen av kontaktene årsmodell 09 Systems

[/fusion_modal][/fusion_builder_column][/fusion_builder_row][/fusion_builder_container][fusion_builder_container hundred_percent=nohundred_percent_height=nohundred_percent_height_scroll=nohundred_percent_height_center_content=yesequal_height_columns=nomenu_anchor=”” hide_on_mobile=small-visibility,medium-visibility,large-visibilitystatus=publishedpublish_date=”” class=”” id=”” background_color=”” background_image=”” background_position=center centerbackground_repeat=no-repeatfade=nobackground_parallax=noneenable_mobile=noparallax_speed=”0.3″ video_mp4=”” video_webm=”” video_ogv=”” video_url=”” video_aspect_ratio=”16:9″ video_loop=yesvideo_mute=yesvideo_preview_image=”” border_size=”” border_color=”” border_style=solidmargin_top=”” margin_bottom=”” padding_top=”” padding_right=”” padding_bottom=”” padding_left=””][fusion_builder_row][fusion_builder_column type=”1_1layout=”1_1spacing=”” center_content=nolink=”” target=_selfmin_height=”” hide_on_mobile=small-visibility,medium-visibility,large-visibilityclass=”” id=”” background_color=”” background_image=”” background_image_id=”” background_position=left topbackground_repeat=no-repeathover_type=noneborder_size=”0″ border_color=”” border_style=solidborder_position=allpadding_top=”” padding_right=”” padding_bottom=”” padding_left=”” margin_top=”” margin_bottom=”” animation_type=”” animation_direction=leftanimation_speed=”0.3″ animation_offset=”” last=no”][fusion_content_boxes layout=clean-horizontalcolumns=”1″ title_size=”18pxheading_size=”3″ title_color=”#ffffffbody_color=”#ffffffbackgroundcolor=”#4f4f4ficon=”” iconflip=”” iconrotate=”” iconspin=noiconcolor=”” icon_circle=”” icon_circle_radius=”” circlecolor=”” circlebordersize=”” circlebordercolor=”” outercirclebordersize=”” outercirclebordercolor=”” icon_size=”” icon_hover_type=”” hover_accent_color=”” image=”” image_id=”” image_max_width=”” link_type=”” button_span=”” link_area=”” link_target=”” icon_align=leftanimation_type=”” animation_delay=”” animation_offset=”” animation_direction=leftanimation_speed=”0.3″ margin_top=”” margin_bottom=”” hide_on_mobile=small-visibility,medium-visibility,large-visibilityclass=”” id=””][fusion_content_box title=SKRITT 1. Kontroller Inverter bakken kontinuitetbackgroundcolor=”” icon=”” iconflip=”” iconrotate=”” iconspin=noiconcolor=”” circlecolor=”” circlebordersize=”” circlebordercolor=”” outercirclebordersize=”” outercirclebordercolor=”” image=”” image_id=”” image_max_width=”” link=”” linktext=”Les mer” link_target=”” animation_type=”” animation_direction=leftanimation_speed=”0.3″ animation_offset=””]

  1. Utfør Elektrisk Forprøvekontroll, deretter fortsette å # 2.
  2. Key off.
  3. Koble omformeren 40-Way Connector.
    Fare: Se Stoppe av høyspenningstjeneste og oppstartprosedyrer. Følg fremgangsmåten for å unngå sjokk, brenne eller død feil håndtert høyspent.
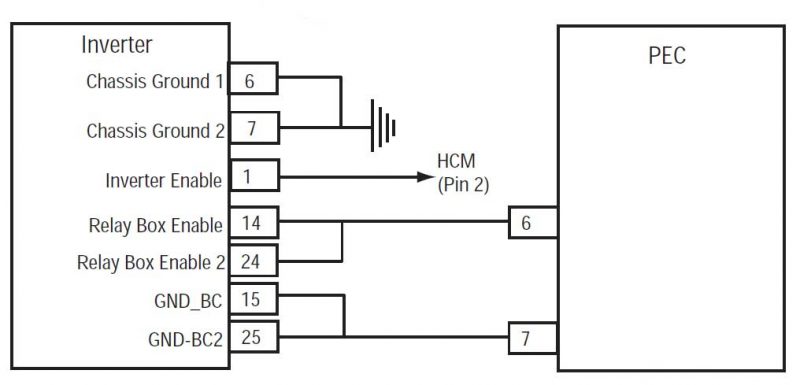
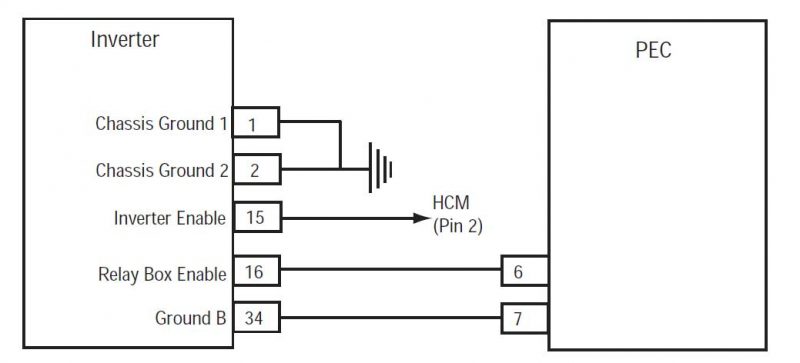
  4. (MY08) Måle motstanden fra Pin 1 til batteriets negative og deretter fra Pin 2 til batteriets negative:
    • Hvis motstanden er 0-0,3 ohm fra Pin 1 til batteriets negative og fra Pin 2 til batteriets negative, gå til trinn 2.
    • Hvis motstanden er utenfor rekkevidde, reparere Inverter Ground Harness. Gjenta dette trinnet.
      (MY09) Måle motstanden fra Pin 6 til batteriets negative og deretter fra Pin 7 til batteriets negative:
    • Hvis motstanden er 0-0,3 ohm fra Pin 6 til batteriets negative og fra Pin 7 til batteriets negative, gå til trinn 2.
    • Hvis motstanden er utenfor rekkevidde, reparere Inverter Ground Harness. Gjenta dette trinnet.

[/fusion_content_box][/fusion_content_boxes][fusion_content_boxes layout=clean-horizontalcolumns=”2″ title_size=”18pxheading_size=”3″ title_color=”#ffffffbody_color=”#ffffffbackgroundcolor=”#4f4f4ficon=”” iconflip=”” iconrotate=”” iconspin=noiconcolor=”” icon_circle=”” icon_circle_radius=”” circlecolor=”” circlebordersize=”” circlebordercolor=”” outercirclebordersize=”” outercirclebordercolor=”” icon_size=”” icon_hover_type=”” hover_accent_color=”” image=”” image_id=”” image_max_width=”” link_type=”” button_span=”” link_area=”” link_target=”” icon_align=leftanimation_type=”” animation_delay=”” animation_offset=”” animation_direction=leftanimation_speed=”0.3″ margin_top=”” margin_bottom=”” hide_on_mobile=small-visibility,medium-visibility,large-visibilityclass=”” id=””][fusion_content_box title=SKRITT 2. erify spenning ved Inverter Connector. backgroundcolor=”” icon=”” iconflip=”” iconrotate=”” iconspin=noiconcolor=”” circlecolor=”” circlebordersize=”” circlebordercolor=”” outercirclebordersize=”” outercirclebordercolor=”” image=”” image_id=”” image_max_width=”” link=”” linktext=”Les mer” link_target=”” animation_type=”” animation_direction=leftanimation_speed=”0.3″ animation_offset=””]

  1. (MY08) Koble et multimeter til Inverter 56-Way Connector Pin 15 og Pin 1.
    (MY09)Koble en volt / ohm meter til Inverter 40-Way Connector Pin 1 og Pin 6.
  2. tast på.
  3. Observer Volt / Ohm Meter spenning lesing:
    • Hvis spenningen er 11-13 volt, gå til trinn 3.
    • Hvis spenningen er utenfor rekkevidde, reparere selen fra HCM. Gjenta dette trinnet.

[/fusion_content_box][fusion_content_box title=SKRITT 3. Kontroller kontinuiteten Inverter til PEC jordledning. .backgroundcolor=”” icon=”” iconflip=”” iconrotate=”” iconspin=noiconcolor=”” circlecolor=”” circlebordersize=”” circlebordercolor=”” outercirclebordersize=”” outercirclebordercolor=”” image=”” image_id=”” image_max_width=”” link=”” linktext=”Les mer” link_target=”” animation_type=”” animation_direction=leftanimation_speed=”0.3″ animation_offset=””]

  1. Key off.
  2. Koble Inverter 56-Way Connector Pin 15 & pin 1 (MY08) Inverter 40-Way Connector (MY09).
  3. Disconnect the Power Electric Carrier (PEC) 19- måte Connector.
  4. Måle motstanden fra PEC Pin 7 til batteriets negative.
    • Hvis motstanden fra Pin 7 til batteriets negative er 0-0,3 ohm, gå til trinn D.
    • Hvis motstanden er utenfor rekkevidde, reparere Inverter til PEC jordledningen. Gjenta dette trinnet.

[/fusion_content_box][/fusion_content_boxes][fusion_content_boxes layout=clean-horizontalcolumns=”2″ title_size=”18pxheading_size=”3″ title_color=”#ffffffbody_color=”#ffffffbackgroundcolor=”#4f4f4ficon=”” iconflip=”” iconrotate=”” iconspin=noiconcolor=”” icon_circle=”” icon_circle_radius=”” circlecolor=”” circlebordersize=”” circlebordercolor=”” outercirclebordersize=”” outercirclebordercolor=”” icon_size=”” icon_hover_type=”” hover_accent_color=”” image=”” image_id=”” image_max_width=”” link_type=”” button_span=”” link_area=”” link_target=”” icon_align=leftanimation_type=”” animation_delay=”” animation_offset=”” animation_direction=leftanimation_speed=”0.3″ margin_top=”” margin_bottom=”” hide_on_mobile=small-visibility,medium-visibility,large-visibilityclass=”” id=””][fusion_content_box title=SKRITT 4. Kontroller spenningen på PEC 19-veis Connectorbackgroundcolor=”” icon=”” iconflip=”” iconrotate=”” iconspin=noiconcolor=”” circlecolor=”” circlebordersize=”” circlebordercolor=”” outercirclebordersize=”” outercirclebordercolor=”” image=”” image_id=”” image_max_width=”” link=”” linktext=”Les mer” link_target=”” animation_type=”” animation_direction=leftanimation_speed=”0.3″ animation_offset=””]

  1. Koble en volt / ohm til PEC 19-Way Connector Pin 6 og Pin 7.
  2. tast på.
  3. Observer volt / ohm spenning lesing.
    • Hvis spenningen er 11-13 volt og bilen har ePTO funksjonen på Push Button, gå til trinn 5.
    • Hvis spenningen er 11-13 volt og bilen ikke har ePTO funksjonen, testen er fullført. Koble PEC 19-Way Connector. Go to “Feilkode Isolation Prosedyre Hovedsiden”.
    • Hvis spenningen er utenfor rekkevidde, reparere strømforsyningen sele fra Inverter. Gjenta dette trinnet.

[/fusion_content_box][fusion_content_box title=SKRITT 5. Kontroller kontinuiteten av DC / DC Ground Wire.backgroundcolor=”” icon=”” iconflip=”” iconrotate=”” iconspin=”” iconcolor=”” circlecolor=”” circlebordersize=”” circlebordercolor=”” outercirclebordersize=”” outercirclebordercolor=”” image=”” image_id=”” image_max_width=”” link=”” linktext=”” link_target=”” animation_type=”” animation_direction=leftanimation_speed=”0.3″ animation_offset=””]

  1. Key off.
  2. Koble PEC 19-Way Connector.
  3. Koble DC / DC Converter 4-veis Connector.
  4. Mål motstand fra DC / DC Converter 4-veis Connector Pin 4 til batteriets negative:
    • Hvis motstanden mellom Pin 4 og batteriets negative er 0-0,3 ohm, testen er fullført. Koble 4-veis Connector. se “Feilkode Isolation Prosedyre Hovedsiden”.
    • Hvis motstanden er utenfor rekkevidde, reparere Ground Harness fra DC / DC Converter til batteriets negative, deretter gjenta dette trinnet.

[/fusion_content_box][/fusion_content_boxes][/fusion_builder_column][/fusion_builder_row][/fusion_builder_container][fusion_global id=”13788″]