[fusion_builder_container hundred_percent=nohundred_percent_height=nohundred_percent_height_scroll=nohundred_percent_height_center_content=yesequal_height_columns=nomenu_anchor=”” hide_on_mobile=small-visibility,medium-visibility,large-visibilitystatus=publishedpublish_date=”” class=”” id=”” background_color=”” background_image=”” background_position=center centerbackground_repeat=no-repeatfade=nobackground_parallax=noneenable_mobile=noparallax_speed=”0.3″ video_mp4=”” video_webm=”” video_ogv=”” video_url=”” video_aspect_ratio=”16:9″ video_loop=yesvideo_mute=yesvideo_preview_image=”” border_size=”” border_color=”” border_style=solidmargin_top=”35″ margin_bottom=”” padding_top=”” padding_right=”” padding_bottom=”” padding_left=””][fusion_builder_row][fusion_builder_column type=”1_1layout=”1_1spacing=”” center_content=nolink=”” target=_selfmin_height=”” hide_on_mobile=small-visibility,medium-visibility,large-visibilityclass=”” id=”” background_color=”” background_image=”” background_image_id=”” background_position=left topbackground_repeat=no-repeathover_type=noneborder_size=”0″ border_color=”” border_style=solidborder_position=allpadding_top=”” padding_right=”” padding_bottom=”” padding_left=”” margin_top=”” margin_bottom=”” animation_type=”” animation_direction=leftanimation_speed=”0.3″ animation_offset=”” last=no”][fusion_text columns=”” column_min_width=”” column_spacing=”” rule_style=defaultrule_size=”” rule_color=”” hide_on_mobile=small-visibility,medium-visibility,large-visibilityclass=”” id=””]

Eaton Fuller lai truyền lỗi Mã 97 – PTO Engagement

[/fusion_text][/fusion_builder_column][/fusion_builder_row][/fusion_builder_container][fusion_builder_container hundred_percent=nohundred_percent_height=nohundred_percent_height_scroll=nohundred_percent_height_center_content=yesequal_height_columns=nomenu_anchor=”” hide_on_mobile=small-visibility,medium-visibility,large-visibilitystatus=publishedpublish_date=”” class=”” id=”” background_color=”” background_image=”” background_position=center centerbackground_repeat=no-repeatfade=nobackground_parallax=noneenable_mobile=noparallax_speed=”0.3″ video_mp4=”” video_webm=”” video_ogv=”” video_url=”” video_aspect_ratio=”16:9″ video_loop=yesvideo_mute=yesvideo_preview_image=”” border_size=”” border_color=”” border_style=solidmargin_top=”” margin_bottom=”” padding_top=”” padding_right=”” padding_bottom=”” padding_left=””][fusion_builder_row][fusion_builder_column type=”1_1layout=”1_1spacing=”” center_content=nolink=”” target=_selfmin_height=”” hide_on_mobile=small-visibility,medium-visibility,large-visibilityclass=”” id=”” background_color=”” background_image=”” background_image_id=”” background_position=left topbackground_repeat=no-repeathover_type=noneborder_size=”0″ border_color=”” border_style=solidborder_position=allpadding_top=”” padding_right=”” padding_bottom=”” padding_left=”” margin_top=”” margin_bottom=”” animation_type=”” animation_direction=leftanimation_speed=”0.3″ animation_offset=”” last=no”][fusion_text columns=”” column_min_width=”” column_spacing=”” rule_style=defaultrule_size=”” rule_color=”” hide_on_mobile=small-visibility,medium-visibility,large-visibilityclass=”” id=””]

Lỗi mã cho Hệ thống lái Eaton lai mô hình (MY08) EH-8E306A-U, EH-8E306A-UPG, EH-8E306A-UP, EH-8E306A-CD, EH-8E306A-T, EH-6E606B-CD, (MY09) EH-8E406A-U / P, EH-8E406A-UP, EH-8E406A-UPG, EH-8E406A-CD, EH-8E406A-CDG, EH-8E406A-CDR, EH-8E406A-T, EH-6E706B-CD, EH-6E706B-P và EH-6E706B-UPG. Đọc dưới đây để học cách làm thế nào để kiểm tra, xóa và sửa lỗi mã lỗi cho Freightliner của bạn, Mack, Peterbilt, Kenworth, Volvo, quốc tế, và xe tải hạng nặng và thiết bị.

PTO là một cài đặt tùy chọn trên truyền. PTO là một giao điện ngoài trời đơn vị. PTO được điều khiển bằng cách vào Control module hybrid (HCM) or the Body Controller. chú thích: lỗi này chỉ được đặt nếu HCM được nối trực tiếp đến thePTO. Điều này có thể được xác định bằng cách kiểm tra cấu hình HCM. Các “PTO phản hồi” sẽ đọc analog.

PTO HCM-Controlled:

Các HCM kiểm soát PTO sinh lực solenoid điện và áp suất không khí tham gia PTO. Tín hiệu phản hồi PTO là một tín hiệu 12-volt. Ít hơn 1 volt chỉ PTO là tham gia, và lớn hơn 3 volt chỉ PTO được thảnh thơi.

Body điều khiển PTO Operated:

The Body Controller điều hành PTO sinh lực solenoid điện và áp suất không khí tham gia PTO. Khi người sử dụng chọn tùy chọn ePTO Control module hybrid (HCM) sẽ gửi một yêu cầu đến bộ điều khiển cơ thể để kích hoạt PTO. Khi PTO là tham gia, Controller Body gửi lại một thông báo xác nhận.
chú thích: When determining which module is controlling the PTO, kết nối ServiceRanger và xem “Cấu hình” màn hình. Dưới mục “Control Module lai” là một danh sách cho PTO Phản hồi, đó là một trong hai Analog kiểm soát (HCM), hoặc J1939 kiểm soát (Body điều khiển). Các “PTO đính hôn” tham số cung cấp đầu vào từ HCM hoặc Controller Body về tình trạng hiện tại của PTO. Tham số này có sẵn trong ServiceRanger dưới Data Monitor danh sách “Hybrid ePTO”.

Mã lỗi 97 – PTO Engagement Detection

Các điều kiện tiên quyết sau đây phải được đáp ứng trước khi hệ thống phát hiện lỗi:

  • Hybrid mô-đun kiểm soát (HCM) điện áp đánh lửa lớn hơn 7 volt và ít hơn 16 volt.

chú thích: Khi xử lý sự cố một mã số không hoạt động tham khảo Chế độ chẩn đoán sản phẩm (PDM)

Điều kiện để Đặt lỗi Mã kích hoạt

  • IMF 3 được thiết lập khi Hồ Chí Minh phát hiện một đoạn ngắn đến VBATT trong mạch điều khiển PTO.
  • IMF 4 được thiết lập khi Hồ Chí Minh phát hiện một đoạn ngắn xuống mặt đất trong mạch điều khiển PTO.
  • IMF 5 được thiết lập khi Hồ Chí Minh phát hiện phiên mở cửa trong mạch điều khiển PTO.
  • IMF 7 được thiết lập khi Hồ Chí Minh phát hiện việc truyền tải là ở trung tính và, nếu sau 8 giây từ chế độ PTO yêu cầu PTO tham gia vào tín hiệu đọc “thảnh thơi”.
  • IMF 14 được thiết lập khi lựa chọn ePTO trên Push Button phím Shift kiểm soát được chọn và HCM phát hiện việc truyền tải không nằm trong trung tính dựa trên tốc độ trục đầu ra.

Fallback Khi lỗi Mã 97 được thiết lập các điều kiện sau xảy ra:

  • Lỗi được lưu trữ trong bộ nhớ HCM.
  • Nếu PTO là tham gia và các lỗi xảy ra, PTO vẫn cuốn hút cho đến khi yêu cầu thay đổi ePTO, hoặc áp suất không khí giảm xuống dưới một
    hạn quy định.
  • Nếu PTO không tham gia vào nhấp nháy ánh sáng ePTO trên Push Button phím Shift Bảng điều khiển.

[/fusion_text][fusion_text columns=”” column_min_width=”” column_spacing=”” rule_style=defaultrule_size=”” rule_color=”” hide_on_mobile=small-visibility,medium-visibility,large-visibilityclass=”” id=””]

Điều kiện để Đặt lỗi Mã Inactive

Chỉ lỗi không hoạt động có thể được xóa khỏi Transmission Unit Electronic Control (TECU) hoặc lịch sử Hồ Chí Minh sử dụng ServiceRanger. Các TECU tự động xóa các lỗi từ lịch sử sau 200 giờ và HCM sẽ tự động xóa những lỗi lầm trong lịch sử sau khi lỗi đã không hoạt động 200 giờ.

mã lỗi này có thể được gây ra bởi bất kỳ những điều sau đây:

  • IMF 7:
    • PTO Air Solenoid
    • Áp suất không khí thấp
    • dây mạch điều khiển PTO
    • PTO
    • mạch phản hồi PTO
    • PTO bóng Chuyển

[/fusion_text][/fusion_builder_column][/fusion_builder_row][/fusion_builder_container][fusion_builder_container hundred_percent=nohundred_percent_height=nohundred_percent_height_scroll=nohundred_percent_height_center_content=yesequal_height_columns=nomenu_anchor=”” hide_on_mobile=small-visibility,medium-visibility,large-visibilitystatus=publishedpublish_date=”” class=”” id=”” background_color=”” background_image=”” background_position=center centerbackground_repeat=no-repeatfade=nobackground_parallax=noneenable_mobile=noparallax_speed=”0.3″ video_mp4=”” video_webm=”” video_ogv=”” video_url=”” video_aspect_ratio=”16:9″ video_loop=yesvideo_mute=yesvideo_preview_image=”” border_size=”” border_color=”” border_style=solidmargin_top=”” margin_bottom=”” padding_top=”” padding_right=”” padding_bottom=”” padding_left=””][fusion_builder_row][fusion_builder_column type=”1_1layout=”1_1spacing=”” center_content=nolink=”” target=_selfmin_height=”” hide_on_mobile=small-visibility,medium-visibility,large-visibilityclass=”” id=”” background_color=”” background_image=”” background_image_id=”” background_position=left topbackground_repeat=no-repeathover_type=noneborder_size=”0″ border_color=”” border_style=solidborder_position=allpadding_top=”” padding_right=”” padding_bottom=”” padding_left=”” margin_top=”” margin_bottom=”” animation_type=”” animation_direction=leftanimation_speed=”0.3″ animation_offset=”” last=no”][fusion_text columns=”” column_min_width=”” column_spacing=”” rule_style=defaultrule_size=”” rule_color=”” hide_on_mobile=small-visibility,medium-visibility,large-visibilityclass=”” id=””]

Mã lỗi 97 – PTO Engagement thử nghiệm

[/fusion_text][/fusion_builder_column][/fusion_builder_row][/fusion_builder_container][fusion_builder_container hundred_percent=nohundred_percent_height=nohundred_percent_height_scroll=nohundred_percent_height_center_content=yesequal_height_columns=nomenu_anchor=”” hide_on_mobile=small-visibility,medium-visibility,large-visibilitystatus=publishedpublish_date=”” class=”” id=”” background_color=”” background_image=”” background_position=center centerbackground_repeat=no-repeatfade=nobackground_parallax=noneenable_mobile=noparallax_speed=”0.3″ video_mp4=”” video_webm=”” video_ogv=”” video_url=”” video_aspect_ratio=”16:9″ video_loop=yesvideo_mute=yesvideo_preview_image=”” border_size=”” border_color=”” border_style=solidmargin_top=”” margin_bottom=”” padding_top=”” padding_right=”” padding_bottom=”” padding_left=””][fusion_builder_row][fusion_builder_column type=”1_1layout=”1_1spacing=”” center_content=nolink=”” target=_selfmin_height=”” hide_on_mobile=small-visibility,medium-visibility,large-visibilityclass=”” id=”” background_color=”” background_image=”” background_image_id=”” background_position=left topbackground_repeat=no-repeathover_type=noneborder_size=”0″ border_color=”” border_style=solidborder_position=allpadding_top=”” padding_right=”” padding_bottom=”” padding_left=”” margin_top=”” margin_bottom=”” animation_type=”” animation_direction=leftanimation_speed=”0.3″ animation_offset=”” last=no”][fusion_text columns=”” column_min_width=”” column_spacing=”” rule_style=defaultrule_size=”” rule_color=”” hide_on_mobile=small-visibility,medium-visibility,large-visibilityclass=”” id=””]

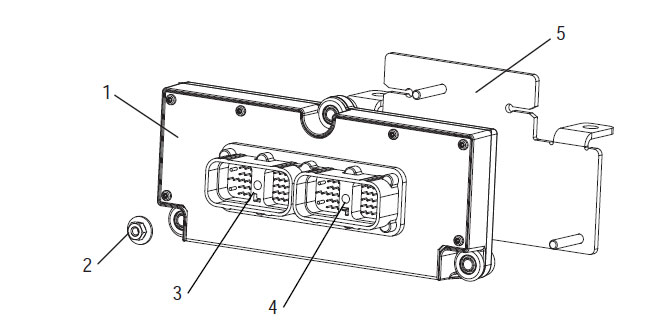
Xác định thành phần:

[/fusion_text][/fusion_builder_column][fusion_builder_column type=”1_1layout=”1_2spacing=”” center_content=nolink=”” target=_selfmin_height=”” hide_on_mobile=small-visibility,medium-visibility,large-visibilityclass=”” id=”” background_color=”” background_image=”” background_image_id=”” background_position=left topbackground_repeat=no-repeathover_type=noneborder_size=”0″ border_color=”” border_style=solidborder_position=allpadding_top=”” padding_right=”” padding_bottom=”” padding_left=”” margin_top=”” margin_bottom=”” animation_type=”” animation_direction=leftanimation_speed=”0.3″ animation_offset=”” last=no”][fusion_imageframe image_id=”14400|fullmax_width=”” style_type=”” blur=”” stylecolor=”” hover_type=nonebordersize=”” bordercolor=”” borderradius=”” align=centerlightbox=nogallery_id=”” lightbox_image=”” lightbox_image_id=”” alt=”Hybrid mô-đun kiểm soát” link=”” linktarget=_selfhide_on_mobile=small-visibility,medium-visibility,large-visibilityclass=”” id=”” animation_type=”” animation_direction=leftanimation_speed=”0.3″ animation_offset=””]https://www.globaltransmissionsupply.com/wp-content/uploads/Hybrid-Control-Module.jpg[/fusion_imageframe][fusion_text columns=”2″ column_min_width=”” column_spacing=”” rule_style=defaultrule_size=”” rule_color=”” hide_on_mobile=small-visibility,medium-visibility,large-visibilityclass=”” id=””]

1. Hybrid mô-đun kiểm soát (HCM)
2. Hạt (3)
3. 38-Cách hệ thống kết nối Plug-in
4. 38-Way xe nối Plug-in
5. gắn tấm

[/fusion_text][/fusion_builder_column][fusion_builder_column type=”1_1layout=”1_1spacing=”” center_content=nolink=”” target=_selfmin_height=”” hide_on_mobile=small-visibility,medium-visibility,large-visibilityclass=”” id=”” background_image_id=”” background_color=”#000000″ background_image=”” background_position=left topundefined=”” background_repeat=no-repeathover_type=noneborder_size=”0″ border_color=”” border_style=solidborder_position=allpadding_top=”” padding_right=”” padding_bottom=”” padding_left=”” margin_top=”” margin_bottom=”” animation_type=”” animation_direction=leftanimation_speed=”0.3″ animation_offset=”” last=no”][fusion_text columns=”” column_min_width=”” column_spacing=”” rule_style=defaultrule_size=”” rule_color=”” hide_on_mobile=small-visibility,medium-visibility,large-visibilityclass=”” id=””]

CHÚ THÍCH: Tham khảo đến Eaton Component Hybrid và kết nối Location cho địa điểm kết nối trong hệ thống MY08

[/fusion_text][/fusion_builder_column][fusion_builder_column type=”1_1layout=”1_1spacing=”” center_content=nolink=”” target=_selfmin_height=”” hide_on_mobile=small-visibility,medium-visibility,large-visibilityclass=”” id=”” background_image_id=”” background_color=”#000000″ background_image=”” background_position=left topundefined=”” background_repeat=no-repeathover_type=noneborder_size=”0″ border_color=”” border_style=solidborder_position=allpadding_top=”” padding_right=”” padding_bottom=”” padding_left=”” margin_top=”20″ margin_bottom=”20″ animation_type=”” animation_direction=leftanimation_speed=”0.3″ animation_offset=”” last=no”][fusion_text columns=”” column_min_width=”” column_spacing=”” rule_style=defaultrule_size=”” rule_color=”” hide_on_mobile=small-visibility,medium-visibility,large-visibilityclass=”” id=””]

CHÚ THÍCH: Tham khảo đến Eaton Component Hybrid và kết nối Location cho địa điểm kết nối trong hệ thống MY09.

[/fusion_text][/fusion_builder_column][/fusion_builder_row][/fusion_builder_container][fusion_builder_container hundred_percent=nohundred_percent_height=nohundred_percent_height_scroll=nohundred_percent_height_center_content=yesequal_height_columns=nomenu_anchor=”” hide_on_mobile=small-visibility,medium-visibility,large-visibilitystatus=publishedpublish_date=”” class=”” id=”” background_color=”” background_image=”” background_position=center centerbackground_repeat=no-repeatfade=nobackground_parallax=noneenable_mobile=noparallax_speed=”0.3″ video_mp4=”” video_webm=”” video_ogv=”” video_url=”” video_aspect_ratio=”16:9″ video_loop=yesvideo_mute=yesvideo_preview_image=”” border_size=”” border_color=”” border_style=solidmargin_top=”” margin_bottom=”” padding_top=”” padding_right=”” padding_bottom=”” padding_left=””][fusion_builder_row][fusion_builder_column type=”1_1layout=”1_1spacing=”” center_content=nolink=”” target=_selfmin_height=”” hide_on_mobile=small-visibility,medium-visibility,large-visibilityclass=”” id=”” background_color=”” background_image=”” background_image_id=”” background_position=left topbackground_repeat=no-repeathover_type=noneborder_size=”0″ border_color=”” border_style=solidborder_position=allpadding_top=”” padding_right=”” padding_bottom=”” padding_left=”” margin_top=”” margin_bottom=”” animation_type=”” animation_direction=leftanimation_speed=”0.3″ animation_offset=”” last=no”][fusion_modal name=warnings_cautionstitle=”cảnh báo & Lưu ý” size=largebackground=”” border_color=”” show_footer=yesclass=”” id=””]nguy hiểm: Danger cho thấy bạn sẽ bị tổn thương nghiêm trọng hoặc bị giết nếu không tuân theo các thủ tục chỉ định.
Cảnh báo: Cảnh báo chỉ ra một mối nguy hiểm ngay lập tức, mà có thể dẫn đến thương tích cá nhân nghiêm trọng nếu bạn không tuân theo các thủ tục chỉ định.
Chú ý: Chú ý chỉ xe hoặc tài sản thiệt hại có thể xảy ra nếu bạn không tuân theo các thủ tục chỉ định.

chú thích: Lưu ý chỉ ra chi tiết bổ sung mà sẽ hỗ trợ trong việc chẩn đoán hoặc sửa chữa một bộ phận / hệ thống.

Thực hiện theo các thủ tục quy định trong thứ tự được chỉ để tránh thương tích cá nhân:

1. Nếu nón cao áp là xung quanh chiếc xe và khóa được cài đặt trên PEC, người duy nhất được phép khởi động xe là người ký thẻ khóa.
2. Trước khi làm việc trên một chiếc xe hoặc rời khỏi buồng lái trong khi động cơ đang chạy, bạn nên đặt các đòn bẩy thay đổi trong “N” đặt phanh đậu xe, và chặn các bánh xe.
3. Vì lý do an toàn, luôn tham gia vào các dịch vụ hệ thống phanh trước khi lựa chọn vị trí thiết bị từ “N.”
4. Trước khi bắt đầu một chiếc xe luôn được ngồi ở ghế của người lái xe, chọn “N” trên điều khiển thay đổi, và thiết lập hệ thống phanh xe.
5. Trong xe có ePTO, động cơ và / hoặc
Motor / Generator có thể bắt đầu trong chế độ ePTO. Không bao giờ thực hiện bất kỳ bảo dưỡng hoặc làm việc trên xe, trong khi ở chế độ này.
6. 12-Volt Pin tích cực (+) và tiêu cực (-) phải bị ngắt kết nối trước khi bất kỳ hàn trên bất kỳ trang bị lai xe.

Chú ý: Thực hiện theo các thủ tục quy định trong thứ tự được chỉ để tránh bị trục trặc hoặc hư hỏng.
Chú ý: Đừng thả phanh đậu xe hoặc cố chọn một thiết bị cho đến khi áp suất không khí ở mức độ chính xác.
Chú ý: Để tránh thiệt hại cho việc truyền tải trong kéo ra đòn bẩy thay đổi trong “N” và nâng bánh dẫn động lên khỏi mặt đất hoặc ngắt kết nối driveline.

Cảnh báo cao áp & Lưu ý

  • Sử dụng CO2 hoặc khô Hóa bình chữa cháy.
  • Hệ thống dây điện cao áp được bao phủ trong cách cam hoặc ống phức tạp và được đánh dấu bằng nhãn cảnh báo tại đầu nối.
  • Tất cả Eaton® lai Diesel / Xe điện sẽ được đánh dấu ‘lai’ ở bên ngoài của xe, cùng với các nhãn thay đổi trên bảng điều khiển.
  • Tham khảo OEM cho vị trí cụ thể của khung gầm có gắn linh kiện hybrid.
  • ĐỪNG cắt vào cáp cao áp cam.
  • ĐỪNG cắt thành hoặc mở PEC.
  • ĐỪNG cắt thành hoặc mở Chuyển đổi DC / DC.
  • ĐỪNG cắt thành hoặc mở Inverter.

Một vùng đệm phải được thiết lập và cao áp cách điện găng tay cao su (lớp học 0 với bảo vệ da) được yêu cầu trước khi làm việc trên cao áp. Thất bại trong việc làm theo những hướng dẫn này có thể dẫn đến thương tích cá nhân nghiêm trọng hoặc tử vong.
Găng tay cao su cách nhiệt phải được đeo khi làm việc trên các hệ thống cao áp là lớp 0 với bảo vệ da. Găng tay cao su phải được kiểm tra trước khi sử dụng MỌI theo thủ tục cao su găng tay cách kiểm tra tìm thấy trong “Công cụ Chẩn đoán / Dịch vụ Ấn phẩm” trên trang 6. Thất bại trong việc làm theo những hướng dẫn này có thể dẫn đến thương tích cá nhân nghiêm trọng hoặc tử vong.
Trước khi kiểm tra hoặc làm việc trên bất kỳ loại cáp cao áp hoặc các thành phần “Dịch vụ cao áp Shutdown và Power-Up Thủ tục” trên trang 4 nên được tuân thủ. Thất bại trong việc làm theo những hướng dẫn này có thể dẫn đến thương tích cá nhân nghiêm trọng hoặc tử vong.
Các thiết bị Lockout và Tagout chỉ nên được gỡ bỏ bởi các kỹ thuật viên mà đặt các thiết bị Lockout và Tagout trên xe. Thất bại trong việc làm theo những hướng dẫn này có thể dẫn đến thương tích cá nhân nghiêm trọng hoặc tử vong.
găng tay cao su cách điện cao áp (lớp học 0 với bảo vệ da) phải được đeo khi làm việc trên bất kỳ
cáp cao áp. Các “Shutdown cao Voltage Dịch vụ và Power-Up Thủ tục” trên trang 4 phải được tuân thủ trước khi loại bỏ bất kỳ loại cáp cao áp. Thất bại trong việc làm theo những hướng dẫn này có thể dẫn đến thương tích cá nhân nghiêm trọng hoặc tử vong.
cáp cao áp và hệ thống dây điện là cam và chứa một nhãn cảnh báo tại đầu nối. linh kiện cao áp được đánh dấu bằng nhãn. găng tay cao su cách điện cao áp (lớp học 0 với bảo vệ da) phải được sử dụng khi làm việc trên bất kỳ của các thành phần. Thất bại trong việc làm theo những hướng dẫn này có thể dẫn đến thương tích cá nhân nghiêm trọng hoặc tử vong.

High-Voltage Thủ tục Dịch vụ Shutdown

High-Voltage Shutdown Dịch vụ và thủ tục Power-Up1. Làm theo “High-Voltage Work Area” thủ tục.
2. Xác định vị trí đỏ PEC Dịch vụ Chuyển dữ liệu trên phía trước của PEC và đẩy tắt.
3. Tháo Dịch vụ Chuyển Bìa và cài đặt các giá đỡ Lockout (J48506).
4. tag Vặn chặt vào Lockout Bracket.
5. Đảm bảo PEC Dịch vụ Chuyển không thể di chuyển từ vị trí tắt.
6. Cho phép hệ thống để thiết lập tối thiểu 5 phút để xả điện áp cao.
7. Kết nối ServiceRanger và xem các dữ liệu Màn hình PID 116 gọi là “High-Voltage tiềm năng Pin.” Sử dụng SPN 520323 để kết nối J1939 “Battery Voltage RB” (Hộp rơ-le).
8. Điện áp nên 30 volt hoặc ít hơn. Nếu điện áp là trên 30 volt, không làm việc trên chiếc xe và liên hệ với Eaton® tại 1-800-826-HELP (4357).
9. Bật khóa điện ra và tiến hành sửa chữa hoặc bước khắc phục sự cố.
chú thích: Điện áp xuống hết khi phím tắt.

Thủ tục cao Voltage Sở Điện Lực-Up

1. Cài đặt tất cả kết nối cao áp vào vị trí của họ bị khóa.
2. Nếu bạn là người làm việc trên xe, loại bỏ các Lockout Bracket và thẻ.
3. Cài đặt lại Lockout Bracket qua dịch vụ chuyển mạch.
4. Kéo Dịch vụ Chuyển ra và cho xe bộ cho 2 từ phút.
5. Start vehicle when appropriate.[/fusion_modal][fusion_modal name=component_locationtitle=”Eaton Component Hybrid và kết nối Location ” size=largebackground=”#ffffffborder_color=”” show_footer=yesclass=”” id=””]

Eaton Component Hybrid và địa điểm kết nối hệ thống MY08

[/fusion_modal][fusion_modal name=component_location2title=”Eaton Component Hybrid và kết nối Location Systems MY09” size=largebackground=”#ffffffborder_color=”” show_footer=yesclass=”” id=””]

Eaton Component Hybrid và địa điểm kết nối hệ thống MY09

[/fusion_modal][/fusion_builder_column][/fusion_builder_row][/fusion_builder_container][fusion_builder_container hundred_percent=nohundred_percent_height=nohundred_percent_height_scroll=nohundred_percent_height_center_content=yesequal_height_columns=nomenu_anchor=”” hide_on_mobile=small-visibility,medium-visibility,large-visibilitystatus=publishedpublish_date=”” class=”” id=”” background_color=”” background_image=”” background_position=center centerbackground_repeat=no-repeatfade=nobackground_parallax=noneenable_mobile=noparallax_speed=”0.3″ video_mp4=”” video_webm=”” video_ogv=”” video_url=”” video_aspect_ratio=”16:9″ video_loop=yesvideo_mute=yesvideo_preview_image=”” border_size=”” border_color=”” border_style=solidmargin_top=”” margin_bottom=”” padding_top=”” padding_right=”” padding_bottom=”” padding_left=””][fusion_builder_row][fusion_builder_column type=”1_1layout=”1_1spacing=”” center_content=nolink=”” target=_selfmin_height=”” hide_on_mobile=small-visibility,medium-visibility,large-visibilityclass=”” id=”” background_color=”” background_image=”” background_image_id=”” background_position=left topbackground_repeat=no-repeathover_type=noneborder_size=”0″ border_color=”” border_style=solidborder_position=allpadding_top=”” padding_right=”” padding_bottom=”” padding_left=”” margin_top=”” margin_bottom=”” animation_type=”” animation_direction=leftanimation_speed=”0.3″ animation_offset=”” last=no”][fusion_content_boxes layout=clean-horizontalcolumns=”2″ title_size=”18pxheading_size=”3″ title_color=”#ffffffbody_color=”#ffffffbackgroundcolor=”#4f4f4ficon=”” iconflip=”” iconrotate=”” iconspin=noiconcolor=”” icon_circle=”” icon_circle_radius=”” circlecolor=”” circlebordersize=”” circlebordercolor=”” outercirclebordersize=”” outercirclebordercolor=”” icon_size=”” icon_hover_type=”” hover_accent_color=”” image=”” image_id=”” image_width=”” image_height=”” link_type=”” button_span=”” link_area=”” link_target=”” icon_align=leftanimation_type=”” animation_delay=”” animation_offset=”” animation_direction=leftanimation_speed=”0.3″ margin_top=”” margin_bottom=”” hide_on_mobile=small-visibility,medium-visibility,large-visibilityclass=”” id=””][fusion_content_box title=BƯỚC 1.Verify FMIS hiện tại.backgroundcolor=”” icon=”” iconflip=”” iconrotate=”” iconspin=noiconcolor=”” circlecolor=”” circlebordersize=”” circlebordercolor=”” outercirclebordersize=”” outercirclebordercolor=”” image=”” image_id=”” image_width=”” image_height=”” link=”” linktext=”Đọc thêm” link_target=”” animation_type=”” animation_direction=leftanimation_speed=”0.3″ animation_offset=””]

  1. Lấy mã lỗi hoạt động và FMIS với ServiceRanger sử dụng chẩn đoán kết nối 9-Way hoặc bằng tay.
  2. Phím tắt.
  3. Mà FMIS có mặt?
    • Nếu lỗi Mã 97 IMF 3 đã được liệt kê, chuyển sang Bước 2.
    • Nếu lỗi Mã 97 IMF 4 hoặc là 5 được liệt kê, chuyển sang Bước 3.
    • Nếu lỗi Mã 97 IMF 7 đã được liệt kê, chuyển sang Bước 6.
    • Nếu lỗi Mã 97 IMF 14 đã được liệt kê, liên hệ với Eaton tại 1-800-826-HELP (4357).

[/fusion_content_box][fusion_content_box title=BẬC THANG 2. Xác nhận sản lượng điện áp tại HCM 38-Way.backgroundcolor=”” icon=”” iconflip=”” iconrotate=”” iconspin=”” iconcolor=”” circlecolor=”” circlebordersize=”” circlebordercolor=”” outercirclebordersize=”” outercirclebordercolor=”” image=”” image_id=”” image_width=”” image_height=”” link=”” linktext=”” link_target=”” animation_type=”” animation_direction=leftanimation_speed=”0.3″ animation_offset=””]

  1. Phím tắt.
  2. Ngắt kết nối cáp pin tiêu cực.
  3. Ngắt kết nối HCM Harness 38-Way nối.
  4. Bật khoa.
  5. Measure the voltage from Pin 34 xuống mặt đất trên HCM Harness 38-Way nối:
    • Nếu điện áp từ Pin 34 xuống đất là 0 volt, thay thế các Control Module lai (HCM)
      (chỉ nếu mã lỗi là hoạt động), sau đó quay trở lại bước 8.
    • Nếu điện áp từ Pin 34 xuống đất là 11-13 volt, sửa chữa các hệ thống Harness Hybrid cho một đoạn ngắn để pin, sau đó quay trở lại bước 8.

[/fusion_content_box][/fusion_content_boxes][fusion_content_boxes layout=clean-horizontalcolumns=”2″ title_size=”18pxheading_size=”3″ title_color=”#ffffffbody_color=”#ffffffbackgroundcolor=”#4f4f4ficon=”” iconflip=”” iconrotate=”” iconspin=noiconcolor=”” icon_circle=”” icon_circle_radius=”” circlecolor=”” circlebordersize=”” circlebordercolor=”” outercirclebordersize=”” outercirclebordercolor=”” icon_size=”” icon_hover_type=”” hover_accent_color=”” image=”” image_id=”” image_width=”” image_height=”” link_type=”” button_span=”” link_area=”” link_target=”” icon_align=leftanimation_type=”” animation_delay=”” animation_offset=”” animation_direction=leftanimation_speed=”0.3″ margin_top=”” margin_bottom=”” hide_on_mobile=small-visibility,medium-visibility,large-visibilityclass=”” id=””][fusion_content_box title=BẬC THANG 3. Xác minh tính liên tục của mạch điện từ PTO.backgroundcolor=”” icon=”” iconflip=”” iconrotate=”” iconspin=noiconcolor=”” circlecolor=”” circlebordersize=”” circlebordercolor=”” outercirclebordersize=”” outercirclebordercolor=”” image=”” image_id=”” image_width=”” image_height=”” link=”” linktext=”Đọc thêm” link_target=”” animation_type=”” animation_direction=leftanimation_speed=”0.3″ animation_offset=””]

  1. Phím tắt.
  2. Ngắt kết nối cáp pin tiêu cực.
  3. Ngắt kết nối 38-đường Hồ Chí Minh Harness.
  4. Đo điện trở giữa dây nịt HCM 38- Cách kết nối và các chân sau:
    • Ghim 34 Pin 6
    • Ghim 34 xuống đất
      • Nếu kháng giữa Pin 34 và Pin 6 là 0-0,3 ohms và kháng giữa Pin 34 và mặt đất là 10K ohms hoặc cao hơn, thay thế các Control Module lai (HCM) (chỉ nếu mã lỗi được kích hoạt). Tới Bước 8.
      • Nếu kháng nằm ngoài phạm vi, chuyển sang Bước 4.

[/fusion_content_box][fusion_content_box title=BẬC THANG 4. Đo điện trở của HCM Harness xuống mặt đất.backgroundcolor=”” icon=”” iconflip=”” iconrotate=”” iconspin=”” iconcolor=”” circlecolor=”” circlebordersize=”” circlebordercolor=”” outercirclebordersize=”” outercirclebordercolor=”” image=”” image_id=”” image_width=”” image_height=”” link=”” linktext=”” link_target=”” animation_type=”” animation_direction=leftanimation_speed=”0.3″ animation_offset=””]

  1. Phím tắt.
  2. Ngắt kết nối PTO 2-Way nối tại PTO.
  3. Đo điện trở giữa PTO 2-Way nối tại các chân sau:
    • Pin A đến B pin
    • Pin A đến mặt đất
      • Nếu kháng giữa Pin A và Pin B là 0-0,3 ohms và kháng giữa Pin A và mặt đất là 10K ohms hoặc cao hơn, sửa chữa các hệ thống Harness Hybrid cho một mở hoặc ngắn xuống mặt đất, sau đó quay trở lại bước 8.
      • Nếu kháng nằm ngoài giới hạn, thay thế các PTO Chuyển, sau đó quay trở lại bước 8.

[/fusion_content_box][/fusion_content_boxes][fusion_content_boxes layout=clean-horizontalcolumns=”2″ title_size=”18pxheading_size=”3″ title_color=”#ffffffbody_color=”#ffffffbackgroundcolor=”#4f4f4ficon=”” iconflip=”” iconrotate=”” iconspin=noiconcolor=”” icon_circle=”” icon_circle_radius=”” circlecolor=”” circlebordersize=”” circlebordercolor=”” outercirclebordersize=”” outercirclebordercolor=”” icon_size=”” icon_hover_type=”” hover_accent_color=”” image=”” image_id=”” image_width=”” image_height=”” link_type=”” button_span=”” link_area=”” link_target=”” icon_align=leftanimation_type=”” animation_delay=”” animation_offset=”” animation_direction=leftanimation_speed=”0.3″ margin_top=”” margin_bottom=”” hide_on_mobile=small-visibility,medium-visibility,large-visibilityclass=”” id=””][fusion_content_box title=BẬC THANG 5. Kiểm tra cho Active FMISbackgroundcolor=”” icon=”” iconflip=”” iconrotate=”” iconspin=”” iconcolor=”” circlecolor=”” circlebordersize=”” circlebordercolor=”” outercirclebordersize=”” outercirclebordercolor=”” image=”” image_id=”” image_width=”” image_height=”” link=”” linktext=”” link_target=”” animation_type=”” animation_direction=leftanimation_speed=”0.3″ animation_offset=””]

  1. Nếu lỗi Mã 97 IMF 3, 4, hoặc là 5 đang hoạt động:
    1. Tới Bước 1.

[/fusion_content_box][fusion_content_box title=BẬC THANG 6. điện áp đo tại Dây tín hiệu xuống đất.backgroundcolor=”” icon=”” iconflip=”” iconrotate=”” iconspin=noiconcolor=”” circlecolor=”” circlebordersize=”” circlebordercolor=”” outercirclebordersize=”” outercirclebordercolor=”” image=”” image_id=”” image_width=”” image_height=”” link=”” linktext=”Đọc thêm” link_target=”” animation_type=”” animation_direction=leftanimation_speed=”0.3″ animation_offset=””]

  1. Ngắt kết nối PTO dây tín hiệu duy nhất tại PTO.
  2. Bật khoa.
  3. Measure the voltage from the PTO Signal Wire Connector to ground:
    • Nếu điện áp là 12 volt tại phím trên, problem is with the faulty PTO engagement signal switch in the PTO. Liên OEM của bạn cho các thủ tục sửa chữa.
    • Nếu điện áp nhỏ hơn 1 volt tại phím trên, chuyển sang Bước 6.

[/fusion_content_box][/fusion_content_boxes][fusion_content_boxes layout=clean-horizontalcolumns=”2″ title_size=”18pxheading_size=”3″ title_color=”#ffffffbody_color=”#ffffffbackgroundcolor=”#4f4f4ficon=”” iconflip=”” iconrotate=”” iconspin=noiconcolor=”” icon_circle=”” icon_circle_radius=”” circlecolor=”” circlebordersize=”” circlebordercolor=”” outercirclebordersize=”” outercirclebordercolor=”” icon_size=”” icon_hover_type=”” hover_accent_color=”#f41000image=”” image_id=”” image_width=”” image_height=”” link_type=”” button_span=”” link_area=”” link_target=”” icon_align=leftanimation_type=”” animation_delay=”” animation_offset=”” animation_direction=leftanimation_speed=”0.3″ margin_top=”” margin_bottom=”” hide_on_mobile=small-visibility,medium-visibility,large-visibilityclass=”” id=””][fusion_content_box title=BẬC THANG 7. Xác minh tính liên tục trên dây tín hiệu PTO.backgroundcolor=”” icon=”” iconflip=”” iconrotate=”” iconspin=”” iconcolor=”” circlecolor=”” circlebordersize=”” circlebordercolor=”” outercirclebordersize=”” outercirclebordercolor=”” image=”” image_id=”” image_width=”” image_height=”” link=”” linktext=”” link_target=”” animation_type=”” animation_direction=leftanimation_speed=”0.3″ animation_offset=””]

  1. Phím tắt.
  2. Ngắt kết nối cáp pin tiêu cực.
  3. Ngắt kết nối HCM Harness 38-Way nối.
  4. Measure the resistance from the HCM Harness 38- Cách kết nối Pin 18 để điều ngược lại PTO cuối Dây tín hiệu.
    • Nếu kháng từ Pin 18 đến cuối PTO của dây tín hiệu là 0-0,3 ohms, thay thế các Control Module lai (HCM), sau đó quay trở lại bước 8.
    • Nếu kháng nằm ngoài giới hạn, sửa chữa mở trong dây tín hiệu PTO từ HCM đến PTO, sau đó quay trở lại bước 8.

[/fusion_content_box][fusion_content_box title=BẬC THANG 8. xác nhận sửa chữa.backgroundcolor=”” icon=”” iconflip=”” iconrotate=”” iconspin=noiconcolor=”” circlecolor=”” circlebordersize=”” circlebordercolor=”” outercirclebordersize=”” outercirclebordercolor=”” image=”” image_id=”” image_width=”” image_height=”” link=”” linktext=”Đọc thêm” link_target=”” animation_type=”” animation_direction=leftanimation_speed=”0.3″ animation_offset=””]

  1. Phím tắt.
  2. Kết nối lại tất cả các kết nối và cáp pin tiêu cực.
  3. Bật khoa.
  4. rõ ràng mã, xem Lỗi không hoạt động rõ ràng.
  5. Lái xe và cố gắng để thiết lập lại mã.
  6. Kiểm tra mã, xem Xem những lỗi Active và Inactive.
    • Nếu không có mã, kiểm tra hoàn tất.
    • Nếu Mã lỗi 97 xuất hiện, tìm lỗi trong thử nghiệm, chuyển sang Bước 1.
    • Nếu một mã khác hơn 97 xuất hiện, xem Fault Danh sách Mã Index.

[/fusion_content_box][/fusion_content_boxes][/fusion_builder_column][/fusion_builder_row][/fusion_builder_container][fusion_global id=”13788″]