[fusion_builder_container hundred_percent=”no” hundred_percent_height=”no” hundred_percent_height_scroll=”no” hundred_percent_height_center_content=”yes” equal_height_columns=”no” menu_anchor=”” hide_on_mobile=”small-visibility,medium-visibility,large-visibility” status=”published” publish_date=”” class=”” id=”” background_color=”” background_image=”” background_position=”center center” background_repeat=”no-repeat” fade=”no” background_parallax=”none” enable_mobile=”no” parallax_speed=”0.3″ video_mp4=”” video_webm=”” video_ogv=”” video_url=”” video_aspect_ratio=”16:9″ video_loop=”yes” video_mute=”yes” video_preview_image=”” border_size=”” border_color=”” border_style=”solid” margin_top=”35″ margin_bottom=”” padding_top=”” padding_right=”” padding_bottom=”” padding_left=””][fusion_builder_row][fusion_builder_column type=”1_1″ layout=”1_1″ spacing=”” center_content=”no” link=”” target=”_self” min_height=”” hide_on_mobile=”small-visibility,medium-visibility,large-visibility” class=”” id=”” background_color=”” background_image=”” background_image_id=”” background_position=”left top” background_repeat=”no-repeat” hover_type=”none” border_size=”0″ border_color=”” border_style=”solid” border_position=”all” padding_top=”” padding_right=”” padding_bottom=”” padding_left=”” margin_top=”” margin_bottom=”” animation_type=”” animation_direction=”left” animation_speed=”0.3″ animation_offset=”” last=”no”][fusion_text columns=”” column_min_width=”” column_spacing=”” rule_style=”default” rule_size=”” rule_color=”” hide_on_mobile=”small-visibility,medium-visibility,large-visibility” class=”” id=””]
Eaton Fuller Hybrid Transmisi Patahan Kode 89 – Tenaga listrik Pembawa CAN Pesan Kesalahan (HCM)
[/fusion_text][/fusion_builder_column][/fusion_builder_row][/fusion_builder_container][fusion_builder_container hundred_percent=”no” hundred_percent_height=”no” hundred_percent_height_scroll=”no” hundred_percent_height_center_content=”yes” equal_height_columns=”no” menu_anchor=”” hide_on_mobile=”small-visibility,medium-visibility,large-visibility” status=”published” publish_date=”” class=”” id=”” background_color=”” background_image=”” background_position=”center center” background_repeat=”no-repeat” fade=”no” background_parallax=”none” enable_mobile=”no” parallax_speed=”0.3″ video_mp4=”” video_webm=”” video_ogv=”” video_url=”” video_aspect_ratio=”16:9″ video_loop=”yes” video_mute=”yes” video_preview_image=”” border_size=”” border_color=”” border_style=”solid” margin_top=”” margin_bottom=”” padding_top=”” padding_right=”” padding_bottom=”” padding_left=””][fusion_builder_row][fusion_builder_column type=”1_1″ layout=”1_1″ spacing=”” center_content=”no” link=”” target=”_self” min_height=”” hide_on_mobile=”small-visibility,medium-visibility,large-visibility” class=”” id=”” background_color=”” background_image=”” background_image_id=”” background_position=”left top” background_repeat=”no-repeat” hover_type=”none” border_size=”0″ border_color=”” border_style=”solid” border_position=”all” padding_top=”” padding_right=”” padding_bottom=”” padding_left=”” margin_top=”” margin_bottom=”” animation_type=”” animation_direction=”left” animation_speed=”0.3″ animation_offset=”” last=”no”][fusion_text columns=”” column_min_width=”” column_spacing=”” rule_style=”default” rule_size=”” rule_color=”” hide_on_mobile=”small-visibility,medium-visibility,large-visibility” class=”” id=””]
Kesalahan kode untuk Eaton Hybrid Drive Sistem model (MY09) EH-8E406A-U / P, EH-8E406A-UP, EH-8E406A-UPG, EH-8E406A-CD, EH-8E406A-CDG, EH-8E406A-CDR, EH-8E406A-T, EH-6E706B-CD, EH-6E706B-P dan EH-6E706B-UPG. Baca di bawah untuk belajar bagaimana untuk menguji, membersihkan dan memperbaiki kesalahan kode kesalahan untuk Freightliner Anda, mack, Peterbilt, Kenworth, volvo, Internasional, dan tugas berat truk dan peralatan. Hybrid Control Module (HCM) berkomunikasi dengan Inverter berkomunikasi dengan Unit Baterai Kontrol (BCU) terletak di Electronics Pengangkut Daya (PEC) dan HCM pada Controller Area Network (BISA) Kecepatan tinggi data link proprietary. Data link adalah dua-kawat twisted pair dengan dua 120 ohm resistor terletak di link.
kesalahan Kode 89 – Tenaga listrik Pembawa BISA Pesan kesalahan Deteksi
Prasyarat berikut harus dipenuhi sebelum sistem mendeteksi kesalahan:
- HCM tegangan pengapian lebih besar dari 7 volt dan kurang dari 16 volt.
- kesalahan HCM BISA data link adalah tidak aktif.
Catatan: Ketika masalah kode aktif mengacu pada Produk Diagnostik Mode (PDM)
Kondisi Set Patahan Kode Aktif
- IMF 2 hanya Aktif dalam Mode Diagnostik Produk (PDM) dan set jika 3 pesan berturut-turut tidak diterima oleh HCM.
- IMF 9 diatur ketika HCM belum menerima a 1 pesan untuk 30 siklus pesan berturut-turut.
Fallback Ketika Patahan Kode 89 diatur kondisi berikut terjadi:
- Amber “Periksa Hybrid” menyala terang.
- Kesalahan disimpan di Control Hybrid Modul (HCM) ingatan.
- Motor Listrik / Generator Assist dan Regenerasi dinonaktifkan; namun, relay tegangan tinggi tetap bertenaga.
- HCM terus mengontrol kendaraan Hybrid dalam mode diesel-satunya.
- default transmisi mulai gigi untuk 1.
[/fusion_text][fusion_text columns=”” column_min_width=”” column_spacing=”” rule_style=”default” rule_size=”” rule_color=”” hide_on_mobile=”small-visibility,medium-visibility,large-visibility” class=”” id=””]
Kondisi Set Patahan Kode Aktif
Hanya kesalahan yang tidak aktif bisa dibersihkan dari Unit Transmission Control Electronic (TECU) atau sejarah HCM menggunakan ServiceRanger. The TECU otomatis membersihkan kesalahan dari sejarah setelah 200 jam dan HCM otomatis membersihkan kesalahan dari sejarah setelah kesalahan telah aktif untuk 200 jam.
Kode kesalahan ini dapat disebabkan oleh salah satu dari berikut:
- IMF 2, 9
- inverter
- BISA Data Link ke Relay Box
- Relay Box di dalam PEC
- Tidak ada kekuasaan atau tanah untuk Relay Box
[/fusion_text][/fusion_builder_column][/fusion_builder_row][/fusion_builder_container][fusion_builder_container hundred_percent=”no” hundred_percent_height=”no” hundred_percent_height_scroll=”no” hundred_percent_height_center_content=”yes” equal_height_columns=”no” menu_anchor=”” hide_on_mobile=”small-visibility,medium-visibility,large-visibility” status=”published” publish_date=”” class=”” id=”” background_color=”” background_image=”” background_position=”center center” background_repeat=”no-repeat” fade=”no” background_parallax=”none” enable_mobile=”no” parallax_speed=”0.3″ video_mp4=”” video_webm=”” video_ogv=”” video_url=”” video_aspect_ratio=”16:9″ video_loop=”yes” video_mute=”yes” video_preview_image=”” border_size=”” border_color=”” border_style=”solid” margin_top=”” margin_bottom=”” padding_top=”” padding_right=”” padding_bottom=”” padding_left=””][fusion_builder_row][fusion_builder_column type=”1_1″ layout=”1_1″ spacing=”” center_content=”no” link=”” target=”_self” min_height=”” hide_on_mobile=”small-visibility,medium-visibility,large-visibility” class=”” id=”” background_color=”” background_image=”” background_image_id=”” background_position=”left top” background_repeat=”no-repeat” hover_type=”none” border_size=”0″ border_color=”” border_style=”solid” border_position=”all” padding_top=”” padding_right=”” padding_bottom=”” padding_left=”” margin_top=”” margin_bottom=”” animation_type=”” animation_direction=”left” animation_speed=”0.3″ animation_offset=”” last=”no”][fusion_text columns=”” column_min_width=”” column_spacing=”” rule_style=”default” rule_size=”” rule_color=”” hide_on_mobile=”small-visibility,medium-visibility,large-visibility” class=”” id=””]
kesalahan Kode 89 – Tenaga listrik Pembawa BISA Pesan Kesalahan Uji
[/fusion_text][/fusion_builder_column][/fusion_builder_row][/fusion_builder_container][fusion_builder_container hundred_percent=”no” hundred_percent_height=”no” hundred_percent_height_scroll=”no” hundred_percent_height_center_content=”yes” equal_height_columns=”no” menu_anchor=”” hide_on_mobile=”small-visibility,medium-visibility,large-visibility” status=”published” publish_date=”” class=”” id=”” background_color=”” background_image=”” background_position=”center center” background_repeat=”no-repeat” fade=”no” background_parallax=”none” enable_mobile=”no” parallax_speed=”0.3″ video_mp4=”” video_webm=”” video_ogv=”” video_url=”” video_aspect_ratio=”16:9″ video_loop=”yes” video_mute=”yes” video_preview_image=”” border_size=”” border_color=”” border_style=”solid” margin_top=”” margin_bottom=”” padding_top=”” padding_right=”” padding_bottom=”” padding_left=””][fusion_builder_row][fusion_builder_column type=”1_1″ layout=”1_1″ spacing=”” center_content=”no” link=”” target=”_self” min_height=”” hide_on_mobile=”small-visibility,medium-visibility,large-visibility” class=”” id=”” background_color=”” background_image=”” background_image_id=”” background_position=”left top” background_repeat=”no-repeat” hover_type=”none” border_size=”0″ border_color=”” border_style=”solid” border_position=”all” padding_top=”” padding_right=”” padding_bottom=”” padding_left=”” margin_top=”” margin_bottom=”” animation_type=”” animation_direction=”left” animation_speed=”0.3″ animation_offset=”” last=”no”][fusion_text columns=”” column_min_width=”” column_spacing=”” rule_style=”default” rule_size=”” rule_color=”” hide_on_mobile=”small-visibility,medium-visibility,large-visibility” class=”” id=””]
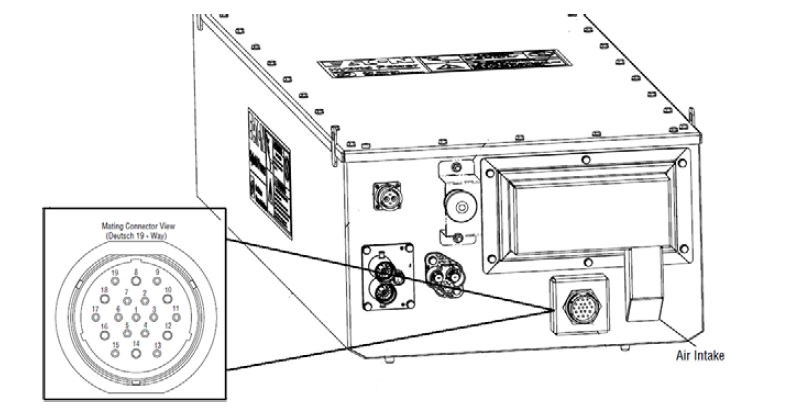
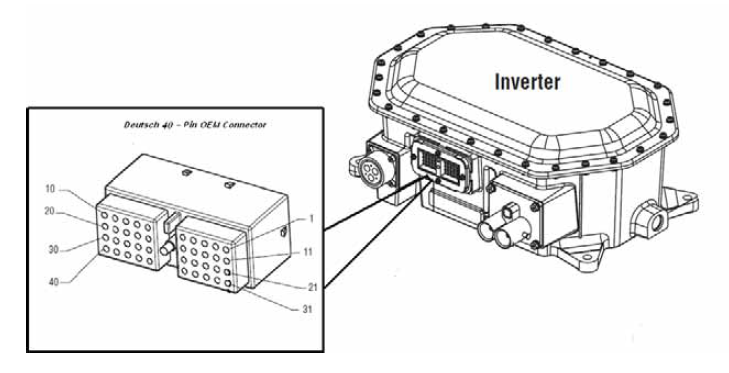
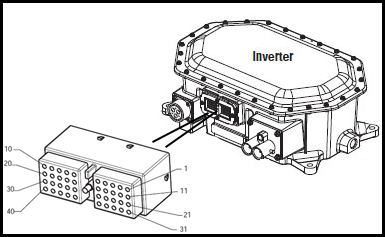
Komponen Sistem MY09 Identifikasi:
[/fusion_text][/fusion_builder_column][fusion_builder_column type=”1_1″ layout=”1_2″ spacing=”” center_content=”no” link=”” target=”_self” min_height=”” hide_on_mobile=”small-visibility,medium-visibility,large-visibility” class=”” id=”” background_color=”” background_image=”” background_image_id=”” background_position=”left top” background_repeat=”no-repeat” hover_type=”none” border_size=”0″ border_color=”” border_style=”solid” border_position=”all” padding_top=”” padding_right=”” padding_bottom=”” padding_left=”” margin_top=”” margin_bottom=”” animation_type=”” animation_direction=”left” animation_speed=”0.3″ animation_offset=”” last=”no”][fusion_imageframe image_id=”14503|full” max_width=”” style_type=”” blur=”” stylecolor=”” hover_type=”none” bordersize=”” bordercolor=”” borderradius=”” align=”center” lightbox=”no” gallery_id=”” lightbox_image=”” lightbox_image_id=”” alt=”kawin konektor Deustch 19-way” link=”” linktarget=”_self” hide_on_mobile=”small-visibility,medium-visibility,large-visibility” class=”” id=”” animation_type=”” animation_direction=”left” animation_speed=”0.3″ animation_offset=””]https://www.globaltransmissionsupply.com/wp-content/uploads/mating-connector-deustch-19-way.png[/fusion_imageframe][fusion_imageframe image_id=”14504|full” max_width=”” style_type=”” blur=”” stylecolor=”” hover_type=”none” bordersize=”” bordercolor=”” borderradius=”” align=”center” lightbox=”no” gallery_id=”” lightbox_image=”” lightbox_image_id=”” alt=”konektor inverter Deutsch 40-Pin” link=”” linktarget=”_self” hide_on_mobile=”small-visibility,medium-visibility,large-visibility” class=”” id=”” animation_type=”” animation_direction=”left” animation_speed=”0.3″ animation_offset=””]https://www.globaltransmissionsupply.com/wp-content/uploads/Inverter-Deutsch-40-Pin-connector.png[/fusion_imageframe][/fusion_builder_column][fusion_builder_column type=”1_1″ layout=”1_1″ spacing=”” center_content=”no” link=”” target=”_self” min_height=”” hide_on_mobile=”small-visibility,medium-visibility,large-visibility” class=”” id=”” background_image_id=”” background_color=”#000000″ background_image=”” background_position=”left top” undefined=”” background_repeat=”no-repeat” hover_type=”none” border_size=”0″ border_color=”” border_style=”solid” border_position=”all” padding_top=”” padding_right=”” padding_bottom=”” padding_left=”” margin_top=”20″ margin_bottom=”20″ animation_type=”” animation_direction=”left” animation_speed=”0.3″ animation_offset=”” last=”no”][fusion_text columns=”” column_min_width=”” column_spacing=”” rule_style=”default” rule_size=”” rule_color=”” hide_on_mobile=”small-visibility,medium-visibility,large-visibility” class=”” id=””]
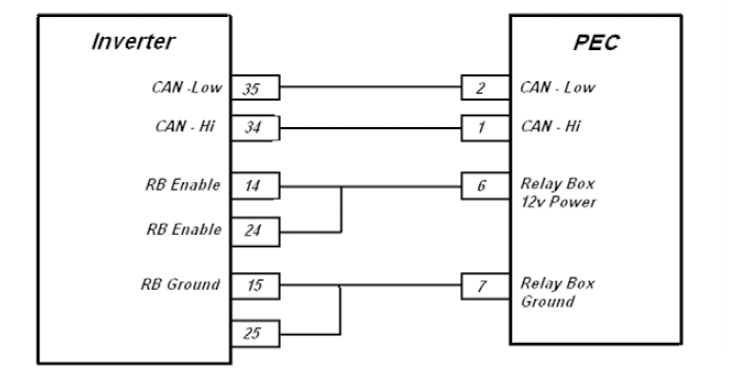
CATATAN: Mengacu kepada Eaton Hybrid Komponen dan Connector Lokasi untuk Connector Lokasi di MY09 Sistem.
[/fusion_text][/fusion_builder_column][fusion_builder_column type=”1_1″ layout=”1_1″ spacing=”” center_content=”no” link=”” target=”_self” min_height=”” hide_on_mobile=”small-visibility,medium-visibility,large-visibility” class=”” id=”” background_color=”” background_image=”” background_image_id=”” background_position=”left top” background_repeat=”no-repeat” hover_type=”none” border_size=”0″ border_color=”” border_style=”solid” border_position=”all” padding_top=”” padding_right=”” padding_bottom=”” padding_left=”” margin_top=”” margin_bottom=”” animation_type=”” animation_direction=”left” animation_speed=”0.3″ animation_offset=”” last=”no”][fusion_imageframe image_id=”14506|full” max_width=”” style_type=”” blur=”” stylecolor=”” hover_type=”none” bordersize=”” bordercolor=”” borderradius=”” align=”center” lightbox=”no” gallery_id=”” lightbox_image=”” lightbox_image_id=”” alt=”Inverter untuk PEC ” link=”” linktarget=”_self” hide_on_mobile=”small-visibility,medium-visibility,large-visibility” class=”” id=”” animation_type=”” animation_direction=”left” animation_speed=”0.3″ animation_offset=””]https://www.globaltransmissionsupply.com/wp-content/uploads/Inverter-to-PEC.png[/fusion_imageframe][fusion_text columns=”” column_min_width=”” column_spacing=”” rule_style=”default” rule_size=”” rule_color=”” hide_on_mobile=”small-visibility,medium-visibility,large-visibility” class=”” id=””]
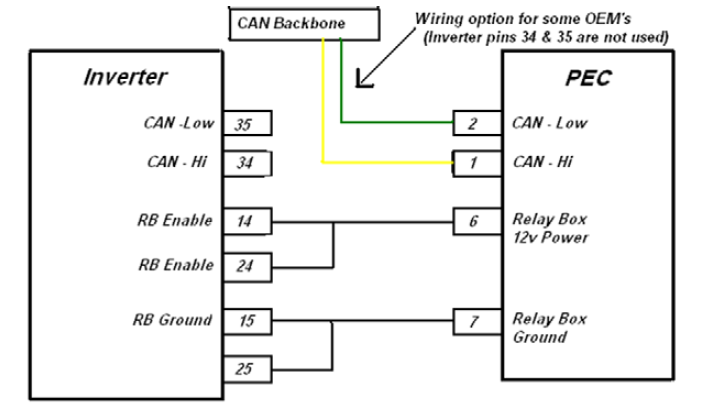
Atau CAN opsional ditransfer langsung ke CAN Data Link Backbone (inverter Pins 34 dan 35 tidak digunakan):
[/fusion_text][fusion_imageframe image_id=”14505|full” max_width=”” style_type=”” blur=”” stylecolor=”” hover_type=”none” bordersize=”” bordercolor=”” borderradius=”” align=”center” lightbox=”no” gallery_id=”” lightbox_image=”” lightbox_image_id=”” alt=”Inverter untuk PEC CAN Backbone” link=”” linktarget=”_self” hide_on_mobile=”small-visibility,medium-visibility,large-visibility” class=”” id=”” animation_type=”” animation_direction=”left” animation_speed=”0.3″ animation_offset=””]https://www.globaltransmissionsupply.com/wp-content/uploads/Inverter-to-PEC-CAN-Backbone.png[/fusion_imageframe][/fusion_builder_column][/fusion_builder_row][/fusion_builder_container][fusion_builder_container hundred_percent=”no” hundred_percent_height=”no” hundred_percent_height_scroll=”no” hundred_percent_height_center_content=”yes” equal_height_columns=”no” menu_anchor=”” hide_on_mobile=”small-visibility,medium-visibility,large-visibility” status=”published” publish_date=”” class=”” id=”” background_color=”” background_image=”” background_position=”center center” background_repeat=”no-repeat” fade=”no” background_parallax=”none” enable_mobile=”no” parallax_speed=”0.3″ video_mp4=”” video_webm=”” video_ogv=”” video_url=”” video_aspect_ratio=”16:9″ video_loop=”yes” video_mute=”yes” video_preview_image=”” border_size=”” border_color=”” border_style=”solid” margin_top=”” margin_bottom=”” padding_top=”” padding_right=”” padding_bottom=”” padding_left=””][fusion_builder_row][fusion_builder_column type=”1_1″ layout=”1_1″ spacing=”” center_content=”no” link=”” target=”_self” min_height=”” hide_on_mobile=”small-visibility,medium-visibility,large-visibility” class=”” id=”” background_color=”” background_image=”” background_image_id=”” background_position=”left top” background_repeat=”no-repeat” hover_type=”none” border_size=”0″ border_color=”” border_style=”solid” border_position=”all” padding_top=”” padding_right=”” padding_bottom=”” padding_left=”” margin_top=”” margin_bottom=”” animation_type=”” animation_direction=”left” animation_speed=”0.3″ animation_offset=”” last=”no”][fusion_modal name=”warnings_cautions” title=”peringatan & Perhatian” size=”large” background=”” border_color=”” show_footer=”yes” class=”” id=””]Bahaya: Bahaya menunjukkan Anda akan terluka parah atau terbunuh jika tidak mengikuti prosedur yang ditunjukkan.
Peringatan: Peringatan menunjukkan bahaya langsung, yang dapat mengakibatkan cedera pribadi yang parah jika Anda tidak mengikuti prosedur yang ditunjukkan.
Peringatan: Perhatian menunjukkan kendaraan atau kerusakan properti bisa terjadi jika Anda tidak mengikuti prosedur yang ditunjukkan.
Catatan: Catatan menunjukkan rincian tambahan yang akan membantu dalam diagnosis atau perbaikan komponen / sistem.
Ikuti prosedur yang ditetapkan dalam urutan yang ditunjukkan untuk menghindari cedera:
1. Jika kerucut tegangan tinggi sekitar kendaraan dan lockout dipasang di PEC, satu-satunya orang yang harus diperbolehkan untuk memulai kendaraan adalah orang yang menandatangani tag lockout.
2. Sebelum bekerja pada kendaraan atau meninggalkan taksi sementara mesin sedang berjalan, Anda harus menempatkan tuas pergeseran “N” set rem parkir, dan memblokir roda.
3. Untuk alasan keselamatan, selalu terlibat rem layanan sebelum memilih posisi gigi dari “N.”
4. Sebelum memulai kendaraan selalu duduk di kursi pengemudi, pilih “N” pada kontrol pergeseran, dan mengatur rem tangan.
5. Dalam kendaraan dengan ePTO, mesin dan / atau
Motor / Generator dapat mulai di modus ePTO. Tidak pernah melakukan perawatan atau bekerja pada kendaraan, Dalam modus ini.
6. 12-Volt Baterai positif (+) dan negatif (-) harus diputuskan sebelum pengelasan pada setiap Hybrid dilengkapi kendaraan.
Peringatan: Ikuti prosedur yang ditetapkan dalam urutan yang ditunjukkan untuk menghindari kerusakan peralatan atau kerusakan.
Peringatan: Jangan melepaskan rem parkir atau mencoba untuk memilih gigi sampai tekanan udara pada tingkat yang benar.
Peringatan: Untuk menghindari kerusakan transmisi selama penarik tempat tuas shift di “N” dan mengangkat roda penggerak dari tanah atau memutuskan driveline.
Peringatan Tegangan Tinggi & Perhatian
- Gunakan CO2 atau Dry Chemical Fire Extinguishers.
- Tegangan tinggi kabel ditutupi isolasi oranye atau tubing berbelit-belit dan ditandai dengan label peringatan pada konektor.
- Semua Eaton® Hybrid Diesel / kendaraan listrik akan ditandai ‘Hybrid’ di luar kendaraan, bersama dengan label pergeseran di dasbor.
- Mengacu pada OEM untuk lokasi tertentu dari chassis mount komponen hybrid.
- JANGAN potong kabel tegangan tinggi orange.
- TIDAK potong atau membuka PEC.
- TIDAK potong atau membuka Converter DC / DC.
- TIDAK potong atau membuka Inverter.
Sebuah zona penyangga harus diatur dan tegangan tinggi terisolasi sarung tangan karet (kelas 0 dengan pelindung kulit) diperlukan sebelum bekerja di tegangan tinggi. Kegagalan untuk mengikuti instruksi ini dapat menyebabkan cedera pribadi yang parah atau kematian.
Sarung tangan karet-terisolasi yang harus dikenakan saat bekerja pada sistem tegangan tinggi adalah kelas 0 dengan pelindung kulit. Sarung tangan karet harus diuji sebelum SETIAP digunakan mengikuti prosedur sarung tangan karet isolasi pengujian ditemukan di “Diagnostik Alat / Jasa Publikasi” pada halaman 6. Kegagalan untuk mengikuti instruksi ini dapat menyebabkan cedera pribadi yang parah atau kematian.
Sebelum memeriksa atau bekerja pada setiap kabel tegangan tinggi atau komponen yang “Tegangan Tinggi Jasa Shutdown dan Power-Up Prosedur” pada halaman 4 harus diikuti. Kegagalan untuk mengikuti instruksi ini dapat menyebabkan cedera pribadi yang parah atau kematian.
The Lockout dan tagout perangkat hanya harus dihapus oleh teknisi yang menempatkan perangkat Lockout dan tagout pada kendaraan. Kegagalan untuk mengikuti instruksi ini dapat menyebabkan cedera pribadi yang parah atau kematian.
Tegangan tinggi karet terisolasi sarung tangan (kelas 0 dengan pelindung kulit) harus dipakai saat bekerja pada setiap
kabel tegangan tinggi. The “High-Voltage Layanan Shutdown dan Power-Up Prosedur” pada halaman 4 harus diikuti sebelum menghapus setiap kabel tegangan tinggi. Kegagalan untuk mengikuti instruksi ini dapat menyebabkan cedera pribadi yang parah atau kematian.
Tegangan tinggi kabel dan kabel yang oranye dan mengandung label peringatan pada konektor. komponen tegangan tinggi ditandai dengan label. Tegangan tinggi karet terisolasi sarung tangan (kelas 0 dengan pelindung kulit) harus digunakan ketika bekerja pada salah satu komponen ini. Kegagalan untuk mengikuti instruksi ini dapat menyebabkan cedera pribadi yang parah atau kematian.
Prosedur Layanan Shutdown Tegangan Tinggi

1. Ikuti “Tegangan Tinggi Wilayah Kerja” Prosedur.
2. Menemukan merah PEC Service Switch di depan PEC dan mendorong mematikan.
3. Lepaskan Service Switch Tutup dan menginstal Bracket Lockout (J48506).
4. tag Kencangkan ke Lockout Bracket.
5. Pastikan PEC Service Switch tidak bisa bergerak dari posisi off.
6. Memungkinkan sistem untuk mengatur selama minimal 5 menit untuk melepaskan tegangan tinggi.
7. Hubungkan ServiceRanger dan melihat Data Monitor PID 116 disebut “Tegangan Tinggi Potensi Battery.” Gunakan SPN 520323 untuk koneksi J1939 “Battery Voltage RB” (Relay Box).
8. tegangan harus 30 volt atau kurang. Jika tegangan di atas 30 volt, tidak bekerja pada kendaraan dan menghubungi Eaton® di 1-800-826-HELP (4357).
9. Putar kunci kontak off dan melanjutkan untuk memperbaiki atau langkah pemecahan masalah.
Catatan: tegangan turun ke nol ketika kuncinya adalah off.
Tegangan Tinggi Jasa Power-Up Prosedur
1. Install semua konektor tegangan tinggi ke posisi mereka terkunci.
2. Jika Anda adalah orang yang bekerja pada kendaraan, menghapus Lockout Bracket dan tag.
3. Instal ulang Lockout Bracket atas Service Switch.
4. Tarik Jasa Beralih keluar dan membiarkan kendaraan ditetapkan untuk 2 menit.
5. Start vehicle when appropriate.[/fusion_modal][fusion_modal name=”component_location” title=”Eaton Hybrid Komponen dan Connector Lokasi ” size=”large” background=”#ffffff” border_color=”” show_footer=”yes” class=”” id=””]

[/fusion_modal][fusion_modal name=”component_location2″ title=”Eaton Hybrid Komponen dan Connector Lokasi MY09 Sistem” size=”large” background=”#ffffff” border_color=”” show_footer=”yes” class=”” id=””]

[/fusion_modal][/fusion_builder_column][/fusion_builder_row][/fusion_builder_container][fusion_builder_container hundred_percent=”no” hundred_percent_height=”no” hundred_percent_height_scroll=”no” hundred_percent_height_center_content=”yes” equal_height_columns=”no” menu_anchor=”” hide_on_mobile=”small-visibility,medium-visibility,large-visibility” status=”published” publish_date=”” class=”” id=”” background_color=”” background_image=”” background_position=”center center” background_repeat=”no-repeat” fade=”no” background_parallax=”none” enable_mobile=”no” parallax_speed=”0.3″ video_mp4=”” video_webm=”” video_ogv=”” video_url=”” video_aspect_ratio=”16:9″ video_loop=”yes” video_mute=”yes” video_preview_image=”” border_size=”” border_color=”” border_style=”solid” margin_top=”” margin_bottom=”” padding_top=”” padding_right=”” padding_bottom=”” padding_left=””][fusion_builder_row][fusion_builder_column type=”1_1″ layout=”1_1″ spacing=”” center_content=”no” link=”” target=”_self” min_height=”” hide_on_mobile=”small-visibility,medium-visibility,large-visibility” class=”” id=”” background_color=”” background_image=”” background_image_id=”” background_position=”left top” background_repeat=”no-repeat” hover_type=”none” border_size=”0″ border_color=”” border_style=”solid” border_position=”all” padding_top=”” padding_right=”” padding_bottom=”” padding_left=”” margin_top=”” margin_bottom=”” animation_type=”” animation_direction=”left” animation_speed=”0.3″ animation_offset=”” last=”no”][fusion_content_boxes layout=”clean-horizontal” columns=”1″ title_size=”18px” heading_size=”3″ title_color=”#ffffff” body_color=”#ffffff” backgroundcolor=”#4f4f4f” icon=”” iconflip=”” iconrotate=”” iconspin=”no” iconcolor=”” icon_circle=”” icon_circle_radius=”” circlecolor=”” circlebordersize=”” circlebordercolor=”” outercirclebordersize=”” outercirclebordercolor=”” icon_size=”” icon_hover_type=”” hover_accent_color=”” image=”” image_id=”” image_width=”” image_height=”” link_type=”” button_span=”” link_area=”” link_target=”” icon_align=”left” animation_type=”” animation_delay=”” animation_offset=”” animation_direction=”left” animation_speed=”0.3″ margin_top=”” margin_bottom=”” hide_on_mobile=”small-visibility,medium-visibility,large-visibility” class=”” id=””][fusion_content_box title=”LANGKAH 1. Periksa status kode kesalahan Aktif atau Nonaktif dan periksa konfigurasi HCM.” backgroundcolor=”” icon=”” iconflip=”” iconrotate=”” iconspin=”no” iconcolor=”” circlecolor=”” circlebordersize=”” circlebordercolor=”” outercirclebordersize=”” outercirclebordercolor=”” image=”” image_id=”” image_width=”” image_height=”” link=”” linktext=”Baca lebih lajut” link_target=”” animation_type=”” animation_direction=”left” animation_speed=”0.3″ animation_offset=””]
- Ambil kode kesalahan aktif dan FMIS dengan ServiceRanger menggunakan 9-Way Diagnostik Konektor atau secara manual.
- Lakukan Pretest Listrik dan Hybrid Listrik Pretest.
- Jika tidak ada masalah ditemukan selama tes baik listrik, pergi ke Langkah 2.
- Jika masalah itu diperbaiki selama tes baik listrik, pergi ke Langkah 10.
[/fusion_content_box][/fusion_content_boxes][fusion_content_boxes layout=”clean-horizontal” columns=”1″ title_size=”18px” heading_size=”3″ title_color=”#ffffff” body_color=”#ffffff” backgroundcolor=”#4f4f4f” icon=”” iconflip=”” iconrotate=”” iconspin=”no” iconcolor=”” icon_circle=”” icon_circle_radius=”” circlecolor=”” circlebordersize=”” circlebordercolor=”” outercirclebordersize=”” outercirclebordercolor=”” icon_size=”” icon_hover_type=”” hover_accent_color=”” image=”” image_id=”” image_width=”” image_height=”” link_type=”” button_span=”” link_area=”” link_target=”” icon_align=”left” animation_type=”” animation_delay=”” animation_offset=”” animation_direction=”left” animation_speed=”0.3″ margin_top=”” margin_bottom=”” hide_on_mobile=”small-visibility,medium-visibility,large-visibility” class=”” id=””][fusion_content_box title=”LANGKAH 2. Verifikasi kelangsungan sirkuit PEC.” backgroundcolor=”” icon=”” iconflip=”” iconrotate=”” iconspin=”no” iconcolor=”” circlecolor=”” circlebordersize=”” circlebordercolor=”” outercirclebordersize=”” outercirclebordercolor=”” image=”” image_id=”” image_width=”” image_height=”” link=”” linktext=”Baca lebih lajut” link_target=”” animation_type=”” animation_direction=”left” animation_speed=”0.3″ animation_offset=””]
- off kunci.
Bahaya: Lihat Tegangan Tinggi Jasa Shutdown dan Power-Up Prosedur. Ikuti prosedur untuk menghindari kejutan, membakar atau kematian dari tidak benar ditangani tegangan tinggi. - Putus PEC 19-Way Connector.
- Mengukur resistansi pada PEC 19-Way OEM Kawat Harness Connector Pin 1 dan Pin 2:
Catatan: Pastikan volt / ohm meter pada skala yang tepat (sekitar 200 skala ohm).- Jika perlawanan antara Pin 1 dan Pin 2 adalah antara 50-70 ohm, pergi ke Langkah 3.
- Jika resistance berada di luar jangkauan, pergi ke Langkah 7.
[/fusion_content_box][/fusion_content_boxes][fusion_content_boxes layout=”clean-horizontal” columns=”1″ title_size=”18px” heading_size=”3″ title_color=”#ffffff” body_color=”#ffffff” backgroundcolor=”#4f4f4f” icon=”” iconflip=”” iconrotate=”” iconspin=”no” iconcolor=”” icon_circle=”” icon_circle_radius=”” circlecolor=”” circlebordersize=”” circlebordercolor=”” outercirclebordersize=”” outercirclebordercolor=”” icon_size=”” icon_hover_type=”” hover_accent_color=”” image=”” image_id=”” image_width=”” image_height=”” link_type=”” button_span=”” link_area=”” link_target=”” icon_align=”left” animation_type=”” animation_delay=”” animation_offset=”” animation_direction=”left” animation_speed=”0.3″ margin_top=”” margin_bottom=”” hide_on_mobile=”small-visibility,medium-visibility,large-visibility” class=”” id=””][fusion_content_box title=”LANGKAH 3. Verifikasi BISA sirkuit untuk pendek ke tanah.” backgroundcolor=”” icon=”” iconflip=”” iconrotate=”” iconspin=”no” iconcolor=”” circlecolor=”” circlebordersize=”” circlebordercolor=”” outercirclebordersize=”” outercirclebordercolor=”” image=”” image_id=”” image_width=”” image_height=”” link=”” linktext=”Baca lebih lajut” link_target=”” animation_type=”” animation_direction=”left” animation_speed=”0.3″ animation_offset=””]
- Mengukur perlawanan antara PEC 19-Way OEM Kawat Harness Connector Pin 1 dan tanah dan antara Pin 2 dan tanah:
- Jika salah satu hambatan adalah 0-100 ohm, memperbaiki OEM BISA kabel sirkuit. pergi ke Langkah 10.
- Jika kedua resistance 7k ohm, pergi ke Langkah 4.
[/fusion_content_box][/fusion_content_boxes][fusion_content_boxes layout=”clean-horizontal” columns=”1″ title_size=”18px” heading_size=”3″ title_color=”#ffffff” body_color=”#ffffff” backgroundcolor=”#4f4f4f” icon=”” iconflip=”” iconrotate=”” iconspin=”no” iconcolor=”” icon_circle=”” icon_circle_radius=”” circlecolor=”” circlebordersize=”” circlebordercolor=”” outercirclebordersize=”” outercirclebordercolor=”” icon_size=”” icon_hover_type=”” hover_accent_color=”” image=”” image_id=”” image_width=”” image_height=”” link_type=”” button_span=”” link_area=”” link_target=”” icon_align=”left” animation_type=”” animation_delay=”” animation_offset=”” animation_direction=”left” animation_speed=”0.3″ margin_top=”” margin_bottom=”” hide_on_mobile=”small-visibility,medium-visibility,large-visibility” class=”” id=””][fusion_content_box title=”LANGKAH 4. Verifikasi BISA diisi dalam yang benar Connector Pin.” backgroundcolor=”” icon=”” iconflip=”” iconrotate=”” iconspin=”” iconcolor=”” circlecolor=”” circlebordersize=”” circlebordercolor=”” outercirclebordersize=”” outercirclebordercolor=”” image=”” image_id=”” image_width=”” image_height=”” link=”” linktext=”” link_target=”” animation_type=”” animation_direction=”left” animation_speed=”0.3″ animation_offset=””]
- Mengukur perlawanan antara PEC 19-Way Connector Pin 1 dan Inverter 40-Way Connector Pin 4:
- Jika resistance adalah 0-0,3 ohm, pergi ke Langkah 5.
- Jika resistance ini 60 ohm, perbaikan BISA Wiring (hi dan rendah kabel yang salah), kemudian pergi ke Langkah 10.
[/fusion_content_box][/fusion_content_boxes][fusion_content_boxes layout=”clean-horizontal” columns=”1″ title_size=”18px” heading_size=”3″ title_color=”#ffffff” body_color=”#ffffff” backgroundcolor=”#4f4f4f” icon=”” iconflip=”” iconrotate=”” iconspin=”no” iconcolor=”” icon_circle=”” icon_circle_radius=”” circlecolor=”” circlebordersize=”” circlebordercolor=”” outercirclebordersize=”” outercirclebordercolor=”” icon_size=”” icon_hover_type=”” hover_accent_color=”” image=”” image_id=”” image_width=”” image_height=”” link_type=”” button_span=”” link_area=”” link_target=”” icon_align=”left” animation_type=”” animation_delay=”” animation_offset=”” animation_direction=”left” animation_speed=”0.3″ margin_top=”” margin_bottom=”” hide_on_mobile=”small-visibility,medium-visibility,large-visibility” class=”” id=””][fusion_content_box title=”LANGKAH 5. Verifikasi kekuasaan dan tanah untuk PEC.” backgroundcolor=”” icon=”” iconflip=”” iconrotate=”” iconspin=”” iconcolor=”” circlecolor=”” circlebordersize=”” circlebordercolor=”” outercirclebordersize=”” outercirclebordercolor=”” image=”” image_id=”” image_width=”” image_height=”” link=”” linktext=”” link_target=”” animation_type=”” animation_direction=”left” animation_speed=”0.3″ animation_offset=””]
- Menginstal ulang 40-Way Connector di Inverter.
- tombol pada.
- Ukur voltase pada Pin Konektor Wire Harness OEM 19 Arah PEC 6 dan 7:
- Jika Pins 6 dan 7 mempunyai tegangan baterai (12 volt +/ – 1.2 volt), menggantikan PEC, kemudian pergi ke Langkah 10.
- Jika pin 6 dan 7 tidak memiliki tegangan atau kurang dari 1.2 volt tegangan baterai, pergi ke Langkah 6.
[/fusion_content_box][/fusion_content_boxes][fusion_content_boxes layout=”clean-horizontal” columns=”1″ title_size=”18px” heading_size=”3″ title_color=”#ffffff” body_color=”#ffffff” backgroundcolor=”#4f4f4f” icon=”” iconflip=”” iconrotate=”” iconspin=”no” iconcolor=”” icon_circle=”” icon_circle_radius=”” circlecolor=”” circlebordersize=”” circlebordercolor=”” outercirclebordersize=”” outercirclebordercolor=”” icon_size=”” icon_hover_type=”” hover_accent_color=”” image=”” image_id=”” image_width=”” image_height=”” link_type=”” button_span=”” link_area=”” link_target=”” icon_align=”left” animation_type=”” animation_delay=”” animation_offset=”” animation_direction=”left” animation_speed=”0.3″ margin_top=”” margin_bottom=”” hide_on_mobile=”small-visibility,medium-visibility,large-visibility” class=”” id=””][fusion_content_box title=”LANGKAH 6. Verifikasi kontinuitas antara Inverter dan PEC.” backgroundcolor=”” icon=”” iconflip=”” iconrotate=”” iconspin=”” iconcolor=”” circlecolor=”” circlebordersize=”” circlebordercolor=”” outercirclebordersize=”” outercirclebordercolor=”” image=”” image_id=”” image_width=”” image_height=”” link=”” linktext=”” link_target=”” animation_type=”” animation_direction=”left” animation_speed=”0.3″ animation_offset=””]
- off kunci.
- Hapus Inverter 40-Way Connector.
- Mengukur resistansi pada OEM 40-Way Inverter Connector Pin 14 untuk OEM 19-Way PEC Connector Pin 6 dan Inverter Connector Pin 15 untuk PEC Connector Pin 7:
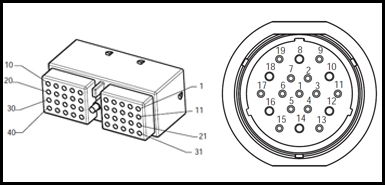
- Jika perlawanan dari Pin 14 Pin 6 adalah 0-0,3 ohm, dan perlawanan dari Pin 15 Pin 7 adalah 0-0,3 ohm (juga memeriksa ketegangan terminal pada Pins), mengganti Inverter, kemudian pergi ke Langkah 7.
?? Jika resistance ini OL atau di luar jangkauan, memperbaiki OEM Kawat Harness antara Inverter dan PEC, kemudian pergi ke Langkah 10.
- Jika perlawanan dari Pin 14 Pin 6 adalah 0-0,3 ohm, dan perlawanan dari Pin 15 Pin 7 adalah 0-0,3 ohm (juga memeriksa ketegangan terminal pada Pins), mengganti Inverter, kemudian pergi ke Langkah 7.
[/fusion_content_box][/fusion_content_boxes][fusion_content_boxes layout=”clean-horizontal” columns=”1″ title_size=”18px” heading_size=”3″ title_color=”#ffffff” body_color=”#ffffff” backgroundcolor=”#4f4f4f” icon=”” iconflip=”” iconrotate=”” iconspin=”no” iconcolor=”” icon_circle=”” icon_circle_radius=”” circlecolor=”” circlebordersize=”” circlebordercolor=”” outercirclebordersize=”” outercirclebordercolor=”” icon_size=”” icon_hover_type=”” hover_accent_color=”” image=”” image_id=”” image_width=”” image_height=”” link_type=”” button_span=”” link_area=”” link_target=”” icon_align=”left” animation_type=”” animation_delay=”” animation_offset=”” animation_direction=”left” animation_speed=”0.3″ margin_top=”” margin_bottom=”” hide_on_mobile=”small-visibility,medium-visibility,large-visibility” class=”” id=””][fusion_content_box title=”LANGKAH 7. Verifikasi CAN di PEC dengan Inverter.” backgroundcolor=”” icon=”” iconflip=”” iconrotate=”” iconspin=”” iconcolor=”” circlecolor=”” circlebordersize=”” circlebordercolor=”” outercirclebordersize=”” outercirclebordercolor=”” image=”” image_id=”” image_width=”” image_height=”” link=”” linktext=”” link_target=”” animation_type=”” animation_direction=”left” animation_speed=”0.3″ animation_offset=””]
- off kunci.
- Hapus Inverter 40-Way Connector.

- Periksa OEM Inverter Connector untuk Pins 34 dan 35. Jika tidak ada pin yang dihuni di konektor, PEC CAN Komunikasi pergi ke CAN Backbone, tidak Inverter:
- Jika Pin 34 dan Pin 35 tidak padat, pergi ke Langkah 9.
- Jika OEM Inverter Connector memiliki Pins 34 dan 35, pergi ke Langkah 8.
[/fusion_content_box][/fusion_content_boxes][fusion_content_boxes layout=”clean-horizontal” columns=”1″ title_size=”18px” heading_size=”3″ title_color=”#ffffff” body_color=”#ffffff” backgroundcolor=”#4f4f4f” icon=”” iconflip=”” iconrotate=”” iconspin=”no” iconcolor=”” icon_circle=”” icon_circle_radius=”” circlecolor=”” circlebordersize=”” circlebordercolor=”” outercirclebordersize=”” outercirclebordercolor=”” icon_size=”” icon_hover_type=”” hover_accent_color=”” image=”” image_id=”” image_width=”” image_height=”” link_type=”” button_span=”” link_area=”” link_target=”” icon_align=”left” animation_type=”” animation_delay=”” animation_offset=”” animation_direction=”left” animation_speed=”0.3″ margin_top=”” margin_bottom=”” hide_on_mobile=”small-visibility,medium-visibility,large-visibility” class=”” id=””][fusion_content_box title=”LANGKAH 8. Verifikasi kontinuitas antara sirkuit Inverter dan sirkuit PEC.” backgroundcolor=”” icon=”” iconflip=”” iconrotate=”” iconspin=”” iconcolor=”” circlecolor=”” circlebordersize=”” circlebordercolor=”” outercirclebordersize=”” outercirclebordercolor=”” image=”” image_id=”” image_width=”” image_height=”” link=”” linktext=”” link_target=”” animation_type=”” animation_direction=”left” animation_speed=”0.3″ animation_offset=””]
- Mengukur perlawanan antara Inverter 40-Way Connector Pin 34 dan OEM 19-Way PEC Connector Pin 1 dan Inverter 40-Way Connector Pin 35 dan PEC 19-Way Connector Pin 2:
Catatan: Pastikan volt / ohm meter pada skala yang tepat (sekitar 200 skala ohm)
- Jika perlawanan antara Pin 34 dan Pin 1 adalah antara 0-0,3 ohm, dan perlawanan antara Pin 35 dan Pin 2 adalah antara 0-0,3 ohm, mengganti Inverter. Lihat MY09 Inverter Penghapusan dan Instalasi), kemudian pergi ke Langkah 10.
- Jika resistance ini OL atau di luar jangkauan, memperbaiki OEM Kawat Harness antara Inverter dan PEC, kemudian pergi ke Langkah 10.
[/fusion_content_box][/fusion_content_boxes][fusion_content_boxes layout=”clean-horizontal” columns=”1″ title_size=”18px” heading_size=”3″ title_color=”#ffffff” body_color=”#ffffff” backgroundcolor=”#4f4f4f” icon=”” iconflip=”” iconrotate=”” iconspin=”no” iconcolor=”” icon_circle=”” icon_circle_radius=”” circlecolor=”” circlebordersize=”” circlebordercolor=”” outercirclebordersize=”” outercirclebordercolor=”” icon_size=”” icon_hover_type=”” hover_accent_color=”” image=”” image_id=”” image_width=”” image_height=”” link_type=”” button_span=”” link_area=”” link_target=”” icon_align=”left” animation_type=”” animation_delay=”” animation_offset=”” animation_direction=”left” animation_speed=”0.3″ margin_top=”” margin_bottom=”” hide_on_mobile=”small-visibility,medium-visibility,large-visibility” class=”” id=””][fusion_content_box title=”LANGKAH 9. Verifikasi kontinuitas antara PEC BISA dan BISA Backbone.” backgroundcolor=”” icon=”” iconflip=”” iconrotate=”” iconspin=”” iconcolor=”” circlecolor=”” circlebordersize=”” circlebordercolor=”” outercirclebordersize=”” outercirclebordercolor=”” image=”” image_id=”” image_width=”” image_height=”” link=”” linktext=”” link_target=”” animation_type=”” animation_direction=”left” animation_speed=”0.3″ animation_offset=””]
- Jika inverter konektor 40-pin tidak memiliki Pins 34 dan 35 dihuni maka cabang komunikasi CAN ke 19-Way Connector di PEC adalah kabel langsung ke CAN Backbone:
- Memperbaiki OEM Kawat Harness antara PEC dan Backbone CAN Komunikasi, kemudian pergi ke Langkah 10.
[/fusion_content_box][/fusion_content_boxes][fusion_content_boxes layout=”clean-horizontal” columns=”1″ title_size=”18px” heading_size=”3″ title_color=”#ffffff” body_color=”#ffffff” backgroundcolor=”#4f4f4f” icon=”” iconflip=”” iconrotate=”” iconspin=”no” iconcolor=”” icon_circle=”” icon_circle_radius=”” circlecolor=”” circlebordersize=”” circlebordercolor=”” outercirclebordersize=”” outercirclebordercolor=”” icon_size=”” icon_hover_type=”” hover_accent_color=”#f41000″ image=”” image_id=”” image_width=”” image_height=”” link_type=”” button_span=”” link_area=”” link_target=”” icon_align=”left” animation_type=”” animation_delay=”” animation_offset=”” animation_direction=”left” animation_speed=”0.3″ margin_top=”” margin_bottom=”” hide_on_mobile=”small-visibility,medium-visibility,large-visibility” class=”” id=””][fusion_content_box title=”LANGKAH 10. Verifikasi perbaikan.” backgroundcolor=”” icon=”” iconflip=”” iconrotate=”” iconspin=”no” iconcolor=”” circlecolor=”” circlebordersize=”” circlebordercolor=”” outercirclebordersize=”” outercirclebordercolor=”” image=”” image_id=”” image_width=”” image_height=”” link=”” linktext=”Baca lebih lajut” link_target=”” animation_type=”” animation_direction=”left” animation_speed=”0.3″ animation_offset=””]
- off kunci.
- Sambungkan kembali semua konektor dan kabel baterai negatif.
- tombol pada.
- kode jelas, Lihat Kesalahan aktif jelas.
- Menggerakkan kendaraan dan berusaha untuk me-reset kode.
- Periksa kode, Lihat Lihat Kesalahan Aktif dan Tidak Aktif.
- Jika tidak ada kode, tes selesai.
- Jika Kode kesalahan 89 muncul, menemukan kesalahan dalam pengujian, pergi ke Langkah 1.
- Jika kode selain 89 muncul, Lihat Kesalahan Daftar Kode Indeks.
[/fusion_content_box][/fusion_content_boxes][/fusion_builder_column][/fusion_builder_row][/fusion_builder_container][fusion_global id=”13788″]