[fusion_builder_container hundred_percent=”yes” hundred_percent_height=”no” hundred_percent_height_scroll=”no” hundred_percent_height_center_content=”yes” equal_height_columns=”no” menu_anchor=”” hide_on_mobile=”small-visibility,medium-visibility,large-visibility” status=”published” publish_date=”” class=”” id=”” background_color=”” background_image=”” background_position=”center center” background_repeat=”no-repeat” fade=”no” background_parallax=”none” enable_mobile=”no” parallax_speed=”0.3″ video_mp4=”” video_webm=”” video_ogv=”” video_url=”” video_aspect_ratio=”16:9″ video_loop=”yes” video_mute=”yes” video_preview_image=”” border_size=”” border_color=”” border_style=”solid” margin_top=”35″ margin_bottom=”” padding_top=”” padding_right=”” padding_bottom=”” padding_left=””][fusion_builder_row][fusion_builder_column type=”1_1″ layout=”1_1″ spacing=”” center_content=”no” link=”” target=”_self” min_height=”” hide_on_mobile=”small-visibility,medium-visibility,large-visibility” class=”” id=”” background_color=”” background_image=”” background_image_id=”” background_position=”left top” background_repeat=”no-repeat” hover_type=”none” border_size=”0″ border_color=”” border_style=”solid” border_position=”all” padding_top=”” padding_right=”” padding_bottom=”” padding_left=”” margin_top=”” margin_bottom=”” animation_type=”” animation_direction=”left” animation_speed=”0.3″ animation_offset=”” last=”no”][fusion_text columns=”” column_min_width=”” column_spacing=”” rule_style=”default” rule_size=”” rule_color=”” hide_on_mobile=”small-visibility,medium-visibility,large-visibility” class=”” id=””]
Eaton Fuller Hybrid Fault Code 17 – Begin inschakelen Relais
[/fusion_text][/fusion_builder_column][/fusion_builder_row][/fusion_builder_container][fusion_builder_container hundred_percent=”no” hundred_percent_height=”no” hundred_percent_height_scroll=”no” hundred_percent_height_center_content=”yes” equal_height_columns=”no” menu_anchor=”” hide_on_mobile=”small-visibility,medium-visibility,large-visibility” status=”published” publish_date=”” class=”” id=”” background_color=”” background_image=”” background_position=”center center” background_repeat=”no-repeat” fade=”no” background_parallax=”none” enable_mobile=”no” parallax_speed=”0.3″ video_mp4=”” video_webm=”” video_ogv=”” video_url=”” video_aspect_ratio=”16:9″ video_loop=”yes” video_mute=”yes” video_preview_image=”” border_size=”” border_color=”” border_style=”solid” margin_top=”” margin_bottom=”” padding_top=”” padding_right=”” padding_bottom=”” padding_left=””][fusion_builder_row][fusion_builder_column type=”1_1″ layout=”1_1″ spacing=”” center_content=”no” link=”” target=”_self” min_height=”” hide_on_mobile=”small-visibility,medium-visibility,large-visibility” class=”” id=”” background_color=”” background_image=”” background_image_id=”” background_position=”left top” background_repeat=”no-repeat” hover_type=”none” border_size=”0″ border_color=”” border_style=”solid” border_position=”all” padding_top=”” padding_right=”” padding_bottom=”” padding_left=”” margin_top=”” margin_bottom=”” animation_type=”” animation_direction=”left” animation_speed=”0.3″ animation_offset=”” last=”no”][fusion_text columns=”” column_min_width=”” column_spacing=”” rule_style=”default” rule_size=”” rule_color=”” hide_on_mobile=”small-visibility,medium-visibility,large-visibility” class=”” id=””]
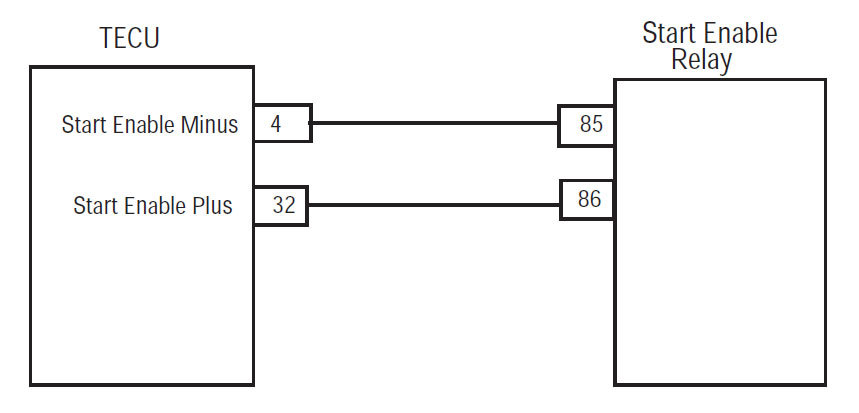
Storing code voor Eaton Hybrid Drive Systems modellen (MY08) EH-8E306A-U, EH-8E306A-UPG, EH-8E306A-UP, EH-8E306A-CD, EH-8E306A-T, EH-6E606B-CD, (MY09) EH-8E406A-E / P, EH-8E406A-UP, EH-8E406A-UPG, EH-8E406A-CD, EH-8E406A-CDG, EH-8E406A-CDR, EH-8E406A-T, EH-6E706B-CD, EH-6E706B-P en EH-6E706B-UPG. De Start inschakelen relais is aangesloten in de Unit Transmission Electronic Control (TECU) aan de spoel van het relais. Op toets op, HCM bepaalt welke startmethode te gebruiken (high-voltage Motor / Generator of Motor Starter). Als de HCM maakt gebruik van de standaard motor Starter, de 12-volt Cranking relais wordt bekrachtigd levert stroom aan de Startvrijgave Relay hoofdtoevoerleiding, dat vervolgens de bevoegdheden startrelais.
Fout code 17 – Begin inschakelen Relais Detection
De volgende randvoorwaarden moet worden voldaan voordat het systeem de fout detecteert:
- Transmission Electronic Control Unit (TECU) ontsteekspanning hoger dan 7 volt en minder dan 16 volt.
Voorwaarden voor Set Fault Code Active
- IMF 3: TECU detecteert een open of kort om VBATT in het stuurcircuit van de Start inschakelen Relais voor 1 seconde of meer.
IMF 4: TECU detecteert een kortsluiting naar de grond in het stuurcircuit van de Start inschakelen Relais voor 1 seconde of meer.
Terugval Als Fault Code 17 ingesteld gebeurt het volgende:
- Red “Service” brandt en een “F” knippert in het versnellingsweergave.
- Storing wordt opgeslagen in TECU geheugen.
- Als de storing wordt bij het opstarten van de motor nog steeds krukken, op voorwaarde dat de high-voltage batterijen hebben een voldoende State of Charge (SOC).
- Als de storing sets tijdens het rijden, het voertuig blijft werken.
[/fusion_text][fusion_text columns=”” column_min_width=”” column_spacing=”” rule_style=”default” rule_size=”” rule_color=”” hide_on_mobile=”small-visibility,medium-visibility,large-visibility” class=”” id=””]
Voorwaarden voor Set Fault Code Inactieve
Alleen Inactieve fouten kunnen worden gewist uit het TECU of HCM geschiedenis met behulp ServiceRanger. De TECU verdwijnt automatisch de fouten uit de geschiedenis na 200 uur. De HCM wist een fout uit de geschiedenis automatisch nadat het Inactief voor is geweest 200 uur.
Deze fout code kan worden veroorzaakt door een van de volgende:
- IMF 3, 4
- Losse of gecorrodeerde verbindingen, gebogen of verbrand pinnen, kortsluiting naar de massa, Open, of kort VBATT op het circuit.
- Begin inschakelen Relais
- TECU
[/fusion_text][/fusion_builder_column][/fusion_builder_row][/fusion_builder_container][fusion_builder_container hundred_percent=”no” hundred_percent_height=”no” hundred_percent_height_scroll=”no” hundred_percent_height_center_content=”yes” equal_height_columns=”no” menu_anchor=”” hide_on_mobile=”small-visibility,medium-visibility,large-visibility” status=”published” publish_date=”” class=”” id=”” background_color=”” background_image=”” background_position=”center center” background_repeat=”no-repeat” fade=”no” background_parallax=”none” enable_mobile=”no” parallax_speed=”0.3″ video_mp4=”” video_webm=”” video_ogv=”” video_url=”” video_aspect_ratio=”16:9″ video_loop=”yes” video_mute=”yes” video_preview_image=”” border_size=”” border_color=”” border_style=”solid” margin_top=”” margin_bottom=”” padding_top=”” padding_right=”” padding_bottom=”” padding_left=””][fusion_builder_row][fusion_builder_column type=”1_1″ layout=”1_1″ spacing=”” center_content=”no” link=”” target=”_self” min_height=”” hide_on_mobile=”small-visibility,medium-visibility,large-visibility” class=”” id=”” background_color=”” background_image=”” background_image_id=”” background_position=”left top” background_repeat=”no-repeat” hover_type=”none” border_size=”0″ border_color=”” border_style=”solid” border_position=”all” padding_top=”” padding_right=”” padding_bottom=”” padding_left=”” margin_top=”” margin_bottom=”” animation_type=”” animation_direction=”left” animation_speed=”0.3″ animation_offset=”” last=”no”][fusion_text columns=”” column_min_width=”” column_spacing=”” rule_style=”default” rule_size=”” rule_color=”” hide_on_mobile=”small-visibility,medium-visibility,large-visibility” class=”” id=””]
Fout code 17 – STARTVRIJGAVE Relay Test
[/fusion_text][/fusion_builder_column][/fusion_builder_row][/fusion_builder_container][fusion_builder_container hundred_percent=”no” hundred_percent_height=”no” hundred_percent_height_scroll=”no” hundred_percent_height_center_content=”yes” equal_height_columns=”no” menu_anchor=”” hide_on_mobile=”small-visibility,medium-visibility,large-visibility” status=”published” publish_date=”” class=”” id=”” background_color=”” background_image=”” background_position=”center center” background_repeat=”no-repeat” fade=”no” background_parallax=”none” enable_mobile=”no” parallax_speed=”0.3″ video_mp4=”” video_webm=”” video_ogv=”” video_url=”” video_aspect_ratio=”16:9″ video_loop=”yes” video_mute=”yes” video_preview_image=”” border_size=”” border_color=”” border_style=”solid” margin_top=”” margin_bottom=”” padding_top=”” padding_right=”” padding_bottom=”” padding_left=””][fusion_builder_row][fusion_builder_column type=”1_1″ layout=”1_1″ spacing=”” center_content=”no” link=”” target=”_self” min_height=”” hide_on_mobile=”small-visibility,medium-visibility,large-visibility” class=”” id=”” background_color=”” background_image=”” background_image_id=”” background_position=”left top” background_repeat=”no-repeat” hover_type=”none” border_size=”0″ border_color=”” border_style=”solid” border_position=”all” padding_top=”” padding_right=”” padding_bottom=”” padding_left=”” margin_top=”” margin_bottom=”” animation_type=”” animation_direction=”left” animation_speed=”0.3″ animation_offset=”” last=”no”][fusion_text columns=”” column_min_width=”” column_spacing=”” rule_style=”default” rule_size=”” rule_color=”” hide_on_mobile=”small-visibility,medium-visibility,large-visibility” class=”” id=””]
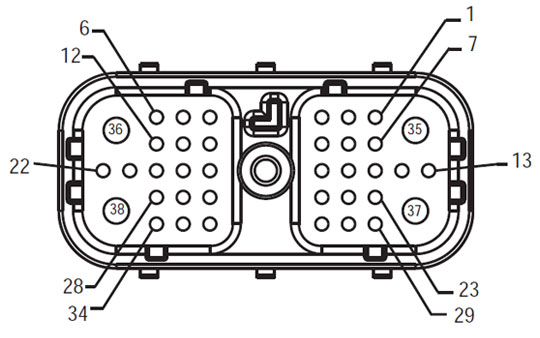
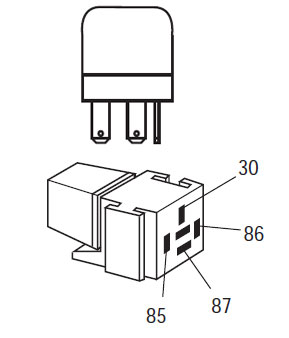
Identificatie van de onderdelen:
[/fusion_text][/fusion_builder_column][fusion_builder_column type=”2_3″ layout=”1_2″ spacing=”” center_content=”no” link=”” target=”_self” min_height=”” hide_on_mobile=”small-visibility,medium-visibility,large-visibility” class=”” id=”” background_color=”” background_image=”” background_image_id=”” background_position=”left top” background_repeat=”no-repeat” hover_type=”none” border_size=”0″ border_color=”” border_style=”solid” border_position=”all” padding_top=”” padding_right=”” padding_bottom=”” padding_left=”” margin_top=”” margin_bottom=”” animation_type=”” animation_direction=”left” animation_speed=”0.3″ animation_offset=”” last=”no”][fusion_imageframe image_id=”14126|full” max_width=”” style_type=”” blur=”” stylecolor=”” hover_type=”none” bordersize=”” bordercolor=”” borderradius=”” align=”center” lightbox=”no” gallery_id=”” lightbox_image=”” lightbox_image_id=”” alt=”Harness Frontaal TECU – Voertuig Interface Connector” link=”” linktarget=”_self” hide_on_mobile=”small-visibility,medium-visibility,large-visibility” class=”” id=”” animation_type=”” animation_direction=”left” animation_speed=”0.3″ animation_offset=””]https://www.globaltransmissionsupply.com/wp-content/uploads/Harness-Front-View-TECU.jpg[/fusion_imageframe][fusion_text columns=”” column_min_width=”” column_spacing=”” rule_style=”default” rule_size=”” rule_color=”” hide_on_mobile=”small-visibility,medium-visibility,large-visibility” class=”” id=””]
Voorzijde Harness View
(TECU – Voertuig Interface Connecto
[/fusion_text][/fusion_builder_column][fusion_builder_column type=”1_3″ layout=”1_2″ spacing=”” center_content=”no” link=”” target=”_self” min_height=”” hide_on_mobile=”small-visibility,medium-visibility,large-visibility” class=”” id=”” background_color=”” background_image=”” background_image_id=”” background_position=”left top” background_repeat=”no-repeat” hover_type=”none” border_size=”0″ border_color=”” border_style=”solid” border_position=”all” padding_top=”” padding_right=”” padding_bottom=”” padding_left=”” margin_top=”” margin_bottom=”” animation_type=”” animation_direction=”left” animation_speed=”0.3″ animation_offset=”” last=”no”][fusion_imageframe image_id=”14063|full” max_width=”” style_type=”” blur=”” stylecolor=”” hover_type=”none” bordersize=”” bordercolor=”” borderradius=”” align=”center” lightbox=”no” gallery_id=”” lightbox_image=”” lightbox_image_id=”” alt=”relaisschakelaar” link=”” linktarget=”_self” hide_on_mobile=”small-visibility,medium-visibility,large-visibility” class=”” id=”” animation_type=”” animation_direction=”left” animation_speed=”0.3″ animation_offset=””]https://www.globaltransmissionsupply.com/wp-content/uploads/Typical-Relay-Switch.jpg[/fusion_imageframe][fusion_text columns=”” column_min_width=”” column_spacing=”” rule_style=”default” rule_size=”” rule_color=”” hide_on_mobile=”small-visibility,medium-visibility,large-visibility” class=”” id=””]
Typische Relaisschakelaar
[/fusion_text][/fusion_builder_column][fusion_builder_column type=”1_1″ layout=”1_1″ spacing=”” center_content=”no” link=”” target=”_self” min_height=”” hide_on_mobile=”small-visibility,medium-visibility,large-visibility” class=”” id=”” background_image_id=”” background_color=”#000000″ background_image=”” background_position=”left top” undefined=”” background_repeat=”no-repeat” hover_type=”none” border_size=”0″ border_color=”” border_style=”solid” border_position=”all” padding_top=”” padding_right=”” padding_bottom=”” padding_left=”” margin_top=”” margin_bottom=”” animation_type=”” animation_direction=”left” animation_speed=”0.3″ animation_offset=”” last=”no”][fusion_text columns=”” column_min_width=”” column_spacing=”” rule_style=”default” rule_size=”” rule_color=”” hide_on_mobile=”small-visibility,medium-visibility,large-visibility” class=”” id=””]
NOTITIE: Verwijs naar de Eaton Hybrid Component en aansluiting Plaats voor Connector Locaties in MY08 Systems
[/fusion_text][/fusion_builder_column][fusion_builder_column type=”1_1″ spacing=”” center_content=”no” link=”” target=”_self” min_height=”” hide_on_mobile=”small-visibility,medium-visibility,large-visibility” class=”” id=”” background_image_id=”” background_color=”#000000″ background_image=”” background_position=”left top” undefined=”” background_repeat=”no-repeat” hover_type=”none” border_size=”0″ border_color=”” border_style=”solid” border_position=”all” padding_top=”” padding_right=”” padding_bottom=”” padding_left=”” margin_top=”25″ margin_bottom=”” animation_type=”” animation_direction=”left” animation_speed=”0.3″ animation_offset=”” last=”no”][fusion_text columns=”” column_min_width=”” column_spacing=”” rule_style=”default” rule_size=”” rule_color=”” hide_on_mobile=”small-visibility,medium-visibility,large-visibility” class=”” id=””]
NOTITIE: Verwijs naar de Eaton Hybrid Component en aansluiting Plaats voor Connector Locaties in MY09 Systems.
[/fusion_text][/fusion_builder_column][fusion_builder_column type=”1_1″ layout=”1_1″ spacing=”” center_content=”no” link=”” target=”_self” min_height=”” hide_on_mobile=”small-visibility,medium-visibility,large-visibility” class=”” id=”” background_color=”” background_image=”” background_image_id=”” background_position=”left top” background_repeat=”no-repeat” hover_type=”none” border_size=”0″ border_color=”” border_style=”solid” border_position=”all” padding_top=”” padding_right=”” padding_bottom=”” padding_left=”” margin_top=”” margin_bottom=”” animation_type=”” animation_direction=”left” animation_speed=”0.3″ animation_offset=”” last=”no”][fusion_imageframe image_id=”14142|full” max_width=”” style_type=”” blur=”” stylecolor=”” hover_type=”none” bordersize=”” bordercolor=”” borderradius=”” align=”center” lightbox=”no” gallery_id=”” lightbox_image=”” lightbox_image_id=”” alt=”Eaton Fuller TECU startvrijgave relaisaansluiting” link=”” linktarget=”_self” hide_on_mobile=”small-visibility,medium-visibility,large-visibility” class=”” id=”” animation_type=”” animation_direction=”left” animation_speed=”0.3″ animation_offset=””]https://www.globaltransmissionsupply.com/wp-content/uploads/TECU-start-enable-relay-connection.jpg[/fusion_imageframe][/fusion_builder_column][/fusion_builder_row][/fusion_builder_container][fusion_builder_container hundred_percent=”no” hundred_percent_height=”no” hundred_percent_height_scroll=”no” hundred_percent_height_center_content=”yes” equal_height_columns=”no” menu_anchor=”” hide_on_mobile=”small-visibility,medium-visibility,large-visibility” status=”published” publish_date=”” class=”” id=”” background_color=”” background_image=”” background_position=”center center” background_repeat=”no-repeat” fade=”no” background_parallax=”none” enable_mobile=”no” parallax_speed=”0.3″ video_mp4=”” video_webm=”” video_ogv=”” video_url=”” video_aspect_ratio=”16:9″ video_loop=”yes” video_mute=”yes” video_preview_image=”” border_size=”” border_color=”” border_style=”solid” margin_top=”” margin_bottom=”” padding_top=”” padding_right=”” padding_bottom=”” padding_left=””][fusion_builder_row][fusion_builder_column type=”1_1″ layout=”1_1″ spacing=”” center_content=”no” link=”” target=”_self” min_height=”” hide_on_mobile=”small-visibility,medium-visibility,large-visibility” class=”” id=”” background_color=”” background_image=”” background_image_id=”” background_position=”left top” background_repeat=”no-repeat” hover_type=”none” border_size=”0″ border_color=”” border_style=”solid” border_position=”all” padding_top=”” padding_right=”” padding_bottom=”” padding_left=”” margin_top=”” margin_bottom=”” animation_type=”” animation_direction=”left” animation_speed=”0.3″ animation_offset=”” last=”no”][fusion_modal name=”warnings_cautions” title=”waarschuwingen & waarschuwingen” size=”large” background=”” border_color=”” show_footer=”yes” class=”” id=””]Gevaar: Gevaar betekent zult u ernstig gewond raken of gedood als niet de aangegeven procedure niet volgen.
Waarschuwing: Waarschuwing duidt op een onmiddellijk gevaar, die kan leiden tot ernstig persoonlijk letsel als je niet de aangegeven procedure te volgen.
Voorzichtigheid: Let op geeft voertuig of materiële schade zou kunnen ontstaan als je niet de aangegeven procedure te volgen.
Notitie: Note geeft bijkomende details die helpen bij de diagnose of reparatie van een onderdeel / systeem.
Volg de voorgeschreven procedures in de aangegeven volgorde om persoonlijk letsel te voorkomen:
1. Als het hoogspanningsnet kegels zijn rond het voertuig en de lock-out is geïnstalleerd op de PEC, de enige persoon die moet worden toegestaan om het voertuig te starten is de persoon die de lockout tag ondertekend.
2. Voor werkzaamheden aan een voertuig of de cabine te verlaten, terwijl de motor loopt, moet u de versnellingspook in “N” plaatsen trek de handrem, en blokkeren de wielen.
3. Voor veiligheidsredenen, altijd de bedrijfsremmen aangrijpen vóór selectie schakelstanden van “N.”
4. Voordat u begint met een voertuig altijd zitten in de bestuurdersstoel, Selecteer “N” op de schakelbesturingsinrichting, en stel de handrem.
5. In voertuigen met EPTO, de motor en / of
Motor / Generator kan starten in EPTO modus. Voer nooit onderhoud of werken aan het voertuig, In deze modus.
6. 12-Volt batterij positief (+) en negatieve (-) moet vooraf worden losgekoppeld laswerkzaamheden op een hybride voertuig uitgerust.
Voorzichtigheid: Volg de voorgeschreven procedures in de aangegeven volgorde om apparatuur storingen of schade te voorkomen.
Voorzichtigheid: Laat de parkeerrem niet vrijgeven of een poging om een versnelling te selecteren totdat de luchtdruk op het juiste niveau.
Voorzichtigheid: Om beschadiging van de transmissie tijdens het slepen plaats de schakelhefboom in “N” te vermijden en til de aandrijfwielen van de grond en koppel de aandrijflijn.
High-Voltage Waarschuwingen & waarschuwingen
- Gebruik CO2 of Dry Chemical Brandblussers.
- De hoogspanning bedrading bedekt met oranje isolatie of gekronkelde slangen en aangegeven met waarschuwingen op de connectoren.
- Alle Eaton® Hybride Diesel / Elektrische voertuigen zullen worden gemarkeerd als ‘Hybrid’ aan de buitenzijde van het voertuig, samen met de verschuiving label op het dashboard.
- Raadpleeg OEM voor specifieke locatie van het chassis gemonteerde hybridecomponenten.
- Knip niet in de oranje hoogspanningskabels.
- Niet snijden in of open de PEC.
- Knip niet in of de DC / DC-converter te openen.
- Niet snijden in of open de Inverter.
Een bufferzone moet worden opgezet en hoogspanningsinstallaties geïsoleerde rubberhandschoenen (klasse 0 met lederen beschermers) zijn voorafgaand moeten aan hoogspanning. Het negeren van deze instructies kan leiden tot ernstig persoonlijk letsel of de dood.
De rubber isolerende handschoenen die moeten worden gedragen tijdens het werken op de high-voltage systeem zijn klasse 0 met lederen beschermers. De rubberen handschoenen moeten worden getest voor elk gebruik na de rubberen isolatie handschoenen testprocedure vinden in “Diagnostic Tools / Dienst Publicaties” op pagina 6. Het negeren van deze instructies kan leiden tot ernstig persoonlijk letsel of de dood.
Voordat het inspecteren of werken op elk hoogspanningskabels of onderdelen van het “High-Voltage service Shutdown en Power-Up procedure” op pagina 4 moet worden gevolgd. Het negeren van deze instructies kan leiden tot ernstig persoonlijk letsel of de dood.
De Lockout en Tagout apparaten mag alleen worden verwijderd door de technicus die de Lockout en Tagout op het voertuig geplaatst. Het negeren van deze instructies kan leiden tot ernstig persoonlijk letsel of de dood.
Hoogspanning rubber isolerende handschoenen (klasse 0 met lederen beschermers) moet gedragen worden bij het werken op een
hoogspanningskabels. De “High-Voltage service Shutdown en Power-Up procedure” op pagina 4 moet voor worden gevolgd om het verwijderen van hoogspanningskabels. Het negeren van deze instructies kan leiden tot ernstig persoonlijk letsel of de dood.
Hoogspanningskabels en bedrading zijn oranje en voorzien van een waarschuwingslabel op de connectoren. Hoogspanningsonderdelen worden gemarkeerd met een label. Hoogspanning rubber isolerende handschoenen (klasse 0 met lederen beschermers) moeten worden bij het werken op een van deze componenten. Het negeren van deze instructies kan leiden tot ernstig persoonlijk letsel of de dood.
High-Voltage Dienst Uitschakelprocedures

1. Volg de “High-Voltage Work Area” -procedure.
2. Zoek de rode PEC Dienst Switch aan de voorzijde van de PEC en druk uit te schakelen.
3. Verwijder de Dienst Switch Cover en installeer de Lockout Bracket (J48506).
4. Bevestig tag aan de Lockout Bracket.
5. Zorg ervoor dat de PEC Dienst Switch kan niet verplaatsen van de uit-stand.
6. Laat het systeem in te stellen voor een minimum van 5 minuten hoogspanningsontlading.
7. Sluit ServiceRanger en bekijk de Data Monitor PID 116 genaamd “High-Voltage Potential Battery.” Gebruik SPN 520323 voor J1939 aansluiting “Battery Voltage RB” (relaiskast).
8. De spanning moet 30 volt of minder. Indien de spanning boven 30 volt, werken niet op het voertuig en neem contact op Eaton® bij 1-800-826-HELP (4357).
9. Draai de contactsleutel uit en ga verder met repareren of stap het oplossen van problemen.
Notitie: De spanning daalt tot nul wanneer de sleutel uit.
High-Voltage dienst Power-Up Procedure
1. Installeer alle high-voltage connectoren in hun vergrendelde positie.
2. Als je de persoon die werkzaamheden aan het voertuig, verwijder de Lockout Bracket en tag.
3. Installeer de Lockout beugel over de Dienst Switch.
4. Trek de Dienst Schakel uit en laat het voertuig set voor 2 notulen.
5. Start vehicle when appropriate.[/fusion_modal][fusion_modal name=”component_location” title=”Eaton Hybrid Component en aansluiting Plaats ” size=”large” background=”#ffffff” border_color=”” show_footer=”yes” class=”” id=””]

[/fusion_modal][fusion_modal name=”component_location2″ title=”Eaton Hybrid Component en aansluiting Plaats MY09 Systems” size=”large” background=”#ffffff” border_color=”” show_footer=”yes” class=”” id=””]

[/fusion_modal][/fusion_builder_column][/fusion_builder_row][/fusion_builder_container][fusion_builder_container hundred_percent=”no” hundred_percent_height=”no” hundred_percent_height_scroll=”no” hundred_percent_height_center_content=”yes” equal_height_columns=”no” menu_anchor=”” hide_on_mobile=”small-visibility,medium-visibility,large-visibility” status=”published” publish_date=”” class=”” id=”” background_color=”” background_image=”” background_position=”center center” background_repeat=”no-repeat” fade=”no” background_parallax=”none” enable_mobile=”no” parallax_speed=”0.3″ video_mp4=”” video_webm=”” video_ogv=”” video_url=”” video_aspect_ratio=”16:9″ video_loop=”yes” video_mute=”yes” video_preview_image=”” border_size=”” border_color=”” border_style=”solid” margin_top=”” margin_bottom=”” padding_top=”” padding_right=”” padding_bottom=”” padding_left=””][fusion_builder_row][fusion_builder_column type=”1_1″ layout=”1_1″ spacing=”” center_content=”no” link=”” target=”_self” min_height=”” hide_on_mobile=”small-visibility,medium-visibility,large-visibility” class=”” id=”” background_color=”” background_image=”” background_image_id=”” background_position=”left top” background_repeat=”no-repeat” hover_type=”none” border_size=”0″ border_color=”” border_style=”solid” border_position=”all” padding_top=”” padding_right=”” padding_bottom=”” padding_left=”” margin_top=”” margin_bottom=”” animation_type=”” animation_direction=”left” animation_speed=”0.3″ animation_offset=”” last=”no”][fusion_content_boxes layout=”clean-horizontal” columns=”1″ title_size=”18px” heading_size=”3″ title_color=”#ffffff” body_color=”#ffffff” backgroundcolor=”#4f4f4f” icon=”” iconflip=”” iconrotate=”” iconspin=”no” iconcolor=”” icon_circle=”” icon_circle_radius=”” circlecolor=”” circlebordersize=”” circlebordercolor=”” outercirclebordersize=”” outercirclebordercolor=”” icon_size=”” icon_hover_type=”” hover_accent_color=”” image=”” image_id=”” image_width=”” image_height=”” link_type=”” button_span=”” link_area=”” link_target=”” icon_align=”left” animation_type=”” animation_delay=”” animation_offset=”” animation_direction=”left” animation_speed=”0.3″ margin_top=”” margin_bottom=”” hide_on_mobile=”small-visibility,medium-visibility,large-visibility” class=”” id=””][fusion_content_box title=”STAP 1. Controleer voor actieve of inactieve toestand foutcode en FMIS aanwezig.” backgroundcolor=”” icon=”” iconflip=”” iconrotate=”” iconspin=”no” iconcolor=”” circlecolor=”” circlebordersize=”” circlebordercolor=”” outercirclebordersize=”” outercirclebordercolor=”” image=”” image_id=”” image_width=”” image_height=”” link=”” linktext=”Lees verder” link_target=”” animation_type=”” animation_direction=”left” animation_speed=”0.3″ animation_offset=””]
- Herzien en volg de waarschuwingen & waarschuwingen.
- Ophalen Actieve foutcodes en FMIS met ServiceRanger met behulp van de 9-polige diagnose-aansluiting.
- Ruil de huidige Startvrijgave relais met een ander relais en te zien als de fout terugkeert:
- Wanneer het probleem niet terugkeert met nieuwe relais, vervang de Startvrijgave Relay (alleen als foutcode is Active), ga dan naar stap 6.
- Wanneer het probleem komt terug met nieuwe relais, ga dan naar stap 2.
[/fusion_content_box][/fusion_content_boxes][fusion_content_boxes layout=”clean-horizontal” columns=”1″ title_size=”18px” heading_size=”3″ title_color=”#ffffff” body_color=”#ffffff” backgroundcolor=”#4f4f4f” icon=”” iconflip=”” iconrotate=”” iconspin=”no” iconcolor=”” icon_circle=”” icon_circle_radius=”” circlecolor=”” circlebordersize=”” circlebordercolor=”” outercirclebordersize=”” outercirclebordercolor=”” icon_size=”” icon_hover_type=”” hover_accent_color=”” image=”” image_id=”” image_width=”” image_height=”” link_type=”” button_span=”” link_area=”” link_target=”” icon_align=”left” animation_type=”” animation_delay=”” animation_offset=”” animation_direction=”left” animation_speed=”0.3″ margin_top=”” margin_bottom=”” hide_on_mobile=”small-visibility,medium-visibility,large-visibility” class=”” id=””][fusion_content_box title=”STEP 2.Verify FMI set.” backgroundcolor=”” icon=”” iconflip=”” iconrotate=”” iconspin=”no” iconcolor=”” circlecolor=”” circlebordersize=”” circlebordercolor=”” outercirclebordersize=”” outercirclebordercolor=”” image=”” image_id=”” image_width=”” image_height=”” link=”” linktext=”Lees verder” link_target=”” animation_type=”” animation_direction=”left” animation_speed=”0.3″ animation_offset=””]
- Welke FMIS werden opgenomen van Step 1?
- Als FMI 3 is genoteerd, ga dan naar stap 3.
- Als FMI 4 is genoteerd, ga dan naar stap 5.
[/fusion_content_box][/fusion_content_boxes][fusion_content_boxes layout=”clean-horizontal” columns=”2″ title_size=”18px” heading_size=”3″ title_color=”#ffffff” body_color=”#ffffff” backgroundcolor=”#4f4f4f” icon=”” iconflip=”” iconrotate=”” iconspin=”no” iconcolor=”” icon_circle=”” icon_circle_radius=”” circlecolor=”” circlebordersize=”” circlebordercolor=”” outercirclebordersize=”” outercirclebordercolor=”” icon_size=”” icon_hover_type=”” hover_accent_color=”” image=”” image_id=”” image_width=”” image_height=”” link_type=”” button_span=”” link_area=”” link_target=”” icon_align=”left” animation_type=”” animation_delay=”” animation_offset=”” animation_direction=”left” animation_speed=”0.3″ margin_top=”” margin_bottom=”” hide_on_mobile=”small-visibility,medium-visibility,large-visibility” class=”” id=””][fusion_content_box title=”STEP 3.Verify continuïteit van Transmission Harness circuits.” backgroundcolor=”” icon=”” iconflip=”” iconrotate=”” iconspin=”no” iconcolor=”” circlecolor=”” circlebordersize=”” circlebordercolor=”” outercirclebordersize=”” outercirclebordercolor=”” image=”” image_id=”” image_width=”” image_height=”” link=”” linktext=”Lees verder” link_target=”” animation_type=”” animation_direction=”left” animation_speed=”0.3″ animation_offset=””]
- Key off.
- Koppel de negatieve kabel van de accu.
- Koppel de Transmission Harness 38- verbindingselement.
- Meet de weerstand tussen voertuig Harness 38- Way Connector Pin 32 en Pin 4:
- Als weerstand tussen Pin 32 en Pin 4 is 40-120 ohm, ga dan naar stap 4.
- Als de weerstand buiten bereik, repareren voertuig harnas een onderbreking, ga dan naar stap 6.
[/fusion_content_box][fusion_content_box title=”STAP 4.Verify spanningen bij Transmission Harness.” backgroundcolor=”” icon=”” iconflip=”” iconrotate=”” iconspin=”no” iconcolor=”” circlecolor=”” circlebordersize=”” circlebordercolor=”” outercirclebordersize=”” outercirclebordercolor=”” image=”” image_id=”” image_width=”” image_height=”” link=”” linktext=”Lees verder” link_target=”” animation_type=”” animation_direction=”left” animation_speed=”0.3″ animation_offset=””]
- sleutel op.
- Meet de spanning tussen Vehicle Harness 38-polige stekker Pin 32 en gemalen:
Notitie: De spanning leest 5 volt voor slechts 1-2 seconden- Als de spanning tussen Pin 32 en grond 5 volt, vervang de Unit Transmission Electronic Control (TECU) (alleen als foutcode is Active), ga dan naar stap 6.
- Als de spanning tussen Pin 32 en grond 12 volt, het herstel van de korte tot VBATT op het harnas. De spanning moet bij blijven 5 volt gedurende 1-2 seconden na beginsleutel op. Ga naar stap 6.
[/fusion_content_box][/fusion_content_boxes][fusion_content_boxes layout=”clean-horizontal” columns=”2″ title_size=”18px” heading_size=”3″ title_color=”#ffffff” body_color=”#ffffff” backgroundcolor=”#4f4f4f” icon=”” iconflip=”” iconrotate=”” iconspin=”no” iconcolor=”” icon_circle=”” icon_circle_radius=”” circlecolor=”” circlebordersize=”” circlebordercolor=”” outercirclebordersize=”” outercirclebordercolor=”” icon_size=”” icon_hover_type=”” hover_accent_color=”#f41000″ image=”” image_id=”” image_width=”” image_height=”” link_type=”” button_span=”” link_area=”” link_target=”” icon_align=”left” animation_type=”” animation_delay=”” animation_offset=”” animation_direction=”left” animation_speed=”0.3″ margin_top=”” margin_bottom=”” hide_on_mobile=”small-visibility,medium-visibility,large-visibility” class=”” id=””][fusion_content_box title=”STAP 5. Controleer de continuïteit van de transmissie Harness circuits met aarde.” backgroundcolor=”” icon=”” iconflip=”” iconrotate=”” iconspin=”” iconcolor=”” circlecolor=”” circlebordersize=”” circlebordercolor=”” outercirclebordersize=”” outercirclebordercolor=”” image=”” image_id=”” image_width=”” image_height=”” link=”” linktext=”” link_target=”” animation_type=”” animation_direction=”left” animation_speed=”0.3″ animation_offset=””]
- Key off.
- Koppel de accu los.
- Koppel de Transmission Harness 38- Way Connector. Meet de weerstand tussen Vehicle Harness 38- Way Connector Pin 32 en gemalen:
- Indien de weerstand tussen 32 en grond 10K ohm of meer, vervang de Unit Transmission Electronic Control (TECU) (alleen als foutcode is Active), ga dan naar stap 6.
- Als de weerstand buiten bereik, het herstel van de Vehicle Harness voor een korte aan de grond, ga dan naar stap 6.
[/fusion_content_box][fusion_content_box title=”STAP 6. Controleer of reparatie.” backgroundcolor=”” icon=”” iconflip=”” iconrotate=”” iconspin=”no” iconcolor=”” circlecolor=”” circlebordersize=”” circlebordercolor=”” outercirclebordersize=”” outercirclebordercolor=”” image=”” image_id=”” image_width=”” image_height=”” link=”” linktext=”Lees verder” link_target=”” animation_type=”” animation_direction=”left” animation_speed=”0.3″ animation_offset=””]
- Key off.
- Sluit alle stekkers en negatieve accukabel.
- sleutel op.
- Clear codes, zien Clear Inactieve Storingen.
- Het voertuig rijdt en probeer de code opnieuw in te stellen.
- Controleer op codes, zien Toon actieve en inactieve Storingen.
- Als er geen codes, test is voltooid.
- Als fout Code 17 komt naar voren, vind fout bij het testen, ga dan naar stap 1.
- Als een code anders dan 17 komt naar voren, zien Storing Code Index List.
[/fusion_content_box][/fusion_content_boxes][/fusion_builder_column][/fusion_builder_row][/fusion_builder_container][fusion_global id=”13788″]