[fusion_builder_container hundred_percent=yeshundred_percent_height=nohundred_percent_height_scroll=nohundred_percent_height_center_content=yesequal_height_columns=nomenu_anchor=”” hide_on_mobile=small-visibility,medium-visibility,large-visibilitystatus=publishedpublish_date=”” class=”” id=”” background_color=”” background_image=https://www.globaltransmissionsupply.com/wp-content/uploads/gears-dark-overlay.jpgbackground_position=center centerbackground_repeat=no-repeatfade=nobackground_parallax=noneenable_mobile=noparallax_speed=”0.3″ video_mp4=”” video_webm=”” video_ogv=”” video_url=”” video_aspect_ratio=”16:9″ video_loop=yesvideo_mute=yesvideo_preview_image=”” border_size=”” border_color=”” border_style=solidmargin_top=”” margin_bottom=”” padding_top=”3%” padding_right=”” padding_bottom=”3%” padding_left=””][fusion_builder_row][fusion_builder_column type=”1_1layout=”1_1spacing=”” center_content=nolink=”” target=_selfmin_height=”” hide_on_mobile=small-visibility,medium-visibility,large-visibilityclass=”” id=”” background_image_id=”” background_color=rgba(0,0,0,0.4)” background_image=”” background_position=left topundefined=”” background_repeat=no-repeathover_type=noneborder_size=”0″ border_color=”” border_style=solidborder_position=allpadding_top=”” padding_right=”” padding_bottom=”” padding_left=”” margin_top=”” margin_bottom=”” animation_type=”” animation_direction=leftanimation_speed=”0.3″ animation_offset=”” last=no”][fusion_text columns=”” column_min_width=”” column_spacing=”” rule_style=defaultrule_size=”” rule_color=”” hide_on_mobile=small-visibility,medium-visibility,large-visibilityclass=”” id=””]

イートンフラー伝送フォルトコード

[/fusion_text][/fusion_builder_column][/fusion_builder_row][/fusion_builder_container][fusion_builder_container hundred_percent=nohundred_percent_height=nohundred_percent_height_scroll=nohundred_percent_height_center_content=yesequal_height_columns=nomenu_anchor=”” hide_on_mobile=small-visibility,medium-visibility,large-visibilitystatus=publishedpublish_date=”” class=”” id=”” background_color=”” background_image=”” background_position=center centerbackground_repeat=no-repeatfade=nobackground_parallax=noneenable_mobile=noparallax_speed=”0.3″ video_mp4=”” video_webm=”” video_ogv=”” video_url=”” video_aspect_ratio=”16:9″ video_loop=yesvideo_mute=yesvideo_preview_image=”” border_size=”” border_color=”” border_style=solidmargin_top=”25″ margin_bottom=”” padding_top=”” padding_right=”” padding_bottom=”” padding_left=””][fusion_builder_row][fusion_builder_column type=”1_1layout=”1_1spacing=”” center_content=nolink=”” target=_selfmin_height=”” hide_on_mobile=small-visibility,medium-visibility,large-visibilityclass=”” id=”” background_color=”” background_image=”” background_image_id=”” background_position=left topbackground_repeat=no-repeathover_type=noneborder_size=”0″ border_color=”” border_style=solidborder_position=allpadding_top=”” padding_right=”” padding_bottom=”” padding_left=”” margin_top=”” margin_bottom=”” animation_type=”” animation_direction=leftanimation_speed=”0.3″ animation_offset=”” last=no”][fusion_text columns=”” column_min_width=”” column_spacing=”” rule_style=defaultrule_size=”” rule_color=”” hide_on_mobile=small-visibility,medium-visibility,large-visibilityclass=”” id=””]

手動イートンフラー伝送フォルトコードを取得

[/fusion_text][fusion_separator style_type=defaulthide_on_mobile=small-visibility,medium-visibility,large-visibilityclass=”” id=”” sep_color=”#0038a0top_margin=”” bottom_margin=”20″ border_size=”” icon=”” icon_circle=”” icon_circle_color=”” width=”20%” alignment=left” /][fusion_text columns=”” column_min_width=”” column_spacing=”” rule_style=defaultrule_size=”” rule_color=”” hide_on_mobile=small-visibility,medium-visibility,large-visibilityclass=”” id=””]

見つけるために、このページの指示に従ってください, テストしてフレイトライナーの障害コードのエラーを修正する方法を学びます, マック, ピータービルト, ケンワース, ボルボと国際トラック. システムの自己診断モードを有効にすることにより、イートンフラー伝送故障コードを取得. あなたのフォルトコードを持っていたら、, 説明を見つけるために、下記の表にスクロール.

Fault code pointing to a failed unit? Rebuilt Eaton Fuller transmissions そして replacement transmission parts ship same day from Pro Gear & 送信 — または電話する 877-776-4600.

注意: また、PCを使用することができます- ベースのサービス・ツール, このようServiceRangerは、故障コードを取得すると.

[/fusion_text][/fusion_builder_column][fusion_builder_column type=”1_2layout=”1_2spacing=”” center_content=nolink=”” target=_selfmin_height=”” hide_on_mobile=small-visibility,medium-visibility,large-visibilityclass=”” id=”” background_color=”” background_image=”” background_image_id=”” background_position=left topbackground_repeat=no-repeathover_type=noneborder_size=”0″ border_color=”” border_style=solidborder_position=allpadding_top=”” padding_right=”” padding_bottom=”” padding_left=”” margin_top=”” margin_bottom=”” animation_type=”” animation_direction=leftanimation_speed=”0.3″ animation_offset=”” last=no”][fusion_text columns=”” column_min_width=”” column_spacing=”” rule_style=defaultrule_size=”” rule_color=”” hide_on_mobile=small-visibility,medium-visibility,large-visibilityclass=”” id=””]

    1. ニュートラルにシフトレバーを配置.
    2. パーキングブレーキを設定します。.
    3. エンジンをオフにした状態で上キーを回し.
      注意: エンジンがすでに実行されている場合, あなたはまだコードを検索することができます; しかしながら, エンジンストール場合はスターターを係合しません.
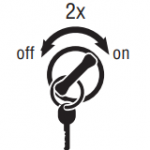
    4. アクティブコードを取得します: 上のキー. オフとオンのキーを回し 2 上のキーで終わる5秒以内に回. 後に 5 秒, サービスの光は、2桁の故障コードを点滅し. 何の障害には有効でない場合, サービス光はコードを点滅します 25 (何のコードありません).
      注意: 「88」の表示の通常のパワーアップテストされているキーでダッシュに表示します フォルトコードの手動テスト
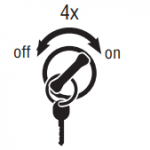
    5. 非アクティブコードを取得します: 上のキーを回し. オフとオンのキーを回し 4 上の位置にあるキーで終了する5秒以内に回. 後に 5 秒, サービスの光は、2桁の故障コードを点滅し. 何の障害には有効でない場合, サービス光はコードを点滅します 25 (何のコードありません).コードの手動検索を障害
      • 2桁の故障コードは、ギアディスプレイに表示されます. いくつかの車両は、サービス光を備えていてもよいです.
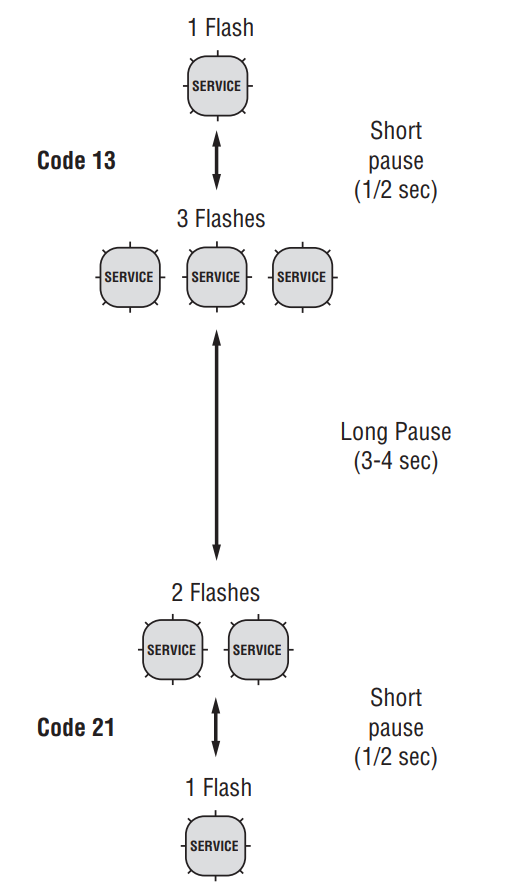
    6. サービス光の点滅のシーケンスを観察し、コードを記録. A 1- 2秒のポーズにそれぞれ格納されたコードを分離します, すべてのコードが点滅された後、シーケンスが自動的に繰り返されます.
[/fusion_text][/fusion_builder_column][fusion_builder_column type=”1_2layout=”1_2spacing=”” center_content=nolink=”” target=_selfmin_height=”” hide_on_mobile=small-visibility,medium-visibility,large-visibilityclass=”” id=”” background_color=”” background_image=”” background_image_id=”” background_position=left topbackground_repeat=no-repeathover_type=noneborder_size=”0″ border_color=”” border_style=solidborder_position=allpadding_top=”” padding_right=”” padding_bottom=”” padding_left=”” margin_top=”” margin_bottom=”” animation_type=”” animation_direction=leftanimation_speed=”0.3″ animation_offset=”” last=no”][fusion_imageframe image_id=”13871|fullmax_width=”” style_type=”” blur=”” stylecolor=”” hover_type=nonebordersize=”” bordercolor=”” borderradius=”” align=nonelightbox=nogallery_id=”” lightbox_image=”” lightbox_image_id=”” alt=”イートンフラー伝送故障コード- 手動フォルトコード・シーケンスを読み取る方法 ” link=”” linktarget=_selfhide_on_mobile=small-visibility,medium-visibility,large-visibilityclass=”” id=”” animation_type=”” animation_direction=leftanimation_speed=”0.3″ animation_offset=””]https://www.globaltransmissionsupply.com/wp-content/uploads/fault-code-sequence-flash-e1553099338337.png[/fusion_imageframe][/fusion_builder_column][fusion_builder_column type=”1_1layout=”1_1spacing=”” center_content=nolink=”” target=_selfmin_height=”” hide_on_mobile=small-visibility,medium-visibility,large-visibilityclass=”” id=”” background_color=”” background_image=”” background_image_id=”” background_position=left topbackground_repeat=no-repeathover_type=noneborder_size=”0″ border_color=”” border_style=solidborder_position=allpadding_top=”” padding_right=”” padding_bottom=”” padding_left=”” margin_top=”” margin_bottom=”” animation_type=”” animation_direction=leftanimation_speed=”0.3″ animation_offset=”” last=no”][fusion_text columns=”” column_min_width=”” column_spacing=”” rule_style=defaultrule_size=”” rule_color=”” hide_on_mobile=small-visibility,medium-visibility,large-visibilityclass=”” id=””]

手動でフォルトコードをクリア

[/fusion_text][fusion_separator style_type=defaulthide_on_mobile=small-visibility,medium-visibility,large-visibilityclass=”” id=”” sep_color=”#0038a0top_margin=”” bottom_margin=”20″ border_size=”” icon=”” icon_circle=”” icon_circle_color=”” width=”20%” alignment=left” /][fusion_text columns=”” column_min_width=”” column_spacing=”” rule_style=defaultrule_size=”” rule_color=”” hide_on_mobile=small-visibility,medium-visibility,large-visibilityclass=”” id=””]

次の手順では、TECUのメモリからすべての非アクティブの故障コードをクリア. 障害が修正されたとき、活断層のコードが自動的にクリアされます.
注意: あなたは、PCベースのサービスツールを使用することができます, このようServiceRangerなど, 故障コードをクリアします.
1. ニュートラルに入れシフトレバー.
2. パーキングブレーキを掛け.
3. エンジンをオフにした状態で上キーを回し.
4. オフとオンのキーを回し 6 内回 5 キー上で終わる秒. 注意: コードが正常にクリアされた場合, サービスライトが点灯し、5秒間に滞在します. ギアの画面が表示されます 25 (何のコードありません).
5. OFFキーを回しても、システムは起動し
ダウン.

[/fusion_text][/fusion_builder_column][/fusion_builder_row][/fusion_builder_container][fusion_builder_container hundred_percent=nohundred_percent_height=nohundred_percent_height_scroll=nohundred_percent_height_center_content=yesequal_height_columns=nomenu_anchor=”” hide_on_mobile=small-visibility,medium-visibility,large-visibilitystatus=publishedpublish_date=”” class=”” id=”” background_color=”” background_image=”” background_position=center centerbackground_repeat=no-repeatfade=nobackground_parallax=noneenable_mobile=noparallax_speed=”0.3″ video_mp4=”” video_webm=”” video_ogv=”” video_url=”” video_aspect_ratio=”16:9″ video_loop=yesvideo_mute=yesvideo_preview_image=”” border_size=”” border_color=”” border_style=solidmargin_top=”” margin_bottom=”” padding_top=”” padding_right=”” padding_bottom=”” padding_left=””][fusion_builder_row][fusion_builder_column type=”1_1layout=”1_1spacing=”” center_content=nolink=”” target=_selfmin_height=”” hide_on_mobile=small-visibility,medium-visibility,large-visibilityclass=”” id=”” background_color=”” background_image=”” background_image_id=”” background_position=left topbackground_repeat=no-repeathover_type=noneborder_size=”0″ border_color=”” border_style=solidborder_position=allpadding_top=”” padding_right=”” padding_bottom=”” padding_left=”” margin_top=”” margin_bottom=”” animation_type=”” animation_direction=leftanimation_speed=”0.3″ animation_offset=”” last=no”][fusion_text columns=”” column_min_width=”” column_spacing=”” rule_style=defaultrule_size=”” rule_color=”” hide_on_mobile=small-visibility,medium-visibility,large-visibilityclass=”” id=””]

ServiceRangerでのコードの取得とクリアフォールト

[/fusion_text][fusion_separator style_type=defaulthide_on_mobile=small-visibility,medium-visibility,large-visibilityclass=”” id=”” sep_color=”#0038a0top_margin=”” bottom_margin=”20″ border_size=”” icon=”” icon_circle=”” icon_circle_color=”” width=”20%” alignment=left” /][fusion_text columns=”” column_min_width=”” column_spacing=”” rule_style=defaultrule_size=”” rule_color=”” hide_on_mobile=small-visibility,medium-visibility,large-visibilityclass=”” id=””]

故障コードを表示するか、それらをクリアします, 以下の手順に従ってください.

[/fusion_text][/fusion_builder_column][fusion_builder_column type=”1_2layout=”1_2spacing=”” center_content=nolink=”” target=_selfmin_height=”” hide_on_mobile=small-visibility,medium-visibility,large-visibilityclass=”” id=”” background_color=”” background_image=”” background_image_id=”” background_position=left topbackground_repeat=no-repeathover_type=noneborder_size=”0″ border_color=”” border_style=solidborder_position=allpadding_top=”” padding_right=”” padding_bottom=”” padding_left=”” margin_top=”” margin_bottom=”” animation_type=”” animation_direction=leftanimation_speed=”0.3″ animation_offset=”” last=no”][fusion_text columns=”” column_min_width=”” column_spacing=”” rule_style=defaultrule_size=”” rule_color=”” hide_on_mobile=small-visibility,medium-visibility,large-visibilityclass=”” id=””]

アクティブおよび非アクティブの障害を表示

1. 9ウェイの診断コネクタにServiceRangerを接続します.
2. 「ツール」メニューに移動し、「通信」タブを選択します.
3. J1587およびJ1939のための適切な通信デバイスを選択.
4. メインページの「接続」を選択.
5. 「ビューのフォルトコード」タブを選択します.
注意: 初期の使用は、すべての手順が必要です; しかし、その後の用途は唯一のステップが必要です 4 ステップ 5.

[/fusion_text][/fusion_builder_column][fusion_builder_column type=”1_2layout=”1_2spacing=”” center_content=nolink=”” target=_selfmin_height=”” hide_on_mobile=small-visibility,medium-visibility,large-visibilityclass=”” id=”” background_color=”” background_image=”” background_image_id=”” background_position=left topbackground_repeat=no-repeathover_type=noneborder_size=”0″ border_color=”” border_style=solidborder_position=allpadding_top=”” padding_right=”” padding_bottom=”” padding_left=”” margin_top=”” margin_bottom=”” animation_type=”” animation_direction=leftanimation_speed=”0.3″ animation_offset=”” last=no”][fusion_text columns=”” column_min_width=”” column_spacing=”” rule_style=defaultrule_size=”” rule_color=”” hide_on_mobile=small-visibility,medium-visibility,large-visibilityclass=”” id=””]

クリア非アクティブな障害

1. 9ウェイの診断コネクタにServiceRangerを接続します.
2. 「ツール」メニューに移動し、「通信」タブを選択します.
3. J1587およびJ1939のための適切な通信デバイスを選択.
4. メインページの「接続」を選択.
5. 「ビューのフォルトコード」タブを選択します.
6. 「フォルトクリア」ボタンを選択します.
注意: 初期の使用は、すべての手順が必要です, しかしながら, その後の用途は唯一のステップが必要です 4 ステップ 5.

[/fusion_text][/fusion_builder_column][/fusion_builder_row][/fusion_builder_container][fusion_builder_container hundred_percent=nohundred_percent_height=nohundred_percent_height_scroll=nohundred_percent_height_center_content=yesequal_height_columns=nomenu_anchor=”” hide_on_mobile=small-visibility,medium-visibility,large-visibilitystatus=publishedpublish_date=”” class=”” id=”” background_color=”” background_image=”” background_position=center centerbackground_repeat=no-repeatfade=nobackground_parallax=noneenable_mobile=noparallax_speed=”0.3″ video_mp4=”” video_webm=”” video_ogv=”” video_url=”” video_aspect_ratio=”16:9″ video_loop=yesvideo_mute=yesvideo_preview_image=”” border_size=”” border_color=”” border_style=solidmargin_top=”” margin_bottom=”” padding_top=”” padding_right=”” padding_bottom=”” padding_left=””][fusion_builder_row][fusion_builder_column type=”1_1layout=”1_1spacing=”” center_content=nolink=”” target=_selfmin_height=”” hide_on_mobile=small-visibility,medium-visibility,large-visibilityclass=”” id=”” background_color=”” background_image=”” background_image_id=”” background_position=left topbackground_repeat=no-repeathover_type=noneborder_size=”0″ border_color=”” border_style=solidborder_position=allpadding_top=”” padding_right=”” padding_bottom=”” padding_left=”” margin_top=”” margin_bottom=”” animation_type=”” animation_direction=leftanimation_speed=”0.3″ animation_offset=”” last=no”][fusion_text columns=”” column_min_width=”” column_spacing=”” rule_style=defaultrule_size=”” rule_color=”” hide_on_mobile=small-visibility,medium-visibility,large-visibilityclass=”” id=””]

製品診断モード (PDM)

[/fusion_text][fusion_text columns=”” column_min_width=”” column_spacing=”” rule_style=defaultrule_size=”” rule_color=”” hide_on_mobile=small-visibility,medium-visibility,large-visibilityclass=”” id=””]

製品診断モード (PDM)
製品診断モード (PDM) 通常の運転中に設定されている可能性が非アクティブコードを診断するために使用されています. この診断モードでは、障害検知機能の感度を高めます.
この手順は、緩いテスト, 劣化したと断続的な接続. 以下の「オールトコード分離手順インデックスを参照してください。. 非アクティブな欠陥コードに関連付けられている配線やコネクタのガイドとしてインデックスを使用します. ワイヤーハーネスとコネクタをFlexとPDMを起動した後、障害を再作成しようと.
PDMは、正規販売店の訓練を受けたサービス技術者のみが使用されるべきです.
PDMモードを入力するには:
注意: 車両は、製品診断モードで起動しません.
(PDM). 車両キー「OFF」を回して、システムはPDMを終了するにはパワーダウンすることができます.

        1. 車両が静止していなければなりません, エンジンは実行しないでください, 車両のパーキングブレーキを設定する必要があります.
        2. 9ウェイの診断コネクタにServiceRangerを接続します.
        3. 「ビューフォルトコード」を選択し、画面.
        4. 上のキーで始まるイグニッションスイッチの2回のキークリックを実行します, そして上のキーで終わります.
          注意: アン “88” キーでダッシュ上に表示します, これはディスプレイの通常のパワーアップ試験であります.
        5. ギア表示は、固体「PD」と点滅します (製品診断モード) そしてモードが有効になります.
        6. ワイヤーハーネスとコネクタを曲げると、障害を再作成しようと. 障害は、PDMの間にアクティブになった場合, ServiceRangerはアクティブの状態で、故障が表示されます.
        7. 障害は、PDMの間にアクティブになった場合, ServiceRangerはアクティブの状態で、故障が表示されます.
        8. 障害が検出された場合, 出口PDMモードと対応する故障コードトラブルシューティング手順を実行. 以下のフォルトコードの分離手順インデックスを参照してください。.
          注意:
          PDMモード時に設定され、アクティブコードが非アクティブとして保存されることはありません.
        9. PDMモードを終了するには, オフキーを回すことによって、システムの電源を切ります.

[/fusion_text][fusion_text columns=”” column_min_width=”” column_spacing=”” rule_style=defaultrule_size=”” rule_color=”” hide_on_mobile=small-visibility,medium-visibility,large-visibilityclass=”” id=””]

PDMは、次の非アクティブコードで動作します

9, 10, 14, 16, 17, 18, 19, 22, 24, 32, 33, 34, 35, 36, 38, 39, 40, 48, 49, 50, 51, 52, 56, 58, 59, 60, 61, 63, 76, 87, 88, 89, 95, 118

[/fusion_text][/fusion_builder_column][/fusion_builder_row][/fusion_builder_container][fusion_builder_container hundred_percent=nohundred_percent_height=nohundred_percent_height_scroll=nohundred_percent_height_center_content=yesequal_height_columns=nomenu_anchor=”” hide_on_mobile=small-visibility,medium-visibility,large-visibilitystatus=publishedpublish_date=”” class=”” id=”” background_color=”” background_image=”” background_position=center centerbackground_repeat=no-repeatfade=nobackground_parallax=noneenable_mobile=noparallax_speed=”0.3″ video_mp4=”” video_webm=”” video_ogv=”” video_url=”” video_aspect_ratio=”16:9″ video_loop=yesvideo_mute=yesvideo_preview_image=”” border_size=”” border_color=”” border_style=solidmargin_top=”” margin_bottom=”” padding_top=”” padding_right=”” padding_bottom=”” padding_left=””][fusion_builder_row][fusion_builder_column type=”1_1layout=”1_1spacing=”” center_content=nolink=”” target=_selfmin_height=”” hide_on_mobile=small-visibility,medium-visibility,large-visibilityclass=”” id=”” background_color=”” background_image=”” background_image_id=”” background_position=left topbackground_repeat=no-repeathover_type=noneborder_size=”0″ border_color=”” border_style=solidborder_position=allpadding_top=”” padding_right=”” padding_bottom=”” padding_left=”” margin_top=”” margin_bottom=”” animation_type=”” animation_direction=leftanimation_speed=”0.3″ animation_offset=”” last=no”][fusion_text columns=”” column_min_width=”” column_spacing=”” rule_style=defaultrule_size=”” rule_color=”” hide_on_mobile=small-visibility,medium-visibility,large-visibilityclass=”” id=””]

FMI (故障モード識別子)

[/fusion_text][fusion_text columns=”” column_min_width=”” column_spacing=”” rule_style=defaultrule_size=”” rule_color=”” hide_on_mobile=small-visibility,medium-visibility,large-visibilityclass=”” id=””]

FMI (故障モード識別子) 診断トラブルコードに関連する特定の情報を提供するために、SPNと一緒に使用され (DTC). FMIは、電子回路や電子部品に問題が検出されたことを示すことができます. FMIはまた、異常な動作状態が検出されたことを示すことができます.

[/fusion_text][fusion_text columns=”” column_min_width=”” column_spacing=”” rule_style=defaultrule_size=”” rule_color=”” hide_on_mobile=small-visibility,medium-visibility,large-visibilityclass=”” id=””]

国際通貨基金 – 説明

[/fusion_text][fusion_text columns=”2″ column_min_width=”” column_spacing=”” rule_style=defaultrule_size=”” rule_color=”” hide_on_mobile=small-visibility,medium-visibility,large-visibilityclass=”” id=””]

0 高 - 最も厳しいです
1 低 - 最も厳しいです
2 不安定な, 間欠, または正しくありません
3 ノーマル超える電圧
4 通常より低い電圧
5 ノーマル以下は現在の
6 ノーマル超える電流
7 適切に応答しません
8 異常周波数, パルス幅, または期間
9 異常な更新レート
10 変化の異常レート
11 その他の故障モード
12 故障
13 キャリブレーションのうち、
14 特別命令
15 ハイ - 少なくとも厳しいです
16 高 - 中等度の重症度
17 低 - 最も厳しいです
18 低 - 中等度の重症度
19 データエラー
20 データがハイ漂流しました
21 データは、低漂流しました
31 -

[/fusion_text][/fusion_builder_column][/fusion_builder_row][/fusion_builder_container][fusion_builder_container hundred_percent=nohundred_percent_height=nohundred_percent_height_scroll=nohundred_percent_height_center_content=yesequal_height_columns=nomenu_anchor=”” hide_on_mobile=small-visibility,medium-visibility,large-visibilitystatus=publishedpublish_date=”” class=”” id=”” background_color=”” background_image=”” background_position=center centerbackground_repeat=no-repeatfade=nobackground_parallax=noneenable_mobile=noparallax_speed=”0.3″ video_mp4=”” video_webm=”” video_ogv=”” video_url=”” video_aspect_ratio=”16:9″ video_loop=yesvideo_mute=yesvideo_preview_image=”” border_size=”” border_color=”” border_style=solidmargin_top=”” margin_bottom=”” padding_top=”” padding_right=”” padding_bottom=”” padding_left=””][fusion_builder_row][fusion_builder_column type=”1_1layout=”1_1spacing=”” center_content=nolink=”” target=_selfmin_height=”” hide_on_mobile=small-visibility,medium-visibility,large-visibilityclass=”” id=”” background_color=”” background_image=”” background_image_id=”” background_position=left topbackground_repeat=no-repeathover_type=noneborder_size=”0″ border_color=”” border_style=solidborder_position=allborder_radius=”” box_shadow=nodimension_box_shadow=”” box_shadow_blur=”0″ box_shadow_spread=”0″ box_shadow_color=”” box_shadow_style=”” padding_top=”” padding_right=”” padding_bottom=”” padding_left=”” margin_top=”” margin_bottom=”” animation_type=”” animation_direction=leftanimation_speed=”0.3″ animation_offset=”” last=no”][fusion_text columns=”” column_min_width=”” column_spacing=”” rule_style=defaultrule_size=”” rule_color=”” hide_on_mobile=small-visibility,medium-visibility,large-visibilityclass=”” id=””]

ビューイートンフラー伝送フォルトコードの分離手順インデックス

[/fusion_text][/fusion_builder_column][fusion_builder_column type=”1_1layout=”1_1spacing=”” center_content=nolink=”” target=_selfmin_height=”” hide_on_mobile=small-visibility,medium-visibility,large-visibilityclass=”” id=”” background_image_id=”” background_color=”” background_image=”” background_position=left topundefined=”” background_repeat=no-repeathover_type=noneborder_size=”0″ border_color=”” border_style=solidborder_position=allpadding_top=”” padding_right=”” padding_bottom=”” padding_left=”” margin_top=”” margin_bottom=”” animation_type=”” animation_direction=leftanimation_speed=”0.3″ animation_offset=”” last=no”][fusion_separator style_type=nonehide_on_mobile=small-visibility,medium-visibility,large-visibilityclass=”” id=”” sep_color=”” top_margin=”20″ bottom_margin=”20″ border_size=”0″ icon=”” icon_circle=”” icon_circle_color=”” width=”” alignment=center” /][fusion_text columns=”” column_min_width=”” column_spacing=”” rule_style=defaultrule_size=”” rule_color=”” class=”” id=””]

マニュアルおよびその他のリソースを解放するために、当社のダウンロードページをご覧ください

トランスミッションマニュアルのPDF

[/fusion_text][fusion_button link=https://globaltransmissionsupply.com/transmission-manualstext_transform=uppercasetitle=”図表, マニュアルやパートPDFファイル” target=_selflink_attributes=”図表, マニュアルやパートPDFファイル” alignment=centermodal=”” hide_on_mobile=small-visibility,medium-visibility,large-visibilityclass=”” id=”” color=custombutton_gradient_top_color=”#000000″ button_gradient_bottom_color=”#000000″ button_gradient_top_color_hover=”#f44336button_gradient_bottom_color_hover=”#f44336accent_color=”#ffffffaccent_hover_color=”#fffffftype=flatbevel_color=”” border_width=”” size=mediumstretch=defaultshape=squareicon=”” icon_position=lefticon_divider=noanimation_type=”” animation_direction=leftanimation_speed=”0.3″ animation_offset=””]図表, マニュアルや部品のPDFファイル >>>[/fusion_button][fusion_separator style_type=nonehide_on_mobile=small-visibility,medium-visibility,large-visibilityclass=”” id=”” sep_color=”” top_margin=”20″ bottom_margin=”20″ border_size=”0″ icon=”” icon_circle=”” icon_circle_color=”” width=”” alignment=center” /][/fusion_builder_column][/fusion_builder_row][/fusion_builder_container][fusion_global id=”13788″]