[fusion_builder_container hundred_percent=”no” hundred_percent_height=”no” hundred_percent_height_scroll=”no” hundred_percent_height_center_content=”yes” equal_height_columns=”no” menu_anchor=”” hide_on_mobile=”small-visibility,medium-visibility,large-visibility” status=”published” publish_date=”” class=”” id=”” background_color=”” background_image=”” background_position=”center center” background_repeat=”no-repeat” fade=”no” background_parallax=”none” enable_mobile=”no” parallax_speed=”0.3″ video_mp4=”” video_webm=”” video_ogv=”” video_url=”” video_aspect_ratio=”16:9″ video_loop=”yes” video_mute=”yes” video_preview_image=”” border_size=”” border_color=”” border_style=”solid” margin_top=”35″ margin_bottom=”” padding_top=”” padding_right=”” padding_bottom=”” padding_left=””][fusion_builder_row][fusion_builder_column type=”1_1″ layout=”1_1″ spacing=”” center_content=”no” link=”” target=”_self” min_height=”” hide_on_mobile=”small-visibility,medium-visibility,large-visibility” class=”” id=”” background_color=”” background_image=”” background_image_id=”” background_position=”left top” background_repeat=”no-repeat” hover_type=”none” border_size=”0″ border_color=”” border_style=”solid” border_position=”all” padding_top=”” padding_right=”” padding_bottom=”” padding_left=”” margin_top=”” margin_bottom=”” animation_type=”” animation_direction=”left” animation_speed=”0.3″ animation_offset=”” last=”no”][fusion_text columns=”” column_min_width=”” column_spacing=”” rule_style=”default” rule_size=”” rule_color=”” hide_on_mobile=”small-visibility,medium-visibility,large-visibility” class=”” id=””]
Еатон Фуллер Хибридни Пренос грешке код 116 – Релеји високог напона -(МИ08 системи)
[/fusion_text][/fusion_builder_column][/fusion_builder_row][/fusion_builder_container][fusion_builder_container hundred_percent=”no” hundred_percent_height=”no” hundred_percent_height_scroll=”no” hundred_percent_height_center_content=”yes” equal_height_columns=”no” menu_anchor=”” hide_on_mobile=”small-visibility,medium-visibility,large-visibility” status=”published” publish_date=”” class=”” id=”” background_color=”” background_image=”” background_position=”center center” background_repeat=”no-repeat” fade=”no” background_parallax=”none” enable_mobile=”no” parallax_speed=”0.3″ video_mp4=”” video_webm=”” video_ogv=”” video_url=”” video_aspect_ratio=”16:9″ video_loop=”yes” video_mute=”yes” video_preview_image=”” border_size=”” border_color=”” border_style=”solid” margin_top=”” margin_bottom=”” padding_top=”” padding_right=”” padding_bottom=”” padding_left=””][fusion_builder_row][fusion_builder_column type=”1_1″ layout=”1_1″ spacing=”” center_content=”no” link=”” target=”_self” min_height=”” hide_on_mobile=”small-visibility,medium-visibility,large-visibility” class=”” id=”” background_color=”” background_image=”” background_image_id=”” background_position=”left top” background_repeat=”no-repeat” hover_type=”none” border_size=”0″ border_color=”” border_style=”solid” border_position=”all” padding_top=”” padding_right=”” padding_bottom=”” padding_left=”” margin_top=”” margin_bottom=”” animation_type=”” animation_direction=”left” animation_speed=”0.3″ animation_offset=”” last=”no”][fusion_text columns=”” column_min_width=”” column_spacing=”” rule_style=”default” rule_size=”” rule_color=”” hide_on_mobile=”small-visibility,medium-visibility,large-visibility” class=”” id=””]
Грешка код за АПЦ Хибрид Дриве Системс модела (МИ08) ЕХ-8Е306А-У, ЕБ-8Е306А-УПГ, ЕБ-8Е306А УП, ЕБ-8Е306А-ЦД-, ЕХ-8Е306А-Т, ЕБ-6Е606Б-ЦД-. У наставку можете да научите како да тест, јасно и поправити квар кода грешке за ваш Фреигхтлинер, мацк, петербилт, кенвортх, волво, међународни, и камион тешке и опрема. The High-Voltage Relays are located inside the Power Electronics Carrier (ПИК) у релаи бок јединице. There is 1 precharge relay on the positive side, додатни релеј на позитивном, и 1 on the negative for a total of 3. Ови релеји су нормално отворени када је систем искључен. У релеји се контролишу преко Инвертер.
фаулт цоде 116 – High Voltage Relays Detection
Следећи предуслови морају бити испуњени пре него што систем детектује грешку:
- напон инвертер паљење је већи од 7 волтс и мање од 16 волти.
Белешка: Када решавање проблема неактивна код односе се на Производ Дијагностички приказ (ПСМ)
Услови за Сет грешке код пријављен
- ММФ 10 is set when the Inverter detects the input voltage measured at the capacitor is less than 210 volts within 3 seconds after the sub-relay closed in the Relay Box.
- ММФ 14 is set when only the negative relay in the Relay Box is on and capacitor voltage decreases less than 10 volts/5 seconds when initial capacitor voltage was greater than 200 volts and motor speed less than 500 min-1, or there is a detect error in the initial check.
Фаллбацк Када грешке код 116 је подешен следећи услови јављају:
- Амбер "Одлазак Хибридни" трепери за ФМИ 10 and remains solid for FMI 14.
- Грешка се чува у меморији ХЦМ.
- Инвертер затвара систем високог напона од.
- ХЦМ наставља да контролише хибридно возило у режиму дизел само.
- Трансмиссион стандардно старт опрему до 1..
[/fusion_text][fusion_text columns=”” column_min_width=”” column_spacing=”” rule_style=”default” rule_size=”” rule_color=”” hide_on_mobile=”small-visibility,medium-visibility,large-visibility” class=”” id=””]
Услови за Сет фаулт цоде Неактивна
Само Неактивна грешке могу бити избрисани из Јединице за Пренос електронском контролом (ТЕЦУ) или ХЦМ историја користећи СервицеРангер. ТЕЦУ аутоматски брише грешке из историје после 200 сати и ХЦМ аутоматски брише грешке из историје након грешке није активан 200 сати.
Овај код грешка може бити узроковано неким од следећих:
- ММФ 10
- ПИК
- АПГ
- инвертер
- DC high-voltage cable
- DC cable interlock loops
- inercija Пребаци
- сервис Пребаци
- ММФ 14
- инвертер
- ПИК
[/fusion_text][/fusion_builder_column][/fusion_builder_row][/fusion_builder_container][fusion_builder_container hundred_percent=”no” hundred_percent_height=”no” hundred_percent_height_scroll=”no” hundred_percent_height_center_content=”yes” equal_height_columns=”no” menu_anchor=”” hide_on_mobile=”small-visibility,medium-visibility,large-visibility” status=”published” publish_date=”” class=”” id=”” background_color=”” background_image=”” background_position=”center center” background_repeat=”no-repeat” fade=”no” background_parallax=”none” enable_mobile=”no” parallax_speed=”0.3″ video_mp4=”” video_webm=”” video_ogv=”” video_url=”” video_aspect_ratio=”16:9″ video_loop=”yes” video_mute=”yes” video_preview_image=”” border_size=”” border_color=”” border_style=”solid” margin_top=”” margin_bottom=”” padding_top=”” padding_right=”” padding_bottom=”” padding_left=””][fusion_builder_row][fusion_builder_column type=”1_1″ layout=”1_1″ spacing=”” center_content=”no” link=”” target=”_self” min_height=”” hide_on_mobile=”small-visibility,medium-visibility,large-visibility” class=”” id=”” background_color=”” background_image=”” background_image_id=”” background_position=”left top” background_repeat=”no-repeat” hover_type=”none” border_size=”0″ border_color=”” border_style=”solid” border_position=”all” padding_top=”” padding_right=”” padding_bottom=”” padding_left=”” margin_top=”” margin_bottom=”” animation_type=”” animation_direction=”left” animation_speed=”0.3″ animation_offset=”” last=”no”][fusion_text columns=”” column_min_width=”” column_spacing=”” rule_style=”default” rule_size=”” rule_color=”” hide_on_mobile=”small-visibility,medium-visibility,large-visibility” class=”” id=””]
фаулт цоде 116 – High Voltage Relays Test
[/fusion_text][/fusion_builder_column][/fusion_builder_row][/fusion_builder_container][fusion_builder_container hundred_percent=”no” hundred_percent_height=”no” hundred_percent_height_scroll=”no” hundred_percent_height_center_content=”yes” equal_height_columns=”no” menu_anchor=”” hide_on_mobile=”small-visibility,medium-visibility,large-visibility” status=”published” publish_date=”” class=”” id=”” background_color=”” background_image=”” background_position=”center center” background_repeat=”no-repeat” fade=”no” background_parallax=”none” enable_mobile=”no” parallax_speed=”0.3″ video_mp4=”” video_webm=”” video_ogv=”” video_url=”” video_aspect_ratio=”16:9″ video_loop=”yes” video_mute=”yes” video_preview_image=”” border_size=”” border_color=”” border_style=”solid” margin_top=”” margin_bottom=”” padding_top=”” padding_right=”” padding_bottom=”” padding_left=””][fusion_builder_row][fusion_builder_column type=”1_1″ layout=”1_1″ spacing=”” center_content=”no” link=”” target=”_self” min_height=”” hide_on_mobile=”small-visibility,medium-visibility,large-visibility” class=”” id=”” background_color=”” background_image=”” background_image_id=”” background_position=”left top” background_repeat=”no-repeat” hover_type=”none” border_size=”0″ border_color=”” border_style=”solid” border_position=”all” padding_top=”” padding_right=”” padding_bottom=”” padding_left=”” margin_top=”” margin_bottom=”” animation_type=”” animation_direction=”left” animation_speed=”0.3″ animation_offset=”” last=”no”][fusion_text columns=”” column_min_width=”” column_spacing=”” rule_style=”default” rule_size=”” rule_color=”” hide_on_mobile=”small-visibility,medium-visibility,large-visibility” class=”” id=””]
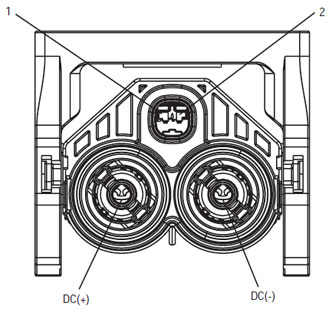
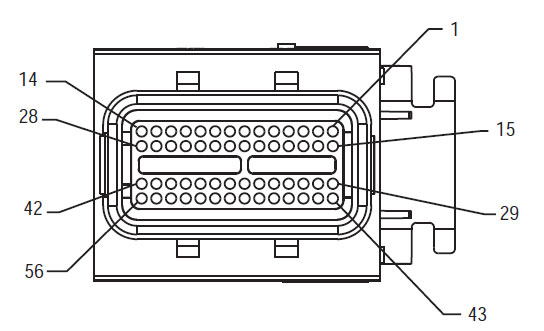
Компонента Идентифицатион МИ08 системи:
[/fusion_text][/fusion_builder_column][/fusion_builder_row][/fusion_builder_container][fusion_builder_container hundred_percent=”yes” hundred_percent_height=”no” hundred_percent_height_scroll=”no” hundred_percent_height_center_content=”yes” equal_height_columns=”no” menu_anchor=”” hide_on_mobile=”small-visibility,medium-visibility,large-visibility” status=”published” publish_date=”” class=”” id=”” background_color=”” background_image=”” background_position=”center center” background_repeat=”no-repeat” fade=”no” background_parallax=”none” enable_mobile=”no” parallax_speed=”0.3″ video_mp4=”” video_webm=”” video_ogv=”” video_url=”” video_aspect_ratio=”16:9″ video_loop=”yes” video_mute=”yes” video_preview_image=”” border_size=”” border_color=”” border_style=”solid” margin_top=”” margin_bottom=”” padding_top=”” padding_right=”10%” padding_bottom=”” padding_left=”10%”][fusion_builder_row][fusion_builder_column type=”1_3″ layout=”1_3″ spacing=”” center_content=”no” link=”” target=”_self” min_height=”” hide_on_mobile=”small-visibility,medium-visibility,large-visibility” class=”” id=”” background_color=”” background_image=”” background_image_id=”” background_position=”left top” background_repeat=”no-repeat” hover_type=”none” border_size=”0″ border_color=”” border_style=”solid” border_position=”all” padding_top=”” padding_right=”” padding_bottom=”” padding_left=”” margin_top=”” margin_bottom=”” animation_type=”” animation_direction=”left” animation_speed=”0.3″ animation_offset=”” last=”no”][fusion_imageframe image_id=”14474|full” max_width=”” style_type=”” blur=”” stylecolor=”” hover_type=”none” bordersize=”” bordercolor=”” borderradius=”” align=”center” lightbox=”no” gallery_id=”” lightbox_image=”” lightbox_image_id=”” alt=”Делпхи 56-Пут парења конектор Погледај” link=”” linktarget=”_self” hide_on_mobile=”small-visibility,medium-visibility,large-visibility” class=”” id=”” animation_type=”” animation_direction=”left” animation_speed=”0.3″ animation_offset=””]хттпс://www.globaltransmissionsupply.com/wp-content/uploads/Inverter-56-Way-Mating-Connector-View.jpg[/fusion_imageframe][fusion_text columns=”” column_min_width=”” column_spacing=”” rule_style=”default” rule_size=”” rule_color=”” hide_on_mobile=”small-visibility,medium-visibility,large-visibility” class=”” id=””]
56-Начин парења конектор Погледај
[/fusion_text][/fusion_builder_column][fusion_builder_column type=”1_3″ layout=”1_3″ spacing=”” center_content=”no” link=”” target=”_self” min_height=”” hide_on_mobile=”small-visibility,medium-visibility,large-visibility” class=”” id=”” background_color=”” background_image=”” background_image_id=”” background_position=”left top” background_repeat=”no-repeat” hover_type=”none” border_size=”0″ border_color=”” border_style=”solid” border_position=”all” padding_top=”” padding_right=”” padding_bottom=”” padding_left=”” margin_top=”” margin_bottom=”” animation_type=”” animation_direction=”left” animation_speed=”0.3″ animation_offset=”” last=”no”][fusion_imageframe image_id=”14635|full” max_width=”” style_type=”” blur=”” stylecolor=”” hover_type=”none” bordersize=”” bordercolor=”” borderradius=”” align=”center” lightbox=”no” gallery_id=”” lightbox_image=”” lightbox_image_id=”” alt=”Високи напон ДЦ конектор Погледај Иазаки конектор” link=”” linktarget=”_self” hide_on_mobile=”small-visibility,medium-visibility,large-visibility” class=”” id=”” animation_type=”” animation_direction=”left” animation_speed=”0.3″ animation_offset=””]хттпс://www.globaltransmissionsupply.com/wp-content/uploads/High-Voltage-DC-Connector-View.jpg[/fusion_imageframe][fusion_text columns=”” column_min_width=”” column_spacing=”” rule_style=”default” rule_size=”” rule_color=”” hide_on_mobile=”small-visibility,medium-visibility,large-visibility” class=”” id=””]
Високи напон ДЦ конектор Погледај Иазаки конектор

[/fusion_text][/fusion_builder_column][fusion_builder_column type=”1_3″ layout=”1_3″ spacing=”” center_content=”no” link=”” target=”_self” min_height=”” hide_on_mobile=”small-visibility,medium-visibility,large-visibility” class=”” id=”” background_color=”” background_image=”” background_image_id=”” background_position=”left top” background_repeat=”no-repeat” hover_type=”none” border_size=”0″ border_color=”” border_style=”solid” border_position=”all” padding_top=”” padding_right=”” padding_bottom=”” padding_left=”” margin_top=”” margin_bottom=”” animation_type=”” animation_direction=”left” animation_speed=”0.3″ animation_offset=”” last=”no”][fusion_imageframe image_id=”14213|medium” max_width=”” style_type=”” blur=”” stylecolor=”” hover_type=”none” bordersize=”” bordercolor=”” borderradius=”” align=”center” lightbox=”no” gallery_id=”” lightbox_image=”” lightbox_image_id=”” alt=”Mating Connector View Deutsch 19 – Начин” link=”” linktarget=”_self” hide_on_mobile=”small-visibility,medium-visibility,large-visibility” class=”” id=”” animation_type=”” animation_direction=”left” animation_speed=”0.3″ animation_offset=””]хттпс://www.globaltransmissionsupply.com/wp-content/uploads/Eaton-Fuller-Harness-Connector-View-300×289.jpg[/fusion_imageframe][fusion_text columns=”” column_min_width=”” column_spacing=”” rule_style=”default” rule_size=”” rule_color=”” hide_on_mobile=”small-visibility,medium-visibility,large-visibility” class=”” id=””]
Mating Connector View Deutsch 19 – Начин
[/fusion_text][/fusion_builder_column][/fusion_builder_row][/fusion_builder_container][fusion_builder_container hundred_percent=”no” hundred_percent_height=”no” hundred_percent_height_scroll=”no” hundred_percent_height_center_content=”yes” equal_height_columns=”no” menu_anchor=”” hide_on_mobile=”small-visibility,medium-visibility,large-visibility” status=”published” publish_date=”” class=”” id=”” background_color=”” background_image=”” background_position=”center center” background_repeat=”no-repeat” fade=”no” background_parallax=”none” enable_mobile=”no” parallax_speed=”0.3″ video_mp4=”” video_webm=”” video_ogv=”” video_url=”” video_aspect_ratio=”16:9″ video_loop=”yes” video_mute=”yes” video_preview_image=”” border_size=”” border_color=”” border_style=”solid” margin_top=”” margin_bottom=”” padding_top=”” padding_right=”” padding_bottom=”” padding_left=””][fusion_builder_row][fusion_builder_column type=”1_1″ layout=”1_1″ spacing=”” center_content=”no” link=”” target=”_self” min_height=”” hide_on_mobile=”small-visibility,medium-visibility,large-visibility” class=”” id=”” background_image_id=”” background_color=”#000000″ background_image=”” background_position=”left top” undefined=”” background_repeat=”no-repeat” hover_type=”none” border_size=”0″ border_color=”” border_style=”solid” border_position=”all” padding_top=”” padding_right=”” padding_bottom=”” padding_left=”” margin_top=”” margin_bottom=”” animation_type=”” animation_direction=”left” animation_speed=”0.3″ animation_offset=”” last=”no”][fusion_text columns=”” column_min_width=”” column_spacing=”” rule_style=”default” rule_size=”” rule_color=”” hide_on_mobile=”small-visibility,medium-visibility,large-visibility” class=”” id=””]
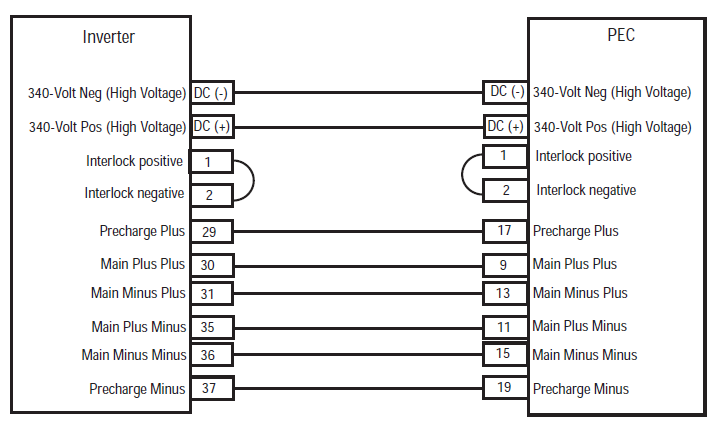
БЕЛЕШКА: Односи се АПЦ хибридни компоненте и конектор Локација за конектора у МИ08 Системс
[/fusion_text][/fusion_builder_column][fusion_builder_column type=”1_1″ layout=”1_1″ spacing=”” center_content=”no” link=”” target=”_self” min_height=”” hide_on_mobile=”small-visibility,medium-visibility,large-visibility” class=”” id=”” background_color=”” background_image=”” background_image_id=”” background_position=”left top” background_repeat=”no-repeat” hover_type=”none” border_size=”0″ border_color=”” border_style=”solid” border_position=”all” padding_top=”” padding_right=”” padding_bottom=”” padding_left=”” margin_top=”” margin_bottom=”” animation_type=”” animation_direction=”left” animation_speed=”0.3″ animation_offset=”” last=”no”][fusion_imageframe image_id=”14666|full” max_width=”” style_type=”” blur=”” stylecolor=”” hover_type=”none” bordersize=”” bordercolor=”” borderradius=”” align=”center” lightbox=”no” gallery_id=”” lightbox_image=”” lightbox_image_id=”” alt=”Inverter PEC connectors Eaton Fuller Hybrid transmission” link=”” linktarget=”_self” hide_on_mobile=”small-visibility,medium-visibility,large-visibility” class=”” id=”” animation_type=”” animation_direction=”left” animation_speed=”0.3″ animation_offset=””]хттпс://www.globaltransmissionsupply.com/wp-content/uploads/Inverter-PEC-connectors.png[/fusion_imageframe][/fusion_builder_column][/fusion_builder_row][/fusion_builder_container][fusion_builder_container hundred_percent=”no” hundred_percent_height=”no” hundred_percent_height_scroll=”no” hundred_percent_height_center_content=”yes” equal_height_columns=”no” menu_anchor=”” hide_on_mobile=”small-visibility,medium-visibility,large-visibility” status=”published” publish_date=”” class=”” id=”” background_color=”” background_image=”” background_position=”center center” background_repeat=”no-repeat” fade=”no” background_parallax=”none” enable_mobile=”no” parallax_speed=”0.3″ video_mp4=”” video_webm=”” video_ogv=”” video_url=”” video_aspect_ratio=”16:9″ video_loop=”yes” video_mute=”yes” video_preview_image=”” border_size=”” border_color=”” border_style=”solid” margin_top=”” margin_bottom=”” padding_top=”” padding_right=”” padding_bottom=”” padding_left=””][fusion_builder_row][fusion_builder_column type=”1_1″ layout=”1_1″ spacing=”” center_content=”no” link=”” target=”_self” min_height=”” hide_on_mobile=”small-visibility,medium-visibility,large-visibility” class=”” id=”” background_color=”” background_image=”” background_image_id=”” background_position=”left top” background_repeat=”no-repeat” hover_type=”none” border_size=”0″ border_color=”” border_style=”solid” border_position=”all” padding_top=”” padding_right=”” padding_bottom=”” padding_left=”” margin_top=”” margin_bottom=”” animation_type=”” animation_direction=”left” animation_speed=”0.3″ animation_offset=”” last=”no”][fusion_modal name=”warnings_cautions” title=”Упозорења & Упозорења” size=”large” background=”” border_color=”” show_footer=”yes” class=”” id=””]опасност: Опасност означава да ће бити тешко повређен или убијен ако не прати наведено поступак.
Упозорење: Упозорење указује хитну опасност, што би могло довести до тешке повреде ако не пратите наведено поступак.
Опрез: Опрез указује на возило или оштећења имовине могао настати ако се не придржавате дато поступак.
Белешка: Напомена показује додатне детаље који ће помоћи у дијагнози или поправку саставни / система.
Пратите наведене процедуре у назначеном би се избегли повреде:
1. Ако су високог напона корнети су око возила и блокадом је инсталиран на ПИК, једина особа која би требало да буде дозвољено да покрене возило је особа која је потписала Блокирање таг.
2. Пре рада на возилу или напуштања кабине док мотор ради, треба да ставите ручицу мењача у "Н" повуците ручну кочницу, и блокирати точкове.
3. Из безбедносних разлога, увек ангажују сервиса кочнице пре избора степена преноса позиције са "Н."
4. Пре почетка возило увек да седи у седишту возача, изаберите "Н" на контролу схифт, и повуците ручну кочницу.
5. Код возила са еПТО, мотор и / или
Мотор / генератор може почети у еПТО моду. Никада вршити никакво одржавање или раде на возилу, У овом режиму.
6. 12-Волт батерије позитиван (+) и негативно (-) мора бити пре прекида сваком заваривања на било који Хибрид опремљена возила.
Опрез: Следите наведене процедуре у назначеном циљу избегавања квар опреме или оштећење.
Опрез: Не отпустите ручну кочницу или покуша да бисте изабрали брзину док ваздушни притисак је на добром нивоу.
Опрез: Да бисте избегли оштећења мењача током вуче Ставите ручицу мењача у "Н" и подигните погонских точкова са земље или искључите погонски склоп.
Хигх-Волтаге Упозорења & Упозорења
- Користите ЦО2 или суве хемикалије за гашење пожара.
- Високонапонски изведена прекривен наранџастим изолације или спиралну цеви и означен са ознакама упозорења на конекторе.
- Све Еатон® Хибрид Диесел / Електрична возила ће бити означене као "хибридни’ на спољашњој страни возила, заједно са схифт налепници на табли.
- Се односе на ОЕМ за одређену локацију на шасије монтиран хибридних компоненти.
- Не сеците у наранџасте високо-напонских каблова.
- Не сеците у или отворите ПЕЦ.
- Не сеците у или отворите ДЦ / ДЦ.
- Не сеците у или отворите Инвертер.
Тампон зона мора бити подешен и изолована високонапонска гумене рукавице (класа 0 са кожним заштитницима) су потребни пре раде на високом напону. Непоштовање ових упутстава може довести до тешке повреде или смрт.
Рукавице гумене изолацијом који се морају носити док је радио на високонапонског система су класа 0 са кожним заштитницима. У гумене рукавице треба да се тестира пре сваке употребе након поступку гуме изолационе рукавице тестирање се налазе у "Диагностиц Тоолс / Услуга Публикације" на страни 6. Непоштовање ових упутстава може довести до тешке повреде или смрт.
Пре прегледа или раде на било високо-напонских каблова или компоненти за "Високи напон-сервис гашења и Повер-процедуру" на страни 4 треба следити. Непоштовање ових упутстава може довести до тешке повреде или смрт.
Лоцкоут анд Тагоут уређаје треба уклонити само техничара која поставља лоцкоут и Тагоут уређаје на возилу. Непоштовање ових упутстава може довести до тешке повреде или смрт.
Високонапонске гуменом изолацијом рукавице (класа 0 са кожним заштитницима) мора да носи када се ради о било
високонапонске каблове. "Хигх Волтаге сервис Гашење и Повер-уп процедура" на страни 4 морају прије следи уклањању било које високонапонске каблове. Непоштовање ових упутстава може довести до тешке повреде или смрт.
Хигх-каблови и проводници су наранџаста и садрже ознаку упозорења на конекторе. компоненте високог напона су означене са ознаком. Високонапонске гуменом изолацијом рукавице (класа 0 са кожним заштитницима) мора се користити када се ради о било којој од ових компоненти. Непоштовање ових упутстава може довести до тешке повреде или смрт.
Хигх-Волтаге сервис процедуре за искључивање

1. Фоллов "Високи напон-Радна површина" поступак.
2. Лоцирати црвену ПИК Сервице Укључите испред ПЕЦ и гурнути искључити.
3. Уклоните сервис Свитцх Цовер и инсталирати Лоцкоут конзоле (Ј48506).
4. Причврстите ознака на Лоцкоут носачем.
5. Осигурати ПИК Сервице прекидач не може да се креће од офф положаја.
6. Дозволите систему да постави на минимум 5 минута да обављају високи напон.
7. Повежите СервицеРангер и видите података Монитор ПИД 116 под називом "Високи напон-потенцијал батерије." Коришћење СПН 520323 за Ј1939 вези "Напон батерије ДБ" (релеј кутија).
8. Напон би требало да буде 30 волтс или мање. Ако је напон изнад 30 волти, не раде на возилу и контакт Еатон® на 1-800-826-ХЕЛП (4357).
9. Окренути кључ офф и наставите да поправи или корак за решавање проблема.
Белешка: Напон падне на нулу када је кључ искључен.
Високог напона сервис Снага-уп Процедура
1. Инсталирајте све високо-напонске конекторе у своје закључане позиције.
2. Ако сте особа која ради на возилу, уклонити Лоцкоут Брацкет и ознаку.
3. Поново инсталирајте Лоцкоут конзоле преко сервиса Свитцх.
4. Извуците Сервице Свитцх и пустити сет возила за 2 минута.
5. Start vehicle when appropriate.[/fusion_modal][fusion_modal name=”component_location” title=”АПЦ хибридни компоненте и конектор Локација ” size=”large” background=”#ffffff” border_color=”” show_footer=”yes” class=”” id=””]

[/fusion_modal][fusion_modal name=”component_location2″ title=”АПЦ хибридни компоненте и конектор Локација МИ09 системи” size=”large” background=”#ffffff” border_color=”” show_footer=”yes” class=”” id=””]

[/fusion_modal][/fusion_builder_column][/fusion_builder_row][/fusion_builder_container][fusion_builder_container hundred_percent=”no” hundred_percent_height=”no” hundred_percent_height_scroll=”no” hundred_percent_height_center_content=”yes” equal_height_columns=”no” menu_anchor=”” hide_on_mobile=”small-visibility,medium-visibility,large-visibility” status=”published” publish_date=”” class=”” id=”” background_color=”” background_image=”” background_position=”center center” background_repeat=”no-repeat” fade=”no” background_parallax=”none” enable_mobile=”no” parallax_speed=”0.3″ video_mp4=”” video_webm=”” video_ogv=”” video_url=”” video_aspect_ratio=”16:9″ video_loop=”yes” video_mute=”yes” video_preview_image=”” border_size=”” border_color=”” border_style=”solid” margin_top=”” margin_bottom=”” padding_top=”” padding_right=”” padding_bottom=”” padding_left=””][fusion_builder_row][fusion_builder_column type=”1_1″ layout=”1_1″ spacing=”” center_content=”no” link=”” target=”_self” min_height=”” hide_on_mobile=”small-visibility,medium-visibility,large-visibility” class=”” id=”” background_color=”” background_image=”” background_image_id=”” background_position=”left top” background_repeat=”no-repeat” hover_type=”none” border_size=”0″ border_color=”” border_style=”solid” border_position=”all” padding_top=”” padding_right=”” padding_bottom=”” padding_left=”” margin_top=”” margin_bottom=”” animation_type=”” animation_direction=”left” animation_speed=”0.3″ animation_offset=”” last=”no”][fusion_content_boxes layout=”clean-horizontal” columns=”2″ title_size=”18px” heading_size=”3″ title_color=”#ffffff” body_color=”#ffffff” backgroundcolor=”#4f4f4f” icon=”” iconflip=”” iconrotate=”” iconspin=”no” iconcolor=”” icon_circle=”” icon_circle_radius=”” circlecolor=”” circlebordersize=”” circlebordercolor=”” outercirclebordersize=”” outercirclebordercolor=”” icon_size=”” icon_hover_type=”” hover_accent_color=”” image=”” image_id=”” image_width=”” image_height=”” link_type=”” button_span=”” link_area=”” link_target=”” icon_align=”left” animation_type=”” animation_delay=”” animation_offset=”” animation_direction=”left” animation_speed=”0.3″ margin_top=”” margin_bottom=”” hide_on_mobile=”small-visibility,medium-visibility,large-visibility” class=”” id=””][fusion_content_box title=”КОРАК 1. Уверите се ФМИС поклон.” backgroundcolor=”” icon=”” iconflip=”” iconrotate=”” iconspin=”no” iconcolor=”” circlecolor=”” circlebordersize=”” circlebordercolor=”” outercirclebordersize=”” outercirclebordercolor=”” image=”” image_id=”” image_width=”” image_height=”” link=”” linktext=”Опширније” link_target=”” animation_type=”” animation_direction=”left” animation_speed=”0.3″ animation_offset=””]
- Прегледати и пратите Упозорења & Упозорења.
- Поврат активног грешке и ФМИС са СервицеРангер коришћењем 9-Ваи дијагностички конектор.
опасност: видети Високог напона сервис Гашење и Повер-Уп Процедуре. Пратите процедуре како би се избегло шок, бурн или смрт од неправилно рукује високог напона. - Који ФМИС су присутни
- Ако фаулт цоде 116 ММФ 14 ис листед, пређите на корак 9.
- Ако фаулт цоде 116 ММФ 10 ис листед, пређите на корак 2.
- If no Fault Codes are listed, The Service Switch was pushed in. Идите на корак 10.
[/fusion_content_box][fusion_content_box title=”КОРАК 2. Verify Data Monitor parameters.” backgroundcolor=”” icon=”” iconflip=”” iconrotate=”” iconspin=”no” iconcolor=”” circlecolor=”” circlebordersize=”” circlebordercolor=”” outercirclebordersize=”” outercirclebordercolor=”” image=”” image_id=”” image_width=”” image_height=”” link=”” linktext=”Опширније” link_target=”” animation_type=”” animation_direction=”left” animation_speed=”0.3″ animation_offset=””]
- тастер на.
- Повежите СервицеРангер до 9-Ваи дијагностички конектор за у кабини.
- Изаберите опцију "Подаци Монитор".
- View the Battery Pack Voltage (BCU1) Нови ПИД 118 in the high- voltage Battery list:
- If the Battery Pack Voltage (BCU1) Нови ПИД 118 is greater than 200 волти, пређите на корак 3.
- If the Battery Pack Voltage (BCU1) Нови ПИД 118 је мање од 200 волти, заменити Повер Елецтроницс Царриер (ПИК), затим пређите на корак 10.
[/fusion_content_box][/fusion_content_boxes][fusion_content_boxes layout=”clean-horizontal” columns=”2″ title_size=”18px” heading_size=”3″ title_color=”#ffffff” body_color=”#ffffff” backgroundcolor=”#4f4f4f” icon=”” iconflip=”” iconrotate=”” iconspin=”no” iconcolor=”” icon_circle=”” icon_circle_radius=”” circlecolor=”” circlebordersize=”” circlebordercolor=”” outercirclebordersize=”” outercirclebordercolor=”” icon_size=”” icon_hover_type=”” hover_accent_color=”” image=”” image_id=”” image_width=”” image_height=”” link_type=”” button_span=”” link_area=”” link_target=”” icon_align=”left” animation_type=”” animation_delay=”” animation_offset=”” animation_direction=”left” animation_speed=”0.3″ margin_top=”” margin_bottom=”” hide_on_mobile=”small-visibility,medium-visibility,large-visibility” class=”” id=””][fusion_content_box title=”КОРАК 3. Verify continuity of Inverter connector circuits.” backgroundcolor=”” icon=”” iconflip=”” iconrotate=”” iconspin=”no” iconcolor=”” circlecolor=”” circlebordersize=”” circlebordercolor=”” outercirclebordersize=”” outercirclebordercolor=”” image=”” image_id=”” image_width=”” image_height=”” link=”” linktext=”Опширније” link_target=”” animation_type=”” animation_direction=”left” animation_speed=”0.3″ animation_offset=””]
- кључ од.
- If the vehicle is not equipped with a DC/DC Converter or APG, skip this step.
- Using ASTM Class 0 electrical insulating rubber gloves with leather protectors, disconnect the DC cable for the DC/DC Converter and APG at the PEC.
- With the key off, temporarily remove the Lockout Bracket and pull the Service Switch out.
- тастер на.
- Је фаулт цоде 116 ММФ 10 still Active in ServiceRanger?
- Ако фаулт цоде 116 ММФ 10 is Active with the DC/DC Converter and APG disconnected, пређите на корак 4.
- Ако фаулт цоде 116 ММФ 10 is no longer Active with the DC/DC Converter and APG disconnected, key off and reinstall the Lockout Bracket on the PEC. Replace the Power Electronics Carrier (ПИК), затим пређите на корак 10.
[/fusion_content_box][fusion_content_box title=”КОРАК 4. Verify continuity of PEC connector circuits to ground.” backgroundcolor=”” icon=”” iconflip=”” iconrotate=”” iconspin=”” iconcolor=”” circlecolor=”” circlebordersize=”” circlebordercolor=”” outercirclebordersize=”” outercirclebordercolor=”” image=”” image_id=”” image_width=”” image_height=”” link=”” linktext=”” link_target=”” animation_type=”” animation_direction=”left” animation_speed=”0.3″ animation_offset=””]
- кључ од.
- Искључите ПЕЦ 19-пински конектор.
- Temporarily remove the Lockout Bracket and pull the Service Switch out.
Белешка: Ensure the Key Switch is off. - Measure resistance at the PEC 19-Way Connector Terminal at the following pins:
- игла 17 на пин 19
- игла 9 на пин 11
- игла 13 на пин 15
- If the resistance between Pins 17 и ПИН 19 је 112-122 Ома и отпор Пин 9 на пин 11 и ПИН 13 на пин 15 су сваки 33-37 ома, пређите на корак 5.
- Ако отпор ван домета, пређите на корак 6.
[/fusion_content_box][/fusion_content_boxes][fusion_content_boxes layout=”clean-horizontal” columns=”2″ title_size=”18px” heading_size=”3″ title_color=”#ffffff” body_color=”#ffffff” backgroundcolor=”#4f4f4f” icon=”” iconflip=”” iconrotate=”” iconspin=”no” iconcolor=”” icon_circle=”” icon_circle_radius=”” circlecolor=”” circlebordersize=”” circlebordercolor=”” outercirclebordersize=”” outercirclebordercolor=”” icon_size=”” icon_hover_type=”” hover_accent_color=”” image=”” image_id=”” image_width=”” image_height=”” link_type=”” button_span=”” link_area=”” link_target=”” icon_align=”left” animation_type=”” animation_delay=”” animation_offset=”” animation_direction=”left” animation_speed=”0.3″ margin_top=”” margin_bottom=”” hide_on_mobile=”small-visibility,medium-visibility,large-visibility” class=”” id=””][fusion_content_box title=”КОРАК 5. Verify continuity of Inverter connector circuits to ground.” backgroundcolor=”” icon=”” iconflip=”” iconrotate=”” iconspin=”no” iconcolor=”” circlecolor=”” circlebordersize=”” circlebordercolor=”” outercirclebordersize=”” outercirclebordercolor=”” image=”” image_id=”” image_width=”” image_height=”” link=”” linktext=”Опширније” link_target=”” animation_type=”” animation_direction=”left” animation_speed=”0.3″ animation_offset=””]
- кључ од.
- Reconnect the PEC 19-Way Connector.
- Искључите регулатор 56-пински конектор.
- Inspect the connector pins for damaged, corroded and/or loose wires.
- Measure resistance between the Inverter 56-Way Connector at the following pins:
- игла 29 на пин 37
- игла 30 на пин 35
- игла 31 на пин 36 Белешка: Нежно савијте регулатор 56-пински конектор Харнесс близини конектора, док праћења вредности отпора.
- Ако отпор између Пин 29 и ПИН 37 је 112-122 Ома и отпор Пин 30 на пин 35 и ПИН 31 на пин 36 су сваки 33-37 ома, push the Service Switch on the PEC and reinstall the Lockout Bracket. Идите на корак 8.
- Ако отпор ван домета, repair the Hybrid Harness between the PEC and Inverter, затим пређите на корак 10.
[/fusion_content_box][fusion_content_box title=”КОРАК 6. Verify continuity of PEC connector circuits.” backgroundcolor=”” icon=”” iconflip=”” iconrotate=”” iconspin=”” iconcolor=”” circlecolor=”” circlebordersize=”” circlebordercolor=”” outercirclebordersize=”” outercirclebordercolor=”” image=”” image_id=”” image_width=”” image_height=”” link=”” linktext=”” link_target=”” animation_type=”” animation_direction=”left” animation_speed=”0.3″ animation_offset=””]
- кључ од.
- Remove the Air Filter Cover and Air Filter from the PEC. Refer to TRSM1000 for procedures.*
- An Inertia Switch is located at the front of the PEC inside the box and viewable when the Air Filter is removed.
- Using ASTM Class 0 electrical insulating rubber gloves with leather protectors, press the button on the top of the Inertia Switch until heard or felt a click. This switch must be depressed a set distance to reset the switch.
- Measure resistance at the PEC 19-Way Connector Terminal at the following pins:
- игла 17 на пин 19
- игла 9 на пин 11
- игла 13 на пин 15
- qIf the resistance between Pin 17 и ПИН 19 је 112-122 Ома и отпор Пин 9 на пин 11 и ПИН 13 на пин 15 су сваки 33-37 ома, the Inertia Switch was tripped. Test is complete. Идите на корак 10.
- Ако отпор ван домета, push in the Service Switch on the PEC and reinstall the Lockout Bracket, затим пређите на корак 7.
[/fusion_content_box][/fusion_content_boxes][fusion_content_boxes layout=”clean-horizontal” columns=”2″ title_size=”18px” heading_size=”3″ title_color=”#ffffff” body_color=”#ffffff” backgroundcolor=”#4f4f4f” icon=”” iconflip=”” iconrotate=”” iconspin=”no” iconcolor=”” icon_circle=”” icon_circle_radius=”” circlecolor=”” circlebordersize=”” circlebordercolor=”” outercirclebordersize=”” outercirclebordercolor=”” icon_size=”” icon_hover_type=”” hover_accent_color=”” image=”” image_id=”” image_width=”” image_height=”” link_type=”” button_span=”” link_area=”” link_target=”” icon_align=”left” animation_type=”” animation_delay=”” animation_offset=”” animation_direction=”left” animation_speed=”0.3″ margin_top=”” margin_bottom=”” hide_on_mobile=”small-visibility,medium-visibility,large-visibility” class=”” id=””][fusion_content_box title=”КОРАК 7. Verify continuity of Inverter connector circuits.” backgroundcolor=”” icon=”” iconflip=”” iconrotate=”” iconspin=”no” iconcolor=”” circlecolor=”” circlebordersize=”” circlebordercolor=”” outercirclebordersize=”” outercirclebordercolor=”” image=”” image_id=”” image_width=”” image_height=”” link=”” linktext=”Опширније” link_target=”” animation_type=”” animation_direction=”left” animation_speed=”0.3″ animation_offset=””]
- кључ од.
- Disconnect the DC High-Voltage Cable at the PEC Bulkhead and at the Inverter Bulkhead.
- Measure resistance between the Low-Voltage Interlock Pins on the PEC side of the DC High-Voltage Cable:
Белешка: The Interlock Pins are the two small spade terminals located in the same opening.- If the resistance is 0–0.3 ohms between the Interlock Loop Pins, заменити Повер Елецтроницс Царриер (ПИК), затим пређите на корак 10.
- Ако отпор ван домета, замените ДЦ високи напон кабла, затим пређите на корак 10.
[/fusion_content_box][fusion_content_box title=”КОРАК 8. Verify continuity of DC Cable from PEC to Inverter Connector circuits.” backgroundcolor=”” icon=”” iconflip=”” iconrotate=”” iconspin=”” iconcolor=”” circlecolor=”” circlebordersize=”” circlebordercolor=”” outercirclebordersize=”” outercirclebordercolor=”” image=”” image_id=”” image_width=”” image_height=”” link=”” linktext=”” link_target=”” animation_type=”” animation_direction=”left” animation_speed=”0.3″ animation_offset=””]
- кључ од.
- Disconnect the DC High-Voltage Cable at the PEC Bulkhead and the Inverter Bulkhead.
- Measure the resistance of each high-voltage circuit on the cable:
- If the resistance of each high-voltage circuit in the cable is 1 ома или мање, заменити регулатор, затим пређите на корак 10.
- Ако отпор ван домета, replace the DC High-Voltage Cable, затим пређите на корак 10.
[/fusion_content_box][/fusion_content_boxes][fusion_content_boxes layout=”clean-horizontal” columns=”2″ title_size=”18px” heading_size=”3″ title_color=”#ffffff” body_color=”#ffffff” backgroundcolor=”#4f4f4f” icon=”” iconflip=”” iconrotate=”” iconspin=”no” iconcolor=”” icon_circle=”” icon_circle_radius=”” circlecolor=”” circlebordersize=”” circlebordercolor=”” outercirclebordersize=”” outercirclebordercolor=”” icon_size=”” icon_hover_type=”” hover_accent_color=”#f41000″ image=”” image_id=”” image_width=”” image_height=”” link_type=”” button_span=”” link_area=”” link_target=”” icon_align=”left” animation_type=”” animation_delay=”” animation_offset=”” animation_direction=”left” animation_speed=”0.3″ margin_top=”” margin_bottom=”” hide_on_mobile=”small-visibility,medium-visibility,large-visibility” class=”” id=””][fusion_content_box title=”КОРАК 9. Verify Data Monitor parameters.” backgroundcolor=”” icon=”” iconflip=”” iconrotate=”” iconspin=”” iconcolor=”” circlecolor=”” circlebordersize=”” circlebordercolor=”” outercirclebordersize=”” outercirclebordercolor=”” image=”” image_id=”” image_width=”” image_height=”” link=”” linktext=”” link_target=”” animation_type=”” animation_direction=”left” animation_speed=”0.3″ animation_offset=””]
- Повежите СервицеРангер до 9-Ваи дијагностички конектор за у кабини.
- Изаберите опцију "Подаци Монитор".
- View the following parameters in the High-Voltage Battery list.
- Battery Pack Voltage (BCU1) Нови ПИД 118
- Battery Voltage PID 116
- If the voltage readings on PID 116 и ПИД 118 are within 10 волти једни другима, заменити Повер Елецтроницс Царриер (ПИК), затим пређите на корак 10.
- If the voltage readings on PID 116 и ПИД 118 are greater than 10 волти једни другима, заменити регулатор, затим пређите на корак 10.
[/fusion_content_box][fusion_content_box title=”КОРАК 10. провери поправку.” backgroundcolor=”” icon=”” iconflip=”” iconrotate=”” iconspin=”no” iconcolor=”” circlecolor=”” circlebordersize=”” circlebordercolor=”” outercirclebordersize=”” outercirclebordercolor=”” image=”” image_id=”” image_width=”” image_height=”” link=”” linktext=”Опширније” link_target=”” animation_type=”” animation_direction=”left” animation_speed=”0.3″ animation_offset=””]
- кључ од.
- Поново повежите све конекторе и негативни кабел акумулатора.
- тастер на.
- Цлеар кодови, видети Цлеар Неактивни Грешке.
- Вози возило и покушати да вратите код.
- Проверите за кодове, видети Погледај активне и неактивне Фаултс.
- Ако нема кодова, Тест је завршен.
- Ако фаулт цоде 116 izgleda, контактирајте Еатон на 1- 800-826-ПОМОЋ (4357). Repeat this Step (корак 10).
- Ако се код осим 116 izgleda, видети Грешка код Индек Лист.
[/fusion_content_box][/fusion_content_boxes][/fusion_builder_column][/fusion_builder_row][/fusion_builder_container][fusion_global id=”13788″]