[fusion_builder_container hundred_percent=nohundred_percent_height=nohundred_percent_height_scroll=nohundred_percent_height_center_content=yesequal_height_columns=nomenu_anchor=”” hide_on_mobile=small-visibility,medium-visibility,large-visibilitystatus=publishedpublish_date=”” class=”” id=”” background_color=”” background_image=”” background_position=center centerbackground_repeat=no-repeatfade=nobackground_parallax=noneenable_mobile=noparallax_speed=”0.3″ video_mp4=”” video_webm=”” video_ogv=”” video_url=”” video_aspect_ratio=”16:9″ video_loop=yesvideo_mute=yesvideo_preview_image=”” border_size=”” border_color=”” border_style=solidmargin_top=”35″ margin_bottom=”” padding_top=”” padding_right=”” padding_bottom=”” padding_left=””][fusion_builder_row][fusion_builder_column type=”1_1layout=”1_1spacing=”” center_content=nolink=”” target=_selfmin_height=”” hide_on_mobile=small-visibility,medium-visibility,large-visibilityclass=”” id=”” background_color=”” background_image=”” background_image_id=”” background_position=left topbackground_repeat=no-repeathover_type=noneborder_size=”0″ border_color=”” border_style=solidborder_position=allpadding_top=”” padding_right=”” padding_bottom=”” padding_left=”” margin_top=”” margin_bottom=”” animation_type=”” animation_direction=leftanimation_speed=”0.3″ animation_offset=”” last=no”][fusion_text columns=”” column_min_width=”” column_spacing=”” rule_style=defaultrule_size=”” rule_color=”” hide_on_mobile=small-visibility,medium-visibility,large-visibilityclass=”” id=””]

Eaton ਆਪੋ ਹਾਈਬ੍ਰਾਇਡ ਸੰਚਾਰਨ ਨੁਕਸ ਕੋਡ 116 – High Voltage Relays -(MY08 ਸਿਸਟਮ)

[/fusion_text][/fusion_builder_column][/fusion_builder_row][/fusion_builder_container][fusion_builder_container hundred_percent=nohundred_percent_height=nohundred_percent_height_scroll=nohundred_percent_height_center_content=yesequal_height_columns=nomenu_anchor=”” hide_on_mobile=small-visibility,medium-visibility,large-visibilitystatus=publishedpublish_date=”” class=”” id=”” background_color=”” background_image=”” background_position=center centerbackground_repeat=no-repeatfade=nobackground_parallax=noneenable_mobile=noparallax_speed=”0.3″ video_mp4=”” video_webm=”” video_ogv=”” video_url=”” video_aspect_ratio=”16:9″ video_loop=yesvideo_mute=yesvideo_preview_image=”” border_size=”” border_color=”” border_style=solidmargin_top=”” margin_bottom=”” padding_top=”” padding_right=”” padding_bottom=”” padding_left=””][fusion_builder_row][fusion_builder_column type=”1_1layout=”1_1spacing=”” center_content=nolink=”” target=_selfmin_height=”” hide_on_mobile=small-visibility,medium-visibility,large-visibilityclass=”” id=”” background_color=”” background_image=”” background_image_id=”” background_position=left topbackground_repeat=no-repeathover_type=noneborder_size=”0″ border_color=”” border_style=solidborder_position=allpadding_top=”” padding_right=”” padding_bottom=”” padding_left=”” margin_top=”” margin_bottom=”” animation_type=”” animation_direction=leftanimation_speed=”0.3″ animation_offset=”” last=no”][fusion_text columns=”” column_min_width=”” column_spacing=”” rule_style=defaultrule_size=”” rule_color=”” hide_on_mobile=small-visibility,medium-visibility,large-visibilityclass=”” id=””]

Eaton ਹਾਈਬ੍ਰਾਇਡ ਡਰਾਈਵ ਸਿਸਟਮ ਮਾਡਲ ਲਈ ਕੋਡ ਖਰਾਬ (MY08) EH-8E306A-ਯੂ, EH-8E306A-UPG, EH-8E306A-ਅੱਪ, EH-8E306A-ਸੀਡੀ, EH-8E306A-ਟੀ, EH-6E606B-ਸੀਡੀ. ਟੈਸਟ ਕਿਵੇਂ ਕਰਨਾ ਹੈ ਬਾਰੇ ਸਿੱਖਣ ਲਈ ਹੇਠਾਂ ਪੜ੍ਹੋ, ਨੂੰ ਸਾਫ ਕਰੋ ਅਤੇ ਆਪਣੇ Freightliner ਲਈ ਕਸੂਰ ਕੋਡ ਗਲਤੀ ਨੂੰ ਠੀਕ, mack, Peterbilt, Kenworth, ਵੋਲਵੋ, ਅੰਤਰਰਾਸ਼ਟਰੀ, ਅਤੇ ਭਾਰੀ-ਡਿਊਟੀ ਟਰੱਕ ਅਤੇ ਸਾਜ਼ੋ. The High-Voltage Relays are located inside the Power Electronics Carrier (ਪੈਕ) ਰੀਲੇਅ ਬਾਕਸ ਯੂਨਿਟ ਵਿਚ. There is 1 precharge relay on the positive side, an additional relay on the positive, ਅਤੇ 1 on the negative for a total of 3. ਇਹ ਦੱਸਦੀ ਆਮ ਤੌਰ ਖੁੱਲ੍ਹੇ ਹਨ, ਜਦ ਸਿਸਟਮ ਬੰਦ ਹੈ. ਦੱਸਦੀ Inverter ਦੁਆਰਾ ਕੰਟਰੋਲ ਕਰ ਰਹੇ ਹਨ.

ਖਰਾਬ ਕੋਡ 116 – High Voltage Relays Detection

ਅੱਗੇ ਸਿਸਟਮ ਕਸੂਰ ਖੋਜਦਾ ਹੈ ਹੇਠ ਸ਼ਰਤ ਨੂੰ ਮਿਲੇ ਕੀਤਾ ਜਾਣਾ ਚਾਹੀਦਾ ਹੈ:

  • Inverter ਇਗਨੀਸ਼ਨ ਵੋਲਟੇਜ ਵੱਧ ਵੱਡਾ ਹੈ 7 ਵੋਲਟ ਅਤੇ ਵੱਧ ਘੱਟ 16 ਵੋਲਟ.

ਸੂਚਨਾ: ਇੱਕ ਸਰਗਰਮ ਕੋਡ ਨੂੰ ਹੱਲ ਕਰਨ ਲਈ ਵੇਖੋ ਉਤਪਾਦ ਡਾਇਗਨੋਸਟਿਕ ਮੋਡ (PDM)

ਹਾਲਾਤ ਨੁਕਸ ਕੋਡ ਸਰਗਰਮ ਸੈੱਟ

  • ਐੱਫ 10 is set when the Inverter detects the input voltage measured at the capacitor is less than 210 volts within 3 seconds after the sub-relay closed in the Relay Box.
  • ਐੱਫ 14 is set when only the negative relay in the Relay Box is on and capacitor voltage decreases less than 10 volts/5 seconds when initial capacitor voltage was greater than 200 volts and motor speed less than 500 min-1, or there is a detect error in the initial check.

ਫਾਲਬੈਕ ਜਦ ਨੁਕਸ ਕੋਡ 116 ਸੈੱਟ ਕੀਤਾ ਗਿਆ ਹੈ ਹੇਠ ਹਾਲਾਤ ਵਾਪਰ:

  • ਅੰਬਰ "ਚੈੱਕ ਹਾਈਬ੍ਰਾਇਡ" FMI ਰੌਸ਼ਨੀ ਦੇ ਫ਼ੇਰ 10 and remains solid for FMI 14.
  • ਕਸੂਰ HCM ਮੈਮੋਰੀ ਵਿੱਚ ਸੰਭਾਲਿਆ ਗਿਆ ਹੈ.
  • Inverter ਬੰਦ ਹਾਈ-ਵੋਲਟੇਜ ਸਿਸਟਮ ਬੰਦ.
  • HCM ਨੂੰ ਇੱਕ ਡੀਜ਼ਲ ਸਿਰਫ-ਮੋਡ ਵਿੱਚ ਹਾਈਬ੍ਰਿਡ ਵਾਹਨ ਨੂੰ ਕੰਟਰੋਲ ਕਰਨ ਲਈ ਜਾਰੀ ਹੈ.
  • ਸੰਚਾਰ ਮੂਲ ਨੂੰ 1 ਦਾ ਸਾਮਾਨ ਸ਼ੁਰੂ.

[/fusion_text][fusion_text columns=”” column_min_width=”” column_spacing=”” rule_style=defaultrule_size=”” rule_color=”” hide_on_mobile=small-visibility,medium-visibility,large-visibilityclass=”” id=””]

ਹਾਲਾਤ ਨੁਕਸ ਕੋਡ ਸਰਗਰਮ ਸੈੱਟ

ਕੇਵਲ ਸਰਗਰਮ ਨੁਕਸ ਸੰਚਾਰ ਇਲੈਕਟ੍ਰਾਨਿਕ ਕੰਟਰੋਲ ਯੂਨਿਟ ਤੱਕ ਸਾਫ਼ ਕਰ ਕੀਤਾ ਜਾ ਸਕਦਾ ਹੈ (TECU) ਜ HCM ਦਾ ਇਤਿਹਾਸ ServiceRanger ਵਰਤ. TECU ਆਪ ਹੀ ਬਾਅਦ ਇਤਿਹਾਸ ਨੁਕਸ ਸਾਫ 200 ਘੰਟੇ ਅਤੇ HCM ਆਪ ਹੀ ਨੁਕਸ ਬਾਅਦ ਇਤਿਹਾਸ ਨੁਕਸ ਸਾਫ ਕਰਨ ਲਈ ਸਰਗਰਮ ਕੀਤਾ ਗਿਆ ਹੈ, 200 ਘੰਟੇ.

ਇਹ ਕਸੂਰ ਕੋਡ ਹੇਠ ਦੇ ਕਿਸੇ ਵੀ ਦੇ ਕਾਰਨ ਕੀਤਾ ਜਾ ਸਕਦਾ ਹੈ:

  • ਐੱਫ 10
    • ਪੈਕ
    • APG
    • inverter
    • DC high-voltage cable
    • DC cable interlock loops
    • inertia ਸਵਿਚ
    • ਸਰਵਿਸ ਸਵਿੱਚ
  • ਐੱਫ 14
    • inverter
    • ਪੈਕ

[/fusion_text][/fusion_builder_column][/fusion_builder_row][/fusion_builder_container][fusion_builder_container hundred_percent=nohundred_percent_height=nohundred_percent_height_scroll=nohundred_percent_height_center_content=yesequal_height_columns=nomenu_anchor=”” hide_on_mobile=small-visibility,medium-visibility,large-visibilitystatus=publishedpublish_date=”” class=”” id=”” background_color=”” background_image=”” background_position=center centerbackground_repeat=no-repeatfade=nobackground_parallax=noneenable_mobile=noparallax_speed=”0.3″ video_mp4=”” video_webm=”” video_ogv=”” video_url=”” video_aspect_ratio=”16:9″ video_loop=yesvideo_mute=yesvideo_preview_image=”” border_size=”” border_color=”” border_style=solidmargin_top=”” margin_bottom=”” padding_top=”” padding_right=”” padding_bottom=”” padding_left=””][fusion_builder_row][fusion_builder_column type=”1_1layout=”1_1spacing=”” center_content=nolink=”” target=_selfmin_height=”” hide_on_mobile=small-visibility,medium-visibility,large-visibilityclass=”” id=”” background_color=”” background_image=”” background_image_id=”” background_position=left topbackground_repeat=no-repeathover_type=noneborder_size=”0″ border_color=”” border_style=solidborder_position=allpadding_top=”” padding_right=”” padding_bottom=”” padding_left=”” margin_top=”” margin_bottom=”” animation_type=”” animation_direction=leftanimation_speed=”0.3″ animation_offset=”” last=no”][fusion_text columns=”” column_min_width=”” column_spacing=”” rule_style=defaultrule_size=”” rule_color=”” hide_on_mobile=small-visibility,medium-visibility,large-visibilityclass=”” id=””]

ਖਰਾਬ ਕੋਡ 116 – High Voltage Relays Test

[/fusion_text][/fusion_builder_column][/fusion_builder_row][/fusion_builder_container][fusion_builder_container hundred_percent=nohundred_percent_height=nohundred_percent_height_scroll=nohundred_percent_height_center_content=yesequal_height_columns=nomenu_anchor=”” hide_on_mobile=small-visibility,medium-visibility,large-visibilitystatus=publishedpublish_date=”” class=”” id=”” background_color=”” background_image=”” background_position=center centerbackground_repeat=no-repeatfade=nobackground_parallax=noneenable_mobile=noparallax_speed=”0.3″ video_mp4=”” video_webm=”” video_ogv=”” video_url=”” video_aspect_ratio=”16:9″ video_loop=yesvideo_mute=yesvideo_preview_image=”” border_size=”” border_color=”” border_style=solidmargin_top=”” margin_bottom=”” padding_top=”” padding_right=”” padding_bottom=”” padding_left=””][fusion_builder_row][fusion_builder_column type=”1_1layout=”1_1spacing=”” center_content=nolink=”” target=_selfmin_height=”” hide_on_mobile=small-visibility,medium-visibility,large-visibilityclass=”” id=”” background_color=”” background_image=”” background_image_id=”” background_position=left topbackground_repeat=no-repeathover_type=noneborder_size=”0″ border_color=”” border_style=solidborder_position=allpadding_top=”” padding_right=”” padding_bottom=”” padding_left=”” margin_top=”” margin_bottom=”” animation_type=”” animation_direction=leftanimation_speed=”0.3″ animation_offset=”” last=no”][fusion_text columns=”” column_min_width=”” column_spacing=”” rule_style=defaultrule_size=”” rule_color=”” hide_on_mobile=small-visibility,medium-visibility,large-visibilityclass=”” id=””]

ਭਾਗ ਪਛਾਣ MY08 ਸਿਸਟਮ:

[/fusion_text][/fusion_builder_column][/fusion_builder_row][/fusion_builder_container][fusion_builder_container hundred_percent=yeshundred_percent_height=nohundred_percent_height_scroll=nohundred_percent_height_center_content=yesequal_height_columns=nomenu_anchor=”” hide_on_mobile=small-visibility,medium-visibility,large-visibilitystatus=publishedpublish_date=”” class=”” id=”” background_color=”” background_image=”” background_position=center centerbackground_repeat=no-repeatfade=nobackground_parallax=noneenable_mobile=noparallax_speed=”0.3″ video_mp4=”” video_webm=”” video_ogv=”” video_url=”” video_aspect_ratio=”16:9″ video_loop=yesvideo_mute=yesvideo_preview_image=”” border_size=”” border_color=”” border_style=solidmargin_top=”” margin_bottom=”” padding_top=”” padding_right=”10%” padding_bottom=”” padding_left=”10%”][fusion_builder_row][fusion_builder_column type=”1_3layout=”1_3spacing=”” center_content=nolink=”” target=_selfmin_height=”” hide_on_mobile=small-visibility,medium-visibility,large-visibilityclass=”” id=”” background_color=”” background_image=”” background_image_id=”” background_position=left topbackground_repeat=no-repeathover_type=noneborder_size=”0″ border_color=”” border_style=solidborder_position=allpadding_top=”” padding_right=”” padding_bottom=”” padding_left=”” margin_top=”” margin_bottom=”” animation_type=”” animation_direction=leftanimation_speed=”0.3″ animation_offset=”” last=no”][fusion_imageframe image_id=”14474|fullmax_width=”” style_type=”” blur=”” stylecolor=”” hover_type=nonebordersize=”” bordercolor=”” borderradius=”” align=centerlightbox=nogallery_id=”” lightbox_image=”” lightbox_image_id=”” alt=”ਡੈਲਫੀ 56-ਰਾਹ ਮੇਲ ਕੁਨੈਕਟਰ ਦੇਖੋ” link=”” linktarget=_selfhide_on_mobile=small-visibility,medium-visibility,large-visibilityclass=”” id=”” animation_type=”” animation_direction=leftanimation_speed=”0.3″ animation_offset=””]https://www.globaltransmissionsupply.com/wp-content/uploads/Inverter-56-Way-Mating-Connector-View.jpg[/fusion_imageframe][fusion_text columns=”” column_min_width=”” column_spacing=”” rule_style=defaultrule_size=”” rule_color=”” hide_on_mobile=small-visibility,medium-visibility,large-visibilityclass=”” id=””]

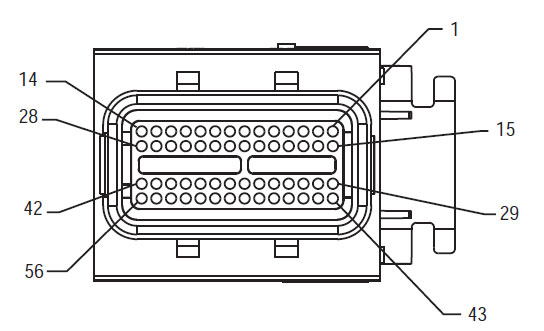
56-ਰਾਹ ਮੇਲ ਕੁਨੈਕਟਰ ਦੇਖੋ

[/fusion_text][/fusion_builder_column][fusion_builder_column type=”1_3layout=”1_3spacing=”” center_content=nolink=”” target=_selfmin_height=”” hide_on_mobile=small-visibility,medium-visibility,large-visibilityclass=”” id=”” background_color=”” background_image=”” background_image_id=”” background_position=left topbackground_repeat=no-repeathover_type=noneborder_size=”0″ border_color=”” border_style=solidborder_position=allpadding_top=”” padding_right=”” padding_bottom=”” padding_left=”” margin_top=”” margin_bottom=”” animation_type=”” animation_direction=leftanimation_speed=”0.3″ animation_offset=”” last=no”][fusion_imageframe image_id=”14635|fullmax_width=”” style_type=”” blur=”” stylecolor=”” hover_type=nonebordersize=”” bordercolor=”” borderradius=”” align=centerlightbox=nogallery_id=”” lightbox_image=”” lightbox_image_id=”” alt=”ਹਾਈ ਵੋਲਟੇਜ ਡੀ.ਸੀ. ਕੁਨੈਕਟਰ ਦੇਖੋ Yazaki ਕੁਨੈਕਟਰ” link=”” linktarget=_selfhide_on_mobile=small-visibility,medium-visibility,large-visibilityclass=”” id=”” animation_type=”” animation_direction=leftanimation_speed=”0.3″ animation_offset=””]https://www.globaltransmissionsupply.com/wp-content/uploads/High-Voltage-DC-Connector-View.jpg[/fusion_imageframe][fusion_text columns=”” column_min_width=”” column_spacing=”” rule_style=defaultrule_size=”” rule_color=”” hide_on_mobile=small-visibility,medium-visibility,large-visibilityclass=”” id=””]

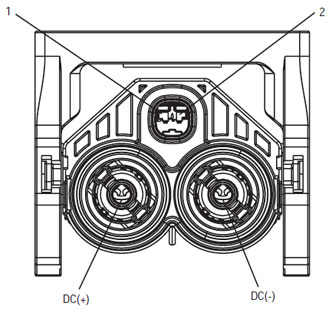
ਹਾਈ ਵੋਲਟੇਜ ਡੀ.ਸੀ. ਕੁਨੈਕਟਰ ਦੇਖੋ Yazaki ਕੁਨੈਕਟਰ

[/fusion_text][/fusion_builder_column][fusion_builder_column type=”1_3layout=”1_3spacing=”” center_content=nolink=”” target=_selfmin_height=”” hide_on_mobile=small-visibility,medium-visibility,large-visibilityclass=”” id=”” background_color=”” background_image=”” background_image_id=”” background_position=left topbackground_repeat=no-repeathover_type=noneborder_size=”0″ border_color=”” border_style=solidborder_position=allpadding_top=”” padding_right=”” padding_bottom=”” padding_left=”” margin_top=”” margin_bottom=”” animation_type=”” animation_direction=leftanimation_speed=”0.3″ animation_offset=”” last=no”][fusion_imageframe image_id=”14213|mediummax_width=”” style_type=”” blur=”” stylecolor=”” hover_type=nonebordersize=”” bordercolor=”” borderradius=”” align=centerlightbox=nogallery_id=”” lightbox_image=”” lightbox_image_id=”” alt=Mating Connector View Deutsch 19 – ਰਾਹ” link=”” linktarget=_selfhide_on_mobile=small-visibility,medium-visibility,large-visibilityclass=”” id=”” animation_type=”” animation_direction=leftanimation_speed=”0.3″ animation_offset=””]https://www.globaltransmissionsupply.com/wp-content/uploads/Eaton-Fuller-Harness-Connector-View-300×289.jpg[/fusion_imageframe][fusion_text columns=”” column_min_width=”” column_spacing=”” rule_style=defaultrule_size=”” rule_color=”” hide_on_mobile=small-visibility,medium-visibility,large-visibilityclass=”” id=””]

Mating Connector View Deutsch 19 – ਰਾਹ

[/fusion_text][/fusion_builder_column][/fusion_builder_row][/fusion_builder_container][fusion_builder_container hundred_percent=nohundred_percent_height=nohundred_percent_height_scroll=nohundred_percent_height_center_content=yesequal_height_columns=nomenu_anchor=”” hide_on_mobile=small-visibility,medium-visibility,large-visibilitystatus=publishedpublish_date=”” class=”” id=”” background_color=”” background_image=”” background_position=center centerbackground_repeat=no-repeatfade=nobackground_parallax=noneenable_mobile=noparallax_speed=”0.3″ video_mp4=”” video_webm=”” video_ogv=”” video_url=”” video_aspect_ratio=”16:9″ video_loop=yesvideo_mute=yesvideo_preview_image=”” border_size=”” border_color=”” border_style=solidmargin_top=”” margin_bottom=”” padding_top=”” padding_right=”” padding_bottom=”” padding_left=””][fusion_builder_row][fusion_builder_column type=”1_1layout=”1_1spacing=”” center_content=nolink=”” target=_selfmin_height=”” hide_on_mobile=small-visibility,medium-visibility,large-visibilityclass=”” id=”” background_image_id=”” background_color=”#000000″ background_image=”” background_position=left topundefined=”” background_repeat=no-repeathover_type=noneborder_size=”0″ border_color=”” border_style=solidborder_position=allpadding_top=”” padding_right=”” padding_bottom=”” padding_left=”” margin_top=”” margin_bottom=”” animation_type=”” animation_direction=leftanimation_speed=”0.3″ animation_offset=”” last=no”][fusion_text columns=”” column_min_width=”” column_spacing=”” rule_style=defaultrule_size=”” rule_color=”” hide_on_mobile=small-visibility,medium-visibility,large-visibilityclass=”” id=””]

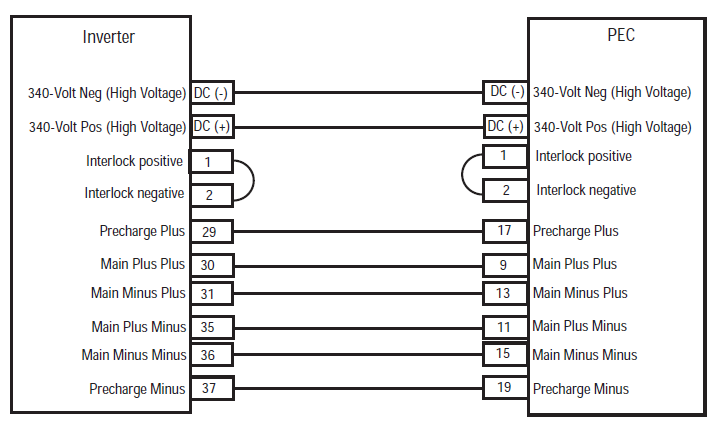
ਸੂਚਨਾ: ਵੇਖੋ Eaton ਹਾਈਬ੍ਰਾਇਡ ਭਾਗ ਅਤੇ ਕੁਨੈਕਟਰ ਸਥਿਤੀ MY08 ਸਿਸਟਮ ਵਿੱਚ ਕੁਨੈਕਟਰ ਸਥਾਨ ਲਈ
[/fusion_text][/fusion_builder_column][fusion_builder_column type=”1_1layout=”1_1spacing=”” center_content=nolink=”” target=_selfmin_height=”” hide_on_mobile=small-visibility,medium-visibility,large-visibilityclass=”” id=”” background_color=”” background_image=”” background_image_id=”” background_position=left topbackground_repeat=no-repeathover_type=noneborder_size=”0″ border_color=”” border_style=solidborder_position=allpadding_top=”” padding_right=”” padding_bottom=”” padding_left=”” margin_top=”” margin_bottom=”” animation_type=”” animation_direction=leftanimation_speed=”0.3″ animation_offset=”” last=no”][fusion_imageframe image_id=”14666|fullmax_width=”” style_type=”” blur=”” stylecolor=”” hover_type=nonebordersize=”” bordercolor=”” borderradius=”” align=centerlightbox=nogallery_id=”” lightbox_image=”” lightbox_image_id=”” alt=Inverter PEC connectors Eaton Fuller Hybrid transmissionlink=”” linktarget=_selfhide_on_mobile=small-visibility,medium-visibility,large-visibilityclass=”” id=”” animation_type=”” animation_direction=leftanimation_speed=”0.3″ animation_offset=””]https://www.globaltransmissionsupply.com/wp-content/uploads/Inverter-PEC-connectors.png[/fusion_imageframe][/fusion_builder_column][/fusion_builder_row][/fusion_builder_container][fusion_builder_container hundred_percent=nohundred_percent_height=nohundred_percent_height_scroll=nohundred_percent_height_center_content=yesequal_height_columns=nomenu_anchor=”” hide_on_mobile=small-visibility,medium-visibility,large-visibilitystatus=publishedpublish_date=”” class=”” id=”” background_color=”” background_image=”” background_position=center centerbackground_repeat=no-repeatfade=nobackground_parallax=noneenable_mobile=noparallax_speed=”0.3″ video_mp4=”” video_webm=”” video_ogv=”” video_url=”” video_aspect_ratio=”16:9″ video_loop=yesvideo_mute=yesvideo_preview_image=”” border_size=”” border_color=”” border_style=solidmargin_top=”” margin_bottom=”” padding_top=”” padding_right=”” padding_bottom=”” padding_left=””][fusion_builder_row][fusion_builder_column type=”1_1layout=”1_1spacing=”” center_content=nolink=”” target=_selfmin_height=”” hide_on_mobile=small-visibility,medium-visibility,large-visibilityclass=”” id=”” background_color=”” background_image=”” background_image_id=”” background_position=left topbackground_repeat=no-repeathover_type=noneborder_size=”0″ border_color=”” border_style=solidborder_position=allpadding_top=”” padding_right=”” padding_bottom=”” padding_left=”” margin_top=”” margin_bottom=”” animation_type=”” animation_direction=leftanimation_speed=”0.3″ animation_offset=”” last=no”][fusion_modal name=warnings_cautionstitle=”ਚੇਤਾਵਨੀ & ਚੇਤਾਵਨੀ” size=largebackground=”” border_color=”” show_footer=yesclass=”” id=””]ਖ਼ਤਰਾ: ਖ਼ਤਰੇ ਦੇ ਸੰਕੇਤ ਕਰਦਾ ਹੈ ਕਿ ਤੁਹਾਨੂੰ ਬੁਰੀ ਜ਼ਖਮੀ ਹੋ ਜ ਦੀ ਮੌਤ ਹੋ ਜਾਵੇਗਾ, ਜੇ ਸੰਕੇਤ ਵਿਧੀ ਦੀ ਪਾਲਣਾ ਨਾ ਕਰਦੇ,.
ਚੇਤਾਵਨੀ: ਚੇਤਾਵਨੀ ਤੁਰੰਤ ਖਤਰਾ ਲੱਗਦਾ ਹੈ, ਗੰਭੀਰ ਨਿਜੀ ਸੱਟ ਦਾ ਨਤੀਜਾ ਹੋ ਸਕਦਾ ਹੈ, ਜੋ ਕਿ ਜੇਕਰ ਤੁਹਾਨੂੰ ਸੰਕੇਤ ਵਿਧੀ ਦੀ ਪਾਲਣਾ ਨਾ ਕਰਦੇ,.
ਸਾਵਧਾਨ: ਸਾਵਧਾਨ ਲੱਗਦਾ ਹੈ ਵਾਹਨ ਜ ਸੰਪਤੀ ਨੂੰ ਨੁਕਸਾਨ ਵਾਪਰ ਸਕਦਾ ਹੈ, ਜੇ ਤੁਹਾਨੂੰ ਸੰਕੇਤ ਵਿਧੀ ਦੀ ਪਾਲਣਾ ਨਾ ਕਰਦੇ,.

ਸੂਚਨਾ: ਸੂਚਨਾ ਵਾਧੂ ਵਿਸਥਾਰ ਹੈ, ਜੋ ਕਿ ਤਸ਼ਖੀਸ ਜ ਇੱਕ ਭਾਗ ਨੂੰ / ਸਿਸਟਮ ਦੀ ਮੁਰੰਮਤ 'ਚ ਮਦਦ ਕਰੇਗਾ ਪਤਾ ਲੱਗਦਾ ਹੈ.

ਵੇਖਾਏ ਕ੍ਰਮ ਨੂੰ ਨਿਜੀ ਸੱਟ ਬਚਣ ਲਈ ਵਿੱਚ ਦਿੱਤਾ ਕਾਰਵਾਈ ਦੀ ਪਾਲਣਾ ਕਰੋ:

1. ਹਾਈ-ਵੋਲਟੇਜ ਸ਼ੰਕੂ ਵਾਹਨ ਦੇ ਆਲੇ-ਦੁਆਲੇ ਹਨ ਅਤੇ ਤਾਲਾਬੰਦੀ PEC ਤੇ ਇੰਸਟਾਲ ਹੈ, ਜੇ, ਸਿਰਫ ਵਿਅਕਤੀ ਹੈ, ਜੋ ਕਿ ਵਾਹਨ ਸ਼ੁਰੂ ਕਰਨ ਦੀ ਇਜਾਜ਼ਤ ਕੀਤਾ ਜਾਣਾ ਚਾਹੀਦਾ ਹੈ, ਜੋ ਵਿਅਕਤੀ ਤਾਲਾਬੰਦੀ ਟੈਗ ਸਾਈਨ ਕੀਤਾ ਗਿਆ ਹੈ.
2. ਇੱਕ ਵਾਹਨ 'ਤੇ ਕੰਮ ਕਰ ਜ ਕੈਬ ਨੂੰ ਛੱਡ ਕੇ ਅੱਗੇ ਇੰਜਣ ਚੱਲ ਰਿਹਾ ਹੈ, ਜਦਕਿ, ਤੁਹਾਨੂੰ "n" ਵਿਚ ਸ਼ਿਫਟ ਲੀਵਰ ਰੱਖਣ ਚਾਹੀਦਾ ਹੈ ਪਾਰਕਿੰਗ ਤੋੜੀ ਸੈੱਟ ਕੀਤਾ, ਅਤੇ ਪਹੀਏ ਨੂੰ ਬਲਾਕ.
3. ਸੁਰੱਖਿਆ ਦੇ ਕਾਰਨ ਲਈ, ਹਮੇਸ਼ਾ ਸੇਵਾ ਬ੍ਰੇਕ ਸ਼ਾਮਲ "ਐਨ" ਤੱਕ ਗੇਅਰ ਅਹੁਦੇ ਦੀ ਚੋਣ ਕਰਨ ਲਈ ਪੁਰਾਣੇ
4. ਅੱਗੇ ਸ਼ੁਰੂ ਕਰਨ ਲਈ ਇੱਕ ਵਾਹਨ ਨੂੰ ਹਮੇਸ਼ਾ ਡਰਾਈਵਰ ਦੀ ਸੀਟ 'ਤੇ ਬੈਠੇ ਕੀਤਾ ਜਾ, ਦੀ ਚੋਣ ਕਰੋ "n" ਸ਼ਿਫਟ ਕੰਟਰੋਲ 'ਤੇ, ਅਤੇ ਪਾਰਕਿੰਗ ਬ੍ਰੇਕ ਸੈੱਟ ਕੀਤਾ.
5. ePTO ਨਾਲ ਵਾਹਨ ਵਿੱਚ, ਇੰਜਣ ਅਤੇ / ਜ
ਮੋਟਰ / ਜੇਨਰੇਟਰ ePTO ਮੋਡ ਵਿੱਚ ਸ਼ੁਰੂ ਕਰ ਸਕਦੇ ਹੋ. ਕਦੇ ਵੀ ਕਿਸੇ ਵੀ ਨਿਗਰਾਨੀ ਕਰਨ ਜ ਵਾਹਨ 'ਤੇ ਕੰਮ, ਇਸ ਮੋਡ ਵਿੱਚ, ਜਦਕਿ.
6. 12-ਵੋਲਟ ਬੈਟਰੀ ਸਕਾਰਾਤਮਕ (+) ਅਤੇ ਨਕਾਰਾਤਮਕ (-) ਕਿਸੇ ਵੀ ਹਾਈਬ੍ਰਾਇਡ ਲੈਸ ਵਾਹਨ 'ਤੇ ਕਿਸੇ ਵੀ ਿਲਵਿੰਗ ਕਰਨ ਲਈ ਪੁਰਾਣੇ ਕੁਨੈਕਸ਼ਨ ਬੰਦ ਕੀਤਾ ਜਾਣਾ ਚਾਹੀਦਾ ਹੈ.

ਸਾਵਧਾਨ: ਵੇਖਾਏ ਲਈ ਕ੍ਰਮ ਦੇ ਸਾਮਾਨ ਖ਼ਰਾਬ ਨੁਕਸਾਨ ਬਚਣ ਲਈ ਵਿੱਚ ਦਿੱਤਾ ਕਾਰਵਾਈ ਦੀ ਪਾਲਣਾ ਕਰੋ.
ਸਾਵਧਾਨ: ਪਾਰਕਿੰਗ ਤੋੜੀ ਮੁਕਤ ਕਰ ਜ, ਜਦ ਤੱਕ ਕਿ ਹਵਾ ਦਾ ਪ੍ਰੈਸ਼ਰ ਸਹੀ ਪੱਧਰ 'ਤੇ ਹੁੰਦਾ ਹੈ, ਇੱਕ ਗੇਅਰ ਦੀ ਚੋਣ ਕਰਨ ਦੀ ਕੋਸ਼ਿਸ਼ ਨਾ ਕਰੋ.
ਸਾਵਧਾਨ: "N" ਵਿਚ ਜਗ੍ਹਾ ਸ਼ਿਫਟ ਲੀਵਰ ਫ਼ਰਾਰ ਦੌਰਾਨ ਸੰਚਾਰ ਨੂੰ ਨੁਕਸਾਨ ਬਚਣ ਅਤੇ ਜ਼ਮੀਨ ਬੰਦ ਡਰਾਈਵ ਪਹੀਏ ਚੁੱਕਣ ਜ driveline ਕੁਨੈਕਸ਼ਨ ਬੰਦ ਕਰਨ ਲਈ.

ਹਾਈ-ਵੋਲਟੇਜ ਚੇਤਾਵਨੀ & ਚੇਤਾਵਨੀ

  • CO2 ਜ ਡਰਾਈ ਕੈਮੀਕਲ Fire Extinguishers ਵਰਤੋ.
  • ਹਾਈ-ਵੋਲਟੇਜ ਤਾਰ ਸੰਤਰੀ ਇਨਸੂਲੇਸ਼ਨ ਜ ਪੇਚੀਦਾ ਵਟਊਵਬੰਗ ਵਿਚ ਕਵਰ ਕੀਤਾ ਹੈ ਅਤੇ ਕੁਨੈਕਟਰ 'ਤੇ ਚੇਤਾਵਨੀ ਦੇ ਲੇਬਲ ਦੇ ਨਾਲ ਮਾਰਕ ਕੀਤਾ ਗਿਆ ਹੈ.
  • ਸਾਰੇ Eaton® ਹਾਈਬ੍ਰਾਇਡ ਡੀਜ਼ਲ / ਇਲੈਕਟ੍ਰਿਕ ਵਾਹਨ ਮਾਰਕ ਕੀਤਾ ਜਾਵੇਗਾ, 'ਹਾਈਬ੍ਰਾਇਡ’ ਵਾਹਨ ਦੇ ਬਾਹਰ ਤੇ, ਡੈਸ਼ 'ਤੇ ਸ਼ਿਫਟ ਲੇਬਲ ਨੂੰ ਨਾਲ-ਨਾਲ.
  • ਚੈਸੀ ਮਾਊਟ ਹਾਈਬ੍ਰਿਡ ਭਾਗ ਦੇ ਖਾਸ ਸਥਾਨ ਲਈ OEM ਵੇਖੋ.
  • ਸੰਤਰੀ ਹਾਈ-ਵੋਲਟੇਜ ਕੇਬਲ ਵਿੱਚ ਕੱਟ ਨਾ ਕਰੋ.
  • ਵਿੱਚ ਕੱਟ ਜ ਨਾ ਖੋਲ੍ਹੋ ਪੈਕ.
  • ਵਿੱਚ ਕੱਟ ਜ ਡੀ.ਸੀ. / ਡੀ.ਸੀ. ਪਰਿਵਰਤਕ ਨਾ ਖੋਲ੍ਹੋ.
  • ਵਿੱਚ ਕੱਟ ਜ Inverter ਨਾ ਖੋਲ੍ਹੋ.

ਇੱਕ ਬਫਰ ਜ਼ੋਨ ਸਥਾਪਤ ਹੋਣਾ ਚਾਹੀਦਾ ਹੈ ਅਤੇ ਉੱਚ-ਵੋਲਟੇਜ ਰਬੜ ਦੇ ਦਸਤਾਨੇ ਗਰਮੀ ਨੂੰ (ਕਲਾਸ 0 ਚਮੜੇ ਸੁਰੱਖਿਆ ਦੇ ਨਾਲ) ਹਾਈ-ਵੋਲਟੇਜ 'ਤੇ ਕੰਮ ਕਰ ਰਹੇ ਹਨ, ਨੂੰ ਪੁਰਾਣੇ ਦੀ ਲੋੜ. ਅਸਫ਼ਲਤਾ ਇਹ ਹਦਾਇਤ ਦੀ ਪਾਲਣਾ ਕਰਨ ਲਈ ਗੰਭੀਰ ਨਿਜੀ ਸੱਟ ਮੌਤ ਦਾ ਨਤੀਜਾ ਹੋ ਸਕਦਾ.
ਰਬੜ ਦੇ ਦਸਤਾਨੇ-ਗਰਮੀ ਨੂੰ ਹੈ, ਜੋ ਕਿ ਹੈ, ਜਦਕਿ ਹਾਈ-ਵੋਲਟੇਜ ਸਿਸਟਮ 'ਤੇ ਕੰਮ ਕਰ ਪਾਉਣਾ ਲਾਜ਼ਮੀ ਹੋਵੇਗਾ ਕਲਾਸ ਹਨ 0 ਚਮੜੇ ਸੁਰੱਖਿਆ ਦੇ ਨਾਲ. ਰਬੜ ਦੇ ਦਸਤਾਨੇ ਰਬੜ ਇਨਸੂਲੇਸ਼ਨ ਦਸਤਾਨੇ ਟੈਸਟਿੰਗ ਵਿਧੀ ਸਫ਼ਾ 'ਤੇ "ਡਾਇਗਨੋਸਟਿਕ ਲਈ ਸੰਦ / ਸੇਵਾ ਪ੍ਰਕਾਸ਼ਨ" ਵਿੱਚ ਪਾਇਆ ਹੇਠ ਹਰ ਵਰਤਣ ਅੱਗੇ ਟੈਸਟ ਕੀਤਾ ਜਾਣਾ ਚਾਹੀਦਾ ਹੈ 6. ਅਸਫ਼ਲਤਾ ਇਹ ਹਦਾਇਤ ਦੀ ਪਾਲਣਾ ਕਰਨ ਲਈ ਗੰਭੀਰ ਨਿਜੀ ਸੱਟ ਮੌਤ ਦਾ ਨਤੀਜਾ ਹੋ ਸਕਦਾ.
ਸਫ਼ੇ 'ਤੇ ਮੁਆਇਨਾ ਜ ਕੋਈ ਵੀ ਹਾਈ-ਵੋਲਟੇਜ ਕੇਬਲ ਜ ਭਾਗ' ਤੇ ਕੰਮ ਕਰ "ਹਾਈ-ਵੋਲਟੇਜ ਸੇਵਾ ਬੰਦ ਹੈ ਅਤੇ ਪਾਵਰ-ਅੱਪ ਵਿਧੀ" ਅੱਗੇ 4 ਬਾਅਦ ਵਿੱਚ ਕੀਤਾ ਜਾਣਾ ਚਾਹੀਦਾ ਹੈ. ਅਸਫ਼ਲਤਾ ਇਹ ਹਦਾਇਤ ਦੀ ਪਾਲਣਾ ਕਰਨ ਲਈ ਗੰਭੀਰ ਨਿਜੀ ਸੱਟ ਮੌਤ ਦਾ ਨਤੀਜਾ ਹੋ ਸਕਦਾ.
ਲਾਕਆਉਟ ਤੇ ਟੈਗਆਉਟ ਜੰਤਰ ਸਿਰਫ ਤਕਨੀਸ਼ੀਅਨ ਹੈ, ਜੋ ਕਿ ਗੱਡੀ 'ਤੇ ਲਾਕਆਉਟ ਤੇ ਟੈਗਆਉਟ ਜੰਤਰ ਰੱਖਿਆ ਕੇ ਹਟਾਇਆ ਜਾਣਾ ਚਾਹੀਦਾ ਹੈ. ਅਸਫ਼ਲਤਾ ਇਹ ਹਦਾਇਤ ਦੀ ਪਾਲਣਾ ਕਰਨ ਲਈ ਗੰਭੀਰ ਨਿਜੀ ਸੱਟ ਮੌਤ ਦਾ ਨਤੀਜਾ ਹੋ ਸਕਦਾ.
ਹਾਈ-ਵੋਲਟੇਜ ਰਬੜ ਦੇ ਦਸਤਾਨੇ ਗਰਮੀ ਨੂੰ (ਕਲਾਸ 0 ਚਮੜੇ ਸੁਰੱਖਿਆ ਦੇ ਨਾਲ) ਜਦ ਕਿਸੇ ਵੀ 'ਤੇ ਕੰਮ ਕਰ ਪਾਉਣਾ ਲਾਜ਼ਮੀ ਹੋਵੇਗਾ
ਹਾਈ-ਵੋਲਟੇਜ ਕੇਬਲ. "ਹਾਈ-ਵੋਲਟੇਜ ਸੇਵਾ ਬੰਦ ਹੈ ਅਤੇ ਪਾਵਰ-ਅੱਪ ਵਿਧੀ" ਸਫ਼ੇ 'ਤੇ 4 ਕਿਸੇ ਵੀ ਹਾਈ-ਵੋਲਟੇਜ ਕੇਬਲ ਨੂੰ ਹਟਾਉਣ ਲਈ ਪੁਰਾਣੇ ਬਾਅਦ ਵਿੱਚ ਕੀਤਾ ਜਾਣਾ ਚਾਹੀਦਾ ਹੈ. ਅਸਫ਼ਲਤਾ ਇਹ ਹਦਾਇਤ ਦੀ ਪਾਲਣਾ ਕਰਨ ਲਈ ਗੰਭੀਰ ਨਿਜੀ ਸੱਟ ਮੌਤ ਦਾ ਨਤੀਜਾ ਹੋ ਸਕਦਾ.
ਹਾਈ-ਵੋਲਟੇਜ ਕੇਬਲ ਅਤੇ ਵਾਇਰਿੰਗ ਸੰਤਰੀ ਹਨ ਅਤੇ ਕੁਨੈਕਟਰ 'ਤੇ ਇੱਕ ਚੇਤਾਵਨੀ ਦੇ ਲੇਬਲ ਸ਼ਾਮਿਲ ਹਨ. ਹਾਈ-ਵੋਲਟੇਜ ਭਾਗ ਇੱਕ ਲੇਬਲ ਨਾਲ ਮਾਰਕ ਕੀਤੇ ਹਨ,. ਹਾਈ-ਵੋਲਟੇਜ ਰਬੜ ਦੇ ਦਸਤਾਨੇ ਗਰਮੀ ਨੂੰ (ਕਲਾਸ 0 ਚਮੜੇ ਸੁਰੱਖਿਆ ਦੇ ਨਾਲ) ਇਹ ਭਾਗ ਦੇ ਕਿਸੇ ਵੀ 'ਤੇ ਕੰਮ ਕਰ ਲਈ ਵਰਤਿਆ ਜਾਣਾ ਚਾਹੀਦਾ ਹੈ. ਅਸਫ਼ਲਤਾ ਇਹ ਹਦਾਇਤ ਦੀ ਪਾਲਣਾ ਕਰਨ ਲਈ ਗੰਭੀਰ ਨਿਜੀ ਸੱਟ ਮੌਤ ਦਾ ਨਤੀਜਾ ਹੋ ਸਕਦਾ.

ਹਾਈ-ਵੋਲਟੇਜ ਸੇਵਾ ਬੰਦ ਨੇਮਾਵਲੀ

ਹਾਈ-ਵੋਲਟੇਜ ਸੇਵਾ ਬੰਦ ਹੈ ਅਤੇ ਪਾਵਰ-ਅੱਪ ਵਿਧੀ1. ਮਗਰ "ਹਾਈ-ਵੋਲਟੇਜ ਕੰਮ ਖੇਤਰ 'ਵਿਧੀ.
2. ਪੈਕ ਦੇ ਮੋਰਚੇ 'ਤੇ ਲਾਲ ਪੈਕ ਸਰਵਿਸ ਸਵਿੱਚ ਨੂੰ ਲੱਭੋ ਅਤੇ ਧੱਕਣ ਨੂੰ ਬੰਦ.
3. ਸਰਵਿਸ ਸਵਿੱਚ ਦਾ ਢੱਕਣ ਹਟਾਓ ਅਤੇ ਤਾਲਾਬੰਦੀ ਬਰੈਕਟ ਇੰਸਟਾਲ (J48506).
4. ਲਾੱਕਆਉਟ ਬਰੈਕਟ ਨੂੰ ਠੀਕ ਟੈਗ.
5. ਪੈਕ ਸਰਵਿਸ ਸਵਿੱਚ ਯਕੀਨੀ ਬੰਦ ਸਥਿਤੀ ਤੱਕ ਜਾਣ ਨਾ ਕਰ ਸਕਦਾ ਹੈ.
6. ਸਿਸਟਮ ਦੇ ਇੱਕ ਘੱਟੋ ਘੱਟ ਕਰਨ ਲਈ ਸੈੱਟ ਕਰਨ ਲਈ ਆਗਿਆ ਦਿਓ 5 ਮਿੰਟ ਹਾਈ ਵੋਲਟੇਜ ਉਤਾਰਨਾ.
7. ServiceRanger ਜੁੜੋ ਅਤੇ ਵੇਖਣ ਲਈ ਡਾਟਾ ਦੀ ਨਿਗਰਾਨੀ PID 116 ਕਹਿੰਦੇ ਹਨ, "ਹਾਈ-ਵੋਲਟੇਜ ਬੈਟਰੀ ਸੰਭਾਵੀ." SPN ਵਰਤੋ 520323 J1939 ਕੁਨੈਕਸ਼ਨ ਲਈ "ਬੈਟਰੀ ਵੋਲਟੇਜ ਆਰ.ਬੀ." (ਰੀਲੇਅ ਬਾਕਸ).
8. ਵੋਲਟੇਜ ਹੋਣਾ ਚਾਹੀਦਾ ਹੈ 30 ਵੋਲਟ ਜ ਘੱਟ. ਜੇ ਵੋਲਟੇਜ ਉਪਰ ਹੈ 30 ਵੋਲਟ, ਵਾਹਨ 'ਤੇ ਕੰਮ ਨਾ ਕਰਦੇ ਅਤੇ 1-800-826-ਮਦਦ' ਤੇ Eaton® ਸੰਪਰਕ ਕਰੋ (4357).
9. ਇਗਨੀਸ਼ਨ ਕੁੰਜੀ ਨੂੰ ਬੰਦ ਕਰ ਦਿਓ ਅਤੇ ਦੀ ਮੁਰੰਮਤ ਜ ਕਦਮ ਹੈ ਨਿਪਟਾਰਾ ਕਰਨ ਲਈ ਅੱਗੇ ਜਾਰੀ.
ਸੂਚਨਾ: ਵੋਲਟੇਜ ਫਿਲਹਾਲ ਜਦ ਕੁੰਜੀ ਬੰਦ ਹੈ ਦੇ ਤੁਪਕੇ.

ਹਾਈ-ਵੋਲਟੇਜ ਸਰਵਿਸ ਪਾਵਰ-ਅੱਪ ਵਿਧੀ

1. ਆਪਣੇ ਨੂੰ ਜਿੰਦਰਾ ਅਹੁਦੇ ਨੂੰ ਸਭ ਹਾਈ-ਵੋਲਟੇਜ ਕੁਨੈਕਟਰ ਇੰਸਟਾਲ.
2. ਵਿਅਕਤੀ ਨੂੰ ਵਾਹਨ 'ਤੇ ਕੰਮ ਕਰ ਤੁਹਾਨੂੰ ਹਨ, ਜੇ, ਲਾੱਕਆਉਟ ਬਰੈਕਟ ਅਤੇ ਟੈਗ ਹਟਾਉਣ ਲਈ.
3. ਸਰਵਿਸ ਸਵਿੱਚ ਵੱਧ ਲਾੱਕਆਉਟ ਬਰੈਕਟ ਮੁੜ.
4. ਸਰਵਿਸ ਕੱਢਣ ਬਾਹਰ ਜਾਓ ਅਤੇ ਇਸ ਲਈ ਵਾਹਨ ਦਾ ਸਮੂਹ ਚਾਹੀਦਾ ਹੈ 2 ਮਿੰਟ.
5. Start vehicle when appropriate.[/fusion_modal][fusion_modal name=component_locationtitle=”Eaton ਹਾਈਬ੍ਰਾਇਡ ਭਾਗ ਅਤੇ ਕੁਨੈਕਟਰ ਸਥਿਤੀ ” size=largebackground=”#ffffffborder_color=”” show_footer=yesclass=”” id=””]

Eaton ਹਾਈਬ੍ਰਾਇਡ ਭਾਗ ਅਤੇ ਕੁਨੈਕਟਰ ਸਥਾਨ MY08 ਸਿਸਟਮ

[/fusion_modal][fusion_modal name=component_location2title=”Eaton ਹਾਈਬ੍ਰਾਇਡ ਭਾਗ ਅਤੇ ਕੁਨੈਕਟਰ ਸਥਿਤੀ my09 ਸਿਸਟਮ” size=largebackground=”#ffffffborder_color=”” show_footer=yesclass=”” id=””]

Eaton ਹਾਈਬ੍ਰਾਇਡ ਭਾਗ ਅਤੇ ਕੁਨੈਕਟਰ ਸਥਾਨ my09 ਸਿਸਟਮ

[/fusion_modal][/fusion_builder_column][/fusion_builder_row][/fusion_builder_container][fusion_builder_container hundred_percent=nohundred_percent_height=nohundred_percent_height_scroll=nohundred_percent_height_center_content=yesequal_height_columns=nomenu_anchor=”” hide_on_mobile=small-visibility,medium-visibility,large-visibilitystatus=publishedpublish_date=”” class=”” id=”” background_color=”” background_image=”” background_position=center centerbackground_repeat=no-repeatfade=nobackground_parallax=noneenable_mobile=noparallax_speed=”0.3″ video_mp4=”” video_webm=”” video_ogv=”” video_url=”” video_aspect_ratio=”16:9″ video_loop=yesvideo_mute=yesvideo_preview_image=”” border_size=”” border_color=”” border_style=solidmargin_top=”” margin_bottom=”” padding_top=”” padding_right=”” padding_bottom=”” padding_left=””][fusion_builder_row][fusion_builder_column type=”1_1layout=”1_1spacing=”” center_content=nolink=”” target=_selfmin_height=”” hide_on_mobile=small-visibility,medium-visibility,large-visibilityclass=”” id=”” background_color=”” background_image=”” background_image_id=”” background_position=left topbackground_repeat=no-repeathover_type=noneborder_size=”0″ border_color=”” border_style=solidborder_position=allpadding_top=”” padding_right=”” padding_bottom=”” padding_left=”” margin_top=”” margin_bottom=”” animation_type=”” animation_direction=leftanimation_speed=”0.3″ animation_offset=”” last=no”][fusion_content_boxes layout=clean-horizontalcolumns=”2″ title_size=”18pxheading_size=”3″ title_color=”#ffffffbody_color=”#ffffffbackgroundcolor=”#4f4f4ficon=”” iconflip=”” iconrotate=”” iconspin=noiconcolor=”” icon_circle=”” icon_circle_radius=”” circlecolor=”” circlebordersize=”” circlebordercolor=”” outercirclebordersize=”” outercirclebordercolor=”” icon_size=”” icon_hover_type=”” hover_accent_color=”” image=”” image_id=”” image_width=”” image_height=”” link_type=”” button_span=”” link_area=”” link_target=”” icon_align=leftanimation_type=”” animation_delay=”” animation_offset=”” animation_direction=leftanimation_speed=”0.3″ margin_top=”” margin_bottom=”” hide_on_mobile=small-visibility,medium-visibility,large-visibilityclass=”” id=””][fusion_content_box title=ਕਦਮ 1. FMIs ਮੌਜੂਦ ਪੁਸ਼ਟੀ ਕਰੋ.backgroundcolor=”” icon=”” iconflip=”” iconrotate=”” iconspin=noiconcolor=”” circlecolor=”” circlebordersize=”” circlebordercolor=”” outercirclebordersize=”” outercirclebordercolor=”” image=”” image_id=”” image_width=”” image_height=”” link=”” linktext=”ਹੋਰ ਪੜ੍ਹੋ” link_target=”” animation_type=”” animation_direction=leftanimation_speed=”0.3″ animation_offset=””]

  1. ਦੀ ਸਮੀਖਿਆ ਅਤੇ ਪਾਲਣਾ ਕਰੋ ਚੇਤਾਵਨੀ & ਚੇਤਾਵਨੀ.
  2. 9-ਰਾਹ ਡਾਇਗਨੋਸਟਿਕ ਕੁਨੈਕਟਰ ਵਰਤ ServiceRanger ਨਾਲ ਸਰਗਰਮ ਨੁਕਸ ਕੋਡ ਅਤੇ FMIs ਪ੍ਰਾਪਤ.
    ਖ਼ਤਰਾ: ਦੇਖੋ ਉੱਚ-ਵੋਲਟੇਜ ਸੇਵਾ ਬੰਦ ਅਤੇ ਪਾਵਰ-ਅਪ ਪ੍ਰਕਿਰਿਆ. ਸਦਮਾ ਬਚਣ ਲਈ ਕਾਰਵਾਈ ਦੀ ਪਾਲਣਾ ਕਰੋ, ਸਾੜ ਜ ਗਲਤ ਪਰਬੰਧਨ ਹਾਈ-ਵੋਲਟੇਜ ਮੌਤ.
  3. ਕਿਹੜੇ FMIs ਮੌਜੂਦ ਹਨ
    • Fault ਕੋਡ ਜੇ 116 ਐੱਫ 14 ਸੂਚੀਬੱਧ ਹੈ, ਕਦਮ ਨੂੰ ਜਾਣ 9.
    • Fault ਕੋਡ ਜੇ 116 ਐੱਫ 10 ਸੂਚੀਬੱਧ ਹੈ, ਕਦਮ ਨੂੰ ਜਾਣ 2.
    • If no Fault Codes are listed, The Service Switch was pushed in. ਕਦਮ ਜਾਓ 10.

[/fusion_content_box][fusion_content_box title=ਕਦਮ 2. Verify Data Monitor parameters.backgroundcolor=”” icon=”” iconflip=”” iconrotate=”” iconspin=noiconcolor=”” circlecolor=”” circlebordersize=”” circlebordercolor=”” outercirclebordersize=”” outercirclebordercolor=”” image=”” image_id=”” image_width=”” image_height=”” link=”” linktext=”ਹੋਰ ਪੜ੍ਹੋ” link_target=”” animation_type=”” animation_direction=leftanimation_speed=”0.3″ animation_offset=””]

  1. ਕੁੰਜੀ 'ਤੇ.
  2. ਕੈਬ ਵਿਚ 9-ਰਾਹ ਡਾਇਗਨੋਸਟਿਕ ਕੁਨੈਕਟਰ ਨੂੰ ServiceRanger ਕਨੈਕਟ ਕਰੋ.
  3. "ਡਾਟਾ ਦੀ ਨਿਗਰਾਨੀ" ਚੋਣ ਨੂੰ ਚੁਣੋ.
  4. View the Battery Pack Voltage (BCU1) PID 118 in the high- voltage Battery list:
    • If the Battery Pack Voltage (BCU1) PID 118 is greater than 200 ਵੋਲਟ, ਕਦਮ ਨੂੰ ਜਾਣ 3.
    • If the Battery Pack Voltage (BCU1) PID 118 ਵੱਧ ਘੱਟ ਹੈ 200 ਵੋਲਟ, ਪਾਵਰ ਇਲੈਕਟ੍ਰਾਨਿਕਸ ਕੈਰੀਅਰ ਨੂੰ ਤਬਦੀਲ (ਪੈਕ), ਫਿਰ ਕਦਮ ਨੂੰ ਜਾਣ 10.

[/fusion_content_box][/fusion_content_boxes][fusion_content_boxes layout=clean-horizontalcolumns=”2″ title_size=”18pxheading_size=”3″ title_color=”#ffffffbody_color=”#ffffffbackgroundcolor=”#4f4f4ficon=”” iconflip=”” iconrotate=”” iconspin=noiconcolor=”” icon_circle=”” icon_circle_radius=”” circlecolor=”” circlebordersize=”” circlebordercolor=”” outercirclebordersize=”” outercirclebordercolor=”” icon_size=”” icon_hover_type=”” hover_accent_color=”” image=”” image_id=”” image_width=”” image_height=”” link_type=”” button_span=”” link_area=”” link_target=”” icon_align=leftanimation_type=”” animation_delay=”” animation_offset=”” animation_direction=leftanimation_speed=”0.3″ margin_top=”” margin_bottom=”” hide_on_mobile=small-visibility,medium-visibility,large-visibilityclass=”” id=””][fusion_content_box title=ਕਦਮ 3. Verify continuity of Inverter connector circuits.backgroundcolor=”” icon=”” iconflip=”” iconrotate=”” iconspin=noiconcolor=”” circlecolor=”” circlebordersize=”” circlebordercolor=”” outercirclebordersize=”” outercirclebordercolor=”” image=”” image_id=”” image_width=”” image_height=”” link=”” linktext=”ਹੋਰ ਪੜ੍ਹੋ” link_target=”” animation_type=”” animation_direction=leftanimation_speed=”0.3″ animation_offset=””]

  1. ਕੁੰਜੀ ਬੰਦ.
  2. If the vehicle is not equipped with a DC/DC Converter or APG, skip this step.
  3. Using ASTM Class 0 electrical insulating rubber gloves with leather protectors, disconnect the DC cable for the DC/DC Converter and APG at the PEC.
  4. With the key off, temporarily remove the Lockout Bracket and pull the Service Switch out.
  5. ਕੁੰਜੀ 'ਤੇ.
  6. Fault ਕੋਡ ਹੈ 116 ਐੱਫ 10 still Active in ServiceRanger?
    • Fault ਕੋਡ ਜੇ 116 ਐੱਫ 10 is Active with the DC/DC Converter and APG disconnected, ਕਦਮ ਨੂੰ ਜਾਣ 4.
    • Fault ਕੋਡ ਜੇ 116 ਐੱਫ 10 is no longer Active with the DC/DC Converter and APG disconnected, key off and reinstall the Lockout Bracket on the PEC. Replace the Power Electronics Carrier (ਪੈਕ), ਫਿਰ ਕਦਮ ਨੂੰ ਜਾਣ 10.

[/fusion_content_box][fusion_content_box title=ਕਦਮ 4. Verify continuity of PEC connector circuits to ground.backgroundcolor=”” icon=”” iconflip=”” iconrotate=”” iconspin=”” iconcolor=”” circlecolor=”” circlebordersize=”” circlebordercolor=”” outercirclebordersize=”” outercirclebordercolor=”” image=”” image_id=”” image_width=”” image_height=”” link=”” linktext=”” link_target=”” animation_type=”” animation_direction=leftanimation_speed=”0.3″ animation_offset=””]

  1. ਕੁੰਜੀ ਬੰਦ.
  2. ਪੈਕ 19-ਰਾਹ ਕੁਨੈਕਟਰ ਬੰਦ.
  3. Temporarily remove the Lockout Bracket and pull the Service Switch out.
    ਸੂਚਨਾ: Ensure the Key Switch is off.
  4. Measure resistance at the PEC 19-Way Connector Terminal at the following pins:
    • ਪਿੰਨ 17 ਪਿੰਨ ਨੂੰ 19
    • ਪਿੰਨ 9 ਪਿੰਨ ਨੂੰ 11
    • ਪਿੰਨ 13 ਪਿੰਨ ਨੂੰ 15
      • If the resistance between Pins 17 ਅਤੇ ਪਿੰਨ 19 112-122 ohms ਅਤੇ ਪਿੰਨ ਵਿਰੋਧ ਹੈ 9 ਪਿੰਨ ਨੂੰ 11 ਅਤੇ ਪਿੰਨ 13 ਪਿੰਨ ਨੂੰ 15 ਹਰ 33-37 ohms ਹਨ, ਕਦਮ ਨੂੰ ਜਾਣ 5.
      • ਟਾਕਰੇ ਸੀਮਾ ਦੇ ਬਾਹਰ ਹੈ, ਜੇ, ਕਦਮ ਨੂੰ ਜਾਣ 6.

[/fusion_content_box][/fusion_content_boxes][fusion_content_boxes layout=clean-horizontalcolumns=”2″ title_size=”18pxheading_size=”3″ title_color=”#ffffffbody_color=”#ffffffbackgroundcolor=”#4f4f4ficon=”” iconflip=”” iconrotate=”” iconspin=noiconcolor=”” icon_circle=”” icon_circle_radius=”” circlecolor=”” circlebordersize=”” circlebordercolor=”” outercirclebordersize=”” outercirclebordercolor=”” icon_size=”” icon_hover_type=”” hover_accent_color=”” image=”” image_id=”” image_width=”” image_height=”” link_type=”” button_span=”” link_area=”” link_target=”” icon_align=leftanimation_type=”” animation_delay=”” animation_offset=”” animation_direction=leftanimation_speed=”0.3″ margin_top=”” margin_bottom=”” hide_on_mobile=small-visibility,medium-visibility,large-visibilityclass=”” id=””][fusion_content_box title=ਕਦਮ 5. Verify continuity of Inverter connector circuits to ground.backgroundcolor=”” icon=”” iconflip=”” iconrotate=”” iconspin=noiconcolor=”” circlecolor=”” circlebordersize=”” circlebordercolor=”” outercirclebordersize=”” outercirclebordercolor=”” image=”” image_id=”” image_width=”” image_height=”” link=”” linktext=”ਹੋਰ ਪੜ੍ਹੋ” link_target=”” animation_type=”” animation_direction=leftanimation_speed=”0.3″ animation_offset=””]

  1. ਕੁੰਜੀ ਬੰਦ.
  2. Reconnect the PEC 19-Way Connector.
  3. Inverter 56-ਰਾਹ ਕੁਨੈਕਟਰ ਬੰਦ.
  4. Inspect the connector pins for damaged, corroded and/or loose wires.
  5. Measure resistance between the Inverter 56-Way Connector at the following pins:
    • ਪਿੰਨ 29 ਪਿੰਨ ਨੂੰ 37
    • ਪਿੰਨ 30 ਪਿੰਨ ਨੂੰ 35
    • ਪਿੰਨ 31 ਪਿੰਨ ਨੂੰ 36 ਸੂਚਨਾ: ਨਰਮੀ ਕੁਨੈਕਟਰ ਨੇੜੇ Inverter 56-ਰਾਹ ਕੁਨੈਕਟਰ ਹਾਰਨੈਸ ਤੰਦਰੁਸਤ ਟਾਕਰੇ ਮੁੱਲ ਦੀ ਨਿਗਰਾਨੀ, ਜਦਕਿ.
      • ਜੇ ਪਿੰਨ ਵਿਚਕਾਰ ਟਾਕਰੇ 29 ਅਤੇ ਪਿੰਨ 37 112-122 ohms ਅਤੇ ਪਿੰਨ ਵਿਰੋਧ ਹੈ 30 ਪਿੰਨ ਨੂੰ 35 ਅਤੇ ਪਿੰਨ 31 ਪਿੰਨ ਨੂੰ 36 ਹਰ 33-37 ohms ਹਨ, push the Service Switch on the PEC and reinstall the Lockout Bracket. ਕਦਮ ਜਾਓ 8.
      • ਟਾਕਰੇ ਸੀਮਾ ਦੇ ਬਾਹਰ ਹੈ, ਜੇ, repair the Hybrid Harness between the PEC and Inverter, ਫਿਰ ਕਦਮ ਨੂੰ ਜਾਣ 10.

[/fusion_content_box][fusion_content_box title=ਕਦਮ 6. Verify continuity of PEC connector circuits.backgroundcolor=”” icon=”” iconflip=”” iconrotate=”” iconspin=”” iconcolor=”” circlecolor=”” circlebordersize=”” circlebordercolor=”” outercirclebordersize=”” outercirclebordercolor=”” image=”” image_id=”” image_width=”” image_height=”” link=”” linktext=”” link_target=”” animation_type=”” animation_direction=leftanimation_speed=”0.3″ animation_offset=””]

  1. ਕੁੰਜੀ ਬੰਦ.
  2. Remove the Air Filter Cover and Air Filter from the PEC. Refer to TRSM1000 for procedures.*
  3. An Inertia Switch is located at the front of the PEC inside the box and viewable when the Air Filter is removed.
  4. Using ASTM Class 0 electrical insulating rubber gloves with leather protectors, press the button on the top of the Inertia Switch until heard or felt a click. This switch must be depressed a set distance to reset the switch.
  5. Measure resistance at the PEC 19-Way Connector Terminal at the following pins:
    • ਪਿੰਨ 17 ਪਿੰਨ ਨੂੰ 19
    • ਪਿੰਨ 9 ਪਿੰਨ ਨੂੰ 11
    • ਪਿੰਨ 13 ਪਿੰਨ ਨੂੰ 15
      • qIf the resistance between Pin 17 ਅਤੇ ਪਿੰਨ 19 112-122 ohms ਅਤੇ ਪਿੰਨ ਵਿਰੋਧ ਹੈ 9 ਪਿੰਨ ਨੂੰ 11 ਅਤੇ ਪਿੰਨ 13 ਪਿੰਨ ਨੂੰ 15 ਹਰ 33-37 ohms ਹਨ, the Inertia Switch was tripped. Test is complete. ਕਦਮ ਜਾਓ 10.
      • ਟਾਕਰੇ ਸੀਮਾ ਦੇ ਬਾਹਰ ਹੈ, ਜੇ, push in the Service Switch on the PEC and reinstall the Lockout Bracket, ਫਿਰ ਕਦਮ ਨੂੰ ਜਾਣ 7.

[/fusion_content_box][/fusion_content_boxes][fusion_content_boxes layout=clean-horizontalcolumns=”2″ title_size=”18pxheading_size=”3″ title_color=”#ffffffbody_color=”#ffffffbackgroundcolor=”#4f4f4ficon=”” iconflip=”” iconrotate=”” iconspin=noiconcolor=”” icon_circle=”” icon_circle_radius=”” circlecolor=”” circlebordersize=”” circlebordercolor=”” outercirclebordersize=”” outercirclebordercolor=”” icon_size=”” icon_hover_type=”” hover_accent_color=”” image=”” image_id=”” image_width=”” image_height=”” link_type=”” button_span=”” link_area=”” link_target=”” icon_align=leftanimation_type=”” animation_delay=”” animation_offset=”” animation_direction=leftanimation_speed=”0.3″ margin_top=”” margin_bottom=”” hide_on_mobile=small-visibility,medium-visibility,large-visibilityclass=”” id=””][fusion_content_box title=ਕਦਮ 7. Verify continuity of Inverter connector circuits.backgroundcolor=”” icon=”” iconflip=”” iconrotate=”” iconspin=noiconcolor=”” circlecolor=”” circlebordersize=”” circlebordercolor=”” outercirclebordersize=”” outercirclebordercolor=”” image=”” image_id=”” image_width=”” image_height=”” link=”” linktext=”ਹੋਰ ਪੜ੍ਹੋ” link_target=”” animation_type=”” animation_direction=leftanimation_speed=”0.3″ animation_offset=””]

  1. ਕੁੰਜੀ ਬੰਦ.
  2. Disconnect the DC High-Voltage Cable at the PEC Bulkhead and at the Inverter Bulkhead.
  3. Measure resistance between the Low-Voltage Interlock Pins on the PEC side of the DC High-Voltage Cable:
    ਸੂਚਨਾ: The Interlock Pins are the two small spade terminals located in the same opening.

    • If the resistance is 0–0.3 ohms between the Interlock Loop Pins, ਪਾਵਰ ਇਲੈਕਟ੍ਰਾਨਿਕਸ ਕੈਰੀਅਰ ਨੂੰ ਤਬਦੀਲ (ਪੈਕ), ਫਿਰ ਕਦਮ ਨੂੰ ਜਾਣ 10.
    • ਟਾਕਰੇ ਸੀਮਾ ਦੇ ਬਾਹਰ ਹੈ, ਜੇ, ਡੀ.ਸੀ. ਹਾਈ-ਵੋਲਟੇਜ ਕੇਬਲ ਨੂੰ ਤਬਦੀਲ, ਫਿਰ ਕਦਮ ਨੂੰ ਜਾਣ 10.

[/fusion_content_box][fusion_content_box title=ਕਦਮ 8. Verify continuity of DC Cable from PEC to Inverter Connector circuits.backgroundcolor=”” icon=”” iconflip=”” iconrotate=”” iconspin=”” iconcolor=”” circlecolor=”” circlebordersize=”” circlebordercolor=”” outercirclebordersize=”” outercirclebordercolor=”” image=”” image_id=”” image_width=”” image_height=”” link=”” linktext=”” link_target=”” animation_type=”” animation_direction=leftanimation_speed=”0.3″ animation_offset=””]

  1. ਕੁੰਜੀ ਬੰਦ.
  2. Disconnect the DC High-Voltage Cable at the PEC Bulkhead and the Inverter Bulkhead.
  3. Measure the resistance of each high-voltage circuit on the cable:
    • If the resistance of each high-voltage circuit in the cable is 1 ohm ਜ ਘੱਟ, Inverter ਨੂੰ ਤਬਦੀਲ, ਫਿਰ ਕਦਮ ਨੂੰ ਜਾਣ 10.
    • ਟਾਕਰੇ ਸੀਮਾ ਦੇ ਬਾਹਰ ਹੈ, ਜੇ, replace the DC High-Voltage Cable, ਫਿਰ ਕਦਮ ਨੂੰ ਜਾਣ 10.

[/fusion_content_box][/fusion_content_boxes][fusion_content_boxes layout=clean-horizontalcolumns=”2″ title_size=”18pxheading_size=”3″ title_color=”#ffffffbody_color=”#ffffffbackgroundcolor=”#4f4f4ficon=”” iconflip=”” iconrotate=”” iconspin=noiconcolor=”” icon_circle=”” icon_circle_radius=”” circlecolor=”” circlebordersize=”” circlebordercolor=”” outercirclebordersize=”” outercirclebordercolor=”” icon_size=”” icon_hover_type=”” hover_accent_color=”#f41000image=”” image_id=”” image_width=”” image_height=”” link_type=”” button_span=”” link_area=”” link_target=”” icon_align=leftanimation_type=”” animation_delay=”” animation_offset=”” animation_direction=leftanimation_speed=”0.3″ margin_top=”” margin_bottom=”” hide_on_mobile=small-visibility,medium-visibility,large-visibilityclass=”” id=””][fusion_content_box title=ਕਦਮ 9. Verify Data Monitor parameters.backgroundcolor=”” icon=”” iconflip=”” iconrotate=”” iconspin=”” iconcolor=”” circlecolor=”” circlebordersize=”” circlebordercolor=”” outercirclebordersize=”” outercirclebordercolor=”” image=”” image_id=”” image_width=”” image_height=”” link=”” linktext=”” link_target=”” animation_type=”” animation_direction=leftanimation_speed=”0.3″ animation_offset=””]

  1. ਕੈਬ ਵਿਚ 9-ਰਾਹ ਡਾਇਗਨੋਸਟਿਕ ਕੁਨੈਕਟਰ ਨੂੰ ServiceRanger ਕਨੈਕਟ ਕਰੋ.
  2. "ਡਾਟਾ ਦੀ ਨਿਗਰਾਨੀ" ਚੋਣ ਨੂੰ ਚੁਣੋ.
  3. View the following parameters in the High-Voltage Battery list.
    • Battery Pack Voltage (BCU1) PID 118
    • Battery Voltage PID 116
      • If the voltage readings on PID 116 ਅਤੇ PID 118 are within 10 ਇਕ-ਦੂਜੇ ਨੂੰ ਦੇ ਵੋਲਟ, ਪਾਵਰ ਇਲੈਕਟ੍ਰਾਨਿਕਸ ਕੈਰੀਅਰ ਨੂੰ ਤਬਦੀਲ (ਪੈਕ), ਫਿਰ ਕਦਮ ਨੂੰ ਜਾਣ 10.
      • If the voltage readings on PID 116 ਅਤੇ PID 118 are greater than 10 ਇਕ-ਦੂਜੇ ਨੂੰ ਦੇ ਵੋਲਟ, Inverter ਨੂੰ ਤਬਦੀਲ, ਫਿਰ ਕਦਮ ਨੂੰ ਜਾਣ 10.

[/fusion_content_box][fusion_content_box title=ਕਦਮ 10. ਮੁਰੰਮਤ ਦੀ ਪੜਤਾਲ.backgroundcolor=”” icon=”” iconflip=”” iconrotate=”” iconspin=noiconcolor=”” circlecolor=”” circlebordersize=”” circlebordercolor=”” outercirclebordersize=”” outercirclebordercolor=”” image=”” image_id=”” image_width=”” image_height=”” link=”” linktext=”ਹੋਰ ਪੜ੍ਹੋ” link_target=”” animation_type=”” animation_direction=leftanimation_speed=”0.3″ animation_offset=””]

  1. ਕੁੰਜੀ ਬੰਦ.
  2. ਸਾਰੇ ਕੁਨੈਕਟਰ ਤੇ ਰਿਣਾਤਮਕ ਬੈਟਰੀ ਕੇਬਲ ਮੁੜ ਜੁੜਨ.
  3. ਕੁੰਜੀ 'ਤੇ.
  4. ਕੋਡ ਆਸਮਾਨ, ਵੇਖੋ, ਆਸਮਾਨ ਸਰਗਰਮ ਨੁਕਸ.
  5. ਵਾਹਨ ਗੱਡੀ ਅਤੇ ਕੋਡ ਸੈੱਟ ਕਰਨ ਲਈ ਕੋਸ਼ਿਸ਼.
  6. ਕੋਡ ਲਈ ਚੈੱਕ ਕਰੋ, ਵੇਖੋ, ਸਰਗਰਮ ਅਤੇ ਸਰਗਰਮ ਨੁਕਸ ਦੇਖੋ.
    • ਕੋਈ ਕੋਡ ਜੇ, ਟੈਸਟ ਮੁਕੰਮਲ ਹੋ ਗਈ ਹੈ.
    • Fault ਕੋਡ ਜੇ 116 ਦਿਸਦਾ ਹੈ, contact Eaton at 1- 800-826-ਮਦਦ ਕਰੋ (4357). Repeat this Step (ਕਦਮ 10).
    • ਇੱਕ ਕੋਡ ਦੇ ਇਲਾਵਾ ਹੋਰ, ਜੇ 116 ਦਿਸਦਾ ਹੈ, ਵੇਖੋ, ਕੋਡ ਇੰਡੈਕਸ ਸੂਚੀ ਖਰਾਬ.

[/fusion_content_box][/fusion_content_boxes][/fusion_builder_column][/fusion_builder_row][/fusion_builder_container][fusion_global id=”13788″]