[fusion_builder_container hundred_percent=nohundred_percent_height=nohundred_percent_height_scroll=nohundred_percent_height_center_content=yesequal_height_columns=nomenu_anchor=”” hide_on_mobile=small-visibility,medium-visibility,large-visibilitystatus=publishedpublish_date=”” class=”” id=”” background_color=”” background_image=”” background_position=center centerbackground_repeat=no-repeatfade=nobackground_parallax=noneenable_mobile=noparallax_speed=”0.3″ video_mp4=”” video_webm=”” video_ogv=”” video_url=”” video_aspect_ratio=”16:9″ video_loop=yesvideo_mute=yesvideo_preview_image=”” border_size=”” border_color=”” border_style=solidmargin_top=”35″ margin_bottom=”” padding_top=”” padding_right=”” padding_bottom=”” padding_left=””][fusion_builder_row][fusion_builder_column type=”1_1layout=”1_1spacing=”” center_content=nolink=”” target=_selfmin_height=”” hide_on_mobile=small-visibility,medium-visibility,large-visibilityclass=”” id=”” background_color=”” background_image=”” background_image_id=”” background_position=left topbackground_repeat=no-repeathover_type=noneborder_size=”0″ border_color=”” border_style=solidborder_position=allpadding_top=”” padding_right=”” padding_bottom=”” padding_left=”” margin_top=”” margin_bottom=”” animation_type=”” animation_direction=leftanimation_speed=”0.3″ animation_offset=”” last=no”][fusion_text columns=”” column_min_width=”” column_spacing=”” rule_style=defaultrule_size=”” rule_color=”” hide_on_mobile=small-visibility,medium-visibility,large-visibilityclass=”” id=””]

Eaton ਆਪੋ ਹਾਈਬ੍ਰਾਇਡ ਸੰਚਾਰਨ ਨੁਕਸ ਕੋਡ 89 – ਪਾਵਰ ਇਲੈਕਟ੍ਰਿਕ ਕੈਰੀਅਰ CAN ਸੁਨੇਹਾ Fault (HCM)

[/fusion_text][/fusion_builder_column][/fusion_builder_row][/fusion_builder_container][fusion_builder_container hundred_percent=nohundred_percent_height=nohundred_percent_height_scroll=nohundred_percent_height_center_content=yesequal_height_columns=nomenu_anchor=”” hide_on_mobile=small-visibility,medium-visibility,large-visibilitystatus=publishedpublish_date=”” class=”” id=”” background_color=”” background_image=”” background_position=center centerbackground_repeat=no-repeatfade=nobackground_parallax=noneenable_mobile=noparallax_speed=”0.3″ video_mp4=”” video_webm=”” video_ogv=”” video_url=”” video_aspect_ratio=”16:9″ video_loop=yesvideo_mute=yesvideo_preview_image=”” border_size=”” border_color=”” border_style=solidmargin_top=”” margin_bottom=”” padding_top=”” padding_right=”” padding_bottom=”” padding_left=””][fusion_builder_row][fusion_builder_column type=”1_1layout=”1_1spacing=”” center_content=nolink=”” target=_selfmin_height=”” hide_on_mobile=small-visibility,medium-visibility,large-visibilityclass=”” id=”” background_color=”” background_image=”” background_image_id=”” background_position=left topbackground_repeat=no-repeathover_type=noneborder_size=”0″ border_color=”” border_style=solidborder_position=allpadding_top=”” padding_right=”” padding_bottom=”” padding_left=”” margin_top=”” margin_bottom=”” animation_type=”” animation_direction=leftanimation_speed=”0.3″ animation_offset=”” last=no”][fusion_text columns=”” column_min_width=”” column_spacing=”” rule_style=defaultrule_size=”” rule_color=”” hide_on_mobile=small-visibility,medium-visibility,large-visibilityclass=”” id=””]

Eaton ਹਾਈਬ੍ਰਾਇਡ ਡਰਾਈਵ ਸਿਸਟਮ ਮਾਡਲ ਲਈ ਕੋਡ ਖਰਾਬ (my09) EH-8E406A-ਯੂ / ਪੀ, EH-8E406A-ਅੱਪ, EH-8E406A-UPG, EH-8E406A-ਸੀਡੀ, EH-8E406A-CDG, EH-8E406A-CDR, EH-8E406A-ਟੀ, EH-6E706B-ਸੀਡੀ, EH-6E706B-ਪੀ ਅਤੇ EH-6E706B-UPG. ਟੈਸਟ ਕਿਵੇਂ ਕਰਨਾ ਹੈ ਬਾਰੇ ਸਿੱਖਣ ਲਈ ਹੇਠਾਂ ਪੜ੍ਹੋ, ਨੂੰ ਸਾਫ ਕਰੋ ਅਤੇ ਆਪਣੇ Freightliner ਲਈ ਕਸੂਰ ਕੋਡ ਗਲਤੀ ਨੂੰ ਠੀਕ, mack, Peterbilt, Kenworth, ਵੋਲਵੋ, ਅੰਤਰਰਾਸ਼ਟਰੀ, ਅਤੇ ਭਾਰੀ-ਡਿਊਟੀ ਟਰੱਕ ਅਤੇ ਸਾਜ਼ੋ. ਹਾਈਬ੍ਰਾਇਡ ਕੰਟਰੋਲ ਮੋਡੀਊਲ (HCM) Inverter ਨਾਲ ਸੰਚਾਰ ਬੈਟਰੀ ਕੰਟਰੋਲ ਯੂਨਿਟ ਦੇ ਨਾਲ ਗੱਲਬਾਤ (BCU) ਪਾਵਰ ਇਲੈਕਟ੍ਰਾਨਿਕਸ ਕੈਰੀਅਰ ਵਿੱਚ ਸਥਿਤ (ਪੈਕ) ਅਤੇ ਕੰਟਰੋਲਰ ਏਰੀਆ ਨੈੱਟਵਰਕ 'ਤੇ HCM (CAN) ਹਾਈ ਸਪੀਡ ਮਲਕੀਅਤ ਡਾਟਾ ਲਿੰਕ ਨੂੰ. ਡਾਟਾ ਲਿੰਕ ਨੂੰ ਦੋ ਦੇ ਨਾਲ ਇੱਕ ਦੋ-ਤਾਰ ਮਰੋੜ ਜੋੜਾ ਹੈ 120 ohm ਲਿੰਕ ਵਿੱਚ ਸਥਿਤ resistors.

ਖਰਾਬ ਕੋਡ 89 – ਪਾਵਰ ਇਲੈਕਟ੍ਰਿਕ ਕੈਰੀਅਰ CAN ਸੁਨੇਹਾ Fault ਖੋਜ

ਅੱਗੇ ਸਿਸਟਮ ਕਸੂਰ ਖੋਜਦਾ ਹੈ ਹੇਠ ਸ਼ਰਤ ਨੂੰ ਮਿਲੇ ਕੀਤਾ ਜਾਣਾ ਚਾਹੀਦਾ ਹੈ:

  • HCM ਇਗਨੀਸ਼ਨ ਵੋਲਟੇਜ ਵੱਧ ਵੱਡਾ ਹੈ 7 ਵੋਲਟ ਅਤੇ ਵੱਧ ਘੱਟ 16 ਵੋਲਟ.
  • HCM CAN ਡਾਟਾ ਲਿੰਕ ਨੂੰ ਨੁਕਸ ਸਰਗਰਮ ਹੈ.

ਸੂਚਨਾ: ਇੱਕ ਸਰਗਰਮ ਕੋਡ ਨੂੰ ਹੱਲ ਕਰਨ ਲਈ ਵੇਖੋ ਉਤਪਾਦ ਡਾਇਗਨੋਸਟਿਕ ਮੋਡ (PDM)

ਹਾਲਾਤ ਨੁਕਸ ਕੋਡ ਸਰਗਰਮ ਸੈੱਟ

  • ਐੱਫ 2 is only Active in Product Diagnostic Mode (PDM) ਅਤੇ ਜੇ ਸੈੱਟ 3 consecutive messages are not received by the HCM.
  • ਐੱਫ 9 is set when the HCM has not received a 1 ਲਈ ਸੁਨੇਹੇ ਨੂੰ 30 ਲਗਾਤਾਰ ਸੁਨੇਹੇ ਨੂੰ ਚੱਕਰ.

ਫਾਲਬੈਕ ਜਦ ਨੁਕਸ ਕੋਡ 89 ਸੈੱਟ ਕੀਤਾ ਗਿਆ ਹੈ ਹੇਠ ਹਾਲਾਤ ਵਾਪਰ:

  • ਅੰਬਰ "ਚੈੱਕ ਹਾਈਬ੍ਰਾਇਡ" ਪ੍ਰਕਾਸ਼.
  • ਕਸੂਰ ਹਾਈਬ੍ਰਾਇਡ ਕੰਟਰੋਲ ਮੋਡੀਊਲ ਵਿੱਚ ਸੰਭਾਲਿਆ ਗਿਆ ਹੈ (HCM) ਮੈਮੋਰੀ.
  • ਇਲੈਕਟ੍ਰਿਕ ਮੋਟਰ / ਜੇਨਰੇਟਰ ਦੀ ਮਦਦ ਕਰਨ ਅਤੇ ਬਣਾਉਣਾ ਅਯੋਗ ਹਨ; ਪਰ, ਹਾਈ-ਵੋਲਟੇਜ ਦੱਸਦੀ ਪੱਧਰੀ ਰਹਿਣ.
  • HCM ਨੂੰ ਇੱਕ ਡੀਜ਼ਲ ਸਿਰਫ-ਮੋਡ ਵਿੱਚ ਹਾਈਬ੍ਰਾਇਡ ਵਾਹਨ ਨੂੰ ਕੰਟਰੋਲ ਕਰਨ ਲਈ ਜਾਰੀ ਹੈ.
  • ਸੰਚਾਰ ਮੂਲ ਨੂੰ 1 ਦਾ ਸਾਮਾਨ ਸ਼ੁਰੂ.

[/fusion_text][fusion_text columns=”” column_min_width=”” column_spacing=”” rule_style=defaultrule_size=”” rule_color=”” hide_on_mobile=small-visibility,medium-visibility,large-visibilityclass=”” id=””]

ਹਾਲਾਤ ਨੁਕਸ ਕੋਡ ਸਰਗਰਮ ਸੈੱਟ

ਕੇਵਲ ਸਰਗਰਮ ਨੁਕਸ ਸੰਚਾਰ ਇਲੈਕਟ੍ਰਾਨਿਕ ਕੰਟਰੋਲ ਯੂਨਿਟ ਤੱਕ ਸਾਫ਼ ਕਰ ਕੀਤਾ ਜਾ ਸਕਦਾ ਹੈ (TECU) ਜ HCM ਦਾ ਇਤਿਹਾਸ ServiceRanger ਵਰਤ. TECU ਆਪ ਹੀ ਬਾਅਦ ਇਤਿਹਾਸ ਨੁਕਸ ਸਾਫ 200 ਘੰਟੇ ਅਤੇ HCM ਆਪ ਹੀ ਨੁਕਸ ਬਾਅਦ ਇਤਿਹਾਸ ਨੁਕਸ ਸਾਫ ਕਰਨ ਲਈ ਸਰਗਰਮ ਕੀਤਾ ਗਿਆ ਹੈ, 200 ਘੰਟੇ.

ਇਹ ਕਸੂਰ ਕੋਡ ਹੇਠ ਦੇ ਕਿਸੇ ਵੀ ਦੇ ਕਾਰਨ ਕੀਤਾ ਜਾ ਸਕਦਾ ਹੈ:

  • ਐੱਫ 2, 9
    • inverter
    • ਕਰ ਸਕਦੇ ਹੋ ਬਾਕਸ ਰੀਲੇਅ ਦਾ ਡਾਟਾ ਲਿੰਕ
    • ਪੈਕ ਦੇ ਅੰਦਰ ਬਾਕਸ ਰੀਲੇਅ
    • ਕੋਈ ਸ਼ਕਤੀ ਜ ਜ਼ਮੀਨ ਬਾਕਸ ਰੀਲੇਅ ਕਰਨ ਲਈ

[/fusion_text][/fusion_builder_column][/fusion_builder_row][/fusion_builder_container][fusion_builder_container hundred_percent=nohundred_percent_height=nohundred_percent_height_scroll=nohundred_percent_height_center_content=yesequal_height_columns=nomenu_anchor=”” hide_on_mobile=small-visibility,medium-visibility,large-visibilitystatus=publishedpublish_date=”” class=”” id=”” background_color=”” background_image=”” background_position=center centerbackground_repeat=no-repeatfade=nobackground_parallax=noneenable_mobile=noparallax_speed=”0.3″ video_mp4=”” video_webm=”” video_ogv=”” video_url=”” video_aspect_ratio=”16:9″ video_loop=yesvideo_mute=yesvideo_preview_image=”” border_size=”” border_color=”” border_style=solidmargin_top=”” margin_bottom=”” padding_top=”” padding_right=”” padding_bottom=”” padding_left=””][fusion_builder_row][fusion_builder_column type=”1_1layout=”1_1spacing=”” center_content=nolink=”” target=_selfmin_height=”” hide_on_mobile=small-visibility,medium-visibility,large-visibilityclass=”” id=”” background_color=”” background_image=”” background_image_id=”” background_position=left topbackground_repeat=no-repeathover_type=noneborder_size=”0″ border_color=”” border_style=solidborder_position=allpadding_top=”” padding_right=”” padding_bottom=”” padding_left=”” margin_top=”” margin_bottom=”” animation_type=”” animation_direction=leftanimation_speed=”0.3″ animation_offset=”” last=no”][fusion_text columns=”” column_min_width=”” column_spacing=”” rule_style=defaultrule_size=”” rule_color=”” hide_on_mobile=small-visibility,medium-visibility,large-visibilityclass=”” id=””]

ਖਰਾਬ ਕੋਡ 89 – ਪਾਵਰ ਇਲੈਕਟ੍ਰਿਕ ਕੈਰੀਅਰ CAN ਸੁਨੇਹਾ Fault ਟੈਸਟ

[/fusion_text][/fusion_builder_column][/fusion_builder_row][/fusion_builder_container][fusion_builder_container hundred_percent=nohundred_percent_height=nohundred_percent_height_scroll=nohundred_percent_height_center_content=yesequal_height_columns=nomenu_anchor=”” hide_on_mobile=small-visibility,medium-visibility,large-visibilitystatus=publishedpublish_date=”” class=”” id=”” background_color=”” background_image=”” background_position=center centerbackground_repeat=no-repeatfade=nobackground_parallax=noneenable_mobile=noparallax_speed=”0.3″ video_mp4=”” video_webm=”” video_ogv=”” video_url=”” video_aspect_ratio=”16:9″ video_loop=yesvideo_mute=yesvideo_preview_image=”” border_size=”” border_color=”” border_style=solidmargin_top=”” margin_bottom=”” padding_top=”” padding_right=”” padding_bottom=”” padding_left=””][fusion_builder_row][fusion_builder_column type=”1_1layout=”1_1spacing=”” center_content=nolink=”” target=_selfmin_height=”” hide_on_mobile=small-visibility,medium-visibility,large-visibilityclass=”” id=”” background_color=”” background_image=”” background_image_id=”” background_position=left topbackground_repeat=no-repeathover_type=noneborder_size=”0″ border_color=”” border_style=solidborder_position=allpadding_top=”” padding_right=”” padding_bottom=”” padding_left=”” margin_top=”” margin_bottom=”” animation_type=”” animation_direction=leftanimation_speed=”0.3″ animation_offset=”” last=no”][fusion_text columns=”” column_min_width=”” column_spacing=”” rule_style=defaultrule_size=”” rule_color=”” hide_on_mobile=small-visibility,medium-visibility,large-visibilityclass=”” id=””]

ਭਾਗ ਪਛਾਣ my09 ਸਿਸਟਮ:

[/fusion_text][/fusion_builder_column][fusion_builder_column type=”1_1layout=”1_2spacing=”” center_content=nolink=”” target=_selfmin_height=”” hide_on_mobile=small-visibility,medium-visibility,large-visibilityclass=”” id=”” background_color=”” background_image=”” background_image_id=”” background_position=left topbackground_repeat=no-repeathover_type=noneborder_size=”0″ border_color=”” border_style=solidborder_position=allpadding_top=”” padding_right=”” padding_bottom=”” padding_left=”” margin_top=”” margin_bottom=”” animation_type=”” animation_direction=leftanimation_speed=”0.3″ animation_offset=”” last=no”][fusion_imageframe image_id=”14503|fullmax_width=”” style_type=”” blur=”” stylecolor=”” hover_type=nonebordersize=”” bordercolor=”” borderradius=”” align=centerlightbox=nogallery_id=”” lightbox_image=”” lightbox_image_id=”” alt=”ਮੇਲ ਕੁਨੈਕਟਰ Deustch 19-ਤਰੀਕੇ” link=”” linktarget=_selfhide_on_mobile=small-visibility,medium-visibility,large-visibilityclass=”” id=”” animation_type=”” animation_direction=leftanimation_speed=”0.3″ animation_offset=””]https://www.globaltransmissionsupply.com/wp-content/uploads/mating-connector-deustch-19-way.png[/fusion_imageframe][fusion_imageframe image_id=”14504|fullmax_width=”” style_type=”” blur=”” stylecolor=”” hover_type=nonebordersize=”” bordercolor=”” borderradius=”” align=centerlightbox=nogallery_id=”” lightbox_image=”” lightbox_image_id=”” alt=”Inverter Deutsch 40-ਪਿੰਨ ਕੁਨੈਕਟਰ” link=”” linktarget=_selfhide_on_mobile=small-visibility,medium-visibility,large-visibilityclass=”” id=”” animation_type=”” animation_direction=leftanimation_speed=”0.3″ animation_offset=””]https://www.globaltransmissionsupply.com/wp-content/uploads/Inverter-Deutsch-40-Pin-connector.png[/fusion_imageframe][/fusion_builder_column][fusion_builder_column type=”1_1layout=”1_1spacing=”” center_content=nolink=”” target=_selfmin_height=”” hide_on_mobile=small-visibility,medium-visibility,large-visibilityclass=”” id=”” background_image_id=”” background_color=”#000000″ background_image=”” background_position=left topundefined=”” background_repeat=no-repeathover_type=noneborder_size=”0″ border_color=”” border_style=solidborder_position=allpadding_top=”” padding_right=”” padding_bottom=”” padding_left=”” margin_top=”20″ margin_bottom=”20″ animation_type=”” animation_direction=leftanimation_speed=”0.3″ animation_offset=”” last=no”][fusion_text columns=”” column_min_width=”” column_spacing=”” rule_style=defaultrule_size=”” rule_color=”” hide_on_mobile=small-visibility,medium-visibility,large-visibilityclass=”” id=””]

ਸੂਚਨਾ: ਵੇਖੋ Eaton ਹਾਈਬ੍ਰਾਇਡ ਭਾਗ ਅਤੇ ਕੁਨੈਕਟਰ ਸਥਿਤੀ My09 ਸਿਸਟਮ ਵਿੱਚ ਕੁਨੈਕਟਰ ਸਥਾਨ ਲਈ.
[/fusion_text][/fusion_builder_column][fusion_builder_column type=”1_1layout=”1_1spacing=”” center_content=nolink=”” target=_selfmin_height=”” hide_on_mobile=small-visibility,medium-visibility,large-visibilityclass=”” id=”” background_color=”” background_image=”” background_image_id=”” background_position=left topbackground_repeat=no-repeathover_type=noneborder_size=”0″ border_color=”” border_style=solidborder_position=allpadding_top=”” padding_right=”” padding_bottom=”” padding_left=”” margin_top=”” margin_bottom=”” animation_type=”” animation_direction=leftanimation_speed=”0.3″ animation_offset=”” last=no”][fusion_imageframe image_id=”14506|fullmax_width=”” style_type=”” blur=”” stylecolor=”” hover_type=nonebordersize=”” bordercolor=”” borderradius=”” align=centerlightbox=nogallery_id=”” lightbox_image=”” lightbox_image_id=”” alt=”ਪੈਕ ਕਰਨ ਲਈ Inverter ” link=”” linktarget=_selfhide_on_mobile=small-visibility,medium-visibility,large-visibilityclass=”” id=”” animation_type=”” animation_direction=leftanimation_speed=”0.3″ animation_offset=””]https://www.globaltransmissionsupply.com/wp-content/uploads/Inverter-to-PEC.png[/fusion_imageframe][fusion_text columns=”” column_min_width=”” column_spacing=”” rule_style=defaultrule_size=”” rule_color=”” hide_on_mobile=small-visibility,medium-visibility,large-visibilityclass=”” id=””]

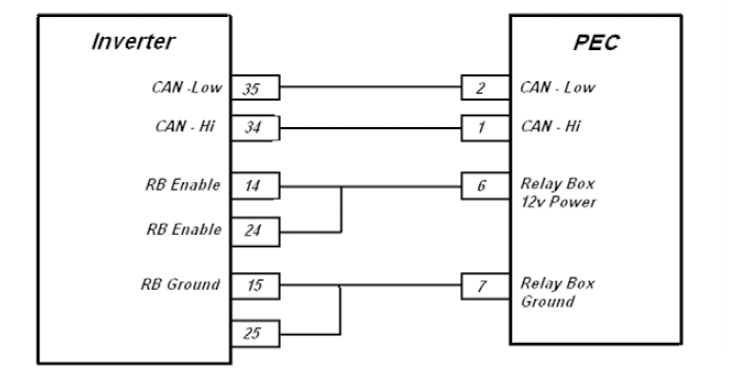
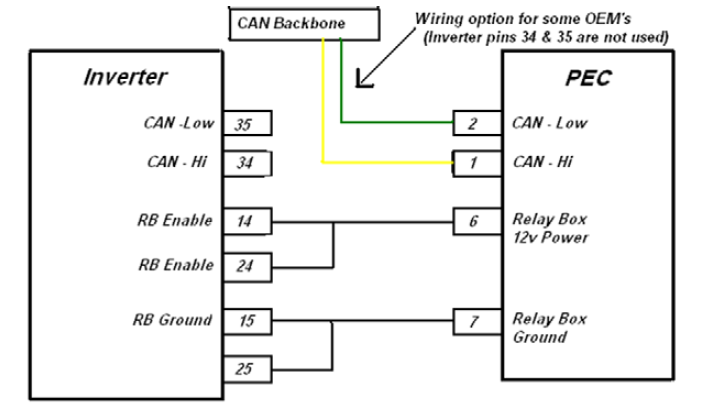
ਜ ਵਿਕਲਪਿਕ ਕਰ ਸਕਦਾ ਹੈ ਡਾਟਾ ਲਿੰਕ ਹੱਡੀ ਨੂੰ ਸਿੱਧੇ ਤਾਰ (inverter ਪਿੰਨ੍ਹ 34 ਅਤੇ 35 ਵਰਤਿਆ ਨਹੀ ਕਰ ਰਹੇ ਹਨ):
[/fusion_text][fusion_imageframe image_id=”14505|fullmax_width=”” style_type=”” blur=”” stylecolor=”” hover_type=nonebordersize=”” bordercolor=”” borderradius=”” align=centerlightbox=nogallery_id=”” lightbox_image=”” lightbox_image_id=”” alt=”ਪੈਕ CAN ਹੱਡੀ ਨੂੰ Inverter” link=”” linktarget=_selfhide_on_mobile=small-visibility,medium-visibility,large-visibilityclass=”” id=”” animation_type=”” animation_direction=leftanimation_speed=”0.3″ animation_offset=””]https://www.globaltransmissionsupply.com/wp-content/uploads/Inverter-to-PEC-CAN-Backbone.png[/fusion_imageframe][/fusion_builder_column][/fusion_builder_row][/fusion_builder_container][fusion_builder_container hundred_percent=nohundred_percent_height=nohundred_percent_height_scroll=nohundred_percent_height_center_content=yesequal_height_columns=nomenu_anchor=”” hide_on_mobile=small-visibility,medium-visibility,large-visibilitystatus=publishedpublish_date=”” class=”” id=”” background_color=”” background_image=”” background_position=center centerbackground_repeat=no-repeatfade=nobackground_parallax=noneenable_mobile=noparallax_speed=”0.3″ video_mp4=”” video_webm=”” video_ogv=”” video_url=”” video_aspect_ratio=”16:9″ video_loop=yesvideo_mute=yesvideo_preview_image=”” border_size=”” border_color=”” border_style=solidmargin_top=”” margin_bottom=”” padding_top=”” padding_right=”” padding_bottom=”” padding_left=””][fusion_builder_row][fusion_builder_column type=”1_1layout=”1_1spacing=”” center_content=nolink=”” target=_selfmin_height=”” hide_on_mobile=small-visibility,medium-visibility,large-visibilityclass=”” id=”” background_color=”” background_image=”” background_image_id=”” background_position=left topbackground_repeat=no-repeathover_type=noneborder_size=”0″ border_color=”” border_style=solidborder_position=allpadding_top=”” padding_right=”” padding_bottom=”” padding_left=”” margin_top=”” margin_bottom=”” animation_type=”” animation_direction=leftanimation_speed=”0.3″ animation_offset=”” last=no”][fusion_modal name=warnings_cautionstitle=”ਚੇਤਾਵਨੀ & ਚੇਤਾਵਨੀ” size=largebackground=”” border_color=”” show_footer=yesclass=”” id=””]ਖ਼ਤਰਾ: ਖ਼ਤਰੇ ਦੇ ਸੰਕੇਤ ਕਰਦਾ ਹੈ ਕਿ ਤੁਹਾਨੂੰ ਬੁਰੀ ਜ਼ਖਮੀ ਹੋ ਜ ਦੀ ਮੌਤ ਹੋ ਜਾਵੇਗਾ, ਜੇ ਸੰਕੇਤ ਵਿਧੀ ਦੀ ਪਾਲਣਾ ਨਾ ਕਰਦੇ,.
ਚੇਤਾਵਨੀ: ਚੇਤਾਵਨੀ ਤੁਰੰਤ ਖਤਰਾ ਲੱਗਦਾ ਹੈ, ਗੰਭੀਰ ਨਿਜੀ ਸੱਟ ਦਾ ਨਤੀਜਾ ਹੋ ਸਕਦਾ ਹੈ, ਜੋ ਕਿ ਜੇਕਰ ਤੁਹਾਨੂੰ ਸੰਕੇਤ ਵਿਧੀ ਦੀ ਪਾਲਣਾ ਨਾ ਕਰਦੇ,.
ਸਾਵਧਾਨ: ਸਾਵਧਾਨ ਲੱਗਦਾ ਹੈ ਵਾਹਨ ਜ ਸੰਪਤੀ ਨੂੰ ਨੁਕਸਾਨ ਵਾਪਰ ਸਕਦਾ ਹੈ, ਜੇ ਤੁਹਾਨੂੰ ਸੰਕੇਤ ਵਿਧੀ ਦੀ ਪਾਲਣਾ ਨਾ ਕਰਦੇ,.

ਸੂਚਨਾ: ਸੂਚਨਾ ਵਾਧੂ ਵਿਸਥਾਰ ਹੈ, ਜੋ ਕਿ ਤਸ਼ਖੀਸ ਜ ਇੱਕ ਭਾਗ ਨੂੰ / ਸਿਸਟਮ ਦੀ ਮੁਰੰਮਤ 'ਚ ਮਦਦ ਕਰੇਗਾ ਪਤਾ ਲੱਗਦਾ ਹੈ.

ਵੇਖਾਏ ਕ੍ਰਮ ਨੂੰ ਨਿਜੀ ਸੱਟ ਬਚਣ ਲਈ ਵਿੱਚ ਦਿੱਤਾ ਕਾਰਵਾਈ ਦੀ ਪਾਲਣਾ ਕਰੋ:

1. ਹਾਈ-ਵੋਲਟੇਜ ਸ਼ੰਕੂ ਵਾਹਨ ਦੇ ਆਲੇ-ਦੁਆਲੇ ਹਨ ਅਤੇ ਤਾਲਾਬੰਦੀ PEC ਤੇ ਇੰਸਟਾਲ ਹੈ, ਜੇ, ਸਿਰਫ ਵਿਅਕਤੀ ਹੈ, ਜੋ ਕਿ ਵਾਹਨ ਸ਼ੁਰੂ ਕਰਨ ਦੀ ਇਜਾਜ਼ਤ ਕੀਤਾ ਜਾਣਾ ਚਾਹੀਦਾ ਹੈ, ਜੋ ਵਿਅਕਤੀ ਤਾਲਾਬੰਦੀ ਟੈਗ ਸਾਈਨ ਕੀਤਾ ਗਿਆ ਹੈ.
2. ਇੱਕ ਵਾਹਨ 'ਤੇ ਕੰਮ ਕਰ ਜ ਕੈਬ ਨੂੰ ਛੱਡ ਕੇ ਅੱਗੇ ਇੰਜਣ ਚੱਲ ਰਿਹਾ ਹੈ, ਜਦਕਿ, ਤੁਹਾਨੂੰ "n" ਵਿਚ ਸ਼ਿਫਟ ਲੀਵਰ ਰੱਖਣ ਚਾਹੀਦਾ ਹੈ ਪਾਰਕਿੰਗ ਤੋੜੀ ਸੈੱਟ ਕੀਤਾ, ਅਤੇ ਪਹੀਏ ਨੂੰ ਬਲਾਕ.
3. ਸੁਰੱਖਿਆ ਦੇ ਕਾਰਨ ਲਈ, ਹਮੇਸ਼ਾ ਸੇਵਾ ਬ੍ਰੇਕ ਸ਼ਾਮਲ "ਐਨ" ਤੱਕ ਗੇਅਰ ਅਹੁਦੇ ਦੀ ਚੋਣ ਕਰਨ ਲਈ ਪੁਰਾਣੇ
4. ਅੱਗੇ ਸ਼ੁਰੂ ਕਰਨ ਲਈ ਇੱਕ ਵਾਹਨ ਨੂੰ ਹਮੇਸ਼ਾ ਡਰਾਈਵਰ ਦੀ ਸੀਟ 'ਤੇ ਬੈਠੇ ਕੀਤਾ ਜਾ, ਦੀ ਚੋਣ ਕਰੋ "n" ਸ਼ਿਫਟ ਕੰਟਰੋਲ 'ਤੇ, ਅਤੇ ਪਾਰਕਿੰਗ ਬ੍ਰੇਕ ਸੈੱਟ ਕੀਤਾ.
5. ePTO ਨਾਲ ਵਾਹਨ ਵਿੱਚ, ਇੰਜਣ ਅਤੇ / ਜ
ਮੋਟਰ / ਜੇਨਰੇਟਰ ePTO ਮੋਡ ਵਿੱਚ ਸ਼ੁਰੂ ਕਰ ਸਕਦੇ ਹੋ. ਕਦੇ ਵੀ ਕਿਸੇ ਵੀ ਨਿਗਰਾਨੀ ਕਰਨ ਜ ਵਾਹਨ 'ਤੇ ਕੰਮ, ਇਸ ਮੋਡ ਵਿੱਚ, ਜਦਕਿ.
6. 12-ਵੋਲਟ ਬੈਟਰੀ ਸਕਾਰਾਤਮਕ (+) ਅਤੇ ਨਕਾਰਾਤਮਕ (-) ਕਿਸੇ ਵੀ ਹਾਈਬ੍ਰਾਇਡ ਲੈਸ ਵਾਹਨ 'ਤੇ ਕਿਸੇ ਵੀ ਿਲਵਿੰਗ ਕਰਨ ਲਈ ਪੁਰਾਣੇ ਕੁਨੈਕਸ਼ਨ ਬੰਦ ਕੀਤਾ ਜਾਣਾ ਚਾਹੀਦਾ ਹੈ.

ਸਾਵਧਾਨ: ਵੇਖਾਏ ਲਈ ਕ੍ਰਮ ਦੇ ਸਾਮਾਨ ਖ਼ਰਾਬ ਨੁਕਸਾਨ ਬਚਣ ਲਈ ਵਿੱਚ ਦਿੱਤਾ ਕਾਰਵਾਈ ਦੀ ਪਾਲਣਾ ਕਰੋ.
ਸਾਵਧਾਨ: ਪਾਰਕਿੰਗ ਤੋੜੀ ਮੁਕਤ ਕਰ ਜ, ਜਦ ਤੱਕ ਕਿ ਹਵਾ ਦਾ ਪ੍ਰੈਸ਼ਰ ਸਹੀ ਪੱਧਰ 'ਤੇ ਹੁੰਦਾ ਹੈ, ਇੱਕ ਗੇਅਰ ਦੀ ਚੋਣ ਕਰਨ ਦੀ ਕੋਸ਼ਿਸ਼ ਨਾ ਕਰੋ.
ਸਾਵਧਾਨ: "N" ਵਿਚ ਜਗ੍ਹਾ ਸ਼ਿਫਟ ਲੀਵਰ ਫ਼ਰਾਰ ਦੌਰਾਨ ਸੰਚਾਰ ਨੂੰ ਨੁਕਸਾਨ ਬਚਣ ਅਤੇ ਜ਼ਮੀਨ ਬੰਦ ਡਰਾਈਵ ਪਹੀਏ ਚੁੱਕਣ ਜ driveline ਕੁਨੈਕਸ਼ਨ ਬੰਦ ਕਰਨ ਲਈ.

ਹਾਈ-ਵੋਲਟੇਜ ਚੇਤਾਵਨੀ & ਚੇਤਾਵਨੀ

  • CO2 ਜ ਡਰਾਈ ਕੈਮੀਕਲ Fire Extinguishers ਵਰਤੋ.
  • ਹਾਈ-ਵੋਲਟੇਜ ਤਾਰ ਸੰਤਰੀ ਇਨਸੂਲੇਸ਼ਨ ਜ ਪੇਚੀਦਾ ਵਟਊਵਬੰਗ ਵਿਚ ਕਵਰ ਕੀਤਾ ਹੈ ਅਤੇ ਕੁਨੈਕਟਰ 'ਤੇ ਚੇਤਾਵਨੀ ਦੇ ਲੇਬਲ ਦੇ ਨਾਲ ਮਾਰਕ ਕੀਤਾ ਗਿਆ ਹੈ.
  • ਸਾਰੇ Eaton® ਹਾਈਬ੍ਰਾਇਡ ਡੀਜ਼ਲ / ਇਲੈਕਟ੍ਰਿਕ ਵਾਹਨ ਮਾਰਕ ਕੀਤਾ ਜਾਵੇਗਾ, 'ਹਾਈਬ੍ਰਾਇਡ’ ਵਾਹਨ ਦੇ ਬਾਹਰ ਤੇ, ਡੈਸ਼ 'ਤੇ ਸ਼ਿਫਟ ਲੇਬਲ ਨੂੰ ਨਾਲ-ਨਾਲ.
  • ਚੈਸੀ ਮਾਊਟ ਹਾਈਬ੍ਰਿਡ ਭਾਗ ਦੇ ਖਾਸ ਸਥਾਨ ਲਈ OEM ਵੇਖੋ.
  • ਸੰਤਰੀ ਹਾਈ-ਵੋਲਟੇਜ ਕੇਬਲ ਵਿੱਚ ਕੱਟ ਨਾ ਕਰੋ.
  • ਵਿੱਚ ਕੱਟ ਜ ਨਾ ਖੋਲ੍ਹੋ ਪੈਕ.
  • ਵਿੱਚ ਕੱਟ ਜ ਡੀ.ਸੀ. / ਡੀ.ਸੀ. ਪਰਿਵਰਤਕ ਨਾ ਖੋਲ੍ਹੋ.
  • ਵਿੱਚ ਕੱਟ ਜ Inverter ਨਾ ਖੋਲ੍ਹੋ.

ਇੱਕ ਬਫਰ ਜ਼ੋਨ ਸਥਾਪਤ ਹੋਣਾ ਚਾਹੀਦਾ ਹੈ ਅਤੇ ਉੱਚ-ਵੋਲਟੇਜ ਰਬੜ ਦੇ ਦਸਤਾਨੇ ਗਰਮੀ ਨੂੰ (ਕਲਾਸ 0 ਚਮੜੇ ਸੁਰੱਖਿਆ ਦੇ ਨਾਲ) ਹਾਈ-ਵੋਲਟੇਜ 'ਤੇ ਕੰਮ ਕਰ ਰਹੇ ਹਨ, ਨੂੰ ਪੁਰਾਣੇ ਦੀ ਲੋੜ. ਅਸਫ਼ਲਤਾ ਇਹ ਹਦਾਇਤ ਦੀ ਪਾਲਣਾ ਕਰਨ ਲਈ ਗੰਭੀਰ ਨਿਜੀ ਸੱਟ ਮੌਤ ਦਾ ਨਤੀਜਾ ਹੋ ਸਕਦਾ.
ਰਬੜ ਦੇ ਦਸਤਾਨੇ-ਗਰਮੀ ਨੂੰ ਹੈ, ਜੋ ਕਿ ਹੈ, ਜਦਕਿ ਹਾਈ-ਵੋਲਟੇਜ ਸਿਸਟਮ 'ਤੇ ਕੰਮ ਕਰ ਪਾਉਣਾ ਲਾਜ਼ਮੀ ਹੋਵੇਗਾ ਕਲਾਸ ਹਨ 0 ਚਮੜੇ ਸੁਰੱਖਿਆ ਦੇ ਨਾਲ. ਰਬੜ ਦੇ ਦਸਤਾਨੇ ਰਬੜ ਇਨਸੂਲੇਸ਼ਨ ਦਸਤਾਨੇ ਟੈਸਟਿੰਗ ਵਿਧੀ ਸਫ਼ਾ 'ਤੇ "ਡਾਇਗਨੋਸਟਿਕ ਲਈ ਸੰਦ / ਸੇਵਾ ਪ੍ਰਕਾਸ਼ਨ" ਵਿੱਚ ਪਾਇਆ ਹੇਠ ਹਰ ਵਰਤਣ ਅੱਗੇ ਟੈਸਟ ਕੀਤਾ ਜਾਣਾ ਚਾਹੀਦਾ ਹੈ 6. ਅਸਫ਼ਲਤਾ ਇਹ ਹਦਾਇਤ ਦੀ ਪਾਲਣਾ ਕਰਨ ਲਈ ਗੰਭੀਰ ਨਿਜੀ ਸੱਟ ਮੌਤ ਦਾ ਨਤੀਜਾ ਹੋ ਸਕਦਾ.
ਸਫ਼ੇ 'ਤੇ ਮੁਆਇਨਾ ਜ ਕੋਈ ਵੀ ਹਾਈ-ਵੋਲਟੇਜ ਕੇਬਲ ਜ ਭਾਗ' ਤੇ ਕੰਮ ਕਰ "ਹਾਈ-ਵੋਲਟੇਜ ਸੇਵਾ ਬੰਦ ਹੈ ਅਤੇ ਪਾਵਰ-ਅੱਪ ਵਿਧੀ" ਅੱਗੇ 4 ਬਾਅਦ ਵਿੱਚ ਕੀਤਾ ਜਾਣਾ ਚਾਹੀਦਾ ਹੈ. ਅਸਫ਼ਲਤਾ ਇਹ ਹਦਾਇਤ ਦੀ ਪਾਲਣਾ ਕਰਨ ਲਈ ਗੰਭੀਰ ਨਿਜੀ ਸੱਟ ਮੌਤ ਦਾ ਨਤੀਜਾ ਹੋ ਸਕਦਾ.
ਲਾਕਆਉਟ ਤੇ ਟੈਗਆਉਟ ਜੰਤਰ ਸਿਰਫ ਤਕਨੀਸ਼ੀਅਨ ਹੈ, ਜੋ ਕਿ ਗੱਡੀ 'ਤੇ ਲਾਕਆਉਟ ਤੇ ਟੈਗਆਉਟ ਜੰਤਰ ਰੱਖਿਆ ਕੇ ਹਟਾਇਆ ਜਾਣਾ ਚਾਹੀਦਾ ਹੈ. ਅਸਫ਼ਲਤਾ ਇਹ ਹਦਾਇਤ ਦੀ ਪਾਲਣਾ ਕਰਨ ਲਈ ਗੰਭੀਰ ਨਿਜੀ ਸੱਟ ਮੌਤ ਦਾ ਨਤੀਜਾ ਹੋ ਸਕਦਾ.
ਹਾਈ-ਵੋਲਟੇਜ ਰਬੜ ਦੇ ਦਸਤਾਨੇ ਗਰਮੀ ਨੂੰ (ਕਲਾਸ 0 ਚਮੜੇ ਸੁਰੱਖਿਆ ਦੇ ਨਾਲ) ਜਦ ਕਿਸੇ ਵੀ 'ਤੇ ਕੰਮ ਕਰ ਪਾਉਣਾ ਲਾਜ਼ਮੀ ਹੋਵੇਗਾ
ਹਾਈ-ਵੋਲਟੇਜ ਕੇਬਲ. "ਹਾਈ-ਵੋਲਟੇਜ ਸੇਵਾ ਬੰਦ ਹੈ ਅਤੇ ਪਾਵਰ-ਅੱਪ ਵਿਧੀ" ਸਫ਼ੇ 'ਤੇ 4 ਕਿਸੇ ਵੀ ਹਾਈ-ਵੋਲਟੇਜ ਕੇਬਲ ਨੂੰ ਹਟਾਉਣ ਲਈ ਪੁਰਾਣੇ ਬਾਅਦ ਵਿੱਚ ਕੀਤਾ ਜਾਣਾ ਚਾਹੀਦਾ ਹੈ. ਅਸਫ਼ਲਤਾ ਇਹ ਹਦਾਇਤ ਦੀ ਪਾਲਣਾ ਕਰਨ ਲਈ ਗੰਭੀਰ ਨਿਜੀ ਸੱਟ ਮੌਤ ਦਾ ਨਤੀਜਾ ਹੋ ਸਕਦਾ.
ਹਾਈ-ਵੋਲਟੇਜ ਕੇਬਲ ਅਤੇ ਵਾਇਰਿੰਗ ਸੰਤਰੀ ਹਨ ਅਤੇ ਕੁਨੈਕਟਰ 'ਤੇ ਇੱਕ ਚੇਤਾਵਨੀ ਦੇ ਲੇਬਲ ਸ਼ਾਮਿਲ ਹਨ. ਹਾਈ-ਵੋਲਟੇਜ ਭਾਗ ਇੱਕ ਲੇਬਲ ਨਾਲ ਮਾਰਕ ਕੀਤੇ ਹਨ,. ਹਾਈ-ਵੋਲਟੇਜ ਰਬੜ ਦੇ ਦਸਤਾਨੇ ਗਰਮੀ ਨੂੰ (ਕਲਾਸ 0 ਚਮੜੇ ਸੁਰੱਖਿਆ ਦੇ ਨਾਲ) ਇਹ ਭਾਗ ਦੇ ਕਿਸੇ ਵੀ 'ਤੇ ਕੰਮ ਕਰ ਲਈ ਵਰਤਿਆ ਜਾਣਾ ਚਾਹੀਦਾ ਹੈ. ਅਸਫ਼ਲਤਾ ਇਹ ਹਦਾਇਤ ਦੀ ਪਾਲਣਾ ਕਰਨ ਲਈ ਗੰਭੀਰ ਨਿਜੀ ਸੱਟ ਮੌਤ ਦਾ ਨਤੀਜਾ ਹੋ ਸਕਦਾ.

ਹਾਈ-ਵੋਲਟੇਜ ਸੇਵਾ ਬੰਦ ਨੇਮਾਵਲੀ

ਹਾਈ-ਵੋਲਟੇਜ ਸੇਵਾ ਬੰਦ ਹੈ ਅਤੇ ਪਾਵਰ-ਅੱਪ ਵਿਧੀ1. ਮਗਰ "ਹਾਈ-ਵੋਲਟੇਜ ਕੰਮ ਖੇਤਰ 'ਵਿਧੀ.
2. ਪੈਕ ਦੇ ਮੋਰਚੇ 'ਤੇ ਲਾਲ ਪੈਕ ਸਰਵਿਸ ਸਵਿੱਚ ਨੂੰ ਲੱਭੋ ਅਤੇ ਧੱਕਣ ਨੂੰ ਬੰਦ.
3. ਸਰਵਿਸ ਸਵਿੱਚ ਦਾ ਢੱਕਣ ਹਟਾਓ ਅਤੇ ਤਾਲਾਬੰਦੀ ਬਰੈਕਟ ਇੰਸਟਾਲ (J48506).
4. ਲਾੱਕਆਉਟ ਬਰੈਕਟ ਨੂੰ ਠੀਕ ਟੈਗ.
5. ਪੈਕ ਸਰਵਿਸ ਸਵਿੱਚ ਯਕੀਨੀ ਬੰਦ ਸਥਿਤੀ ਤੱਕ ਜਾਣ ਨਾ ਕਰ ਸਕਦਾ ਹੈ.
6. ਸਿਸਟਮ ਦੇ ਇੱਕ ਘੱਟੋ ਘੱਟ ਕਰਨ ਲਈ ਸੈੱਟ ਕਰਨ ਲਈ ਆਗਿਆ ਦਿਓ 5 ਮਿੰਟ ਹਾਈ ਵੋਲਟੇਜ ਉਤਾਰਨਾ.
7. ServiceRanger ਜੁੜੋ ਅਤੇ ਵੇਖਣ ਲਈ ਡਾਟਾ ਦੀ ਨਿਗਰਾਨੀ PID 116 ਕਹਿੰਦੇ ਹਨ, "ਹਾਈ-ਵੋਲਟੇਜ ਬੈਟਰੀ ਸੰਭਾਵੀ." SPN ਵਰਤੋ 520323 J1939 ਕੁਨੈਕਸ਼ਨ ਲਈ "ਬੈਟਰੀ ਵੋਲਟੇਜ ਆਰ.ਬੀ." (ਰੀਲੇਅ ਬਾਕਸ).
8. ਵੋਲਟੇਜ ਹੋਣਾ ਚਾਹੀਦਾ ਹੈ 30 ਵੋਲਟ ਜ ਘੱਟ. ਜੇ ਵੋਲਟੇਜ ਉਪਰ ਹੈ 30 ਵੋਲਟ, ਵਾਹਨ 'ਤੇ ਕੰਮ ਨਾ ਕਰਦੇ ਅਤੇ 1-800-826-ਮਦਦ' ਤੇ Eaton® ਸੰਪਰਕ ਕਰੋ (4357).
9. ਇਗਨੀਸ਼ਨ ਕੁੰਜੀ ਨੂੰ ਬੰਦ ਕਰ ਦਿਓ ਅਤੇ ਦੀ ਮੁਰੰਮਤ ਜ ਕਦਮ ਹੈ ਨਿਪਟਾਰਾ ਕਰਨ ਲਈ ਅੱਗੇ ਜਾਰੀ.
ਸੂਚਨਾ: ਵੋਲਟੇਜ ਫਿਲਹਾਲ ਜਦ ਕੁੰਜੀ ਬੰਦ ਹੈ ਦੇ ਤੁਪਕੇ.

ਹਾਈ-ਵੋਲਟੇਜ ਸਰਵਿਸ ਪਾਵਰ-ਅੱਪ ਵਿਧੀ

1. ਆਪਣੇ ਨੂੰ ਜਿੰਦਰਾ ਅਹੁਦੇ ਨੂੰ ਸਭ ਹਾਈ-ਵੋਲਟੇਜ ਕੁਨੈਕਟਰ ਇੰਸਟਾਲ.
2. ਵਿਅਕਤੀ ਨੂੰ ਵਾਹਨ 'ਤੇ ਕੰਮ ਕਰ ਤੁਹਾਨੂੰ ਹਨ, ਜੇ, ਲਾੱਕਆਉਟ ਬਰੈਕਟ ਅਤੇ ਟੈਗ ਹਟਾਉਣ ਲਈ.
3. ਸਰਵਿਸ ਸਵਿੱਚ ਵੱਧ ਲਾੱਕਆਉਟ ਬਰੈਕਟ ਮੁੜ.
4. ਸਰਵਿਸ ਕੱਢਣ ਬਾਹਰ ਜਾਓ ਅਤੇ ਇਸ ਲਈ ਵਾਹਨ ਦਾ ਸਮੂਹ ਚਾਹੀਦਾ ਹੈ 2 ਮਿੰਟ.
5. Start vehicle when appropriate.[/fusion_modal][fusion_modal name=component_locationtitle=”Eaton ਹਾਈਬ੍ਰਾਇਡ ਭਾਗ ਅਤੇ ਕੁਨੈਕਟਰ ਸਥਿਤੀ ” size=largebackground=”#ffffffborder_color=”” show_footer=yesclass=”” id=””]

Eaton ਹਾਈਬ੍ਰਾਇਡ ਭਾਗ ਅਤੇ ਕੁਨੈਕਟਰ ਸਥਾਨ MY08 ਸਿਸਟਮ

[/fusion_modal][fusion_modal name=component_location2title=”Eaton ਹਾਈਬ੍ਰਾਇਡ ਭਾਗ ਅਤੇ ਕੁਨੈਕਟਰ ਸਥਿਤੀ my09 ਸਿਸਟਮ” size=largebackground=”#ffffffborder_color=”” show_footer=yesclass=”” id=””]

Eaton ਹਾਈਬ੍ਰਾਇਡ ਭਾਗ ਅਤੇ ਕੁਨੈਕਟਰ ਸਥਾਨ my09 ਸਿਸਟਮ

[/fusion_modal][/fusion_builder_column][/fusion_builder_row][/fusion_builder_container][fusion_builder_container hundred_percent=nohundred_percent_height=nohundred_percent_height_scroll=nohundred_percent_height_center_content=yesequal_height_columns=nomenu_anchor=”” hide_on_mobile=small-visibility,medium-visibility,large-visibilitystatus=publishedpublish_date=”” class=”” id=”” background_color=”” background_image=”” background_position=center centerbackground_repeat=no-repeatfade=nobackground_parallax=noneenable_mobile=noparallax_speed=”0.3″ video_mp4=”” video_webm=”” video_ogv=”” video_url=”” video_aspect_ratio=”16:9″ video_loop=yesvideo_mute=yesvideo_preview_image=”” border_size=”” border_color=”” border_style=solidmargin_top=”” margin_bottom=”” padding_top=”” padding_right=”” padding_bottom=”” padding_left=””][fusion_builder_row][fusion_builder_column type=”1_1layout=”1_1spacing=”” center_content=nolink=”” target=_selfmin_height=”” hide_on_mobile=small-visibility,medium-visibility,large-visibilityclass=”” id=”” background_color=”” background_image=”” background_image_id=”” background_position=left topbackground_repeat=no-repeathover_type=noneborder_size=”0″ border_color=”” border_style=solidborder_position=allpadding_top=”” padding_right=”” padding_bottom=”” padding_left=”” margin_top=”” margin_bottom=”” animation_type=”” animation_direction=leftanimation_speed=”0.3″ animation_offset=”” last=no”][fusion_content_boxes layout=clean-horizontalcolumns=”1″ title_size=”18pxheading_size=”3″ title_color=”#ffffffbody_color=”#ffffffbackgroundcolor=”#4f4f4ficon=”” iconflip=”” iconrotate=”” iconspin=noiconcolor=”” icon_circle=”” icon_circle_radius=”” circlecolor=”” circlebordersize=”” circlebordercolor=”” outercirclebordersize=”” outercirclebordercolor=”” icon_size=”” icon_hover_type=”” hover_accent_color=”” image=”” image_id=”” image_width=”” image_height=”” link_type=”” button_span=”” link_area=”” link_target=”” icon_align=leftanimation_type=”” animation_delay=”” animation_offset=”” animation_direction=leftanimation_speed=”0.3″ margin_top=”” margin_bottom=”” hide_on_mobile=small-visibility,medium-visibility,large-visibilityclass=”” id=””][fusion_content_box title=ਕਦਮ 1. ਐਕਟਿਵ ਜ ਸਰਗਰਮ ਨੁਕਸ ਕੋਡ ਹਾਲਤ ਲਈ ਚੈੱਕ ਕਰੋ ਅਤੇ HCM ਸੰਰਚਨਾ ਚੈੱਕ.backgroundcolor=”” icon=”” iconflip=”” iconrotate=”” iconspin=noiconcolor=”” circlecolor=”” circlebordersize=”” circlebordercolor=”” outercirclebordersize=”” outercirclebordercolor=”” image=”” image_id=”” image_width=”” image_height=”” link=”” linktext=”ਹੋਰ ਪੜ੍ਹੋ” link_target=”” animation_type=”” animation_direction=leftanimation_speed=”0.3″ animation_offset=””]

  1. 9-ਵੇਅ ਡਾਇਗਨੋਸਟਿਕ ਕਨੈਕਟਰ ਜਾਂ ਹੱਥੀਂ ਵਰਤਦੇ ਹੋਏ ਸਰਵਿਸ ਰੇਂਜਰ ਨਾਲ ਐਕਟਿਵ ਫਾਲਟ ਕੋਡ ਅਤੇ ਐਫਐਮਆਈ ਪ੍ਰਾਪਤ ਕਰੋ.
  2. ਇਲੈਕਟ੍ਰੀਕਲ Pretest ਅਤੇ ਹਾਈਬ੍ਰਾਇਡ ਇਲੈਕਟ੍ਰੀਕਲ Pretest ਕਰਨ.
    • ਕੋਈ ਮੁੱਦੇ ਕਿਸੇ ਬਿਜਲੀ ਟੈਸਟ ਦੌਰਾਨ ਪਾਇਆ ਕਰ ਰਹੇ ਹੋ, ਕਦਮ ਨੂੰ ਜਾਣ 2.
    • ਜੇ ਇਸ ਮੁੱਦੇ ਨੂੰ ਕਿਸੇ ਬਿਜਲੀ ਟੈਸਟ ਦੌਰਾਨ ਮੁਰੰਮਤ ਕੀਤਾ ਗਿਆ ਹੈ, ਕਦਮ ਨੂੰ ਜਾਣ 10.

[/fusion_content_box][/fusion_content_boxes][fusion_content_boxes layout=clean-horizontalcolumns=”1″ title_size=”18pxheading_size=”3″ title_color=”#ffffffbody_color=”#ffffffbackgroundcolor=”#4f4f4ficon=”” iconflip=”” iconrotate=”” iconspin=noiconcolor=”” icon_circle=”” icon_circle_radius=”” circlecolor=”” circlebordersize=”” circlebordercolor=”” outercirclebordersize=”” outercirclebordercolor=”” icon_size=”” icon_hover_type=”” hover_accent_color=”” image=”” image_id=”” image_width=”” image_height=”” link_type=”” button_span=”” link_area=”” link_target=”” icon_align=leftanimation_type=”” animation_delay=”” animation_offset=”” animation_direction=leftanimation_speed=”0.3″ margin_top=”” margin_bottom=”” hide_on_mobile=small-visibility,medium-visibility,large-visibilityclass=”” id=””][fusion_content_box title=ਕਦਮ 2. ਪੈਕ ਸਰਕਟ ਦੀ ਨਿਰੰਤਰਤਾ ਦੀ ਪੜਤਾਲ.backgroundcolor=”” icon=”” iconflip=”” iconrotate=”” iconspin=noiconcolor=”” circlecolor=”” circlebordersize=”” circlebordercolor=”” outercirclebordersize=”” outercirclebordercolor=”” image=”” image_id=”” image_width=”” image_height=”” link=”” linktext=”ਹੋਰ ਪੜ੍ਹੋ” link_target=”” animation_type=”” animation_direction=leftanimation_speed=”0.3″ animation_offset=””]

  1. ਕੁੰਜੀ ਬੰਦ.
    ਖ਼ਤਰਾ: ਦੇਖੋ ਹਾਈ-ਵੋਲਟੇਜ ਸੇਵਾ ਬੰਦ ਹੈ ਅਤੇ ਪਾਵਰ-ਅੱਪ ਵਿਧੀ. ਸਦਮਾ ਬਚਣ ਲਈ ਕਾਰਵਾਈ ਦੀ ਪਾਲਣਾ ਕਰੋ, ਸਾੜ ਜ ਗਲਤ ਪਰਬੰਧਨ ਹਾਈ-ਵੋਲਟੇਜ ਮੌਤ.
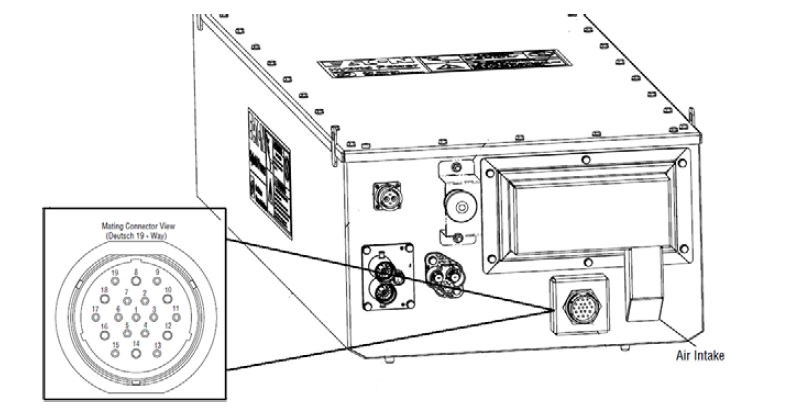
  2. ਕੁਨੈਕਸ਼ਨ ਪੈਕ 19-ਰਾਹ ਕੁਨੈਕਟਰ.
  3. ਪੈਕ 'ਤੇ ਰਾਗ ਟਾਕਰੇ 19-ਰਾਹ OEM ਵਾਇਰ ਹਾਰਨੈਸ ਕੁਨੈਕਟਰ ਪਿਨ 1 ਅਤੇ ਪਿੰਨ 2:
    ਸੂਚਨਾ: ਇਹ ਯਕੀਨੀ ਬਣਾਓ volt / ohm ਮੀਟਰ ਸਹੀ ਪੈਮਾਨੇ 'ਤੇ ਹੈ, (ਆਲੇ-ਦੁਆਲੇ ਦੇ 200 ohm ਪੈਮਾਨੇ).

    • ਜੇ ਪਿੰਨ ਵਿਚਕਾਰ ਟਾਕਰੇ 1 ਅਤੇ ਪਿੰਨ 2 50-70 ohms ਵਿਚਕਾਰ ਹੈ, ਕਦਮ ਨੂੰ ਜਾਣ 3.
    • ਟਾਕਰੇ ਸੀਮਾ ਦੇ ਬਾਹਰ ਹੈ, ਜੇ, ਕਦਮ ਨੂੰ ਜਾਣ 7.

[/fusion_content_box][/fusion_content_boxes][fusion_content_boxes layout=clean-horizontalcolumns=”1″ title_size=”18pxheading_size=”3″ title_color=”#ffffffbody_color=”#ffffffbackgroundcolor=”#4f4f4ficon=”” iconflip=”” iconrotate=”” iconspin=noiconcolor=”” icon_circle=”” icon_circle_radius=”” circlecolor=”” circlebordersize=”” circlebordercolor=”” outercirclebordersize=”” outercirclebordercolor=”” icon_size=”” icon_hover_type=”” hover_accent_color=”” image=”” image_id=”” image_width=”” image_height=”” link_type=”” button_span=”” link_area=”” link_target=”” icon_align=leftanimation_type=”” animation_delay=”” animation_offset=”” animation_direction=leftanimation_speed=”0.3″ margin_top=”” margin_bottom=”” hide_on_mobile=small-visibility,medium-visibility,large-visibilityclass=”” id=””][fusion_content_box title=ਕਦਮ 3. ਜ਼ਮੀਨ ਲਈ ਆਉਣ ਕਰ ਸਕਦੇ ਸਰਕਟ ਦੀ ਪੜਤਾਲ.backgroundcolor=”” icon=”” iconflip=”” iconrotate=”” iconspin=noiconcolor=”” circlecolor=”” circlebordersize=”” circlebordercolor=”” outercirclebordersize=”” outercirclebordercolor=”” image=”” image_id=”” image_width=”” image_height=”” link=”” linktext=”ਹੋਰ ਪੜ੍ਹੋ” link_target=”” animation_type=”” animation_direction=leftanimation_speed=”0.3″ animation_offset=””]

  1. ਰਾਗ ਵਿਚਕਾਰ ਪੈਕ 19-ਰਾਹ OEM ਵਾਇਰ ਹਾਰਨੈਸ ਕੁਨੈਕਟਰ ਪਿੰਨ ਟਾਕਰੇ 1 ਅਤੇ ਜ਼ਮੀਨ ਅਤੇ PIN ਵਿਚਕਾਰ 2 ਅਤੇ ਜ਼ਮੀਨ:
    • ਕਿਸੇ ਵਿਰੋਧ ਦੇ 0-100 ohms ਹੈ, ਜੇ, ਦੀ ਮੁਰੰਮਤ OEM ਸਕਦੇ ਸਰਕਟ ਵਿਛਾਕੇ. ਕਦਮ ਨੂੰ ਜਾਣ 10.
    • ਦੋਨੋ resistances 7k ohms ਹਨ, ਜੇ, ਕਦਮ ਨੂੰ ਜਾਣ 4.

[/fusion_content_box][/fusion_content_boxes][fusion_content_boxes layout=clean-horizontalcolumns=”1″ title_size=”18pxheading_size=”3″ title_color=”#ffffffbody_color=”#ffffffbackgroundcolor=”#4f4f4ficon=”” iconflip=”” iconrotate=”” iconspin=noiconcolor=”” icon_circle=”” icon_circle_radius=”” circlecolor=”” circlebordersize=”” circlebordercolor=”” outercirclebordersize=”” outercirclebordercolor=”” icon_size=”” icon_hover_type=”” hover_accent_color=”” image=”” image_id=”” image_width=”” image_height=”” link_type=”” button_span=”” link_area=”” link_target=”” icon_align=leftanimation_type=”” animation_delay=”” animation_offset=”” animation_direction=leftanimation_speed=”0.3″ margin_top=”” margin_bottom=”” hide_on_mobile=small-visibility,medium-visibility,large-visibilityclass=”” id=””][fusion_content_box title=ਕਦਮ 4. ਦੀ ਪੜਤਾਲ ਕਰ ਸਕਦਾ ਹੈ, ਠੀਕ ਕੁਨੈਕਟਰ ਪਿੰਨ ਤਿਆਰ ਹੈ.backgroundcolor=”” icon=”” iconflip=”” iconrotate=”” iconspin=”” iconcolor=”” circlecolor=”” circlebordersize=”” circlebordercolor=”” outercirclebordersize=”” outercirclebordercolor=”” image=”” image_id=”” image_width=”” image_height=”” link=”” linktext=”” link_target=”” animation_type=”” animation_direction=leftanimation_speed=”0.3″ animation_offset=””]

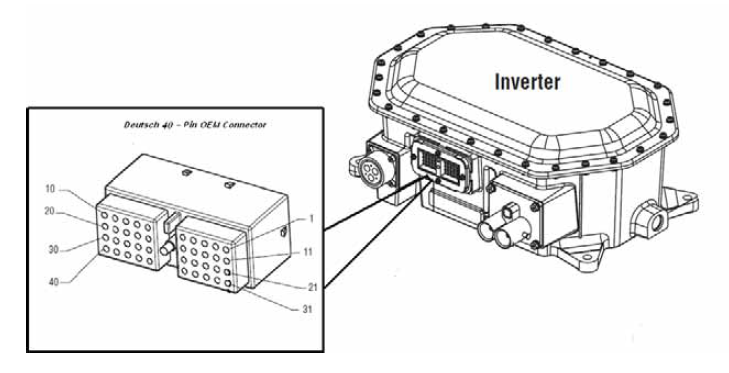
  1. ਰਾਗ ਵਿਚਕਾਰ ਪੈਕ 19-ਰਾਹ ਕੁਨੈਕਟਰ ਪਿੰਨ ਟਾਕਰੇ 1 ਅਤੇ Inverter 40-ਰਾਹ ਕੁਨੈਕਟਰ ਪਿਨ 4:
    • ਵਿਰੋਧ ਦੇ 0-0.3 ohms ਹੈ, ਜੇ, ਕਦਮ ਨੂੰ ਜਾਣ 5.
    • ਟਾਕਰੇ ਹੈ, ਜੇ 60 ohms, ਮੁਰੰਮਤ ਤਾਰ ਸਕਦੇ (hi ਅਤੇ ਘੱਟ-ਗ਼ਲਤ ਤਾਰ ਕਰ ਰਹੇ ਹਨ), ਫਿਰ ਕਦਮ ਨੂੰ ਜਾਣ 10.

[/fusion_content_box][/fusion_content_boxes][fusion_content_boxes layout=clean-horizontalcolumns=”1″ title_size=”18pxheading_size=”3″ title_color=”#ffffffbody_color=”#ffffffbackgroundcolor=”#4f4f4ficon=”” iconflip=”” iconrotate=”” iconspin=noiconcolor=”” icon_circle=”” icon_circle_radius=”” circlecolor=”” circlebordersize=”” circlebordercolor=”” outercirclebordersize=”” outercirclebordercolor=”” icon_size=”” icon_hover_type=”” hover_accent_color=”” image=”” image_id=”” image_width=”” image_height=”” link_type=”” button_span=”” link_area=”” link_target=”” icon_align=leftanimation_type=”” animation_delay=”” animation_offset=”” animation_direction=leftanimation_speed=”0.3″ margin_top=”” margin_bottom=”” hide_on_mobile=small-visibility,medium-visibility,large-visibilityclass=”” id=””][fusion_content_box title=ਕਦਮ 5. ਪੈਕ ਕਰਨ ਦੀ ਸ਼ਕਤੀ ਹੈ ਅਤੇ ਜ਼ਮੀਨ ਦੀ ਪੜਤਾਲ.backgroundcolor=”” icon=”” iconflip=”” iconrotate=”” iconspin=”” iconcolor=”” circlecolor=”” circlebordersize=”” circlebordercolor=”” outercirclebordersize=”” outercirclebordercolor=”” image=”” image_id=”” image_width=”” image_height=”” link=”” linktext=”” link_target=”” animation_type=”” animation_direction=leftanimation_speed=”0.3″ animation_offset=””]

  1. Inverter 'ਤੇ ਮੁੜ 40-ਰਾਹ ਕੁਨੈਕਟਰ.
  2. ਕੁੰਜੀ 'ਤੇ.
  3. Measure for voltage on PEC 19-Way OEM Wire Harness Connector Pins 6 ਅਤੇ 7:
    • ਜੇ ਪਿੰਨ੍ਹ 6 ਅਤੇ 7 have battery voltage (12 ਵੋਲਟ +/ – 1.2 ਵੋਲਟ), ਪੈਕ ਨੂੰ ਤਬਦੀਲ, ਫਿਰ ਕਦਮ ਨੂੰ ਜਾਣ 10.
    • ਜੇ ਪਿੰਨ 6 ਅਤੇ 7 ਕੋਈ ਵੋਲਟੇਜ ਜ ਵੱਧ ਘੱਟ ਹੈ 1.2 ਬੈਟਰੀ ਵੋਲਟੇਜ ਦੇ ਵੋਲਟ, ਕਦਮ ਨੂੰ ਜਾਣ 6.

[/fusion_content_box][/fusion_content_boxes][fusion_content_boxes layout=clean-horizontalcolumns=”1″ title_size=”18pxheading_size=”3″ title_color=”#ffffffbody_color=”#ffffffbackgroundcolor=”#4f4f4ficon=”” iconflip=”” iconrotate=”” iconspin=noiconcolor=”” icon_circle=”” icon_circle_radius=”” circlecolor=”” circlebordersize=”” circlebordercolor=”” outercirclebordersize=”” outercirclebordercolor=”” icon_size=”” icon_hover_type=”” hover_accent_color=”” image=”” image_id=”” image_width=”” image_height=”” link_type=”” button_span=”” link_area=”” link_target=”” icon_align=leftanimation_type=”” animation_delay=”” animation_offset=”” animation_direction=leftanimation_speed=”0.3″ margin_top=”” margin_bottom=”” hide_on_mobile=small-visibility,medium-visibility,large-visibilityclass=”” id=””][fusion_content_box title=ਕਦਮ 6. Inverter ਅਤੇ PEC ਵਿਚਕਾਰ ਨਿਰੰਤਰਤਾ ਦੀ ਪੜਤਾਲ.backgroundcolor=”” icon=”” iconflip=”” iconrotate=”” iconspin=”” iconcolor=”” circlecolor=”” circlebordersize=”” circlebordercolor=”” outercirclebordersize=”” outercirclebordercolor=”” image=”” image_id=”” image_width=”” image_height=”” link=”” linktext=”” link_target=”” animation_type=”” animation_direction=leftanimation_speed=”0.3″ animation_offset=””]

  1. ਕੁੰਜੀ ਬੰਦ.
  2. Inverter 40-ਰਾਹ ਕੁਨੈਕਟਰ ਹਟਾਓ.40 ਪਿੰਨ ਕੁਨੈਕਟਰ inverter ਦਾ Eaton ਧੋਬੀ ਪ੍ਰਸਾਰਣ
  3. ਰਾਗ ਤੇ OEM 40-ਰਾਹ Inverter ਕੁਨੈਕਟਰ ਪਿੰਨ ਟਾਕਰੇ 14 ਨੂੰ OEM 19-ਰਾਹ ਪੈਕ ਕੁਨੈਕਟਰ ਪਿਨ 6 ਅਤੇ Inverter ਕੁਨੈਕਟਰ ਪਿਨ 15 ਨੂੰ ਪੈਕ ਕੁਨੈਕਟਰ ਪਿਨ 7: 19 ਪਿੰਨ ਕੁਨੈਕਟਰ-40-ਪਿੰਨ-ਕੁਨੈਕਟਰ
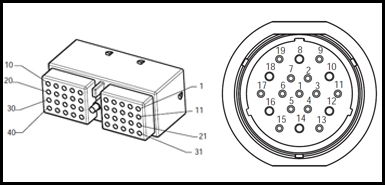
    • ਜੇ ਪਿੰਨ ਵਿਰੋਧ 14 ਪਿੰਨ ਨੂੰ 6 0-0.3 ohms ਹੈ, ਅਤੇ ਪਿੰਨ ਵਿਰੋਧ 15 ਪਿੰਨ ਨੂੰ 7 0-0.3 ohms ਹੈ (ਇਹ ਵੀ ਪਿੰਨ੍ਹ ਤੇ ਟਰਮੀਨਲ ਤਣਾਅ ਨੂੰ ਚੈੱਕ), Inverter ਨੂੰ ਤਬਦੀਲ, ਫਿਰ ਕਦਮ ਨੂੰ ਜਾਣ 7.
      ?? ਵਿਰੋਧ ਦੇ ol ਜ ਸੀਮਾ ਦੇ ਬਾਹਰ ਹੈ, ਜੇ, Inverter ਅਤੇ PEC ਵਿਚਕਾਰ OEM ਵਾਇਰ ਹਾਰਨੈਸ ਦੀ ਮੁਰੰਮਤ, ਫਿਰ ਕਦਮ ਨੂੰ ਜਾਣ 10.

[/fusion_content_box][/fusion_content_boxes][fusion_content_boxes layout=clean-horizontalcolumns=”1″ title_size=”18pxheading_size=”3″ title_color=”#ffffffbody_color=”#ffffffbackgroundcolor=”#4f4f4ficon=”” iconflip=”” iconrotate=”” iconspin=noiconcolor=”” icon_circle=”” icon_circle_radius=”” circlecolor=”” circlebordersize=”” circlebordercolor=”” outercirclebordersize=”” outercirclebordercolor=”” icon_size=”” icon_hover_type=”” hover_accent_color=”” image=”” image_id=”” image_width=”” image_height=”” link_type=”” button_span=”” link_area=”” link_target=”” icon_align=leftanimation_type=”” animation_delay=”” animation_offset=”” animation_direction=leftanimation_speed=”0.3″ margin_top=”” margin_bottom=”” hide_on_mobile=small-visibility,medium-visibility,large-visibilityclass=”” id=””][fusion_content_box title=ਕਦਮ 7. Inverter ਨਾਲ ਪੈਕ 'ਤੇ CAN ਪੜਤਾਲ ਕਰੋ.backgroundcolor=”” icon=”” iconflip=”” iconrotate=”” iconspin=”” iconcolor=”” circlecolor=”” circlebordersize=”” circlebordercolor=”” outercirclebordersize=”” outercirclebordercolor=”” image=”” image_id=”” image_width=”” image_height=”” link=”” linktext=”” link_target=”” animation_type=”” animation_direction=leftanimation_speed=”0.3″ animation_offset=””]

  1. ਕੁੰਜੀ ਬੰਦ.
  2. Inverter 40-ਰਾਹ ਕੁਨੈਕਟਰ ਹਟਾਓ.40 inverter ਦਾ ਰਾਹ ਕਨੈਕਟਰ
  3. ਪਿੰਨ੍ਹ ਲਈ OEM Inverter ਕੁਨੈਕਟਰ ਚੈੱਕ ਕਰੋ 34 ਅਤੇ 35. ਕੋਈ ਪਿੰਨ ਕੁਨੈਕਟਰ ਵਿੱਚ ਤਿਆਰ ਕਰ ਰਹੇ ਹੋ,, ਪੈਕ CAN ਸੰਚਾਰ CAN ਰੀੜ ਨੂੰ ਚਲਾ, ਨਾ Inverter:
    • ਜੇ ਪਿੰਨ 34 ਅਤੇ ਪਿੰਨ 35 ਆਬਾਦੀ ਨਹੀ ਹਨ, ਕਦਮ ਨੂੰ ਜਾਣ 9.
    • OEM Inverter ਕੁਨੈਕਟਰ ਪਿੰਨ੍ਹ ਹੈ 34 ਅਤੇ 35, ਕਦਮ ਨੂੰ ਜਾਣ 8.

[/fusion_content_box][/fusion_content_boxes][fusion_content_boxes layout=clean-horizontalcolumns=”1″ title_size=”18pxheading_size=”3″ title_color=”#ffffffbody_color=”#ffffffbackgroundcolor=”#4f4f4ficon=”” iconflip=”” iconrotate=”” iconspin=noiconcolor=”” icon_circle=”” icon_circle_radius=”” circlecolor=”” circlebordersize=”” circlebordercolor=”” outercirclebordersize=”” outercirclebordercolor=”” icon_size=”” icon_hover_type=”” hover_accent_color=”” image=”” image_id=”” image_width=”” image_height=”” link_type=”” button_span=”” link_area=”” link_target=”” icon_align=leftanimation_type=”” animation_delay=”” animation_offset=”” animation_direction=leftanimation_speed=”0.3″ margin_top=”” margin_bottom=”” hide_on_mobile=small-visibility,medium-visibility,large-visibilityclass=”” id=””][fusion_content_box title=ਕਦਮ 8. Inverter ਸਰਕਟ ਅਤੇ PEC ਸਰਕਟ ਵਿਚਕਾਰ ਨਿਰੰਤਰਤਾ ਦੀ ਪੜਤਾਲ.backgroundcolor=”” icon=”” iconflip=”” iconrotate=”” iconspin=”” iconcolor=”” circlecolor=”” circlebordersize=”” circlebordercolor=”” outercirclebordersize=”” outercirclebordercolor=”” image=”” image_id=”” image_width=”” image_height=”” link=”” linktext=”” link_target=”” animation_type=”” animation_direction=leftanimation_speed=”0.3″ animation_offset=””]

  1. ਰਾਗ ਵਿਚਕਾਰ Inverter 40-ਰਾਹ ਕੁਨੈਕਟਰ ਪਿੰਨ ਟਾਕਰੇ 34 ਅਤੇ OEM 19-ਰਾਹ ਪੈਕ ਕੁਨੈਕਟਰ ਪਿਨ 1 ਅਤੇ Inverter 40-ਰਾਹ ਕੁਨੈਕਟਰ ਪਿਨ 35 ਅਤੇ PEC 19-ਰਾਹ ਕੁਨੈਕਟਰ ਪਿਨ 2:19 ਪਿੰਨ ਕੁਨੈਕਟਰ-40-ਪਿੰਨ-ਕੁਨੈਕਟਰਸੂਚਨਾ: ਇਹ ਯਕੀਨੀ ਬਣਾਓ volt / ohm ਮੀਟਰ ਸਹੀ ਪੈਮਾਨੇ 'ਤੇ ਹੈ, (ਆਲੇ-ਦੁਆਲੇ ਦੇ 200 ohm ਪੈਮਾਨੇ)
    • ਜੇ ਪਿੰਨ ਵਿਚਕਾਰ ਟਾਕਰੇ 34 ਅਤੇ ਪਿੰਨ 1 0-0.3 ohms ਵਿਚਕਾਰ ਹੈ, ਅਤੇ ਪਿੰਨ ਵਿਚਕਾਰ ਟਾਕਰੇ 35 ਅਤੇ ਪਿੰਨ 2 0-0.3 ohms ਵਿਚਕਾਰ ਹੈ, Inverter ਨੂੰ ਤਬਦੀਲ. ਦੇਖੋ my09 Inverter ਹਟਾਉਣ ਅਤੇ ਇੰਸਟਾਲੇਸ਼ਨ), ਫਿਰ ਕਦਮ ਨੂੰ ਜਾਣ 10.
    • ਵਿਰੋਧ ਦੇ ol ਜ ਸੀਮਾ ਦੇ ਬਾਹਰ ਹੈ, ਜੇ, Inverter ਅਤੇ PEC ਵਿਚਕਾਰ OEM ਵਾਇਰ ਹਾਰਨੈਸ ਦੀ ਮੁਰੰਮਤ, ਫਿਰ ਕਦਮ ਨੂੰ ਜਾਣ 10.

[/fusion_content_box][/fusion_content_boxes][fusion_content_boxes layout=clean-horizontalcolumns=”1″ title_size=”18pxheading_size=”3″ title_color=”#ffffffbody_color=”#ffffffbackgroundcolor=”#4f4f4ficon=”” iconflip=”” iconrotate=”” iconspin=noiconcolor=”” icon_circle=”” icon_circle_radius=”” circlecolor=”” circlebordersize=”” circlebordercolor=”” outercirclebordersize=”” outercirclebordercolor=”” icon_size=”” icon_hover_type=”” hover_accent_color=”” image=”” image_id=”” image_width=”” image_height=”” link_type=”” button_span=”” link_area=”” link_target=”” icon_align=leftanimation_type=”” animation_delay=”” animation_offset=”” animation_direction=leftanimation_speed=”0.3″ margin_top=”” margin_bottom=”” hide_on_mobile=small-visibility,medium-visibility,large-visibilityclass=”” id=””][fusion_content_box title=ਕਦਮ 9. ਪੈਕ ਕਰ ਸਕਦਾ ਹੈ ਅਤੇ CAN ਹੱਡੀ ਦੇ ਵਿਚਕਾਰ ਨਿਰੰਤਰਤਾ ਦੀ ਪੜਤਾਲ.backgroundcolor=”” icon=”” iconflip=”” iconrotate=”” iconspin=”” iconcolor=”” circlecolor=”” circlebordersize=”” circlebordercolor=”” outercirclebordersize=”” outercirclebordercolor=”” image=”” image_id=”” image_width=”” image_height=”” link=”” linktext=”” link_target=”” animation_type=”” animation_direction=leftanimation_speed=”0.3″ animation_offset=””]

  1. inverter 40-ਪਿੰਨ ਕੁਨੈਕਟਰ ਪਿੰਨ੍ਹ ਹੈ, ਨਾ ਹੈ, ਜੇ 34 ਅਤੇ 35 ਫਿਰ ਆਬਾਦੀ ਪੈਕ 'ਤੇ 19-ਰਾਹ ਕੁਨੈਕਟਰ ਸਕਦੇ ਹੋ ਸੰਚਾਰ ਸ਼ਾਖਾ CAN ਹੱਡੀ ਨੂੰ ਸਿੱਧੇ ਤਾਰ ਹੈ:
    • ਮੁਰੰਮਤ OEM ਵਾਇਰ ਹਾਰਨੈਸ ਪੈਕ ਕਰ ਸਕਦਾ ਹੈ ਸੰਚਾਰ ਰੀੜ ਵਿਚਕਾਰ, ਫਿਰ ਕਦਮ ਨੂੰ ਜਾਣ 10.

[/fusion_content_box][/fusion_content_boxes][fusion_content_boxes layout=clean-horizontalcolumns=”1″ title_size=”18pxheading_size=”3″ title_color=”#ffffffbody_color=”#ffffffbackgroundcolor=”#4f4f4ficon=”” iconflip=”” iconrotate=”” iconspin=noiconcolor=”” icon_circle=”” icon_circle_radius=”” circlecolor=”” circlebordersize=”” circlebordercolor=”” outercirclebordersize=”” outercirclebordercolor=”” icon_size=”” icon_hover_type=”” hover_accent_color=”#f41000image=”” image_id=”” image_width=”” image_height=”” link_type=”” button_span=”” link_area=”” link_target=”” icon_align=leftanimation_type=”” animation_delay=”” animation_offset=”” animation_direction=leftanimation_speed=”0.3″ margin_top=”” margin_bottom=”” hide_on_mobile=small-visibility,medium-visibility,large-visibilityclass=”” id=””][fusion_content_box title=ਕਦਮ 10. ਮੁਰੰਮਤ ਦੀ ਪੜਤਾਲ.backgroundcolor=”” icon=”” iconflip=”” iconrotate=”” iconspin=noiconcolor=”” circlecolor=”” circlebordersize=”” circlebordercolor=”” outercirclebordersize=”” outercirclebordercolor=”” image=”” image_id=”” image_width=”” image_height=”” link=”” linktext=”ਹੋਰ ਪੜ੍ਹੋ” link_target=”” animation_type=”” animation_direction=leftanimation_speed=”0.3″ animation_offset=””]

  1. ਕੁੰਜੀ ਬੰਦ.
  2. ਸਾਰੇ ਕੁਨੈਕਟਰ ਤੇ ਰਿਣਾਤਮਕ ਬੈਟਰੀ ਕੇਬਲ ਮੁੜ ਜੁੜਨ.
  3. ਕੁੰਜੀ 'ਤੇ.
  4. ਕੋਡ ਆਸਮਾਨ, ਵੇਖੋ, ਆਸਮਾਨ ਸਰਗਰਮ ਨੁਕਸ.
  5. ਵਾਹਨ ਗੱਡੀ ਅਤੇ ਕੋਡ ਸੈੱਟ ਕਰਨ ਲਈ ਕੋਸ਼ਿਸ਼.
  6. ਕੋਡ ਲਈ ਚੈੱਕ ਕਰੋ, ਵੇਖੋ, ਸਰਗਰਮ ਅਤੇ ਸਰਗਰਮ ਨੁਕਸ ਦੇਖੋ.
    • ਕੋਈ ਕੋਡ ਜੇ, ਟੈਸਟ ਮੁਕੰਮਲ ਹੋ ਗਈ ਹੈ.
    • ਜੇ ਨੁਕਸ ਕੋਡ 89 ਦਿਸਦਾ ਹੈ, ਟੈਸਟਿੰਗ ਵਿੱਚ ਗਲਤੀ ਦਾ ਪਤਾ, ਕਦਮ ਨੂੰ ਜਾਣ 1.
    • ਇੱਕ ਕੋਡ ਦੇ ਇਲਾਵਾ ਹੋਰ, ਜੇ 89 ਦਿਸਦਾ ਹੈ, ਵੇਖੋ, ਕੋਡ ਇੰਡੈਕਸ ਸੂਚੀ ਖਰਾਬ.

[/fusion_content_box][/fusion_content_boxes][/fusion_builder_column][/fusion_builder_row][/fusion_builder_container][fusion_global id=”13788″]