[fusion_builder_container hundred_percent=”no” hundred_percent_height=”no” hundred_percent_height_scroll=”no” hundred_percent_height_center_content=”yes” equal_height_columns=”no” menu_anchor=”” hide_on_mobile=”small-visibility,medium-visibility,large-visibility” status=”published” publish_date=”” class=”” id=”” background_color=”” background_image=”” background_position=”center center” background_repeat=”не-повторуваат” fade=”no” background_parallax=”никој” enable_mobile=”no” parallax_speed=”0.3″ video_mp4=”” video_webm=”” video_ogv=”” video_url=”” video_aspect_ratio=”16:9″ video_loop=”yes” video_mute=”yes” video_preview_image=”” border_size=”” border_color=”” border_style=”solid” margin_top=”35″ margin_bottom=”” padding_top=”” padding_right=”” padding_bottom=”” padding_left=””][fusion_builder_row][fusion_builder_column type=”1_1″ layout=”1_1″ spacing=”” center_content=”no” link=”” target=”_self” min_height=”” hide_on_mobile=”small-visibility,medium-visibility,large-visibility” class=”” id=”” background_color=”” background_image=”” background_image_id=”” background_position=”left top” background_repeat=”не-повторуваат” hover_type=”никој” border_size=”0″ border_color=”” border_style=”solid” border_position=”all” padding_top=”” padding_right=”” padding_bottom=”” padding_left=”” margin_top=”” margin_bottom=”” animation_type=”” animation_direction=”лево” animation_speed=”0.3″ animation_offset=”” last=”no”][fusion_text columns=”” column_min_width=”” column_spacing=”” rule_style=”default” rule_size=”” rule_color=”” hide_on_mobile=”small-visibility,medium-visibility,large-visibility” class=”” id=””]
Eaton Fuller хибриден Пренос Код на грешка 89 – Моќ Електрични превозникот може Грешка порака (HCM)
[/fusion_text][/fusion_builder_column][/fusion_builder_row][/fusion_builder_container][fusion_builder_container hundred_percent=”no” hundred_percent_height=”no” hundred_percent_height_scroll=”no” hundred_percent_height_center_content=”yes” equal_height_columns=”no” menu_anchor=”” hide_on_mobile=”small-visibility,medium-visibility,large-visibility” status=”published” publish_date=”” class=”” id=”” background_color=”” background_image=”” background_position=”center center” background_repeat=”не-повторуваат” fade=”no” background_parallax=”никој” enable_mobile=”no” parallax_speed=”0.3″ video_mp4=”” video_webm=”” video_ogv=”” video_url=”” video_aspect_ratio=”16:9″ video_loop=”yes” video_mute=”yes” video_preview_image=”” border_size=”” border_color=”” border_style=”solid” margin_top=”” margin_bottom=”” padding_top=”” padding_right=”” padding_bottom=”” padding_left=””][fusion_builder_row][fusion_builder_column type=”1_1″ layout=”1_1″ spacing=”” center_content=”no” link=”” target=”_self” min_height=”” hide_on_mobile=”small-visibility,medium-visibility,large-visibility” class=”” id=”” background_color=”” background_image=”” background_image_id=”” background_position=”left top” background_repeat=”не-повторуваат” hover_type=”никој” border_size=”0″ border_color=”” border_style=”solid” border_position=”all” padding_top=”” padding_right=”” padding_bottom=”” padding_left=”” margin_top=”” margin_bottom=”” animation_type=”” animation_direction=”лево” animation_speed=”0.3″ animation_offset=”” last=”no”][fusion_text columns=”” column_min_width=”” column_spacing=”” rule_style=”default” rule_size=”” rule_color=”” hide_on_mobile=”small-visibility,medium-visibility,large-visibility” class=”” id=””]
Дефект код за Eaton хибридни модели диск системи (MY09) EH-8E406A-U / P, EH-8E406A-UP, EH-8E406A-UPG, EH-8E406A-CD, EH-8E406A-CDG, EH-8E406A-РДО, EH-8E406A-T, EH-6E706B-CD, EH-6E706B-P и EH-6E706B-UPG. Прочитајте подолу за да дознаете како да се тестира, се расчисти и да се утврдат грешки вина кодот за вашиот Freightliner, Мек, Peterbilt, Kenworth, Volvo, меѓународен, и тешки камиони и опрема. Хибрид контролен модул (HCM) комуницира со Инвертер комуницира со единицата за контрола на батеријата (BCU) се наоѓа во енергетска електроника оператор на (PEC) и HCM на мрежа на контролорот (CAN) со голема брзина комерцијален податоци врска. податоците линк е две-жица извртени пар со две 120 оми отпорници наоѓа во врската.
Дефект законик 89 – Моќ Електрични превозникот може Порака вина за откривање
Следните предуслови треба да се исполнат пред системот детектира грешка:
- HCM напонот за палењето е поголема од 7 волти и помалку од 16 волти.
- вина HCM CAN податоци врска е оневозможена.
Забелешка: Кога смена на неактивен код се однесува на Режим на производот Дијагностички (PDM)
Услови за поставување Грешка Код Active
- ММФ 2 is only Active in Product Diagnostic Mode (PDM) и сетови ако 3 consecutive messages are not received by the HCM.
- ММФ 9 is set when the HCM has not received a 1 порака за 30 последователни циклуси порака.
Резервен план Кога Дефект законик 89 е поставена да се јават следните услови:
- Килибарните "Провери Hybrid" светло за.
- Грешка се чуваат во хибриден контрола Модул (HCM) меморија.
- Електричен мотор / генератор за помош и обнова се исклучени; сепак, релеи висок напон остане погон.
- HCM продолжува да ја контролира хибридни возила во режим на дизел-само.
- Пренос стандардно почне брзина до 1.
[/fusion_text][fusion_text columns=”” column_min_width=”” column_spacing=”” rule_style=”default” rule_size=”” rule_color=”” hide_on_mobile=”small-visibility,medium-visibility,large-visibility” class=”” id=””]
Услови за поставување Грешка Код Неактивен
Само Неактивен грешки можат да бидат избришани од Единицата за Пренос Електронска контрола на (TECU) или историја HCM користење ServiceRanger. На TECU автоматски отвора грешки од историјата по 200 часа и HCM автоматски отвора грешки од историјата по грешка е неактивен за 200 часа.
Оваа грешка кодот може да биде предизвикана од било кое од следниве:
- ММФ 2, 9
- инвертер
- ДА Податоци линк до Реле кутија
- Реле кутија во внатрешноста PEC
- Нема моќ или земјата да ја препраќаш кутија
[/fusion_text][/fusion_builder_column][/fusion_builder_row][/fusion_builder_container][fusion_builder_container hundred_percent=”no” hundred_percent_height=”no” hundred_percent_height_scroll=”no” hundred_percent_height_center_content=”yes” equal_height_columns=”no” menu_anchor=”” hide_on_mobile=”small-visibility,medium-visibility,large-visibility” status=”published” publish_date=”” class=”” id=”” background_color=”” background_image=”” background_position=”center center” background_repeat=”не-повторуваат” fade=”no” background_parallax=”никој” enable_mobile=”no” parallax_speed=”0.3″ video_mp4=”” video_webm=”” video_ogv=”” video_url=”” video_aspect_ratio=”16:9″ video_loop=”yes” video_mute=”yes” video_preview_image=”” border_size=”” border_color=”” border_style=”solid” margin_top=”” margin_bottom=”” padding_top=”” padding_right=”” padding_bottom=”” padding_left=””][fusion_builder_row][fusion_builder_column type=”1_1″ layout=”1_1″ spacing=”” center_content=”no” link=”” target=”_self” min_height=”” hide_on_mobile=”small-visibility,medium-visibility,large-visibility” class=”” id=”” background_color=”” background_image=”” background_image_id=”” background_position=”left top” background_repeat=”не-повторуваат” hover_type=”никој” border_size=”0″ border_color=”” border_style=”solid” border_position=”all” padding_top=”” padding_right=”” padding_bottom=”” padding_left=”” margin_top=”” margin_bottom=”” animation_type=”” animation_direction=”лево” animation_speed=”0.3″ animation_offset=”” last=”no”][fusion_text columns=”” column_min_width=”” column_spacing=”” rule_style=”default” rule_size=”” rule_color=”” hide_on_mobile=”small-visibility,medium-visibility,large-visibility” class=”” id=””]
Дефект законик 89 – Моќ Електрични превозникот може Порака Дефект на испитување
[/fusion_text][/fusion_builder_column][/fusion_builder_row][/fusion_builder_container][fusion_builder_container hundred_percent=”no” hundred_percent_height=”no” hundred_percent_height_scroll=”no” hundred_percent_height_center_content=”yes” equal_height_columns=”no” menu_anchor=”” hide_on_mobile=”small-visibility,medium-visibility,large-visibility” status=”published” publish_date=”” class=”” id=”” background_color=”” background_image=”” background_position=”center center” background_repeat=”не-повторуваат” fade=”no” background_parallax=”никој” enable_mobile=”no” parallax_speed=”0.3″ video_mp4=”” video_webm=”” video_ogv=”” video_url=”” video_aspect_ratio=”16:9″ video_loop=”yes” video_mute=”yes” video_preview_image=”” border_size=”” border_color=”” border_style=”solid” margin_top=”” margin_bottom=”” padding_top=”” padding_right=”” padding_bottom=”” padding_left=””][fusion_builder_row][fusion_builder_column type=”1_1″ layout=”1_1″ spacing=”” center_content=”no” link=”” target=”_self” min_height=”” hide_on_mobile=”small-visibility,medium-visibility,large-visibility” class=”” id=”” background_color=”” background_image=”” background_image_id=”” background_position=”left top” background_repeat=”не-повторуваат” hover_type=”никој” border_size=”0″ border_color=”” border_style=”solid” border_position=”all” padding_top=”” padding_right=”” padding_bottom=”” padding_left=”” margin_top=”” margin_bottom=”” animation_type=”” animation_direction=”лево” animation_speed=”0.3″ animation_offset=”” last=”no”][fusion_text columns=”” column_min_width=”” column_spacing=”” rule_style=”default” rule_size=”” rule_color=”” hide_on_mobile=”small-visibility,medium-visibility,large-visibility” class=”” id=””]
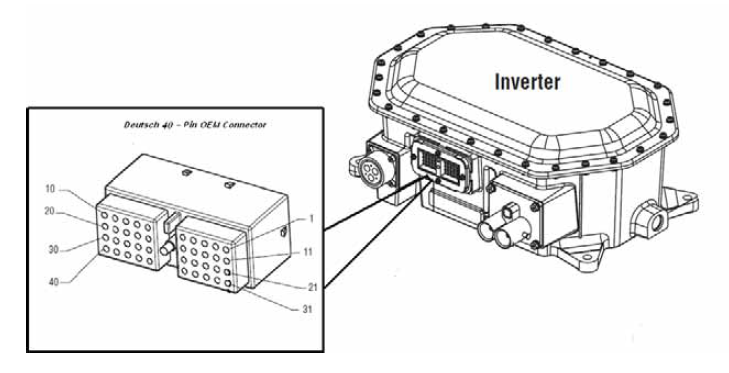
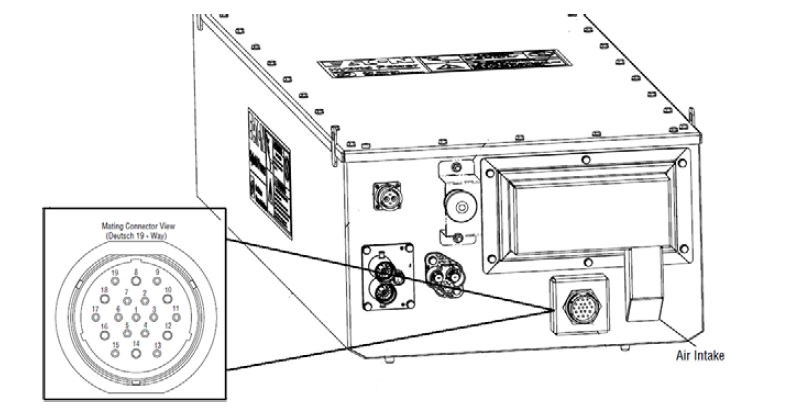
Компонента Идентификација MY09 системи:
[/fusion_text][/fusion_builder_column][fusion_builder_column type=”1_1″ layout=”1_2″ spacing=”” center_content=”no” link=”” target=”_self” min_height=”” hide_on_mobile=”small-visibility,medium-visibility,large-visibility” class=”” id=”” background_color=”” background_image=”” background_image_id=”” background_position=”left top” background_repeat=”не-повторуваат” hover_type=”никој” border_size=”0″ border_color=”” border_style=”solid” border_position=”all” padding_top=”” padding_right=”” padding_bottom=”” padding_left=”” margin_top=”” margin_bottom=”” animation_type=”” animation_direction=”лево” animation_speed=”0.3″ animation_offset=”” last=”no”][fusion_imageframe image_id=”14503|full” max_width=”” style_type=”” blur=”” stylecolor=”” hover_type=”никој” bordersize=”” bordercolor=”” borderradius=”” align=”центар” lightbox=”no” gallery_id=”” lightbox_image=”” lightbox_image_id=”” alt=”парење конектор Deustch 19-начин” link=”” linktarget=”_self” hide_on_mobile=”small-visibility,medium-visibility,large-visibility” class=”” id=”” animation_type=”” animation_direction=”лево” animation_speed=”0.3″ animation_offset=””]https://www.globaltransmissionsupply.com/wp-content/uploads/mating-connector-deustch-19-way.png[/fusion_imageframe][fusion_imageframe image_id=”14504|full” max_width=”” style_type=”” blur=”” stylecolor=”” hover_type=”никој” bordersize=”” bordercolor=”” borderradius=”” align=”центар” lightbox=”no” gallery_id=”” lightbox_image=”” lightbox_image_id=”” alt=”Инвертер Deutsch 40-пински конектор” link=”” linktarget=”_self” hide_on_mobile=”small-visibility,medium-visibility,large-visibility” class=”” id=”” animation_type=”” animation_direction=”лево” animation_speed=”0.3″ animation_offset=””]https://www.globaltransmissionsupply.com/wp-content/uploads/Inverter-Deutsch-40-Pin-connector.png[/fusion_imageframe][/fusion_builder_column][fusion_builder_column type=”1_1″ layout=”1_1″ spacing=”” center_content=”no” link=”” target=”_self” min_height=”” hide_on_mobile=”small-visibility,medium-visibility,large-visibility” class=”” id=”” background_image_id=”” background_color=”#000000″ background_image=”” background_position=”left top” undefined=”” background_repeat=”не-повторуваат” hover_type=”никој” border_size=”0″ border_color=”” border_style=”solid” border_position=”all” padding_top=”” padding_right=”” padding_bottom=”” padding_left=”” margin_top=”20″ margin_bottom=”20″ animation_type=”” animation_direction=”лево” animation_speed=”0.3″ animation_offset=”” last=”no”][fusion_text columns=”” column_min_width=”” column_spacing=”” rule_style=”default” rule_size=”” rule_color=”” hide_on_mobile=”small-visibility,medium-visibility,large-visibility” class=”” id=””]
ЗАБЕЛЕШКА: Се однесуваат на Eaton хибриден компоненти и конектори Локација Конектор за локации во MY09 системи.
[/fusion_text][/fusion_builder_column][fusion_builder_column type=”1_1″ layout=”1_1″ spacing=”” center_content=”no” link=”” target=”_self” min_height=”” hide_on_mobile=”small-visibility,medium-visibility,large-visibility” class=”” id=”” background_color=”” background_image=”” background_image_id=”” background_position=”left top” background_repeat=”не-повторуваат” hover_type=”никој” border_size=”0″ border_color=”” border_style=”solid” border_position=”all” padding_top=”” padding_right=”” padding_bottom=”” padding_left=”” margin_top=”” margin_bottom=”” animation_type=”” animation_direction=”лево” animation_speed=”0.3″ animation_offset=”” last=”no”][fusion_imageframe image_id=”14506|full” max_width=”” style_type=”” blur=”” stylecolor=”” hover_type=”никој” bordersize=”” bordercolor=”” borderradius=”” align=”центар” lightbox=”no” gallery_id=”” lightbox_image=”” lightbox_image_id=”” alt=”Инверторот да PEC ” link=”” linktarget=”_self” hide_on_mobile=”small-visibility,medium-visibility,large-visibility” class=”” id=”” animation_type=”” animation_direction=”лево” animation_speed=”0.3″ animation_offset=””]https://www.globaltransmissionsupply.com/wp-content/uploads/Inverter-to-PEC.png[/fusion_imageframe][fusion_text columns=”” column_min_width=”” column_spacing=”” rule_style=”default” rule_size=”” rule_color=”” hide_on_mobile=”small-visibility,medium-visibility,large-visibility” class=”” id=””]
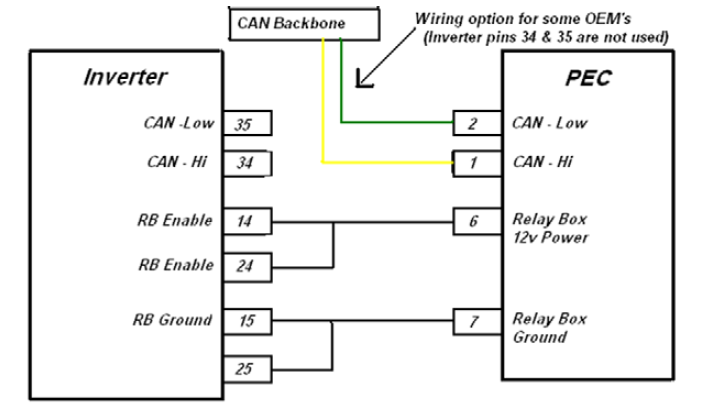
Или опционален CAN жичен директно да може линк податоци 'рбетот (инвертер игли 34 и 35 не се користат):
[/fusion_text][fusion_imageframe image_id=”14505|full” max_width=”” style_type=”” blur=”” stylecolor=”” hover_type=”никој” bordersize=”” bordercolor=”” borderradius=”” align=”центар” lightbox=”no” gallery_id=”” lightbox_image=”” lightbox_image_id=”” alt=”Инверторот да PEC CAN 'рбетот” link=”” linktarget=”_self” hide_on_mobile=”small-visibility,medium-visibility,large-visibility” class=”” id=”” animation_type=”” animation_direction=”лево” animation_speed=”0.3″ animation_offset=””]https://www.globaltransmissionsupply.com/wp-content/uploads/Inverter-to-PEC-CAN-Backbone.png[/fusion_imageframe][/fusion_builder_column][/fusion_builder_row][/fusion_builder_container][fusion_builder_container hundred_percent=”no” hundred_percent_height=”no” hundred_percent_height_scroll=”no” hundred_percent_height_center_content=”yes” equal_height_columns=”no” menu_anchor=”” hide_on_mobile=”small-visibility,medium-visibility,large-visibility” status=”published” publish_date=”” class=”” id=”” background_color=”” background_image=”” background_position=”center center” background_repeat=”не-повторуваат” fade=”no” background_parallax=”никој” enable_mobile=”no” parallax_speed=”0.3″ video_mp4=”” video_webm=”” video_ogv=”” video_url=”” video_aspect_ratio=”16:9″ video_loop=”yes” video_mute=”yes” video_preview_image=”” border_size=”” border_color=”” border_style=”solid” margin_top=”” margin_bottom=”” padding_top=”” padding_right=”” padding_bottom=”” padding_left=””][fusion_builder_row][fusion_builder_column type=”1_1″ layout=”1_1″ spacing=”” center_content=”no” link=”” target=”_self” min_height=”” hide_on_mobile=”small-visibility,medium-visibility,large-visibility” class=”” id=”” background_color=”” background_image=”” background_image_id=”” background_position=”left top” background_repeat=”не-повторуваат” hover_type=”никој” border_size=”0″ border_color=”” border_style=”solid” border_position=”all” padding_top=”” padding_right=”” padding_bottom=”” padding_left=”” margin_top=”” margin_bottom=”” animation_type=”” animation_direction=”лево” animation_speed=”0.3″ animation_offset=”” last=”no”][fusion_modal name=”warnings_cautions” title=”Предупредувања & Предупредувања” size=”large” background=”” border_color=”” show_footer=”yes” class=”” id=””]опасност: Опасност покажува дека вие ќе биде сериозно повредени или убиени, ако не ги следат наведено постапка.
Предупредување: Предупредување укажува на непосредна опасност, што може да предизвика сериозни повреди ако не ги следат наведено постапка.
Внимание: ВНИМАНИЕ укажува на возилото или оштетување на имот може да се случи ако не ги следат наведено постапка.
Забелешка: Забелешка покажува дополнителни детали кои ќе помогнат во дијагнозата или поправка на компонента / систем.
Следат посебните постапки во означената цел да се избегнат повреди:
1. Ако шишарки на висок напон околу возилото и болест е инсталиран на ПЕК, единствената личност што треба да биде дозволено да се запали возилото е лицето кое го потпишаа болест таг.
2. Пред работат на возило или напуштање на кабината додека работи моторот, треба да се одржи на рачката на менувачот во "N" постави рачната сопирачка, и да го блокира тркалата.
3. Од безбедносни причини, секогаш се вклучат кочници пред изборот брзини од "Н"
4. Пред отпочнување на возилото секогаш се седи во седиштето на возачот, изберете "N" за контрола на промена, и го постави сопирачките на паркинг.
5. Во возилата со ePTO, на моторот и / или
Мотор / генератор може да почне во режим ePTO. Никогаш не се вршат какви било одржување или работат на возилото, додека во овој режим.
6. 12-Волт батерија позитивни (+) и негативни (-) мора да биде исклучен пред било заварување на било хибриден опремено возило.
Внимание: Следат посебните постапки во означената цел да се избегне опрема дефект или оштетување.
Внимание: Не ја отпуштите рачната сопирачка или да се обидете да изберете брзина додека воздушниот притисок е на правилно ниво.
Внимание: За да се избегне оштетување на пренос при влечење место рачката на менувачот во "N" и укинување на погонските тркала надвор од земјата и не исклучувајте го погонска група.
Висок напон Предупредувања & Предупредувања
- Користете CO2 или сув хемиски противпожарни апарати.
- жици на висок напон е покриена со портокал изолација или згрчена цевки и означени со предупредување етикети на конектори.
- Сите Eaton® хибриден дизел / Електрични возила ќе бидат означени со "Hybrid’ на надворешната страна на возилото, заедно со етикетата на промена на цртичка.
- Се однесуваат на OEM за одредена локација на шасијата монтирани хибридни компоненти.
- Не се намали во портокалова високонапонски кабли за.
- Не се намали или да се отвори во ПЕК.
- НЕ се сече или да се отвори на DC / DC конвертор.
- Не се намали или да се отвори во инверторски.
Заштитен појас мора да се постави и висок напон изолација гумени ракавици (класа 0 со кожа штитници) се потребни пред да работат на висок напон. Непочитувањето на овие упатства може да резултира со сериозни повреди или смрт.
гумени изолирани ракавици кои мора да се носат додека се работи на системот на висок напон се класа 0 со кожа штитници. гумени ракавици треба да се проверат пред секоја употреба следнава постапка гумени изолација ракавици тестирање се најде во "дијагностички алатки / услуга Публикации" на страница 6. Непочитувањето на овие упатства може да резултира со сериозни повреди или смрт.
Пред инспекција или работат на било високо-напонски кабли или компоненти на "висок напон служба исклучување и моќ-up постапка" на страница 4 треба да се следи. Непочитувањето на овие упатства може да резултира со сериозни повреди или смрт.
Уредите за болест и Tagout треба да се отстранат само со техничар кој поставени уредите болест и Tagout на возилото. Непочитувањето на овие упатства може да резултира со сериозни повреди или смрт.
Висок напон со изолација од гума ракавици (класа 0 со кожа штитници) мора да се носат кога се работи на било кој
кабли висок напон. "Услугата Исклучување висок напон и моќ-up постапка" на страница 4 мора да се следи пред отстранување на било високо-напонски кабли. Непочитувањето на овие упатства може да резултира со сериозни повреди или смрт.
Високонапонски кабли и жици се портокалови и да содржи предупредување етикета на конектори. компоненти висок напон се означени со етикета означени. Висок напон со изолација од гума ракавици (класа 0 со кожа штитници) мора да се користи кога се работи на било кој од овие компоненти. Непочитувањето на овие упатства може да резултира со сериозни повреди или смрт.
Висок напон услуги Исклучување процедури

1. Следи "висок напон работа област" постапка.
2. Лоцира црвено PEC услуги Вклучете го предниот дел на ПЕК и да се поттикнат да го исклучите.
3. Отстрани служба Switch Корица и да ја инсталирате на локаутот држач (J48506).
4. Прицврстете ознака на локаутот држач.
5. Префрли се обезбеди ПЕК сервис не може да се движи од надвор позиција.
6. Им овозможи на системот да се постави за минимум 5 минути за да се ослободи висок напон.
7. Поврзете ServiceRanger и да ја видите монитор PID на податоци 116 се нарекува "висок напон потенцијалот на батеријата." Употреба СФМ 520323 за J1939 врска "батеријата напон РБ" (реле кутија).
8. На напонот треба да биде 30 волти или помалку. Ако напонот е над 30 волти, не работат на возилото и контактирајте Eaton® на 1-800-826-HELP (4357).
9. Свртете го клучот во стартерот и продолжи да се поправи или чекор за смена на проблеми.
Забелешка: Напонот ќе падне на нула кога клучот е исклучен.
Висок напон служба моќ-up постапка
1. Ставете ги сите високо-напонски приклучоци во заклучена своите позиции.
2. Ако сте личност која работи на возилото, отстранување на локаутот конзола и ознака.
3. Инсталирај го на локаутот конзола во текот Switch сервисот.
4. Повлечете сервисот Switch надвор и нека сет возило за 2 минути.
5. Start vehicle when appropriate.[/fusion_modal][fusion_modal name=”component_location” title=”Eaton хибриден компоненти и конектори Локација ” size=”large” background=”#ffffff” border_color=”” show_footer=”yes” class=”” id=””]

[/fusion_modal][fusion_modal name=”component_location2″ title=”Eaton хибриден компоненти и конектори Локација MY09 системи” size=”large” background=”#ffffff” border_color=”” show_footer=”yes” class=”” id=””]

[/fusion_modal][/fusion_builder_column][/fusion_builder_row][/fusion_builder_container][fusion_builder_container hundred_percent=”no” hundred_percent_height=”no” hundred_percent_height_scroll=”no” hundred_percent_height_center_content=”yes” equal_height_columns=”no” menu_anchor=”” hide_on_mobile=”small-visibility,medium-visibility,large-visibility” status=”published” publish_date=”” class=”” id=”” background_color=”” background_image=”” background_position=”center center” background_repeat=”не-повторуваат” fade=”no” background_parallax=”никој” enable_mobile=”no” parallax_speed=”0.3″ video_mp4=”” video_webm=”” video_ogv=”” video_url=”” video_aspect_ratio=”16:9″ video_loop=”yes” video_mute=”yes” video_preview_image=”” border_size=”” border_color=”” border_style=”solid” margin_top=”” margin_bottom=”” padding_top=”” padding_right=”” padding_bottom=”” padding_left=””][fusion_builder_row][fusion_builder_column type=”1_1″ layout=”1_1″ spacing=”” center_content=”no” link=”” target=”_self” min_height=”” hide_on_mobile=”small-visibility,medium-visibility,large-visibility” class=”” id=”” background_color=”” background_image=”” background_image_id=”” background_position=”left top” background_repeat=”не-повторуваат” hover_type=”никој” border_size=”0″ border_color=”” border_style=”solid” border_position=”all” padding_top=”” padding_right=”” padding_bottom=”” padding_left=”” margin_top=”” margin_bottom=”” animation_type=”” animation_direction=”лево” animation_speed=”0.3″ animation_offset=”” last=”no”][fusion_content_boxes layout=”clean-horizontal” columns=”1″ title_size=”18px” heading_size=”3″ title_color=”#ffffff” body_color=”#ffffff” backgroundcolor=”#4f4f4f” icon=”” iconflip=”” iconrotate=”” iconspin=”no” iconcolor=”” icon_circle=”” icon_circle_radius=”” circlecolor=”” circlebordersize=”” circlebordercolor=”” outercirclebordersize=”” outercirclebordercolor=”” icon_size=”” icon_hover_type=”” hover_accent_color=”” image=”” image_id=”” image_width=”” image_height=”” link_type=”” button_span=”” link_area=”” link_target=”” icon_align=”лево” animation_type=”” animation_delay=”” animation_offset=”” animation_direction=”лево” animation_speed=”0.3″ margin_top=”” margin_bottom=”” hide_on_mobile=”small-visibility,medium-visibility,large-visibility” class=”” id=””][fusion_content_box title=”ЧЕКОР 1. Провери за активен или неактивен статус вина кодот и да го провери HCM конфигурации.” backgroundcolor=”” icon=”” iconflip=”” iconrotate=”” iconspin=”no” iconcolor=”” circlecolor=”” circlebordersize=”” circlebordercolor=”” outercirclebordersize=”” outercirclebordercolor=”” image=”” image_id=”” image_width=”” image_height=”” link=”” linktext=”Прочитај повеќе” link_target=”” animation_type=”” animation_direction=”лево” animation_speed=”0.3″ animation_offset=””]
- Обновете Активни кодовите и FMIs со ServiceRanger користење Приклучок за дијагностика на 9-начин или рачно.
- Изведување на електрични и хибридни електрични Тестирајте Тестирајте.
- Ако не се пронајдени прашања за време или електричен тест, одете на чекор 2.
- Ако е во прашање бил поправен во текот или електричен тест, одете на чекор 10.
[/fusion_content_box][/fusion_content_boxes][fusion_content_boxes layout=”clean-horizontal” columns=”1″ title_size=”18px” heading_size=”3″ title_color=”#ffffff” body_color=”#ffffff” backgroundcolor=”#4f4f4f” icon=”” iconflip=”” iconrotate=”” iconspin=”no” iconcolor=”” icon_circle=”” icon_circle_radius=”” circlecolor=”” circlebordersize=”” circlebordercolor=”” outercirclebordersize=”” outercirclebordercolor=”” icon_size=”” icon_hover_type=”” hover_accent_color=”” image=”” image_id=”” image_width=”” image_height=”” link_type=”” button_span=”” link_area=”” link_target=”” icon_align=”лево” animation_type=”” animation_delay=”” animation_offset=”” animation_direction=”лево” animation_speed=”0.3″ margin_top=”” margin_bottom=”” hide_on_mobile=”small-visibility,medium-visibility,large-visibility” class=”” id=””][fusion_content_box title=”ЧЕКОР 2. Потврди континуитет на PEC кола.” backgroundcolor=”” icon=”” iconflip=”” iconrotate=”” iconspin=”no” iconcolor=”” circlecolor=”” circlebordersize=”” circlebordercolor=”” outercirclebordersize=”” outercirclebordercolor=”” image=”” image_id=”” image_width=”” image_height=”” link=”” linktext=”Прочитај повеќе” link_target=”” animation_type=”” animation_direction=”лево” animation_speed=”0.3″ animation_offset=””]
- клучни надвор.
опасност: види Висок напон служба исклучување и моќ-up постапка. Следете ја постапката за да се избегне шок, изгори или смрт од ракува неправилно висок напон. - Прекини PEC 19-Way конектори.
- Мерење на отпор на ППЕ 19-Way OEM жица темперамент Конектор игла 1 и Пин 2:
Забелешка: Бидете сигурни дека волти / оми метар е на соодветно ниво (околу 200 оми скала).- Ако отпорност помеѓу Пин 1 и Пин 2 е помеѓу 50-70 оми, одете на чекор 3.
- Ако отпорот е надвор од опсегот, одете на чекор 7.
[/fusion_content_box][/fusion_content_boxes][fusion_content_boxes layout=”clean-horizontal” columns=”1″ title_size=”18px” heading_size=”3″ title_color=”#ffffff” body_color=”#ffffff” backgroundcolor=”#4f4f4f” icon=”” iconflip=”” iconrotate=”” iconspin=”no” iconcolor=”” icon_circle=”” icon_circle_radius=”” circlecolor=”” circlebordersize=”” circlebordercolor=”” outercirclebordersize=”” outercirclebordercolor=”” icon_size=”” icon_hover_type=”” hover_accent_color=”” image=”” image_id=”” image_width=”” image_height=”” link_type=”” button_span=”” link_area=”” link_target=”” icon_align=”лево” animation_type=”” animation_delay=”” animation_offset=”” animation_direction=”лево” animation_speed=”0.3″ margin_top=”” margin_bottom=”” hide_on_mobile=”small-visibility,medium-visibility,large-visibility” class=”” id=””][fusion_content_box title=”ЧЕКОР 3. Потврди CAN коло за кратко да земјата.” backgroundcolor=”” icon=”” iconflip=”” iconrotate=”” iconspin=”no” iconcolor=”” circlecolor=”” circlebordersize=”” circlebordercolor=”” outercirclebordersize=”” outercirclebordercolor=”” image=”” image_id=”” image_width=”” image_height=”” link=”” linktext=”Прочитај повеќе” link_target=”” animation_type=”” animation_direction=”лево” animation_speed=”0.3″ animation_offset=””]
- Мерење отпорност помеѓу PEC 19-Way OEM жица темперамент Конектор игла 1 и земјата и меѓу Пин 2 и земјата:
- Ако која било отпор е 0-100 оми, поправка ОЕМ ожичување коло. одете на чекор 10.
- Ако двете отпори се 7k оми, одете на чекор 4.
[/fusion_content_box][/fusion_content_boxes][fusion_content_boxes layout=”clean-horizontal” columns=”1″ title_size=”18px” heading_size=”3″ title_color=”#ffffff” body_color=”#ffffff” backgroundcolor=”#4f4f4f” icon=”” iconflip=”” iconrotate=”” iconspin=”no” iconcolor=”” icon_circle=”” icon_circle_radius=”” circlecolor=”” circlebordersize=”” circlebordercolor=”” outercirclebordersize=”” outercirclebordercolor=”” icon_size=”” icon_hover_type=”” hover_accent_color=”” image=”” image_id=”” image_width=”” image_height=”” link_type=”” button_span=”” link_area=”” link_target=”” icon_align=”лево” animation_type=”” animation_delay=”” animation_offset=”” animation_direction=”лево” animation_speed=”0.3″ margin_top=”” margin_bottom=”” hide_on_mobile=”small-visibility,medium-visibility,large-visibility” class=”” id=””][fusion_content_box title=”ЧЕКОР 4. Потврди CAN е населен во правилна Конектор игла.” backgroundcolor=”” icon=”” iconflip=”” iconrotate=”” iconspin=”” iconcolor=”” circlecolor=”” circlebordersize=”” circlebordercolor=”” outercirclebordersize=”” outercirclebordercolor=”” image=”” image_id=”” image_width=”” image_height=”” link=”” linktext=”” link_target=”” animation_type=”” animation_direction=”лево” animation_speed=”0.3″ animation_offset=””]
- Мерење отпорност помеѓу PEC 19-Way Конектор игла 1 инвертер и 40-Пат Конектор игла 4:
- Ако отпорот е 0-0,3 оми, одете на чекор 5.
- Ако отпорот е 60 оми, поправка може Вмрежувањето (Здраво и ниски се жичен во ред), потоа одете на чекор 10.
[/fusion_content_box][/fusion_content_boxes][fusion_content_boxes layout=”clean-horizontal” columns=”1″ title_size=”18px” heading_size=”3″ title_color=”#ffffff” body_color=”#ffffff” backgroundcolor=”#4f4f4f” icon=”” iconflip=”” iconrotate=”” iconspin=”no” iconcolor=”” icon_circle=”” icon_circle_radius=”” circlecolor=”” circlebordersize=”” circlebordercolor=”” outercirclebordersize=”” outercirclebordercolor=”” icon_size=”” icon_hover_type=”” hover_accent_color=”” image=”” image_id=”” image_width=”” image_height=”” link_type=”” button_span=”” link_area=”” link_target=”” icon_align=”лево” animation_type=”” animation_delay=”” animation_offset=”” animation_direction=”лево” animation_speed=”0.3″ margin_top=”” margin_bottom=”” hide_on_mobile=”small-visibility,medium-visibility,large-visibility” class=”” id=””][fusion_content_box title=”ЧЕКОР 5. Потврди моќ и земјата да се PEC.” backgroundcolor=”” icon=”” iconflip=”” iconrotate=”” iconspin=”” iconcolor=”” circlecolor=”” circlebordersize=”” circlebordercolor=”” outercirclebordersize=”” outercirclebordercolor=”” image=”” image_id=”” image_width=”” image_height=”” link=”” linktext=”” link_target=”” animation_type=”” animation_direction=”лево” animation_speed=”0.3″ animation_offset=””]
- Реинсталирај 40-Way конектор на Инвертер.
- копчето на.
- Measure for voltage on PEC 19-Way OEM Wire Harness Connector Pins 6 и 7:
- Ако игли 6 и 7 have battery voltage (12 волти +/ – 1.2 волти), замени PEC, потоа одете на чекор 10.
- Ако игли 6 и 7 немаат напон или помалку од 1.2 волти на батеријата напон, одете на чекор 6.
[/fusion_content_box][/fusion_content_boxes][fusion_content_boxes layout=”clean-horizontal” columns=”1″ title_size=”18px” heading_size=”3″ title_color=”#ffffff” body_color=”#ffffff” backgroundcolor=”#4f4f4f” icon=”” iconflip=”” iconrotate=”” iconspin=”no” iconcolor=”” icon_circle=”” icon_circle_radius=”” circlecolor=”” circlebordersize=”” circlebordercolor=”” outercirclebordersize=”” outercirclebordercolor=”” icon_size=”” icon_hover_type=”” hover_accent_color=”” image=”” image_id=”” image_width=”” image_height=”” link_type=”” button_span=”” link_area=”” link_target=”” icon_align=”лево” animation_type=”” animation_delay=”” animation_offset=”” animation_direction=”лево” animation_speed=”0.3″ margin_top=”” margin_bottom=”” hide_on_mobile=”small-visibility,medium-visibility,large-visibility” class=”” id=””][fusion_content_box title=”ЧЕКОР 6. Потврди континуитет помеѓу инвертер и PEC.” backgroundcolor=”” icon=”” iconflip=”” iconrotate=”” iconspin=”” iconcolor=”” circlecolor=”” circlebordersize=”” circlebordercolor=”” outercirclebordersize=”” outercirclebordercolor=”” image=”” image_id=”” image_width=”” image_height=”” link=”” linktext=”” link_target=”” animation_type=”” animation_direction=”лево” animation_speed=”0.3″ animation_offset=””]
- клучни надвор.
- Отстрани Инвертер 40-Way конектори.
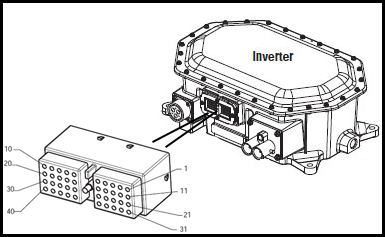
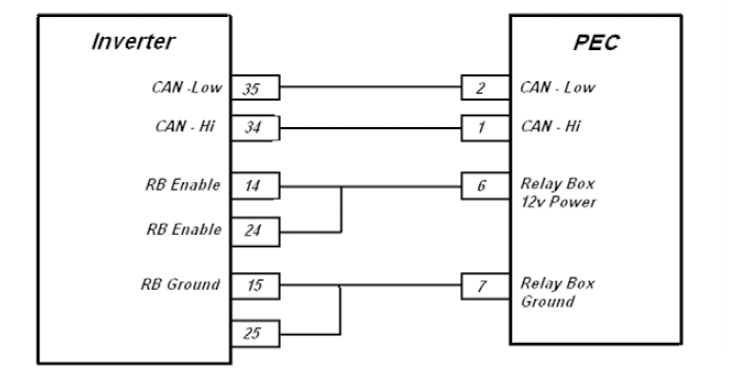
- Мерење на отпор на ОЕМ 40-Way Инвертер Конектор игла 14 за OEM 19-Way PEC Конектор игла 6 инвертер и конектори Пин 15 во Пеќ Конектор игла 7:
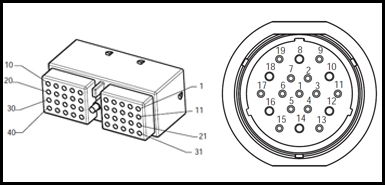
- Ако отпор од игла 14 да се утврди 6 е 0-0,3 оми, и отпор од игла 15 да се утврди 7 е 0-0,3 оми (исто така, проверете терминал тензија на игли), замени Инвертер, потоа одете на чекор 7.
?? Ако отпорот е OL или надвор од опсегот, поправка OEM жица темперамент меѓу Инвертер и PEC, потоа одете на чекор 10.
- Ако отпор од игла 14 да се утврди 6 е 0-0,3 оми, и отпор од игла 15 да се утврди 7 е 0-0,3 оми (исто така, проверете терминал тензија на игли), замени Инвертер, потоа одете на чекор 7.
[/fusion_content_box][/fusion_content_boxes][fusion_content_boxes layout=”clean-horizontal” columns=”1″ title_size=”18px” heading_size=”3″ title_color=”#ffffff” body_color=”#ffffff” backgroundcolor=”#4f4f4f” icon=”” iconflip=”” iconrotate=”” iconspin=”no” iconcolor=”” icon_circle=”” icon_circle_radius=”” circlecolor=”” circlebordersize=”” circlebordercolor=”” outercirclebordersize=”” outercirclebordercolor=”” icon_size=”” icon_hover_type=”” hover_accent_color=”” image=”” image_id=”” image_width=”” image_height=”” link_type=”” button_span=”” link_area=”” link_target=”” icon_align=”лево” animation_type=”” animation_delay=”” animation_offset=”” animation_direction=”лево” animation_speed=”0.3″ margin_top=”” margin_bottom=”” hide_on_mobile=”small-visibility,medium-visibility,large-visibility” class=”” id=””][fusion_content_box title=”ЧЕКОР 7. Потврди може во ПЕК со Инвертер.” backgroundcolor=”” icon=”” iconflip=”” iconrotate=”” iconspin=”” iconcolor=”” circlecolor=”” circlebordersize=”” circlebordercolor=”” outercirclebordersize=”” outercirclebordercolor=”” image=”” image_id=”” image_width=”” image_height=”” link=”” linktext=”” link_target=”” animation_type=”” animation_direction=”лево” animation_speed=”0.3″ animation_offset=””]
- клучни надвор.
- Отстрани Инвертер 40-Way конектори.

- Проверете OEM Инвертер Конектор за игли 34 и 35. Ако нема иглички се населени во конектор, CAN комуникација ПЕК оди на CAN 'рбетот, не инверторски:
- Ако Пин 34 и Пин 35 не се населени, одете на чекор 9.
- Ако OEM Инвертер конектор игли 34 и 35, одете на чекор 8.
[/fusion_content_box][/fusion_content_boxes][fusion_content_boxes layout=”clean-horizontal” columns=”1″ title_size=”18px” heading_size=”3″ title_color=”#ffffff” body_color=”#ffffff” backgroundcolor=”#4f4f4f” icon=”” iconflip=”” iconrotate=”” iconspin=”no” iconcolor=”” icon_circle=”” icon_circle_radius=”” circlecolor=”” circlebordersize=”” circlebordercolor=”” outercirclebordersize=”” outercirclebordercolor=”” icon_size=”” icon_hover_type=”” hover_accent_color=”” image=”” image_id=”” image_width=”” image_height=”” link_type=”” button_span=”” link_area=”” link_target=”” icon_align=”лево” animation_type=”” animation_delay=”” animation_offset=”” animation_direction=”лево” animation_speed=”0.3″ margin_top=”” margin_bottom=”” hide_on_mobile=”small-visibility,medium-visibility,large-visibility” class=”” id=””][fusion_content_box title=”ЧЕКОР 8. Потврди континуитет помеѓу Инвертер кола и PEC кола.” backgroundcolor=”” icon=”” iconflip=”” iconrotate=”” iconspin=”” iconcolor=”” circlecolor=”” circlebordersize=”” circlebordercolor=”” outercirclebordersize=”” outercirclebordercolor=”” image=”” image_id=”” image_width=”” image_height=”” link=”” linktext=”” link_target=”” animation_type=”” animation_direction=”лево” animation_speed=”0.3″ animation_offset=””]
- Мерење отпорност помеѓу Инвертер 40-Пат Конектор игла 34 и OEM 19-Way PEC Конектор игла 1 инвертер и 40-Пат Конектор игла 35 и PEC 19-Way Конектор игла 2:
Забелешка: Бидете сигурни дека волти / оми метар е на соодветно ниво (околу 200 оми скала)
- Ако отпорност помеѓу Пин 34 и Пин 1 е помеѓу 0-0,3 оми, и отпорност помеѓу игла 35 и Пин 2 е помеѓу 0-0,3 оми, замени Инвертер. Види MY09 Инвертер отстранување и инсталација), потоа одете на чекор 10.
- Ако отпорот е OL или надвор од опсегот, поправка OEM жица темперамент меѓу Инвертер и PEC, потоа одете на чекор 10.
[/fusion_content_box][/fusion_content_boxes][fusion_content_boxes layout=”clean-horizontal” columns=”1″ title_size=”18px” heading_size=”3″ title_color=”#ffffff” body_color=”#ffffff” backgroundcolor=”#4f4f4f” icon=”” iconflip=”” iconrotate=”” iconspin=”no” iconcolor=”” icon_circle=”” icon_circle_radius=”” circlecolor=”” circlebordersize=”” circlebordercolor=”” outercirclebordersize=”” outercirclebordercolor=”” icon_size=”” icon_hover_type=”” hover_accent_color=”” image=”” image_id=”” image_width=”” image_height=”” link_type=”” button_span=”” link_area=”” link_target=”” icon_align=”лево” animation_type=”” animation_delay=”” animation_offset=”” animation_direction=”лево” animation_speed=”0.3″ margin_top=”” margin_bottom=”” hide_on_mobile=”small-visibility,medium-visibility,large-visibility” class=”” id=””][fusion_content_box title=”ЧЕКОР 9. Потврди континуитет помеѓу PEC може и CAN 'рбетот.” backgroundcolor=”” icon=”” iconflip=”” iconrotate=”” iconspin=”” iconcolor=”” circlecolor=”” circlebordersize=”” circlebordercolor=”” outercirclebordersize=”” outercirclebordercolor=”” image=”” image_id=”” image_width=”” image_height=”” link=”” linktext=”” link_target=”” animation_type=”” animation_direction=”лево” animation_speed=”0.3″ animation_offset=””]
- Ако инвертер 40-пински конектор нема игли 34 и 35 населени потоа CAN комуникација гранка на 19-Way конектор на ПЕК на е жичен директно CAN 'рбетот:
- Поправка OEM жица темперамент меѓу ППЕ и CAN комуникација 'рбетот, потоа одете на чекор 10.
[/fusion_content_box][/fusion_content_boxes][fusion_content_boxes layout=”clean-horizontal” columns=”1″ title_size=”18px” heading_size=”3″ title_color=”#ffffff” body_color=”#ffffff” backgroundcolor=”#4f4f4f” icon=”” iconflip=”” iconrotate=”” iconspin=”no” iconcolor=”” icon_circle=”” icon_circle_radius=”” circlecolor=”” circlebordersize=”” circlebordercolor=”” outercirclebordersize=”” outercirclebordercolor=”” icon_size=”” icon_hover_type=”” hover_accent_color=”#f41000″ image=”” image_id=”” image_width=”” image_height=”” link_type=”” button_span=”” link_area=”” link_target=”” icon_align=”лево” animation_type=”” animation_delay=”” animation_offset=”” animation_direction=”лево” animation_speed=”0.3″ margin_top=”” margin_bottom=”” hide_on_mobile=”small-visibility,medium-visibility,large-visibility” class=”” id=””][fusion_content_box title=”ЧЕКОР 10. потврди поправка.” backgroundcolor=”” icon=”” iconflip=”” iconrotate=”” iconspin=”no” iconcolor=”” circlecolor=”” circlebordersize=”” circlebordercolor=”” outercirclebordersize=”” outercirclebordercolor=”” image=”” image_id=”” image_width=”” image_height=”” link=”” linktext=”Прочитај повеќе” link_target=”” animation_type=”” animation_direction=”лево” animation_speed=”0.3″ animation_offset=””]
- клучни надвор.
- Повторно поврзете сите кабли и негативен кабел на батеријата.
- копчето на.
- Отстрани кодови, види Отстрани Неактивен грешки.
- Возете го возилото и да се обиде да го ресетирате код.
- Проверете за кодови, види Види ги активните и неактивните грешки.
- Ако не кодови, тестот е завршен.
- Ако вина законик 89 се појавува, најдете грешка во тестирањето, одете на чекор 1.
- Ако код, освен 89 се појавува, види Дефект Листа Код индекс.
[/fusion_content_box][/fusion_content_boxes][/fusion_builder_column][/fusion_builder_row][/fusion_builder_container][fusion_global id=”13788″]