[fusion_builder_container hundred_percent=yeshundred_percent_height=nohundred_percent_height_scroll=nohundred_percent_height_center_content=yesequal_height_columns=nomenu_anchor=”” hide_on_mobile=small-visibility,medium-visibility,large-visibilitystatus=publishedpublish_date=”” class=”” id=”” background_color=”” background_image=”” background_position=center centerbackground_repeat=no-repeatfade=nobackground_parallax=noneenable_mobile=noparallax_speed=”0.3″ video_mp4=”” video_webm=”” video_ogv=”” video_url=”” video_aspect_ratio=”16:9″ video_loop=yesvideo_mute=yesvideo_preview_image=”” border_size=”” border_color=”” border_style=solidmargin_top=”35″ margin_bottom=”” padding_top=”” padding_right=”” padding_bottom=”” padding_left=””][fusion_builder_row][fusion_builder_column type=”1_1layout=”1_1spacing=”” center_content=nolink=”” target=_selfmin_height=”” hide_on_mobile=small-visibility,medium-visibility,large-visibilityclass=”” id=”” background_color=”” background_image=”” background_image_id=”” background_position=left topbackground_repeat=no-repeathover_type=noneborder_size=”0″ border_color=”” border_style=solidborder_position=allpadding_top=”” padding_right=”” padding_bottom=”” padding_left=”” margin_top=”” margin_bottom=”” animation_type=”” animation_direction=leftanimation_speed=”0.3″ animation_offset=”” last=no”][fusion_text columns=”” column_min_width=”” column_spacing=”” rule_style=defaultrule_size=”” rule_color=”” hide_on_mobile=small-visibility,medium-visibility,large-visibilityclass=”” id=””]

イートンフラーハイブリッドフォルトコード 2 モーター / 発電機の温度センサー

[/fusion_text][/fusion_builder_column][/fusion_builder_row][/fusion_builder_container][fusion_builder_container hundred_percent=nohundred_percent_height=nohundred_percent_height_scroll=nohundred_percent_height_center_content=yesequal_height_columns=nomenu_anchor=”” hide_on_mobile=small-visibility,medium-visibility,large-visibilitystatus=publishedpublish_date=”” class=”” id=”” background_color=”” background_image=”” background_position=center centerbackground_repeat=no-repeatfade=nobackground_parallax=noneenable_mobile=noparallax_speed=”0.3″ video_mp4=”” video_webm=”” video_ogv=”” video_url=”” video_aspect_ratio=”16:9″ video_loop=yesvideo_mute=yesvideo_preview_image=”” border_size=”” border_color=”” border_style=solidmargin_top=”” margin_bottom=”” padding_top=”” padding_right=”” padding_bottom=”” padding_left=””][fusion_builder_row][fusion_builder_column type=”1_1layout=”1_1spacing=”” center_content=nolink=”” target=_selfmin_height=”” hide_on_mobile=small-visibility,medium-visibility,large-visibilityclass=”” id=”” background_color=”” background_image=”” background_image_id=”” background_position=left topbackground_repeat=no-repeathover_type=noneborder_size=”0″ border_color=”” border_style=solidborder_position=allpadding_top=”” padding_right=”” padding_bottom=”” padding_left=”” margin_top=”” margin_bottom=”” animation_type=”” animation_direction=leftanimation_speed=”0.3″ animation_offset=”” last=no”][fusion_text columns=”” column_min_width=”” column_spacing=”” rule_style=defaultrule_size=”” rule_color=”” hide_on_mobile=small-visibility,medium-visibility,large-visibilityclass=”” id=””]

イートンハイブリッド駆動システムのモデルEH-8E406A-U / P用のコードを障害, EH-8E406A-UP, EH-8E406A-UPG, EH-8E406A-CD, EH-8E406A-CDG, EH-8E406A-CDR, EH-8E406A-T, EH-6E706B-CD, EH-6E706B-PとEH-6E706B-UPG. コントローラエリアネットワーク (できる) 一つに高速ツイストペア500K独自のデータリンクであります 120 リンクの両端にあるオームの抵抗. ハイブリッド制御モジュール (HCM) 38ウェイコネクタでCANデータリンクに接続されています. このリンクは、HCMに情報を送信するだけでなく、通信や電気クラッチアクチュエータのようなネットワーク上の他のモジュールからデータを受信するために使用されます (ECA).

コードの障害 19 – ECAメッセージ障害は、CAN (HCM) 検出

システムが障害を検出する前に、次の前提条件が満たされなければなりません:

  • HCM点火電圧よりも大きいです 7 ボルト未満 16 ボルト.
  • HCM CAN通信リンク障害がアクティブではありません.

活断層コードを設定するための条件

  • 国際通貨基金 9: HCMは、ECAデータの受信に失敗したときに設定します (例えば, クラッチ位置) 少なくとも用 30 連続したメッセージ, そしてそれはまだCAN上の他のモジュールと通信しています.
  • 国際通貨基金 2: 唯一のPDMでのアクティブおよびHCMを受信しない場合に設定されています 3 ECAからの連続したメッセージ.

フォールバックするとフォルトコード 19 以下の条件が発生しています:

  • レッド「ストップハイブリッド」ライトディスプレイ.
  • 障害は、HCMのメモリに記憶されています.
  • 動作モードは、オートシフトモードのみに変更します.
  • 障害は、電源投入時に設定した場合, エンジンは、クランクはありません.
  • 電動モータ/発電機支援し、再生が無効になっています; しかしながら, 高電圧リレーはパワード残ります.
  • 運転中に故障が発生した場合, ECAは、現在のクラッチ位置を維持するか、またはHCMによって指令最後の位置に移動しますか.
  • 送信のデフォルトは第一に、ギアを開始します.

[/fusion_text][fusion_text columns=”” column_min_width=”” column_spacing=”” rule_style=defaultrule_size=”” rule_color=”” hide_on_mobile=small-visibility,medium-visibility,large-visibilityclass=”” id=””]

この障害コードは、次のいずれかが原因で発生することができ:

  • 国際通貨基金 9, 2
    • CANデータリンク
    • ECAへの電源が入っていませんか地面
    • ECA

[/fusion_text][/fusion_builder_column][/fusion_builder_row][/fusion_builder_container][fusion_builder_container hundred_percent=nohundred_percent_height=nohundred_percent_height_scroll=nohundred_percent_height_center_content=yesequal_height_columns=nomenu_anchor=”” hide_on_mobile=small-visibility,medium-visibility,large-visibilitystatus=publishedpublish_date=”” class=”” id=”” background_color=”” background_image=”” background_position=center centerbackground_repeat=no-repeatfade=nobackground_parallax=noneenable_mobile=noparallax_speed=”0.3″ video_mp4=”” video_webm=”” video_ogv=”” video_url=”” video_aspect_ratio=”16:9″ video_loop=yesvideo_mute=yesvideo_preview_image=”” border_size=”” border_color=”” border_style=solidmargin_top=”” margin_bottom=”” padding_top=”” padding_right=”” padding_bottom=”” padding_left=””][fusion_builder_row][fusion_builder_column type=”1_1layout=”1_1spacing=”” center_content=nolink=”” target=_selfmin_height=”” hide_on_mobile=small-visibility,medium-visibility,large-visibilityclass=”” id=”” background_color=”” background_image=”” background_image_id=”” background_position=left topbackground_repeat=no-repeathover_type=noneborder_size=”0″ border_color=”” border_style=solidborder_position=allpadding_top=”” padding_right=”” padding_bottom=”” padding_left=”” margin_top=”” margin_bottom=”” animation_type=”” animation_direction=leftanimation_speed=”0.3″ animation_offset=”” last=no”][fusion_text columns=”” column_min_width=”” column_spacing=”” rule_style=defaultrule_size=”” rule_color=”” hide_on_mobile=small-visibility,medium-visibility,large-visibilityclass=”” id=””]

コードの障害 19 – ECAメッセージ障害は、CAN (HCM) テスト

[/fusion_text][/fusion_builder_column][/fusion_builder_row][/fusion_builder_container][fusion_builder_container hundred_percent=nohundred_percent_height=nohundred_percent_height_scroll=nohundred_percent_height_center_content=yesequal_height_columns=nomenu_anchor=”” hide_on_mobile=small-visibility,medium-visibility,large-visibilitystatus=publishedpublish_date=”” class=”” id=”” background_color=”” background_image=”” background_position=center centerbackground_repeat=no-repeatfade=nobackground_parallax=noneenable_mobile=noparallax_speed=”0.3″ video_mp4=”” video_webm=”” video_ogv=”” video_url=”” video_aspect_ratio=”16:9″ video_loop=yesvideo_mute=yesvideo_preview_image=”” border_size=”” border_color=”” border_style=solidmargin_top=”” margin_bottom=”” padding_top=”” padding_right=”” padding_bottom=”” padding_left=””][fusion_builder_row][fusion_builder_column type=”1_1layout=”1_1spacing=”” center_content=nolink=”” target=_selfmin_height=”” hide_on_mobile=small-visibility,medium-visibility,large-visibilityclass=”” id=”” background_color=”” background_image=”” background_image_id=”” background_position=left topbackground_repeat=no-repeathover_type=noneborder_size=”0″ border_color=”” border_style=solidborder_position=allpadding_top=”” padding_right=”” padding_bottom=”” padding_left=”” margin_top=”” margin_bottom=”” animation_type=”” animation_direction=leftanimation_speed=”0.3″ animation_offset=”” last=no”][fusion_text columns=”” column_min_width=”” column_spacing=”” rule_style=defaultrule_size=”” rule_color=”” hide_on_mobile=small-visibility,medium-visibility,large-visibilityclass=”” id=””]

コンポーネントの識別:

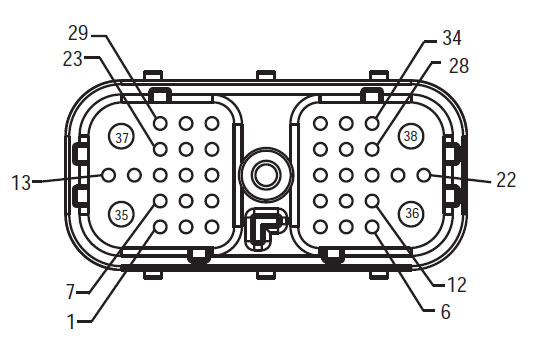
[/fusion_text][/fusion_builder_column][fusion_builder_column type=”2_3layout=”1_2spacing=”” center_content=nolink=”” target=_selfmin_height=”” hide_on_mobile=small-visibility,medium-visibility,large-visibilityclass=”” id=”” background_color=”” background_image=”” background_image_id=”” background_position=left topbackground_repeat=no-repeathover_type=noneborder_size=”0″ border_color=”” border_style=solidborder_position=allpadding_top=”” padding_right=”” padding_bottom=”” padding_left=”” margin_top=”” margin_bottom=”” animation_type=”” animation_direction=leftanimation_speed=”0.3″ animation_offset=”” last=no”][fusion_imageframe image_id=”14061|fullmax_width=”” style_type=”” blur=”” stylecolor=”” hover_type=nonebordersize=”” bordercolor=”” borderradius=”” align=centerlightbox=nogallery_id=”” lightbox_image=”” lightbox_image_id=”” alt=”ハーネス正面 (HCM – 車両インターフェースコネクタ) フラー伝送” link=”” linktarget=_selfhide_on_mobile=small-visibility,medium-visibility,large-visibilityclass=”” id=”” animation_type=”” animation_direction=leftanimation_speed=”0.3″ animation_offset=””]https://www.globaltransmissionsupply.com/wp-content/uploads/Fuller-Front-Harness-View-HCM.jpg[/fusion_imageframe][fusion_text columns=”” column_min_width=”” column_spacing=”” rule_style=defaultrule_size=”” rule_color=”” hide_on_mobile=small-visibility,medium-visibility,large-visibilityclass=”” id=””]

ハーネス正面
(HCM – 車両インターフェースコネクタ)

[/fusion_text][/fusion_builder_column][fusion_builder_column type=”1_3layout=”1_2spacing=”” center_content=nolink=”” target=_selfmin_height=”” hide_on_mobile=small-visibility,medium-visibility,large-visibilityclass=”” id=”” background_color=”” background_image=”” background_image_id=”” background_position=left topbackground_repeat=no-repeathover_type=noneborder_size=”0″ border_color=”” border_style=solidborder_position=allpadding_top=”” padding_right=”” padding_bottom=”” padding_left=”” margin_top=”” margin_bottom=”” animation_type=”” animation_direction=leftanimation_speed=”0.3″ animation_offset=”” last=no”][fusion_imageframe image_id=”14146|fullmax_width=”” style_type=”” blur=”” stylecolor=”” hover_type=nonebordersize=”” bordercolor=”” borderradius=”” align=centerlightbox=nogallery_id=”” lightbox_image=”” lightbox_image_id=”” alt=”ECA 8ウェイコネクタ” link=”” linktarget=_selfhide_on_mobile=small-visibility,medium-visibility,large-visibilityclass=”” id=”” animation_type=”” animation_direction=leftanimation_speed=”0.3″ animation_offset=””]https://www.globaltransmissionsupply.com/wp-content/uploads/Fuller-ECA-8-Way-Harness-Connector.jpg[/fusion_imageframe][fusion_text columns=”” column_min_width=”” column_spacing=”” rule_style=defaultrule_size=”” rule_color=”” hide_on_mobile=small-visibility,medium-visibility,large-visibilityclass=”” id=””]

ECA 8ウェイコネクタ

[/fusion_text][/fusion_builder_column][fusion_builder_column type=”1_1layout=”1_1spacing=”” center_content=nolink=”” target=_selfmin_height=”” hide_on_mobile=small-visibility,medium-visibility,large-visibilityclass=”” id=”” background_image_id=”” background_color=”#000000″ background_image=”” background_position=left topundefined=”” background_repeat=no-repeathover_type=noneborder_size=”0″ border_color=”” border_style=solidborder_position=allpadding_top=”” padding_right=”” padding_bottom=”” padding_left=”” margin_top=”” margin_bottom=”” animation_type=”” animation_direction=leftanimation_speed=”0.3″ animation_offset=”” last=no”][fusion_text columns=”” column_min_width=”” column_spacing=”” rule_style=defaultrule_size=”” rule_color=”” hide_on_mobile=small-visibility,medium-visibility,large-visibilityclass=”” id=””]

注意: を参照してください。 イートンハイブリッドコンポーネントおよびコネクタの位置 コネクタの位置については、.

[/fusion_text][/fusion_builder_column][fusion_builder_column type=”1_1layout=”1_1spacing=”” center_content=nolink=”” target=_selfmin_height=”” hide_on_mobile=small-visibility,medium-visibility,large-visibilityclass=”” id=”” background_color=”” background_image=”” background_image_id=”” background_position=left topbackground_repeat=no-repeathover_type=noneborder_size=”0″ border_color=”” border_style=solidborder_position=allpadding_top=”” padding_right=”” padding_bottom=”” padding_left=”” margin_top=”” margin_bottom=”” animation_type=”” animation_direction=leftanimation_speed=”0.3″ animation_offset=”” last=no”][fusion_imageframe image_id=”14153|800″ max_width=”” style_type=”” blur=”” stylecolor=”” hover_type=nonebordersize=”” bordercolor=”” borderradius=”” align=centerlightbox=nogallery_id=”” lightbox_image=”” lightbox_image_id=”” alt=”イートンフラーHCM ECA接続” link=”” linktarget=_selfhide_on_mobile=small-visibility,medium-visibility,large-visibilityclass=”” id=”” animation_type=”” animation_direction=leftanimation_speed=”0.3″ animation_offset=””]https://www.globaltransmissionsupply.com/wp-content/uploads/Eaton-Fuller-HCM-ECA-Connection-800×272.jpg[/fusion_imageframe][/fusion_builder_column][/fusion_builder_row][/fusion_builder_container][fusion_builder_container hundred_percent=nohundred_percent_height=nohundred_percent_height_scroll=nohundred_percent_height_center_content=yesequal_height_columns=nomenu_anchor=”” hide_on_mobile=small-visibility,medium-visibility,large-visibilitystatus=publishedpublish_date=”” class=”” id=”” background_color=”” background_image=”” background_position=center centerbackground_repeat=no-repeatfade=nobackground_parallax=noneenable_mobile=noparallax_speed=”0.3″ video_mp4=”” video_webm=”” video_ogv=”” video_url=”” video_aspect_ratio=”16:9″ video_loop=yesvideo_mute=yesvideo_preview_image=”” border_size=”” border_color=”” border_style=solidmargin_top=”” margin_bottom=”” padding_top=”” padding_right=”” padding_bottom=”” padding_left=””][fusion_builder_row][fusion_builder_column type=”1_1layout=”1_1spacing=”” center_content=nolink=”” target=_selfmin_height=”” hide_on_mobile=small-visibility,medium-visibility,large-visibilityclass=”” id=”” background_color=”” background_image=”” background_image_id=”” background_position=left topbackground_repeat=no-repeathover_type=noneborder_size=”0″ border_color=”” border_style=solidborder_position=allpadding_top=”” padding_right=”” padding_bottom=”” padding_left=”” margin_top=”” margin_bottom=”” animation_type=”” animation_direction=leftanimation_speed=”0.3″ animation_offset=”” last=no”][fusion_modal name=warnings_cautionstitle=”警告 & 注意事項” size=largebackground=”” border_color=”” show_footer=yesclass=”” id=””]危険: 危険は指示された手順に従わない場合は、重傷を負ったり殺されることを示します.
警告: 警告は、すぐに危険を示し、, あなたが示された手順に従わない場合には重大な人身事故につながる可能性があります.
あぶない: 注意は、あなたが示された手順に従わない場合は車両や物的損害が発生する可能性を示しています.

注意: 注コンポーネント/システムの診断又は修理に役立つ追加の詳細を示しています.

人身事故を避けるために、指示された順序で指定された手順に従ってください:

1. 高電圧コーンは、車両の周囲にあり、ロックアウトは、PECにインストールされている場合, 車両を発進させるべきである唯一の人はロックアウトタグに署名した人物であります.
2. 車両の作業やタクシーを出る前に、エンジンが実行されている間, あなたは、パーキングブレーキを設定し、「N」にシフトレバーを配置する必要があります, そして、車輪をブロックします.
3. 安全対策のため, 常に「N.」からギアポジションを選択する前に、サービスブレーキを従事
4. 必ず運転席に着席する車両を開始する前に, シフト制御の「N」を選択, そして、パーキングブレーキを設定.
5. EPTO付き車両で, エンジンおよび/または
モータ/発電機はEPTOモードで起動することができます. 車両のメンテナンスや作業を行うことはありません, このモード中.
6. 12-ボルトバッテリー正 (+) そして、負 (-) 任意のハイブリッド車両搭載上の任意の溶接前に切断されなければなりません.

あぶない: 機器の故障や破損を避けるために、指示された順序で指定された手順に従ってください.
あぶない: 空気圧が適正なレベルになるまで、パーキングブレーキを解除したり、ギアを選択しようとしないでください.
あぶない: 「N」にシフトレバーを場所を牽引時の伝送への損傷を避け、地面から駆動輪を持ち上げたり、ドライブラインを切断するには.

高電圧の警告 & 注意事項

  • CO2を使用するか、またはドライケミカル消火器.
  • 高電圧配線はオレンジ絶縁または複雑なチューブで覆われており、コネクタの警告ラベルが付いています.
  • すべてのEaton®ハイブリッドディーゼル/電気自動車は、「ハイブリッドマークされます’ 車両の外側に, ダッシュ上のシフトラベルと一緒に.
  • シャーシ搭載ハイブリッド部品の特定の場所のためにOEMを参照.
  • オレンジ色の高電圧ケーブルに切断しないでください.
  • PECをにカットしたり開いたりしないでください.
  • カットまたはDC / DCコンバータを開けないでください.
  • カットまたはインバータを開けないでください.

バッファゾーンを設定し、高電圧絶縁ゴム手袋されなければなりません (クラス 0 革プロテクター付き) 高電圧で作業する前に必要とされています. これらの指示に従わないと、重大な人身事故や死に至ることが.
高電圧システムで作業しながら、着用しなければならないゴム絶縁手袋はクラスであります 0 革プロテクター付き. ゴム手袋は、ページの「診断ツール/サービス出版物」で見つかったゴム製絶縁手袋の試験手順以下のEVERY使用する前にテストする必要があります 6. これらの指示に従わないと、重大な人身事故や死に至ることが.
ページの「高電圧サービスのシャットダウンとパワーアップ手順」を検査または任意の高電圧ケーブルやコンポーネントの作業を行う前に、 4 従うべきです. これらの指示に従わないと、重大な人身事故や死に至ることが.
ロックアウトとタグアウト装置は、車両にロックアウトとタグアウト装置を配置技術によって除去されなければなりません. これらの指示に従わないと、重大な人身事故や死に至ることが.
高電圧絶縁ゴム手袋 (クラス 0 革プロテクター付き) 任意の上で作業するときに着用しなければなりません
高電圧ケーブル. ページの「高電圧・サービスのシャットダウンとパワーアップ手順」 4 任意の高電圧ケーブルを除去する前に従わなければなりません. これらの指示に従わないと、重大な人身事故や死に至ることが.
高電圧ケーブルや配線がオレンジ色であり、コネクタの警告ラベルが含まれています. 高電圧部品は、ラベルが付いています. 高電圧絶縁ゴム手袋 (クラス 0 革プロテクター付き) これらのコンポーネントのいずれかで作業するときに使用する必要があります. これらの指示に従わないと、重大な人身事故や死に至ることが.

高電圧・サービスのシャットダウン手順

高電圧サービスのシャットダウンとパワーアップ手順1. 「高電圧ワークエリア」の手順に従ってください.
2. PECの前面にある赤いPECサービススイッチの位置を確認し、オフにプッシュします.
3. サービススイッチのカバーを外し、ロックアウトブラケットを取り付けます (J48506).
4. ロックアウトブラケットにタグを固定し.
5. PECサービススイッチがオフの位置から移動することはできません確認してください.
6. システムは最低に設定することを許可します 5 高電圧を放電する分.
7. ServiceRangerを接続し、データモニタPIDを表示 116 「高電圧バッテリポテンシャル」と呼ば使用SPN 520323 J1939接続用の「バッテリー電圧RB」 (リレーボックス).
8. 電圧はする必要があります 30 ボルト以下. 電圧は、上記の場合 30 ボルト, 車両に取り組み、1-800-826-HELPでEaton®接触していません (4357).
9. イグニッションキーをオフにし、修理やトラブルシューティングのステップに進みます.
注意: キーがオフのときの電圧がゼロに低下します.

高電圧サービスパワーアップ手順

1. 彼らのロックされた位置にすべての高電圧コネクタをインストールします。.
2. あなたがいる場合は人が車両に取り組んで, ロックアウトブラケットとタグを削除.
3. サービススイッチ上でロックアウトブラケットを再インストールします.
4. サービスを引っ張り出し切り替えて、車両がために設定しましょう 2 分.
5. Start vehicle when appropriate.[/fusion_modal][fusion_modal name=component_locationtitle=”イートンハイブリッドコンポーネントおよびコネクタの位置 ” size=largebackground=”#ffffffborder_color=”” show_footer=yesclass=”” id=””]

イートンハイブリッドコンポーネントおよびコネクタの位置MY08システム

[/fusion_modal][fusion_modal name=component_location2title=”イートンハイブリッドコンポーネントおよびコネクタの位置MY09システム” size=largebackground=”#ffffffborder_color=”” show_footer=yesclass=”” id=””]

イートンハイブリッドコンポーネントおよびコネクタの位置MY09システム

[/fusion_modal][/fusion_builder_column][/fusion_builder_row][/fusion_builder_container][fusion_builder_container hundred_percent=nohundred_percent_height=nohundred_percent_height_scroll=nohundred_percent_height_center_content=yesequal_height_columns=nomenu_anchor=”” hide_on_mobile=small-visibility,medium-visibility,large-visibilitystatus=publishedpublish_date=”” class=”” id=”” background_color=”” background_image=”” background_position=center centerbackground_repeat=no-repeatfade=nobackground_parallax=noneenable_mobile=noparallax_speed=”0.3″ video_mp4=”” video_webm=”” video_ogv=”” video_url=”” video_aspect_ratio=”16:9″ video_loop=yesvideo_mute=yesvideo_preview_image=”” border_size=”” border_color=”” border_style=solidmargin_top=”” margin_bottom=”” padding_top=”” padding_right=”” padding_bottom=”” padding_left=””][fusion_builder_row][fusion_builder_column type=”1_1layout=”1_1spacing=”” center_content=nolink=”” target=_selfmin_height=”” hide_on_mobile=small-visibility,medium-visibility,large-visibilityclass=”” id=”” background_color=”” background_image=”” background_image_id=”” background_position=left topbackground_repeat=no-repeathover_type=noneborder_size=”0″ border_color=”” border_style=solidborder_position=allpadding_top=”” padding_right=”” padding_bottom=”” padding_left=”” margin_top=”” margin_bottom=”” animation_type=”” animation_direction=leftanimation_speed=”0.3″ animation_offset=”” last=no”][fusion_content_boxes layout=clean-horizontalcolumns=”1″ title_size=”18pxheading_size=”3″ title_color=”#ffffffbody_color=”#ffffffbackgroundcolor=”#4f4f4ficon=”” iconflip=”” iconrotate=”” iconspin=noiconcolor=”” icon_circle=”” icon_circle_radius=”” circlecolor=”” circlebordersize=”” circlebordercolor=”” outercirclebordersize=”” outercirclebordercolor=”” icon_size=”” icon_hover_type=”” hover_accent_color=”” image=”” image_id=”” image_width=”” image_height=”” link_type=”” button_span=”” link_area=”” link_target=”” icon_align=leftanimation_type=”” animation_delay=”” animation_offset=”” animation_direction=leftanimation_speed=”0.3″ margin_top=”” margin_bottom=”” hide_on_mobile=small-visibility,medium-visibility,large-visibilityclass=”” id=””][fusion_content_box title=STEP 1. アクティブまたは非アクティブ故障コードのステータスをチェックし、電気プレテストとハイブリッド電気プリテストを行います.backgroundcolor=”” icon=”” iconflip=”” iconrotate=”” iconspin=noiconcolor=”” circlecolor=”” circlebordersize=”” circlebordercolor=”” outercirclebordersize=”” outercirclebordercolor=”” image=”” image_id=”” image_width=”” image_height=”” link=”” linktext=”続きを読む” link_target=”” animation_type=”” animation_direction=leftanimation_speed=”0.3″ animation_offset=””]

  1. 9ウェイの診断コネクタを使用してServiceRangerと活断層コードとFMISを取得.
  2. 電気プリテストを実行します.
    • 何も問題は電気プレテスト中に発見されなかった場合, 進みます 2.
    • 問題は、電気プレテスト中に修理された場合, 進みます 7.

[/fusion_content_box][/fusion_content_boxes][fusion_content_boxes layout=clean-horizontalcolumns=”2″ title_size=”18pxheading_size=”3″ title_color=”#ffffffbody_color=”#ffffffbackgroundcolor=”#4f4f4ficon=”” iconflip=”” iconrotate=”” iconspin=noiconcolor=”” icon_circle=”” icon_circle_radius=”” circlecolor=”” circlebordersize=”” circlebordercolor=”” outercirclebordersize=”” outercirclebordercolor=”” icon_size=”” icon_hover_type=”” hover_accent_color=”” image=”” image_id=”” image_width=”” image_height=”” link_type=”” button_span=”” link_area=”” link_target=”” icon_align=leftanimation_type=”” animation_delay=”” animation_offset=”” animation_direction=leftanimation_speed=”0.3″ margin_top=”” margin_bottom=”” hide_on_mobile=small-visibility,medium-visibility,large-visibilityclass=”” id=””][fusion_content_box title=STEP 2. ECA回路の連続性を確認してください.backgroundcolor=”” icon=”” iconflip=”” iconrotate=”” iconspin=noiconcolor=”” circlecolor=”” circlebordersize=”” circlebordercolor=”” outercirclebordersize=”” outercirclebordercolor=”” image=”” image_id=”” image_width=”” image_height=”” link=”” linktext=”続きを読む” link_target=”” animation_type=”” animation_direction=leftanimation_speed=”0.3″ animation_offset=””]

  1. キーオフ
  2. ECA 8ウェイコネクタを外してください.
  3. 水の侵入や腐食のためのECA 8ウェイコネクタをチェック.
  4. ECA 8ウェイコネクタ端子Aと端子Bとの間の抵抗を測定します.
    注意: ボルト/オームメーターが適切な規模であることを確認します (周りに 200 オームスケール)

      • 端子Aと端子Bとの間の抵抗は、50〜70オームの間にある場合, 進みます 3.
      • 抵抗値が範囲外である場合, CANデータリンクハーネスを修理, その後に進みます 7.

[/fusion_content_box][fusion_content_box title=STEP 3. ECA回路の連続性を確認してください.backgroundcolor=”” icon=”” iconflip=”” iconrotate=”” iconspin=”” iconcolor=”” circlecolor=”” circlebordersize=”” circlebordercolor=”” outercirclebordersize=”” outercirclebordercolor=”” image=”” image_id=”” image_width=”” image_height=”” link=”” linktext=”” link_target=”” animation_type=”” animation_direction=leftanimation_speed=”0.3″ animation_offset=””]

  1. キーオフ.
  2. ECA 8ウェイコネクタを外してください 2.
  3. 地面に接地する端子Aと端子Bとの間の抵抗を測定します.
    • どちらかのピンが7Kであるため抵抗がある場合, 進みます 4.
    • 結果がある場合 0-100 オーム, 修理CANワイヤーハーネス. 修理が行われた後、, 進みます 7.

[/fusion_content_box][/fusion_content_boxes][fusion_content_boxes layout=clean-horizontalcolumns=”2″ title_size=”18pxheading_size=”3″ title_color=”#ffffffbody_color=”#ffffffbackgroundcolor=”#4f4f4ficon=”” iconflip=”” iconrotate=”” iconspin=noiconcolor=”” icon_circle=”” icon_circle_radius=”” circlecolor=”” circlebordersize=”” circlebordercolor=”” outercirclebordersize=”” outercirclebordercolor=”” icon_size=”” icon_hover_type=”” hover_accent_color=”” image=”” image_id=”” image_width=”” image_height=”” link_type=”” button_span=”” link_area=”” link_target=”” icon_align=leftanimation_type=”” animation_delay=”” animation_offset=”” animation_direction=leftanimation_speed=”0.3″ margin_top=”” margin_bottom=”” hide_on_mobile=small-visibility,medium-visibility,large-visibilityclass=”” id=””][fusion_content_box title=STEP 4. CANワイヤーハーネスが正しく配線されていることを確認し.backgroundcolor=”” icon=”” iconflip=”” iconrotate=”” iconspin=noiconcolor=”” circlecolor=”” circlebordersize=”” circlebordercolor=”” outercirclebordersize=”” outercirclebordercolor=”” image=”” image_id=”” image_width=”” image_height=”” link=”” linktext=”続きを読む” link_target=”” animation_type=”” animation_direction=leftanimation_speed=”0.3″ animation_offset=””]

  1. キーオフ
  2. ECA 8ウェイコネクタを外してください.
  3. 水の侵入や腐食のためのECA 8ウェイコネクタをチェック.
  4. 以下の端子間の抵抗を測定します. 抵抗値が列挙された範囲内にあるかどうかを決定.
    • ピンH 9ウェイ診断コネクタのピンA (ダッシュの下で) 0から0.3オームでなければなりません.
    • 9ウェイの診断コネクタのピンA (ダッシュの下で) 19ウェイPECコネクタピンへ 1 0から0.3オームでなければなりません.
    • 9ウェイ診断コネクタのピンB (ダッシュの下で) ピンJに0から0.3オームでなければなりません.
    • 9ウェイ診断コネクタのピンB (ダッシュの下で) ピンへ 2 19ウェイPECコネクタ0から0.3オームでなければなりません.
      • 測定値は、範囲外にある場合, 修理CANハーネス. 修理が行われた後、, 進みます 7.
      • 測定値は、範囲内にある場合, 進みます 5.

[/fusion_content_box][fusion_content_box title=ECAのSTEP 5.Verify電圧.backgroundcolor=”” icon=”” iconflip=”” iconrotate=”” iconspin=”” iconcolor=”” circlecolor=”” circlebordersize=”” circlebordercolor=”” outercirclebordersize=”” outercirclebordercolor=”” image=”” image_id=”” image_width=”” image_height=”” link=”” linktext=”” link_target=”” animation_type=”” animation_direction=leftanimation_speed=”0.3″ animation_offset=””]

  1. 上のキー.
  2. デジタルボルト/オーム計でECA 8ウェイコネクタピンHに12ボルトの電源をチェック.
    • 電圧が存在する場合, にスキップ #4.
    • 電圧がより低い場合 10 ボルトまたは無電圧はありません, 進みます 6.
  3. ECA 3ウェイコネクタを外し、水の侵入や腐食をチェック.
  4. デジタルボルト/オーム計でECA 3ウェイコネクタ端子Cと端子Bの電圧を確認.
    • ピンCとピンBは、両方の電圧を持っている場合, ECAを交換. TRSM2000で電動クラッチアクチュエータの取り外しおよび取り付け手順を参照してください。. 修理が行われた後、, 進みます 7.
    • ピンCとピンBは未満を持っている場合 10 ボルトまたは無電圧, にスキップ #5.
  5. バッテリ電圧用のピンCをチェック, グランド用負のバッテリポストを使用します. アース用のピンBをチェック, 陽性バッテリポストを使用します 12 ボルト.
    • 問題は、バッテリポストを使用した場合, ECAの配線ハーネスを修理.
    • 何ら問題は見つからなかった場合, テストでエラーを見つけます, 進みます 1.

[/fusion_content_box][/fusion_content_boxes][fusion_content_boxes layout=clean-horizontalcolumns=”2″ title_size=”18pxheading_size=”3″ title_color=”#ffffffbody_color=”#ffffffbackgroundcolor=”#4f4f4ficon=”” iconflip=”” iconrotate=”” iconspin=noiconcolor=”” icon_circle=”” icon_circle_radius=”” circlecolor=”” circlebordersize=”” circlebordercolor=”” outercirclebordersize=”” outercirclebordercolor=”” icon_size=”” icon_hover_type=”” hover_accent_color=”#f41000image=”” image_id=”” image_width=”” image_height=”” link_type=”” button_span=”” link_area=”” link_target=”” icon_align=leftanimation_type=”” animation_delay=”” animation_offset=”” animation_direction=leftanimation_speed=”0.3″ margin_top=”” margin_bottom=”” hide_on_mobile=small-visibility,medium-visibility,large-visibilityclass=”” id=””][fusion_content_box title=STEP 6. HCMとECA間の連続性を測定しますbackgroundcolor=”” icon=”” iconflip=”” iconrotate=”” iconspin=”” iconcolor=”” circlecolor=”” circlebordersize=”” circlebordercolor=”” outercirclebordersize=”” outercirclebordercolor=”” image=”” image_id=”” image_width=”” image_height=”” link=”” linktext=”” link_target=”” animation_type=”” animation_direction=leftanimation_speed=”0.3″ animation_offset=””]

  1. キーオフ.
  2. HCM S2線のコネクタを外します.
  3. HCM S2コネクタピンとの間の抵抗を測定します 13 そしてECA 8ウェイピンH.
    • 抵抗が0から0.3の場合, HCMを交換 (ハイブリッド制御モジュールを参照してください (HCM) 取り外しと取り付け). 修理が行われた後, 進みます 7.
    • 抵抗が範囲外である場合, リペア配線ハーネス.

[/fusion_content_box][fusion_content_box title=STEP 7. 修復を検査します.backgroundcolor=”” icon=”” iconflip=”” iconrotate=”” iconspin=noiconcolor=”” circlecolor=”” circlebordersize=”” circlebordercolor=”” outercirclebordersize=”” outercirclebordercolor=”” image=”” image_id=”” image_width=”” image_height=”” link=”” linktext=”続きを読む” link_target=”” animation_type=”” animation_direction=leftanimation_speed=”0.3″ animation_offset=””]

  1. キーオフ.
  2. すべてのコネクタとバッテリーのマイナスケーブルを再接続します.
  3. 上のキー.
  4. クリアコード, 見る クリア非アクティブな障害.
  5. 車を運転し、コードをリセットしようとし.
  6. コードの確認, 見る アクティブおよび非アクティブの障害を表示.
    • いいえコードの場合, テストは完了です.
    • もし、故障コード 19 表示されます, テストでエラーを見つけます, 進みます 1.
    • 以外のコードの場合 19 表示されます, 見る コードインデックスリストフォールト.

[/fusion_content_box][/fusion_content_boxes][/fusion_builder_column][/fusion_builder_row][/fusion_builder_container][fusion_global id=”13788″]