[fusion_builder_container hundred_percent=nohundred_percent_height=nohundred_percent_height_scroll=nohundred_percent_height_center_content=yesequal_height_columns=nomenu_anchor=”” hide_on_mobile=small-visibility,medium-visibility,large-visibilitystatus=publishedpublish_date=”” class=”” id=”” background_color=”” background_image=”” background_position=center centerbackground_repeat=no-repeatfade=nobackground_parallax=noneenable_mobile=noparallax_speed=”0.3″ video_mp4=”” video_webm=”” video_ogv=”” video_url=”” video_aspect_ratio=”16:9″ video_loop=yesvideo_mute=yesvideo_preview_image=”” border_size=”” border_color=”” border_style=solidmargin_top=”35″ margin_bottom=”” padding_top=”” padding_right=”” padding_bottom=”” padding_left=””][fusion_builder_row][fusion_builder_column type=”1_1layout=”1_1spacing=”” center_content=nolink=”” target=_selfmin_height=”” hide_on_mobile=small-visibility,medium-visibility,large-visibilityclass=”” id=”” background_color=”” background_image=”” background_image_id=”” background_position=left topbackground_repeat=no-repeathover_type=noneborder_size=”0″ border_color=”” border_style=solidborder_position=allpadding_top=”” padding_right=”” padding_bottom=”” padding_left=”” margin_top=”” margin_bottom=”” animation_type=”” animation_direction=leftanimation_speed=”0.3″ animation_offset=”” last=no”][fusion_text columns=”” column_min_width=”” column_spacing=”” rule_style=defaultrule_size=”” rule_color=”” hide_on_mobile=small-visibility,medium-visibility,large-visibilityclass=”” id=””]

Eaton ਆਪੋ ਹਾਈਬ੍ਰਾਇਡ ਸੰਚਾਰਨ ਨੁਕਸ ਕੋਡ 111 – Inverter CAN ਸੁਨੇਹਾ Fault (HCM)

[/fusion_text][/fusion_builder_column][/fusion_builder_row][/fusion_builder_container][fusion_builder_container hundred_percent=nohundred_percent_height=nohundred_percent_height_scroll=nohundred_percent_height_center_content=yesequal_height_columns=nomenu_anchor=”” hide_on_mobile=small-visibility,medium-visibility,large-visibilitystatus=publishedpublish_date=”” class=”” id=”” background_color=”” background_image=”” background_position=center centerbackground_repeat=no-repeatfade=nobackground_parallax=noneenable_mobile=noparallax_speed=”0.3″ video_mp4=”” video_webm=”” video_ogv=”” video_url=”” video_aspect_ratio=”16:9″ video_loop=yesvideo_mute=yesvideo_preview_image=”” border_size=”” border_color=”” border_style=solidmargin_top=”” margin_bottom=”” padding_top=”” padding_right=”” padding_bottom=”” padding_left=””][fusion_builder_row][fusion_builder_column type=”1_1layout=”1_1spacing=”” center_content=nolink=”” target=_selfmin_height=”” hide_on_mobile=small-visibility,medium-visibility,large-visibilityclass=”” id=”” background_color=”” background_image=”” background_image_id=”” background_position=left topbackground_repeat=no-repeathover_type=noneborder_size=”0″ border_color=”” border_style=solidborder_position=allpadding_top=”” padding_right=”” padding_bottom=”” padding_left=”” margin_top=”” margin_bottom=”” animation_type=”” animation_direction=leftanimation_speed=”0.3″ animation_offset=”” last=no”][fusion_text columns=”” column_min_width=”” column_spacing=”” rule_style=defaultrule_size=”” rule_color=”” hide_on_mobile=small-visibility,medium-visibility,large-visibilityclass=”” id=””]

Eaton ਹਾਈਬ੍ਰਾਇਡ ਡਰਾਈਵ ਸਿਸਟਮ ਮਾਡਲ ਲਈ ਕੋਡ ਖਰਾਬ (my09) EH-8E406A-ਯੂ / ਪੀ, EH-8E406A-ਅੱਪ, EH-8E406A-UPG, EH-8E406A-ਸੀਡੀ, EH-8E406A-CDG, EH-8E406A-CDR, EH-8E406A-ਟੀ, EH-6E706B-ਸੀਡੀ, EH-6E706B-ਪੀ ਅਤੇ EH-6E706B-UPG. ਟੈਸਟ ਕਿਵੇਂ ਕਰਨਾ ਹੈ ਬਾਰੇ ਸਿੱਖਣ ਲਈ ਹੇਠਾਂ ਪੜ੍ਹੋ, ਨੂੰ ਸਾਫ ਕਰੋ ਅਤੇ ਆਪਣੇ Freightliner ਲਈ ਕਸੂਰ ਕੋਡ ਗਲਤੀ ਨੂੰ ਠੀਕ, mack, Peterbilt, Kenworth, ਵੋਲਵੋ, ਅੰਤਰਰਾਸ਼ਟਰੀ, ਅਤੇ ਭਾਰੀ-ਡਿਊਟੀ ਟਰੱਕ ਅਤੇ ਸਾਜ਼ੋ. Inverter ਬੈਟਰੀ ਕੰਟਰੋਲ ਯੂਨਿਟ ਦੇ ਨਾਲ ਗੱਲਬਾਤ (BCU) ਪੈਕ ਅਤੇ ਹਾਈਬ੍ਰਾਇਡ ਕੰਟਰੋਲ ਮੋਡੀਊਲ ਵਿੱਚ ਸਥਿਤ (HCM) CAN ਹਾਈ ਸਪੀਡ ਮਲਕੀਅਤ ਡਾਟਾ ਲਿੰਕ 'ਤੇ. The data link is a two wire twisted pair with two 120 ohm ਲਿੰਕ ਵਿੱਚ ਸਥਿਤ resistors.

ਖਰਾਬ ਕੋਡ 111 – Inverter CAN ਸੁਨੇਹਾ Fault (HCM) ਖੋਜ

ਅੱਗੇ ਸਿਸਟਮ ਕਸੂਰ ਖੋਜਦਾ ਹੈ ਹੇਠ ਸ਼ਰਤ ਨੂੰ ਮਿਲੇ ਕੀਤਾ ਜਾਣਾ ਚਾਹੀਦਾ ਹੈ:.

  • HCM CAN ਡਾਟਾ ਲਿੰਕ ਕਸੂਰ ਸਰਗਰਮ ਨਹੀ ਹੈ. (my09)

ਸੂਚਨਾ: ਇੱਕ ਸਰਗਰਮ ਕੋਡ ਨੂੰ ਹੱਲ ਕਰਨ ਲਈ ਵੇਖੋ ਉਤਪਾਦ ਡਾਇਗਨੋਸਟਿਕ ਮੋਡ (PDM)

ਹਾਲਾਤ ਨੁਕਸ ਕੋਡ ਸਰਗਰਮ ਸੈੱਟ)

  • ਐੱਫ 9 ਜਦ HCM ਲਈ ਇੱਕ Inverter ਸੁਨੇਹਾ ਮਿਲਿਆ ਹੈ, ਨਾ ਹੈ ਸੈੱਟ ਕੀਤਾ ਗਿਆ ਹੈ 30 ਲਗਾਤਾਰ ਸੁਨੇਹੇ ਨੂੰ ਚੱਕਰ.
  • ਐੱਫ 2 ਉਤਪਾਦ ਡਾਇਗਨੋਸਟਿਕ ਮੋਡ ਵਿੱਚ ਹੀ ਸਰਗਰਮ ਹੈ ਅਤੇ ਜੇਕਰ ਸੈੱਟ ਕੀਤਾ ਜਾਵੇਗਾ 3 ਲਗਾਤਾਰ Inverter ਸੁਨੇਹੇ HCM ਦੁਆਰਾ ਪ੍ਰਾਪਤ ਨਹੀ ਕਰ ਰਹੇ ਹਨ.

ਫਾਲਬੈਕ ਜਦ ਨੁਕਸ ਕੋਡ 111 ਸੈੱਟ ਕੀਤਾ ਗਿਆ ਹੈ ਹੇਠ ਹਾਲਾਤ ਵਾਪਰ:

  • ਅੰਬਰ "ਚੈੱਕ ਹਾਈਬ੍ਰਾਇਡ" ਪ੍ਰਕਾਸ਼.
  • ਕਸੂਰ ਹਾਈਬ੍ਰਾਇਡ ਕੰਟਰੋਲ ਮੋਡੀਊਲ ਵਿੱਚ ਸੰਭਾਲਿਆ ਗਿਆ ਹੈ (HCM) ਮੈਮੋਰੀ.
  • ਹਾਈ-ਵੋਲਟੇਜ ਮੋਟਰ / ਜੇਨਰੇਟਰ ਮਦਦ ਉਪਲਬਧ ਹੈ, ਪਰ ਘਟੀ ਹੋਈ ਰਕਮ '.

[/fusion_text][fusion_text columns=”” column_min_width=”” column_spacing=”” rule_style=defaultrule_size=”” rule_color=”” hide_on_mobile=small-visibility,medium-visibility,large-visibilityclass=”” id=””]

ਹਾਲਾਤ ਨੁਕਸ ਕੋਡ ਸਰਗਰਮ ਸੈੱਟ

ਕੇਵਲ ਸਰਗਰਮ ਨੁਕਸ ਸੰਚਾਰ ਇਲੈਕਟ੍ਰਾਨਿਕ ਕੰਟਰੋਲ ਯੂਨਿਟ ਤੱਕ ਸਾਫ਼ ਕਰ ਕੀਤਾ ਜਾ ਸਕਦਾ ਹੈ (TECU) ਜ HCM ਦਾ ਇਤਿਹਾਸ ServiceRanger ਵਰਤ. TECU ਆਪ ਹੀ ਬਾਅਦ ਇਤਿਹਾਸ ਨੁਕਸ ਸਾਫ 200 ਘੰਟੇ ਅਤੇ HCM ਆਪ ਹੀ ਨੁਕਸ ਬਾਅਦ ਇਤਿਹਾਸ ਨੁਕਸ ਸਾਫ ਕਰਨ ਲਈ ਸਰਗਰਮ ਕੀਤਾ ਗਿਆ ਹੈ, 200 ਘੰਟੇ.

ਇਹ ਕਸੂਰ ਕੋਡ ਹੇਠ ਦੇ ਕਿਸੇ ਵੀ ਦੇ ਕਾਰਨ ਕੀਤਾ ਜਾ ਸਕਦਾ ਹੈ:

  • ਐੱਫ 2 ,9:
    • CAN ਡਾਟਾ ਲਿੰਕ
    • ਕੋਈ ਸ਼ਕਤੀ ਜ ਜ਼ਮੀਨ inverter ਕਰਨ
    • HCM
    • inverter

[/fusion_text][/fusion_builder_column][/fusion_builder_row][/fusion_builder_container][fusion_builder_container hundred_percent=nohundred_percent_height=nohundred_percent_height_scroll=nohundred_percent_height_center_content=yesequal_height_columns=nomenu_anchor=”” hide_on_mobile=small-visibility,medium-visibility,large-visibilitystatus=publishedpublish_date=”” class=”” id=”” background_color=”” background_image=”” background_position=center centerbackground_repeat=no-repeatfade=nobackground_parallax=noneenable_mobile=noparallax_speed=”0.3″ video_mp4=”” video_webm=”” video_ogv=”” video_url=”” video_aspect_ratio=”16:9″ video_loop=yesvideo_mute=yesvideo_preview_image=”” border_size=”” border_color=”” border_style=solidmargin_top=”” margin_bottom=”” padding_top=”” padding_right=”” padding_bottom=”” padding_left=””][fusion_builder_row][fusion_builder_column type=”1_1layout=”1_1spacing=”” center_content=nolink=”” target=_selfmin_height=”” hide_on_mobile=small-visibility,medium-visibility,large-visibilityclass=”” id=”” background_color=”” background_image=”” background_image_id=”” background_position=left topbackground_repeat=no-repeathover_type=noneborder_size=”0″ border_color=”” border_style=solidborder_position=allpadding_top=”” padding_right=”” padding_bottom=”” padding_left=”” margin_top=”” margin_bottom=”” animation_type=”” animation_direction=leftanimation_speed=”0.3″ animation_offset=”” last=no”][fusion_text columns=”” column_min_width=”” column_spacing=”” rule_style=defaultrule_size=”” rule_color=”” hide_on_mobile=small-visibility,medium-visibility,large-visibilityclass=”” id=””]

ਖਰਾਬ ਕੋਡ 111 – Inverter CAN ਸੁਨੇਹਾ Fault (HCM) ਟੈਸਟ

[/fusion_text][/fusion_builder_column][/fusion_builder_row][/fusion_builder_container][fusion_builder_container hundred_percent=nohundred_percent_height=nohundred_percent_height_scroll=nohundred_percent_height_center_content=yesequal_height_columns=nomenu_anchor=”” hide_on_mobile=small-visibility,medium-visibility,large-visibilitystatus=publishedpublish_date=”” class=”” id=”” background_color=”” background_image=”” background_position=center centerbackground_repeat=no-repeatfade=nobackground_parallax=noneenable_mobile=noparallax_speed=”0.3″ video_mp4=”” video_webm=”” video_ogv=”” video_url=”” video_aspect_ratio=”16:9″ video_loop=yesvideo_mute=yesvideo_preview_image=”” border_size=”” border_color=”” border_style=solidmargin_top=”” margin_bottom=”” padding_top=”” padding_right=”” padding_bottom=”” padding_left=””][fusion_builder_row][fusion_builder_column type=”1_1layout=”1_1spacing=”” center_content=nolink=”” target=_selfmin_height=”” hide_on_mobile=small-visibility,medium-visibility,large-visibilityclass=”” id=”” background_color=”” background_image=”” background_image_id=”” background_position=left topbackground_repeat=no-repeathover_type=noneborder_size=”0″ border_color=”” border_style=solidborder_position=allpadding_top=”” padding_right=”” padding_bottom=”” padding_left=”” margin_top=”” margin_bottom=”” animation_type=”” animation_direction=leftanimation_speed=”0.3″ animation_offset=”” last=no”][fusion_text columns=”” column_min_width=”” column_spacing=”” rule_style=defaultrule_size=”” rule_color=”” hide_on_mobile=small-visibility,medium-visibility,large-visibilityclass=”” id=””]

ਭਾਗ ਪਛਾਣ my09 Sytems:

[/fusion_text][/fusion_builder_column][fusion_builder_column type=”1_2layout=”1_2spacing=”” center_content=nolink=”” target=_selfmin_height=”” hide_on_mobile=small-visibility,medium-visibility,large-visibilityclass=”” id=”” background_color=”” background_image=”” background_image_id=”” background_position=left topbackground_repeat=no-repeathover_type=noneborder_size=”0″ border_color=”” border_style=solidborder_position=allpadding_top=”” padding_right=”” padding_bottom=”” padding_left=”” margin_top=”” margin_bottom=”” animation_type=”” animation_direction=leftanimation_speed=”0.3″ animation_offset=”” last=no”][fusion_imageframe image_id=”14061|fullmax_width=”” style_type=”” blur=”” stylecolor=”” hover_type=nonebordersize=”” bordercolor=”” borderradius=”” align=centerlightbox=nogallery_id=”” lightbox_image=”” lightbox_image_id=”” alt=”HCM ਵਾਹਨ ਇੰਟਰਫੇਸ ਕੁਨੈਕਟਰ” link=”” linktarget=_selfhide_on_mobile=small-visibility,medium-visibility,large-visibilityclass=”” id=”” animation_type=”” animation_direction=leftanimation_speed=”0.3″ animation_offset=””]https://www.globaltransmissionsupply.com/wp-content/uploads/Fuller-Front-Harness-View-HCM.jpg[/fusion_imageframe][fusion_text columns=”” column_min_width=”” column_spacing=”” rule_style=defaultrule_size=”” rule_color=”” hide_on_mobile=small-visibility,medium-visibility,large-visibilityclass=”” id=””]

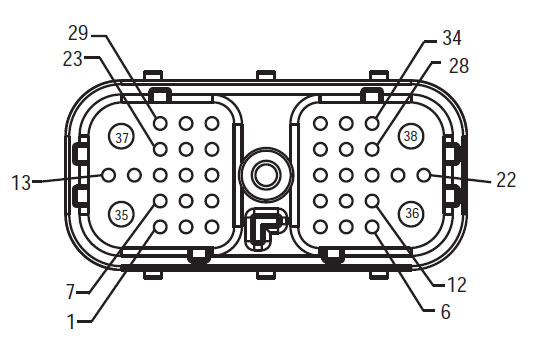
ਕਵਚ ਫਰੰਟ ਦੇਖੋ
(HCM ਵਾਹਨ ਇੰਟਰਫੇਸ ਕੁਨੈਕਟਰ)
[/fusion_text][/fusion_builder_column][fusion_builder_column type=”1_2layout=”1_2spacing=”” center_content=nolink=”” target=_selfmin_height=”” hide_on_mobile=small-visibility,medium-visibility,large-visibilityclass=”” id=”” background_color=”” background_image=”” background_image_id=”” background_position=left topbackground_repeat=no-repeathover_type=noneborder_size=”0″ border_color=”” border_style=solidborder_position=allpadding_top=”” padding_right=”” padding_bottom=”” padding_left=”” margin_top=”” margin_bottom=”” animation_type=”” animation_direction=leftanimation_speed=”0.3″ animation_offset=”” last=no”][fusion_imageframe image_id=”14476|fullmax_width=”” style_type=”” blur=”” stylecolor=”” hover_type=nonebordersize=”” bordercolor=”” borderradius=”” align=centerlightbox=nogallery_id=”” lightbox_image=”” lightbox_image_id=”” alt=”Duetsch 40-ਤਰੀਕੇ ਨਾਲ ਮੇਲ ਕੁਨੈਕਟਰ ਝਲਕ” link=”” linktarget=_selfhide_on_mobile=small-visibility,medium-visibility,large-visibilityclass=”” id=”” animation_type=”” animation_direction=leftanimation_speed=”0.3″ animation_offset=””]https://www.globaltransmissionsupply.com/wp-content/uploads/Duetsch-40-way-mating-connector-view.png[/fusion_imageframe][fusion_text columns=”” column_min_width=”” column_spacing=”” rule_style=defaultrule_size=”” rule_color=”” hide_on_mobile=small-visibility,medium-visibility,large-visibilityclass=”” id=””]

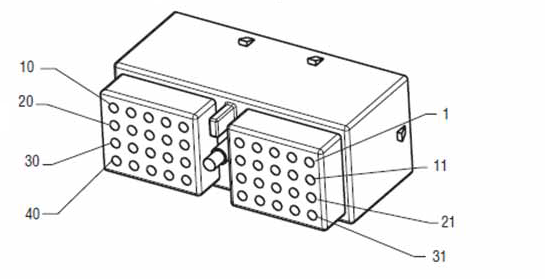
Duetsch 40-ਰਾਹ ਮੇਲ ਕੁਨੈਕਟਰ
(inverter – ਘੱਟ ਵੋਲਟੇਜ਼ ਕੁਨੈਕਟਰ)

[/fusion_text][/fusion_builder_column][fusion_builder_column type=”1_1layout=”1_1spacing=”” center_content=nolink=”” target=_selfmin_height=”” hide_on_mobile=small-visibility,medium-visibility,large-visibilityclass=”” id=”” background_image_id=”” background_color=”#000000″ background_image=”” background_position=left topundefined=”” background_repeat=no-repeathover_type=noneborder_size=”0″ border_color=”” border_style=solidborder_position=allpadding_top=”” padding_right=”” padding_bottom=”” padding_left=”” margin_top=”20″ margin_bottom=”20″ animation_type=”” animation_direction=leftanimation_speed=”0.3″ animation_offset=”” last=no”][fusion_text columns=”” column_min_width=”” column_spacing=”” rule_style=defaultrule_size=”” rule_color=”” hide_on_mobile=small-visibility,medium-visibility,large-visibilityclass=”” id=””]

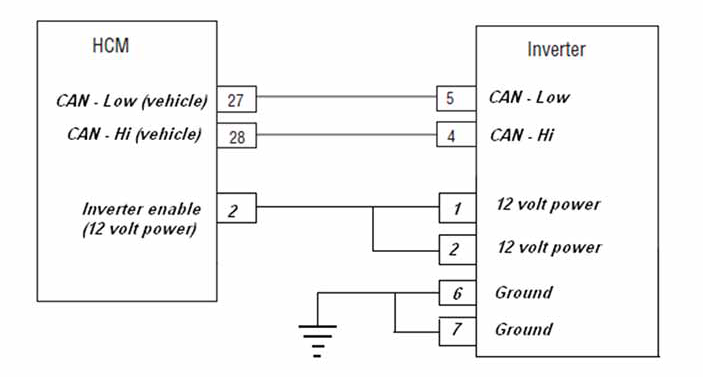
ਸੂਚਨਾ: ਵੇਖੋ Eaton ਹਾਈਬ੍ਰਾਇਡ ਭਾਗ ਅਤੇ ਕੁਨੈਕਟਰ ਸਥਿਤੀ My09 ਸਿਸਟਮ ਵਿੱਚ ਕੁਨੈਕਟਰ ਸਥਾਨ ਲਈ.
[/fusion_text][/fusion_builder_column][fusion_builder_column type=”1_1layout=”1_1spacing=”” center_content=nolink=”” target=_selfmin_height=”” hide_on_mobile=small-visibility,medium-visibility,large-visibilityclass=”” id=”” background_color=”” background_image=”” background_image_id=”” background_position=left topbackground_repeat=no-repeathover_type=noneborder_size=”0″ border_color=”” border_style=solidborder_position=allpadding_top=”” padding_right=”” padding_bottom=”” padding_left=”” margin_top=”” margin_bottom=”” animation_type=”” animation_direction=leftanimation_speed=”0.3″ animation_offset=”” last=no”][fusion_imageframe image_id=”14477|fullmax_width=”” style_type=”” blur=”” stylecolor=”” hover_type=nonebordersize=”” bordercolor=”” borderradius=”” align=centerlightbox=nogallery_id=”” lightbox_image=”” lightbox_image_id=”” alt=”HCM inverter ਕੁਨੈਕਸ਼ਨ ” link=”” linktarget=_selfhide_on_mobile=small-visibility,medium-visibility,large-visibilityclass=”” id=”” animation_type=”” animation_direction=leftanimation_speed=”0.3″ animation_offset=””]https://www.globaltransmissionsupply.com/wp-content/uploads/HCM-Inverter-MY09.png[/fusion_imageframe][/fusion_builder_column][/fusion_builder_row][/fusion_builder_container][fusion_builder_container hundred_percent=nohundred_percent_height=nohundred_percent_height_scroll=nohundred_percent_height_center_content=yesequal_height_columns=nomenu_anchor=”” hide_on_mobile=small-visibility,medium-visibility,large-visibilitystatus=publishedpublish_date=”” class=”” id=”” background_color=”” background_image=”” background_position=center centerbackground_repeat=no-repeatfade=nobackground_parallax=noneenable_mobile=noparallax_speed=”0.3″ video_mp4=”” video_webm=”” video_ogv=”” video_url=”” video_aspect_ratio=”16:9″ video_loop=yesvideo_mute=yesvideo_preview_image=”” border_size=”” border_color=”” border_style=solidmargin_top=”” margin_bottom=”” padding_top=”” padding_right=”” padding_bottom=”” padding_left=””][fusion_builder_row][fusion_builder_column type=”1_1layout=”1_1spacing=”” center_content=nolink=”” target=_selfmin_height=”” hide_on_mobile=small-visibility,medium-visibility,large-visibilityclass=”” id=”” background_color=”” background_image=”” background_image_id=”” background_position=left topbackground_repeat=no-repeathover_type=noneborder_size=”0″ border_color=”” border_style=solidborder_position=allpadding_top=”” padding_right=”” padding_bottom=”” padding_left=”” margin_top=”” margin_bottom=”” animation_type=”” animation_direction=leftanimation_speed=”0.3″ animation_offset=”” last=no”][fusion_modal name=warnings_cautionstitle=”ਚੇਤਾਵਨੀ & ਚੇਤਾਵਨੀ” size=largebackground=”” border_color=”” show_footer=yesclass=”” id=””]ਖ਼ਤਰਾ: ਖ਼ਤਰੇ ਦੇ ਸੰਕੇਤ ਕਰਦਾ ਹੈ ਕਿ ਤੁਹਾਨੂੰ ਬੁਰੀ ਜ਼ਖਮੀ ਹੋ ਜ ਦੀ ਮੌਤ ਹੋ ਜਾਵੇਗਾ, ਜੇ ਸੰਕੇਤ ਵਿਧੀ ਦੀ ਪਾਲਣਾ ਨਾ ਕਰਦੇ,.
ਚੇਤਾਵਨੀ: ਚੇਤਾਵਨੀ ਤੁਰੰਤ ਖਤਰਾ ਲੱਗਦਾ ਹੈ, ਗੰਭੀਰ ਨਿਜੀ ਸੱਟ ਦਾ ਨਤੀਜਾ ਹੋ ਸਕਦਾ ਹੈ, ਜੋ ਕਿ ਜੇਕਰ ਤੁਹਾਨੂੰ ਸੰਕੇਤ ਵਿਧੀ ਦੀ ਪਾਲਣਾ ਨਾ ਕਰਦੇ,.
ਸਾਵਧਾਨ: ਸਾਵਧਾਨ ਲੱਗਦਾ ਹੈ ਵਾਹਨ ਜ ਸੰਪਤੀ ਨੂੰ ਨੁਕਸਾਨ ਵਾਪਰ ਸਕਦਾ ਹੈ, ਜੇ ਤੁਹਾਨੂੰ ਸੰਕੇਤ ਵਿਧੀ ਦੀ ਪਾਲਣਾ ਨਾ ਕਰਦੇ,.

ਸੂਚਨਾ: ਸੂਚਨਾ ਵਾਧੂ ਵਿਸਥਾਰ ਹੈ, ਜੋ ਕਿ ਤਸ਼ਖੀਸ ਜ ਇੱਕ ਭਾਗ ਨੂੰ / ਸਿਸਟਮ ਦੀ ਮੁਰੰਮਤ 'ਚ ਮਦਦ ਕਰੇਗਾ ਪਤਾ ਲੱਗਦਾ ਹੈ.

ਵੇਖਾਏ ਕ੍ਰਮ ਨੂੰ ਨਿਜੀ ਸੱਟ ਬਚਣ ਲਈ ਵਿੱਚ ਦਿੱਤਾ ਕਾਰਵਾਈ ਦੀ ਪਾਲਣਾ ਕਰੋ:

1. ਹਾਈ-ਵੋਲਟੇਜ ਸ਼ੰਕੂ ਵਾਹਨ ਦੇ ਆਲੇ-ਦੁਆਲੇ ਹਨ ਅਤੇ ਤਾਲਾਬੰਦੀ PEC ਤੇ ਇੰਸਟਾਲ ਹੈ, ਜੇ, ਸਿਰਫ ਵਿਅਕਤੀ ਹੈ, ਜੋ ਕਿ ਵਾਹਨ ਸ਼ੁਰੂ ਕਰਨ ਦੀ ਇਜਾਜ਼ਤ ਕੀਤਾ ਜਾਣਾ ਚਾਹੀਦਾ ਹੈ, ਜੋ ਵਿਅਕਤੀ ਤਾਲਾਬੰਦੀ ਟੈਗ ਸਾਈਨ ਕੀਤਾ ਗਿਆ ਹੈ.
2. ਇੱਕ ਵਾਹਨ 'ਤੇ ਕੰਮ ਕਰ ਜ ਕੈਬ ਨੂੰ ਛੱਡ ਕੇ ਅੱਗੇ ਇੰਜਣ ਚੱਲ ਰਿਹਾ ਹੈ, ਜਦਕਿ, ਤੁਹਾਨੂੰ "n" ਵਿਚ ਸ਼ਿਫਟ ਲੀਵਰ ਰੱਖਣ ਚਾਹੀਦਾ ਹੈ ਪਾਰਕਿੰਗ ਤੋੜੀ ਸੈੱਟ ਕੀਤਾ, ਅਤੇ ਪਹੀਏ ਨੂੰ ਬਲਾਕ.
3. ਸੁਰੱਖਿਆ ਦੇ ਕਾਰਨ ਲਈ, ਹਮੇਸ਼ਾ ਸੇਵਾ ਬ੍ਰੇਕ ਸ਼ਾਮਲ "ਐਨ" ਤੱਕ ਗੇਅਰ ਅਹੁਦੇ ਦੀ ਚੋਣ ਕਰਨ ਲਈ ਪੁਰਾਣੇ
4. ਅੱਗੇ ਸ਼ੁਰੂ ਕਰਨ ਲਈ ਇੱਕ ਵਾਹਨ ਨੂੰ ਹਮੇਸ਼ਾ ਡਰਾਈਵਰ ਦੀ ਸੀਟ 'ਤੇ ਬੈਠੇ ਕੀਤਾ ਜਾ, ਦੀ ਚੋਣ ਕਰੋ "n" ਸ਼ਿਫਟ ਕੰਟਰੋਲ 'ਤੇ, ਅਤੇ ਪਾਰਕਿੰਗ ਬ੍ਰੇਕ ਸੈੱਟ ਕੀਤਾ.
5. ePTO ਨਾਲ ਵਾਹਨ ਵਿੱਚ, ਇੰਜਣ ਅਤੇ / ਜ
ਮੋਟਰ / ਜੇਨਰੇਟਰ ePTO ਮੋਡ ਵਿੱਚ ਸ਼ੁਰੂ ਕਰ ਸਕਦੇ ਹੋ. ਕਦੇ ਵੀ ਕਿਸੇ ਵੀ ਨਿਗਰਾਨੀ ਕਰਨ ਜ ਵਾਹਨ 'ਤੇ ਕੰਮ, ਇਸ ਮੋਡ ਵਿੱਚ, ਜਦਕਿ.
6. 12-ਵੋਲਟ ਬੈਟਰੀ ਸਕਾਰਾਤਮਕ (+) ਅਤੇ ਨਕਾਰਾਤਮਕ (-) ਕਿਸੇ ਵੀ ਹਾਈਬ੍ਰਾਇਡ ਲੈਸ ਵਾਹਨ 'ਤੇ ਕਿਸੇ ਵੀ ਿਲਵਿੰਗ ਕਰਨ ਲਈ ਪੁਰਾਣੇ ਕੁਨੈਕਸ਼ਨ ਬੰਦ ਕੀਤਾ ਜਾਣਾ ਚਾਹੀਦਾ ਹੈ.

ਸਾਵਧਾਨ: ਵੇਖਾਏ ਲਈ ਕ੍ਰਮ ਦੇ ਸਾਮਾਨ ਖ਼ਰਾਬ ਨੁਕਸਾਨ ਬਚਣ ਲਈ ਵਿੱਚ ਦਿੱਤਾ ਕਾਰਵਾਈ ਦੀ ਪਾਲਣਾ ਕਰੋ.
ਸਾਵਧਾਨ: ਪਾਰਕਿੰਗ ਤੋੜੀ ਮੁਕਤ ਕਰ ਜ, ਜਦ ਤੱਕ ਕਿ ਹਵਾ ਦਾ ਪ੍ਰੈਸ਼ਰ ਸਹੀ ਪੱਧਰ 'ਤੇ ਹੁੰਦਾ ਹੈ, ਇੱਕ ਗੇਅਰ ਦੀ ਚੋਣ ਕਰਨ ਦੀ ਕੋਸ਼ਿਸ਼ ਨਾ ਕਰੋ.
ਸਾਵਧਾਨ: "N" ਵਿਚ ਜਗ੍ਹਾ ਸ਼ਿਫਟ ਲੀਵਰ ਫ਼ਰਾਰ ਦੌਰਾਨ ਸੰਚਾਰ ਨੂੰ ਨੁਕਸਾਨ ਬਚਣ ਅਤੇ ਜ਼ਮੀਨ ਬੰਦ ਡਰਾਈਵ ਪਹੀਏ ਚੁੱਕਣ ਜ driveline ਕੁਨੈਕਸ਼ਨ ਬੰਦ ਕਰਨ ਲਈ.

ਹਾਈ-ਵੋਲਟੇਜ ਚੇਤਾਵਨੀ & ਚੇਤਾਵਨੀ

  • CO2 ਜ ਡਰਾਈ ਕੈਮੀਕਲ Fire Extinguishers ਵਰਤੋ.
  • ਹਾਈ-ਵੋਲਟੇਜ ਤਾਰ ਸੰਤਰੀ ਇਨਸੂਲੇਸ਼ਨ ਜ ਪੇਚੀਦਾ ਵਟਊਵਬੰਗ ਵਿਚ ਕਵਰ ਕੀਤਾ ਹੈ ਅਤੇ ਕੁਨੈਕਟਰ 'ਤੇ ਚੇਤਾਵਨੀ ਦੇ ਲੇਬਲ ਦੇ ਨਾਲ ਮਾਰਕ ਕੀਤਾ ਗਿਆ ਹੈ.
  • ਸਾਰੇ Eaton® ਹਾਈਬ੍ਰਾਇਡ ਡੀਜ਼ਲ / ਇਲੈਕਟ੍ਰਿਕ ਵਾਹਨ ਮਾਰਕ ਕੀਤਾ ਜਾਵੇਗਾ, 'ਹਾਈਬ੍ਰਾਇਡ’ ਵਾਹਨ ਦੇ ਬਾਹਰ ਤੇ, ਡੈਸ਼ 'ਤੇ ਸ਼ਿਫਟ ਲੇਬਲ ਨੂੰ ਨਾਲ-ਨਾਲ.
  • ਚੈਸੀ ਮਾਊਟ ਹਾਈਬ੍ਰਿਡ ਭਾਗ ਦੇ ਖਾਸ ਸਥਾਨ ਲਈ OEM ਵੇਖੋ.
  • ਸੰਤਰੀ ਹਾਈ-ਵੋਲਟੇਜ ਕੇਬਲ ਵਿੱਚ ਕੱਟ ਨਾ ਕਰੋ.
  • ਵਿੱਚ ਕੱਟ ਜ ਨਾ ਖੋਲ੍ਹੋ ਪੈਕ.
  • ਵਿੱਚ ਕੱਟ ਜ ਡੀ.ਸੀ. / ਡੀ.ਸੀ. ਪਰਿਵਰਤਕ ਨਾ ਖੋਲ੍ਹੋ.
  • ਵਿੱਚ ਕੱਟ ਜ Inverter ਨਾ ਖੋਲ੍ਹੋ.

ਇੱਕ ਬਫਰ ਜ਼ੋਨ ਸਥਾਪਤ ਹੋਣਾ ਚਾਹੀਦਾ ਹੈ ਅਤੇ ਉੱਚ-ਵੋਲਟੇਜ ਰਬੜ ਦੇ ਦਸਤਾਨੇ ਗਰਮੀ ਨੂੰ (ਕਲਾਸ 0 ਚਮੜੇ ਸੁਰੱਖਿਆ ਦੇ ਨਾਲ) ਹਾਈ-ਵੋਲਟੇਜ 'ਤੇ ਕੰਮ ਕਰ ਰਹੇ ਹਨ, ਨੂੰ ਪੁਰਾਣੇ ਦੀ ਲੋੜ. ਅਸਫ਼ਲਤਾ ਇਹ ਹਦਾਇਤ ਦੀ ਪਾਲਣਾ ਕਰਨ ਲਈ ਗੰਭੀਰ ਨਿਜੀ ਸੱਟ ਮੌਤ ਦਾ ਨਤੀਜਾ ਹੋ ਸਕਦਾ.
ਰਬੜ ਦੇ ਦਸਤਾਨੇ-ਗਰਮੀ ਨੂੰ ਹੈ, ਜੋ ਕਿ ਹੈ, ਜਦਕਿ ਹਾਈ-ਵੋਲਟੇਜ ਸਿਸਟਮ 'ਤੇ ਕੰਮ ਕਰ ਪਾਉਣਾ ਲਾਜ਼ਮੀ ਹੋਵੇਗਾ ਕਲਾਸ ਹਨ 0 ਚਮੜੇ ਸੁਰੱਖਿਆ ਦੇ ਨਾਲ. ਰਬੜ ਦੇ ਦਸਤਾਨੇ ਰਬੜ ਇਨਸੂਲੇਸ਼ਨ ਦਸਤਾਨੇ ਟੈਸਟਿੰਗ ਵਿਧੀ ਸਫ਼ਾ 'ਤੇ "ਡਾਇਗਨੋਸਟਿਕ ਲਈ ਸੰਦ / ਸੇਵਾ ਪ੍ਰਕਾਸ਼ਨ" ਵਿੱਚ ਪਾਇਆ ਹੇਠ ਹਰ ਵਰਤਣ ਅੱਗੇ ਟੈਸਟ ਕੀਤਾ ਜਾਣਾ ਚਾਹੀਦਾ ਹੈ 6. ਅਸਫ਼ਲਤਾ ਇਹ ਹਦਾਇਤ ਦੀ ਪਾਲਣਾ ਕਰਨ ਲਈ ਗੰਭੀਰ ਨਿਜੀ ਸੱਟ ਮੌਤ ਦਾ ਨਤੀਜਾ ਹੋ ਸਕਦਾ.
ਸਫ਼ੇ 'ਤੇ ਮੁਆਇਨਾ ਜ ਕੋਈ ਵੀ ਹਾਈ-ਵੋਲਟੇਜ ਕੇਬਲ ਜ ਭਾਗ' ਤੇ ਕੰਮ ਕਰ "ਹਾਈ-ਵੋਲਟੇਜ ਸੇਵਾ ਬੰਦ ਹੈ ਅਤੇ ਪਾਵਰ-ਅੱਪ ਵਿਧੀ" ਅੱਗੇ 4 ਬਾਅਦ ਵਿੱਚ ਕੀਤਾ ਜਾਣਾ ਚਾਹੀਦਾ ਹੈ. ਅਸਫ਼ਲਤਾ ਇਹ ਹਦਾਇਤ ਦੀ ਪਾਲਣਾ ਕਰਨ ਲਈ ਗੰਭੀਰ ਨਿਜੀ ਸੱਟ ਮੌਤ ਦਾ ਨਤੀਜਾ ਹੋ ਸਕਦਾ.
ਲਾਕਆਉਟ ਤੇ ਟੈਗਆਉਟ ਜੰਤਰ ਸਿਰਫ ਤਕਨੀਸ਼ੀਅਨ ਹੈ, ਜੋ ਕਿ ਗੱਡੀ 'ਤੇ ਲਾਕਆਉਟ ਤੇ ਟੈਗਆਉਟ ਜੰਤਰ ਰੱਖਿਆ ਕੇ ਹਟਾਇਆ ਜਾਣਾ ਚਾਹੀਦਾ ਹੈ. ਅਸਫ਼ਲਤਾ ਇਹ ਹਦਾਇਤ ਦੀ ਪਾਲਣਾ ਕਰਨ ਲਈ ਗੰਭੀਰ ਨਿਜੀ ਸੱਟ ਮੌਤ ਦਾ ਨਤੀਜਾ ਹੋ ਸਕਦਾ.
ਹਾਈ-ਵੋਲਟੇਜ ਰਬੜ ਦੇ ਦਸਤਾਨੇ ਗਰਮੀ ਨੂੰ (ਕਲਾਸ 0 ਚਮੜੇ ਸੁਰੱਖਿਆ ਦੇ ਨਾਲ) ਜਦ ਕਿਸੇ ਵੀ 'ਤੇ ਕੰਮ ਕਰ ਪਾਉਣਾ ਲਾਜ਼ਮੀ ਹੋਵੇਗਾ
ਹਾਈ-ਵੋਲਟੇਜ ਕੇਬਲ. "ਹਾਈ-ਵੋਲਟੇਜ ਸੇਵਾ ਬੰਦ ਹੈ ਅਤੇ ਪਾਵਰ-ਅੱਪ ਵਿਧੀ" ਸਫ਼ੇ 'ਤੇ 4 ਕਿਸੇ ਵੀ ਹਾਈ-ਵੋਲਟੇਜ ਕੇਬਲ ਨੂੰ ਹਟਾਉਣ ਲਈ ਪੁਰਾਣੇ ਬਾਅਦ ਵਿੱਚ ਕੀਤਾ ਜਾਣਾ ਚਾਹੀਦਾ ਹੈ. ਅਸਫ਼ਲਤਾ ਇਹ ਹਦਾਇਤ ਦੀ ਪਾਲਣਾ ਕਰਨ ਲਈ ਗੰਭੀਰ ਨਿਜੀ ਸੱਟ ਮੌਤ ਦਾ ਨਤੀਜਾ ਹੋ ਸਕਦਾ.
ਹਾਈ-ਵੋਲਟੇਜ ਕੇਬਲ ਅਤੇ ਵਾਇਰਿੰਗ ਸੰਤਰੀ ਹਨ ਅਤੇ ਕੁਨੈਕਟਰ 'ਤੇ ਇੱਕ ਚੇਤਾਵਨੀ ਦੇ ਲੇਬਲ ਸ਼ਾਮਿਲ ਹਨ. ਹਾਈ-ਵੋਲਟੇਜ ਭਾਗ ਇੱਕ ਲੇਬਲ ਨਾਲ ਮਾਰਕ ਕੀਤੇ ਹਨ,. ਹਾਈ-ਵੋਲਟੇਜ ਰਬੜ ਦੇ ਦਸਤਾਨੇ ਗਰਮੀ ਨੂੰ (ਕਲਾਸ 0 ਚਮੜੇ ਸੁਰੱਖਿਆ ਦੇ ਨਾਲ) ਇਹ ਭਾਗ ਦੇ ਕਿਸੇ ਵੀ 'ਤੇ ਕੰਮ ਕਰ ਲਈ ਵਰਤਿਆ ਜਾਣਾ ਚਾਹੀਦਾ ਹੈ. ਅਸਫ਼ਲਤਾ ਇਹ ਹਦਾਇਤ ਦੀ ਪਾਲਣਾ ਕਰਨ ਲਈ ਗੰਭੀਰ ਨਿਜੀ ਸੱਟ ਮੌਤ ਦਾ ਨਤੀਜਾ ਹੋ ਸਕਦਾ.

ਹਾਈ-ਵੋਲਟੇਜ ਸੇਵਾ ਬੰਦ ਨੇਮਾਵਲੀ

ਹਾਈ-ਵੋਲਟੇਜ ਸੇਵਾ ਬੰਦ ਹੈ ਅਤੇ ਪਾਵਰ-ਅੱਪ ਵਿਧੀ1. ਮਗਰ "ਹਾਈ-ਵੋਲਟੇਜ ਕੰਮ ਖੇਤਰ 'ਵਿਧੀ.
2. ਪੈਕ ਦੇ ਮੋਰਚੇ 'ਤੇ ਲਾਲ ਪੈਕ ਸਰਵਿਸ ਸਵਿੱਚ ਨੂੰ ਲੱਭੋ ਅਤੇ ਧੱਕਣ ਨੂੰ ਬੰਦ.
3. ਸਰਵਿਸ ਸਵਿੱਚ ਦਾ ਢੱਕਣ ਹਟਾਓ ਅਤੇ ਤਾਲਾਬੰਦੀ ਬਰੈਕਟ ਇੰਸਟਾਲ (J48506).
4. ਲਾੱਕਆਉਟ ਬਰੈਕਟ ਨੂੰ ਠੀਕ ਟੈਗ.
5. ਪੈਕ ਸਰਵਿਸ ਸਵਿੱਚ ਯਕੀਨੀ ਬੰਦ ਸਥਿਤੀ ਤੱਕ ਜਾਣ ਨਾ ਕਰ ਸਕਦਾ ਹੈ.
6. ਸਿਸਟਮ ਦੇ ਇੱਕ ਘੱਟੋ ਘੱਟ ਕਰਨ ਲਈ ਸੈੱਟ ਕਰਨ ਲਈ ਆਗਿਆ ਦਿਓ 5 ਮਿੰਟ ਹਾਈ ਵੋਲਟੇਜ ਉਤਾਰਨਾ.
7. ServiceRanger ਜੁੜੋ ਅਤੇ ਵੇਖਣ ਲਈ ਡਾਟਾ ਦੀ ਨਿਗਰਾਨੀ PID 116 ਕਹਿੰਦੇ ਹਨ, "ਹਾਈ-ਵੋਲਟੇਜ ਬੈਟਰੀ ਸੰਭਾਵੀ." SPN ਵਰਤੋ 520323 J1939 ਕੁਨੈਕਸ਼ਨ ਲਈ "ਬੈਟਰੀ ਵੋਲਟੇਜ ਆਰ.ਬੀ." (ਰੀਲੇਅ ਬਾਕਸ).
8. ਵੋਲਟੇਜ ਹੋਣਾ ਚਾਹੀਦਾ ਹੈ 30 ਵੋਲਟ ਜ ਘੱਟ. ਜੇ ਵੋਲਟੇਜ ਉਪਰ ਹੈ 30 ਵੋਲਟ, ਵਾਹਨ 'ਤੇ ਕੰਮ ਨਾ ਕਰਦੇ ਅਤੇ 1-800-826-ਮਦਦ' ਤੇ Eaton® ਸੰਪਰਕ ਕਰੋ (4357).
9. ਇਗਨੀਸ਼ਨ ਕੁੰਜੀ ਨੂੰ ਬੰਦ ਕਰ ਦਿਓ ਅਤੇ ਦੀ ਮੁਰੰਮਤ ਜ ਕਦਮ ਹੈ ਨਿਪਟਾਰਾ ਕਰਨ ਲਈ ਅੱਗੇ ਜਾਰੀ.
ਸੂਚਨਾ: ਵੋਲਟੇਜ ਫਿਲਹਾਲ ਜਦ ਕੁੰਜੀ ਬੰਦ ਹੈ ਦੇ ਤੁਪਕੇ.

ਹਾਈ-ਵੋਲਟੇਜ ਸਰਵਿਸ ਪਾਵਰ-ਅੱਪ ਵਿਧੀ

1. ਆਪਣੇ ਨੂੰ ਜਿੰਦਰਾ ਅਹੁਦੇ ਨੂੰ ਸਭ ਹਾਈ-ਵੋਲਟੇਜ ਕੁਨੈਕਟਰ ਇੰਸਟਾਲ.
2. ਵਿਅਕਤੀ ਨੂੰ ਵਾਹਨ 'ਤੇ ਕੰਮ ਕਰ ਤੁਹਾਨੂੰ ਹਨ, ਜੇ, ਲਾੱਕਆਉਟ ਬਰੈਕਟ ਅਤੇ ਟੈਗ ਹਟਾਉਣ ਲਈ.
3. ਸਰਵਿਸ ਸਵਿੱਚ ਵੱਧ ਲਾੱਕਆਉਟ ਬਰੈਕਟ ਮੁੜ.
4. ਸਰਵਿਸ ਕੱਢਣ ਬਾਹਰ ਜਾਓ ਅਤੇ ਇਸ ਲਈ ਵਾਹਨ ਦਾ ਸਮੂਹ ਚਾਹੀਦਾ ਹੈ 2 ਮਿੰਟ.
5. Start vehicle when appropriate.[/fusion_modal][fusion_modal name=component_locationtitle=”Eaton ਹਾਈਬ੍ਰਾਇਡ ਭਾਗ ਅਤੇ ਕੁਨੈਕਟਰ ਸਥਿਤੀ ” size=largebackground=”#ffffffborder_color=”” show_footer=yesclass=”” id=””]

Eaton ਹਾਈਬ੍ਰਾਇਡ ਭਾਗ ਅਤੇ ਕੁਨੈਕਟਰ ਸਥਾਨ MY08 ਸਿਸਟਮ

[/fusion_modal][fusion_modal name=component_location2title=”Eaton ਹਾਈਬ੍ਰਾਇਡ ਭਾਗ ਅਤੇ ਕੁਨੈਕਟਰ ਸਥਿਤੀ my09 ਸਿਸਟਮ” size=largebackground=”#ffffffborder_color=”” show_footer=yesclass=”” id=””]

Eaton ਹਾਈਬ੍ਰਾਇਡ ਭਾਗ ਅਤੇ ਕੁਨੈਕਟਰ ਸਥਾਨ my09 ਸਿਸਟਮ

[/fusion_modal][/fusion_builder_column][/fusion_builder_row][/fusion_builder_container][fusion_builder_container hundred_percent=nohundred_percent_height=nohundred_percent_height_scroll=nohundred_percent_height_center_content=yesequal_height_columns=nomenu_anchor=”” hide_on_mobile=small-visibility,medium-visibility,large-visibilitystatus=publishedpublish_date=”” class=”” id=”” background_color=”” background_image=”” background_position=center centerbackground_repeat=no-repeatfade=nobackground_parallax=noneenable_mobile=noparallax_speed=”0.3″ video_mp4=”” video_webm=”” video_ogv=”” video_url=”” video_aspect_ratio=”16:9″ video_loop=yesvideo_mute=yesvideo_preview_image=”” border_size=”” border_color=”” border_style=solidmargin_top=”” margin_bottom=”” padding_top=”” padding_right=”” padding_bottom=”” padding_left=””][fusion_builder_row][fusion_builder_column type=”1_1layout=”1_1spacing=”” center_content=nolink=”” target=_selfmin_height=”” hide_on_mobile=small-visibility,medium-visibility,large-visibilityclass=”” id=”” background_color=”” background_image=”” background_image_id=”” background_position=left topbackground_repeat=no-repeathover_type=noneborder_size=”0″ border_color=”” border_style=solidborder_position=allpadding_top=”” padding_right=”” padding_bottom=”” padding_left=”” margin_top=”” margin_bottom=”” animation_type=”” animation_direction=leftanimation_speed=”0.3″ animation_offset=”” last=no”][fusion_content_boxes layout=clean-horizontalcolumns=”1″ title_size=”18pxheading_size=”3″ title_color=”#ffffffbody_color=”#ffffffbackgroundcolor=”#4f4f4ficon=”” iconflip=”” iconrotate=”” iconspin=noiconcolor=”” icon_circle=”” icon_circle_radius=”” circlecolor=”” circlebordersize=”” circlebordercolor=”” outercirclebordersize=”” outercirclebordercolor=”” icon_size=”” icon_hover_type=”” hover_accent_color=”” image=”” image_id=”” image_width=”” image_height=”” link_type=”” button_span=”” link_area=”” link_target=”” icon_align=leftanimation_type=”” animation_delay=”” animation_offset=”” animation_direction=leftanimation_speed=”0.3″ margin_top=”” margin_bottom=”” hide_on_mobile=small-visibility,medium-visibility,large-visibilityclass=”” id=””][fusion_content_box title=ਕਦਮ 1. ਐਕਟਿਵ ਜ ਸਰਗਰਮ ਨੁਕਸ ਕੋਡ ਹਾਲਤ ਲਈ ਚੈੱਕ ਕਰੋ ਅਤੇ ਇਲੈਕਟ੍ਰੀਕਲ Pretest ਕਰਨ.backgroundcolor=”” icon=”” iconflip=”” iconrotate=”” iconspin=noiconcolor=”” circlecolor=”” circlebordersize=”” circlebordercolor=”” outercirclebordersize=”” outercirclebordercolor=”” image=”” image_id=”” image_width=”” image_height=”” link=”” linktext=”ਹੋਰ ਪੜ੍ਹੋ” link_target=”” animation_type=”” animation_direction=leftanimation_speed=”0.3″ animation_offset=””]

  1. ਦੀ ਸਮੀਖਿਆ ਅਤੇ ਪਾਲਣਾ ਕਰੋ ਚੇਤਾਵਨੀ & ਚੇਤਾਵਨੀ.
  2. Key off or two minutes.
  3. ਕੁੰਜੀ 'ਤੇ.
  4. 9-ਵੇਅ ਡਾਇਗਨੋਸਟਿਕ ਕਨੈਕਟਰ ਜਾਂ ਹੱਥੀਂ ਵਰਤਦੇ ਹੋਏ ਸਰਵਿਸ ਰੇਂਜਰ ਨਾਲ ਐਕਟਿਵ ਫਾਲਟ ਕੋਡ ਅਤੇ ਐਫਐਮਆਈ ਪ੍ਰਾਪਤ ਕਰੋ.
  5. ਖ਼ਤਰਾ: ਦੇਖੋ ਉੱਚ-ਵੋਲਟੇਜ ਸੇਵਾ ਬੰਦ ਅਤੇ ਪਾਵਰ-ਅਪ ਪ੍ਰਕਿਰਿਆ. ਸਦਮਾ ਬਚਣ ਲਈ ਕਾਰਵਾਈ ਦੀ ਪਾਲਣਾ ਕਰੋ, ਸਾੜ ਜ ਗਲਤ ਪਰਬੰਧਨ ਹਾਈ-ਵੋਲਟੇਜ ਮੌਤ.
  6. ਇਲੈਕਟ੍ਰੀਕਲ Pretest ਅਤੇ ਹਾਈਬ੍ਰਾਇਡ ਇਲੈਕਟ੍ਰੀਕਲ Pretest ਕਰਨ:
    • ਕੋਈ ਮੁੱਦੇ ਕਿਸੇ ਬਿਜਲੀ ਟੈਸਟ ਦੌਰਾਨ ਪਾਇਆ ਕਰ ਰਹੇ ਹੋ, ਕਦਮ ਨੂੰ ਜਾਣ 2.
    • ਜੇ ਇਸ ਮੁੱਦੇ ਨੂੰ ਕਿਸੇ ਬਿਜਲੀ ਟੈਸਟ ਦੌਰਾਨ ਮੁਰੰਮਤ ਕੀਤਾ ਗਿਆ ਹੈ, ਕਦਮ ਨੂੰ ਜਾਣ 8.

[/fusion_content_box][/fusion_content_boxes][fusion_content_boxes layout=clean-horizontalcolumns=”1″ title_size=”18pxheading_size=”3″ title_color=”#ffffffbody_color=”#ffffffbackgroundcolor=”#4f4f4ficon=”” iconflip=”” iconrotate=”” iconspin=noiconcolor=”” icon_circle=”” icon_circle_radius=”” circlecolor=”” circlebordersize=”” circlebordercolor=”” outercirclebordersize=”” outercirclebordercolor=”” icon_size=”” icon_hover_type=”” hover_accent_color=”” image=”” image_id=”” image_width=”” image_height=”” link_type=”” button_span=”” link_area=”” link_target=”” icon_align=leftanimation_type=”” animation_delay=”” animation_offset=”” animation_direction=leftanimation_speed=”0.3″ margin_top=”” margin_bottom=”” hide_on_mobile=small-visibility,medium-visibility,large-visibilityclass=”” id=””][fusion_content_box title=ਕਦਮ 2. FMIs ਮੌਜੂਦ ਪੁਸ਼ਟੀ ਕਰੋ.backgroundcolor=”” icon=”” iconflip=”” iconrotate=”” iconspin=noiconcolor=”” circlecolor=”” circlebordersize=”” circlebordercolor=”” outercirclebordersize=”” outercirclebordercolor=”” image=”” image_id=”” image_width=”” image_height=”” link=”” linktext=”ਹੋਰ ਪੜ੍ਹੋ” link_target=”” animation_type=”” animation_direction=leftanimation_speed=”0.3″ animation_offset=””]

  1. 1. Which FMIs are present for Active Fault Code 111?
     If any FMIs other than 2 ਜ 9 is set, check ServiceRanger HCM configurations. Inverter type should have 40-Pin selected. If 56-Pin is selected, change to 40-Pin, ਫਿਰ ਕਦਮ ਨੂੰ ਜਾਣ 3.

[/fusion_content_box][/fusion_content_boxes][fusion_content_boxes layout=clean-horizontalcolumns=”1″ title_size=”18pxheading_size=”3″ title_color=”#ffffffbody_color=”#ffffffbackgroundcolor=”#4f4f4ficon=”” iconflip=”” iconrotate=”” iconspin=noiconcolor=”” icon_circle=”” icon_circle_radius=”” circlecolor=”” circlebordersize=”” circlebordercolor=”” outercirclebordersize=”” outercirclebordercolor=”” icon_size=”” icon_hover_type=”” hover_accent_color=”” image=”” image_id=”” image_width=”” image_height=”” link_type=”” button_span=”” link_area=”” link_target=”” icon_align=leftanimation_type=”” animation_delay=”” animation_offset=”” animation_direction=leftanimation_speed=”0.3″ margin_top=”” margin_bottom=”” hide_on_mobile=small-visibility,medium-visibility,large-visibilityclass=”” id=””][fusion_content_box title=ਕਦਮ 2. FMIs ਮੌਜੂਦ ਪੁਸ਼ਟੀ ਕਰੋ.backgroundcolor=”” icon=”” iconflip=”” iconrotate=”” iconspin=noiconcolor=”” circlecolor=”” circlebordersize=”” circlebordercolor=”” outercirclebordersize=”” outercirclebordercolor=”” image=”” image_id=”” image_width=”” image_height=”” link=”” linktext=”ਹੋਰ ਪੜ੍ਹੋ” link_target=”” animation_type=”” animation_direction=leftanimation_speed=”0.3″ animation_offset=””]

  1. 1. Which FMIs are present for Active Fault Code 111?
     If any FMIs other than 2 ਜ 9 is set, check ServiceRanger HCM configurations. Inverter type should have 40-Pin selected. If 56-Pin is selected, change to 40-Pin, ਫਿਰ ਕਦਮ ਨੂੰ ਜਾਣ 3.

[/fusion_content_box][/fusion_content_boxes][fusion_content_boxes layout=clean-horizontalcolumns=”2″ title_size=”18pxheading_size=”3″ title_color=”#ffffffbody_color=”#ffffffbackgroundcolor=”#4f4f4ficon=”” iconflip=”” iconrotate=”” iconspin=noiconcolor=”” icon_circle=”” icon_circle_radius=”” circlecolor=”” circlebordersize=”” circlebordercolor=”” outercirclebordersize=”” outercirclebordercolor=”” icon_size=”” icon_hover_type=”” hover_accent_color=”” image=”” image_id=”” image_width=”” image_height=”” link_type=”” button_span=”” link_area=”” link_target=”” icon_align=leftanimation_type=”” animation_delay=”” animation_offset=”” animation_direction=leftanimation_speed=”0.3″ margin_top=”” margin_bottom=”” hide_on_mobile=small-visibility,medium-visibility,large-visibilityclass=”” id=””][fusion_content_box title=ਕਦਮ 4. Verify ground to Inverter.backgroundcolor=”” icon=”” iconflip=”” iconrotate=”” iconspin=noiconcolor=”” circlecolor=”” circlebordersize=”” circlebordercolor=”” outercirclebordersize=”” outercirclebordercolor=”” image=”” image_id=”” image_width=”” image_height=”” link=”” linktext=”ਹੋਰ ਪੜ੍ਹੋ” link_target=”” animation_type=”” animation_direction=leftanimation_speed=”0.3″ animation_offset=””]

  1. Measure CAN to ground resistance on Inverter OEM Connector Pin 1 to Inverter Case and Pin 2 ਕੇਸ inverter ਕਰਨ ਲਈ:
    • If resistance is 7K ohms, ਕਦਮ ਨੂੰ ਜਾਣ 5.
    • If resistance is 0–100 ohms, repair shorted CAN Link Circuit, ਫਿਰ ਕਦਮ ਨੂੰ ਜਾਣ 5.

[/fusion_content_box][fusion_content_box title=ਕਦਮ 5. Verify CAN terminals are in the correct location.backgroundcolor=”” icon=”” iconflip=”” iconrotate=”” iconspin=noiconcolor=”” circlecolor=”” circlebordersize=”” circlebordercolor=”” outercirclebordersize=”” outercirclebordercolor=”” image=”” image_id=”” image_width=”” image_height=”” link=”” linktext=”ਹੋਰ ਪੜ੍ਹੋ” link_target=”” animation_type=”” animation_direction=leftanimation_speed=”0.3″ animation_offset=””]

  1. ਰਾਗ ਵਿਚਕਾਰ Inverter 40-ਰਾਹ ਕੁਨੈਕਟਰ ਪਿੰਨ ਟਾਕਰੇ 4 and Dash 9-Way Diagnostic Connector Pin H (if Pin H is not populated, find 3- Way Connector near the 9-Way or Terminating Resistor Pin 1 near the 9-Way):
    • ਵਿਰੋਧ ਦੇ 0-0.3 ohms ਹੈ, ਜੇ, ਕਦਮ ਨੂੰ ਜਾਣ 6.
    • ਟਾਕਰੇ ਹੈ, ਜੇ 60 ohms, ਮੁਰੰਮਤ ਵਿਛਾਕੇ ਸਕਦੇ (hi ਅਤੇ ਘੱਟ-ਗ਼ਲਤ ਤਾਰ ਕਰ ਰਹੇ ਹਨ), ਫਿਰ ਕਦਮ ਨੂੰ ਜਾਣ 6.

[/fusion_content_box][/fusion_content_boxes][fusion_content_boxes layout=clean-horizontalcolumns=”2″ title_size=”18pxheading_size=”3″ title_color=”#ffffffbody_color=”#ffffffbackgroundcolor=”#4f4f4ficon=”” iconflip=”” iconrotate=”” iconspin=noiconcolor=”” icon_circle=”” icon_circle_radius=”” circlecolor=”” circlebordersize=”” circlebordercolor=”” outercirclebordersize=”” outercirclebordercolor=”” icon_size=”” icon_hover_type=”” hover_accent_color=”#f41000image=”” image_id=”” image_width=”” image_height=”” link_type=”” button_span=”” link_area=”” link_target=”” icon_align=leftanimation_type=”” animation_delay=”” animation_offset=”” animation_direction=leftanimation_speed=”0.3″ margin_top=”” margin_bottom=”” hide_on_mobile=small-visibility,medium-visibility,large-visibilityclass=”” id=””][fusion_content_box title=ਕਦਮ 6. Verify power and ground to Inverter.backgroundcolor=”” icon=”” iconflip=”” iconrotate=”” iconspin=”” iconcolor=”” circlecolor=”” circlebordersize=”” circlebordercolor=”” outercirclebordersize=”” outercirclebordercolor=”” image=”” image_id=”” image_width=”” image_height=”” link=”” linktext=”” link_target=”” animation_type=”” animation_direction=leftanimation_speed=”0.3″ animation_offset=””]

  1. ਕੁੰਜੀ 'ਤੇ (with Inverter 40-Way Connector still removed).
  2. Measure voltage on OEM 40-Way Connector Pin 1 ਪਿੰਨ ਨੂੰ 6 ਅਤੇ ਪਿੰਨ 2 ਪਿੰਨ ਨੂੰ 7:
    • If battery voltage is present, Inverter ਨੂੰ ਤਬਦੀਲ. My09 Inverter ਹਟਾਉਣ ਅਤੇ TRSM2000 ਵਿਚ ਇੰਸਟਾਲੇਸ਼ਨ ਵਿਧੀ ਵੇਖੋ, ਫਿਰ ਕਦਮ ਨੂੰ ਜਾਣ 9.
    • If battery voltage is not present, ਕਦਮ ਨੂੰ ਜਾਣ 7.

[/fusion_content_box][fusion_content_box title=ਕਦਮ 7. Verify ground to Inverter.backgroundcolor=”” icon=”” iconflip=”” iconrotate=”” iconspin=noiconcolor=”” circlecolor=”” circlebordersize=”” circlebordercolor=”” outercirclebordersize=”” outercirclebordercolor=”” image=”” image_id=”” image_width=”” image_height=”” link=”” linktext=”ਹੋਰ ਪੜ੍ਹੋ” link_target=”” animation_type=”” animation_direction=leftanimation_speed=”0.3″ animation_offset=””]

  1. 1. Measure resistance between OEM 40-Way Connector Pin 6 ਜ 7 ਜ਼ਮੀਨ ਨੂੰ:
    • If resistance to ground is 0–0.3 ohms, ਕਦਮ ਨੂੰ ਜਾਣ 8.
    • If resistance is higher than 0.3 ohms, ਦੀ ਮੁਰੰਮਤ OEM ਜ਼ਮੀਨ ਸਰਕਟ inverter ਕਰਨ, ਫਿਰ ਕਦਮ ਨੂੰ ਜਾਣ 9.

[/fusion_content_box][/fusion_content_boxes][fusion_content_boxes layout=clean-horizontalcolumns=”2″ title_size=”18pxheading_size=”3″ title_color=”#ffffffbody_color=”#ffffffbackgroundcolor=”#4f4f4ficon=”” iconflip=”” iconrotate=”” iconspin=noiconcolor=”” icon_circle=”” icon_circle_radius=”” circlecolor=”” circlebordersize=”” circlebordercolor=”” outercirclebordersize=”” outercirclebordercolor=”” icon_size=”” icon_hover_type=”” hover_accent_color=”#f41000image=”” image_id=”” image_width=”” image_height=”” link_type=”” button_span=”” link_area=”” link_target=”” icon_align=leftanimation_type=”” animation_delay=”” animation_offset=”” animation_direction=leftanimation_speed=”0.3″ margin_top=”” margin_bottom=”” hide_on_mobile=small-visibility,medium-visibility,large-visibilityclass=”” id=””][fusion_content_box title=ਕਦਮ 8. Verify power from HCMbackgroundcolor=”” icon=”” iconflip=”” iconrotate=”” iconspin=”” iconcolor=”” circlecolor=”” circlebordersize=”” circlebordercolor=”” outercirclebordersize=”” outercirclebordercolor=”” image=”” image_id=”” image_width=”” image_height=”” link=”” linktext=”” link_target=”” animation_type=”” animation_direction=leftanimation_speed=”0.3″ animation_offset=””]

  1. ਕੁੰਜੀ ਬੰਦ.
  2. Remove HCM 38-Way System Connector.
  3. Measure resistance on HCM 38-Way OEM Connector Pin 2 to Inverter 40-Way Connector Pin 1:
    • ਵਿਰੋਧ ਦੇ 0-0.3 ohms ਹੈ, ਜੇ, HCM ਨੂੰ ਤਬਦੀਲ, ਫਿਰ ਕਦਮ ਨੂੰ ਜਾਣ 9.
    • If resistance is OL or more than 0.3 ohms, repair OEM Harness between HCM and Inverter, ਫਿਰ ਕਦਮ ਨੂੰ ਜਾਣ 9.

[/fusion_content_box][fusion_content_box title=ਕਦਮ 9. ਮੁਰੰਮਤ ਦੀ ਪੜਤਾਲ.backgroundcolor=”” icon=”” iconflip=”” iconrotate=”” iconspin=noiconcolor=”” circlecolor=”” circlebordersize=”” circlebordercolor=”” outercirclebordersize=”” outercirclebordercolor=”” image=”” image_id=”” image_width=”” image_height=”” link=”” linktext=”ਹੋਰ ਪੜ੍ਹੋ” link_target=”” animation_type=”” animation_direction=leftanimation_speed=”0.3″ animation_offset=””]

  1. ਕੁੰਜੀ ਬੰਦ.
  2. ਸਾਰੇ ਕੁਨੈਕਟਰ ਤੇ ਰਿਣਾਤਮਕ ਬੈਟਰੀ ਕੇਬਲ ਮੁੜ ਜੁੜਨ.
  3. ਕੁੰਜੀ 'ਤੇ.
  4. ਕੋਡ ਆਸਮਾਨ, ਵੇਖੋ, ਆਸਮਾਨ ਸਰਗਰਮ ਨੁਕਸ.
  5. ਵਾਹਨ ਗੱਡੀ ਅਤੇ ਕੋਡ ਸੈੱਟ ਕਰਨ ਲਈ ਕੋਸ਼ਿਸ਼.
  6. ਕੋਡ ਲਈ ਚੈੱਕ ਕਰੋ, ਵੇਖੋ, ਸਰਗਰਮ ਅਤੇ ਸਰਗਰਮ ਨੁਕਸ ਦੇਖੋ.
    • ਕੋਈ ਕੋਡ ਜੇ, ਟੈਸਟ ਮੁਕੰਮਲ ਹੋ ਗਈ ਹੈ.
    • ਜੇ ਨੁਕਸ ਕੋਡ 111 ਦਿਸਦਾ ਹੈ, ਟੈਸਟਿੰਗ ਵਿੱਚ ਗਲਤੀ ਦਾ ਪਤਾ, ਕਦਮ ਨੂੰ ਜਾਣ 1.
    • ਇੱਕ ਕੋਡ ਦੇ ਇਲਾਵਾ ਹੋਰ, ਜੇ 111 ਦਿਸਦਾ ਹੈ, ਵੇਖੋ, ਕੋਡ ਇੰਡੈਕਸ ਸੂਚੀ ਖਰਾਬ.

[/fusion_content_box][/fusion_content_boxes][/fusion_builder_column][/fusion_builder_row][/fusion_builder_container][fusion_global id=”13788″]