[fusion_builder_container hundred_percent=nohundred_percent_height=nohundred_percent_height_scroll=nohundred_percent_height_center_content=yesequal_height_columns=nomenu_anchor=”” hide_on_mobile=small-visibility,medium-visibility,large-visibilitystatus=publishedpublish_date=”” class=”” id=”” background_color=”” background_image=”” background_position=center centerbackground_repeat=no-repeatfade=nobackground_parallax=noneenable_mobile=noparallax_speed=”0.3″ video_mp4=”” video_webm=”” video_ogv=”” video_url=”” video_aspect_ratio=”16:9″ video_loop=yesvideo_mute=yesvideo_preview_image=”” border_size=”” border_color=”” border_style=solidmargin_top=”35″ margin_bottom=”” padding_top=”” padding_right=”” padding_bottom=”” padding_left=””][fusion_builder_row][fusion_builder_column type=”1_1layout=”1_1spacing=”” center_content=nolink=”” target=_selfmin_height=”” hide_on_mobile=small-visibility,medium-visibility,large-visibilityclass=”” id=”” background_color=”” background_image=”” background_image_id=”” background_position=left topbackground_repeat=no-repeathover_type=noneborder_size=”0″ border_color=”” border_style=solidborder_position=allpadding_top=”” padding_right=”” padding_bottom=”” padding_left=”” margin_top=”” margin_bottom=”” animation_type=”” animation_direction=leftanimation_speed=”0.3″ animation_offset=”” last=no”][fusion_text columns=”” column_min_width=”” column_spacing=”” rule_style=defaultrule_size=”” rule_color=”” hide_on_mobile=small-visibility,medium-visibility,large-visibilityclass=”” id=””]

Eaton Fuller Hibrid İletim Arıza Kodu 116 – Yüksek voltaj röleleri -(MY08 Sistemleri)

[/fusion_text][/fusion_builder_column][/fusion_builder_row][/fusion_builder_container][fusion_builder_container hundred_percent=nohundred_percent_height=nohundred_percent_height_scroll=nohundred_percent_height_center_content=yesequal_height_columns=nomenu_anchor=”” hide_on_mobile=small-visibility,medium-visibility,large-visibilitystatus=publishedpublish_date=”” class=”” id=”” background_color=”” background_image=”” background_position=center centerbackground_repeat=no-repeatfade=nobackground_parallax=noneenable_mobile=noparallax_speed=”0.3″ video_mp4=”” video_webm=”” video_ogv=”” video_url=”” video_aspect_ratio=”16:9″ video_loop=yesvideo_mute=yesvideo_preview_image=”” border_size=”” border_color=”” border_style=solidmargin_top=”” margin_bottom=”” padding_top=”” padding_right=”” padding_bottom=”” padding_left=””][fusion_builder_row][fusion_builder_column type=”1_1layout=”1_1spacing=”” center_content=nolink=”” target=_selfmin_height=”” hide_on_mobile=small-visibility,medium-visibility,large-visibilityclass=”” id=”” background_color=”” background_image=”” background_image_id=”” background_position=left topbackground_repeat=no-repeathover_type=noneborder_size=”0″ border_color=”” border_style=solidborder_position=allpadding_top=”” padding_right=”” padding_bottom=”” padding_left=”” margin_top=”” margin_bottom=”” animation_type=”” animation_direction=leftanimation_speed=”0.3″ animation_offset=”” last=no”][fusion_text columns=”” column_min_width=”” column_spacing=”” rule_style=defaultrule_size=”” rule_color=”” hide_on_mobile=small-visibility,medium-visibility,large-visibilityclass=”” id=””]

Eaton Hibrit Sürücü Sistemleri modelleri için kod Arıza (MY08) EH-8E306A-U, EH-8E306A-UPG, EH-8E306A-UP, EH-8E306A-CD, EH-8E306A-T, EH-6E606B-CD. nasıl test öğrenmek için aşağıdaki oku, temizlemek ve Freightliner için arıza kodu hataları düzeltmek, Mack, Peterbilt, Kenworth, Volvo, Uluslararası, ve ağır kamyon ve ekipmanları. The High-Voltage Relays are located inside the Power Electronics Carrier (PEC) Röle Kutusu biriminde. There is 1 precharge relay on the positive side, pozitif üzerinde ek bir röle, ve 1 on the negative for a total of 3. Sistem kapalı olduğunda bu röleler normalde açık. röleler İnvertör vasıtasıyla kontrol edilir.

Hata kodu 116 – High Voltage Relays Detection

Sistem hatası tespit önce aşağıdaki ön koşulların karşılanması gerekir:

  • İnvertör ateşleme voltajı daha büyüktür 7 volt ve daha az 16 volt.

Not: Aktif olmayan bir kod giderirken bakın Ürün Tanı Modu (PDM)

Koşullar Arıza Kodu Aktif ayarlama

  • IMF 10 is set when the Inverter detects the input voltage measured at the capacitor is less than 210 volts within 3 seconds after the sub-relay closed in the Relay Box.
  • IMF 14 is set when only the negative relay in the Relay Box is on and capacitor voltage decreases less than 10 volts/5 seconds when initial capacitor voltage was greater than 200 volts and motor speed less than 500 min-1, or there is a detect error in the initial check.

Yedek zaman Arıza Kodu 116 Aşağıdaki durumlar meydana ayarlanır:

  • FMI için Amber “Kontrol Hibrit” ışığı yanıp söner 10 and remains solid for FMI 14.
  • Hata HCM hafızada saklanır.
  • Inverter kapalı yüksek gerilim sistemi kapanıyor.
  • HCM bir dizel okunur modda hibrid araç kontrol etmeye devam.
  • İletim varsayılan 1'ine dişli başlamak.

[/fusion_text][fusion_text columns=”” column_min_width=”” column_spacing=”” rule_style=defaultrule_size=”” rule_color=”” hide_on_mobile=small-visibility,medium-visibility,large-visibilityclass=”” id=””]

Koşullar Arıza Kodu Aktif olmayan ayarla

Sadece Etkin olmayan arızalar İletim Elektronik Kontrol Biriminden temizlenebilir (TECU) veya HCM geçmişi ServiceRanger kullanarak. TECU sonra otomatik geçmişinden hataları temizler 200 saat ve HCM otomatik hata sonrasında geçmişinden hataları temizler İçin Etkin olmuştur 200 saatler.

Bu hata kodu aşağıdakilerden herhangi neden olabilir:

  • IMF 10
    • PEC
    • APG
    • Inverter
    • DC high-voltage cable
    • DC cable interlock loops
    • atalet Anahtarı
    • servis Anahtarı
  • IMF 14
    • Inverter
    • PEC

[/fusion_text][/fusion_builder_column][/fusion_builder_row][/fusion_builder_container][fusion_builder_container hundred_percent=nohundred_percent_height=nohundred_percent_height_scroll=nohundred_percent_height_center_content=yesequal_height_columns=nomenu_anchor=”” hide_on_mobile=small-visibility,medium-visibility,large-visibilitystatus=publishedpublish_date=”” class=”” id=”” background_color=”” background_image=”” background_position=center centerbackground_repeat=no-repeatfade=nobackground_parallax=noneenable_mobile=noparallax_speed=”0.3″ video_mp4=”” video_webm=”” video_ogv=”” video_url=”” video_aspect_ratio=”16:9″ video_loop=yesvideo_mute=yesvideo_preview_image=”” border_size=”” border_color=”” border_style=solidmargin_top=”” margin_bottom=”” padding_top=”” padding_right=”” padding_bottom=”” padding_left=””][fusion_builder_row][fusion_builder_column type=”1_1layout=”1_1spacing=”” center_content=nolink=”” target=_selfmin_height=”” hide_on_mobile=small-visibility,medium-visibility,large-visibilityclass=”” id=”” background_color=”” background_image=”” background_image_id=”” background_position=left topbackground_repeat=no-repeathover_type=noneborder_size=”0″ border_color=”” border_style=solidborder_position=allpadding_top=”” padding_right=”” padding_bottom=”” padding_left=”” margin_top=”” margin_bottom=”” animation_type=”” animation_direction=leftanimation_speed=”0.3″ animation_offset=”” last=no”][fusion_text columns=”” column_min_width=”” column_spacing=”” rule_style=defaultrule_size=”” rule_color=”” hide_on_mobile=small-visibility,medium-visibility,large-visibilityclass=”” id=””]

Hata kodu 116 – High Voltage Relays Test

[/fusion_text][/fusion_builder_column][/fusion_builder_row][/fusion_builder_container][fusion_builder_container hundred_percent=nohundred_percent_height=nohundred_percent_height_scroll=nohundred_percent_height_center_content=yesequal_height_columns=nomenu_anchor=”” hide_on_mobile=small-visibility,medium-visibility,large-visibilitystatus=publishedpublish_date=”” class=”” id=”” background_color=”” background_image=”” background_position=center centerbackground_repeat=no-repeatfade=nobackground_parallax=noneenable_mobile=noparallax_speed=”0.3″ video_mp4=”” video_webm=”” video_ogv=”” video_url=”” video_aspect_ratio=”16:9″ video_loop=yesvideo_mute=yesvideo_preview_image=”” border_size=”” border_color=”” border_style=solidmargin_top=”” margin_bottom=”” padding_top=”” padding_right=”” padding_bottom=”” padding_left=””][fusion_builder_row][fusion_builder_column type=”1_1layout=”1_1spacing=”” center_content=nolink=”” target=_selfmin_height=”” hide_on_mobile=small-visibility,medium-visibility,large-visibilityclass=”” id=”” background_color=”” background_image=”” background_image_id=”” background_position=left topbackground_repeat=no-repeathover_type=noneborder_size=”0″ border_color=”” border_style=solidborder_position=allpadding_top=”” padding_right=”” padding_bottom=”” padding_left=”” margin_top=”” margin_bottom=”” animation_type=”” animation_direction=leftanimation_speed=”0.3″ animation_offset=”” last=no”][fusion_text columns=”” column_min_width=”” column_spacing=”” rule_style=defaultrule_size=”” rule_color=”” hide_on_mobile=small-visibility,medium-visibility,large-visibilityclass=”” id=””]

Bileşen Tanımlama MY08 Sistemleri:

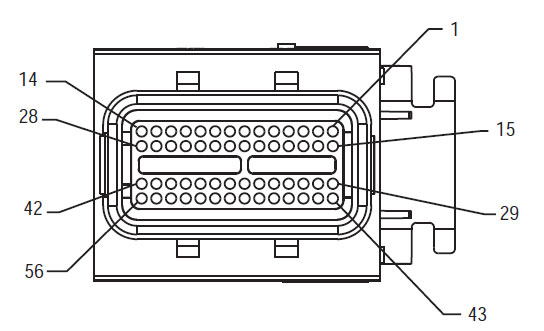
[/fusion_text][/fusion_builder_column][/fusion_builder_row][/fusion_builder_container][fusion_builder_container hundred_percent=yeshundred_percent_height=nohundred_percent_height_scroll=nohundred_percent_height_center_content=yesequal_height_columns=nomenu_anchor=”” hide_on_mobile=small-visibility,medium-visibility,large-visibilitystatus=publishedpublish_date=”” class=”” id=”” background_color=”” background_image=”” background_position=center centerbackground_repeat=no-repeatfade=nobackground_parallax=noneenable_mobile=noparallax_speed=”0.3″ video_mp4=”” video_webm=”” video_ogv=”” video_url=”” video_aspect_ratio=”16:9″ video_loop=yesvideo_mute=yesvideo_preview_image=”” border_size=”” border_color=”” border_style=solidmargin_top=”” margin_bottom=”” padding_top=”” padding_right=”10%” padding_bottom=”” padding_left=”10%”][fusion_builder_row][fusion_builder_column type=”1_3layout=”1_3spacing=”” center_content=nolink=”” target=_selfmin_height=”” hide_on_mobile=small-visibility,medium-visibility,large-visibilityclass=”” id=”” background_color=”” background_image=”” background_image_id=”” background_position=left topbackground_repeat=no-repeathover_type=noneborder_size=”0″ border_color=”” border_style=solidborder_position=allpadding_top=”” padding_right=”” padding_bottom=”” padding_left=”” margin_top=”” margin_bottom=”” animation_type=”” animation_direction=leftanimation_speed=”0.3″ animation_offset=”” last=no”][fusion_imageframe image_id=”14474|fullmax_width=”” style_type=”” blur=”” stylecolor=”” hover_type=nonebordersize=”” bordercolor=”” borderradius=”” align=centerlightbox=nogallery_id=”” lightbox_image=”” lightbox_image_id=”” alt=”Delphi 56 Yönlü Çiftleşme Connector Resmi” link=”” linktarget=_selfhide_on_mobile=small-visibility,medium-visibility,large-visibilityclass=”” id=”” animation_type=”” animation_direction=leftanimation_speed=”0.3″ animation_offset=””]https://www.globaltransmissionsupply.com/wp-content/uploads/Inverter-56-Way-Mating-Connector-View.jpg[/fusion_imageframe][fusion_text columns=”” column_min_width=”” column_spacing=”” rule_style=defaultrule_size=”” rule_color=”” hide_on_mobile=small-visibility,medium-visibility,large-visibilityclass=”” id=””]

56-Yönlü Çiftleşme Connector Resmi

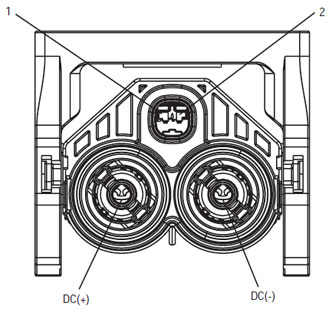
[/fusion_text][/fusion_builder_column][fusion_builder_column type=”1_3layout=”1_3spacing=”” center_content=nolink=”” target=_selfmin_height=”” hide_on_mobile=small-visibility,medium-visibility,large-visibilityclass=”” id=”” background_color=”” background_image=”” background_image_id=”” background_position=left topbackground_repeat=no-repeathover_type=noneborder_size=”0″ border_color=”” border_style=solidborder_position=allpadding_top=”” padding_right=”” padding_bottom=”” padding_left=”” margin_top=”” margin_bottom=”” animation_type=”” animation_direction=leftanimation_speed=”0.3″ animation_offset=”” last=no”][fusion_imageframe image_id=”14635|fullmax_width=”” style_type=”” blur=”” stylecolor=”” hover_type=nonebordersize=”” bordercolor=”” borderradius=”” align=centerlightbox=nogallery_id=”” lightbox_image=”” lightbox_image_id=”” alt=”Yüksek Voltaj DC Connector Resmi Yazaki Bağlayıcı” link=”” linktarget=_selfhide_on_mobile=small-visibility,medium-visibility,large-visibilityclass=”” id=”” animation_type=”” animation_direction=leftanimation_speed=”0.3″ animation_offset=””]https://www.globaltransmissionsupply.com/wp-content/uploads/High-Voltage-DC-Connector-View.jpg[/fusion_imageframe][fusion_text columns=”” column_min_width=”” column_spacing=”” rule_style=defaultrule_size=”” rule_color=”” hide_on_mobile=small-visibility,medium-visibility,large-visibilityclass=”” id=””]

Yüksek Voltaj DC Connector Resmi Yazaki Bağlayıcı

[/fusion_text][/fusion_builder_column][fusion_builder_column type=”1_3layout=”1_3spacing=”” center_content=nolink=”” target=_selfmin_height=”” hide_on_mobile=small-visibility,medium-visibility,large-visibilityclass=”” id=”” background_color=”” background_image=”” background_image_id=”” background_position=left topbackground_repeat=no-repeathover_type=noneborder_size=”0″ border_color=”” border_style=solidborder_position=allpadding_top=”” padding_right=”” padding_bottom=”” padding_left=”” margin_top=”” margin_bottom=”” animation_type=”” animation_direction=leftanimation_speed=”0.3″ animation_offset=”” last=no”][fusion_imageframe image_id=”14213|mediummax_width=”” style_type=”” blur=”” stylecolor=”” hover_type=nonebordersize=”” bordercolor=”” borderradius=”” align=centerlightbox=nogallery_id=”” lightbox_image=”” lightbox_image_id=”” alt=Mating Connector View Deutsch 19 – yol” link=”” linktarget=_selfhide_on_mobile=small-visibility,medium-visibility,large-visibilityclass=”” id=”” animation_type=”” animation_direction=leftanimation_speed=”0.3″ animation_offset=””]https://www.globaltransmissionsupply.com/wp-content/uploads/Eaton-Fuller-Harness-Connector-View-300×289.jpg[/fusion_imageframe][fusion_text columns=”” column_min_width=”” column_spacing=”” rule_style=defaultrule_size=”” rule_color=”” hide_on_mobile=small-visibility,medium-visibility,large-visibilityclass=”” id=””]

Mating Connector View Deutsch 19 – yol

[/fusion_text][/fusion_builder_column][/fusion_builder_row][/fusion_builder_container][fusion_builder_container hundred_percent=nohundred_percent_height=nohundred_percent_height_scroll=nohundred_percent_height_center_content=yesequal_height_columns=nomenu_anchor=”” hide_on_mobile=small-visibility,medium-visibility,large-visibilitystatus=publishedpublish_date=”” class=”” id=”” background_color=”” background_image=”” background_position=center centerbackground_repeat=no-repeatfade=nobackground_parallax=noneenable_mobile=noparallax_speed=”0.3″ video_mp4=”” video_webm=”” video_ogv=”” video_url=”” video_aspect_ratio=”16:9″ video_loop=yesvideo_mute=yesvideo_preview_image=”” border_size=”” border_color=”” border_style=solidmargin_top=”” margin_bottom=”” padding_top=”” padding_right=”” padding_bottom=”” padding_left=””][fusion_builder_row][fusion_builder_column type=”1_1layout=”1_1spacing=”” center_content=nolink=”” target=_selfmin_height=”” hide_on_mobile=small-visibility,medium-visibility,large-visibilityclass=”” id=”” background_image_id=”” background_color=”#000000″ background_image=”” background_position=left topundefined=”” background_repeat=no-repeathover_type=noneborder_size=”0″ border_color=”” border_style=solidborder_position=allpadding_top=”” padding_right=”” padding_bottom=”” padding_left=”” margin_top=”” margin_bottom=”” animation_type=”” animation_direction=leftanimation_speed=”0.3″ animation_offset=”” last=no”][fusion_text columns=”” column_min_width=”” column_spacing=”” rule_style=defaultrule_size=”” rule_color=”” hide_on_mobile=small-visibility,medium-visibility,large-visibilityclass=”” id=””]

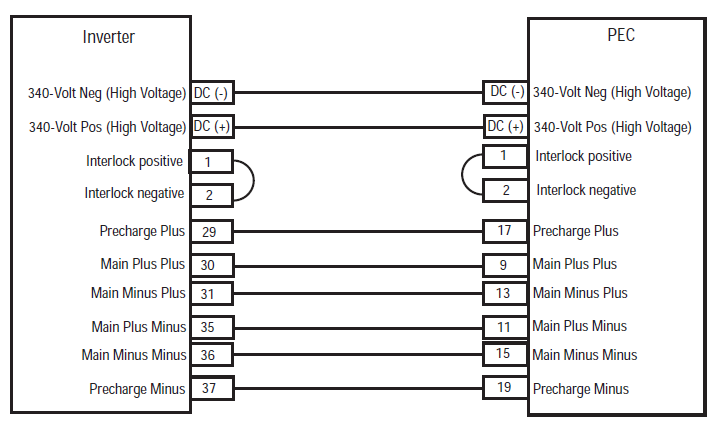
NOT: Bakın Eaton Hibrid Komponent ve Bağlantı Yeri MY08 Sistemlerinde Bağlayıcı yerler için
[/fusion_text][/fusion_builder_column][fusion_builder_column type=”1_1layout=”1_1spacing=”” center_content=nolink=”” target=_selfmin_height=”” hide_on_mobile=small-visibility,medium-visibility,large-visibilityclass=”” id=”” background_color=”” background_image=”” background_image_id=”” background_position=left topbackground_repeat=no-repeathover_type=noneborder_size=”0″ border_color=”” border_style=solidborder_position=allpadding_top=”” padding_right=”” padding_bottom=”” padding_left=”” margin_top=”” margin_bottom=”” animation_type=”” animation_direction=leftanimation_speed=”0.3″ animation_offset=”” last=no”][fusion_imageframe image_id=”14666|fullmax_width=”” style_type=”” blur=”” stylecolor=”” hover_type=nonebordersize=”” bordercolor=”” borderradius=”” align=centerlightbox=nogallery_id=”” lightbox_image=”” lightbox_image_id=”” alt=Inverter PEC connectors Eaton Fuller Hybrid transmissionlink=”” linktarget=_selfhide_on_mobile=small-visibility,medium-visibility,large-visibilityclass=”” id=”” animation_type=”” animation_direction=leftanimation_speed=”0.3″ animation_offset=””]https://www.globaltransmissionsupply.com/wp-content/uploads/Inverter-PEC-connectors.png[/fusion_imageframe][/fusion_builder_column][/fusion_builder_row][/fusion_builder_container][fusion_builder_container hundred_percent=nohundred_percent_height=nohundred_percent_height_scroll=nohundred_percent_height_center_content=yesequal_height_columns=nomenu_anchor=”” hide_on_mobile=small-visibility,medium-visibility,large-visibilitystatus=publishedpublish_date=”” class=”” id=”” background_color=”” background_image=”” background_position=center centerbackground_repeat=no-repeatfade=nobackground_parallax=noneenable_mobile=noparallax_speed=”0.3″ video_mp4=”” video_webm=”” video_ogv=”” video_url=”” video_aspect_ratio=”16:9″ video_loop=yesvideo_mute=yesvideo_preview_image=”” border_size=”” border_color=”” border_style=solidmargin_top=”” margin_bottom=”” padding_top=”” padding_right=”” padding_bottom=”” padding_left=””][fusion_builder_row][fusion_builder_column type=”1_1layout=”1_1spacing=”” center_content=nolink=”” target=_selfmin_height=”” hide_on_mobile=small-visibility,medium-visibility,large-visibilityclass=”” id=”” background_color=”” background_image=”” background_image_id=”” background_position=left topbackground_repeat=no-repeathover_type=noneborder_size=”0″ border_color=”” border_style=solidborder_position=allpadding_top=”” padding_right=”” padding_bottom=”” padding_left=”” margin_top=”” margin_bottom=”” animation_type=”” animation_direction=leftanimation_speed=”0.3″ animation_offset=”” last=no”][fusion_modal name=warnings_cautionstitle=”Uyarılar & Dikkat” size=largebackground=”” border_color=”” show_footer=yesclass=”” id=””]Tehlike: belirtilen prosedürü takip yoksa Tehlike ciddi yaralanabilir veya öldürülecek gösterir.
Uyarı: Uyarı acil tehlikeye işaret, Eğer belirtilen prosedürü takip yoksa ciddi kişisel yaralanmaya neden olabilecek.
Dikkat: Dikkat belirttiğiniz prosedürü takip yoksa araç veya maddi hasar meydana gelebilir gösterir.

Not: Not bir bileşeni / sisteminin teşhis veya tamir yardımcı olacak ek ayrıntı gösterir.

kişisel yaralanmayı önlemek için belirtilen sırayla belirtilen prosedürleri uygulayın:

1. yüksek gerilim konileri aracın etrafında ve lokavt PEC yüklüyse, aracı çalıştırmak için izin verilmelidir tek kişi kilitleme etiketi imzalı kişidir.
2. Bir araç üzerinde çalışan ya da kabinden çıkmadan önce motor çalışırken, Eğer “N” vites kolunu koymanız gerekir park frenini çekin, ve tekerlekleri bloke.
3. Güvenlik nedeniyle, Her zaman önce “N” den dişli pozisyonları seçmenin hizmet fren yapmak
4. Bir araç her zaman sürücü koltuğunda oturmak başlamadan önce, vardiya kumanda üzerindeki “N” seçeneğini, ve park frenleri ayarlamak.
5. epto sahip araçlarda, Motor ve / veya
Motor / Jeneratör epto modunda başlayabilir. herhangi bir bakım yapmadan veya araç üzerinde işlem yapmayın, Bu modda iken.
6. 12-Volt Akü pozitif (+) ve negatif (-) herhangi bir melez donatılmış araç üzerinde herhangi bir kaynak önce çıkarılması gerekir.

Dikkat: ekipman arıza veya hasarı önlemek için belirtilen sırayla belirtilen prosedürleri uygulayın.
Dikkat: el frenini serbest veya hava basıncı doğru seviyede olana değin bir vitese denemeyin.
Dikkat: “N” yer değiştirme kolunu çekme sırasında şanzımana zarar görmemesi ve yerden tahrik tekerlekleri kaldırmak veya aktarma organlarının bağlantısını kesmek için.

Yüksek Gerilim Uyarılar & Dikkat

  • CO2 veya Kuru Kimyevi Yangın Söndürme kullanın.
  • Yüksek gerilim kablo turuncu bir izolasyon ya da kıvrık boru kaplı ve konnektör uyarı etiketleri ile işaretlenmiştir.
  • Tüm Eaton® Hibrid Dizel / Elektrikli araçlar işaretlenecektir ‘Hibrit’ Aracın dış, fırladaki vardiya etiketiyle birlikte.
  • taşıyıcı monte melez bileşenlerinin belirli bir konum için OEM bakınız.
  • turuncu yüksek gerilim kabloları kesilmiş ETMEYİN.
  • PEC halinde kesilmiş veya AÇMAYIN.
  • halinde kesilmiş veya DC / DC Converter AÇMAYIN.
  • halinde kesilmiş veya Inverter AÇMAYIN.

Bir ara bölge ayarlanmalıdır ve yüksek gerilim lastik eldiven yalıtımlı (sınıf 0 deri koruyucuları ile) yüksek gerilim üzerinde çalışan öncesinde gerekli olan. Bu talimatlara uyulmaması ciddi yaralanma ya da ölüme yol açabilir.
yüksek gerilim sistemi üzerinde çalışırken giyilmelidir kauçuk yalıtımlı eldivenler sınıfıdır 0 deri koruyucuları ile. lastik eldiven sayfasında “Teşhis Araçları / Servis Yayınları” bulunan kauçuk izolasyon eldiven test prosedürü izleyerek HER kullanımdan önce test edilmelidir 6. Bu talimatlara uyulmaması ciddi yaralanma ya da ölüme yol açabilir.
sayfasında “Yüksek Gerilim Servis Kapatma ve Güç-up Prosedürü” teftiş veya herhangi yüksek gerilim kabloları veya bileşenler üzerinde çalışmaya başlamadan önce 4 takip edilmelidir. Bu talimatlara uyulmaması ciddi yaralanma ya da ölüme yol açabilir.
Kilitleme ve Tagout cihazları sadece araç üzerinde kilitleme ve Tagout cihazları yerleştirilmiş bir teknisyen tarafından çıkarılmalıdır. Bu talimatlara uyulmaması ciddi yaralanma ya da ölüme yol açabilir.
Yüksek gerilim kauçuk yalıtımlı eldivenler (sınıf 0 deri koruyucuları ile) herhangi çalışırken giyilmelidir
Yüksek gerilim. sayfasında “Yüksek Gerilim Servis Kapatma ve Güç-up Prosedürü” 4 herhangi bir yüksek voltaj kablolarının ayrılması önce takip edilmelidir. Bu talimatlara uyulmaması ciddi yaralanma ya da ölüme yol açabilir.
Yüksek gerilim kabloları ve kablo turuncu ve konnektörleri de bir uyarı etiketi ihtiva. Yüksek gerilim parçaları bir etiketle işaretlenir. Yüksek gerilim kauçuk yalıtımlı eldivenler (sınıf 0 deri koruyucuları ile) Bu bileşenlerden herhangi çalışırken kullanılmalıdır. Bu talimatlara uyulmaması ciddi yaralanma ya da ölüme yol açabilir.

Yüksek Gerilim Servis Kapatma Prosedürleri

Yüksek Gerilim Servis Kapatma ve Güç-up Prosedürü1. Takip “Yüksek Gerilim Çalışma Alanı” prosedürü.
2. PEC önündeki kırmızı PEC Servis Anahtarı bulup itmek kapatın.
3. Servis Anahtarı Kapağını çıkarın ve Lokavt Parantezi yüklemek (J48506).
4. Lokavt Bracket sabitleyin etiketi.
5. kapalı konumdan hareket edemez PEC Servis Anahtarı olun.
6. Sistem en az ayarlamak için izin ver 5 dakika yüksek voltaj deşarj.
7. ServiceRanger bağlayın ve Veri İzleme PID görüntülemek 116 “Yüksek Gerilim Batarya Potansiyeli” denir. Kullanım SPN 520323 J1939 bağlantısı için “Pil Gerilimi RB” (Röle Kutusu).
8. Gerilim olmalıdır 30 volt veya daha az. Voltaj üzerinde ise 30 volt, Aracın üzerinde çalışmak ve 1-800-826-HELP Eaton® iletişime geçmeyin (4357).
9. Kontak anahtarını kapatın ve onarmak veya sorun giderme adımı geçin.
Not: voltaj anahtarı kapalı olduğunda sıfıra düşer.

Yüksek Gerilim Servis Güç-up Prosedürü

1. kilitlenme konumlarında içine tüm yüksek gerilim konnektörleri takın.
2. Eğer varsa kişi araç üzerinde çalışan, Lokavt dirseğini ve etiketi kaldırmak.
3. Service Switch üzerinde Lokavt dirseğini yeniden yükleyin.
4. Servis çekin dışarı açın ve için araç seti izin 2 dakika.
5. Start vehicle when appropriate.[/fusion_modal][fusion_modal name=component_locationtitle=”Eaton Hibrid Komponent ve Bağlantı Yeri ” size=largebackground=”#ffffffborder_color=”” show_footer=yesclass=”” id=””]

Eaton Hibrid Komponent ve Bağlantı yerler MY08 Sistemleri

[/fusion_modal][fusion_modal name=component_location2title=”Eaton Hibrid Komponent ve Bağlantı Yeri MY09 Sistemleri” size=largebackground=”#ffffffborder_color=”” show_footer=yesclass=”” id=””]

Eaton Hibrid Komponent ve Bağlantı yerler MY09 Sistemleri

[/fusion_modal][/fusion_builder_column][/fusion_builder_row][/fusion_builder_container][fusion_builder_container hundred_percent=nohundred_percent_height=nohundred_percent_height_scroll=nohundred_percent_height_center_content=yesequal_height_columns=nomenu_anchor=”” hide_on_mobile=small-visibility,medium-visibility,large-visibilitystatus=publishedpublish_date=”” class=”” id=”” background_color=”” background_image=”” background_position=center centerbackground_repeat=no-repeatfade=nobackground_parallax=noneenable_mobile=noparallax_speed=”0.3″ video_mp4=”” video_webm=”” video_ogv=”” video_url=”” video_aspect_ratio=”16:9″ video_loop=yesvideo_mute=yesvideo_preview_image=”” border_size=”” border_color=”” border_style=solidmargin_top=”” margin_bottom=”” padding_top=”” padding_right=”” padding_bottom=”” padding_left=””][fusion_builder_row][fusion_builder_column type=”1_1layout=”1_1spacing=”” center_content=nolink=”” target=_selfmin_height=”” hide_on_mobile=small-visibility,medium-visibility,large-visibilityclass=”” id=”” background_color=”” background_image=”” background_image_id=”” background_position=left topbackground_repeat=no-repeathover_type=noneborder_size=”0″ border_color=”” border_style=solidborder_position=allpadding_top=”” padding_right=”” padding_bottom=”” padding_left=”” margin_top=”” margin_bottom=”” animation_type=”” animation_direction=leftanimation_speed=”0.3″ animation_offset=”” last=no”][fusion_content_boxes layout=clean-horizontalcolumns=”2″ title_size=”18pxheading_size=”3″ title_color=”#ffffffbody_color=”#ffffffbackgroundcolor=”#4f4f4ficon=”” iconflip=”” iconrotate=”” iconspin=noiconcolor=”” icon_circle=”” icon_circle_radius=”” circlecolor=”” circlebordersize=”” circlebordercolor=”” outercirclebordersize=”” outercirclebordercolor=”” icon_size=”” icon_hover_type=”” hover_accent_color=”” image=”” image_id=”” image_width=”” image_height=”” link_type=”” button_span=”” link_area=”” link_target=”” icon_align=leftanimation_type=”” animation_delay=”” animation_offset=”” animation_direction=leftanimation_speed=”0.3″ margin_top=”” margin_bottom=”” hide_on_mobile=small-visibility,medium-visibility,large-visibilityclass=”” id=””][fusion_content_box title=ADIM 1. AHBS mevcut doğrulama.backgroundcolor=”” icon=”” iconflip=”” iconrotate=”” iconspin=noiconcolor=”” circlecolor=”” circlebordersize=”” circlebordercolor=”” outercirclebordersize=”” outercirclebordercolor=”” image=”” image_id=”” image_width=”” image_height=”” link=”” linktext=”Daha fazla oku” link_target=”” animation_type=”” animation_direction=leftanimation_speed=”0.3″ animation_offset=””]

  1. İnceleyin ve uygulayın Uyarılar & Dikkat.
  2. 9 Yönlü Teşhis Connector kullanarak ServiceRanger Aktif fay kodları ve AHBS Al.
    Tehlike: Görmek Yüksek Gerilim Servis Kapatma ve Güç Prosedürleri. çarpmasını önlemek için prosedürler takip, Usulüne uygun olmayan yüksek gerilimden yakmak ya da ölüm.
  3. Hangi AHBS mevcut
    • Arıza Kodu Eğer 116 IMF 14 listelenir, Adıma gidin 9.
    • Arıza Kodu Eğer 116 IMF 10 listelenir, Adıma gidin 2.
    • If no Fault Codes are listed, The Service Switch was pushed in. Adım Git 10.

[/fusion_content_box][fusion_content_box title=ADIM 2. Verify Data Monitor parameters.backgroundcolor=”” icon=”” iconflip=”” iconrotate=”” iconspin=noiconcolor=”” circlecolor=”” circlebordersize=”” circlebordercolor=”” outercirclebordersize=”” outercirclebordercolor=”” image=”” image_id=”” image_width=”” image_height=”” link=”” linktext=”Daha fazla oku” link_target=”” animation_type=”” animation_direction=leftanimation_speed=”0.3″ animation_offset=””]

  1. Tuş.
  2. Kabinde 9 Yönlü Teşhis Connector için ServiceRanger bağlayın.
  3. “Veri İzleme” seçeneğini.
  4. View the Battery Pack Voltage (BCU1) PID 118 in the high- voltage Battery list:
    • If the Battery Pack Voltage (BCU1) PID 118 is greater than 200 volt, Adıma gidin 3.
    • If the Battery Pack Voltage (BCU1) PID 118 daha az 200 volt, Güç Elektroniği Carrier yerine (PEC), Sonra Adım gitmek 10.

[/fusion_content_box][/fusion_content_boxes][fusion_content_boxes layout=clean-horizontalcolumns=”2″ title_size=”18pxheading_size=”3″ title_color=”#ffffffbody_color=”#ffffffbackgroundcolor=”#4f4f4ficon=”” iconflip=”” iconrotate=”” iconspin=noiconcolor=”” icon_circle=”” icon_circle_radius=”” circlecolor=”” circlebordersize=”” circlebordercolor=”” outercirclebordersize=”” outercirclebordercolor=”” icon_size=”” icon_hover_type=”” hover_accent_color=”” image=”” image_id=”” image_width=”” image_height=”” link_type=”” button_span=”” link_area=”” link_target=”” icon_align=leftanimation_type=”” animation_delay=”” animation_offset=”” animation_direction=leftanimation_speed=”0.3″ margin_top=”” margin_bottom=”” hide_on_mobile=small-visibility,medium-visibility,large-visibilityclass=”” id=””][fusion_content_box title=ADIM 3. Verify continuity of Inverter connector circuits.backgroundcolor=”” icon=”” iconflip=”” iconrotate=”” iconspin=noiconcolor=”” circlecolor=”” circlebordersize=”” circlebordercolor=”” outercirclebordersize=”” outercirclebordercolor=”” image=”” image_id=”” image_width=”” image_height=”” link=”” linktext=”Daha fazla oku” link_target=”” animation_type=”” animation_direction=leftanimation_speed=”0.3″ animation_offset=””]

  1. Kapatmak.
  2. If the vehicle is not equipped with a DC/DC Converter or APG, skip this step.
  3. Using ASTM Class 0 electrical insulating rubber gloves with leather protectors, disconnect the DC cable for the DC/DC Converter and APG at the PEC.
  4. With the key off, temporarily remove the Lockout Bracket and pull the Service Switch out.
  5. Tuş.
  6. Arıza Kodu mi 116 IMF 10 still Active in ServiceRanger?
    • Arıza Kodu Eğer 116 IMF 10 is Active with the DC/DC Converter and APG disconnected, Adıma gidin 4.
    • Arıza Kodu Eğer 116 IMF 10 is no longer Active with the DC/DC Converter and APG disconnected, key off and reinstall the Lockout Bracket on the PEC. Replace the Power Electronics Carrier (PEC), Sonra Adım gitmek 10.

[/fusion_content_box][fusion_content_box title=ADIM 4. Verify continuity of PEC connector circuits to ground.backgroundcolor=”” icon=”” iconflip=”” iconrotate=”” iconspin=”” iconcolor=”” circlecolor=”” circlebordersize=”” circlebordercolor=”” outercirclebordersize=”” outercirclebordercolor=”” image=”” image_id=”” image_width=”” image_height=”” link=”” linktext=”” link_target=”” animation_type=”” animation_direction=leftanimation_speed=”0.3″ animation_offset=””]

  1. Kapatmak.
  2. PEC 19 Yönlü Bağlantı ayırın.
  3. Temporarily remove the Lockout Bracket and pull the Service Switch out.
    Not: Ensure the Key Switch is off.
  4. Measure resistance at the PEC 19-Way Connector Terminal at the following pins:
    • Toplu iğne 17 Pin için 19
    • Toplu iğne 9 Pin için 11
    • Toplu iğne 13 Pin için 15
      • If the resistance between Pins 17 ve Pim 19 112-122 ohm ve Pin gelen direnci 9 Pin için 11 ve Pim 13 Pin için 15 Her 33-37 ohm, Adıma gidin 5.
      • Direnç aralık dışında ise, Adıma gidin 6.

[/fusion_content_box][/fusion_content_boxes][fusion_content_boxes layout=clean-horizontalcolumns=”2″ title_size=”18pxheading_size=”3″ title_color=”#ffffffbody_color=”#ffffffbackgroundcolor=”#4f4f4ficon=”” iconflip=”” iconrotate=”” iconspin=noiconcolor=”” icon_circle=”” icon_circle_radius=”” circlecolor=”” circlebordersize=”” circlebordercolor=”” outercirclebordersize=”” outercirclebordercolor=”” icon_size=”” icon_hover_type=”” hover_accent_color=”” image=”” image_id=”” image_width=”” image_height=”” link_type=”” button_span=”” link_area=”” link_target=”” icon_align=leftanimation_type=”” animation_delay=”” animation_offset=”” animation_direction=leftanimation_speed=”0.3″ margin_top=”” margin_bottom=”” hide_on_mobile=small-visibility,medium-visibility,large-visibilityclass=”” id=””][fusion_content_box title=ADIM 5. Verify continuity of Inverter connector circuits to ground.backgroundcolor=”” icon=”” iconflip=”” iconrotate=”” iconspin=noiconcolor=”” circlecolor=”” circlebordersize=”” circlebordercolor=”” outercirclebordersize=”” outercirclebordercolor=”” image=”” image_id=”” image_width=”” image_height=”” link=”” linktext=”Daha fazla oku” link_target=”” animation_type=”” animation_direction=leftanimation_speed=”0.3″ animation_offset=””]

  1. Kapatmak.
  2. Reconnect the PEC 19-Way Connector.
  3. Inverter 56 Yönlü Bağlantı ayırın.
  4. Inspect the connector pins for damaged, corroded and/or loose wires.
  5. Measure resistance between the Inverter 56-Way Connector at the following pins:
    • Toplu iğne 29 Pin için 37
    • Toplu iğne 30 Pin için 35
    • Toplu iğne 31 Pin için 36 Not: Direnç değerlerini izlerken yavaşça Connector yakın Inverter 56 Yönlü Bağlantı Harness esneyecek.
      • Eğer Pin arasındaki direnç 29 ve Pim 37 112-122 ohm ve Pin gelen direnci 30 Pin için 35 ve Pim 31 Pin için 36 Her 33-37 ohm, push the Service Switch on the PEC and reinstall the Lockout Bracket. Adım Git 8.
      • Direnç aralık dışında ise, repair the Hybrid Harness between the PEC and Inverter, Sonra Adım gitmek 10.

[/fusion_content_box][fusion_content_box title=ADIM 6. Verify continuity of PEC connector circuits.backgroundcolor=”” icon=”” iconflip=”” iconrotate=”” iconspin=”” iconcolor=”” circlecolor=”” circlebordersize=”” circlebordercolor=”” outercirclebordersize=”” outercirclebordercolor=”” image=”” image_id=”” image_width=”” image_height=”” link=”” linktext=”” link_target=”” animation_type=”” animation_direction=leftanimation_speed=”0.3″ animation_offset=””]

  1. Kapatmak.
  2. Remove the Air Filter Cover and Air Filter from the PEC. Refer to TRSM1000 for procedures.*
  3. An Inertia Switch is located at the front of the PEC inside the box and viewable when the Air Filter is removed.
  4. Using ASTM Class 0 electrical insulating rubber gloves with leather protectors, press the button on the top of the Inertia Switch until heard or felt a click. This switch must be depressed a set distance to reset the switch.
  5. Measure resistance at the PEC 19-Way Connector Terminal at the following pins:
    • Toplu iğne 17 Pin için 19
    • Toplu iğne 9 Pin için 11
    • Toplu iğne 13 Pin için 15
      • qIf the resistance between Pin 17 ve Pim 19 112-122 ohm ve Pin gelen direnci 9 Pin için 11 ve Pim 13 Pin için 15 Her 33-37 ohm, the Inertia Switch was tripped. Test is complete. Adım Git 10.
      • Direnç aralık dışında ise, push in the Service Switch on the PEC and reinstall the Lockout Bracket, Sonra Adım gitmek 7.

[/fusion_content_box][/fusion_content_boxes][fusion_content_boxes layout=clean-horizontalcolumns=”2″ title_size=”18pxheading_size=”3″ title_color=”#ffffffbody_color=”#ffffffbackgroundcolor=”#4f4f4ficon=”” iconflip=”” iconrotate=”” iconspin=noiconcolor=”” icon_circle=”” icon_circle_radius=”” circlecolor=”” circlebordersize=”” circlebordercolor=”” outercirclebordersize=”” outercirclebordercolor=”” icon_size=”” icon_hover_type=”” hover_accent_color=”” image=”” image_id=”” image_width=”” image_height=”” link_type=”” button_span=”” link_area=”” link_target=”” icon_align=leftanimation_type=”” animation_delay=”” animation_offset=”” animation_direction=leftanimation_speed=”0.3″ margin_top=”” margin_bottom=”” hide_on_mobile=small-visibility,medium-visibility,large-visibilityclass=”” id=””][fusion_content_box title=ADIM 7. Verify continuity of Inverter connector circuits.backgroundcolor=”” icon=”” iconflip=”” iconrotate=”” iconspin=noiconcolor=”” circlecolor=”” circlebordersize=”” circlebordercolor=”” outercirclebordersize=”” outercirclebordercolor=”” image=”” image_id=”” image_width=”” image_height=”” link=”” linktext=”Daha fazla oku” link_target=”” animation_type=”” animation_direction=leftanimation_speed=”0.3″ animation_offset=””]

  1. Kapatmak.
  2. Disconnect the DC High-Voltage Cable at the PEC Bulkhead and at the Inverter Bulkhead.
  3. Measure resistance between the Low-Voltage Interlock Pins on the PEC side of the DC High-Voltage Cable:
    Not: The Interlock Pins are the two small spade terminals located in the same opening.

    • If the resistance is 0–0.3 ohms between the Interlock Loop Pins, Güç Elektroniği Carrier yerine (PEC), Sonra Adım gitmek 10.
    • Direnç aralık dışında ise, DC yüksek gerilim kablosu yerine, Sonra Adım gitmek 10.

[/fusion_content_box][fusion_content_box title=ADIM 8. Verify continuity of DC Cable from PEC to Inverter Connector circuits.backgroundcolor=”” icon=”” iconflip=”” iconrotate=”” iconspin=”” iconcolor=”” circlecolor=”” circlebordersize=”” circlebordercolor=”” outercirclebordersize=”” outercirclebordercolor=”” image=”” image_id=”” image_width=”” image_height=”” link=”” linktext=”” link_target=”” animation_type=”” animation_direction=leftanimation_speed=”0.3″ animation_offset=””]

  1. Kapatmak.
  2. Disconnect the DC High-Voltage Cable at the PEC Bulkhead and the Inverter Bulkhead.
  3. Measure the resistance of each high-voltage circuit on the cable:
    • If the resistance of each high-voltage circuit in the cable is 1 ohm veya daha az, Inverter yerine, Sonra Adım gitmek 10.
    • Direnç aralık dışında ise, replace the DC High-Voltage Cable, Sonra Adım gitmek 10.

[/fusion_content_box][/fusion_content_boxes][fusion_content_boxes layout=clean-horizontalcolumns=”2″ title_size=”18pxheading_size=”3″ title_color=”#ffffffbody_color=”#ffffffbackgroundcolor=”#4f4f4ficon=”” iconflip=”” iconrotate=”” iconspin=noiconcolor=”” icon_circle=”” icon_circle_radius=”” circlecolor=”” circlebordersize=”” circlebordercolor=”” outercirclebordersize=”” outercirclebordercolor=”” icon_size=”” icon_hover_type=”” hover_accent_color=”#f41000image=”” image_id=”” image_width=”” image_height=”” link_type=”” button_span=”” link_area=”” link_target=”” icon_align=leftanimation_type=”” animation_delay=”” animation_offset=”” animation_direction=leftanimation_speed=”0.3″ margin_top=”” margin_bottom=”” hide_on_mobile=small-visibility,medium-visibility,large-visibilityclass=”” id=””][fusion_content_box title=ADIM 9. Verify Data Monitor parameters.backgroundcolor=”” icon=”” iconflip=”” iconrotate=”” iconspin=”” iconcolor=”” circlecolor=”” circlebordersize=”” circlebordercolor=”” outercirclebordersize=”” outercirclebordercolor=”” image=”” image_id=”” image_width=”” image_height=”” link=”” linktext=”” link_target=”” animation_type=”” animation_direction=leftanimation_speed=”0.3″ animation_offset=””]

  1. Kabinde 9 Yönlü Teşhis Connector için ServiceRanger bağlayın.
  2. “Veri İzleme” seçeneğini.
  3. View the following parameters in the High-Voltage Battery list.
    • Battery Pack Voltage (BCU1) PID 118
    • Battery Voltage PID 116
      • If the voltage readings on PID 116 ve PID 118 are within 10 birbirinden volt, Güç Elektroniği Carrier yerine (PEC), Sonra Adım gitmek 10.
      • If the voltage readings on PID 116 ve PID 118 are greater than 10 birbirinden volt, Inverter yerine, Sonra Adım gitmek 10.

[/fusion_content_box][fusion_content_box title=ADIM 10. onarımı onaylayıp.backgroundcolor=”” icon=”” iconflip=”” iconrotate=”” iconspin=noiconcolor=”” circlecolor=”” circlebordersize=”” circlebordercolor=”” outercirclebordersize=”” outercirclebordercolor=”” image=”” image_id=”” image_width=”” image_height=”” link=”” linktext=”Daha fazla oku” link_target=”” animation_type=”” animation_direction=leftanimation_speed=”0.3″ animation_offset=””]

  1. Kapatmak.
  2. Bütün konnektör ve akünün eksi kablosunu tekrar bağlayın.
  3. Tuş.
  4. temizle kodları, görmek Şeffaf İnaktif Arızaları.
  5. sürün ve kodu sıfırlamak girişiminde.
  6. kodlarını kontrol edin, görmek Aktif ve İnaktif Arızaları görüntüle.
    • kodlara Eğer, Test tamamlandıktan.
    • Arıza Kodu Eğer 116 belirir, Eaton ile iletişime geçin 1- 800-826-YARDIM ET (4357). Repeat this Step (Adım 10).
    • daha kodunun başka ederse 116 belirir, görmek Kod Endeksi Listesini Arıza.

[/fusion_content_box][/fusion_content_boxes][/fusion_builder_column][/fusion_builder_row][/fusion_builder_container][fusion_global id=”13788″]