[fusion_builder_container hundred_percent=”no” hundred_percent_height=”no” hundred_percent_height_scroll=”no” hundred_percent_height_center_content=”yes” equal_height_columns=”no” menu_anchor=”” hide_on_mobile=”small-visibility,medium-visibility,large-visibility” status=”published” publish_date=”” class=”” id=”” background_color=”” background_image=”” background_position=”center center” background_repeat=”no-repeat” fade=”no” background_parallax=”none” enable_mobile=”no” parallax_speed=”0.3″ video_mp4=”” video_webm=”” video_ogv=”” video_url=”” video_aspect_ratio=”16:9″ video_loop=”yes” video_mute=”yes” video_preview_image=”” border_size=”” border_color=”” border_style=”solid” margin_top=”35″ margin_bottom=”” padding_top=”” padding_right=”” padding_bottom=”” padding_left=””][fusion_builder_row][fusion_builder_column type=”1_1″ layout=”1_1″ spacing=”” center_content=”no” link=”” target=”_self” min_height=”” hide_on_mobile=”small-visibility,medium-visibility,large-visibility” class=”” id=”” background_color=”” background_image=”” background_image_id=”” background_position=”left top” background_repeat=”no-repeat” hover_type=”none” border_size=”0″ border_color=”” border_style=”solid” border_position=”all” padding_top=”” padding_right=”” padding_bottom=”” padding_left=”” margin_top=”” margin_bottom=”” animation_type=”” animation_direction=”left” animation_speed=”0.3″ animation_offset=”” last=”no”][fusion_text columns=”” column_min_width=”” column_spacing=”” rule_style=”default” rule_size=”” rule_color=”” hide_on_mobile=”small-visibility,medium-visibility,large-visibility” class=”” id=””]
Eaton Fuller Hybrid Transmissie Engine Crank toets
[/fusion_text][/fusion_builder_column][/fusion_builder_row][/fusion_builder_container][fusion_builder_container hundred_percent=”no” hundred_percent_height=”no” hundred_percent_height_scroll=”no” hundred_percent_height_center_content=”yes” equal_height_columns=”no” menu_anchor=”” hide_on_mobile=”small-visibility,medium-visibility,large-visibility” status=”published” publish_date=”” class=”” id=”” background_color=”” background_image=”” background_position=”center center” background_repeat=”no-repeat” fade=”no” background_parallax=”none” enable_mobile=”no” parallax_speed=”0.3″ video_mp4=”” video_webm=”” video_ogv=”” video_url=”” video_aspect_ratio=”16:9″ video_loop=”yes” video_mute=”yes” video_preview_image=”” border_size=”” border_color=”” border_style=”solid” margin_top=”” margin_bottom=”” padding_top=”” padding_right=”” padding_bottom=”” padding_left=””][fusion_builder_row][fusion_builder_column type=”1_1″ layout=”1_1″ spacing=”” center_content=”no” link=”” target=”_self” min_height=”” hide_on_mobile=”small-visibility,medium-visibility,large-visibility” class=”” id=”” background_color=”” background_image=”” background_image_id=”” background_position=”left top” background_repeat=”no-repeat” hover_type=”none” border_size=”0″ border_color=”” border_style=”solid” border_position=”all” padding_top=”” padding_right=”” padding_bottom=”” padding_left=”” margin_top=”” margin_bottom=”” animation_type=”” animation_direction=”left” animation_speed=”0.3″ animation_offset=”” last=”no”][fusion_text columns=”” column_min_width=”” column_spacing=”” rule_style=”default” rule_size=”” rule_color=”” hide_on_mobile=”small-visibility,medium-visibility,large-visibility” class=”” id=””]
Hierdie simptoom gedrewe toets uitgevoer word as 'n "N" is vertoon op die rat vertoning met geen aktiewe of onaktiewe kodes en die voertuig nie crank.
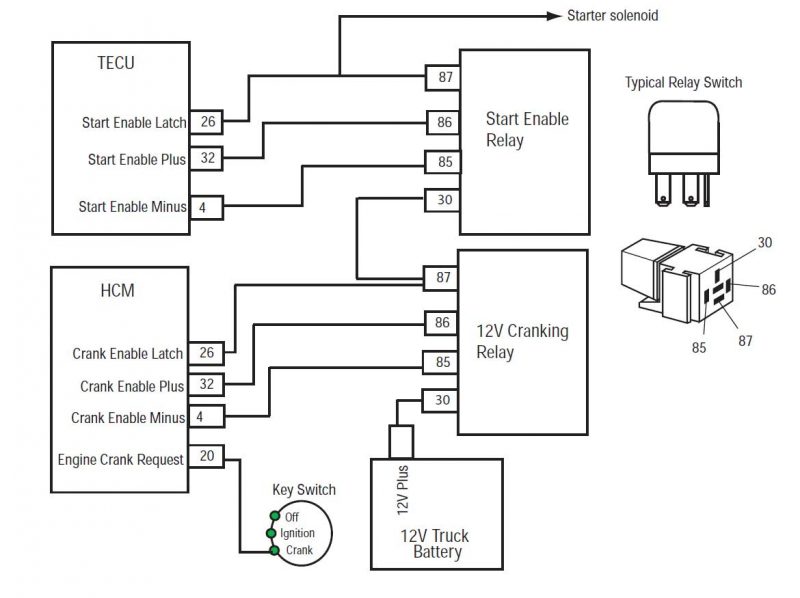
Die Hybrid Control Module (HCM) ontvang die insette om crank uit Pin 20 op die HCM 38-Way Connector, wat bedraad om die sleutel Switch. Die HCM gewoonlik magte die Hoogspannings Motor / Generator om die enjin aan te skakel. As die hibriede stelsel is op die regte, die HCM gebruik die standaard 12-Volt Starter deur krag na die 12-Volt slingerspoed Relay. Dit aflos bied dan battery krag te Pin 30 van die Start Aktiveer Relay, wat dan magte die aansitter solenoïede.
nota: This symptom-based test should only be performed if directed here from the Diagnostic Procedure and there are no Active fault codes.
Eaton Fuller Hybrid Transmissie Engine Crank toets Detection
Die volgende simptome kan ervaar:
- Voertuig nie crank of daar is 'n soliede "N" in die rat Wys.
[/fusion_text][fusion_text columns=”” column_min_width=”” column_spacing=”” rule_style=”default” rule_size=”” rule_color=”” hide_on_mobile=”small-visibility,medium-visibility,large-visibility” class=”” id=””]
moontlike oorsake
Hierdie fout kode kan veroorsaak word deur enige van die volgende:
- 12-Volt slingerspoed Relay
- Begin Aktiveer Relay
- voertuig Span
- enjin starters
- 12-volt batterye
- Sleutel Switch insette te Pin 20 van die HCM
[/fusion_text][/fusion_builder_column][/fusion_builder_row][/fusion_builder_container][fusion_builder_container hundred_percent=”no” hundred_percent_height=”no” hundred_percent_height_scroll=”no” hundred_percent_height_center_content=”yes” equal_height_columns=”no” menu_anchor=”” hide_on_mobile=”small-visibility,medium-visibility,large-visibility” status=”published” publish_date=”” class=”” id=”” background_color=”” background_image=”” background_position=”center center” background_repeat=”no-repeat” fade=”no” background_parallax=”none” enable_mobile=”no” parallax_speed=”0.3″ video_mp4=”” video_webm=”” video_ogv=”” video_url=”” video_aspect_ratio=”16:9″ video_loop=”yes” video_mute=”yes” video_preview_image=”” border_size=”” border_color=”” border_style=”solid” margin_top=”” margin_bottom=”” padding_top=”” padding_right=”” padding_bottom=”” padding_left=””][fusion_builder_row][fusion_builder_column type=”1_1″ layout=”1_1″ spacing=”” center_content=”no” link=”” target=”_self” min_height=”” hide_on_mobile=”small-visibility,medium-visibility,large-visibility” class=”” id=”” background_color=”” background_image=”” background_image_id=”” background_position=”left top” background_repeat=”no-repeat” hover_type=”none” border_size=”0″ border_color=”” border_style=”solid” border_position=”all” padding_top=”” padding_right=”” padding_bottom=”” padding_left=”” margin_top=”” margin_bottom=”” animation_type=”” animation_direction=”left” animation_speed=”0.3″ animation_offset=”” last=”no”][fusion_text columns=”” column_min_width=”” column_spacing=”” rule_style=”default” rule_size=”” rule_color=”” hide_on_mobile=”small-visibility,medium-visibility,large-visibility” class=”” id=””]
Eaton Fuller Hybrid Transmissie Engine Crank toets komponent identifikasie
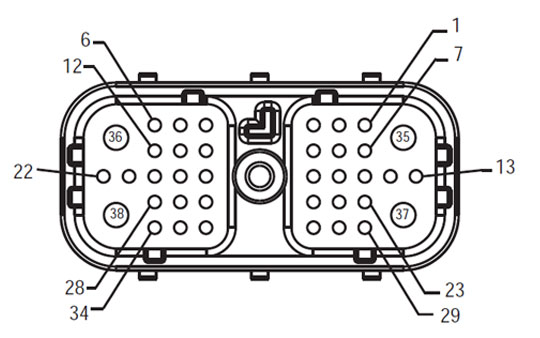
[/fusion_text][/fusion_builder_column][/fusion_builder_row][/fusion_builder_container][fusion_builder_container hundred_percent=”no” hundred_percent_height=”no” hundred_percent_height_scroll=”no” hundred_percent_height_center_content=”yes” equal_height_columns=”no” menu_anchor=”” hide_on_mobile=”small-visibility,medium-visibility,large-visibility” status=”published” publish_date=”” class=”” id=”” background_color=”” background_image=”” background_position=”center center” background_repeat=”no-repeat” fade=”no” background_parallax=”none” enable_mobile=”no” parallax_speed=”0.3″ video_mp4=”” video_webm=”” video_ogv=”” video_url=”” video_aspect_ratio=”16:9″ video_loop=”yes” video_mute=”yes” video_preview_image=”” border_size=”” border_color=”” border_style=”solid” margin_top=”” margin_bottom=”” padding_top=”” padding_right=”” padding_bottom=”” padding_left=””][fusion_builder_row][fusion_builder_column type=”1_2″ layout=”1_2″ spacing=”” center_content=”no” link=”” target=”_self” min_height=”” hide_on_mobile=”small-visibility,medium-visibility,large-visibility” class=”” id=”” background_color=”” background_image=”” background_image_id=”” background_position=”left top” background_repeat=”no-repeat” hover_type=”none” border_size=”0″ border_color=”” border_style=”solid” border_position=”all” padding_top=”” padding_right=”” padding_bottom=”” padding_left=”” margin_top=”” margin_bottom=”” animation_type=”” animation_direction=”left” animation_speed=”0.3″ animation_offset=”” last=”no”][fusion_imageframe image_id=”14135|full” max_width=”” style_type=”” blur=”” stylecolor=”” hover_type=”none” bordersize=”” bordercolor=”” borderradius=”” align=”center” lightbox=”no” gallery_id=”” lightbox_image=”” lightbox_image_id=”” alt=”Fuller Span Front View TECU – Voertuig Interface Connector” link=”” linktarget=”_self” hide_on_mobile=”small-visibility,medium-visibility,large-visibility” class=”” id=”” animation_type=”” animation_direction=”left” animation_speed=”0.3″ animation_offset=””]https://www.globaltransmissionsupply.com/wp-content/uploads/Fuller-Harness-Front-View-TECU-Vehicle-Interface-Connector.jpg[/fusion_imageframe][fusion_text columns=”” column_min_width=”” column_spacing=”” rule_style=”default” rule_size=”” rule_color=”” hide_on_mobile=”small-visibility,medium-visibility,large-visibility” class=”” id=””]
Tuig Front View
(TECU – Voertuig Interface Connector)
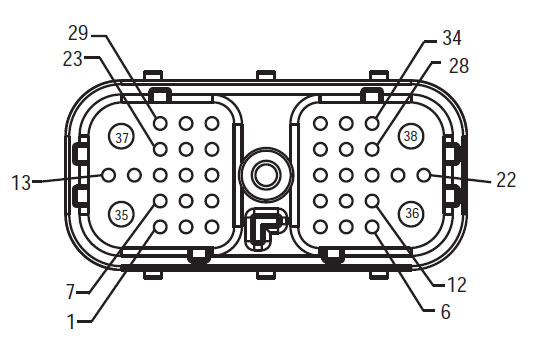
[/fusion_text][/fusion_builder_column][fusion_builder_column type=”1_2″ layout=”1_2″ spacing=”” center_content=”no” link=”” target=”_self” min_height=”” hide_on_mobile=”small-visibility,medium-visibility,large-visibility” class=”” id=”” background_color=”” background_image=”” background_image_id=”” background_position=”left top” background_repeat=”no-repeat” hover_type=”none” border_size=”0″ border_color=”” border_style=”solid” border_position=”all” padding_top=”” padding_right=”” padding_bottom=”” padding_left=”” margin_top=”” margin_bottom=”” animation_type=”” animation_direction=”left” animation_speed=”0.3″ animation_offset=”” last=”no”][fusion_imageframe image_id=”14061|full” max_width=”” style_type=”” blur=”” stylecolor=”” hover_type=”none” bordersize=”” bordercolor=”” borderradius=”” align=”center” lightbox=”no” gallery_id=”” lightbox_image=”” lightbox_image_id=”” alt=”HCM – Hybrid System Interface Connector” link=”” linktarget=”_self” hide_on_mobile=”small-visibility,medium-visibility,large-visibility” class=”” id=”” animation_type=”” animation_direction=”left” animation_speed=”0.3″ animation_offset=””]https://www.globaltransmissionsupply.com/wp-content/uploads/Fuller-Front-Harness-View-HCM.jpg[/fusion_imageframe][fusion_text columns=”” column_min_width=”” column_spacing=”” rule_style=”default” rule_size=”” rule_color=”” hide_on_mobile=”small-visibility,medium-visibility,large-visibility” class=”” id=””]
Tuig Front View
(HCM – Hybrid System Interface Connector)
[/fusion_text][/fusion_builder_column][fusion_builder_column type=”1_1″ layout=”1_1″ spacing=”” center_content=”no” link=”” target=”_self” min_height=”” hide_on_mobile=”small-visibility,medium-visibility,large-visibility” class=”” id=”” background_image_id=”” background_color=”#000000″ background_image=”” background_position=”left top” undefined=”” background_repeat=”no-repeat” hover_type=”none” border_size=”0″ border_color=”” border_style=”solid” border_position=”all” padding_top=”” padding_right=”” padding_bottom=”” padding_left=”” margin_top=”” margin_bottom=”” animation_type=”” animation_direction=”left” animation_speed=”0.3″ animation_offset=”” last=”no”][fusion_text columns=”” column_min_width=”” column_spacing=”” rule_style=”default” rule_size=”” rule_color=”” hide_on_mobile=”small-visibility,medium-visibility,large-visibility” class=”” id=””]
NOTA: Verwys na die Eaton Hybrid komponent en Connector ligging vir Connector plekke in MY08 Systems
[/fusion_text][/fusion_builder_column][fusion_builder_column type=”1_1″ layout=”1_1″ spacing=”” center_content=”no” link=”” target=”_self” min_height=”” hide_on_mobile=”small-visibility,medium-visibility,large-visibility” class=”” id=”” background_image_id=”” background_color=”#000000″ background_image=”” background_position=”left top” undefined=”” background_repeat=”no-repeat” hover_type=”none” border_size=”0″ border_color=”” border_style=”solid” border_position=”all” padding_top=”” padding_right=”” padding_bottom=”” padding_left=”” margin_top=”20″ margin_bottom=”20″ animation_type=”” animation_direction=”left” animation_speed=”0.3″ animation_offset=”” last=”no”][fusion_text columns=”” column_min_width=”” column_spacing=”” rule_style=”default” rule_size=”” rule_color=”” hide_on_mobile=”small-visibility,medium-visibility,large-visibility” class=”” id=””]
NOTA: Verwys na die Eaton Hybrid komponent en Connector ligging vir Connector plekke in MY09 Systems.
[/fusion_text][/fusion_builder_column][fusion_builder_column type=”1_1″ layout=”1_1″ spacing=”” center_content=”no” link=”” target=”_self” min_height=”” hide_on_mobile=”small-visibility,medium-visibility,large-visibility” class=”” id=”” background_color=”” background_image=”” background_image_id=”” background_position=”left top” background_repeat=”no-repeat” hover_type=”none” border_size=”0″ border_color=”” border_style=”solid” border_position=”all” padding_top=”” padding_right=”” padding_bottom=”” padding_left=”” margin_top=”” margin_bottom=”” animation_type=”” animation_direction=”left” animation_speed=”0.3″ animation_offset=”” last=”no”][fusion_imageframe image_id=”14930|800″ max_width=”” style_type=”” blur=”” stylecolor=”” hover_type=”none” bordersize=”” bordercolor=”” borderradius=”” align=”center” lightbox=”no” gallery_id=”” lightbox_image=”” lightbox_image_id=”” alt=”Eaton Fuller Hybrid Transmissie TECU HCM Start Aktiveer Relay slingerspoed Relay Truck Battery Connections” link=”” linktarget=”_self” hide_on_mobile=”small-visibility,medium-visibility,large-visibility” class=”” id=”” animation_type=”” animation_direction=”left” animation_speed=”0.3″ animation_offset=””]https://www.globaltransmissionsupply.com/wp-content/uploads/TECU-HCM-Start-Enable-Relay-Crannking-Relay-Battery-800×598.jpg[/fusion_imageframe][/fusion_builder_column][/fusion_builder_row][/fusion_builder_container][fusion_builder_container hundred_percent=”no” hundred_percent_height=”no” hundred_percent_height_scroll=”no” hundred_percent_height_center_content=”yes” equal_height_columns=”no” menu_anchor=”” hide_on_mobile=”small-visibility,medium-visibility,large-visibility” status=”published” publish_date=”” class=”” id=”” background_color=”” background_image=”” background_position=”center center” background_repeat=”no-repeat” fade=”no” background_parallax=”none” enable_mobile=”no” parallax_speed=”0.3″ video_mp4=”” video_webm=”” video_ogv=”” video_url=”” video_aspect_ratio=”16:9″ video_loop=”yes” video_mute=”yes” video_preview_image=”” border_size=”” border_color=”” border_style=”solid” margin_top=”” margin_bottom=”” padding_top=”” padding_right=”” padding_bottom=”” padding_left=””][fusion_builder_row][fusion_builder_column type=”1_1″ layout=”1_1″ spacing=”” center_content=”no” link=”” target=”_self” min_height=”” hide_on_mobile=”small-visibility,medium-visibility,large-visibility” class=”” id=”” background_color=”” background_image=”” background_image_id=”” background_position=”left top” background_repeat=”no-repeat” hover_type=”none” border_size=”0″ border_color=”” border_style=”solid” border_position=”all” padding_top=”” padding_right=”” padding_bottom=”” padding_left=”” margin_top=”” margin_bottom=”” animation_type=”” animation_direction=”left” animation_speed=”0.3″ animation_offset=”” last=”no”][fusion_modal name=”warnings_cautions” title=”waarskuwings & waarsku” size=”large” background=”” border_color=”” show_footer=”yes” class=”” id=””]gevaar: Gevaar dui jy sal erg beseer of gedood as moenie die aangedui prosedure volg nie.
waarskuwing: Waarskuwing dui op 'n onmiddellike gevaar, wat kan lei tot ernstige persoonlike besering as jy nie die aangewese prosedure te volg.
versigtigheid: Let daarop dui voertuig of skade aan eiendom kan optree as jy nie die aangewese prosedure te volg.
nota: Nota dui addisionele detail wat sal help met die diagnose of herstel van 'n komponent / stelsel.
Volg die gespesifiseerde prosedures in die aangeduide om persoonlike beserings te voorkom:
1. As die hoë-spanning keëls is om die voertuig en die uitsluiting is geïnstalleer op die PUK, die enigste persoon wat toegelaat moet word om die voertuig begin is die persoon wat die uitsluiting tag onderteken.
2. Voor die werk op 'n voertuig of verlaat die kajuit, terwyl die enjin loop, moet jy die rathefboom in "N" plaas het die parkeerrem, en sluit die wiele.
3. Om veiligheidsredes, altyd die diens remme betrek voor die kies van rat posisies van "N."
4. Voor die aanvang van 'n voertuig altyd sit in die bestuurder se sitplek, kies "N" op die verskuiwing beheer, en stel die parkering remme.
5. In voertuie met ePTO, die enjin en / of
Motor / Generator kan begin in ePTO af. voer nooit enige onderhoud of werk op voertuig, terwyl in hierdie modus.
6. 12-Volt battery positiewe (+) en negatiewe (-) moet voor ontkoppel om enige sweiswerk op enige Hybrid toegerus voertuig.
versigtigheid: Volg die gespesifiseerde prosedures in die aangeduide om toerusting wanfunksioneer of skade te vermy.
versigtigheid: Moenie die parkeerrem nie vry te laat of te poog om 'n rat kies totdat die lugdruk is op die regte vlak.
versigtigheid: Om skade aan die oordrag tydens sleep plek die rathefboom in "N" te vermy en die opheffing van die ry wiele van die grond af of ontkoppel die aandrijflijn.
Hoë-spanning Waarskuwings & waarsku
- Gebruik CO2 of droë chemiese brandblussers.
- Die hoë-spanning bedrading bedek in oranje isolasie of ingewikkelde pype en gemerk met waarskuwing etikette op die verbindings.
- Alle Eaton® Hybrid Diesel / Electric voertuie sal gemerk word "Hybrid’ aan die buitekant van die voertuig, saam met die verskuiwing etiket op die paneelbord.
- Verwys na OEM vir spesifieke plek van onderstel gemonteer hibriede komponente.
- MOENIE sny in die oranje hoë-spanning kabels.
- MOENIE sny in of maak die PUK.
- MOENIE sny in of die DC / DC Converter oop.
- MOENIE sny in of maak die Inverter.
'N buffersone moet opgestel word en 'n hoë-spanning geïsoleerde rubberhandskoene (klas 0 met leer beskermers) is voor wat nodig is om die werk op 'n hoë-spanning. Versuim om hierdie instruksies te volg kan lei tot ernstige persoonlike besering of dood.
Die rubber geïsoleerde handskoene wat moet gedra word, terwyl die werk op die hoë-spanning stelsel is klas 0 met leer beskermers. Die rubberhandskoene moet getoets word voor elke gebruik na aanleiding van die rubber isolasie handskoene toetsprosedure gevind in "diagnostiese instrumente / Service Publications" op bladsy 6. Versuim om hierdie instruksies te volg kan lei tot ernstige persoonlike besering of dood.
Voor te inspekteer of werk op 'n hoë-spanning kabels of komponente van die "High-spanning Service Afsluiting en Power-Up Prosedure" op bladsy 4 gevolg moet word. Versuim om hierdie instruksies te volg kan lei tot ernstige persoonlike besering of dood.
Die Uitsluiting en Tagout toestelle moet net verwyder word deur die tegnikus wat die Uitsluiting en Tagout toestelle op die voertuig geplaas. Versuim om hierdie instruksies te volg kan lei tot ernstige persoonlike besering of dood.
Hoë-spanning rubber geïsoleerde handskoene (klas 0 met leer beskermers) moet gedra word wanneer daar op 'n
hoë-spanning kabels. Die "Hoogspannings Service Afsluiting en Power-Up Prosedure" op bladsy 4 moet voor wat gevolg moet word om die verwydering van 'n hoë-spanning kabels. Versuim om hierdie instruksies te volg kan lei tot ernstige persoonlike besering of dood.
Hoë-spanning kabels en bedrading is oranje en bevat 'n waarskuwing etiket op die verbindings. Hoë-spanning komponente gemerk met 'n etiket. Hoë-spanning rubber geïsoleerde handskoene (klas 0 met leer beskermers) moet gebruik word wanneer daar op enige van hierdie komponente. Versuim om hierdie instruksies te volg kan lei tot ernstige persoonlike besering of dood.
Hoë-spanning Service Shutdown Prosedures

1. Volg "Hoogspannings Werk Area" prosedure.
2. Vind die rooi PEC Service Skakel die voorkant van die PAC en stoot afskakel.
3. Verwyder die Diens Skakel Cover en installeer die Uitsluiting Bracket (J48506).
4. Vas tag om die Uitsluiting Bracket.
5. Verseker die PUK Service Switch kan nie beweeg van die af posisie.
6. Laat die stelsel op te rig vir 'n minimum van 5 minute om 'n hoë spanning ontlaai.
7. Verbind ServiceRanger en kyk na die data Monitor PID 116 genaamd "High-spanning Potensiële Battery." Gebruik SPN 520323 vir J1939 verband "Battery Voltage RB" (Relay Box).
8. Die spanning moet wees 30 volts of minder. As die spanning is bo 30 volts, werk nie op die voertuig en kontak Eaton® by 1-800-826-HELP (4357).
9. Draai aansitsleutel af en gaan na herstel of stap probleem op te los.
nota: Die spanning daal tot nul wanneer die sleutel is af.
Hoë-spanning Service Power-Up Prosedure
1. Installeer al 'n hoë-spanning verbindings in hul toegesluit posisies.
2. As jy die persoon wat op die voertuig, verwyder die Uitsluiting Bracket en tag.
3. Installeer die Uitsluiting Bracket oor die Diens Skakel.
4. Trek die Diens Skakel uit en laat voertuig stel vir 2 minute.
5. Start vehicle when appropriate.[/fusion_modal][fusion_modal name=”component_location” title=”Eaton Hybrid komponent en Connector ligging ” size=”large” background=”#ffffff” border_color=”” show_footer=”yes” class=”” id=””]

[/fusion_modal][fusion_modal name=”component_location2″ title=”Eaton Hybrid komponent en Connector ligging MY09 Systems” size=”large” background=”#ffffff” border_color=”” show_footer=”yes” class=”” id=””]

[/fusion_modal][/fusion_builder_column][/fusion_builder_row][/fusion_builder_container][fusion_builder_container hundred_percent=”no” hundred_percent_height=”no” hundred_percent_height_scroll=”no” hundred_percent_height_center_content=”yes” equal_height_columns=”no” menu_anchor=”” hide_on_mobile=”small-visibility,medium-visibility,large-visibility” status=”published” publish_date=”” class=”” id=”” background_color=”” background_image=”” background_position=”center center” background_repeat=”no-repeat” fade=”no” background_parallax=”none” enable_mobile=”no” parallax_speed=”0.3″ video_mp4=”” video_webm=”” video_ogv=”” video_url=”” video_aspect_ratio=”16:9″ video_loop=”yes” video_mute=”yes” video_preview_image=”” border_size=”” border_color=”” border_style=”solid” margin_top=”” margin_bottom=”” padding_top=”” padding_right=”” padding_bottom=”” padding_left=””][fusion_builder_row][fusion_builder_column type=”1_1″ layout=”1_1″ spacing=”” center_content=”no” link=”” target=”_self” min_height=”” hide_on_mobile=”small-visibility,medium-visibility,large-visibility” class=”” id=”” background_color=”” background_image=”” background_image_id=”” background_position=”left top” background_repeat=”no-repeat” hover_type=”none” border_size=”0″ border_color=”” border_style=”solid” border_position=”all” padding_top=”” padding_right=”” padding_bottom=”” padding_left=”” margin_top=”” margin_bottom=”” animation_type=”” animation_direction=”left” animation_speed=”0.3″ animation_offset=”” last=”no”][fusion_content_boxes layout=”clean-horizontal” columns=”2″ title_size=”18px” heading_size=”3″ title_color=”#ffffff” body_color=”#ffffff” backgroundcolor=”#4f4f4f” icon=”” iconflip=”” iconrotate=”” iconspin=”no” iconcolor=”” icon_circle=”” icon_circle_radius=”” circlecolor=”” circlebordersize=”” circlebordercolor=”” outercirclebordersize=”” outercirclebordercolor=”” icon_size=”” icon_hover_type=”” hover_accent_color=”” image=”” image_id=”” image_max_width=”” link_type=”” button_span=”” link_area=”” link_target=”” icon_align=”left” animation_type=”” animation_delay=”” animation_offset=”” animation_direction=”left” animation_speed=”0.3″ margin_top=”” margin_bottom=”” hide_on_mobile=”small-visibility,medium-visibility,large-visibility” class=”” id=””][fusion_content_box title=”STAP 1. Visueel waar te neem die Gear Wys na krag tot.” backgroundcolor=”” icon=”” iconflip=”” iconrotate=”” iconspin=”no” iconcolor=”” circlecolor=”” circlebordersize=”” circlebordercolor=”” outercirclebordersize=”” outercirclebordercolor=”” image=”” image_id=”” image_max_width=”” link=”” linktext=”Lees meer” link_target=”” animation_type=”” animation_direction=”left” animation_speed=”0.3″ animation_offset=””]
- Uit te voer hierdie simptoom toets al is dit net as gerig om dit te doen deur die simptoom Gedryf Diagnostiese indeks en daar is geen Active skuld kodes.
- sleutel op.
- Press N op die drukknop Shift Control:
nota: Die ePTO lig moet af wees wanneer die gebruik van die sleutel skakelaar om die voertuig begin.- As "N" is teenwoordig op die rat vertoning, gaan na Stap 2.
- As "N" is nie teenwoordig op die rat vertoning, verwys na die "Hybrid Diagnostiese Prosedure"Vir die korrekte-simptoom gebaseer toets uit te voer.
[/fusion_content_box][fusion_content_box title=”STAP 2. Verifieer Crank parameter Versoek.” backgroundcolor=”” icon=”” iconflip=”” iconrotate=”” iconspin=”no” iconcolor=”” circlecolor=”” circlebordersize=”” circlebordercolor=”” outercirclebordersize=”” outercirclebordercolor=”” image=”” image_id=”” image_max_width=”” link=”” linktext=”Lees meer” link_target=”” animation_type=”” animation_direction=”left” animation_speed=”0.3″ animation_offset=””]
- sleutel op.
- Verbind ServiceRanger om die 9-Way Diagnostiese Connector.
- Select the “Data Monitor” option and view the “Crank Request” parameter:
- As Crank Versoek lees 1 (crank), gaan na Stap 3.
- As Crank Versoek lees 0 (geen Crank), gaan na Stap 5.
[/fusion_content_box][/fusion_content_boxes][fusion_content_boxes layout=”clean-horizontal” columns=”2″ title_size=”18px” heading_size=”3″ title_color=”#ffffff” body_color=”#ffffff” backgroundcolor=”#4f4f4f” icon=”” iconflip=”” iconrotate=”” iconspin=”no” iconcolor=”” icon_circle=”” icon_circle_radius=”” circlecolor=”” circlebordersize=”” circlebordercolor=”” outercirclebordersize=”” outercirclebordercolor=”” icon_size=”” icon_hover_type=”” hover_accent_color=”” image=”” image_id=”” image_max_width=”” link_type=”” button_span=”” link_area=”” link_target=”” icon_align=”left” animation_type=”” animation_delay=”” animation_offset=”” animation_direction=”left” animation_speed=”0.3″ margin_top=”” margin_bottom=”” hide_on_mobile=”small-visibility,medium-visibility,large-visibility” class=”” id=””][fusion_content_box title=”STAP 3. Bevestig integriteit van die slingerspoed Relay..” backgroundcolor=”” icon=”” iconflip=”” iconrotate=”” iconspin=”no” iconcolor=”” circlecolor=”” circlebordersize=”” circlebordercolor=”” outercirclebordersize=”” outercirclebordercolor=”” image=”” image_id=”” image_max_width=”” link=”” linktext=”Lees meer” link_target=”” animation_type=”” animation_direction=”left” animation_speed=”0.3″ animation_offset=””]
- Vervang 'n ander begin te aktiveer en 12-Volt slingerspoed Relay.
- Probeer om die enjin crank:
- As enjin cranks, om vas te stel watter van die 2 aflosse was die skuldige en vervang dit. Gaan na Stap 6.
- As enjin nie crank, gaan na Stap 4.
[/fusion_content_box][fusion_content_box title=”STAP 4. Verifieer krag om die Start Aktiveer Relay.” backgroundcolor=”” icon=”” iconflip=”” iconrotate=”” iconspin=”” iconcolor=”” circlecolor=”” circlebordersize=”” circlebordercolor=”” outercirclebordersize=”” outercirclebordercolor=”” image=”” image_id=”” image_max_width=”” link=”” linktext=”” link_target=”” animation_type=”” animation_direction=”left” animation_speed=”0.3″ animation_offset=””]
- sleutel op.
- Enjin kan crank.
- Jumper Pin 87 van die Start Aktiveer Relay Connector aan battery krag:
- As enjin cranks, herstel oop kring tussen Pin 87 van die Start Aktiveer Relay en battery. Verwys na OEM vir herstel prosedures.
- As enjin nie crank, kommer is met aansitter solenoïede of Power Span om solenoïde. Verwys na OEM vir herstel prosedures.
[/fusion_content_box][/fusion_content_boxes][fusion_content_boxes layout=”clean-horizontal” columns=”2″ title_size=”18px” heading_size=”3″ title_color=”#ffffff” body_color=”#ffffff” backgroundcolor=”#4f4f4f” icon=”” iconflip=”” iconrotate=”” iconspin=”no” iconcolor=”” icon_circle=”” icon_circle_radius=”” circlecolor=”” circlebordersize=”” circlebordercolor=”” outercirclebordersize=”” outercirclebordercolor=”” icon_size=”” icon_hover_type=”” hover_accent_color=”#f41000″ image=”” image_id=”” image_max_width=”” link_type=”” button_span=”” link_area=”” link_target=”” icon_align=”left” animation_type=”” animation_delay=”” animation_offset=”” animation_direction=”left” animation_speed=”0.3″ margin_top=”” margin_bottom=”” hide_on_mobile=”small-visibility,medium-visibility,large-visibility” class=”” id=””][fusion_content_box title=”STAP 5. Verifieer spanning om gemaalde op HCM Span.” backgroundcolor=”” icon=”” iconflip=”” iconrotate=”” iconspin=”” iconcolor=”” circlecolor=”” circlebordersize=”” circlebordercolor=”” outercirclebordersize=”” outercirclebordercolor=”” image=”” image_id=”” image_max_width=”” link=”” linktext=”” link_target=”” animation_type=”” animation_direction=”left” animation_speed=”0.3″ animation_offset=””]
- sleutel af.
- Ontkoppel negatiewe battery kabel.
- Ontkoppel HCM Span 38-Way Connector.
- Sleutel in die begin posisie plaas.
- Meet spanning uit HCM Span 38-Way Connector Pin 20 om grond.
- As spanning is 11-13 volts, vervang die Hybrid Control Module (HCM), dan gaan na Stap 6.
- As spanning is onder 11 volts, herstel van die voertuig Span, dan gaan na Stap 6.
[/fusion_content_box][fusion_content_box title=”STAP 6. verifieer herstel.” backgroundcolor=”” icon=”” iconflip=”” iconrotate=”” iconspin=”no” iconcolor=”” circlecolor=”” circlebordersize=”” circlebordercolor=”” outercirclebordersize=”” outercirclebordercolor=”” image=”” image_id=”” image_max_width=”” link=”” linktext=”Lees meer” link_target=”” animation_type=”” animation_direction=”left” animation_speed=”0.3″ animation_offset=””]
- sleutel af.
- Herkonnekteer al verbindings.
- Plaas Shift beheer in neutrale.
- sleutel op:
- As enjin begin, toets is voltooi.
- As enjin begin nie, vind fout in die toets, gaan na Stap 1.
[/fusion_content_box][/fusion_content_boxes][/fusion_builder_column][/fusion_builder_row][/fusion_builder_container][fusion_global id=”13788″]
