[fusion_builder_container hundred_percent=”yes” hundred_percent_height=”no” hundred_percent_height_scroll=”no” hundred_percent_height_center_content=”yes” equal_height_columns=”no” menu_anchor=”” hide_on_mobile=”small-visibility,medium-visibility,large-visibility” status=”published” publish_date=”” class=”” id=”” background_color=”” background_image=”https://www.globaltransmissionsupply.com/wp-content/uploads/gears-dark-overlay.jpg” background_position=”center center” background_repeat=”no-repeat” fade=”no” background_parallax=”none” enable_mobile=”no” parallax_speed=”0.3″ video_mp4=”” video_webm=”” video_ogv=”” video_url=”” video_aspect_ratio=”16:9″ video_loop=”yes” video_mute=”yes” video_preview_image=”” border_size=”” border_color=”” border_style=”solid” margin_top=”” margin_bottom=”” padding_top=”3%” padding_right=”” padding_bottom=”3%” padding_left=””][fusion_builder_row][fusion_builder_column type=”1_1″ layout=”1_1″ spacing=”” center_content=”no” link=”” target=”_self” min_height=”” hide_on_mobile=”small-visibility,medium-visibility,large-visibility” class=”” id=”” background_image_id=”” background_color=”rgba(0,0,0,0.4)” background_image=”” background_position=”left top” undefined=”” background_repeat=”no-repeat” hover_type=”none” border_size=”0″ border_color=”” border_style=”solid” border_position=”all” padding_top=”” padding_right=”” padding_bottom=”” padding_left=”” margin_top=”” margin_bottom=”” animation_type=”” animation_direction=”left” animation_speed=”0.3″ animation_offset=”” last=”no”][fusion_text columns=”” column_min_width=”” column_spacing=”” rule_style=”default” rule_size=”” rule_color=”” hide_on_mobile=”small-visibility,medium-visibility,large-visibility” class=”” id=””]
Eaton Fuller Transmission fejlkoder
[/fusion_text][/fusion_builder_column][/fusion_builder_row][/fusion_builder_container][fusion_builder_container hundred_percent=”no” hundred_percent_height=”no” hundred_percent_height_scroll=”no” hundred_percent_height_center_content=”yes” equal_height_columns=”no” menu_anchor=”” hide_on_mobile=”small-visibility,medium-visibility,large-visibility” status=”published” publish_date=”” class=”” id=”” background_color=”” background_image=”” background_position=”center center” background_repeat=”no-repeat” fade=”no” background_parallax=”none” enable_mobile=”no” parallax_speed=”0.3″ video_mp4=”” video_webm=”” video_ogv=”” video_url=”” video_aspect_ratio=”16:9″ video_loop=”yes” video_mute=”yes” video_preview_image=”” border_size=”” border_color=”” border_style=”solid” margin_top=”25″ margin_bottom=”” padding_top=”” padding_right=”” padding_bottom=”” padding_left=””][fusion_builder_row][fusion_builder_column type=”1_1″ layout=”1_1″ spacing=”” center_content=”no” link=”” target=”_self” min_height=”” hide_on_mobile=”small-visibility,medium-visibility,large-visibility” class=”” id=”” background_color=”” background_image=”” background_image_id=”” background_position=”left top” background_repeat=”no-repeat” hover_type=”none” border_size=”0″ border_color=”” border_style=”solid” border_position=”all” padding_top=”” padding_right=”” padding_bottom=”” padding_left=”” margin_top=”” margin_bottom=”” animation_type=”” animation_direction=”left” animation_speed=”0.3″ animation_offset=”” last=”no”][fusion_text columns=”” column_min_width=”” column_spacing=”” rule_style=”default” rule_size=”” rule_color=”” hide_on_mobile=”small-visibility,medium-visibility,large-visibility” class=”” id=””]
Henter Eaton Fuller Transmission fejlkoder manuelt
[/fusion_text][fusion_separator style_type=”default” hide_on_mobile=”small-visibility,medium-visibility,large-visibility” class=”” id=”” sep_color=”#0038a0″ top_margin=”” bottom_margin=”20″ border_size=”” icon=”” icon_circle=”” icon_circle_color=”” width=”20%” alignment=”left” /][fusion_text columns=”” column_min_width=”” column_spacing=”” rule_style=”default” rule_size=”” rule_color=”” hide_on_mobile=”small-visibility,medium-visibility,large-visibility” class=”” id=””]
Følg instruktionerne på denne side for at finde, teste og lære at lave fejl kode fejl til din Freightliner, Mack, Peterbilt, Kenworth, Volvo og internationale lastbil. Hent Eaton Fuller transmission fejlkoder ved at aktivere systemets selvdiagnostisk tilstand. Når du har din fejlkode, rulle til nedenstående tabel for at finde beskrivelsen.
Bemærk: Du kan også bruge en PC- baseret tjeneste værktøj, såsom ServiceRanger for at hente fejlkoder.
[/fusion_text][/fusion_builder_column][fusion_builder_column type=”1_2″ layout=”1_2″ spacing=”” center_content=”no” link=”” target=”_self” min_height=”” hide_on_mobile=”small-visibility,medium-visibility,large-visibility” class=”” id=”” background_color=”” background_image=”” background_image_id=”” background_position=”left top” background_repeat=”no-repeat” hover_type=”none” border_size=”0″ border_color=”” border_style=”solid” border_position=”all” padding_top=”” padding_right=”” padding_bottom=”” padding_left=”” margin_top=”” margin_bottom=”” animation_type=”” animation_direction=”left” animation_speed=”0.3″ animation_offset=”” last=”no”][fusion_text columns=”” column_min_width=”” column_spacing=”” rule_style=”default” rule_size=”” rule_color=”” hide_on_mobile=”small-visibility,medium-visibility,large-visibility” class=”” id=””]
-
- Placer gearstangen i neutral.
- Sæt parkeringsbremsen.
- Drej nøglen om med slukket motor.
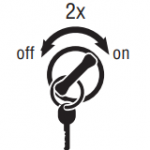
Bemærk: Hvis motoren allerede kører, du kan stadig hente koder; imidlertid, koble ikke starteren til, hvis motoren går i stå. - For at hente aktive koder: nøgle på. Drej nøglen og tænde 2 gange inden for fem sekunder slutter med nøglen på. Efter 5 sekunder, Tjenesten lys begynder at blinke tocifrede fejlkoder. Hvis nogen fejl er aktive, servicelampen vil blinke kode 25 (ingen koder).
Bemærk: En "88" kan dukke op i instrumentbrættet ved tasten, som er en normal opstartstest af displayet
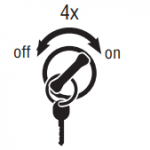
- At hente Inaktive Koder: Drej nøglen om. Sluk og tænd nøglen 4 gange inden for fem sekunder slutter med nøglen i på positionen. Efter 5 sekunder, Tjenesten lys begynder at blinke tocifrede fejlkoder. Hvis nogen fejl er aktive, servicelampen vil blinke kode 25 (ingen koder).
- Tocifrede fejlkoder vil blive vist i geardisplayet. Nogle køretøj kan være udstyret med en tjeneste lys.
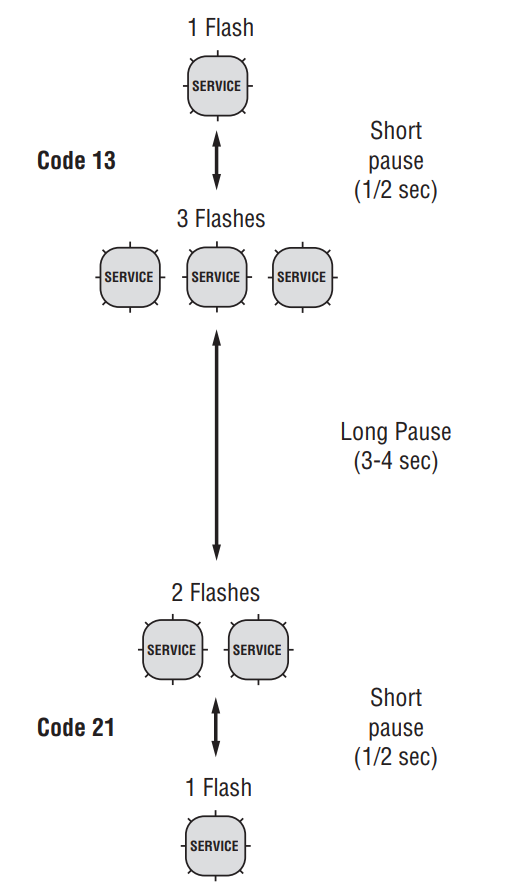
- Overhold rækkefølgen af blink på servicelyset og noter koderne. EN 1- til 2-sekunders pause adskiller hver gemt kode, og sekvensen gentages automatisk, efter at alle koder er blevet blinket.
[/fusion_text][/fusion_builder_column][fusion_builder_column type=”1_2″ layout=”1_2″ spacing=”” center_content=”no” link=”” target=”_self” min_height=”” hide_on_mobile=”small-visibility,medium-visibility,large-visibility” class=”” id=”” background_color=”” background_image=”” background_image_id=”” background_position=”left top” background_repeat=”no-repeat” hover_type=”none” border_size=”0″ border_color=”” border_style=”solid” border_position=”all” padding_top=”” padding_right=”” padding_bottom=”” padding_left=”” margin_top=”” margin_bottom=”” animation_type=”” animation_direction=”left” animation_speed=”0.3″ animation_offset=”” last=”no”][fusion_imageframe image_id=”13871|full” max_width=”” style_type=”” blur=”” stylecolor=”” hover_type=”none” bordersize=”” bordercolor=”” borderradius=”” align=”none” lightbox=”no” gallery_id=”” lightbox_image=”” lightbox_image_id=”” alt=”Eaton Fuller transmission fejlkoder- hvordan man kan læse manuel fejlkode sekvens ” link=”” linktarget=”_self” hide_on_mobile=”small-visibility,medium-visibility,large-visibility” class=”” id=”” animation_type=”” animation_direction=”left” animation_speed=”0.3″ animation_offset=””]https://www.globaltransmissionsupply.com/wp-content/uploads/fault-code-sequence-flash-e1553099338337.png[/fusion_imageframe][/fusion_builder_column][fusion_builder_column type=”1_1″ layout=”1_1″ spacing=”” center_content=”no” link=”” target=”_self” min_height=”” hide_on_mobile=”small-visibility,medium-visibility,large-visibility” class=”” id=”” background_color=”” background_image=”” background_image_id=”” background_position=”left top” background_repeat=”no-repeat” hover_type=”none” border_size=”0″ border_color=”” border_style=”solid” border_position=”all” padding_top=”” padding_right=”” padding_bottom=”” padding_left=”” margin_top=”” margin_bottom=”” animation_type=”” animation_direction=”left” animation_speed=”0.3″ animation_offset=”” last=”no”][fusion_text columns=”” column_min_width=”” column_spacing=”” rule_style=”default” rule_size=”” rule_color=”” hide_on_mobile=”small-visibility,medium-visibility,large-visibility” class=”” id=””]
Rydning fejlkoder manuelt
[/fusion_text][fusion_separator style_type=”default” hide_on_mobile=”small-visibility,medium-visibility,large-visibility” class=”” id=”” sep_color=”#0038a0″ top_margin=”” bottom_margin=”20″ border_size=”” icon=”” icon_circle=”” icon_circle_color=”” width=”20%” alignment=”left” /][fusion_text columns=”” column_min_width=”” column_spacing=”” rule_style=”default” rule_size=”” rule_color=”” hide_on_mobile=”small-visibility,medium-visibility,large-visibility” class=”” id=””]
Følgende procedure sletter alle inaktive fejlkoder fra TECU'ens hukommelse. Aktive fejlkoder slettes automatisk, når fejlen er rettet.
Bemærk: Du kan bruge en pc-baseret tjeneste værktøj, såsom ServiceRanger, at rydde fejlkoder.
1. Sted gearstangen i neutral.
2. Sæt parkeringsbremse.
3. Drej nøglen om med slukket motor.
4. Drej nøglen og tænde 6 gange inden 5 sekunder, der slutter med tasten på. Bemærk: Hvis koderne med succes er blevet ryddet, Servicelampen tændes og forbliver tændt i fem sekunder. Gearet Displayet viser 25 (ingen koder).
5. Drej nøglen ud og lade systemet til magten
ned.
[/fusion_text][/fusion_builder_column][/fusion_builder_row][/fusion_builder_container][fusion_builder_container hundred_percent=”no” hundred_percent_height=”no” hundred_percent_height_scroll=”no” hundred_percent_height_center_content=”yes” equal_height_columns=”no” menu_anchor=”” hide_on_mobile=”small-visibility,medium-visibility,large-visibility” status=”published” publish_date=”” class=”” id=”” background_color=”” background_image=”” background_position=”center center” background_repeat=”no-repeat” fade=”no” background_parallax=”none” enable_mobile=”no” parallax_speed=”0.3″ video_mp4=”” video_webm=”” video_ogv=”” video_url=”” video_aspect_ratio=”16:9″ video_loop=”yes” video_mute=”yes” video_preview_image=”” border_size=”” border_color=”” border_style=”solid” margin_top=”” margin_bottom=”” padding_top=”” padding_right=”” padding_bottom=”” padding_left=””][fusion_builder_row][fusion_builder_column type=”1_1″ layout=”1_1″ spacing=”” center_content=”no” link=”” target=”_self” min_height=”” hide_on_mobile=”small-visibility,medium-visibility,large-visibility” class=”” id=”” background_color=”” background_image=”” background_image_id=”” background_position=”left top” background_repeat=”no-repeat” hover_type=”none” border_size=”0″ border_color=”” border_style=”solid” border_position=”all” padding_top=”” padding_right=”” padding_bottom=”” padding_left=”” margin_top=”” margin_bottom=”” animation_type=”” animation_direction=”left” animation_speed=”0.3″ animation_offset=”” last=”no”][fusion_text columns=”” column_min_width=”” column_spacing=”” rule_style=”default” rule_size=”” rule_color=”” hide_on_mobile=”small-visibility,medium-visibility,large-visibility” class=”” id=””]
Fejlkodehentning og -rydning i ServiceRanger
[/fusion_text][fusion_separator style_type=”default” hide_on_mobile=”small-visibility,medium-visibility,large-visibility” class=”” id=”” sep_color=”#0038a0″ top_margin=”” bottom_margin=”20″ border_size=”” icon=”” icon_circle=”” icon_circle_color=”” width=”20%” alignment=”left” /][fusion_text columns=”” column_min_width=”” column_spacing=”” rule_style=”default” rule_size=”” rule_color=”” hide_on_mobile=”small-visibility,medium-visibility,large-visibility” class=”” id=””]
For at se fejlkoder eller at fjerne dem, følg nedenstående procedurer.
[/fusion_text][/fusion_builder_column][fusion_builder_column type=”1_2″ layout=”1_2″ spacing=”” center_content=”no” link=”” target=”_self” min_height=”” hide_on_mobile=”small-visibility,medium-visibility,large-visibility” class=”” id=”” background_color=”” background_image=”” background_image_id=”” background_position=”left top” background_repeat=”no-repeat” hover_type=”none” border_size=”0″ border_color=”” border_style=”solid” border_position=”all” padding_top=”” padding_right=”” padding_bottom=”” padding_left=”” margin_top=”” margin_bottom=”” animation_type=”” animation_direction=”left” animation_speed=”0.3″ animation_offset=”” last=”no”][fusion_text columns=”” column_min_width=”” column_spacing=”” rule_style=”default” rule_size=”” rule_color=”” hide_on_mobile=”small-visibility,medium-visibility,large-visibility” class=”” id=””]
Se aktive og inaktive Fejl
1. Slut ServiceRanger til 9-vejs Diagnostic Connector.
2. Gå til menuen ”Funktioner” og vælg fanen ”Kommunikation”.
3. Vælg den passende kommunikationsenhed til J1587 og J1939.
4. Vælg ”Opret forbindelse” på hovedsiden.
5. Vælg fanebladet ”Vis fejlkoder”.
Bemærk: Indledende anvendelse kræver alle trin; dog kræver efterfølgende brug kun Trin 4 og trin 5.
[/fusion_text][/fusion_builder_column][fusion_builder_column type=”1_2″ layout=”1_2″ spacing=”” center_content=”no” link=”” target=”_self” min_height=”” hide_on_mobile=”small-visibility,medium-visibility,large-visibility” class=”” id=”” background_color=”” background_image=”” background_image_id=”” background_position=”left top” background_repeat=”no-repeat” hover_type=”none” border_size=”0″ border_color=”” border_style=”solid” border_position=”all” padding_top=”” padding_right=”” padding_bottom=”” padding_left=”” margin_top=”” margin_bottom=”” animation_type=”” animation_direction=”left” animation_speed=”0.3″ animation_offset=”” last=”no”][fusion_text columns=”” column_min_width=”” column_spacing=”” rule_style=”default” rule_size=”” rule_color=”” hide_on_mobile=”small-visibility,medium-visibility,large-visibility” class=”” id=””]
Klare Inaktive fejl
1. Slut ServiceRanger til 9-vejs Diagnostic Connector.
2. Gå til menuen ”Funktioner” og vælg fanen ”Kommunikation”.
3. Vælg den passende kommunikationsenhed til J1587 og J1939.
4. Vælg ”Opret forbindelse” på hovedsiden.
5. Vælg fanebladet ”Vis fejlkoder”.
6. Vælg knappen ”Ryd fejl”.
Bemærk: Indledende anvendelse kræver alle trin, imidlertid, efterfølgende anvendelser kræver kun Trin 4 og trin 5.
[/fusion_text][/fusion_builder_column][/fusion_builder_row][/fusion_builder_container][fusion_builder_container hundred_percent=”no” hundred_percent_height=”no” hundred_percent_height_scroll=”no” hundred_percent_height_center_content=”yes” equal_height_columns=”no” menu_anchor=”” hide_on_mobile=”small-visibility,medium-visibility,large-visibility” status=”published” publish_date=”” class=”” id=”” background_color=”” background_image=”” background_position=”center center” background_repeat=”no-repeat” fade=”no” background_parallax=”none” enable_mobile=”no” parallax_speed=”0.3″ video_mp4=”” video_webm=”” video_ogv=”” video_url=”” video_aspect_ratio=”16:9″ video_loop=”yes” video_mute=”yes” video_preview_image=”” border_size=”” border_color=”” border_style=”solid” margin_top=”” margin_bottom=”” padding_top=”” padding_right=”” padding_bottom=”” padding_left=””][fusion_builder_row][fusion_builder_column type=”1_1″ layout=”1_1″ spacing=”” center_content=”no” link=”” target=”_self” min_height=”” hide_on_mobile=”small-visibility,medium-visibility,large-visibility” class=”” id=”” background_color=”” background_image=”” background_image_id=”” background_position=”left top” background_repeat=”no-repeat” hover_type=”none” border_size=”0″ border_color=”” border_style=”solid” border_position=”all” padding_top=”” padding_right=”” padding_bottom=”” padding_left=”” margin_top=”” margin_bottom=”” animation_type=”” animation_direction=”left” animation_speed=”0.3″ animation_offset=”” last=”no”][fusion_text columns=”” column_min_width=”” column_spacing=”” rule_style=”default” rule_size=”” rule_color=”” hide_on_mobile=”small-visibility,medium-visibility,large-visibility” class=”” id=””]
Produkt Diagnostic tilstand (PDM)
[/fusion_text][fusion_text columns=”” column_min_width=”” column_spacing=”” rule_style=”default” rule_size=”” rule_color=”” hide_on_mobile=”small-visibility,medium-visibility,large-visibility” class=”” id=””]
Produkt Diagnostic tilstand (PDM)
Produkt Diagnostic tilstand (PDM) bruges til at hjælpe med at diagnosticere Inaktive koder, der kan have været sat under normal kørsel. Denne diagnostiske funktion forøger følsomheden af fejl følemuligheder.
Denne procedure tester løs, nedbrudte og intermitterende forbindelser. Se ”Ault kode Isolation Procedure Indeks nedenfor. Brug indekset så en guide til de ledninger og stik, der er forbundet med de Inaktive fejlkoder. Flex ledningsnettet og stikkene og forsøge at genskabe fejlen efter aktivering PDM.
PDM kun at blive brugt af en uddannet tekniker i en autoriseret forhandler.
For at indtaste PDM-tilstand:
Bemærk: Køretøjet vil ikke starte i Product Diagnostic tilstand.
(PDM). Drej bilnøglen ”OFF” og lade systemet til at lukke ned for at afslutte PDM.
-
-
-
- Køretøjet skal holde stille, Motoren må ikke køre, køretøj parkeringsbremse skal indstilles.
- Slut ServiceRanger til 9-vejs Diagnostic Connector.
- Vælg ”Vis fejlkoder” skærm.
- Udfør to centrale klik med tændingslåsen startende med nøglen på, og slutter med nøglen på.
Bemærk: en “88” kan dukke op i instrumentbrættet på tasten på, som er en normal power-up test af displayet. - Gearet blinker et fast ”PD” (Produkt Diagnostic tilstand) og tilstanden vil blive aktiveret.
- Flex ledningsnettet og stikkene og forsøge at genskabe fejlen. Hvis en fejl bliver Aktiv under PDM, ServiceRanger vil vise fejl med en status for Aktiv.
- Hvis en fejl bliver Aktiv under PDM, ServiceRanger vil vise fejl med en status for Aktiv.
- Hvis der opdages en fejl, exit PDM-tilstand og udføre proceduren fejlfinding kode tilsvarende fejl. Se indekset for fejlkodeisoleringsprocedure nedenfor.
Bemærk: Aktive koder, der er under PDM tilstand vil ikke blive lagret som inaktive. - For at afslutte PDM-tilstand, strøm til systemet ned ved at dreje nøglen slukket.
-
-
[/fusion_text][fusion_text columns=”” column_min_width=”” column_spacing=”” rule_style=”default” rule_size=”” rule_color=”” hide_on_mobile=”small-visibility,medium-visibility,large-visibility” class=”” id=””]
PDM vil kun arbejde med følgende Inaktive koder
9, 10, 14, 16, 17, 18, 19, 22, 24, 32, 33, 34, 35, 36, 38, 39, 40, 48, 49, 50, 51, 52, 56, 58, 59, 60, 61, 63, 76, 87, 88, 89, 95, 118
[/fusion_text][/fusion_builder_column][/fusion_builder_row][/fusion_builder_container][fusion_builder_container hundred_percent=”no” hundred_percent_height=”no” hundred_percent_height_scroll=”no” hundred_percent_height_center_content=”yes” equal_height_columns=”no” menu_anchor=”” hide_on_mobile=”small-visibility,medium-visibility,large-visibility” status=”published” publish_date=”” class=”” id=”” background_color=”” background_image=”” background_position=”center center” background_repeat=”no-repeat” fade=”no” background_parallax=”none” enable_mobile=”no” parallax_speed=”0.3″ video_mp4=”” video_webm=”” video_ogv=”” video_url=”” video_aspect_ratio=”16:9″ video_loop=”yes” video_mute=”yes” video_preview_image=”” border_size=”” border_color=”” border_style=”solid” margin_top=”” margin_bottom=”” padding_top=”” padding_right=”” padding_bottom=”” padding_left=””][fusion_builder_row][fusion_builder_column type=”1_1″ layout=”1_1″ spacing=”” center_content=”no” link=”” target=”_self” min_height=”” hide_on_mobile=”small-visibility,medium-visibility,large-visibility” class=”” id=”” background_color=”” background_image=”” background_image_id=”” background_position=”left top” background_repeat=”no-repeat” hover_type=”none” border_size=”0″ border_color=”” border_style=”solid” border_position=”all” padding_top=”” padding_right=”” padding_bottom=”” padding_left=”” margin_top=”” margin_bottom=”” animation_type=”” animation_direction=”left” animation_speed=”0.3″ animation_offset=”” last=”no”][fusion_text columns=”” column_min_width=”” column_spacing=”” rule_style=”default” rule_size=”” rule_color=”” hide_on_mobile=”small-visibility,medium-visibility,large-visibility” class=”” id=””]
den FMI (Failure Mode Identifier)
[/fusion_text][fusion_text columns=”” column_min_width=”” column_spacing=”” rule_style=”default” rule_size=”” rule_color=”” hide_on_mobile=”small-visibility,medium-visibility,large-visibility” class=”” id=””]
den FMI (Failure Mode Identifier) anvendes sammen med SPN at tilvejebringe specifik information, der vedrører et diagnostisk fejlkode (DTC). Den FMI kan indikere, at der er registreret et problem med et elektronisk kredsløb eller en elektronisk komponent. Den FMI kan også indikere, at der er konstateret en unormal driftstilstand.
[/fusion_text][fusion_text columns=”” column_min_width=”” column_spacing=”” rule_style=”default” rule_size=”” rule_color=”” hide_on_mobile=”small-visibility,medium-visibility,large-visibility” class=”” id=””]
IMF – Beskrivelse
[/fusion_text][fusion_text columns=”2″ column_min_width=”” column_spacing=”” rule_style=”default” rule_size=”” rule_color=”” hide_on_mobile=”small-visibility,medium-visibility,large-visibility” class=”” id=””]
| 0 | Høj - mest alvorlige |
| 1 | Lav - mest alvorlige |
| 2 | Erratic, Sporadisk, eller forkert |
| 3 | Spænding over normal |
| 4 | Spænding under normal |
| 5 | Aktuel Nedenfor Normal |
| 6 | Aktuel over normal |
| 7 | Ikke reagerer korrekt |
| 8 | unormal Frekvens, Pulsbredde, eller Periode |
| 9 | Unormal opdateringshastighed |
| 10 | Unormal Rate of Change |
| 11 | Andre Failure Mode |
| 12 | Fiasko |
| 13 | Ud af kalibrering |
| 14 | særlig instruktion |
| 15 | Høj - mindst alvorlige |
| 16 | Høj - moderat sværhedsgrad |
| 17 | Lav - mindst alvorlige |
| 18 | Lav - moderat sværhedsgrad |
| 19 | data Error |
| 20 | Data, Gled Høj |
| 21 | Data, Gled Lav |
| 31 | - |
[/fusion_text][/fusion_builder_column][/fusion_builder_row][/fusion_builder_container][fusion_builder_container hundred_percent=”no” hundred_percent_height=”no” hundred_percent_height_scroll=”no” hundred_percent_height_center_content=”yes” equal_height_columns=”no” menu_anchor=”” hide_on_mobile=”small-visibility,medium-visibility,large-visibility” status=”published” publish_date=”” class=”” id=”” background_color=”” background_image=”” background_position=”center center” background_repeat=”no-repeat” fade=”no” background_parallax=”none” enable_mobile=”no” parallax_speed=”0.3″ video_mp4=”” video_webm=”” video_ogv=”” video_url=”” video_aspect_ratio=”16:9″ video_loop=”yes” video_mute=”yes” video_preview_image=”” border_size=”” border_color=”” border_style=”solid” margin_top=”” margin_bottom=”” padding_top=”” padding_right=”” padding_bottom=”” padding_left=””][fusion_builder_row][fusion_builder_column type=”1_1″ layout=”1_1″ spacing=”” center_content=”no” link=”” target=”_self” min_height=”” hide_on_mobile=”small-visibility,medium-visibility,large-visibility” class=”” id=”” background_color=”” background_image=”” background_image_id=”” background_position=”left top” background_repeat=”no-repeat” hover_type=”none” border_size=”0″ border_color=”” border_style=”solid” border_position=”all” border_radius=”” box_shadow=”no” dimension_box_shadow=”” box_shadow_blur=”0″ box_shadow_spread=”0″ box_shadow_color=”” box_shadow_style=”” padding_top=”” padding_right=”” padding_bottom=”” padding_left=”” margin_top=”” margin_bottom=”” animation_type=”” animation_direction=”left” animation_speed=”0.3″ animation_offset=”” last=”no”][fusion_text columns=”” column_min_width=”” column_spacing=”” rule_style=”default” rule_size=”” rule_color=”” hide_on_mobile=”small-visibility,medium-visibility,large-visibility” class=”” id=””]
Se Eaton Fuller-transmissionsfejlkodernes isoleringsprocedureindeks
[/fusion_text][/fusion_builder_column][fusion_builder_column type=”1_1″ layout=”1_1″ spacing=”” center_content=”no” link=”” target=”_self” min_height=”” hide_on_mobile=”small-visibility,medium-visibility,large-visibility” class=”” id=”” background_image_id=”” background_color=”” background_image=”” background_position=”left top” undefined=”” background_repeat=”no-repeat” hover_type=”none” border_size=”0″ border_color=”” border_style=”solid” border_position=”all” padding_top=”” padding_right=”” padding_bottom=”” padding_left=”” margin_top=”” margin_bottom=”” animation_type=”” animation_direction=”left” animation_speed=”0.3″ animation_offset=”” last=”no”][fusion_separator style_type=”none” hide_on_mobile=”small-visibility,medium-visibility,large-visibility” class=”” id=”” sep_color=”” top_margin=”20″ bottom_margin=”20″ border_size=”0″ icon=”” icon_circle=”” icon_circle_color=”” width=”” alignment=”center” /][fusion_text columns=”” column_min_width=”” column_spacing=”” rule_style=”default” rule_size=”” rule_color=”” class=”” id=””]
For Manualer og andre gratis ressourcer du besøge vores download side
[/fusion_text][fusion_button link=”https://globaltransmissionsupply.com/transmission-manuals” text_transform=”uppercase” title=”Diagrammer, Manualer og del PDF-filer” target=”_self” link_attributes=”Diagrammer, Manualer og del PDF-filer” alignment=”center” modal=”” hide_on_mobile=”small-visibility,medium-visibility,large-visibility” class=”” id=”” color=”custom” button_gradient_top_color=”#000000″ button_gradient_bottom_color=”#000000″ button_gradient_top_color_hover=”#f44336″ button_gradient_bottom_color_hover=”#f44336″ accent_color=”#ffffff” accent_hover_color=”#ffffff” type=”flat” bevel_color=”” border_width=”” size=”medium” stretch=”default” shape=”square” icon=”” icon_position=”left” icon_divider=”no” animation_type=”” animation_direction=”left” animation_speed=”0.3″ animation_offset=””]Diagrammer, Manualer og dele PDF-filer >>>[/fusion_button][fusion_separator style_type=”none” hide_on_mobile=”small-visibility,medium-visibility,large-visibility” class=”” id=”” sep_color=”” top_margin=”20″ bottom_margin=”20″ border_size=”0″ icon=”” icon_circle=”” icon_circle_color=”” width=”” alignment=”center” /][/fusion_builder_column][/fusion_builder_row][/fusion_builder_container][fusion_global id=”13788″]