[fusion_builder_container hundred_percent=nohundred_percent_height=nohundred_percent_height_scroll=nohundred_percent_height_center_content=yesequal_height_columns=nomenu_anchor=”” hide_on_mobile=small-visibility,medium-visibility,large-visibilitystatus=publishedpublish_date=”” class=”” id=”” background_color=”” background_image=”” background_position=center centerbackground_repeat=no-repeatfade=nobackground_parallax=noneenable_mobile=noparallax_speed=”0.3″ video_mp4=”” video_webm=”” video_ogv=”” video_url=”” video_aspect_ratio=”16:9″ video_loop=yesvideo_mute=yesvideo_preview_image=”” border_size=”” border_color=”” border_style=solidmargin_top=”35″ margin_bottom=”” padding_top=”” padding_right=”” padding_bottom=”” padding_left=””][fusion_builder_row][fusion_builder_column type=”1_1layout=”1_1spacing=”” center_content=nolink=”” target=_selfmin_height=”” hide_on_mobile=small-visibility,medium-visibility,large-visibilityclass=”” id=”” background_color=”” background_image=”” background_image_id=”” background_position=left topbackground_repeat=no-repeathover_type=noneborder_size=”0″ border_color=”” border_style=solidborder_position=allpadding_top=”” padding_right=”” padding_bottom=”” padding_left=”” margin_top=”” margin_bottom=”” animation_type=”” animation_direction=leftanimation_speed=”0.3″ animation_offset=”” last=no”][fusion_text columns=”” column_min_width=”” column_spacing=”” rule_style=defaultrule_size=”” rule_color=”” hide_on_mobile=small-visibility,medium-visibility,large-visibilityclass=”” id=””]

Eaton Fuller Հիբրիդ Փոխանցման տուփ մեղքով կոդը 116 – High Voltage Relays -(my08 Systems)

[/fusion_text][/fusion_builder_column][/fusion_builder_row][/fusion_builder_container][fusion_builder_container hundred_percent=nohundred_percent_height=nohundred_percent_height_scroll=nohundred_percent_height_center_content=yesequal_height_columns=nomenu_anchor=”” hide_on_mobile=small-visibility,medium-visibility,large-visibilitystatus=publishedpublish_date=”” class=”” id=”” background_color=”” background_image=”” background_position=center centerbackground_repeat=no-repeatfade=nobackground_parallax=noneenable_mobile=noparallax_speed=”0.3″ video_mp4=”” video_webm=”” video_ogv=”” video_url=”” video_aspect_ratio=”16:9″ video_loop=yesvideo_mute=yesvideo_preview_image=”” border_size=”” border_color=”” border_style=solidmargin_top=”” margin_bottom=”” padding_top=”” padding_right=”” padding_bottom=”” padding_left=””][fusion_builder_row][fusion_builder_column type=”1_1layout=”1_1spacing=”” center_content=nolink=”” target=_selfmin_height=”” hide_on_mobile=small-visibility,medium-visibility,large-visibilityclass=”” id=”” background_color=”” background_image=”” background_image_id=”” background_position=left topbackground_repeat=no-repeathover_type=noneborder_size=”0″ border_color=”” border_style=solidborder_position=allpadding_top=”” padding_right=”” padding_bottom=”” padding_left=”” margin_top=”” margin_bottom=”” animation_type=”” animation_direction=leftanimation_speed=”0.3″ animation_offset=”” last=no”][fusion_text columns=”” column_min_width=”” column_spacing=”” rule_style=defaultrule_size=”” rule_color=”” hide_on_mobile=small-visibility,medium-visibility,large-visibilityclass=”” id=””]

Մեղքով կոդը համար Eaton Հիբրիդ Drive համակարգերի մոդելներ (my08) EH-8E306A-U, EH-8E306A-UPG, EH-8E306A-UP, EH-8E306A-CD, EH-8E306A-T, EH-6E606B-CD. Կարդացեք ստորև՝ իմանալու համար, թե ինչպես փորձարկել, մաքրել եւ ամրագրել մեղքով կոդը սխալների ձեր Freightliner, Mack, Peterbilt, Kenworth, Volvo, միջազգային, եւ ծանր պարտականությունը բեռնատար եւ սարքավորումներ. The High-Voltage Relays are located inside the Power Electronics Carrier (ՏԸՀ-) ի Relay Box միավորի. There is 1 precharge relay on the positive side, an additional relay on the positive, իսկ 1 on the negative for a total of 3. Այս ռելեներ սովորաբար բաց է, երբ այդ համակարգը անջատված է. Այն ռելեներ վերահսկվում են միջոցով Inverter.

մեղքով կոդը 116 – High Voltage Relays Detection

Հետեւյալ նախապայմանները պետք է հանդիպել, նախքան համակարգը detects իր մեղքը:

  • Inverter բոցավառման լարման ավելի մեծ է, քան 7 վոլտ եւ ավելի քիչ, քան 16 վոլտ.

Նշում: Երբ անսարքությունների ակտիվ կոդ վերաբերում է Ապրանք ախտորոշման ռեժիմ (ՄԶՄ)

Պայմանները Սահմանել մեղքով կոդը Ակտիվ

  • ԱՄՀ-ն 10 is set when the Inverter detects the input voltage measured at the capacitor is less than 210 volts within 3 seconds after the sub-relay closed in the Relay Box.
  • ԱՄՀ-ն 14 is set when only the negative relay in the Relay Box is on and capacitor voltage decreases less than 10 volts/5 seconds when initial capacitor voltage was greater than 200 volts and motor speed less than 500 min-1, or there is a detect error in the initial check.

Fallback Երբ մեղքով կոդը 116 սահմանված է հետևյալ պայմանները:

  • Սաթ «Ստուգել Հիբրիդ" թեթեւ blinks համար FMI 10 and remains solid for FMI 14.
  • Մեղքով պահվում է HCM հիշատակին.
  • Inverter shuts բարձր լարման համակարգը դուրս.
  • Վիճակագրական շարունակում է վերահսկել հիբրիդ մեքենան է դիզելային միայն ռեժիմում.
  • Փոխանցման Նախնականը սկսել հանդերձում է 1-ին.

[/fusion_text][fusion_text columns=”” column_min_width=”” column_spacing=”” rule_style=defaultrule_size=”” rule_color=”” hide_on_mobile=small-visibility,medium-visibility,large-visibilityclass=”” id=””]

Պայմանները Սահմանել մեղքով կոդը պասիվ

Միայն ակտիվ սխալներն կարող են մաքրվել է, Փոխանցման տուփ Էլեկտրոնային Control Unit (TECU) կամ HCM պատմություն օգտագործելու ServiceRanger. The TECU ինքնաբերաբար clears սխալները պատմությունից հետո 200 ժամ եւ Վիճակագրական ինքնաբերաբար clears սխալները պատմությունից հետո մեղքով ակտիվ չի եղել 200 ժամեր.

Այս մեղքով կոդը կարող է առաջանալ որեւէ մեկը հետեւյալից:

  • ԱՄՀ-ն 10
    • ՏԸՀ-
    • APG
    • inverter
    • DC high-voltage cable
    • DC cable interlock loops
    • իներցիան Switch
    • ծառայություն Switch
  • ԱՄՀ-ն 14
    • inverter
    • ՏԸՀ-

[/fusion_text][/fusion_builder_column][/fusion_builder_row][/fusion_builder_container][fusion_builder_container hundred_percent=nohundred_percent_height=nohundred_percent_height_scroll=nohundred_percent_height_center_content=yesequal_height_columns=nomenu_anchor=”” hide_on_mobile=small-visibility,medium-visibility,large-visibilitystatus=publishedpublish_date=”” class=”” id=”” background_color=”” background_image=”” background_position=center centerbackground_repeat=no-repeatfade=nobackground_parallax=noneenable_mobile=noparallax_speed=”0.3″ video_mp4=”” video_webm=”” video_ogv=”” video_url=”” video_aspect_ratio=”16:9″ video_loop=yesvideo_mute=yesvideo_preview_image=”” border_size=”” border_color=”” border_style=solidmargin_top=”” margin_bottom=”” padding_top=”” padding_right=”” padding_bottom=”” padding_left=””][fusion_builder_row][fusion_builder_column type=”1_1layout=”1_1spacing=”” center_content=nolink=”” target=_selfmin_height=”” hide_on_mobile=small-visibility,medium-visibility,large-visibilityclass=”” id=”” background_color=”” background_image=”” background_image_id=”” background_position=left topbackground_repeat=no-repeathover_type=noneborder_size=”0″ border_color=”” border_style=solidborder_position=allpadding_top=”” padding_right=”” padding_bottom=”” padding_left=”” margin_top=”” margin_bottom=”” animation_type=”” animation_direction=leftanimation_speed=”0.3″ animation_offset=”” last=no”][fusion_text columns=”” column_min_width=”” column_spacing=”” rule_style=defaultrule_size=”” rule_color=”” hide_on_mobile=small-visibility,medium-visibility,large-visibilityclass=”” id=””]

մեղքով կոդը 116 – High Voltage Relays Test

[/fusion_text][/fusion_builder_column][/fusion_builder_row][/fusion_builder_container][fusion_builder_container hundred_percent=nohundred_percent_height=nohundred_percent_height_scroll=nohundred_percent_height_center_content=yesequal_height_columns=nomenu_anchor=”” hide_on_mobile=small-visibility,medium-visibility,large-visibilitystatus=publishedpublish_date=”” class=”” id=”” background_color=”” background_image=”” background_position=center centerbackground_repeat=no-repeatfade=nobackground_parallax=noneenable_mobile=noparallax_speed=”0.3″ video_mp4=”” video_webm=”” video_ogv=”” video_url=”” video_aspect_ratio=”16:9″ video_loop=yesvideo_mute=yesvideo_preview_image=”” border_size=”” border_color=”” border_style=solidmargin_top=”” margin_bottom=”” padding_top=”” padding_right=”” padding_bottom=”” padding_left=””][fusion_builder_row][fusion_builder_column type=”1_1layout=”1_1spacing=”” center_content=nolink=”” target=_selfmin_height=”” hide_on_mobile=small-visibility,medium-visibility,large-visibilityclass=”” id=”” background_color=”” background_image=”” background_image_id=”” background_position=left topbackground_repeat=no-repeathover_type=noneborder_size=”0″ border_color=”” border_style=solidborder_position=allpadding_top=”” padding_right=”” padding_bottom=”” padding_left=”” margin_top=”” margin_bottom=”” animation_type=”” animation_direction=leftanimation_speed=”0.3″ animation_offset=”” last=no”][fusion_text columns=”” column_min_width=”” column_spacing=”” rule_style=defaultrule_size=”” rule_color=”” hide_on_mobile=small-visibility,medium-visibility,large-visibilityclass=”” id=””]

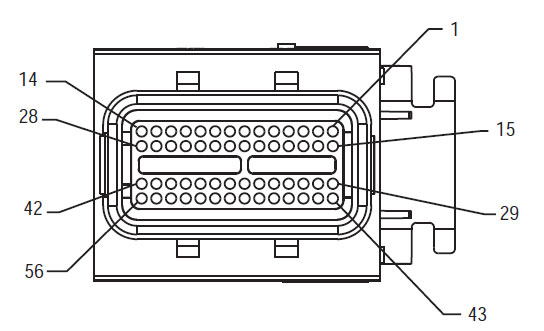
Բաղադրիչ Նույնականացման my08 համակարգ:
[/fusion_text][/fusion_builder_column][/fusion_builder_row][/fusion_builder_container][fusion_builder_container hundred_percent=yeshundred_percent_height=nohundred_percent_height_scroll=nohundred_percent_height_center_content=yesequal_height_columns=nomenu_anchor=”” hide_on_mobile=small-visibility,medium-visibility,large-visibilitystatus=publishedpublish_date=”” class=”” id=”” background_color=”” background_image=”” background_position=center centerbackground_repeat=no-repeatfade=nobackground_parallax=noneenable_mobile=noparallax_speed=”0.3″ video_mp4=”” video_webm=”” video_ogv=”” video_url=”” video_aspect_ratio=”16:9″ video_loop=yesvideo_mute=yesvideo_preview_image=”” border_size=”” border_color=”” border_style=solidmargin_top=”” margin_bottom=”” padding_top=”” padding_right=”10%” padding_bottom=”” padding_left=”10%”][fusion_builder_row][fusion_builder_column type=”1_3layout=”1_3spacing=”” center_content=nolink=”” target=_selfmin_height=”” hide_on_mobile=small-visibility,medium-visibility,large-visibilityclass=”” id=”” background_color=”” background_image=”” background_image_id=”” background_position=left topbackground_repeat=no-repeathover_type=noneborder_size=”0″ border_color=”” border_style=solidborder_position=allpadding_top=”” padding_right=”” padding_bottom=”” padding_left=”” margin_top=”” margin_bottom=”” animation_type=”” animation_direction=leftanimation_speed=”0.3″ animation_offset=”” last=no”][fusion_imageframe image_id=”14474|fullmax_width=”” style_type=”” blur=”” stylecolor=”” hover_type=nonebordersize=”” bordercolor=”” borderradius=”” align=centerlightbox=nogallery_id=”” lightbox_image=”” lightbox_image_id=”” alt=”Delphi 56-Way Զուգավորում միակցիչ Դիտել” link=”” linktarget=_selfhide_on_mobile=small-visibility,medium-visibility,large-visibilityclass=”” id=”” animation_type=”” animation_direction=leftanimation_speed=”0.3″ animation_offset=””]https://www.globaltransmissionsupply.com/wp-content/uploads/Inverter-56-Way-Mating-Connector-View.jpg[/fusion_imageframe][fusion_text columns=”” column_min_width=”” column_spacing=”” rule_style=defaultrule_size=”” rule_color=”” hide_on_mobile=small-visibility,medium-visibility,large-visibilityclass=”” id=””]

56-Ճանապարհ Զուգավորում միակցիչ Դիտել
[/fusion_text][/fusion_builder_column][fusion_builder_column type=”1_3layout=”1_3spacing=”” center_content=nolink=”” target=_selfmin_height=”” hide_on_mobile=small-visibility,medium-visibility,large-visibilityclass=”” id=”” background_color=”” background_image=”” background_image_id=”” background_position=left topbackground_repeat=no-repeathover_type=noneborder_size=”0″ border_color=”” border_style=solidborder_position=allpadding_top=”” padding_right=”” padding_bottom=”” padding_left=”” margin_top=”” margin_bottom=”” animation_type=”” animation_direction=leftanimation_speed=”0.3″ animation_offset=”” last=no”][fusion_imageframe image_id=”14635|fullmax_width=”” style_type=”” blur=”” stylecolor=”” hover_type=nonebordersize=”” bordercolor=”” borderradius=”” align=centerlightbox=nogallery_id=”” lightbox_image=”” lightbox_image_id=”” alt=”Բարձր լարման DC միակցիչ Դիտել Yazaki միակցիչ” link=”” linktarget=_selfhide_on_mobile=small-visibility,medium-visibility,large-visibilityclass=”” id=”” animation_type=”” animation_direction=leftanimation_speed=”0.3″ animation_offset=””]https://www.globaltransmissionsupply.com/wp-content/uploads/High-Voltage-DC-Connector-View.jpg[/fusion_imageframe][fusion_text columns=”” column_min_width=”” column_spacing=”” rule_style=defaultrule_size=”” rule_color=”” hide_on_mobile=small-visibility,medium-visibility,large-visibilityclass=”” id=””]

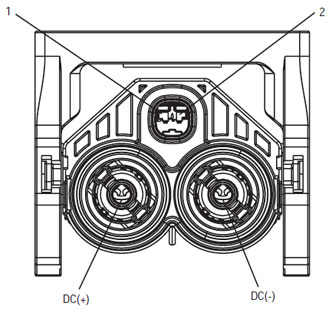
Բարձր լարման DC միակցիչ Դիտել Yazaki միակցիչ

[/fusion_text][/fusion_builder_column][fusion_builder_column type=”1_3layout=”1_3spacing=”” center_content=nolink=”” target=_selfmin_height=”” hide_on_mobile=small-visibility,medium-visibility,large-visibilityclass=”” id=”” background_color=”” background_image=”” background_image_id=”” background_position=left topbackground_repeat=no-repeathover_type=noneborder_size=”0″ border_color=”” border_style=solidborder_position=allpadding_top=”” padding_right=”” padding_bottom=”” padding_left=”” margin_top=”” margin_bottom=”” animation_type=”” animation_direction=leftanimation_speed=”0.3″ animation_offset=”” last=no”][fusion_imageframe image_id=”14213|mediummax_width=”” style_type=”” blur=”” stylecolor=”” hover_type=nonebordersize=”” bordercolor=”” borderradius=”” align=centerlightbox=nogallery_id=”” lightbox_image=”” lightbox_image_id=”” alt=Mating Connector View Deutsch 19 – ճանապարհ” link=”” linktarget=_selfhide_on_mobile=small-visibility,medium-visibility,large-visibilityclass=”” id=”” animation_type=”” animation_direction=leftanimation_speed=”0.3″ animation_offset=””]https://www.globaltransmissionsupply.com/wp-content/uploads/Eaton-Fuller-Harness-Connector-View-300×289.jpg[/fusion_imageframe][fusion_text columns=”” column_min_width=”” column_spacing=”” rule_style=defaultrule_size=”” rule_color=”” hide_on_mobile=small-visibility,medium-visibility,large-visibilityclass=”” id=””]

Mating Connector View Deutsch 19 – ճանապարհ

[/fusion_text][/fusion_builder_column][/fusion_builder_row][/fusion_builder_container][fusion_builder_container hundred_percent=nohundred_percent_height=nohundred_percent_height_scroll=nohundred_percent_height_center_content=yesequal_height_columns=nomenu_anchor=”” hide_on_mobile=small-visibility,medium-visibility,large-visibilitystatus=publishedpublish_date=”” class=”” id=”” background_color=”” background_image=”” background_position=center centerbackground_repeat=no-repeatfade=nobackground_parallax=noneenable_mobile=noparallax_speed=”0.3″ video_mp4=”” video_webm=”” video_ogv=”” video_url=”” video_aspect_ratio=”16:9″ video_loop=yesvideo_mute=yesvideo_preview_image=”” border_size=”” border_color=”” border_style=solidmargin_top=”” margin_bottom=”” padding_top=”” padding_right=”” padding_bottom=”” padding_left=””][fusion_builder_row][fusion_builder_column type=”1_1layout=”1_1spacing=”” center_content=nolink=”” target=_selfmin_height=”” hide_on_mobile=small-visibility,medium-visibility,large-visibilityclass=”” id=”” background_image_id=”” background_color=”#000000″ background_image=”” background_position=left topundefined=”” background_repeat=no-repeathover_type=noneborder_size=”0″ border_color=”” border_style=solidborder_position=allpadding_top=”” padding_right=”” padding_bottom=”” padding_left=”” margin_top=”” margin_bottom=”” animation_type=”” animation_direction=leftanimation_speed=”0.3″ animation_offset=”” last=no”][fusion_text columns=”” column_min_width=”” column_spacing=”” rule_style=defaultrule_size=”” rule_color=”” hide_on_mobile=small-visibility,medium-visibility,large-visibilityclass=”” id=””]

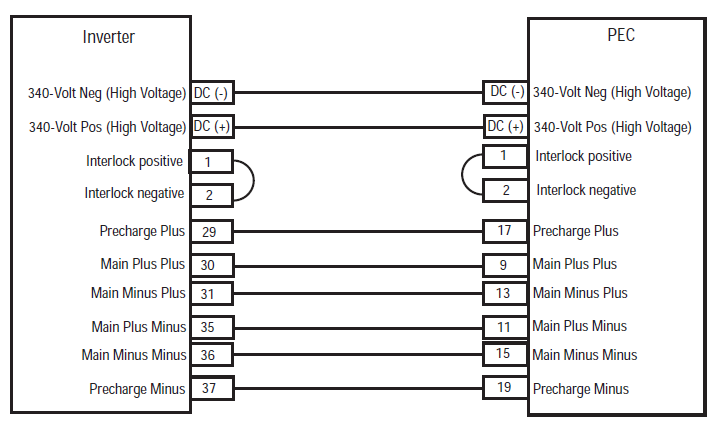
ՆՇՈՒՄ: Վերաբերում է Eaton Հիբրիդ Բաղադրիչ եւ միակցիչ Որտեղից համար միակցիչի վայրերում my08 համակարգերի
[/fusion_text][/fusion_builder_column][fusion_builder_column type=”1_1layout=”1_1spacing=”” center_content=nolink=”” target=_selfmin_height=”” hide_on_mobile=small-visibility,medium-visibility,large-visibilityclass=”” id=”” background_color=”” background_image=”” background_image_id=”” background_position=left topbackground_repeat=no-repeathover_type=noneborder_size=”0″ border_color=”” border_style=solidborder_position=allpadding_top=”” padding_right=”” padding_bottom=”” padding_left=”” margin_top=”” margin_bottom=”” animation_type=”” animation_direction=leftanimation_speed=”0.3″ animation_offset=”” last=no”][fusion_imageframe image_id=”14666|fullmax_width=”” style_type=”” blur=”” stylecolor=”” hover_type=nonebordersize=”” bordercolor=”” borderradius=”” align=centerlightbox=nogallery_id=”” lightbox_image=”” lightbox_image_id=”” alt=Inverter PEC connectors Eaton Fuller Hybrid transmissionlink=”” linktarget=_selfhide_on_mobile=small-visibility,medium-visibility,large-visibilityclass=”” id=”” animation_type=”” animation_direction=leftanimation_speed=”0.3″ animation_offset=””]https://www.globaltransmissionsupply.com/wp-content/uploads/Inverter-PEC-connectors.png[/fusion_imageframe][/fusion_builder_column][/fusion_builder_row][/fusion_builder_container][fusion_builder_container hundred_percent=nohundred_percent_height=nohundred_percent_height_scroll=nohundred_percent_height_center_content=yesequal_height_columns=nomenu_anchor=”” hide_on_mobile=small-visibility,medium-visibility,large-visibilitystatus=publishedpublish_date=”” class=”” id=”” background_color=”” background_image=”” background_position=center centerbackground_repeat=no-repeatfade=nobackground_parallax=noneenable_mobile=noparallax_speed=”0.3″ video_mp4=”” video_webm=”” video_ogv=”” video_url=”” video_aspect_ratio=”16:9″ video_loop=yesvideo_mute=yesvideo_preview_image=”” border_size=”” border_color=”” border_style=solidmargin_top=”” margin_bottom=”” padding_top=”” padding_right=”” padding_bottom=”” padding_left=””][fusion_builder_row][fusion_builder_column type=”1_1layout=”1_1spacing=”” center_content=nolink=”” target=_selfmin_height=”” hide_on_mobile=small-visibility,medium-visibility,large-visibilityclass=”” id=”” background_color=”” background_image=”” background_image_id=”” background_position=left topbackground_repeat=no-repeathover_type=noneborder_size=”0″ border_color=”” border_style=solidborder_position=allpadding_top=”” padding_right=”” padding_bottom=”” padding_left=”” margin_top=”” margin_bottom=”” animation_type=”” animation_direction=leftanimation_speed=”0.3″ animation_offset=”” last=no”][fusion_modal name=warnings_cautionstitle=”նախազգուշացումները & զգուշացնում” size=largebackground=”” border_color=”” show_footer=yesclass=”” id=””]վտանգ: Վտանգը ցույց է տալիս, որ դուք ծանր վիրավորվելու կամ սպանվելու եք, եթե չկատարեք նշված ընթացակարգը.
զգուշացում: Զգուշացում, ցույց է տալիս, անհապաղ վտանգ, որը կարող է հանգեցնել ծանր անձնական վնասվածքի, եթե չհետևեք նշված ընթացակարգին.
Զգուշություն: Զգուշությունը ցույց է տալիս, որ մեքենայի կամ գույքի վնասը կարող է առաջանալ, եթե չկատարեք նշված ընթացակարգը.

Նշում: Նշումը ցույց է տալիս լրացուցիչ մանրամասներ, որոնք կօգնեն բաղադրիչի/համակարգի ախտորոշմանը կամ վերանորոգմանը.

Հետեւեք նշված ընթացակարգերը նշված խուսափելու նպատակով անհատական ​​վնասվածք:

1. Եթե ​​բարձր լարման cones են շուրջ մեքենայի եւ լոկաուտ տեղադրվում է ՏԸՀ-, միակ մարդն է, որ պետք է թույլ տալ, որ սկսել մեքենան է այն անձը, ով ստորագրել է լոկաուտ հատկորոշիչը.
2. Նախքան աշխատում է մեքենայի կամ թողնելով Քաբ, իսկ շարժիչը վազում, Դուք պետք է տեղադրել հերթափոխի լծակ «թիվ" սահմանել ավտոկայանատեղի արգելակ, եւ արգելափակել է անիվները.
3. Անվտանգության նկատառումներից ելնելով, միշտ զբաղվել սպասարկման արգելակները մինչեւ ընտրելով հանդերձում պաշտոններ է «Ն»
4. Սկսելուց առաջ մի մեքենան միշտ պետք է նստած վարորդի նստատեղի, ընտրեք «N» - ին հերթափոխի վերահսկողության, եւ սահմանել ավտոկայանատեղի արգելակները.
5. Տրանսպորտային միջոցների հետ ePTO, շարժիչը եւ / կամ
Motor / գեներատոր կարող եք սկսել է ePTO ռեժիմում. Երբեք կատարել ցանկացած պահպանումը կամ աշխատելու մեքենայի, Այս ռեժիմում.
6. 12-Վոլտ Մարտկոցի դրական (+) եւ բացասական (-) պետք է անջատված նախքան որեւէ եռակցման ցանկացած հիբրիդ հագեցած մեքենայի.

Զգուշություն: Հետեւեք նշված ընթացակարգերը նշված խուսափելու նպատակով սարքավորումների անսարքության կամ վնաս.
Զգուշություն: Մի բաց թողեք կայանման արգելակը և մի փորձեք արագություն ընտրել, քանի դեռ օդի ճնշումը ճիշտ մակարդակի վրա չէ.
Զգուշություն: Քարշակման ժամանակ փոխանցման տուփը վնասելուց խուսափելու համար տեղափոխման լծակը դրեք «N»-ի մեջ և շարժական անիվները բարձրացրեք գետնից կամ անջատեք շարժման գիծը։.

Բարձր լարման Զգուշացումներ & զգուշացնում

  • Օգտագործեք CO2 կամ չոր քիմիական Կրակմարիչ.
  • Բարձր լարման մոնտաժը, որը ծածկված է նարնջագույն մեկուսացման կամ պտույտ ռետինեն խողովակներ եւ նշված նախազգուշական պիտակներով ին միակցիչների.
  • Բոլոր Eaton® Հիբրիդային Բենզին / Էլեկտրական տրանսպորտային միջոցների կնշվի 'Հիբրիդ’ ին դուրս է մեքենայի, հետ միասին հերթափոխի պիտակի վրա գցել.
  • Վերաբերում է OEM համար կոնկրետ գտնվելու վայրը, chassis հեծյալ հիբրիդային բաղադրիչների.
  • Չեն կտրել մեջ նարնջագույն բարձր լարման մալուխների.
  • Չեն կտրել մեջ կամ բացել ՏԸՀ.
  • Չեն կտրել մեջ կամ բացել DC / DC փոխարկիչ.
  • Չեն կտրել մեջ կամ բացել Inverter.

A բուֆերային գոտի պետք է ստեղծվի եւ բարձր լարման Մեկուսացված ռետինե ձեռնոցներ (դաս 0 կաշվե պաշտպաններին) պահանջվում են մինչեւ աշխատում է բարձր լարման. Ձախողումը հետեւել այս հրահանգներին կարող է հանգեցնել ծանր անձնական վնասվածքի կամ մահվան.
Այն ռետինե Մեկուսացված ձեռնոցներ, որոնք պետք է մաշված, երբ աշխատում է բարձր լարման համակարգով են դասի 0 կաշվե պաշտպաններին. Այն ռետինե ձեռնոցներ պետք է փորձարկվել է ամեն օգտագործման հաջորդող ռետինե մեկուսացման ձեռնոցներ թեստավորման ընթացակարգի հայտնաբերվել է «ախտորոշիչ գործիքներ / ծառայություն Հրապարակումներ» շրջանակը, էջ 6. Ձախողումը հետեւել այս հրահանգներին կարող է հանգեցնել ծանր անձնական վնասվածքի կամ մահվան.
Նախքան ստուգող կամ աշխատում է ցանկացած բարձրավոլտ մալուխների կամ բաղադրիչների է «Բարձր լարման ծառայության անջատում եւ Power-Up կարգը» էջի վրա 4 պետք է հետեւել. Ձախողումը հետեւել այս հրահանգներին կարող է հանգեցնել ծանր անձնական վնասվածքի կամ մահվան.
Լոկաուտ եւ Tagout սարքերը պետք է հանվել միայն այն տեխնիկ, որ տեղադրված լոկաուտ եւ Tagout սարքեր մեքենայի վրա. Ձախողումը հետեւել այս հրահանգներին կարող է հանգեցնել ծանր անձնական վնասվածքի կամ մահվան.
Բարձրավոլտ ռետինե Մեկուսացված ձեռնոցներ (դաս 0 կաշվե պաշտպաններին) պետք է մաշված, երբ աշխատում է ցանկացած
բարձր լարման մալուխներ. The "Բարձր լարման ծառայության անջատում եւ Power-Up կարգը» էջի վրա 4 պետք է հետեւել մինչեւ հեռացնել ցանկացած բարձրավոլտ մալուխները. Ձախողումը հետեւել այս հրահանգներին կարող է հանգեցնել ծանր անձնական վնասվածքի կամ մահվան.
Բարձր լարման մալուխներ եւ մոնտաժը են նարնջագույն եւ պարունակում է նախազգուշացնող պիտակի միակցիչների. Բարձրավոլտ բաղադրիչները նշվում են պիտակի. Բարձրավոլտ ռետինե Մեկուսացված ձեռնոցներ (դաս 0 կաշվե պաշտպաններին) պետք է օգտագործել, երբ աշխատում է որեւէ մեկը այդ բաղադրիչների. Ձախողումը հետեւել այս հրահանգներին կարող է հանգեցնել ծանր անձնական վնասվածքի կամ մահվան.

Բարձր լարման ծառայության անջատում ընթացակարգեր

Բարձր լարման ծառայության անջատում եւ Power-Up կարգը1. Հետեւեք «Բարձր լարման աշխատանքներ Տարածաշրջան" ընթացակարգ.
2. Տեղադրեք կարմիր ՏԸՀ-ծառայության միացրեք դիմաց ՏԸՀ եւ հրում անջատել.
3. Հեռացրեք ծառայության Անջատեք կափարիչը եւ տեղադրել լոկաուտ բրա (J48506).
4. Ամրացրեք թեգը է լոկաուտ բրա.
5. Ապահովում է ՏԸՀ-ծառայության Switch չի կարող շարժվել է Off պաշտոնում.
6. Թույլ տալ, որ համակարգը սահմանվել է նվազագույնը 5 րոպե անելու բարձր լարման.
7. Միացեք ServiceRanger եւ դիտելու տվյալների Monitor PID 116 կոչվում է «Բարձր լարման Battery ներուժ." Օգտագործել SPN 520323 համար J1939 կապակցությամբ "մարտկոցի լարումը RB» (հերթափոխ Box).
8. The լարման պետք է լինի 30 վոլտ կամ պակաս. Եթե ​​լարման վերը նշված 30 վոլտ, չեն աշխատում մեքենայի վրա, եւ դիմել Eaton® է 1-800-826-HELP (4357).
9. Turn վառոցքի բանալին անջատված է, եւ անցնել վերանորոգել կամ անսարքությունների քայլ.
Նշում: The լարման կաթիլներ է զրոյի, երբ բանալին է դուրս.

Բարձր լարման ծառայության Power-Up կարգը

1. Տեղադրեք բոլոր բարձր լարման Միակցիչներ իրենց փակել պաշտոնները.
2. Եթե ​​դուք անձը աշխատում է մեքենայի, հեռացնել լոկաուտ բրա եւ tag.
3. Reinstall the լոկաուտ բրա նկատմամբ Ծառայության Switch.
4. Քաշեք Ծառայությունից Switch դուրս, եւ թող տրանսպորտային միջոցների համար սահմանված 2 արձանագրություն.
5. Start vehicle when appropriate.[/fusion_modal][fusion_modal name=component_locationtitle=”Eaton Հիբրիդ Բաղադրիչ եւ միակցիչ Որտեղից ” size=largebackground=”#ffffffborder_color=”” show_footer=yesclass=”” id=””]

Eaton Հիբրիդ Բաղադրիչ եւ միակցիչ Locations my08 համակարգ

[/fusion_modal][fusion_modal name=component_location2title=”Eaton Հիբրիդ Բաղադրիչ եւ միակցիչ Որտեղից MY09 համակարգ” size=largebackground=”#ffffffborder_color=”” show_footer=yesclass=”” id=””]

Eaton Հիբրիդ Բաղադրիչ եւ միակցիչ Locations MY09 համակարգ

[/fusion_modal][/fusion_builder_column][/fusion_builder_row][/fusion_builder_container][fusion_builder_container hundred_percent=nohundred_percent_height=nohundred_percent_height_scroll=nohundred_percent_height_center_content=yesequal_height_columns=nomenu_anchor=”” hide_on_mobile=small-visibility,medium-visibility,large-visibilitystatus=publishedpublish_date=”” class=”” id=”” background_color=”” background_image=”” background_position=center centerbackground_repeat=no-repeatfade=nobackground_parallax=noneenable_mobile=noparallax_speed=”0.3″ video_mp4=”” video_webm=”” video_ogv=”” video_url=”” video_aspect_ratio=”16:9″ video_loop=yesvideo_mute=yesvideo_preview_image=”” border_size=”” border_color=”” border_style=solidmargin_top=”” margin_bottom=”” padding_top=”” padding_right=”” padding_bottom=”” padding_left=””][fusion_builder_row][fusion_builder_column type=”1_1layout=”1_1spacing=”” center_content=nolink=”” target=_selfmin_height=”” hide_on_mobile=small-visibility,medium-visibility,large-visibilityclass=”” id=”” background_color=”” background_image=”” background_image_id=”” background_position=left topbackground_repeat=no-repeathover_type=noneborder_size=”0″ border_color=”” border_style=solidborder_position=allpadding_top=”” padding_right=”” padding_bottom=”” padding_left=”” margin_top=”” margin_bottom=”” animation_type=”” animation_direction=leftanimation_speed=”0.3″ animation_offset=”” last=no”][fusion_content_boxes layout=clean-horizontalcolumns=”2″ title_size=”18pxheading_size=”3″ title_color=”#ffffffbody_color=”#ffffffbackgroundcolor=”#4f4f4ficon=”” iconflip=”” iconrotate=”” iconspin=noiconcolor=”” icon_circle=”” icon_circle_radius=”” circlecolor=”” circlebordersize=”” circlebordercolor=”” outercirclebordersize=”” outercirclebordercolor=”” icon_size=”” icon_hover_type=”” hover_accent_color=”” image=”” image_id=”” image_width=”” image_height=”” link_type=”” button_span=”” link_area=”” link_target=”” icon_align=leftanimation_type=”” animation_delay=”” animation_offset=”” animation_direction=leftanimation_speed=”0.3″ margin_top=”” margin_bottom=”” hide_on_mobile=small-visibility,medium-visibility,large-visibilityclass=”” id=””][fusion_content_box title=ՔԱՅԼ 1. Հաստատեք FMIs նվեր.backgroundcolor=”” icon=”” iconflip=”” iconrotate=”” iconspin=noiconcolor=”” circlecolor=”” circlebordersize=”” circlebordercolor=”” outercirclebordersize=”” outercirclebordercolor=”” image=”” image_id=”” image_width=”” image_height=”” link=”” linktext=”Կարդալ ավելին” link_target=”” animation_type=”” animation_direction=leftanimation_speed=”0.3″ animation_offset=””]

  1. Վերանայել եւ հետեւեք նախազգուշացումները & զգուշացնում.
  2. Առբերման ակտիվ բեկվածքների կանոնագրքերը եւ FMIs հետ ServiceRanger օգտագործելով 9-Way ախտորոշիչ միակցիչ.
    վտանգ: Տեսնել High-Voltage Service Shutdown and Power-Up Procedures. Հետեւեք ընթացակարգերը խուսափելու համար շոկ, այրել կամ մահվան ոչ պատշաճ վարվել բարձր լարման.
  3. Որը FMIs ներկա են
    • Եթե ​​մեղքով կոդը 116 ԱՄՀ-ն 14 նշված է, գնալ Քայլ 9.
    • Եթե ​​մեղքով կոդը 116 ԱՄՀ-ն 10 նշված է, գնալ Քայլ 2.
    • If no Fault Codes are listed, The Service Switch was pushed in. Գնալ դեպի Քայլ 10.

[/fusion_content_box][fusion_content_box title=ՔԱՅԼ 2. Verify Data Monitor parameters.backgroundcolor=”” icon=”” iconflip=”” iconrotate=”” iconspin=noiconcolor=”” circlecolor=”” circlebordersize=”” circlebordercolor=”” outercirclebordersize=”” outercirclebordercolor=”” image=”” image_id=”” image_width=”” image_height=”” link=”” linktext=”Կարդալ ավելին” link_target=”” animation_type=”” animation_direction=leftanimation_speed=”0.3″ animation_offset=””]

  1. բանալին.
  2. Միացեք ServiceRanger է 9-Way Ախտորոշման միակցիչ է Քաբ.
  3. Ընտրեք «Տվյալների Monitor» տարբերակը.
  4. View the Battery Pack Voltage (BCU1) PID 118 in the high- voltage Battery list:
    • If the Battery Pack Voltage (BCU1) PID 118 is greater than 200 վոլտ, գնալ Քայլ 3.
    • If the Battery Pack Voltage (BCU1) PID 118 ավելի քիչ է, քան 200 վոլտ, փոխարինել Power Electronics Carrier (ՏԸՀ-), այնուհետեւ գնալ Քայլ 10.

[/fusion_content_box][/fusion_content_boxes][fusion_content_boxes layout=clean-horizontalcolumns=”2″ title_size=”18pxheading_size=”3″ title_color=”#ffffffbody_color=”#ffffffbackgroundcolor=”#4f4f4ficon=”” iconflip=”” iconrotate=”” iconspin=noiconcolor=”” icon_circle=”” icon_circle_radius=”” circlecolor=”” circlebordersize=”” circlebordercolor=”” outercirclebordersize=”” outercirclebordercolor=”” icon_size=”” icon_hover_type=”” hover_accent_color=”” image=”” image_id=”” image_width=”” image_height=”” link_type=”” button_span=”” link_area=”” link_target=”” icon_align=leftanimation_type=”” animation_delay=”” animation_offset=”” animation_direction=leftanimation_speed=”0.3″ margin_top=”” margin_bottom=”” hide_on_mobile=small-visibility,medium-visibility,large-visibilityclass=”” id=””][fusion_content_box title=ՔԱՅԼ 3. Verify continuity of Inverter connector circuits.backgroundcolor=”” icon=”” iconflip=”” iconrotate=”” iconspin=noiconcolor=”” circlecolor=”” circlebordersize=”” circlebordercolor=”” outercirclebordersize=”” outercirclebordercolor=”” image=”” image_id=”” image_width=”” image_height=”” link=”” linktext=”Կարդալ ավելին” link_target=”” animation_type=”” animation_direction=leftanimation_speed=”0.3″ animation_offset=””]

  1. Key դուրս.
  2. If the vehicle is not equipped with a DC/DC Converter or APG, skip this step.
  3. Using ASTM Class 0 electrical insulating rubber gloves with leather protectors, disconnect the DC cable for the DC/DC Converter and APG at the PEC.
  4. With the key off, temporarily remove the Lockout Bracket and pull the Service Switch out.
  5. բանալին.
  6. Սա մեղքով կոդը 116 ԱՄՀ-ն 10 still Active in ServiceRanger?
    • Եթե ​​մեղքով կոդը 116 ԱՄՀ-ն 10 is Active with the DC/DC Converter and APG disconnected, գնալ Քայլ 4.
    • Եթե ​​մեղքով կոդը 116 ԱՄՀ-ն 10 is no longer Active with the DC/DC Converter and APG disconnected, key off and reinstall the Lockout Bracket on the PEC. Replace the Power Electronics Carrier (ՏԸՀ-), այնուհետեւ գնալ Քայլ 10.

[/fusion_content_box][fusion_content_box title=ՔԱՅԼ 4. Verify continuity of PEC connector circuits to ground.backgroundcolor=”” icon=”” iconflip=”” iconrotate=”” iconspin=”” iconcolor=”” circlecolor=”” circlebordersize=”” circlebordercolor=”” outercirclebordersize=”” outercirclebordercolor=”” image=”” image_id=”” image_width=”” image_height=”” link=”” linktext=”” link_target=”” animation_type=”” animation_direction=leftanimation_speed=”0.3″ animation_offset=””]

  1. Key դուրս.
  2. Անջատեք ՏԸՀ 19-ճանապարհ միակցիչ.
  3. Temporarily remove the Lockout Bracket and pull the Service Switch out.
    Նշում: Ensure the Key Switch is off.
  4. Measure resistance at the PEC 19-Way Connector Terminal at the following pins:
    • տակառիկ 17 Ինչպես Pin 19
    • տակառիկ 9 Ինչպես Pin 11
    • տակառիկ 13 Ինչպես Pin 15
      • If the resistance between Pins 17 եւ Pin 19 Սա 112-122 ohms եւ դիմադրություն Pin 9 Ինչպես Pin 11 եւ Pin 13 Ինչպես Pin 15 են յուրաքանչյուրը 33-37 ohms, գնալ Քայլ 5.
      • Եթե ​​դիմադրություն է դուրս Լեռնաշղթայի, գնալ Քայլ 6.

[/fusion_content_box][/fusion_content_boxes][fusion_content_boxes layout=clean-horizontalcolumns=”2″ title_size=”18pxheading_size=”3″ title_color=”#ffffffbody_color=”#ffffffbackgroundcolor=”#4f4f4ficon=”” iconflip=”” iconrotate=”” iconspin=noiconcolor=”” icon_circle=”” icon_circle_radius=”” circlecolor=”” circlebordersize=”” circlebordercolor=”” outercirclebordersize=”” outercirclebordercolor=”” icon_size=”” icon_hover_type=”” hover_accent_color=”” image=”” image_id=”” image_width=”” image_height=”” link_type=”” button_span=”” link_area=”” link_target=”” icon_align=leftanimation_type=”” animation_delay=”” animation_offset=”” animation_direction=leftanimation_speed=”0.3″ margin_top=”” margin_bottom=”” hide_on_mobile=small-visibility,medium-visibility,large-visibilityclass=”” id=””][fusion_content_box title=ՔԱՅԼ 5. Verify continuity of Inverter connector circuits to ground.backgroundcolor=”” icon=”” iconflip=”” iconrotate=”” iconspin=noiconcolor=”” circlecolor=”” circlebordersize=”” circlebordercolor=”” outercirclebordersize=”” outercirclebordercolor=”” image=”” image_id=”” image_width=”” image_height=”” link=”” linktext=”Կարդալ ավելին” link_target=”” animation_type=”” animation_direction=leftanimation_speed=”0.3″ animation_offset=””]

  1. Key դուրս.
  2. Reconnect the PEC 19-Way Connector.
  3. Անջատեք Inverter 56-ճանապարհ միակցիչ.
  4. Inspect the connector pins for damaged, corroded and/or loose wires.
  5. Measure resistance between the Inverter 56-Way Connector at the following pins:
    • տակառիկ 29 Ինչպես Pin 37
    • տակառիկ 30 Ինչպես Pin 35
    • տակառիկ 31 Ինչպես Pin 36 Նշում: Մեղմորեն դյուրաթեք է Inverter 56-Way միակցիչ զենք ու զրահ մոտ միակցիչին, իսկ մոնիտորինգի դիմադրությունը արժեքները.
      • Եթե ​​դիմադրությունը միջեւ Pin 29 եւ Pin 37 Սա 112-122 ohms եւ դիմադրություն Pin 30 Ինչպես Pin 35 եւ Pin 31 Ինչպես Pin 36 են յուրաքանչյուրը 33-37 ohms, push the Service Switch on the PEC and reinstall the Lockout Bracket. Գնալ դեպի Քայլ 8.
      • Եթե ​​դիմադրություն է դուրս Լեռնաշղթայի, repair the Hybrid Harness between the PEC and Inverter, այնուհետեւ գնալ Քայլ 10.

[/fusion_content_box][fusion_content_box title=ՔԱՅԼ 6. Verify continuity of PEC connector circuits.backgroundcolor=”” icon=”” iconflip=”” iconrotate=”” iconspin=”” iconcolor=”” circlecolor=”” circlebordersize=”” circlebordercolor=”” outercirclebordersize=”” outercirclebordercolor=”” image=”” image_id=”” image_width=”” image_height=”” link=”” linktext=”” link_target=”” animation_type=”” animation_direction=leftanimation_speed=”0.3″ animation_offset=””]

  1. Key դուրս.
  2. Remove the Air Filter Cover and Air Filter from the PEC. Refer to TRSM1000 for procedures.*
  3. An Inertia Switch is located at the front of the PEC inside the box and viewable when the Air Filter is removed.
  4. Using ASTM Class 0 electrical insulating rubber gloves with leather protectors, press the button on the top of the Inertia Switch until heard or felt a click. This switch must be depressed a set distance to reset the switch.
  5. Measure resistance at the PEC 19-Way Connector Terminal at the following pins:
    • տակառիկ 17 Ինչպես Pin 19
    • տակառիկ 9 Ինչպես Pin 11
    • տակառիկ 13 Ինչպես Pin 15
      • qIf the resistance between Pin 17 եւ Pin 19 Սա 112-122 ohms եւ դիմադրություն Pin 9 Ինչպես Pin 11 եւ Pin 13 Ինչպես Pin 15 են յուրաքանչյուրը 33-37 ohms, the Inertia Switch was tripped. Test is complete. Գնալ դեպի Քայլ 10.
      • Եթե ​​դիմադրություն է դուրս Լեռնաշղթայի, push in the Service Switch on the PEC and reinstall the Lockout Bracket, այնուհետեւ գնալ Քայլ 7.

[/fusion_content_box][/fusion_content_boxes][fusion_content_boxes layout=clean-horizontalcolumns=”2″ title_size=”18pxheading_size=”3″ title_color=”#ffffffbody_color=”#ffffffbackgroundcolor=”#4f4f4ficon=”” iconflip=”” iconrotate=”” iconspin=noiconcolor=”” icon_circle=”” icon_circle_radius=”” circlecolor=”” circlebordersize=”” circlebordercolor=”” outercirclebordersize=”” outercirclebordercolor=”” icon_size=”” icon_hover_type=”” hover_accent_color=”” image=”” image_id=”” image_width=”” image_height=”” link_type=”” button_span=”” link_area=”” link_target=”” icon_align=leftanimation_type=”” animation_delay=”” animation_offset=”” animation_direction=leftanimation_speed=”0.3″ margin_top=”” margin_bottom=”” hide_on_mobile=small-visibility,medium-visibility,large-visibilityclass=”” id=””][fusion_content_box title=ՔԱՅԼ 7. Verify continuity of Inverter connector circuits.backgroundcolor=”” icon=”” iconflip=”” iconrotate=”” iconspin=noiconcolor=”” circlecolor=”” circlebordersize=”” circlebordercolor=”” outercirclebordersize=”” outercirclebordercolor=”” image=”” image_id=”” image_width=”” image_height=”” link=”” linktext=”Կարդալ ավելին” link_target=”” animation_type=”” animation_direction=leftanimation_speed=”0.3″ animation_offset=””]

  1. Key դուրս.
  2. Disconnect the DC High-Voltage Cable at the PEC Bulkhead and at the Inverter Bulkhead.
  3. Measure resistance between the Low-Voltage Interlock Pins on the PEC side of the DC High-Voltage Cable:
    Նշում: The Interlock Pins are the two small spade terminals located in the same opening.

    • If the resistance is 0–0.3 ohms between the Interlock Loop Pins, փոխարինել Power Electronics Carrier (ՏԸՀ-), այնուհետեւ գնալ Քայլ 10.
    • Եթե ​​դիմադրություն է դուրս Լեռնաշղթայի, փոխարինել DC բարձր լարման մալուխի, այնուհետեւ գնալ Քայլ 10.

[/fusion_content_box][fusion_content_box title=ՔԱՅԼ 8. Verify continuity of DC Cable from PEC to Inverter Connector circuits.backgroundcolor=”” icon=”” iconflip=”” iconrotate=”” iconspin=”” iconcolor=”” circlecolor=”” circlebordersize=”” circlebordercolor=”” outercirclebordersize=”” outercirclebordercolor=”” image=”” image_id=”” image_width=”” image_height=”” link=”” linktext=”” link_target=”” animation_type=”” animation_direction=leftanimation_speed=”0.3″ animation_offset=””]

  1. Key դուրս.
  2. Disconnect the DC High-Voltage Cable at the PEC Bulkhead and the Inverter Bulkhead.
  3. Measure the resistance of each high-voltage circuit on the cable:
    • If the resistance of each high-voltage circuit in the cable is 1 օհմ կամ պակաս, փոխարինել Inverter, այնուհետեւ գնալ Քայլ 10.
    • Եթե ​​դիմադրություն է դուրս Լեռնաշղթայի, replace the DC High-Voltage Cable, այնուհետեւ գնալ Քայլ 10.

[/fusion_content_box][/fusion_content_boxes][fusion_content_boxes layout=clean-horizontalcolumns=”2″ title_size=”18pxheading_size=”3″ title_color=”#ffffffbody_color=”#ffffffbackgroundcolor=”#4f4f4ficon=”” iconflip=”” iconrotate=”” iconspin=noiconcolor=”” icon_circle=”” icon_circle_radius=”” circlecolor=”” circlebordersize=”” circlebordercolor=”” outercirclebordersize=”” outercirclebordercolor=”” icon_size=”” icon_hover_type=”” hover_accent_color=”#f41000image=”” image_id=”” image_width=”” image_height=”” link_type=”” button_span=”” link_area=”” link_target=”” icon_align=leftanimation_type=”” animation_delay=”” animation_offset=”” animation_direction=leftanimation_speed=”0.3″ margin_top=”” margin_bottom=”” hide_on_mobile=small-visibility,medium-visibility,large-visibilityclass=”” id=””][fusion_content_box title=ՔԱՅԼ 9. Verify Data Monitor parameters.backgroundcolor=”” icon=”” iconflip=”” iconrotate=”” iconspin=”” iconcolor=”” circlecolor=”” circlebordersize=”” circlebordercolor=”” outercirclebordersize=”” outercirclebordercolor=”” image=”” image_id=”” image_width=”” image_height=”” link=”” linktext=”” link_target=”” animation_type=”” animation_direction=leftanimation_speed=”0.3″ animation_offset=””]

  1. Միացեք ServiceRanger է 9-Way Ախտորոշման միակցիչ է Քաբ.
  2. Ընտրեք «Տվյալների Monitor» տարբերակը.
  3. View the following parameters in the High-Voltage Battery list.
    • Battery Pack Voltage (BCU1) PID 118
    • Battery Voltage PID 116
      • If the voltage readings on PID 116 եւ PID 118 are within 10 վոլտ միմյանց, փոխարինել Power Electronics Carrier (ՏԸՀ-), այնուհետեւ գնալ Քայլ 10.
      • If the voltage readings on PID 116 եւ PID 118 are greater than 10 վոլտ միմյանց, փոխարինել Inverter, այնուհետեւ գնալ Քայլ 10.

[/fusion_content_box][fusion_content_box title=ՔԱՅԼ 10. հաստատեք վերանորոգման.backgroundcolor=”” icon=”” iconflip=”” iconrotate=”” iconspin=noiconcolor=”” circlecolor=”” circlebordersize=”” circlebordercolor=”” outercirclebordersize=”” outercirclebordercolor=”” image=”” image_id=”” image_width=”” image_height=”” link=”” linktext=”Կարդալ ավելին” link_target=”” animation_type=”” animation_direction=leftanimation_speed=”0.3″ animation_offset=””]

  1. Key դուրս.
  2. Նորից միացնել բոլոր միակցիչներ եւ բացասական մարտկոցի մալուխի.
  3. բանալին.
  4. Մաքրել կոդեր, տեսնել Մաքրել ակտիվ անսարքությունները.
  5. Քշել է մեքենան եւ փորձել զրոյացնել կոդը.
  6. Ստուգելու համար կոդերի, տեսնել Դիտել ակտիվ եւ ոչ ակտիվ սխալների.
    • Եթե ​​ոչ կոդերը, փորձարկում է ամբողջական.
    • Եթե ​​մեղքով կոդը 116 հայտնվում, contact Eaton at 1- 800-826-ՕԳՆՈՒԹՅՈՒՆ (4357). Repeat this Step (քայլ 10).
    • Եթե ​​կոդը բացառությամբ 116 հայտնվում, տեսնել Մեղքով կոդը ինդեքսի ցուցակ.

[/fusion_content_box][/fusion_content_boxes][/fusion_builder_column][/fusion_builder_row][/fusion_builder_container][fusion_global id=”13788″]
