[fusion_builder_container hundred_percent=nohundred_percent_height=nohundred_percent_height_scroll=nohundred_percent_height_center_content=yesequal_height_columns=nomenu_anchor=”” hide_on_mobile=small-visibility,medium-visibility,large-visibilitystatus=publishedpublish_date=”” class=”” id=”” background_color=”” background_image=”” background_position=center centerbackground_repeat=no-repeatfade=nobackground_parallax=noneenable_mobile=noparallax_speed=”0.3″ video_mp4=”” video_webm=”” video_ogv=”” video_url=”” video_aspect_ratio=”16:9″ video_loop=yesvideo_mute=yesvideo_preview_image=”” border_size=”” border_color=”” border_style=solidmargin_top=”35″ margin_bottom=”” padding_top=”” padding_right=”” padding_bottom=”” padding_left=””][fusion_builder_row][fusion_builder_column type=”1_1layout=”1_1spacing=”” center_content=nolink=”” target=_selfmin_height=”” hide_on_mobile=small-visibility,medium-visibility,large-visibilityclass=”” id=”” background_color=”” background_image=”” background_image_id=”” background_position=left topbackground_repeat=no-repeathover_type=noneborder_size=”0″ border_color=”” border_style=solidborder_position=allpadding_top=”” padding_right=”” padding_bottom=”” padding_left=”” margin_top=”” margin_bottom=”” animation_type=”” animation_direction=leftanimation_speed=”0.3″ animation_offset=”” last=no”][fusion_text columns=”” column_min_width=”” column_spacing=”” rule_style=defaultrule_size=”” rule_color=”” hide_on_mobile=small-visibility,medium-visibility,large-visibilityclass=”” id=””]

ایتون فولر ترکیبی کد خطا انتقال 116 – High Voltage Relays -(سیستم MY08)

[/fusion_text][/fusion_builder_column][/fusion_builder_row][/fusion_builder_container][fusion_builder_container hundred_percent=nohundred_percent_height=nohundred_percent_height_scroll=nohundred_percent_height_center_content=yesequal_height_columns=nomenu_anchor=”” hide_on_mobile=small-visibility,medium-visibility,large-visibilitystatus=publishedpublish_date=”” class=”” id=”” background_color=”” background_image=”” background_position=center centerbackground_repeat=no-repeatfade=nobackground_parallax=noneenable_mobile=noparallax_speed=”0.3″ video_mp4=”” video_webm=”” video_ogv=”” video_url=”” video_aspect_ratio=”16:9″ video_loop=yesvideo_mute=yesvideo_preview_image=”” border_size=”” border_color=”” border_style=solidmargin_top=”” margin_bottom=”” padding_top=”” padding_right=”” padding_bottom=”” padding_left=””][fusion_builder_row][fusion_builder_column type=”1_1layout=”1_1spacing=”” center_content=nolink=”” target=_selfmin_height=”” hide_on_mobile=small-visibility,medium-visibility,large-visibilityclass=”” id=”” background_color=”” background_image=”” background_image_id=”” background_position=left topbackground_repeat=no-repeathover_type=noneborder_size=”0″ border_color=”” border_style=solidborder_position=allpadding_top=”” padding_right=”” padding_bottom=”” padding_left=”” margin_top=”” margin_bottom=”” animation_type=”” animation_direction=leftanimation_speed=”0.3″ animation_offset=”” last=no”][fusion_text columns=”” column_min_width=”” column_spacing=”” rule_style=defaultrule_size=”” rule_color=”” hide_on_mobile=small-visibility,medium-visibility,large-visibilityclass=”” id=””]

خطا کد برای ایتون ترکیبی مدل های سیستم درایو (MY08) EH-8E306A-U, EH-8E306A-UPG, EH-8E306A-UP, EH-8E306A-CD, EH-8E306A-T, EH-6E606B-CD. خوانده شده در زیر برای یادگیری چگونه به آزمون, روشن و رفع خطاهای کد خطا برای کامیون Freightliner خود را, مک, ها Peterbilt, ها Kenworth, ولوو, بین المللی, و کامیون های سنگین و تجهیزات. The High-Voltage Relays are located inside the Power Electronics Carrier (PEC) در واحد رله جعبه. There is 1 precharge relay on the positive side, an additional relay on the positive, و 1 on the negative for a total of 3. این رله هستند به طور معمول باز هنگامی که سیستم خاموش است. رله از طریق اینورتر کنترل.

خطا کد 116 – High Voltage Relays Detection

پیش شرط زیر باید رعایت شود قبل از سیستم تشخیص گسل:

  • ولتاژ جرقه اینورتر بزرگتر از 7 ولت و کمتر از 16 ولت.

توجه داشته باشید: در هنگام عیب یابی کد غیر فعال به مراجعه محصولات حالت تشخیصی (PDM)

شرایط به تنظیم کد گسل فعال

  • صندوق بین المللی پول 10 is set when the Inverter detects the input voltage measured at the capacitor is less than 210 volts within 3 seconds after the sub-relay closed in the Relay Box.
  • صندوق بین المللی پول 14 is set when only the negative relay in the Relay Box is on and capacitor voltage decreases less than 10 volts/5 seconds when initial capacitor voltage was greater than 200 volts and motor speed less than 500 min-1, or there is a detect error in the initial check.

جانشین هنگامی که کد خطا 116 قرار است شرایط زیر رخ می دهد:

  • کهربا "بررسی پیوندی" چشمک می زند نور برای FMI 10 and remains solid for FMI 14.
  • گسل است که در حافظه ذخیره می شود HCM.
  • اینورتر خاموش سیستم ولتاژ بالا خاموش.
  • HCM همچنان به کنترل وسیله نقلیه هیبریدی را در یک حالت تنها دیزل.
  • پیش فرض انتقال شروع دنده به 1.

[/fusion_text][fusion_text columns=”” column_min_width=”” column_spacing=”” rule_style=defaultrule_size=”” rule_color=”” hide_on_mobile=small-visibility,medium-visibility,large-visibilityclass=”” id=””]

شرایط به تنظیم گسل کد غیر فعال

فقط گسل غیر فعال را می توان از واحد انتقال کنترل الکترونیکی پاک (TECU) و یا سابقه HCM با استفاده از ServiceRanger. TECU به طور خودکار پاک گسل از تاریخ، پس از 200 ساعت و HCM به طور خودکار پاک گسل از تاریخ پس از گسل است برای غیر فعال شده 200 ساعت ها.

این کد خطا را می توان با هر یک از موارد زیر ایجاد:

  • صندوق بین المللی پول 10
    • PEC
    • APG
    • معکوس کننده
    • DC high-voltage cable
    • DC cable interlock loops
    • سوئیچ اینرسی
    • تغییر سرویس
  • صندوق بین المللی پول 14
    • معکوس کننده
    • PEC

[/fusion_text][/fusion_builder_column][/fusion_builder_row][/fusion_builder_container][fusion_builder_container hundred_percent=nohundred_percent_height=nohundred_percent_height_scroll=nohundred_percent_height_center_content=yesequal_height_columns=nomenu_anchor=”” hide_on_mobile=small-visibility,medium-visibility,large-visibilitystatus=publishedpublish_date=”” class=”” id=”” background_color=”” background_image=”” background_position=center centerbackground_repeat=no-repeatfade=nobackground_parallax=noneenable_mobile=noparallax_speed=”0.3″ video_mp4=”” video_webm=”” video_ogv=”” video_url=”” video_aspect_ratio=”16:9″ video_loop=yesvideo_mute=yesvideo_preview_image=”” border_size=”” border_color=”” border_style=solidmargin_top=”” margin_bottom=”” padding_top=”” padding_right=”” padding_bottom=”” padding_left=””][fusion_builder_row][fusion_builder_column type=”1_1layout=”1_1spacing=”” center_content=nolink=”” target=_selfmin_height=”” hide_on_mobile=small-visibility,medium-visibility,large-visibilityclass=”” id=”” background_color=”” background_image=”” background_image_id=”” background_position=left topbackground_repeat=no-repeathover_type=noneborder_size=”0″ border_color=”” border_style=solidborder_position=allpadding_top=”” padding_right=”” padding_bottom=”” padding_left=”” margin_top=”” margin_bottom=”” animation_type=”” animation_direction=leftanimation_speed=”0.3″ animation_offset=”” last=no”][fusion_text columns=”” column_min_width=”” column_spacing=”” rule_style=defaultrule_size=”” rule_color=”” hide_on_mobile=small-visibility,medium-visibility,large-visibilityclass=”” id=””]

خطا کد 116 – High Voltage Relays Test

[/fusion_text][/fusion_builder_column][/fusion_builder_row][/fusion_builder_container][fusion_builder_container hundred_percent=nohundred_percent_height=nohundred_percent_height_scroll=nohundred_percent_height_center_content=yesequal_height_columns=nomenu_anchor=”” hide_on_mobile=small-visibility,medium-visibility,large-visibilitystatus=publishedpublish_date=”” class=”” id=”” background_color=”” background_image=”” background_position=center centerbackground_repeat=no-repeatfade=nobackground_parallax=noneenable_mobile=noparallax_speed=”0.3″ video_mp4=”” video_webm=”” video_ogv=”” video_url=”” video_aspect_ratio=”16:9″ video_loop=yesvideo_mute=yesvideo_preview_image=”” border_size=”” border_color=”” border_style=solidmargin_top=”” margin_bottom=”” padding_top=”” padding_right=”” padding_bottom=”” padding_left=””][fusion_builder_row][fusion_builder_column type=”1_1layout=”1_1spacing=”” center_content=nolink=”” target=_selfmin_height=”” hide_on_mobile=small-visibility,medium-visibility,large-visibilityclass=”” id=”” background_color=”” background_image=”” background_image_id=”” background_position=left topbackground_repeat=no-repeathover_type=noneborder_size=”0″ border_color=”” border_style=solidborder_position=allpadding_top=”” padding_right=”” padding_bottom=”” padding_left=”” margin_top=”” margin_bottom=”” animation_type=”” animation_direction=leftanimation_speed=”0.3″ animation_offset=”” last=no”][fusion_text columns=”” column_min_width=”” column_spacing=”” rule_style=defaultrule_size=”” rule_color=”” hide_on_mobile=small-visibility,medium-visibility,large-visibilityclass=”” id=””]

کامپوننت شناسایی سیستم های MY08:

[/fusion_text][/fusion_builder_column][/fusion_builder_row][/fusion_builder_container][fusion_builder_container hundred_percent=yeshundred_percent_height=nohundred_percent_height_scroll=nohundred_percent_height_center_content=yesequal_height_columns=nomenu_anchor=”” hide_on_mobile=small-visibility,medium-visibility,large-visibilitystatus=publishedpublish_date=”” class=”” id=”” background_color=”” background_image=”” background_position=center centerbackground_repeat=no-repeatfade=nobackground_parallax=noneenable_mobile=noparallax_speed=”0.3″ video_mp4=”” video_webm=”” video_ogv=”” video_url=”” video_aspect_ratio=”16:9″ video_loop=yesvideo_mute=yesvideo_preview_image=”” border_size=”” border_color=”” border_style=solidmargin_top=”” margin_bottom=”” padding_top=”” padding_right=”10%” padding_bottom=”” padding_left=”10%”][fusion_builder_row][fusion_builder_column type=”1_3layout=”1_3spacing=”” center_content=nolink=”” target=_selfmin_height=”” hide_on_mobile=small-visibility,medium-visibility,large-visibilityclass=”” id=”” background_color=”” background_image=”” background_image_id=”” background_position=left topbackground_repeat=no-repeathover_type=noneborder_size=”0″ border_color=”” border_style=solidborder_position=allpadding_top=”” padding_right=”” padding_bottom=”” padding_left=”” margin_top=”” margin_bottom=”” animation_type=”” animation_direction=leftanimation_speed=”0.3″ animation_offset=”” last=no”][fusion_imageframe image_id=”14474|fullmax_width=”” style_type=”” blur=”” stylecolor=”” hover_type=nonebordersize=”” bordercolor=”” borderradius=”” align=centerlightbox=nogallery_id=”” lightbox_image=”” lightbox_image_id=”” alt=”دلفی 56-راه جفتگیری اتصال نمایش” link=”” linktarget=_selfhide_on_mobile=small-visibility,medium-visibility,large-visibilityclass=”” id=”” animation_type=”” animation_direction=leftanimation_speed=”0.3″ animation_offset=””]https://www.globaltransmissionsupply.com/wp-content/uploads/Inverter-56-Way-Mating-Connector-View.jpg[/fusion_imageframe][fusion_text columns=”” column_min_width=”” column_spacing=”” rule_style=defaultrule_size=”” rule_color=”” hide_on_mobile=small-visibility,medium-visibility,large-visibilityclass=”” id=””]

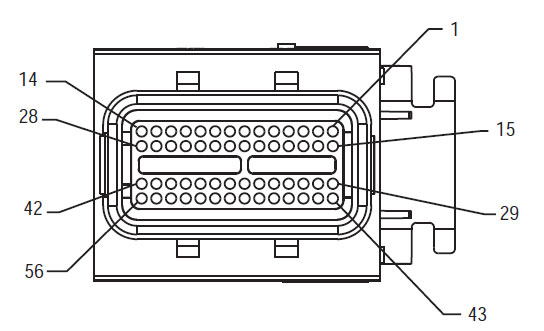
56-راه جفتگیری اتصال نمایش

[/fusion_text][/fusion_builder_column][fusion_builder_column type=”1_3layout=”1_3spacing=”” center_content=nolink=”” target=_selfmin_height=”” hide_on_mobile=small-visibility,medium-visibility,large-visibilityclass=”” id=”” background_color=”” background_image=”” background_image_id=”” background_position=left topbackground_repeat=no-repeathover_type=noneborder_size=”0″ border_color=”” border_style=solidborder_position=allpadding_top=”” padding_right=”” padding_bottom=”” padding_left=”” margin_top=”” margin_bottom=”” animation_type=”” animation_direction=leftanimation_speed=”0.3″ animation_offset=”” last=no”][fusion_imageframe image_id=”14635|fullmax_width=”” style_type=”” blur=”” stylecolor=”” hover_type=nonebordersize=”” bordercolor=”” borderradius=”” align=centerlightbox=nogallery_id=”” lightbox_image=”” lightbox_image_id=”” alt=”ولتاژ بالا اتصال DC اتصال نمایش یازاکی” link=”” linktarget=_selfhide_on_mobile=small-visibility,medium-visibility,large-visibilityclass=”” id=”” animation_type=”” animation_direction=leftanimation_speed=”0.3″ animation_offset=””]https://www.globaltransmissionsupply.com/wp-content/uploads/High-Voltage-DC-Connector-View.jpg[/fusion_imageframe][fusion_text columns=”” column_min_width=”” column_spacing=”” rule_style=defaultrule_size=”” rule_color=”” hide_on_mobile=small-visibility,medium-visibility,large-visibilityclass=”” id=””]

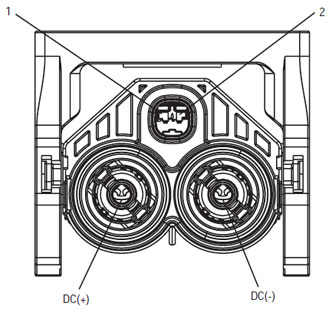
ولتاژ بالا اتصال DC اتصال نمایش یازاکی

[/fusion_text][/fusion_builder_column][fusion_builder_column type=”1_3layout=”1_3spacing=”” center_content=nolink=”” target=_selfmin_height=”” hide_on_mobile=small-visibility,medium-visibility,large-visibilityclass=”” id=”” background_color=”” background_image=”” background_image_id=”” background_position=left topbackground_repeat=no-repeathover_type=noneborder_size=”0″ border_color=”” border_style=solidborder_position=allpadding_top=”” padding_right=”” padding_bottom=”” padding_left=”” margin_top=”” margin_bottom=”” animation_type=”” animation_direction=leftanimation_speed=”0.3″ animation_offset=”” last=no”][fusion_imageframe image_id=”14213|mediummax_width=”” style_type=”” blur=”” stylecolor=”” hover_type=nonebordersize=”” bordercolor=”” borderradius=”” align=centerlightbox=nogallery_id=”” lightbox_image=”” lightbox_image_id=”” alt=Mating Connector View Deutsch 19 – مسیر” link=”” linktarget=_selfhide_on_mobile=small-visibility,medium-visibility,large-visibilityclass=”” id=”” animation_type=”” animation_direction=leftanimation_speed=”0.3″ animation_offset=””]https://www.globaltransmissionsupply.com/wp-content/uploads/Eaton-Fuller-Harness-Connector-View-300×289.jpg[/fusion_imageframe][fusion_text columns=”” column_min_width=”” column_spacing=”” rule_style=defaultrule_size=”” rule_color=”” hide_on_mobile=small-visibility,medium-visibility,large-visibilityclass=”” id=””]

Mating Connector View Deutsch 19 – مسیر

[/fusion_text][/fusion_builder_column][/fusion_builder_row][/fusion_builder_container][fusion_builder_container hundred_percent=nohundred_percent_height=nohundred_percent_height_scroll=nohundred_percent_height_center_content=yesequal_height_columns=nomenu_anchor=”” hide_on_mobile=small-visibility,medium-visibility,large-visibilitystatus=publishedpublish_date=”” class=”” id=”” background_color=”” background_image=”” background_position=center centerbackground_repeat=no-repeatfade=nobackground_parallax=noneenable_mobile=noparallax_speed=”0.3″ video_mp4=”” video_webm=”” video_ogv=”” video_url=”” video_aspect_ratio=”16:9″ video_loop=yesvideo_mute=yesvideo_preview_image=”” border_size=”” border_color=”” border_style=solidmargin_top=”” margin_bottom=”” padding_top=”” padding_right=”” padding_bottom=”” padding_left=””][fusion_builder_row][fusion_builder_column type=”1_1layout=”1_1spacing=”” center_content=nolink=”” target=_selfmin_height=”” hide_on_mobile=small-visibility,medium-visibility,large-visibilityclass=”” id=”” background_image_id=”” background_color=”#000000″ background_image=”” background_position=left topundefined=”” background_repeat=no-repeathover_type=noneborder_size=”0″ border_color=”” border_style=solidborder_position=allpadding_top=”” padding_right=”” padding_bottom=”” padding_left=”” margin_top=”” margin_bottom=”” animation_type=”” animation_direction=leftanimation_speed=”0.3″ animation_offset=”” last=no”][fusion_text columns=”” column_min_width=”” column_spacing=”” rule_style=defaultrule_size=”” rule_color=”” hide_on_mobile=small-visibility,medium-visibility,large-visibilityclass=”” id=””]

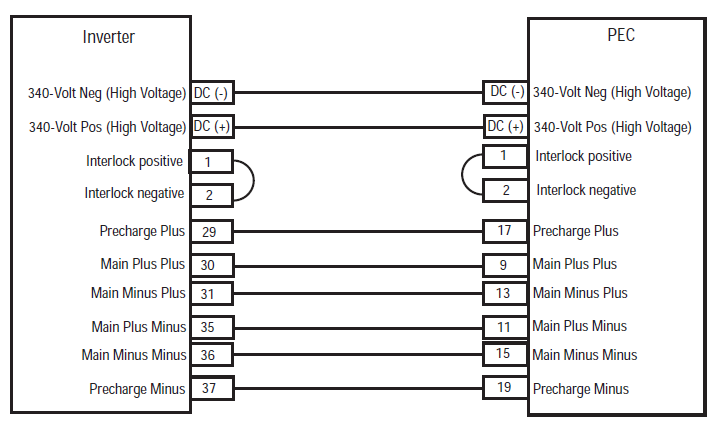
توجه داشته باشید: به مراجعه ایتون و اجزای ترکیبی و اتصال محل سکونت برای مکان های اتصال در سیستم MY08
[/fusion_text][/fusion_builder_column][fusion_builder_column type=”1_1layout=”1_1spacing=”” center_content=nolink=”” target=_selfmin_height=”” hide_on_mobile=small-visibility,medium-visibility,large-visibilityclass=”” id=”” background_color=”” background_image=”” background_image_id=”” background_position=left topbackground_repeat=no-repeathover_type=noneborder_size=”0″ border_color=”” border_style=solidborder_position=allpadding_top=”” padding_right=”” padding_bottom=”” padding_left=”” margin_top=”” margin_bottom=”” animation_type=”” animation_direction=leftanimation_speed=”0.3″ animation_offset=”” last=no”][fusion_imageframe image_id=”14666|fullmax_width=”” style_type=”” blur=”” stylecolor=”” hover_type=nonebordersize=”” bordercolor=”” borderradius=”” align=centerlightbox=nogallery_id=”” lightbox_image=”” lightbox_image_id=”” alt=Inverter PEC connectors Eaton Fuller Hybrid transmissionlink=”” linktarget=_selfhide_on_mobile=small-visibility,medium-visibility,large-visibilityclass=”” id=”” animation_type=”” animation_direction=leftanimation_speed=”0.3″ animation_offset=””]https://www.globaltransmissionsupply.com/wp-content/uploads/Inverter-PEC-connectors.png[/fusion_imageframe][/fusion_builder_column][/fusion_builder_row][/fusion_builder_container][fusion_builder_container hundred_percent=nohundred_percent_height=nohundred_percent_height_scroll=nohundred_percent_height_center_content=yesequal_height_columns=nomenu_anchor=”” hide_on_mobile=small-visibility,medium-visibility,large-visibilitystatus=publishedpublish_date=”” class=”” id=”” background_color=”” background_image=”” background_position=center centerbackground_repeat=no-repeatfade=nobackground_parallax=noneenable_mobile=noparallax_speed=”0.3″ video_mp4=”” video_webm=”” video_ogv=”” video_url=”” video_aspect_ratio=”16:9″ video_loop=yesvideo_mute=yesvideo_preview_image=”” border_size=”” border_color=”” border_style=solidmargin_top=”” margin_bottom=”” padding_top=”” padding_right=”” padding_bottom=”” padding_left=””][fusion_builder_row][fusion_builder_column type=”1_1layout=”1_1spacing=”” center_content=nolink=”” target=_selfmin_height=”” hide_on_mobile=small-visibility,medium-visibility,large-visibilityclass=”” id=”” background_color=”” background_image=”” background_image_id=”” background_position=left topbackground_repeat=no-repeathover_type=noneborder_size=”0″ border_color=”” border_style=solidborder_position=allpadding_top=”” padding_right=”” padding_bottom=”” padding_left=”” margin_top=”” margin_bottom=”” animation_type=”” animation_direction=leftanimation_speed=”0.3″ animation_offset=”” last=no”][fusion_modal name=warnings_cautionstitle=”هشدارها & هشدار” size=largebackground=”” border_color=”” show_footer=yesclass=”” id=””]خطر: خطر را نشان می دهد به شما خواهد شد به شدت مجروح و یا کشته اگر انجام این روش نشان داد پیروی نمی.
هشدار: هشدار نشان می دهد خطر فوری, که می تواند در آسیب شدید شخصی در نتیجه اگر شما انجام این روش نشان داد پیروی نمی.
احتیاط: توجه نشان می دهد خودرو یا خسارت می تواند رخ دهد اگر شما روش نشان داد پیروی نمی.

توجه داشته باشید: توجه نشان می دهد جزئیات اضافی که در تشخیص و یا تعمیر یک جزء / سیستم کمک خواهد کرد.

دنبال روش مشخص شده در جهت نشان داد برای جلوگیری از آسیب های شخصی:

1. اگر مخروط با ولتاژ بالا در سراسر وسیله نقلیه هستند و قفل بر روی PEC نصب, تنها کسی که باید اجازه داده شود برای شروع وسیله نقلیه شخصی که برچسب قفل امضا است.
2. قبل از کار بر روی یک وسیله نقلیه و یا خروج از کابین در حالی که موتور در حال اجرا است, شما باید دسته دنده در "N" قرار دهید مجموعه ترمز دستی, و جلوگیری از چرخ.
3. به دلایل ایمنی, همیشه درگیر ترمز خدمات قبل از انتخاب موقعیت دنده از "N"
4. قبل از شروع یک خودرو همیشه در صندلی راننده نشسته, را انتخاب کنید "N" در کنترل شیفت, و تنظیم ترمز پارکینگ.
5. در وسایل نقلیه با ePTO, موتور و / یا
موتور / ژنراتور می تواند در حالت ePTO شروع. هرگز از تعمیر و نگهداری انجام و یا کار بر روی خودرو, در حالی که در این حالت.
6. 12-ولت باتری مثبت (+) و منفی (-) باید قبل از هر گونه جوش روی هر وسیله نقلیه هیبریدی مجهز قطع شود.

احتیاط: دنبال روش مشخص شده در جهت نشان داد برای جلوگیری از نقص تجهیزات و یا آسیب.
احتیاط: هنوز ترمز دستی را آزاد و یا تلاش برای انتخاب یک دنده تا زمانی که فشار هوا در سطح درست.
احتیاط: برای جلوگیری از آسیب به انتقال در طول بکسل جای دسته دنده را در "N" و بلند چرخ دیسک به خارج از زمین و یا قطع سیستم نیروی محرکه.

هشدار ولتاژ بالا & هشدار

  • استفاده از CO2 و یا خشک شیمیایی آتش خاموش.
  • سیم کشی با ولتاژ بالا در عایق نارنجی و یا لوله پیچیده پوشیده شده و مشخص شده با برچسب های هشدار دهنده در اتصالات.
  • همه Eaton® ترکیبی دیزل / وسایل نقلیه الکتریکی خواهد شد مشخص شده، ترکیبی’ در خارج از خودرو, همراه با برچسب تغییر در فاصله.
  • برای محل خاصی از شاسی سوار شده اجزای ترکیبی به نصب مراجعه کنید.
  • هنوز نه به رنگ نارنجی کابل ولتاژ بالا قطع.
  • آیا به قطع نیست و یا باز کردن PEC.
  • آیا به قطع نیست و یا باز کردن مبدل DC / DC.
  • آیا به قطع نیست و یا باز کردن اینورتر.

یک منطقه حائل باید راه اندازی و ولتاژ بالا عایق دستکش خانگی لاستیک (کلاس 0 با پشتوانه چرم) به کار بر روی ولتاژ بالا قبل مورد نیاز. عدم پیروی از این دستورالعمل ممکن است در آسیب شخصی شدید یا مرگ می شود.
دستکش لاستیکی عایق است که باید در حالی که کار بر روی سیستم های با ولتاژ بالا پوشیده می شود کلاس 0 با پشتوانه چرم. دستکش لاستیکی باید قبل از هر استفاده به روش لاستیک تست دستکش عایق در "وسایل تشخیصی / انتشارات خدمات" در صفحه پیدا شده است مورد آزمایش قرار 6. عدم پیروی از این دستورالعمل ممکن است در آسیب شخصی شدید یا مرگ می شود.
قبل از بازرسی یا کار بر روی هر گونه کابل ولتاژ بالا یا اجزای "ولتاژ بالا خاموش کردن خدمات و قدرت بالا روش" در صفحه 4 باید به دنبال. عدم پیروی از این دستورالعمل ممکن است در آسیب شخصی شدید یا مرگ می شود.
دستگاه های تحریم و Tagout تنها باید توسط تکنسین که دستگاه قفل و Tagout بر روی وسیله نقلیه قرار داده شده حذف. عدم پیروی از این دستورالعمل ممکن است در آسیب شخصی شدید یا مرگ می شود.
انتقال انرژی الکتریکی به لاستیک عایق دستکش (کلاس 0 با پشتوانه چرم) باید هنگام کار با هر پوشیده می شود
کابل ولتاژ بالا. از "خاموش کردن ولتاژ بالا خدمات و قدرت بالا روش" در صفحه 4 باید قبل از از بین بردن هر گونه کابل ولتاژ بالا دنبال شود. عدم پیروی از این دستورالعمل ممکن است در آسیب شخصی شدید یا مرگ می شود.
کابل ولتاژ بالا و سیم کشی نارنجی هستند و شامل یک برچسب هشدار دهنده در اتصالات. قطعات ولتاژ بالا با برچسب مشخص شده. انتقال انرژی الکتریکی به لاستیک عایق دستکش (کلاس 0 با پشتوانه چرم) باید هنگام کار بر روی هر یک از این قطعات استفاده می شود. عدم پیروی از این دستورالعمل ممکن است در آسیب شخصی شدید یا مرگ می شود.

ولتاژ بالا روش خاموش کردن خدمات

ولتاژ بالا خاموش کردن خدمات و قدرت بالا روش1. دنبالکردن "ولتاژ بالا فضای کار" روش.
2. تعیین محل قرمز تغییر PEC خدمات در جلو از PEC و فشار خاموش.
3. حذف پوشش خدمات سوئیچ و نصب براکت تعطیل کار (J48506).
4. برچسب ببندید به تحریم براکت.
5. اطمینان از تغییر PEC خدمات نمی تواند از در وضعیت خاموش حرکت.
6. اجازه می دهد که سیستم به مجموعه ای برای حداقل 5 دقیقه به تخلیه ولتاژ بالا.
7. اتصال ServiceRanger و مشاهده مانیتور داده PID 116 به نام "بالقوه باتری با ولتاژ بالا." استفاده از SPN 520323 برای اتصال J1939 "ولتاژ باتری RB" (جعبه رله).
8. ولتاژ باید 30 ولت یا کمتر. اگر ولتاژ بالا است 30 ولت, بر روی خودرو کار نمی کند و تماس Eaton® در 1-800-826-HELP (4357).
9. کلید احتراق کردن و اقدام به تعمیر و یا گام عیب یابی.
توجه داشته باشید: ولتاژ قطره به صفر زمانی که کلید خاموش است.

ولتاژ بالا خدمات قدرت بالا روش

1. نصب تمام اتصالات با ولتاژ بالا را در موقعیت های قفل شده خود.
2. اگر شما فرد کار بر روی خودرو, حذف تحریم براکت و برچسب.
3. نصب مجدد تحریم براکت بیش از سوئیچ خدمات.
4. نگه دار، خدمات SWITCH و اجازه دهید مجموعه ای وسیله ای برای 2 دقایق.
5. Start vehicle when appropriate.[/fusion_modal][fusion_modal name=component_locationtitle=”ایتون و اجزای ترکیبی و اتصال محل سکونت ” size=largebackground=”#ffffffborder_color=”” show_footer=yesclass=”” id=””]

ایتون و اجزای ترکیبی و محل اتصال MY08 سیستم

[/fusion_modal][fusion_modal name=component_location2title=”ایتون و اجزای ترکیبی و اتصال محل سکونت MY09 سیستم” size=largebackground=”#ffffffborder_color=”” show_footer=yesclass=”” id=””]

ایتون و اجزای ترکیبی و محل اتصال MY09 سیستم

[/fusion_modal][/fusion_builder_column][/fusion_builder_row][/fusion_builder_container][fusion_builder_container hundred_percent=nohundred_percent_height=nohundred_percent_height_scroll=nohundred_percent_height_center_content=yesequal_height_columns=nomenu_anchor=”” hide_on_mobile=small-visibility,medium-visibility,large-visibilitystatus=publishedpublish_date=”” class=”” id=”” background_color=”” background_image=”” background_position=center centerbackground_repeat=no-repeatfade=nobackground_parallax=noneenable_mobile=noparallax_speed=”0.3″ video_mp4=”” video_webm=”” video_ogv=”” video_url=”” video_aspect_ratio=”16:9″ video_loop=yesvideo_mute=yesvideo_preview_image=”” border_size=”” border_color=”” border_style=solidmargin_top=”” margin_bottom=”” padding_top=”” padding_right=”” padding_bottom=”” padding_left=””][fusion_builder_row][fusion_builder_column type=”1_1layout=”1_1spacing=”” center_content=nolink=”” target=_selfmin_height=”” hide_on_mobile=small-visibility,medium-visibility,large-visibilityclass=”” id=”” background_color=”” background_image=”” background_image_id=”” background_position=left topbackground_repeat=no-repeathover_type=noneborder_size=”0″ border_color=”” border_style=solidborder_position=allpadding_top=”” padding_right=”” padding_bottom=”” padding_left=”” margin_top=”” margin_bottom=”” animation_type=”” animation_direction=leftanimation_speed=”0.3″ animation_offset=”” last=no”][fusion_content_boxes layout=clean-horizontalcolumns=”2″ title_size=”18pxheading_size=”3″ title_color=”#ffffffbody_color=”#ffffffbackgroundcolor=”#4f4f4ficon=”” iconflip=”” iconrotate=”” iconspin=noiconcolor=”” icon_circle=”” icon_circle_radius=”” circlecolor=”” circlebordersize=”” circlebordercolor=”” outercirclebordersize=”” outercirclebordercolor=”” icon_size=”” icon_hover_type=”” hover_accent_color=”” image=”” image_id=”” image_width=”” image_height=”” link_type=”” button_span=”” link_area=”” link_target=”” icon_align=leftanimation_type=”” animation_delay=”” animation_offset=”” animation_direction=leftanimation_speed=”0.3″ margin_top=”” margin_bottom=”” hide_on_mobile=small-visibility,medium-visibility,large-visibilityclass=”” id=””][fusion_content_box title=گام 1. بررسی FMIS حاضر.backgroundcolor=”” icon=”” iconflip=”” iconrotate=”” iconspin=noiconcolor=”” circlecolor=”” circlebordersize=”” circlebordercolor=”” outercirclebordersize=”” outercirclebordercolor=”” image=”” image_id=”” image_width=”” image_height=”” link=”” linktext=”ادامه مطلب” link_target=”” animation_type=”” animation_direction=leftanimation_speed=”0.3″ animation_offset=””]

  1. نقد و بررسی و به دنبال هشدارها & هشدار.
  2. بازیابی کدهای گسل فعال و FMIS با ServiceRanger با استفاده از 9 راه تشخیصی اتصال.
    خطر: دیدن خاموش کردن خدمات با ولتاژ بالا و روشهای قدرت دهی بالا. دنبال روش برای جلوگیری از شوک, رایت و یا مرگ ناشی از نادرست به کار گرفته با ولتاژ بالا.
  3. که FMIS حضور دارند
    • اگر کد خطا 116 صندوق بین المللی پول 14 لیست شده است, رفتن به مرحله 9.
    • اگر کد خطا 116 صندوق بین المللی پول 10 لیست شده است, رفتن به مرحله 2.
    • If no Fault Codes are listed, The Service Switch was pushed in. به مرحله 10.

[/fusion_content_box][fusion_content_box title=گام 2. Verify Data Monitor parameters.backgroundcolor=”” icon=”” iconflip=”” iconrotate=”” iconspin=noiconcolor=”” circlecolor=”” circlebordersize=”” circlebordercolor=”” outercirclebordersize=”” outercirclebordercolor=”” image=”” image_id=”” image_width=”” image_height=”” link=”” linktext=”ادامه مطلب” link_target=”” animation_type=”” animation_direction=leftanimation_speed=”0.3″ animation_offset=””]

  1. کلید در.
  2. ServiceRanger اتصال به 9 راه تشخیصی اتصال در کابین.
  3. "اطلاعات مانیتور" گزینه را انتخاب کنید.
  4. View the Battery Pack Voltage (BCU1) PID 118 in the high- voltage Battery list:
    • If the Battery Pack Voltage (BCU1) PID 118 is greater than 200 ولت, رفتن به مرحله 3.
    • If the Battery Pack Voltage (BCU1) PID 118 کمتر است از 200 ولت, جایگزین حامل برق الکترونیک (PEC), سپس به گام 10.

[/fusion_content_box][/fusion_content_boxes][fusion_content_boxes layout=clean-horizontalcolumns=”2″ title_size=”18pxheading_size=”3″ title_color=”#ffffffbody_color=”#ffffffbackgroundcolor=”#4f4f4ficon=”” iconflip=”” iconrotate=”” iconspin=noiconcolor=”” icon_circle=”” icon_circle_radius=”” circlecolor=”” circlebordersize=”” circlebordercolor=”” outercirclebordersize=”” outercirclebordercolor=”” icon_size=”” icon_hover_type=”” hover_accent_color=”” image=”” image_id=”” image_width=”” image_height=”” link_type=”” button_span=”” link_area=”” link_target=”” icon_align=leftanimation_type=”” animation_delay=”” animation_offset=”” animation_direction=leftanimation_speed=”0.3″ margin_top=”” margin_bottom=”” hide_on_mobile=small-visibility,medium-visibility,large-visibilityclass=”” id=””][fusion_content_box title=گام 3. Verify continuity of Inverter connector circuits.backgroundcolor=”” icon=”” iconflip=”” iconrotate=”” iconspin=noiconcolor=”” circlecolor=”” circlebordersize=”” circlebordercolor=”” outercirclebordersize=”” outercirclebordercolor=”” image=”” image_id=”” image_width=”” image_height=”” link=”” linktext=”ادامه مطلب” link_target=”” animation_type=”” animation_direction=leftanimation_speed=”0.3″ animation_offset=””]

  1. خارج از Key.
  2. If the vehicle is not equipped with a DC/DC Converter or APG, skip this step.
  3. Using ASTM Class 0 electrical insulating rubber gloves with leather protectors, disconnect the DC cable for the DC/DC Converter and APG at the PEC.
  4. With the key off, temporarily remove the Lockout Bracket and pull the Service Switch out.
  5. کلید در.
  6. است کد خطا 116 صندوق بین المللی پول 10 still Active in ServiceRanger?
    • اگر کد خطا 116 صندوق بین المللی پول 10 is Active with the DC/DC Converter and APG disconnected, رفتن به مرحله 4.
    • اگر کد خطا 116 صندوق بین المللی پول 10 is no longer Active with the DC/DC Converter and APG disconnected, key off and reinstall the Lockout Bracket on the PEC. Replace the Power Electronics Carrier (PEC), سپس به گام 10.

[/fusion_content_box][fusion_content_box title=گام 4. Verify continuity of PEC connector circuits to ground.backgroundcolor=”” icon=”” iconflip=”” iconrotate=”” iconspin=”” iconcolor=”” circlecolor=”” circlebordersize=”” circlebordercolor=”” outercirclebordersize=”” outercirclebordercolor=”” image=”” image_id=”” image_width=”” image_height=”” link=”” linktext=”” link_target=”” animation_type=”” animation_direction=leftanimation_speed=”0.3″ animation_offset=””]

  1. خارج از Key.
  2. جدا PEC 19-راه اتصال.
  3. Temporarily remove the Lockout Bracket and pull the Service Switch out.
    توجه داشته باشید: Ensure the Key Switch is off.
  4. Measure resistance at the PEC 19-Way Connector Terminal at the following pins:
    • سنجاق 17 به پین 19
    • سنجاق 9 به پین 11
    • سنجاق 13 به پین 15
      • If the resistance between Pins 17 و پین 19 112-122 اهم و مقاومت از پین است 9 به پین 11 و پین 13 به پین 15 هر 33-37 اهم هستند, رفتن به مرحله 5.
      • اگر مقاومت خارج از محدوده, رفتن به مرحله 6.

[/fusion_content_box][/fusion_content_boxes][fusion_content_boxes layout=clean-horizontalcolumns=”2″ title_size=”18pxheading_size=”3″ title_color=”#ffffffbody_color=”#ffffffbackgroundcolor=”#4f4f4ficon=”” iconflip=”” iconrotate=”” iconspin=noiconcolor=”” icon_circle=”” icon_circle_radius=”” circlecolor=”” circlebordersize=”” circlebordercolor=”” outercirclebordersize=”” outercirclebordercolor=”” icon_size=”” icon_hover_type=”” hover_accent_color=”” image=”” image_id=”” image_width=”” image_height=”” link_type=”” button_span=”” link_area=”” link_target=”” icon_align=leftanimation_type=”” animation_delay=”” animation_offset=”” animation_direction=leftanimation_speed=”0.3″ margin_top=”” margin_bottom=”” hide_on_mobile=small-visibility,medium-visibility,large-visibilityclass=”” id=””][fusion_content_box title=گام 5. Verify continuity of Inverter connector circuits to ground.backgroundcolor=”” icon=”” iconflip=”” iconrotate=”” iconspin=noiconcolor=”” circlecolor=”” circlebordersize=”” circlebordercolor=”” outercirclebordersize=”” outercirclebordercolor=”” image=”” image_id=”” image_width=”” image_height=”” link=”” linktext=”ادامه مطلب” link_target=”” animation_type=”” animation_direction=leftanimation_speed=”0.3″ animation_offset=””]

  1. خارج از Key.
  2. Reconnect the PEC 19-Way Connector.
  3. جدا اینورتر 56-راه اتصال.
  4. Inspect the connector pins for damaged, corroded and/or loose wires.
  5. Measure resistance between the Inverter 56-Way Connector at the following pins:
    • سنجاق 29 به پین 37
    • سنجاق 30 به پین 35
    • سنجاق 31 به پین 36 توجه داشته باشید: به آرامی خم اینورتر 56-راه اتصال مهار در نزدیکی اتصال حالی که نظارت بر مقادیر مقاومت.
      • اگر مقاومت بین پین 29 و پین 37 112-122 اهم و مقاومت از پین است 30 به پین 35 و پین 31 به پین 36 هر 33-37 اهم هستند, push the Service Switch on the PEC and reinstall the Lockout Bracket. به مرحله 8.
      • اگر مقاومت خارج از محدوده, repair the Hybrid Harness between the PEC and Inverter, سپس به گام 10.

[/fusion_content_box][fusion_content_box title=گام 6. Verify continuity of PEC connector circuits.backgroundcolor=”” icon=”” iconflip=”” iconrotate=”” iconspin=”” iconcolor=”” circlecolor=”” circlebordersize=”” circlebordercolor=”” outercirclebordersize=”” outercirclebordercolor=”” image=”” image_id=”” image_width=”” image_height=”” link=”” linktext=”” link_target=”” animation_type=”” animation_direction=leftanimation_speed=”0.3″ animation_offset=””]

  1. خارج از Key.
  2. Remove the Air Filter Cover and Air Filter from the PEC. Refer to TRSM1000 for procedures.*
  3. An Inertia Switch is located at the front of the PEC inside the box and viewable when the Air Filter is removed.
  4. Using ASTM Class 0 electrical insulating rubber gloves with leather protectors, press the button on the top of the Inertia Switch until heard or felt a click. This switch must be depressed a set distance to reset the switch.
  5. Measure resistance at the PEC 19-Way Connector Terminal at the following pins:
    • سنجاق 17 به پین 19
    • سنجاق 9 به پین 11
    • سنجاق 13 به پین 15
      • qIf the resistance between Pin 17 و پین 19 112-122 اهم و مقاومت از پین است 9 به پین 11 و پین 13 به پین 15 هر 33-37 اهم هستند, the Inertia Switch was tripped. Test is complete. به مرحله 10.
      • اگر مقاومت خارج از محدوده, push in the Service Switch on the PEC and reinstall the Lockout Bracket, سپس به گام 7.

[/fusion_content_box][/fusion_content_boxes][fusion_content_boxes layout=clean-horizontalcolumns=”2″ title_size=”18pxheading_size=”3″ title_color=”#ffffffbody_color=”#ffffffbackgroundcolor=”#4f4f4ficon=”” iconflip=”” iconrotate=”” iconspin=noiconcolor=”” icon_circle=”” icon_circle_radius=”” circlecolor=”” circlebordersize=”” circlebordercolor=”” outercirclebordersize=”” outercirclebordercolor=”” icon_size=”” icon_hover_type=”” hover_accent_color=”” image=”” image_id=”” image_width=”” image_height=”” link_type=”” button_span=”” link_area=”” link_target=”” icon_align=leftanimation_type=”” animation_delay=”” animation_offset=”” animation_direction=leftanimation_speed=”0.3″ margin_top=”” margin_bottom=”” hide_on_mobile=small-visibility,medium-visibility,large-visibilityclass=”” id=””][fusion_content_box title=گام 7. Verify continuity of Inverter connector circuits.backgroundcolor=”” icon=”” iconflip=”” iconrotate=”” iconspin=noiconcolor=”” circlecolor=”” circlebordersize=”” circlebordercolor=”” outercirclebordersize=”” outercirclebordercolor=”” image=”” image_id=”” image_width=”” image_height=”” link=”” linktext=”ادامه مطلب” link_target=”” animation_type=”” animation_direction=leftanimation_speed=”0.3″ animation_offset=””]

  1. خارج از Key.
  2. Disconnect the DC High-Voltage Cable at the PEC Bulkhead and at the Inverter Bulkhead.
  3. Measure resistance between the Low-Voltage Interlock Pins on the PEC side of the DC High-Voltage Cable:
    توجه داشته باشید: The Interlock Pins are the two small spade terminals located in the same opening.

    • If the resistance is 0–0.3 ohms between the Interlock Loop Pins, جایگزین حامل برق الکترونیک (PEC), سپس به گام 10.
    • اگر مقاومت خارج از محدوده, جایگزین بالا شبکه کابل ولتاژ DC, سپس به گام 10.

[/fusion_content_box][fusion_content_box title=گام 8. Verify continuity of DC Cable from PEC to Inverter Connector circuits.backgroundcolor=”” icon=”” iconflip=”” iconrotate=”” iconspin=”” iconcolor=”” circlecolor=”” circlebordersize=”” circlebordercolor=”” outercirclebordersize=”” outercirclebordercolor=”” image=”” image_id=”” image_width=”” image_height=”” link=”” linktext=”” link_target=”” animation_type=”” animation_direction=leftanimation_speed=”0.3″ animation_offset=””]

  1. خارج از Key.
  2. Disconnect the DC High-Voltage Cable at the PEC Bulkhead and the Inverter Bulkhead.
  3. Measure the resistance of each high-voltage circuit on the cable:
    • If the resistance of each high-voltage circuit in the cable is 1 اهم یا کمتر, جایگزین اینورتر, سپس به گام 10.
    • اگر مقاومت خارج از محدوده, replace the DC High-Voltage Cable, سپس به گام 10.

[/fusion_content_box][/fusion_content_boxes][fusion_content_boxes layout=clean-horizontalcolumns=”2″ title_size=”18pxheading_size=”3″ title_color=”#ffffffbody_color=”#ffffffbackgroundcolor=”#4f4f4ficon=”” iconflip=”” iconrotate=”” iconspin=noiconcolor=”” icon_circle=”” icon_circle_radius=”” circlecolor=”” circlebordersize=”” circlebordercolor=”” outercirclebordersize=”” outercirclebordercolor=”” icon_size=”” icon_hover_type=”” hover_accent_color=”#f41000image=”” image_id=”” image_width=”” image_height=”” link_type=”” button_span=”” link_area=”” link_target=”” icon_align=leftanimation_type=”” animation_delay=”” animation_offset=”” animation_direction=leftanimation_speed=”0.3″ margin_top=”” margin_bottom=”” hide_on_mobile=small-visibility,medium-visibility,large-visibilityclass=”” id=””][fusion_content_box title=گام 9. Verify Data Monitor parameters.backgroundcolor=”” icon=”” iconflip=”” iconrotate=”” iconspin=”” iconcolor=”” circlecolor=”” circlebordersize=”” circlebordercolor=”” outercirclebordersize=”” outercirclebordercolor=”” image=”” image_id=”” image_width=”” image_height=”” link=”” linktext=”” link_target=”” animation_type=”” animation_direction=leftanimation_speed=”0.3″ animation_offset=””]

  1. ServiceRanger اتصال به 9 راه تشخیصی اتصال در کابین.
  2. "اطلاعات مانیتور" گزینه را انتخاب کنید.
  3. View the following parameters in the High-Voltage Battery list.
    • Battery Pack Voltage (BCU1) PID 118
    • Battery Voltage PID 116
      • If the voltage readings on PID 116 و PID 118 are within 10 ولت از یکدیگر, جایگزین حامل برق الکترونیک (PEC), سپس به گام 10.
      • If the voltage readings on PID 116 و PID 118 are greater than 10 ولت از یکدیگر, جایگزین اینورتر, سپس به گام 10.

[/fusion_content_box][fusion_content_box title=گام 10. بررسی تعمیر.backgroundcolor=”” icon=”” iconflip=”” iconrotate=”” iconspin=noiconcolor=”” circlecolor=”” circlebordersize=”” circlebordercolor=”” outercirclebordersize=”” outercirclebordercolor=”” image=”” image_id=”” image_width=”” image_height=”” link=”” linktext=”ادامه مطلب” link_target=”” animation_type=”” animation_direction=leftanimation_speed=”0.3″ animation_offset=””]

  1. خارج از Key.
  2. دوباره به هم متصل تمام اتصالات و کابل منفی باتری.
  3. کلید در.
  4. کد پاک کردن, دیدن گسل غیر فعال روشن.
  5. رانندگی وسیله نقلیه و تلاش برای تنظیم مجدد کد.
  6. بررسی برای کدهای, دیدن نمایش گسل های فعال و غیر فعال.
    • اگر هیچ کد, تست کامل شده است.
    • اگر کد خطا 116 ظاهر می شود, با ایتون تماس بگیرید 1- 800-826-کمک (4357). Repeat this Step (گام 10).
    • اگر یک کد دیگر از 116 ظاهر می شود, دیدن گسل فهرست کد.

[/fusion_content_box][/fusion_content_boxes][/fusion_builder_column][/fusion_builder_row][/fusion_builder_container][fusion_global id=”13788″]