[fusion_builder_container hundred_percent=nohundred_percent_height=nohundred_percent_height_scroll=nohundred_percent_height_center_content=yesequal_height_columns=nomenu_anchor=”” hide_on_mobile=small-visibility,medium-visibility,large-visibilitystatus=publishedpublish_date=”” class=”” id=”” background_color=”” background_image=”” background_position=center centerbackground_repeat=no-repeatfade=nobackground_parallax=noneenable_mobile=noparallax_speed=”0.3″ video_mp4=”” video_webm=”” video_ogv=”” video_url=”” video_aspect_ratio=”16:9″ video_loop=yesvideo_mute=yesvideo_preview_image=”” border_size=”” border_color=”” border_style=solidmargin_top=”35″ margin_bottom=”” padding_top=”” padding_right=”” padding_bottom=”” padding_left=””][fusion_builder_row][fusion_builder_column type=”1_1layout=”1_1spacing=”” center_content=nolink=”” target=_selfmin_height=”” hide_on_mobile=small-visibility,medium-visibility,large-visibilityclass=”” id=”” background_color=”” background_image=”” background_image_id=”” background_position=left topbackground_repeat=no-repeathover_type=noneborder_size=”0″ border_color=”” border_style=solidborder_position=allpadding_top=”” padding_right=”” padding_bottom=”” padding_left=”” margin_top=”” margin_bottom=”” animation_type=”” animation_direction=leftanimation_speed=”0.3″ animation_offset=”” last=no”][fusion_text columns=”” column_min_width=”” column_spacing=”” rule_style=defaultrule_size=”” rule_color=”” hide_on_mobile=small-visibility,medium-visibility,large-visibilityclass=”” id=””]

Eaton Fuller Hybrid Prevodovka chybový kód 116 – High Voltage Relays -(MY08 Systems)

[/fusion_text][/fusion_builder_column][/fusion_builder_row][/fusion_builder_container][fusion_builder_container hundred_percent=nohundred_percent_height=nohundred_percent_height_scroll=nohundred_percent_height_center_content=yesequal_height_columns=nomenu_anchor=”” hide_on_mobile=small-visibility,medium-visibility,large-visibilitystatus=publishedpublish_date=”” class=”” id=”” background_color=”” background_image=”” background_position=center centerbackground_repeat=no-repeatfade=nobackground_parallax=noneenable_mobile=noparallax_speed=”0.3″ video_mp4=”” video_webm=”” video_ogv=”” video_url=”” video_aspect_ratio=”16:9″ video_loop=yesvideo_mute=yesvideo_preview_image=”” border_size=”” border_color=”” border_style=solidmargin_top=”” margin_bottom=”” padding_top=”” padding_right=”” padding_bottom=”” padding_left=””][fusion_builder_row][fusion_builder_column type=”1_1layout=”1_1spacing=”” center_content=nolink=”” target=_selfmin_height=”” hide_on_mobile=small-visibility,medium-visibility,large-visibilityclass=”” id=”” background_color=”” background_image=”” background_image_id=”” background_position=left topbackground_repeat=no-repeathover_type=noneborder_size=”0″ border_color=”” border_style=solidborder_position=allpadding_top=”” padding_right=”” padding_bottom=”” padding_left=”” margin_top=”” margin_bottom=”” animation_type=”” animation_direction=leftanimation_speed=”0.3″ animation_offset=”” last=no”][fusion_text columns=”” column_min_width=”” column_spacing=”” rule_style=defaultrule_size=”” rule_color=”” hide_on_mobile=small-visibility,medium-visibility,large-visibilityclass=”” id=””]

Porucha kód pre Eaton hybridných modelov Systém pohonov (MY08) EH-8E306A-U, EH-8E306A-UPG, EH-8E306A-UP, EH-8E306A-CD, EH-8E306A-T, EH-6E606B-CD. Prečítajte si nižšie sa dozviete, ako sa skúšku, vyčistiť a opraviť chyby chybový kód pre Freightliner, gumák, Peterbilt, Kenworth, volvo, medzinárodný, a ťažké nákladné auto a vybavenie. The High-Voltage Relays are located inside the Power Electronics Carrier (PEC) V jednotke Relay Box. There is 1 precharge relay on the positive side, an additional relay on the positive, a 1 on the negative for a total of 3. Tieto relé sú normálne otvorené, keď je systém vypnutý. Relé sú ovládané pomocou frekvenčného meniča.

chybový kód 116 – High Voltage Relays Detection

Tieto predpoklady musia byť splnené skôr, ako systém zistí poruchu:

  • napäťový striedač zapaľovania je väčšia ako 7 voltov a menej ako 16 voltov.

Poznámka: Pri odstraňovaní neaktívne kód odkazovať na Režim produkt Diagnostic (PDM)

Podmienky Set Code Fault Active

  • IMF 10 is set when the Inverter detects the input voltage measured at the capacitor is less than 210 volts within 3 seconds after the sub-relay closed in the Relay Box.
  • IMF 14 is set when only the negative relay in the Relay Box is on and capacitor voltage decreases less than 10 volts/5 seconds when initial capacitor voltage was greater than 200 volts and motor speed less than 500 min-1, or there is a detect error in the initial check.

Fallback Ak chybový kód 116 je nastavený sú splnené tieto podmienky:

  • Amber "Check Hybrid" bliká na FMI 10 and remains solid for FMI 14.
  • Porucha je uložený v pamäti HCM.
  • Menič vypne systém vysokého napätia off.
  • HCM naďalej riadiť hybridným pohonom v režime vznetového iba.
  • Prenosové predvolený začať výbavu do 1..

[/fusion_text][fusion_text columns=”” column_min_width=”” column_spacing=”” rule_style=defaultrule_size=”” rule_color=”” hide_on_mobile=small-visibility,medium-visibility,large-visibilityclass=”” id=””]

Podmienky, ktorým je nastavený ako chybový kód deaktivovať

Iba Neaktívne závady môžu byť vymazané z oddelenia Transmission Control Electronic (TECU) alebo HCM histórie pomocou ServiceRanger. TECU automaticky vymaže chyby z histórie po 200 hodiny a HCM automaticky vymaže chyby z histórie po poruche je neaktívna 200 hodiny.

Tento chybový kód môže byť spôsobený niektorou z nasledovných:

  • IMF 10
    • PEC
    • APG
    • menič
    • DC high-voltage cable
    • DC cable interlock loops
    • zotrvačnosť Spínač
    • servisné spínač
  • IMF 14
    • menič
    • PEC

[/fusion_text][/fusion_builder_column][/fusion_builder_row][/fusion_builder_container][fusion_builder_container hundred_percent=nohundred_percent_height=nohundred_percent_height_scroll=nohundred_percent_height_center_content=yesequal_height_columns=nomenu_anchor=”” hide_on_mobile=small-visibility,medium-visibility,large-visibilitystatus=publishedpublish_date=”” class=”” id=”” background_color=”” background_image=”” background_position=center centerbackground_repeat=no-repeatfade=nobackground_parallax=noneenable_mobile=noparallax_speed=”0.3″ video_mp4=”” video_webm=”” video_ogv=”” video_url=”” video_aspect_ratio=”16:9″ video_loop=yesvideo_mute=yesvideo_preview_image=”” border_size=”” border_color=”” border_style=solidmargin_top=”” margin_bottom=”” padding_top=”” padding_right=”” padding_bottom=”” padding_left=””][fusion_builder_row][fusion_builder_column type=”1_1layout=”1_1spacing=”” center_content=nolink=”” target=_selfmin_height=”” hide_on_mobile=small-visibility,medium-visibility,large-visibilityclass=”” id=”” background_color=”” background_image=”” background_image_id=”” background_position=left topbackground_repeat=no-repeathover_type=noneborder_size=”0″ border_color=”” border_style=solidborder_position=allpadding_top=”” padding_right=”” padding_bottom=”” padding_left=”” margin_top=”” margin_bottom=”” animation_type=”” animation_direction=leftanimation_speed=”0.3″ animation_offset=”” last=no”][fusion_text columns=”” column_min_width=”” column_spacing=”” rule_style=defaultrule_size=”” rule_color=”” hide_on_mobile=small-visibility,medium-visibility,large-visibilityclass=”” id=””]

chybový kód 116 – High Voltage Relays Test

[/fusion_text][/fusion_builder_column][/fusion_builder_row][/fusion_builder_container][fusion_builder_container hundred_percent=nohundred_percent_height=nohundred_percent_height_scroll=nohundred_percent_height_center_content=yesequal_height_columns=nomenu_anchor=”” hide_on_mobile=small-visibility,medium-visibility,large-visibilitystatus=publishedpublish_date=”” class=”” id=”” background_color=”” background_image=”” background_position=center centerbackground_repeat=no-repeatfade=nobackground_parallax=noneenable_mobile=noparallax_speed=”0.3″ video_mp4=”” video_webm=”” video_ogv=”” video_url=”” video_aspect_ratio=”16:9″ video_loop=yesvideo_mute=yesvideo_preview_image=”” border_size=”” border_color=”” border_style=solidmargin_top=”” margin_bottom=”” padding_top=”” padding_right=”” padding_bottom=”” padding_left=””][fusion_builder_row][fusion_builder_column type=”1_1layout=”1_1spacing=”” center_content=nolink=”” target=_selfmin_height=”” hide_on_mobile=small-visibility,medium-visibility,large-visibilityclass=”” id=”” background_color=”” background_image=”” background_image_id=”” background_position=left topbackground_repeat=no-repeathover_type=noneborder_size=”0″ border_color=”” border_style=solidborder_position=allpadding_top=”” padding_right=”” padding_bottom=”” padding_left=”” margin_top=”” margin_bottom=”” animation_type=”” animation_direction=leftanimation_speed=”0.3″ animation_offset=”” last=no”][fusion_text columns=”” column_min_width=”” column_spacing=”” rule_style=defaultrule_size=”” rule_color=”” hide_on_mobile=small-visibility,medium-visibility,large-visibilityclass=”” id=””]

Komponentný Identifikačné MY08 Systems:
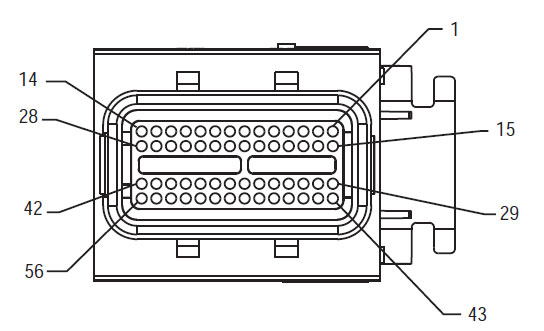
[/fusion_text][/fusion_builder_column][/fusion_builder_row][/fusion_builder_container][fusion_builder_container hundred_percent=yeshundred_percent_height=nohundred_percent_height_scroll=nohundred_percent_height_center_content=yesequal_height_columns=nomenu_anchor=”” hide_on_mobile=small-visibility,medium-visibility,large-visibilitystatus=publishedpublish_date=”” class=”” id=”” background_color=”” background_image=”” background_position=center centerbackground_repeat=no-repeatfade=nobackground_parallax=noneenable_mobile=noparallax_speed=”0.3″ video_mp4=”” video_webm=”” video_ogv=”” video_url=”” video_aspect_ratio=”16:9″ video_loop=yesvideo_mute=yesvideo_preview_image=”” border_size=”” border_color=”” border_style=solidmargin_top=”” margin_bottom=”” padding_top=”” padding_right=”10%” padding_bottom=”” padding_left=”10%”][fusion_builder_row][fusion_builder_column type=”1_3layout=”1_3spacing=”” center_content=nolink=”” target=_selfmin_height=”” hide_on_mobile=small-visibility,medium-visibility,large-visibilityclass=”” id=”” background_color=”” background_image=”” background_image_id=”” background_position=left topbackground_repeat=no-repeathover_type=noneborder_size=”0″ border_color=”” border_style=solidborder_position=allpadding_top=”” padding_right=”” padding_bottom=”” padding_left=”” margin_top=”” margin_bottom=”” animation_type=”” animation_direction=leftanimation_speed=”0.3″ animation_offset=”” last=no”][fusion_imageframe image_id=”14474|fullmax_width=”” style_type=”” blur=”” stylecolor=”” hover_type=nonebordersize=”” bordercolor=”” borderradius=”” align=centerlightbox=nogallery_id=”” lightbox_image=”” lightbox_image_id=”” alt=”Delphi 56-Way párenie konektor View” link=”” linktarget=_selfhide_on_mobile=small-visibility,medium-visibility,large-visibilityclass=”” id=”” animation_type=”” animation_direction=leftanimation_speed=”0.3″ animation_offset=””]https://www.globaltransmissionsupply.com/wp-content/uploads/Inverter-56-Way-Mating-Connector-View.jpg[/fusion_imageframe][fusion_text columns=”” column_min_width=”” column_spacing=”” rule_style=defaultrule_size=”” rule_color=”” hide_on_mobile=small-visibility,medium-visibility,large-visibilityclass=”” id=””]

56-Spôsob párenie Connector View

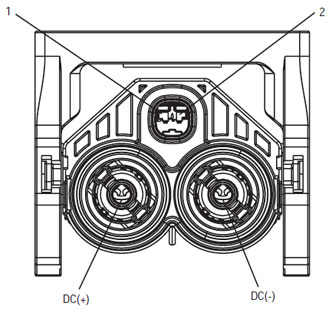
[/fusion_text][/fusion_builder_column][fusion_builder_column type=”1_3layout=”1_3spacing=”” center_content=nolink=”” target=_selfmin_height=”” hide_on_mobile=small-visibility,medium-visibility,large-visibilityclass=”” id=”” background_color=”” background_image=”” background_image_id=”” background_position=left topbackground_repeat=no-repeathover_type=noneborder_size=”0″ border_color=”” border_style=solidborder_position=allpadding_top=”” padding_right=”” padding_bottom=”” padding_left=”” margin_top=”” margin_bottom=”” animation_type=”” animation_direction=leftanimation_speed=”0.3″ animation_offset=”” last=no”][fusion_imageframe image_id=”14635|fullmax_width=”” style_type=”” blur=”” stylecolor=”” hover_type=nonebordersize=”” bordercolor=”” borderradius=”” align=centerlightbox=nogallery_id=”” lightbox_image=”” lightbox_image_id=”” alt=”High Voltage DC konektor View Yazaki Connector” link=”” linktarget=_selfhide_on_mobile=small-visibility,medium-visibility,large-visibilityclass=”” id=”” animation_type=”” animation_direction=leftanimation_speed=”0.3″ animation_offset=””]https://www.globaltransmissionsupply.com/wp-content/uploads/High-Voltage-DC-Connector-View.jpg[/fusion_imageframe][fusion_text columns=”” column_min_width=”” column_spacing=”” rule_style=defaultrule_size=”” rule_color=”” hide_on_mobile=small-visibility,medium-visibility,large-visibilityclass=”” id=””]

High Voltage DC konektor View Yazaki Connector

[/fusion_text][/fusion_builder_column][fusion_builder_column type=”1_3layout=”1_3spacing=”” center_content=nolink=”” target=_selfmin_height=”” hide_on_mobile=small-visibility,medium-visibility,large-visibilityclass=”” id=”” background_color=”” background_image=”” background_image_id=”” background_position=left topbackground_repeat=no-repeathover_type=noneborder_size=”0″ border_color=”” border_style=solidborder_position=allpadding_top=”” padding_right=”” padding_bottom=”” padding_left=”” margin_top=”” margin_bottom=”” animation_type=”” animation_direction=leftanimation_speed=”0.3″ animation_offset=”” last=no”][fusion_imageframe image_id=”14213|mediummax_width=”” style_type=”” blur=”” stylecolor=”” hover_type=nonebordersize=”” bordercolor=”” borderradius=”” align=centerlightbox=nogallery_id=”” lightbox_image=”” lightbox_image_id=”” alt=Mating Connector View Deutsch 19 – spôsob” link=”” linktarget=_selfhide_on_mobile=small-visibility,medium-visibility,large-visibilityclass=”” id=”” animation_type=”” animation_direction=leftanimation_speed=”0.3″ animation_offset=””]https://www.globaltransmissionsupply.com/wp-content/uploads/Eaton-Fuller-Harness-Connector-View-300×289.jpg[/fusion_imageframe][fusion_text columns=”” column_min_width=”” column_spacing=”” rule_style=defaultrule_size=”” rule_color=”” hide_on_mobile=small-visibility,medium-visibility,large-visibilityclass=”” id=””]

Mating Connector View Deutsch 19 – spôsob

[/fusion_text][/fusion_builder_column][/fusion_builder_row][/fusion_builder_container][fusion_builder_container hundred_percent=nohundred_percent_height=nohundred_percent_height_scroll=nohundred_percent_height_center_content=yesequal_height_columns=nomenu_anchor=”” hide_on_mobile=small-visibility,medium-visibility,large-visibilitystatus=publishedpublish_date=”” class=”” id=”” background_color=”” background_image=”” background_position=center centerbackground_repeat=no-repeatfade=nobackground_parallax=noneenable_mobile=noparallax_speed=”0.3″ video_mp4=”” video_webm=”” video_ogv=”” video_url=”” video_aspect_ratio=”16:9″ video_loop=yesvideo_mute=yesvideo_preview_image=”” border_size=”” border_color=”” border_style=solidmargin_top=”” margin_bottom=”” padding_top=”” padding_right=”” padding_bottom=”” padding_left=””][fusion_builder_row][fusion_builder_column type=”1_1layout=”1_1spacing=”” center_content=nolink=”” target=_selfmin_height=”” hide_on_mobile=small-visibility,medium-visibility,large-visibilityclass=”” id=”” background_image_id=”” background_color=”#000000″ background_image=”” background_position=left topundefined=”” background_repeat=no-repeathover_type=noneborder_size=”0″ border_color=”” border_style=solidborder_position=allpadding_top=”” padding_right=”” padding_bottom=”” padding_left=”” margin_top=”” margin_bottom=”” animation_type=”” animation_direction=leftanimation_speed=”0.3″ animation_offset=”” last=no”][fusion_text columns=”” column_min_width=”” column_spacing=”” rule_style=defaultrule_size=”” rule_color=”” hide_on_mobile=small-visibility,medium-visibility,large-visibilityclass=”” id=””]

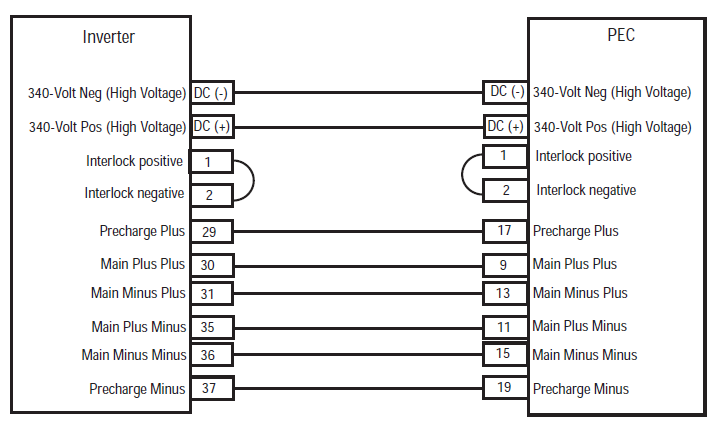
POZNÁMKA: odkazovať na Eaton Hybrid komponentov a konektorov Umiestnenie pre konektory miestach v MY08 Systems
[/fusion_text][/fusion_builder_column][fusion_builder_column type=”1_1layout=”1_1spacing=”” center_content=nolink=”” target=_selfmin_height=”” hide_on_mobile=small-visibility,medium-visibility,large-visibilityclass=”” id=”” background_color=”” background_image=”” background_image_id=”” background_position=left topbackground_repeat=no-repeathover_type=noneborder_size=”0″ border_color=”” border_style=solidborder_position=allpadding_top=”” padding_right=”” padding_bottom=”” padding_left=”” margin_top=”” margin_bottom=”” animation_type=”” animation_direction=leftanimation_speed=”0.3″ animation_offset=”” last=no”][fusion_imageframe image_id=”14666|fullmax_width=”” style_type=”” blur=”” stylecolor=”” hover_type=nonebordersize=”” bordercolor=”” borderradius=”” align=centerlightbox=nogallery_id=”” lightbox_image=”” lightbox_image_id=”” alt=Inverter PEC connectors Eaton Fuller Hybrid transmissionlink=”” linktarget=_selfhide_on_mobile=small-visibility,medium-visibility,large-visibilityclass=”” id=”” animation_type=”” animation_direction=leftanimation_speed=”0.3″ animation_offset=””]https://www.globaltransmissionsupply.com/wp-content/uploads/Inverter-PEC-connectors.png[/fusion_imageframe][/fusion_builder_column][/fusion_builder_row][/fusion_builder_container][fusion_builder_container hundred_percent=nohundred_percent_height=nohundred_percent_height_scroll=nohundred_percent_height_center_content=yesequal_height_columns=nomenu_anchor=”” hide_on_mobile=small-visibility,medium-visibility,large-visibilitystatus=publishedpublish_date=”” class=”” id=”” background_color=”” background_image=”” background_position=center centerbackground_repeat=no-repeatfade=nobackground_parallax=noneenable_mobile=noparallax_speed=”0.3″ video_mp4=”” video_webm=”” video_ogv=”” video_url=”” video_aspect_ratio=”16:9″ video_loop=yesvideo_mute=yesvideo_preview_image=”” border_size=”” border_color=”” border_style=solidmargin_top=”” margin_bottom=”” padding_top=”” padding_right=”” padding_bottom=”” padding_left=””][fusion_builder_row][fusion_builder_column type=”1_1layout=”1_1spacing=”” center_content=nolink=”” target=_selfmin_height=”” hide_on_mobile=small-visibility,medium-visibility,large-visibilityclass=”” id=”” background_color=”” background_image=”” background_image_id=”” background_position=left topbackground_repeat=no-repeathover_type=noneborder_size=”0″ border_color=”” border_style=solidborder_position=allpadding_top=”” padding_right=”” padding_bottom=”” padding_left=”” margin_top=”” margin_bottom=”” animation_type=”” animation_direction=leftanimation_speed=”0.3″ animation_offset=”” last=no”][fusion_modal name=warnings_cautionstitle=”varovanie & Upozornenie” size=largebackground=”” border_color=”” show_footer=yesclass=”” id=””]nebezpečenstvo: Nebezpečenstvo znamená, budete vážne zranený alebo zabitý, ak nenasledujú popísaného postupu.
Výstraha: Varovanie znamená bezprostredné ohrozenie, čo by mohlo viesť k vážnemu zraneniu, ak nechcete sledovať označenú postup.
pozor: Pozor označuje poškodenie vozidla alebo vlastnosť by mohla nastať, ak nechcete sledovať označenú postup.

Poznámka: Poznámka ukazuje ďalšie podrobnosti, ktoré sa pri diagnostike alebo opravu komponentu / systému.

Postupujte podľa pokynov v uvedenom poradí, aby nedošlo k poraneniu:

1. V prípade, že kužele vysokého napätia sa pohybujú okolo vozidla a blokovanie je nainštalovaný na PEC, jediný človek, ktorý by mal byť povolený štart vozidla je osoba, ktorá podpísala uzamknutie značku.
2. Pred začatím prác na vozidle alebo opustenie kabíny, keď je motor v chode, mali by ste umiestniť radiacu páku na "N" zatiahnuť ručnú brzdu, a zablokovanie kolesa.
3. Z bezpečnostných dôvodov, vždy v zábere s prevádzkovej brzdy pred výberom prevodových polôh od "N."
4. Pred začatím vozidlo bude vždy sedieť na sedadle vodiča, zvoľte "N" na ovládací prvok smeny, a nastavenie parkovacej brzdy.
5. Vo vozidlách s ePTO, motor a / alebo
Motor / generátor môže spustiť v režime ePTO. Nikdy nevykonávajte údržbu alebo práca na vozidle, V tomto režime.
6. 12-Volt Battery pozitívne (+) a negatívne (-) musí byť odpojený pred každým zváraním na ľubovoľné hybridného vozidlá vybavené.

pozor: Postupujte podľa uvedených postupov v uvedenom poradí, aby sa zabránilo poruche alebo poškodeniu zariadenia.
pozor: Neuvoľňujú parkovaciu brzdu alebo sa pokúsiť zvoliť rýchlostný stupeň, kým je tlak vzduchu na správnej úrovni.
pozor: Aby nedošlo k poškodeniu prevodovky počas ťažného mieste radiacu páku v "N" a zdvihnite hnacie kolesá od zeme, alebo odpojiť hnacie ústrojenstvo.

High-napätie Varovanie & Upozornenie

  • Používať CO2 alebo suchý chemický hasiace zariadenie.
  • vedenia vysokého napätia sa vzťahuje na oranžovú izoláciou alebo zvinutých potrubných a označených výstražnými štítky na konektoroch.
  • Všetky Eaton® Hybridný motor / Elektromobily budú označené ako, Hybrid’ Na vonkajšej strane vozidla, spolu s označením posunu na palubnej doske.
  • Pozri OEM pre špecifické umiestnenie podvozku namontovaná hybridných súčiastok.
  • Nerežte do oranžových vysokonapäťových káblov.
  • Nerežte do alebo otvoriť PEC.
  • Nerežte do alebo otvorte DC / DC konvertor.
  • NOT nakrájame alebo otvorenie striedača.

Vyrovnávacia zóna musí byť nastavený a vysokého napätia izolované gumové rukavice (trieda 0 s koženými chráničmi) sú povinní pred začatím práce na vysokého napätia. Nedodržanie týchto pokynov môže viesť k vážnemu zraneniu alebo smrti.
Gumové rukavice izoláciou, ktoré musia byť nosené pri práci na systéme vysokého napätia sú class 0 s koženými chráničmi. Gumové rukavice by mali byť testované pred každým použitím nasledujúceho postupu gumové rukavice izolácie testovanie nájdené v "Diagnostické nástroje / Servisná publikácie" na strane 6. Nedodržanie týchto pokynov môže viesť k vážnemu zraneniu alebo smrti.
Pred kontrolou alebo prácou na akýchkoľvek vysokonapäťových káblov alebo komponentov na "High-Voltage Service vypnutie a Power-up procedúra" na strane 4 by mali byť dodržiavané. Nedodržanie týchto pokynov môže viesť k vážnemu zraneniu alebo smrti.
Zariadenie Lockout a Tagout by mali byť odstránené len technik, ktorý umiestnil zariadenie uzamknutie a prívesným štítkom na vozidle. Nedodržanie týchto pokynov môže viesť k vážnemu zraneniu alebo smrti.
Vysokonapäťové v gumové rukavice (trieda 0 s koženými chráničmi) musia nosiť pri práci na akýkoľvek
vysokonapäťové káble. "Služba Shutdown High-Voltage a Power-Up procedúra" na strane 4 musí byť pred a následne k odstráneniu akýchkoľvek vysokonapäťové káble. Nedodržanie týchto pokynov môže viesť k vážnemu zraneniu alebo smrti.
káble vysokého napätia a rozvody sú oranžové a obsahujú varovný štítok na konektory. Komponenty s vysokým napätím sú označené štítkom. Vysokonapäťové v gumové rukavice (trieda 0 s koženými chráničmi) musí byť použitý pri práci s niektorou z týchto zložiek. Nedodržanie týchto pokynov môže viesť k vážnemu zraneniu alebo smrti.

High-napätie Service vypnutie Postupy

High-Voltage Service Shutdown a postup Power-Up1. Sledujte "Voltage High-Work Area" procedúra.
2. Vyhľadajte červenú PEC servisný vypínač na prednej strane PEC a tlačiť vypnúť.
3. Odstráňte Service Kryt vypínača a nainštalovať uzamknutie držiak (J48506).
4. Pripevnite tag k uzamknutiu zátvorka.
5. Uistite sa, že prepínač PEC služby nemožno presunúť z polohy vypnuté.
6. Nechajte systém nastavený na minimum 5 minút k vybitiu vysokého napätia.
7. Pripojte ServiceRanger a zobrazenie dát monitora PID 116 s názvom "High-Voltage potenciál batérie." Use SPN 520323 pre pripojenie J1939 "Battery Voltage RB" (Relay Box).
8. Napätie by malo byť 30 voltov alebo menej. Ak je napätie vyššie ako 30 voltov, nefungujú na vozidle a kontaktné Eaton® na 1-800-826-HELP (4357).
9. Otočte kľúčom zapaľovania vypnúť a pokračovať opraviť alebo krok riešenie problémov.
Poznámka: Napätie klesne na nulu, keď je kľúč off.

High-Voltage Service Power-Up Postup

1. Nainštalovať všetky konektory s vysokým napätím do ich uzamknutých polôh.
2. Ak ste osoba, ktorá pracuje na vozidle, odobrať uzamknutie držiaku a značku.
3. Preinštalovať uzamknutie konzoly cez hlavný vypínač.
4. Vytiahnite hlavný vypínač a dajte set vozidiel pre 2 minúty.
5. Start vehicle when appropriate.[/fusion_modal][fusion_modal name=component_locationtitle=”Eaton Hybrid komponentov a konektorov Umiestnenie ” size=largebackground=”#ffffffborder_color=”” show_footer=yesclass=”” id=””]

Eaton Hybrid komponentov a konektorov Umiestnenie MY08 Systems

[/fusion_modal][fusion_modal name=component_location2title=”Eaton Hybrid komponentov a konektorov Umiestnenie MY09 Systems” size=largebackground=”#ffffffborder_color=”” show_footer=yesclass=”” id=””]

Eaton Hybrid komponentov a konektorov Umiestnenie MY09 Systems

[/fusion_modal][/fusion_builder_column][/fusion_builder_row][/fusion_builder_container][fusion_builder_container hundred_percent=nohundred_percent_height=nohundred_percent_height_scroll=nohundred_percent_height_center_content=yesequal_height_columns=nomenu_anchor=”” hide_on_mobile=small-visibility,medium-visibility,large-visibilitystatus=publishedpublish_date=”” class=”” id=”” background_color=”” background_image=”” background_position=center centerbackground_repeat=no-repeatfade=nobackground_parallax=noneenable_mobile=noparallax_speed=”0.3″ video_mp4=”” video_webm=”” video_ogv=”” video_url=”” video_aspect_ratio=”16:9″ video_loop=yesvideo_mute=yesvideo_preview_image=”” border_size=”” border_color=”” border_style=solidmargin_top=”” margin_bottom=”” padding_top=”” padding_right=”” padding_bottom=”” padding_left=””][fusion_builder_row][fusion_builder_column type=”1_1layout=”1_1spacing=”” center_content=nolink=”” target=_selfmin_height=”” hide_on_mobile=small-visibility,medium-visibility,large-visibilityclass=”” id=”” background_color=”” background_image=”” background_image_id=”” background_position=left topbackground_repeat=no-repeathover_type=noneborder_size=”0″ border_color=”” border_style=solidborder_position=allpadding_top=”” padding_right=”” padding_bottom=”” padding_left=”” margin_top=”” margin_bottom=”” animation_type=”” animation_direction=leftanimation_speed=”0.3″ animation_offset=”” last=no”][fusion_content_boxes layout=clean-horizontalcolumns=”2″ title_size=”18pxheading_size=”3″ title_color=”#ffffffbody_color=”#ffffffbackgroundcolor=”#4f4f4ficon=”” iconflip=”” iconrotate=”” iconspin=noiconcolor=”” icon_circle=”” icon_circle_radius=”” circlecolor=”” circlebordersize=”” circlebordercolor=”” outercirclebordersize=”” outercirclebordercolor=”” icon_size=”” icon_hover_type=”” hover_accent_color=”” image=”” image_id=”” image_width=”” image_height=”” link_type=”” button_span=”” link_area=”” link_target=”” icon_align=leftanimation_type=”” animation_delay=”” animation_offset=”” animation_direction=leftanimation_speed=”0.3″ margin_top=”” margin_bottom=”” hide_on_mobile=small-visibility,medium-visibility,large-visibilityclass=”” id=””][fusion_content_box title=STEP 1. Overiť FMIS darček.backgroundcolor=”” icon=”” iconflip=”” iconrotate=”” iconspin=noiconcolor=”” circlecolor=”” circlebordersize=”” circlebordercolor=”” outercirclebordersize=”” outercirclebordercolor=”” image=”” image_id=”” image_width=”” image_height=”” link=”” linktext=”Čítaj viac” link_target=”” animation_type=”” animation_direction=leftanimation_speed=”0.3″ animation_offset=””]

  1. Preskúmať a postupujte varovanie & Upozornenie.
  2. Načítať aktívny chybové kódy a FMIS s ServiceRanger pomocou 9-Way diagnostického konektora.
    nebezpečenstvo: vidieť High-Voltage Service Vypnutie a Power-Up Postupy. Postupujte podľa pokynov, aby sa zabránilo šoku, horieť alebo smrť neoprávnene manipulované vysokého napätia.
  3. Ktoré FMIS sú prítomné
    • Ak sa kód poruchy 116 IMF 14 je uvedená, prejdite na krok 9.
    • Ak sa kód poruchy 116 IMF 10 je uvedená, prejdite na krok 2.
    • If no Fault Codes are listed, The Service Switch was pushed in. Prejdite na krok 10.

[/fusion_content_box][fusion_content_box title=STEP 2. Verify Data Monitor parameters.backgroundcolor=”” icon=”” iconflip=”” iconrotate=”” iconspin=noiconcolor=”” circlecolor=”” circlebordersize=”” circlebordercolor=”” outercirclebordersize=”” outercirclebordercolor=”” image=”” image_id=”” image_width=”” image_height=”” link=”” linktext=”Čítaj viac” link_target=”” animation_type=”” animation_direction=leftanimation_speed=”0.3″ animation_offset=””]

  1. kľúčom k.
  2. Pripojte ServiceRanger do diagnostického konektora 9-Way v kabíne.
  3. Zvoľte "Monitor dát".
  4. View the Battery Pack Voltage (BCU1) PID 118 in the high- voltage Battery list:
    • If the Battery Pack Voltage (BCU1) PID 118 is greater than 200 voltov, prejdite na krok 3.
    • If the Battery Pack Voltage (BCU1) PID 118 je menej než 200 voltov, vymeniť Carrier Power Electronics (PEC), prejdite na krok 10.

[/fusion_content_box][/fusion_content_boxes][fusion_content_boxes layout=clean-horizontalcolumns=”2″ title_size=”18pxheading_size=”3″ title_color=”#ffffffbody_color=”#ffffffbackgroundcolor=”#4f4f4ficon=”” iconflip=”” iconrotate=”” iconspin=noiconcolor=”” icon_circle=”” icon_circle_radius=”” circlecolor=”” circlebordersize=”” circlebordercolor=”” outercirclebordersize=”” outercirclebordercolor=”” icon_size=”” icon_hover_type=”” hover_accent_color=”” image=”” image_id=”” image_width=”” image_height=”” link_type=”” button_span=”” link_area=”” link_target=”” icon_align=leftanimation_type=”” animation_delay=”” animation_offset=”” animation_direction=leftanimation_speed=”0.3″ margin_top=”” margin_bottom=”” hide_on_mobile=small-visibility,medium-visibility,large-visibilityclass=”” id=””][fusion_content_box title=STEP 3. Verify continuity of Inverter connector circuits.backgroundcolor=”” icon=”” iconflip=”” iconrotate=”” iconspin=noiconcolor=”” circlecolor=”” circlebordersize=”” circlebordercolor=”” outercirclebordersize=”” outercirclebordercolor=”” image=”” image_id=”” image_width=”” image_height=”” link=”” linktext=”Čítaj viac” link_target=”” animation_type=”” animation_direction=leftanimation_speed=”0.3″ animation_offset=””]

  1. Key off.
  2. If the vehicle is not equipped with a DC/DC Converter or APG, skip this step.
  3. Using ASTM Class 0 electrical insulating rubber gloves with leather protectors, disconnect the DC cable for the DC/DC Converter and APG at the PEC.
  4. With the key off, temporarily remove the Lockout Bracket and pull the Service Switch out.
  5. kľúčom k.
  6. Je chybový kód 116 IMF 10 still Active in ServiceRanger?
    • Ak sa kód poruchy 116 IMF 10 is Active with the DC/DC Converter and APG disconnected, prejdite na krok 4.
    • Ak sa kód poruchy 116 IMF 10 is no longer Active with the DC/DC Converter and APG disconnected, key off and reinstall the Lockout Bracket on the PEC. Replace the Power Electronics Carrier (PEC), prejdite na krok 10.

[/fusion_content_box][fusion_content_box title=STEP 4. Verify continuity of PEC connector circuits to ground.backgroundcolor=”” icon=”” iconflip=”” iconrotate=”” iconspin=”” iconcolor=”” circlecolor=”” circlebordersize=”” circlebordercolor=”” outercirclebordersize=”” outercirclebordercolor=”” image=”” image_id=”” image_width=”” image_height=”” link=”” linktext=”” link_target=”” animation_type=”” animation_direction=leftanimation_speed=”0.3″ animation_offset=””]

  1. Key off.
  2. Odpojte PEC 19-Way Connector.
  3. Temporarily remove the Lockout Bracket and pull the Service Switch out.
    Poznámka: Ensure the Key Switch is off.
  4. Measure resistance at the PEC 19-Way Connector Terminal at the following pins:
    • kolík 17 pripnúť 19
    • kolík 9 pripnúť 11
    • kolík 13 pripnúť 15
      • If the resistance between Pins 17 a Pin 19 je 112-122 ohmov a odpor Pin 9 pripnúť 11 a Pin 13 pripnúť 15 sú každý 33-37 ohmov, prejdite na krok 5.
      • Ak je odpor mimo rozsahu, prejdite na krok 6.

[/fusion_content_box][/fusion_content_boxes][fusion_content_boxes layout=clean-horizontalcolumns=”2″ title_size=”18pxheading_size=”3″ title_color=”#ffffffbody_color=”#ffffffbackgroundcolor=”#4f4f4ficon=”” iconflip=”” iconrotate=”” iconspin=noiconcolor=”” icon_circle=”” icon_circle_radius=”” circlecolor=”” circlebordersize=”” circlebordercolor=”” outercirclebordersize=”” outercirclebordercolor=”” icon_size=”” icon_hover_type=”” hover_accent_color=”” image=”” image_id=”” image_width=”” image_height=”” link_type=”” button_span=”” link_area=”” link_target=”” icon_align=leftanimation_type=”” animation_delay=”” animation_offset=”” animation_direction=leftanimation_speed=”0.3″ margin_top=”” margin_bottom=”” hide_on_mobile=small-visibility,medium-visibility,large-visibilityclass=”” id=””][fusion_content_box title=STEP 5. Verify continuity of Inverter connector circuits to ground.backgroundcolor=”” icon=”” iconflip=”” iconrotate=”” iconspin=noiconcolor=”” circlecolor=”” circlebordersize=”” circlebordercolor=”” outercirclebordersize=”” outercirclebordercolor=”” image=”” image_id=”” image_width=”” image_height=”” link=”” linktext=”Čítaj viac” link_target=”” animation_type=”” animation_direction=leftanimation_speed=”0.3″ animation_offset=””]

  1. Key off.
  2. Reconnect the PEC 19-Way Connector.
  3. Odpojenie striedače 56-Way Connector.
  4. Inspect the connector pins for damaged, corroded and/or loose wires.
  5. Measure resistance between the Inverter 56-Way Connector at the following pins:
    • kolík 29 pripnúť 37
    • kolík 30 pripnúť 35
    • kolík 31 pripnúť 36 Poznámka: Opatrne ohnite striedače 56-Way Connector Harness v blízkosti konektore pri sledovaní hodnôt odporu.
      • Ak je odpor medzi Pin 29 a Pin 37 je 112-122 ohmov a odpor Pin 30 pripnúť 35 a Pin 31 pripnúť 36 sú každý 33-37 ohmov, push the Service Switch on the PEC and reinstall the Lockout Bracket. Prejdite na krok 8.
      • Ak je odpor mimo rozsahu, repair the Hybrid Harness between the PEC and Inverter, prejdite na krok 10.

[/fusion_content_box][fusion_content_box title=STEP 6. Verify continuity of PEC connector circuits.backgroundcolor=”” icon=”” iconflip=”” iconrotate=”” iconspin=”” iconcolor=”” circlecolor=”” circlebordersize=”” circlebordercolor=”” outercirclebordersize=”” outercirclebordercolor=”” image=”” image_id=”” image_width=”” image_height=”” link=”” linktext=”” link_target=”” animation_type=”” animation_direction=leftanimation_speed=”0.3″ animation_offset=””]

  1. Key off.
  2. Remove the Air Filter Cover and Air Filter from the PEC. Refer to TRSM1000 for procedures.*
  3. An Inertia Switch is located at the front of the PEC inside the box and viewable when the Air Filter is removed.
  4. Using ASTM Class 0 electrical insulating rubber gloves with leather protectors, press the button on the top of the Inertia Switch until heard or felt a click. This switch must be depressed a set distance to reset the switch.
  5. Measure resistance at the PEC 19-Way Connector Terminal at the following pins:
    • kolík 17 pripnúť 19
    • kolík 9 pripnúť 11
    • kolík 13 pripnúť 15
      • qIf the resistance between Pin 17 a Pin 19 je 112-122 ohmov a odpor Pin 9 pripnúť 11 a Pin 13 pripnúť 15 sú každý 33-37 ohmov, the Inertia Switch was tripped. Test is complete. Prejdite na krok 10.
      • Ak je odpor mimo rozsahu, push in the Service Switch on the PEC and reinstall the Lockout Bracket, prejdite na krok 7.

[/fusion_content_box][/fusion_content_boxes][fusion_content_boxes layout=clean-horizontalcolumns=”2″ title_size=”18pxheading_size=”3″ title_color=”#ffffffbody_color=”#ffffffbackgroundcolor=”#4f4f4ficon=”” iconflip=”” iconrotate=”” iconspin=noiconcolor=”” icon_circle=”” icon_circle_radius=”” circlecolor=”” circlebordersize=”” circlebordercolor=”” outercirclebordersize=”” outercirclebordercolor=”” icon_size=”” icon_hover_type=”” hover_accent_color=”” image=”” image_id=”” image_width=”” image_height=”” link_type=”” button_span=”” link_area=”” link_target=”” icon_align=leftanimation_type=”” animation_delay=”” animation_offset=”” animation_direction=leftanimation_speed=”0.3″ margin_top=”” margin_bottom=”” hide_on_mobile=small-visibility,medium-visibility,large-visibilityclass=”” id=””][fusion_content_box title=STEP 7. Verify continuity of Inverter connector circuits.backgroundcolor=”” icon=”” iconflip=”” iconrotate=”” iconspin=noiconcolor=”” circlecolor=”” circlebordersize=”” circlebordercolor=”” outercirclebordersize=”” outercirclebordercolor=”” image=”” image_id=”” image_width=”” image_height=”” link=”” linktext=”Čítaj viac” link_target=”” animation_type=”” animation_direction=leftanimation_speed=”0.3″ animation_offset=””]

  1. Key off.
  2. Disconnect the DC High-Voltage Cable at the PEC Bulkhead and at the Inverter Bulkhead.
  3. Measure resistance between the Low-Voltage Interlock Pins on the PEC side of the DC High-Voltage Cable:
    Poznámka: The Interlock Pins are the two small spade terminals located in the same opening.

    • If the resistance is 0–0.3 ohms between the Interlock Loop Pins, vymeniť Carrier Power Electronics (PEC), prejdite na krok 10.
    • Ak je odpor mimo rozsahu, vymeniť vysokonapäťový kábel DC, prejdite na krok 10.

[/fusion_content_box][fusion_content_box title=STEP 8. Verify continuity of DC Cable from PEC to Inverter Connector circuits.backgroundcolor=”” icon=”” iconflip=”” iconrotate=”” iconspin=”” iconcolor=”” circlecolor=”” circlebordersize=”” circlebordercolor=”” outercirclebordersize=”” outercirclebordercolor=”” image=”” image_id=”” image_width=”” image_height=”” link=”” linktext=”” link_target=”” animation_type=”” animation_direction=leftanimation_speed=”0.3″ animation_offset=””]

  1. Key off.
  2. Disconnect the DC High-Voltage Cable at the PEC Bulkhead and the Inverter Bulkhead.
  3. Measure the resistance of each high-voltage circuit on the cable:
    • If the resistance of each high-voltage circuit in the cable is 1 ohm alebo nižšia, vymeniť striedače, prejdite na krok 10.
    • Ak je odpor mimo rozsahu, replace the DC High-Voltage Cable, prejdite na krok 10.

[/fusion_content_box][/fusion_content_boxes][fusion_content_boxes layout=clean-horizontalcolumns=”2″ title_size=”18pxheading_size=”3″ title_color=”#ffffffbody_color=”#ffffffbackgroundcolor=”#4f4f4ficon=”” iconflip=”” iconrotate=”” iconspin=noiconcolor=”” icon_circle=”” icon_circle_radius=”” circlecolor=”” circlebordersize=”” circlebordercolor=”” outercirclebordersize=”” outercirclebordercolor=”” icon_size=”” icon_hover_type=”” hover_accent_color=”#f41000image=”” image_id=”” image_width=”” image_height=”” link_type=”” button_span=”” link_area=”” link_target=”” icon_align=leftanimation_type=”” animation_delay=”” animation_offset=”” animation_direction=leftanimation_speed=”0.3″ margin_top=”” margin_bottom=”” hide_on_mobile=small-visibility,medium-visibility,large-visibilityclass=”” id=””][fusion_content_box title=STEP 9. Verify Data Monitor parameters.backgroundcolor=”” icon=”” iconflip=”” iconrotate=”” iconspin=”” iconcolor=”” circlecolor=”” circlebordersize=”” circlebordercolor=”” outercirclebordersize=”” outercirclebordercolor=”” image=”” image_id=”” image_width=”” image_height=”” link=”” linktext=”” link_target=”” animation_type=”” animation_direction=leftanimation_speed=”0.3″ animation_offset=””]

  1. Pripojte ServiceRanger do diagnostického konektora 9-Way v kabíne.
  2. Zvoľte "Monitor dát".
  3. View the following parameters in the High-Voltage Battery list.
    • Battery Pack Voltage (BCU1) PID 118
    • Battery Voltage PID 116
      • If the voltage readings on PID 116 a PID 118 are within 10 voltov na sebe, vymeniť Carrier Power Electronics (PEC), prejdite na krok 10.
      • If the voltage readings on PID 116 a PID 118 are greater than 10 voltov na sebe, vymeniť striedače, prejdite na krok 10.

[/fusion_content_box][fusion_content_box title=STEP 10. overte opravu.backgroundcolor=”” icon=”” iconflip=”” iconrotate=”” iconspin=noiconcolor=”” circlecolor=”” circlebordersize=”” circlebordercolor=”” outercirclebordersize=”” outercirclebordercolor=”” image=”” image_id=”” image_width=”” image_height=”” link=”” linktext=”Čítaj viac” link_target=”” animation_type=”” animation_direction=leftanimation_speed=”0.3″ animation_offset=””]

  1. Key off.
  2. Zapojte všetky konektory a záporný kábel batérie.
  3. kľúčom k.
  4. jasné kódy, vidieť Jasné Neaktívne Závady.
  5. Prejdite vozidlo a pokúsiť sa obnoviť kód.
  6. Skontrolujte, či kódy, vidieť Zobraziť aktívne a neaktívne Chyby.
    • Ak žiadne kódy, dokončenie testu.
    • Ak sa kód poruchy 116 objavia, kontaktujte spoločnosť Eaton na adrese 1- 800-826-POMOC (4357). Repeat this Step (krok 10).
    • Ak je kód iný ako 116 objavia, vidieť Porucha číselníku Register.

[/fusion_content_box][/fusion_content_boxes][/fusion_builder_column][/fusion_builder_row][/fusion_builder_container][fusion_global id=”13788″]