[fusion_builder_container hundred_percent=nohundred_percent_height=nohundred_percent_height_scroll=nohundred_percent_height_center_content=yesequal_height_columns=nomenu_anchor=”” hide_on_mobile=small-visibility,medium-visibility,large-visibilitystatus=publishedpublish_date=”” class=”” id=”” background_color=”” background_image=”” background_position=center centerbackground_repeat=no-repeatfade=nobackground_parallax=noneenable_mobile=noparallax_speed=”0.3″ video_mp4=”” video_webm=”” video_ogv=”” video_url=”” video_aspect_ratio=”16:9″ video_loop=yesvideo_mute=yesvideo_preview_image=”” border_size=”” border_color=”” border_style=solidmargin_top=”35″ margin_bottom=”” padding_top=”” padding_right=”” padding_bottom=”” padding_left=””][fusion_builder_row][fusion_builder_column type=”1_1layout=”1_1spacing=”” center_content=nolink=”” target=_selfmin_height=”” hide_on_mobile=small-visibility,medium-visibility,large-visibilityclass=”” id=”” background_color=”” background_image=”” background_image_id=”” background_position=left topbackground_repeat=no-repeathover_type=noneborder_size=”0″ border_color=”” border_style=solidborder_position=allpadding_top=”” padding_right=”” padding_bottom=”” padding_left=”” margin_top=”” margin_bottom=”” animation_type=”” animation_direction=leftanimation_speed=”0.3″ animation_offset=”” last=no”][fusion_text columns=”” column_min_width=”” column_spacing=”” rule_style=defaultrule_size=”” rule_color=”” hide_on_mobile=small-visibility,medium-visibility,large-visibilityclass=”” id=””]

Eaton Fuller ჰიბრიდული ტრანსმისია ბრალია კოდი 61: Rail Motor Circuit ბრალია

[/fusion_text][/fusion_builder_column][/fusion_builder_row][/fusion_builder_container][fusion_builder_container hundred_percent=nohundred_percent_height=nohundred_percent_height_scroll=nohundred_percent_height_center_content=yesequal_height_columns=nomenu_anchor=”” hide_on_mobile=small-visibility,medium-visibility,large-visibilitystatus=publishedpublish_date=”” class=”” id=”” background_color=”” background_image=”” background_position=center centerbackground_repeat=no-repeatfade=nobackground_parallax=noneenable_mobile=noparallax_speed=”0.3″ video_mp4=”” video_webm=”” video_ogv=”” video_url=”” video_aspect_ratio=”16:9″ video_loop=yesvideo_mute=yesvideo_preview_image=”” border_size=”” border_color=”” border_style=solidmargin_top=”” margin_bottom=”” padding_top=”” padding_right=”” padding_bottom=”” padding_left=””][fusion_builder_row][fusion_builder_column type=”1_1layout=”1_1spacing=”” center_content=nolink=”” target=_selfmin_height=”” hide_on_mobile=small-visibility,medium-visibility,large-visibilityclass=”” id=”” background_color=”” background_image=”” background_image_id=”” background_position=left topbackground_repeat=no-repeathover_type=noneborder_size=”0″ border_color=”” border_style=solidborder_position=allpadding_top=”” padding_right=”” padding_bottom=”” padding_left=”” margin_top=”” margin_bottom=”” animation_type=”” animation_direction=leftanimation_speed=”0.3″ animation_offset=”” last=no”][fusion_text columns=”” column_min_width=”” column_spacing=”” rule_style=defaultrule_size=”” rule_color=”” hide_on_mobile=small-visibility,medium-visibility,large-visibilityclass=”” id=””]

ბრალია კოდი Eaton ჰიბრიდული წამყვანი სისტემები მოდელები (MY09) EH-8E406A-U / P, EH-8E406A-UP, EH-8E406A-UPG, EH-8E406A-CD, EH-8E406A-CDG, EH-8E406A-CDR, EH-8E406A-T, EH-6E706B-CD, EH-6E706B-P and EH-6E706B-UPG The Hybrid Transmission is equipped with an X-Y Shifter that selects a transmission gear. The X-Y Shifter motors are controlled with electrical current supplied by the TECU to move the Shift Finger either side-to-side (სარკინიგზო შერჩევა) და Fore და aft (gear ჩართულობის და დაშორიშორება). ბრალია კოდი 61 indicates a failure with the circuit controlling the Rail Motor and the side-to-side movement of the X-Y Shift Finger. დაწვრილებით ქვემოთ ვისწავლოთ თუ როგორ უნდა შეამოწმოთ, გარკვევა და დაფიქსირება ბრალია კოდი შეცდომები თქვენი Freightliner, Mack, Peterbilt, Kenworth, Volvo, საერთაშორისო, და მძიმე მორიგე სატვირთო და აღჭურვილობა. ვაშინგტონის / DC Converter უკავშირდება დენის ელექტრონიკა Carrier (საუბნო საარჩევნო კომისიის), რომელიც უზრუნველყოფს 340 ვოლტი DC. ძაბვის მცირდება 12-ვოლტი DC და ინარჩუნებს 12-ვოლტ სისტემის დროს ძრავა off PTO ოპერაცია. ვაშინგტონის / DC ინარჩუნებს დგას 14.2 (± 0.2) (my08 სისტემები) ან 12.6 (MY09 სისტემა) ვოლტი გამომავალი და ზრდის amperage ავტომობილის მოთხოვნა მდე 1.5 კვ ან 120 amps.

ბრალია კოდი 61: Rail Motor Circuit ბრალია დიაგნოსტიკა

შემდეგი წინაპირობები უნდა შეხვდნენ, სანამ სისტემა აღმოაჩენს ბრალია:

The system can identify an issue with the X-Y Shifter Rail Motor circuit, the TECU rail motor controller or the power and ground connections to the TECU under the following conditions:

  • საერთაშორისო სავალუტო ფონდის 1 და 12 can be detected when the X-Y Rail Motor is energized
  • საერთაშორისო სავალუტო ფონდის 5 და 6 can be detected when the X-Y Rail Motor is not energized

შენიშვნა: როდესაც troubleshooting Inactive კოდი ეხება პროდუქტის დიაგნოსტიკური რეჟიმი (PDM)

პირობები უცნობია ბრალია კოდი აქტიურია

  • საერთაშორისო სავალუტო ფონდის 1 - მონაცემთა ძალაშია, მაგრამ ნორმალური: გადაცემის ვერ დაასრულებს ცვლა და იზომება მიმდინარე გათამაშებაში სარკინიგზო საავტომობილო ქვემოთ ელოდებიან და ღირებულებები.
  • საერთაშორისო სავალუტო ფონდის 5 - მიმდინარე ნორმალური ან ღია Circuit: TECU detects an open circuit or a short-to-ground condition on the Rail Motor circuit for 0.5 second at power up or prior to a shift.
  • საერთაშორისო სავალუტო ფონდის 6 - მიმდინარე Above ნორმალური და Shorted Circuit: TECU detects a short-to-power on the Rail Motor circuit for 0.5 წამი ძალა ან ადრე ცვლა.
  • საერთაშორისო სავალუტო ფონდის 12 - Bad Intelligent მოწყობილობა: Transmission fails to complete a shift and the TECU detects intermittent fluctuations in supply voltage due to poor connections, shorted Rail Motor circuit or a hardware failure of the TECU.

სამარაგო როდესაც ბრალია კოდი 61 არის შემდეგი პირობებით მოხდეს:

  • "F" ციმციმები სიჩქარის ჩვენება.
  • სამსახურის შუქი ციმციმები (თუ აღჭურვილი).
  • ძრავის შეიძლება არ crank.
  • გადაცემა შეიძლება არ ჩაერთონ მექანიზმი ნეიტრალური.
  • გადამცემი არ გადაიტანოს, ხოლო მანქანა მოძრაობს.
  • სანამ ბრალია ხდება უმოქმედო, მძღოლი შეიძლება ჰქონდეს გათიშვა ძრავით გადაცემის მექანიზმი.

[/fusion_text][fusion_text columns=”” column_min_width=”” column_spacing=”” rule_style=defaultrule_size=”” rule_color=”” hide_on_mobile=small-visibility,medium-visibility,large-visibilityclass=”” id=””]

პირობები უცნობია ბრალია Code Inactive

საერთაშორისო სავალუტო ფონდის 1, 12: ამ მიზეზით არის უმოქმედო როდესაც ცვლა დასრულდა.
საერთაშორისო სავალუტო ფონდის 5, 6: ამ მიზეზით არის უმოქმედო, როდესაც ღია ან მოკლე ჩართვა პირობა არ არის აღმოჩენილი 0.5 წამში.

ეს ბრალია კოდი შეიძლება გამოწვეული რომელიმე შემდეგი:

  • საერთაშორისო სავალუტო ფონდის 1, 5
    • გადამცემი აღკაზმულობა
    – Terminals bent, გავრცელება, კოროზირებული ან ფხვიერი
    – გაყვანილობა shorted რომ მიწაზე, shorted ხელისუფლებაში ან ღია
    • X-Y Shifter Rail Motor
    – Terminals bent, გავრცელება, კოროზირებული ან ფხვიერი
    – Rail Motor shorted რომ მიწაზე, ნაწილობრივი მოკლე მიწაზე, shorted ხელისუფლებაში ან ღია
    – Rail Motor შიდა მარცხი
    • TECU
    – შინაგან მარცხი
  • საერთაშორისო სავალუტო ფონდის 6
    • გადამცემი აღკაზმულობა
    – გაყვანილობა shorted ხელისუფლებაში
    • TECU
    – შინაგან მარცხი
  • საერთაშორისო სავალუტო ფონდის 12
    • OEM Power Supply
    – ცუდი ძალა ან მიწაზე მიწოდება TECU (შეიძლება ერთად ბრალია კოდები 33 ან 34)
    – ბატარეის მარცხი
    – Terminals bent, გავრცელება, კოროზირებული ან ფხვიერი
    – გაყვანილობა shorted რომ მიწაზე, shorted ხელისუფლებაში ან ღია
    • OEM ბატარეები
    – შინაგან მარცხი
    • OEM 30-amp Battery Fuse
    – Terminals bent, გავრცელება, კოროზირებული ან ფხვიერი
    – Fuse დაკარგული ან არასწორად მჯდომარე
    • TECU
    – შინაგან მარცხი

[/fusion_text][/fusion_builder_column][/fusion_builder_row][/fusion_builder_container][fusion_builder_container hundred_percent=nohundred_percent_height=nohundred_percent_height_scroll=nohundred_percent_height_center_content=yesequal_height_columns=nomenu_anchor=”” hide_on_mobile=small-visibility,medium-visibility,large-visibilitystatus=publishedpublish_date=”” class=”” id=”” background_color=”” background_image=”” background_position=center centerbackground_repeat=no-repeatfade=nobackground_parallax=noneenable_mobile=noparallax_speed=”0.3″ video_mp4=”” video_webm=”” video_ogv=”” video_url=”” video_aspect_ratio=”16:9″ video_loop=yesvideo_mute=yesvideo_preview_image=”” border_size=”” border_color=”” border_style=solidmargin_top=”” margin_bottom=”” padding_top=”” padding_right=”” padding_bottom=”” padding_left=””][fusion_builder_row][fusion_builder_column type=”1_1layout=”1_1spacing=”” center_content=nolink=”” target=_selfmin_height=”” hide_on_mobile=small-visibility,medium-visibility,large-visibilityclass=”” id=”” background_color=”” background_image=”” background_image_id=”” background_position=left topbackground_repeat=no-repeathover_type=noneborder_size=”0″ border_color=”” border_style=solidborder_position=allpadding_top=”” padding_right=”” padding_bottom=”” padding_left=”” margin_top=”” margin_bottom=”” animation_type=”” animation_direction=leftanimation_speed=”0.3″ animation_offset=”” last=no”][fusion_text columns=”” column_min_width=”” column_spacing=”” rule_style=defaultrule_size=”” rule_color=”” hide_on_mobile=small-visibility,medium-visibility,large-visibilityclass=”” id=””]

ბრალია კოდი 61: Rail Motor Circuit ბრალია ტესტი

[/fusion_text][/fusion_builder_column][/fusion_builder_row][/fusion_builder_container][fusion_builder_container hundred_percent=nohundred_percent_height=nohundred_percent_height_scroll=nohundred_percent_height_center_content=yesequal_height_columns=nomenu_anchor=”” hide_on_mobile=small-visibility,medium-visibility,large-visibilitystatus=publishedpublish_date=”” class=”” id=”” background_color=”” background_image=”” background_position=center centerbackground_repeat=no-repeatfade=nobackground_parallax=noneenable_mobile=noparallax_speed=”0.3″ video_mp4=”” video_webm=”” video_ogv=”” video_url=”” video_aspect_ratio=”16:9″ video_loop=yesvideo_mute=yesvideo_preview_image=”” border_size=”” border_color=”” border_style=solidmargin_top=”” margin_bottom=”” padding_top=”” padding_right=”” padding_bottom=”” padding_left=””][fusion_builder_row][fusion_builder_column type=”1_1layout=”1_1spacing=”” center_content=nolink=”” target=_selfmin_height=”” hide_on_mobile=small-visibility,medium-visibility,large-visibilityclass=”” id=”” background_color=”” background_image=”” background_image_id=”” background_position=left topbackground_repeat=no-repeathover_type=noneborder_size=”0″ border_color=”” border_style=solidborder_position=allpadding_top=”” padding_right=”” padding_bottom=”” padding_left=”” margin_top=”” margin_bottom=”” animation_type=”” animation_direction=leftanimation_speed=”0.3″ animation_offset=”” last=no”][fusion_text columns=”” column_min_width=”” column_spacing=”” rule_style=defaultrule_size=”” rule_color=”” hide_on_mobile=small-visibility,medium-visibility,large-visibilityclass=”” id=””]

კომპონენტი საიდენტიფიკაციო:

[/fusion_text][/fusion_builder_column][fusion_builder_column type=”1_1layout=”1_2spacing=”” center_content=nolink=”” target=_selfmin_height=”” hide_on_mobile=small-visibility,medium-visibility,large-visibilityclass=”” id=”” background_color=”” background_image=”” background_image_id=”” background_position=left topbackground_repeat=no-repeathover_type=noneborder_size=”0″ border_color=”” border_style=solidborder_position=allpadding_top=”” padding_right=”” padding_bottom=”” padding_left=”” margin_top=”” margin_bottom=”” animation_type=”” animation_direction=leftanimation_speed=”0.3″ animation_offset=”” last=no”][fusion_imageframe image_id=”14319|fullmax_width=”” style_type=”” blur=”” stylecolor=”” hover_type=nonebordersize=”” bordercolor=”” borderradius=”” align=centerlightbox=yesgallery_id=”” lightbox_image=https://www.globaltransmissionsupply.com/wp-content/uploads/Rail-Motor-Circuit-Fault-Component-ID.jpglightbox_image_id=”14319|fullalt=”Rail Motor Circuit ბრალია” link=”” linktarget=_selfhide_on_mobile=small-visibility,medium-visibility,large-visibilityclass=”” id=”” animation_type=”” animation_direction=leftanimation_speed=”0.3″ animation_offset=””]https://www.globaltransmissionsupply.com/wp-content/uploads/Rail-Motor-Circuit-Fault-Component-ID.jpg[/fusion_imageframe][fusion_text columns=”2″ column_min_width=”” column_spacing=”” rule_style=defaultrule_size=”” rule_color=”” hide_on_mobile=small-visibility,medium-visibility,large-visibilityclass=”” id=””]

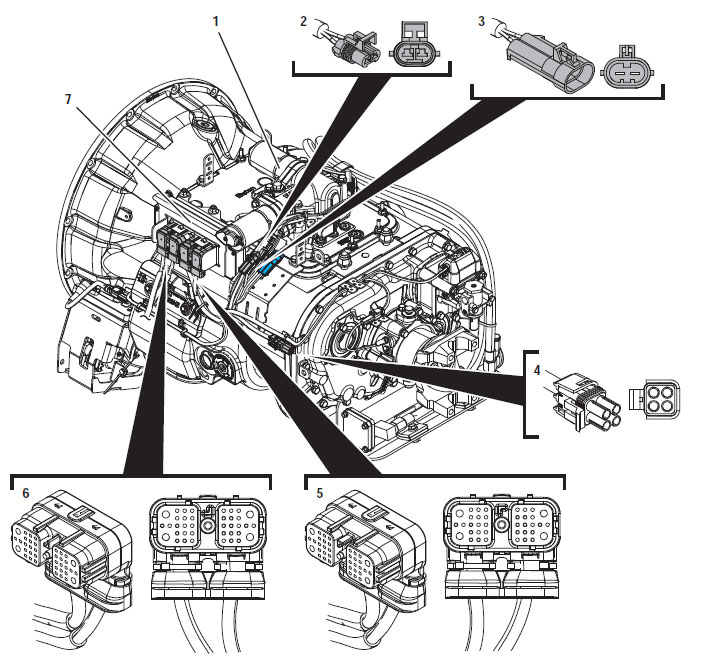
1. X-Y Shifter
2. 2-Way Rail Motor Connector (შავი)
3. 2-Way Rail Motor Connector Body (შავი)
4. 4-Way დიაგნოსტიკური Connector
5. 38-Way ტრანსმისია აღკაზმულობა Connector
6. 38-Way Vehicle აღკაზმულობა Connector
7. გადაცემის ელექტრონული კონტროლის განყოფილება (TECU)

[/fusion_text][/fusion_builder_column][fusion_builder_column type=”1_1layout=”1_1spacing=”” center_content=nolink=”” target=_selfmin_height=”” hide_on_mobile=small-visibility,medium-visibility,large-visibilityclass=”” id=”” background_image_id=”” background_color=”#000000″ background_image=”” background_position=left topundefined=”” background_repeat=no-repeathover_type=noneborder_size=”0″ border_color=”” border_style=solidborder_position=allpadding_top=”” padding_right=”” padding_bottom=”” padding_left=”” margin_top=”20″ margin_bottom=”20″ animation_type=”” animation_direction=leftanimation_speed=”0.3″ animation_offset=”” last=no”][fusion_text columns=”” column_min_width=”” column_spacing=”” rule_style=defaultrule_size=”” rule_color=”” hide_on_mobile=small-visibility,medium-visibility,large-visibilityclass=”” id=””]

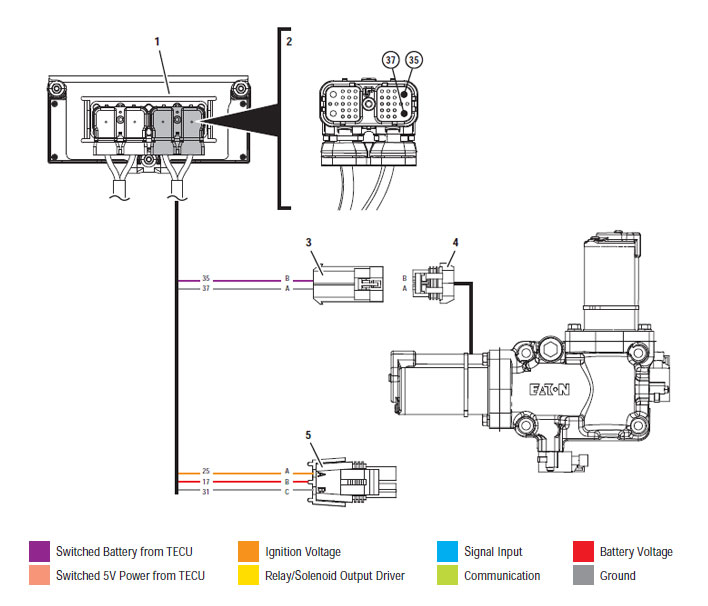
ᲨᲔᲜᲘᲨᲕᲜᲐ: იხილეთ Eaton ჰიბრიდული კომპონენტი და შემაერთებელი მდებარეობა for Connector მისამართები MY09 სისტემები.
[/fusion_text][/fusion_builder_column][fusion_builder_column type=”1_1layout=”1_1spacing=”” center_content=nolink=”” target=_selfmin_height=”” hide_on_mobile=small-visibility,medium-visibility,large-visibilityclass=”” id=”” background_color=”” background_image=”” background_image_id=”” background_position=left topbackground_repeat=no-repeathover_type=noneborder_size=”0″ border_color=”” border_style=solidborder_position=allpadding_top=”” padding_right=”” padding_bottom=”” padding_left=”” margin_top=”” margin_bottom=”” animation_type=”” animation_direction=leftanimation_speed=”0.3″ animation_offset=”” last=no”][fusion_imageframe image_id=”14320|fullmax_width=”” style_type=”” blur=”” stylecolor=”” hover_type=nonebordersize=”” bordercolor=”” borderradius=”” align=centerlightbox=yesgallery_id=”” lightbox_image=https://www.globaltransmissionsupply.com/wp-content/uploads/TECU-rail-motor-connector-locations.jpglightbox_image_id=”14320|fullalt=”TECU სარკინიგზო საავტომობილო connector ადგილას” link=”” linktarget=_selfhide_on_mobile=small-visibility,medium-visibility,large-visibilityclass=”” id=”” animation_type=”” animation_direction=leftanimation_speed=”0.3″ animation_offset=””]https://www.globaltransmissionsupply.com/wp-content/uploads/TECU-rail-motor-connector-locations.jpg[/fusion_imageframe][fusion_text columns=”2″ column_min_width=”” column_spacing=”” rule_style=defaultrule_size=”” rule_color=”” hide_on_mobile=small-visibility,medium-visibility,large-visibilityclass=”” id=””]

1. გადაცემის ელექტრონული კონტროლის განყოფილება (TECU)
2. 38-Way ტრანსმისია აღკაზმულობა Connector
3. 2-Way Rail Motor Connector Body (შავი)
4. 2-Way Rail Motor Connector (შავი)
5. 4-Way დიაგნოსტიკური Connector

[/fusion_text][/fusion_builder_column][/fusion_builder_row][/fusion_builder_container][fusion_builder_container hundred_percent=nohundred_percent_height=nohundred_percent_height_scroll=nohundred_percent_height_center_content=yesequal_height_columns=nomenu_anchor=”” hide_on_mobile=small-visibility,medium-visibility,large-visibilitystatus=publishedpublish_date=”” class=”” id=”” background_color=”” background_image=”” background_position=center centerbackground_repeat=no-repeatfade=nobackground_parallax=noneenable_mobile=noparallax_speed=”0.3″ video_mp4=”” video_webm=”” video_ogv=”” video_url=”” video_aspect_ratio=”16:9″ video_loop=yesvideo_mute=yesvideo_preview_image=”” border_size=”” border_color=”” border_style=solidmargin_top=”” margin_bottom=”” padding_top=”” padding_right=”” padding_bottom=”” padding_left=””][fusion_builder_row][fusion_builder_column type=”1_1layout=”1_1spacing=”” center_content=nolink=”” target=_selfmin_height=”” hide_on_mobile=small-visibility,medium-visibility,large-visibilityclass=”” id=”” background_color=”” background_image=”” background_image_id=”” background_position=left topbackground_repeat=no-repeathover_type=noneborder_size=”0″ border_color=”” border_style=solidborder_position=allpadding_top=”” padding_right=”” padding_bottom=”” padding_left=”” margin_top=”” margin_bottom=”” animation_type=”” animation_direction=leftanimation_speed=”0.3″ animation_offset=”” last=no”][fusion_modal name=warnings_cautionstitle=”გაფრთხილებები & გვაფრთხილებს” size=largebackground=”” border_color=”” show_footer=yesclass=”” id=””]Danger: Danger მიუთითებს თქვენ მძიმედ დაშავდა ან დაიღუპა თუ არ მოჰყვება მითითებული პროცედურა.
გაფრთხილება: გაფრთხილება მიუთითებს დაუყოვნებლივ საფრთხის, რომელიც შეიძლება გამოიწვიოს მძიმე დაზიანება, თუ არ დაიცვას აღნიშნული პროცედურა.
Სიფრთხილით: Caution მიუთითებს ავტომობილის ან ქონებრივი ზიანი შეიძლება მოხდეს, თუ არ დაიცვას აღნიშნული პროცედურა.

შენიშვნა: ნოტაში დამატებითი დეტალი, რომელიც დახმარების დიაგნოზი ან შეკეთება კომპონენტი / სისტემა.

დაიცავით მითითებული პროცედურების აღნიშნული, რათა თავიდან ავიცილოთ დაზიანება:

1. იმ შემთხვევაში, თუ მაღალი ძაბვის გირჩები გარშემო მანქანა და ლოკაუტის დამონტაჟებული საუბნო საარჩევნო კომისიის, ერთადერთი ადამიანი, რომ უნდა მიეცეთ დაიწყოს მანქანა არის პირი, რომელმაც ხელი მოაწერა lockout tag.
2. ადრე მომუშავე სატრანსპორტო საშუალება ან ტოვებს კაბინა ძრავა არის გაშვებული, თქვენ უნდა განათავსონ ცვლა ბერკეტი "N" მითითებული პარკირების მუხრუჭი, და დაბლოკოს დისკები.
3. უსაფრთხოების მიზნით, ყოველთვის ჩაერთონ მომსახურება მუხრუჭები ადრე შერჩევის მექანიზმი თანამდებობებზე "ნ"
4. დაწყებამდე მანქანა ყოველთვის უნდა მჯდომარე მძღოლის სავარძლის, აირჩიეთ "N" ცვლა კონტროლი, და მითითებული პარკირების მუხრუჭები.
5. ავტოსატრანსპორტო საშუალებების ePTO, ძრავა და / ან
Motor / გენერატორი შეიძლება დაიწყოს ePTO რეჟიმი. არასოდეს შეასრულოს ნებისმიერი სარემონტო და მუშაობა მანქანა, ხოლო ამ რეჟიმში.
6. 12-Volt Battery დადებითი (+) და უარყოფითი (-) უნდა იყოს გათიშული ადრე ნებისმიერი შედუღების ნებისმიერ Hybrid აღჭურვილია მანქანა.

Სიფრთხილით: დაიცავით მითითებული პროცედურების მითითებულ თავიდან აცილების მიზნით, ტექნიკის malfunction ან დაზიანება.
Სიფრთხილით: არ გაათავისუფლოს პარკირების მუხრუჭი და ცდილობენ შესარჩევად gear სანამ ჰაერის წნევა არის სწორი დონე.
Სიფრთხილით: რათა თავიდან ავიცილოთ დაზიანება გადაცემის დროს საბუქსირე ადგილი ცვლა ბერკეტი "N" და მოხსნის წამყვანი თვლები off ადგილზე ან გაწყვეტა ხაზზე მოძრაობა.

მაღალი ძაბვის გაფრთხილებები & გვაფრთხილებს

  • გამოყენება CO2 და მშრალი ქიმიური Fire Extinguishers.
  • მაღალი ძაბვის გაყვანილობა არის დაფარული ნარინჯისფერი იზოლაციის ან convoluted მილები და აღნიშნულია გაფრთხილება ეტიკეტები at კონექტორები.
  • ყველა Eaton® ჰიბრიდული დიზელი / ელექტრო ტექნიკა იქნება აღნიშნული "ჰიბრიდული’ გარეთ ავტომანქანა, ერთად ცვლა წარწერა dash.
  • იხილეთ OEM კონკრეტული ადგილმდებარეობა შასი დამონტაჟებული ჰიბრიდული კომპონენტები.
  • არ გაჭრა შევიდა ფორთოხლის მაღალი ძაბვის კაბელები.
  • არ გაჭრა ან გახსნას საუბნო საარჩევნო კომისიის.
  • არ გაჭრა ან გახსნას DC / DC Converter.
  • არ გაჭრა ან გახსნას Inverter.

ბუფერული ზონა უნდა შეიქმნას და მაღალი ძაბვის იზოლირებული რეზინის ხელთათმანები (კლასი 0 ტყავის მფარველები) საჭირო ადრე მუშაობს მაღალი ძაბვის. დაუცველობა დაიცვას ამ ინსტრუქციის შეიძლება გამოიწვიოს მძიმე პირადი დაზიანება ან სიკვდილი.
რეზინის იზოლირებული ხელთათმანები, რომელიც უნდა იყოს ნახმარი მუშაობისას, მაღალი ძაბვის სისტემის კლასის 0 ტყავის მფარველები. რეზინის ხელთათმანები უნდა ტესტირება ყოველი გამოყენების შემდეგ რეზინის იზოლაციის gloves ტესტირება პროცედურა ნაპოვნი "დიაგნოსტიკური ინსტრუმენტები / მომსახურება პუბლიკაციები" გვერდი 6. დაუცველობა დაიცვას ამ ინსტრუქციის შეიძლება გამოიწვიოს მძიმე პირადი დაზიანება ან სიკვდილი.
სანამ შემოწმების ან მუშაობს ნებისმიერი მაღალი ძაბვის კაბელები და კომპონენტები "მაღალი ძაბვის სამსახურის Shutdown და ძალაუფლების პროცედურა" გვერდზე 4 უნდა მოჰყვეს. დაუცველობა დაიცვას ამ ინსტრუქციის შეიძლება გამოიწვიოს მძიმე პირადი დაზიანება ან სიკვდილი.
ლოკაუტის და Tagout მოწყობილობები უნდა იყოს მხოლოდ ამოღებულ მიერ ტექნიკოსი, რომელიც განთავსებული Lockout და Tagout მოწყობილობები მანქანა. დაუცველობა დაიცვას ამ ინსტრუქციის შეიძლება გამოიწვიოს მძიმე პირადი დაზიანება ან სიკვდილი.
მაღალი ძაბვის რეზინის იზოლირებული ხელთათმანები (კლასი 0 ტყავის მფარველები) უნდა იყოს ნახმარი, როდესაც მუშაობა ნებისმიერი
მაღალი ძაბვის კაბელები. The "მაღალი ძაბვის სამსახურის Shutdown და ძალაუფლების პროცედურა" გვერდზე 4 უნდა მოჰყვეს ადრე მოხსნის ნებისმიერი მაღალი ძაბვის კაბელები. დაუცველობა დაიცვას ამ ინსტრუქციის შეიძლება გამოიწვიოს მძიმე პირადი დაზიანება ან სიკვდილი.
მაღალი ძაბვის კაბელები და გაყვანილობა ფორთოხალი და შეიცავდეს გაფრთხილებას ეტიკეტების კონექტორები. მაღალი ძაბვის კომპონენტები აღნიშნულია label. მაღალი ძაბვის რეზინის იზოლირებული ხელთათმანები (კლასი 0 ტყავის მფარველები) უნდა იქნას გამოყენებული, როდესაც მუშაობა რომელიმე ამ კომპონენტების. დაუცველობა დაიცვას ამ ინსტრუქციის შეიძლება გამოიწვიოს მძიმე პირადი დაზიანება ან სიკვდილი.

მაღალი ძაბვის სამსახურის Shutdown პროცედურები

მაღალი ძაბვის სამსახურის Shutdown და ძალაუფლების პროცედურა1. Follow "მაღალი ძაბვის სამუშაო ფართობი" პროცედურა.
2. განთავსდება წითელი საუბნო საარჩევნო კომისიის სამსახურის შეცვლა თვალწინ საუბნო საარჩევნო კომისიის და დააყენებს გათიშვა.
3. ამოღება სამსახურის Switch Cover და დააყენოთ Lockout Bracket (J48506).
4. Fasten tag ლოკაუტის Bracket.
5. დარწმუნდით, რომ საუბნო საარჩევნო კომისიის სამსახურის შეცვლა არ შეუძლიათ გადაადგილება off პოზიცია.
6. საშუალებას სისტემის შექმნას მინიმუმ 5 ე წუთზე განმუხტვა მაღალი ძაბვის.
7. დაკავშირება ServiceRanger და ნახოთ მონაცემები მონიტორი PID 116 ე.წ. "მაღალი ძაბვის ბატარეის პოტენციალი." გამოყენება SPN 520323 for J1939 კავშირი "ბატარეის ძაბვის RB" (relay Box).
8. ძაბვის უნდა იყოს 30 ვოლტი ან ნაკლები. თუ ძაბვის ზემოთ 30 ვ, არ მუშაობს მანქანა და საკონტაქტო Eaton® at 1-800-826 დახმარება (4357).
9. ჩართეთ ანთება გასაღები off და გაგრძელება შეკეთება ან troubleshooting ნაბიჯი.
შენიშვნა: ძაბვის წვეთები ნულის როდესაც გასაღები off.

მაღალი ძაბვის სამსახურის Power-პროცედურა

1. დააინსტალირეთ ყველა მაღალი ძაბვის კონექტორები მათი ჩაკეტილი პოზიციებზე.
2. თუ თქვენ ხართ ადამიანი, მომუშავე მანქანა, ამოიღონ Lockout Bracket და tag.
3. გადააყენეთ Lockout Bracket მეტი სამსახურის შეცვლა.
4. გაიგეთ სამსახურის გადასვლა out და მოდით მანქანა ნაკრები 2 -ე.
5. Start vehicle when appropriate.[/fusion_modal][fusion_modal name=component_locationtitle=”Eaton ჰიბრიდული კომპონენტი და შემაერთებელი მდებარეობა ” size=largebackground=”#ffffffborder_color=”” show_footer=yesclass=”” id=””]

Eaton ჰიბრიდული კომპონენტი და შემაერთებელი Locations my08 სისტემები

[/fusion_modal][fusion_modal name=component_location2title=”Eaton ჰიბრიდული კომპონენტი და შემაერთებელი საიდან MY09 სისტემები” size=largebackground=”#ffffffborder_color=”” show_footer=yesclass=”” id=””]

Eaton ჰიბრიდული კომპონენტი და შემაერთებელი Locations MY09 სისტემები

[/fusion_modal][/fusion_builder_column][/fusion_builder_row][/fusion_builder_container][fusion_builder_container hundred_percent=nohundred_percent_height=nohundred_percent_height_scroll=nohundred_percent_height_center_content=yesequal_height_columns=nomenu_anchor=”” hide_on_mobile=small-visibility,medium-visibility,large-visibilitystatus=publishedpublish_date=”” class=”” id=”” background_color=”” background_image=”” background_position=center centerbackground_repeat=no-repeatfade=nobackground_parallax=noneenable_mobile=noparallax_speed=”0.3″ video_mp4=”” video_webm=”” video_ogv=”” video_url=”” video_aspect_ratio=”16:9″ video_loop=yesvideo_mute=yesvideo_preview_image=”” border_size=”” border_color=”” border_style=solidmargin_top=”” margin_bottom=”” padding_top=”” padding_right=”” padding_bottom=”” padding_left=””][fusion_builder_row][fusion_builder_column type=”1_1layout=”1_1spacing=”” center_content=nolink=”” target=_selfmin_height=”” hide_on_mobile=small-visibility,medium-visibility,large-visibilityclass=”” id=”” background_color=”” background_image=”” background_image_id=”” background_position=left topbackground_repeat=no-repeathover_type=noneborder_size=”0″ border_color=”” border_style=solidborder_position=allpadding_top=”” padding_right=”” padding_bottom=”” padding_left=”” margin_top=”” margin_bottom=”” animation_type=”” animation_direction=leftanimation_speed=”0.3″ animation_offset=”” last=no”][fusion_content_boxes layout=clean-horizontalcolumns=”1″ title_size=”18pxheading_size=”3″ title_color=”#ffffffbody_color=”#ffffffbackgroundcolor=”#4f4f4ficon=”” iconflip=”” iconrotate=”” iconspin=noiconcolor=”” icon_circle=”” icon_circle_radius=”” circlecolor=”” circlebordersize=”” circlebordercolor=”” outercirclebordersize=”” outercirclebordercolor=”” icon_size=”” icon_hover_type=”” hover_accent_color=”” image=”” image_id=”” image_width=”” image_height=”” link_type=”” button_span=”” link_area=”” link_target=”” icon_align=leftanimation_type=”” animation_delay=”” animation_offset=”” animation_direction=leftanimation_speed=”0.3″ margin_top=”” margin_bottom=”” hide_on_mobile=small-visibility,medium-visibility,large-visibilityclass=”” id=””][fusion_content_box title=STEP 1. შეამოწმეთ აქტიური ან არააქტიური ბრალია კოდები.backgroundcolor=”” icon=”” iconflip=”” iconrotate=”” iconspin=noiconcolor=”” circlecolor=”” circlebordersize=”” circlebordercolor=”” outercirclebordersize=”” outercirclebordercolor=”” image=”” image_id=”” image_width=”” image_height=”” link=”” linktext=”Წაიკითხე მეტი” link_target=”” animation_type=”” animation_direction=leftanimation_speed=”0.3″ animation_offset=””]

  1. გასაღები ძრავის off.
  2. Connect ServiceRanger.
  3. Retrieve Snapshot and VPA data by creating a Service Activity Report within ServiceRanger.
  4. Update transmission software to latest available level.
    Სიფრთხილით: რათა თავიდან ავიცილოთ დაზიანება TECU, გამოყენება Eaton დამტკიცებული კომუნიკაციები ადაპტერი და უზრუნველყოს ყველა სატელიტური სისტემები გამორთულია სანამ განახლებაზე პროგრამული უზრუნველყოფა.
  5. მოძიება და ჩაწერა გადაცემის ბრალია კოდები და FMIs, და მათი მოვლენები და timestamps.
    • თუ არც ბრალია კოდი 33 ან 34 აქტიური, პრობლემების ეს პირველი პოსტი ბრალია Code იზოლაცია.
    • თუ ბრალია კოდი 61 აქტიური და ბრალია კოდი 33 ან ბრალია კოდი 34 უმოქმედო ან არ არის მითითებული, წასვლა ნაბიჯი 4.
    • თუ ბრალია კოდი 61 უმოქმედოა და ბრალია კოდი 33 ან ბრალია კოდი 34 უმოქმედო ან არ არის მითითებული, წასვლა ნაბიჯი 2.

[/fusion_content_box][/fusion_content_boxes][fusion_content_boxes layout=clean-horizontalcolumns=”1″ title_size=”18pxheading_size=”3″ title_color=”#ffffffbody_color=”#ffffffbackgroundcolor=”#4f4f4ficon=”” iconflip=”” iconrotate=”” iconspin=noiconcolor=”” icon_circle=”” icon_circle_radius=”” circlecolor=”” circlebordersize=”” circlebordercolor=”” outercirclebordersize=”” outercirclebordercolor=”” icon_size=”” icon_hover_type=”” hover_accent_color=”” image=”” image_id=”” image_width=”” image_height=”” link_type=”” button_span=”” link_area=”” link_target=”” icon_align=leftanimation_type=”” animation_delay=”” animation_offset=”” animation_direction=leftanimation_speed=”0.3″ margin_top=”” margin_bottom=”” hide_on_mobile=small-visibility,medium-visibility,large-visibilityclass=”” id=””][fusion_content_box title=STEP 2. დაადასტურეთ მდგომარეობის ძალა და ადგილზე მიწოდება. backgroundcolor=”” icon=”” iconflip=”” iconrotate=”” iconspin=noiconcolor=”” circlecolor=”” circlebordersize=”” circlebordercolor=”” outercirclebordersize=”” outercirclebordercolor=”” image=”” image_id=”” image_width=”” image_height=”” link=”” linktext=”Წაიკითხე მეტი” link_target=”” animation_type=”” animation_direction=leftanimation_speed=”0.3″ animation_offset=””]

  1. ასრულებს ელექტრო ტესტის Gen1 ECA. ჩაწეროთ მოსმენით(s) საწყისი Load ტესტი ნაბიჯი 3 ელექტრო ტესტის.
    • იმ შემთხვევაში, თუ ელექტრო ტესტის ვერ, სარემონტო პოსტი ელექტრო ტესტის ინსტრუქციები. Retest მანქანა ოპერაცია.
    • იმ შემთხვევაში, თუ ელექტრო ტესტის გადის, წასვლა ნაბიჯი 3.

[/fusion_content_box][/fusion_content_boxes][fusion_content_boxes layout=clean-horizontalcolumns=”1″ title_size=”18pxheading_size=”3″ title_color=”#ffffffbody_color=”#ffffffbackgroundcolor=”#4f4f4ficon=”” iconflip=”” iconrotate=”” iconspin=noiconcolor=”” icon_circle=”” icon_circle_radius=”” circlecolor=”” circlebordersize=”” circlebordercolor=”” outercirclebordersize=”” outercirclebordercolor=”” icon_size=”” icon_hover_type=”” hover_accent_color=”” image=”” image_id=”” image_width=”” image_height=”” link_type=”” button_span=”” link_area=”” link_target=”” icon_align=leftanimation_type=”” animation_delay=”” animation_offset=”” animation_direction=leftanimation_speed=”0.3″ margin_top=”” margin_bottom=”” hide_on_mobile=small-visibility,medium-visibility,large-visibilityclass=”” id=””][fusion_content_box title=STEP 3. გამოყენების პროდუქტის დიაგნოსტიკური (PD) რეჟიმი, რათა იპოვოს წყვეტილი წარუმატებლობის. backgroundcolor=”” icon=”” iconflip=”” iconrotate=”” iconspin=noiconcolor=”” circlecolor=”” circlebordersize=”” circlebordercolor=”” outercirclebordersize=”” outercirclebordercolor=”” image=”” image_id=”” image_width=”” image_height=”” link=”” linktext=”Წაიკითხე მეტი” link_target=”” animation_type=”” animation_direction=leftanimation_speed=”0.3″ animation_offset=””]

  1. უცნობია პარკირების მუხრუჭები და chock დისკები.
  2. ადგილი გადაცემის PD (პროდუქტის Diagnositc) რეჟიმი.
  3. Wiggle wiring and connections between the 38- Way OEM Vehicle აღკაზმულობა კონექტორი TECU და ავტომობილის ბატარეის მიწოდება. ვეძებთ ნიშნები rubbing ან chafing.
  4. Wiggle გაყვანილობა და კავშირები შორის 38-Way ტრანსმისია აღკაზმულობა კონექტორი TECU და შავი (X-Rail Motor) 2-Way ტრანსმისია აღკაზმულობა Connector.
  5. Wiggle გაყვანილობა და კავშირები შორის 38-Way კონექტორი TECU და ლურჯი (Y-Gear Motor) 2- Way ტრანსმისია აღკაზმულობა Connector.
  6. Exit PD რეჟიმი შველის,.
    Მნიშვნელოვანი: ნება 2-3 წუთი TECU შეასრულოს სრული ძალაუფლების ქვემოთ თანმიმდევრობით გაგრძელებამდე.

    • იმ შემთხვევაში, თუ ხარვეზების მითითებული შემოვიდა ხოლო wiggling ავტომობილი აღკაზმულობა, ეხება OEM სახელმძღვანელო სარემონტო ან ჩანაცვლება OEM გაყვანილობა. წასვლა ნაბიჯი 13.
    • იმ შემთხვევაში, თუ ბრალი ადგენს აქტიური, ხოლო wiggling გადამცემი აღკაზმულობა, შეცვლის ტრანსმისია აღკაზმულობა. წასვლა ნაბიჯი 13.
    • თუ არ ხარვეზებით მითითებული შემოვიდა ხოლო wiggling ან აღკაზმულობა, წასვლა ნაბიჯი 4.

[/fusion_content_box][/fusion_content_boxes][fusion_content_boxes layout=clean-horizontalcolumns=”1″ title_size=”18pxheading_size=”3″ title_color=”#ffffffbody_color=”#ffffffbackgroundcolor=”#4f4f4ficon=”” iconflip=”” iconrotate=”” iconspin=noiconcolor=”” icon_circle=”” icon_circle_radius=”” circlecolor=”” circlebordersize=”” circlebordercolor=”” outercirclebordersize=”” outercirclebordercolor=”” icon_size=”” icon_hover_type=”” hover_accent_color=”” image=”” image_id=”” image_width=”” image_height=”” link_type=”” button_span=”” link_area=”” link_target=”” icon_align=leftanimation_type=”” animation_delay=”” animation_offset=”” animation_direction=leftanimation_speed=”0.3″ margin_top=”” margin_bottom=”” hide_on_mobile=small-visibility,medium-visibility,large-visibilityclass=”” id=””][fusion_content_box title=STEP 4. დაადასტურეთ რომელიც FMI კომპლექტი.backgroundcolor=”” icon=”” iconflip=”” iconrotate=”” iconspin=noiconcolor=”” circlecolor=”” circlebordersize=”” circlebordercolor=”” outercirclebordersize=”” outercirclebordercolor=”” image=”” image_id=”” image_width=”” image_height=”” link=”” linktext=”Წაიკითხე მეტი” link_target=”” animation_type=”” animation_direction=leftanimation_speed=”0.3″ animation_offset=””]

  1. განსაზღვრა, რომელიც FMI ნაკრები ბრალია კოდი 61.
    • თუ FMI 1 ან 12 კომპლექტი, წასვლა ნაბიჯი 5.
    • თუ FMI 5 მითითებული და აქტიური, წასვლა ნაბიჯი 5.
    • თუ FMI 5 მითითებული და უმოქმედო, წასვლა ნაბიჯი 11.
    • თუ FMI 6 კომპლექტი, შეცვლის TECU. წასვლა ნაბიჯი 13.

[/fusion_content_box][/fusion_content_boxes][fusion_content_boxes layout=clean-horizontalcolumns=”1″ title_size=”18pxheading_size=”3″ title_color=”#ffffffbody_color=”#ffffffbackgroundcolor=”#4f4f4ficon=”” iconflip=”” iconrotate=”” iconspin=noiconcolor=”” icon_circle=”” icon_circle_radius=”” circlecolor=”” circlebordersize=”” circlebordercolor=”” outercirclebordersize=”” outercirclebordercolor=”” icon_size=”” icon_hover_type=”” hover_accent_color=”” image=”” image_id=”” image_width=”” image_height=”” link_type=”” button_span=”” link_area=”” link_target=”” icon_align=leftanimation_type=”” animation_delay=”” animation_offset=”” animation_direction=leftanimation_speed=”0.3″ margin_top=”” margin_bottom=”” hide_on_mobile=small-visibility,medium-visibility,large-visibilityclass=”” id=””][fusion_content_box title=STEP 5. დაადასტურეთ სათანადო წინააღმდეგობის გადამცემი აღკაზმულობა და Rail Motor.backgroundcolor=”” icon=”” iconflip=”” iconrotate=”” iconspin=noiconcolor=”” circlecolor=”” circlebordersize=”” circlebordercolor=”” outercirclebordersize=”” outercirclebordercolor=”” image=”” image_id=”” image_width=”” image_height=”” link=”” linktext=”Წაიკითხე მეტი” link_target=”” animation_type=”” animation_direction=leftanimation_speed=”0.3″ animation_offset=””]

  1. ძირითადი off.
  2. Disconnect 38-Way ტრანსმისია აღკაზმულობა Connector საწყისი TECU.
  3. შემოწმება, რომ 38-Way შემაერთებელი კოროზიულ; ტერმინალები არა მოხრილი, გავრცელება, ან ფხვიერი ტერმინალები; და არ არსებობს დაზიანება შემაერთებელი სხეულის.
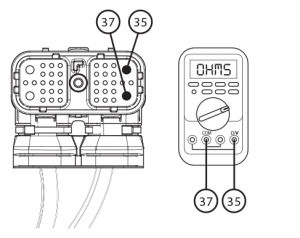
  4. გაზომეთ შორის დაპირისპირებას 38-Way Connector Pin 35 და Pin 37. ჩანაწერების მოსმენით.
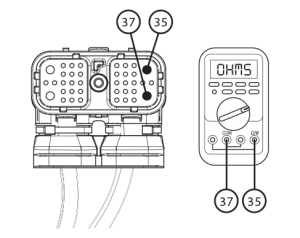
    გაზომეთ შორის დაპირისპირებას 38-Way Connector Pin 35 და Pin 37. ჩანაწერების მოსმენით.
  5. გაზომეთ შორის დაპირისპირებას 38-Way Connector Pin 35 და ადგილზე. 38-გზა connector pin 35
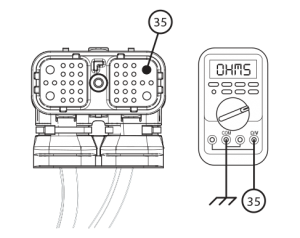
  6. შეადარეთ მოსმენით(s) მითითებულ სპექტრი:
    • თუ კითხვა(s) არის რიგი, წასვლა ნაბიჯი 6.
    • თუ კითხვა(s) გარეთ სპექტრი, წასვლა ნაბიჯი 8.

[/fusion_content_box][/fusion_content_boxes][fusion_content_boxes layout=clean-horizontalcolumns=”1″ title_size=”18pxheading_size=”3″ title_color=”#ffffffbody_color=”#ffffffbackgroundcolor=”#4f4f4ficon=”” iconflip=”” iconrotate=”” iconspin=noiconcolor=”” icon_circle=”” icon_circle_radius=”” circlecolor=”” circlebordersize=”” circlebordercolor=”” outercirclebordersize=”” outercirclebordercolor=”” icon_size=”” icon_hover_type=”” hover_accent_color=”” image=”” image_id=”” image_width=”” image_height=”” link_type=”” button_span=”” link_area=”” link_target=”” icon_align=leftanimation_type=”” animation_delay=”” animation_offset=”” animation_direction=leftanimation_speed=”0.3″ margin_top=”” margin_bottom=”” hide_on_mobile=small-visibility,medium-visibility,large-visibilityclass=”” id=””][fusion_content_box title=STEP 6. დაადასტურეთ რომელიც FMI კომპლექტი.backgroundcolor=”” icon=”” iconflip=”” iconrotate=”” iconspin=noiconcolor=”” circlecolor=”” circlebordersize=”” circlebordercolor=”” outercirclebordersize=”” outercirclebordercolor=”” image=”” image_id=”” image_width=”” image_height=”” link=”” linktext=”Წაიკითხე მეტი” link_target=”” animation_type=”” animation_direction=leftanimation_speed=”0.3″ animation_offset=””]

  1. განსაზღვრა, რომელიც FMI ნაკრები ბრალია კოდი 61.
    • თუ FMI 1 კომპლექტი, შეცვლის X-Y Shifter და ტრანსმისია აღკაზმულობა. წასვლა ნაბიჯი 13.
    • თუ FMI 5 კომპლექტი, წასვლა ნაბიჯი 7.
    • თუ FMI 12 კომპლექტი, წასვლა ნაბიჯი 8.

[/fusion_content_box][/fusion_content_boxes][fusion_content_boxes layout=clean-horizontalcolumns=”1″ title_size=”18pxheading_size=”3″ title_color=”#ffffffbody_color=”#ffffffbackgroundcolor=”#4f4f4ficon=”” iconflip=”” iconrotate=”” iconspin=noiconcolor=”” icon_circle=”” icon_circle_radius=”” circlecolor=”” circlebordersize=”” circlebordercolor=”” outercirclebordersize=”” outercirclebordercolor=”” icon_size=”” icon_hover_type=”” hover_accent_color=”” image=”” image_id=”” image_width=”” image_height=”” link_type=”” button_span=”” link_area=”” link_target=”” icon_align=leftanimation_type=”” animation_delay=”” animation_offset=”” animation_direction=leftanimation_speed=”0.3″ margin_top=”” margin_bottom=”” hide_on_mobile=small-visibility,medium-visibility,large-visibilityclass=”” id=””][fusion_content_box title=STEP 7. დაადასტურეთ ელექტროსქემის წინააღმდეგობის TECU.backgroundcolor=”” icon=”” iconflip=”” iconrotate=”” iconspin=noiconcolor=”” circlecolor=”” circlebordersize=”” circlebordercolor=”” outercirclebordersize=”” outercirclebordercolor=”” image=”” image_id=”” image_width=”” image_height=”” link=”” linktext=”Წაიკითხე მეტი” link_target=”” animation_type=”” animation_direction=leftanimation_speed=”0.3″ animation_offset=””]

  1. Reconnect 38-Way Transmission Harness to the TECU.
  2. Disconnect შავი 2-WayRail Motor Connector გადამცემი აღკაზმულობა.
  3. ამოღება connector საფარი 4-Way დიაგნოსტიკური Connector.
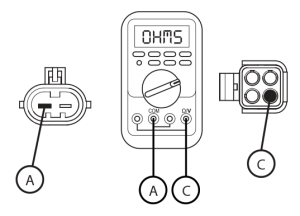
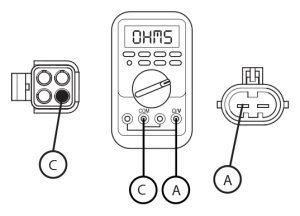
  4. გაზომეთ შორის დაპირისპირებას 2-Way Connector Body Pin A და 4-Way Connector Pin C. ჩანაწერების მოსმენით(s).2-Way Connector Body
  5. Reverse meter leads and take the same measurement between the 2-Way Connector Pin A and the 4-Way Connector Pin C. ჩანაწერების მოსმენით(s).Fuller 4-Way Connector Pin C
  6. შეადარეთ მოსმენით(s) მითითებულ ქედის ჩანაწერები.
    • თუ ორივე კითხვას სპექტრი, შეცვლის X-Y Shifter. წასვლა ნაბიჯი 13.
    • თუ არც კითხვას out of range, შეცვლის TECU. წასვლა ნაბიჯი 13.

[/fusion_content_box][/fusion_content_boxes][fusion_content_boxes layout=clean-horizontalcolumns=”1″ title_size=”18pxheading_size=”3″ title_color=”#ffffffbody_color=”#ffffffbackgroundcolor=”#4f4f4ficon=”” iconflip=”” iconrotate=”” iconspin=noiconcolor=”” icon_circle=”” icon_circle_radius=”” circlecolor=”” circlebordersize=”” circlebordercolor=”” outercirclebordersize=”” outercirclebordercolor=”” icon_size=”” icon_hover_type=”” hover_accent_color=”” image=”” image_id=”” image_width=”” image_height=”” link_type=”” button_span=”” link_area=”” link_target=”” icon_align=leftanimation_type=”” animation_delay=”” animation_offset=”” animation_direction=leftanimation_speed=”0.3″ margin_top=”” margin_bottom=”” hide_on_mobile=small-visibility,medium-visibility,large-visibilityclass=”” id=””][fusion_content_box title=STEP 8. დაადასტურეთ წინააღმდეგობის X-Y Rail Motor და გადამოწმების საავტომობილო არ shorted რომ მიწაზე.backgroundcolor=”” icon=”” iconflip=”” iconrotate=”” iconspin=noiconcolor=”” circlecolor=”” circlebordersize=”” circlebordercolor=”” outercirclebordersize=”” outercirclebordercolor=”” image=”” image_id=”” image_width=”” image_height=”” link=”” linktext=”Წაიკითხე მეტი” link_target=”” animation_type=”” animation_direction=leftanimation_speed=”0.3″ animation_offset=””]

  1. ძირითადი off.
  2. Disconnect blue 2-Way Rail Motor Connector გადამცემი აღკაზმულობა.
  3. დაადასტურეთ 2-Way Connector თავისუფალია კოროზიის; ტერმინალები არ მოხრილი, გავრცელება ან ფხვიერი, და არ არსებობს დაზიანება შემაერთებელი სხეულის.
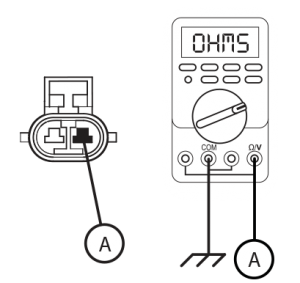
  4. Measure resistance between the black 2-Way Connector Pin A and Pin B. ჩანაწერების მოსმენით(s). 2-Way Rail Motor Connector Pin A და Pin B
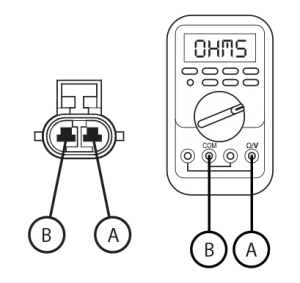
  5. Measure resistance between the 2-Way Connector Pin A and ground. ჩანაწერების მოსმენით.Eaton Fuller ტრანსმისია Rail Motor Circuit 2-Way Connector ამოძრავებთ
  6. შეადარეთ მოსმენით(s).
    • თუ კითხვა(s) არის რიგი, წასვლა ნაბიჯი 9.
    • თუ კითხვა(s) გარეთ სპექტრი, შეცვლის X-Y Shifter. წასვლა ნაბიჯი 13.

[/fusion_content_box][/fusion_content_boxes][fusion_content_boxes layout=clean-horizontalcolumns=”1″ title_size=”18pxheading_size=”3″ title_color=”#ffffffbody_color=”#ffffffbackgroundcolor=”#4f4f4ficon=”” iconflip=”” iconrotate=”” iconspin=noiconcolor=”” icon_circle=”” icon_circle_radius=”” circlecolor=”” circlebordersize=”” circlebordercolor=”” outercirclebordersize=”” outercirclebordercolor=”” icon_size=”” icon_hover_type=”” hover_accent_color=”” image=”” image_id=”” image_width=”” image_height=”” link_type=”” button_span=”” link_area=”” link_target=”” icon_align=leftanimation_type=”” animation_delay=”” animation_offset=”” animation_direction=leftanimation_speed=”0.3″ margin_top=”” margin_bottom=”” hide_on_mobile=small-visibility,medium-visibility,large-visibilityclass=”” id=””][fusion_content_box title=STEP 9. დაადასტურეთ რომელიც FMI კომპლექტი.backgroundcolor=”” icon=”” iconflip=”” iconrotate=”” iconspin=noiconcolor=”” circlecolor=”” circlebordersize=”” circlebordercolor=”” outercirclebordersize=”” outercirclebordercolor=”” image=”” image_id=”” image_width=”” image_height=”” link=”” linktext=”Წაიკითხე მეტი” link_target=”” animation_type=”” animation_direction=leftanimation_speed=”0.3″ animation_offset=””]

  1. განსაზღვრა, რომელიც FMI ნაკრები ბრალია კოდი 61.
    • თუ FMI 1 კომპლექტი, შეცვლის ტრანსმისია აღკაზმულობა. წასვლა ნაბიჯი 13.
    • თუ FMI 5 კომპლექტი, შეცვლის ტრანსმისია აღკაზმულობა. წასვლა ნაბიჯი 13.
    • თუ FMI 12 კომპლექტი, წასვლა ნაბიჯი 10.

[/fusion_content_box][/fusion_content_boxes][fusion_content_boxes layout=clean-horizontalcolumns=”1″ title_size=”18pxheading_size=”3″ title_color=”#ffffffbody_color=”#ffffffbackgroundcolor=”#4f4f4ficon=”” iconflip=”” iconrotate=”” iconspin=noiconcolor=”” icon_circle=”” icon_circle_radius=”” circlecolor=”” circlebordersize=”” circlebordercolor=”” outercirclebordersize=”” outercirclebordercolor=”” icon_size=”” icon_hover_type=”” hover_accent_color=”” image=”” image_id=”” image_width=”” image_height=”” link_type=”” button_span=”” link_area=”” link_target=”” icon_align=leftanimation_type=”” animation_delay=”” animation_offset=”” animation_direction=leftanimation_speed=”0.3″ margin_top=”” margin_bottom=”” hide_on_mobile=small-visibility,medium-visibility,large-visibilityclass=”” id=””][fusion_content_box title=STEP 10. ჩატვირთვა ტესტი მანქანა ელექტროენერგიის მიწოდება TECU.backgroundcolor=”” icon=”” iconflip=”” iconrotate=”” iconspin=noiconcolor=”” circlecolor=”” circlebordersize=”” circlebordercolor=”” outercirclebordersize=”” outercirclebordercolor=”” image=”” image_id=”” image_width=”” image_height=”” link=”” linktext=”Წაიკითხე მეტი” link_target=”” animation_type=”” animation_direction=leftanimation_speed=”0.3″ animation_offset=””]

  1. ძირითადი off.
  2. დაადასტურეთ TECU ბატარეის ძალა და ადგილზე მიწოდება OEM Vehicle აღკაზმულობა სწორად მიერთებული და არ კოროზირებული, დაზიანებული ან ფხვიერი.
  3. Disconnect 38-Way Vehicle აღკაზმულობა კონექტორი TECU.
  4. შემოწმება, რომ 38-Way შემაერთებელი კოროზიულ; ტერმინალები არ bent, გავრცელება, ან ფხვიერი; და არ არსებობს დაზიანება შემაერთებელი სხეულის.
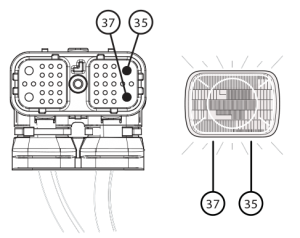
  5. Load შესამოწმებლად მანქანა დენის აღკაზმულობა გარე დატვირთვის წყარო. Use a sealed beam headlamp or blower motor attached to Pin 35 (ძალა) და Pin 37 (ადგილზე). Load ტესტი 5 -ე გადაამოწმონ აღკაზმულობა ტვირთს ატარებენ 30-amp fuse დაყენებული.Eaton Fuller გადამცემი დენის აღკაზმულობა
  6. Wiggle აღკაზმულობა დროს Load ტესტი ავტომობილის ბატარეები TECU.
    • თუ საკითხები გვხვდება ავტომობილი აღკაზმულობა და კონექტორები, ეხება OEM სახელმძღვანელო სარემონტო ან ჩანაცვლება OEM გაყვანილობა და გაგრძელდება Load ტესტი.
    • თუ მანქანის აღკაზმულობა არ განახორციელოს დატვირთვა, ეხება OEM სახელმძღვანელო სარემონტო ან ჩანაცვლება OEM გაყვანილობა. წასვლა ნაბიჯი 13.
    • თუ არსებობს საკითხები გვხვდება ავტომობილი აღკაზმულობა და კონექტორები და ელექტროენერგიის მიწოდება ახორციელებს დატვირთვის, შეცვლის TECU. წასვლა ნაბიჯი 13.

[/fusion_content_box][/fusion_content_boxes][fusion_content_boxes layout=clean-horizontalcolumns=”1″ title_size=”18pxheading_size=”3″ title_color=”#ffffffbody_color=”#ffffffbackgroundcolor=”#4f4f4ficon=”” iconflip=”” iconrotate=”” iconspin=noiconcolor=”” icon_circle=”” icon_circle_radius=”” circlecolor=”” circlebordersize=”” circlebordercolor=”” outercirclebordersize=”” outercirclebordercolor=”” icon_size=”” icon_hover_type=”” hover_accent_color=”” image=”” image_id=”” image_width=”” image_height=”” link_type=”” button_span=”” link_area=”” link_target=”” icon_align=leftanimation_type=”” animation_delay=”” animation_offset=”” animation_direction=leftanimation_speed=”0.3″ margin_top=”” margin_bottom=”” hide_on_mobile=small-visibility,medium-visibility,large-visibilityclass=”” id=””][fusion_content_box title=STEP 11. დაადასტურეთ სათანადო წინააღმდეგობის გადამცემი აღკაზმულობა და Rail Motor.backgroundcolor=”” icon=”” iconflip=”” iconrotate=”” iconspin=noiconcolor=”” circlecolor=”” circlebordersize=”” circlebordercolor=”” outercirclebordersize=”” outercirclebordercolor=”” image=”” image_id=”” image_width=”” image_height=”” link=”” linktext=”Წაიკითხე მეტი” link_target=”” animation_type=”” animation_direction=leftanimation_speed=”0.3″ animation_offset=””]

  1. ძირითადი off.
  2. Disconnect 38-Way ტრანსმისია აღკაზმულობა Connector საწყისი TECU.
  3. შემოწმება, რომ 38-Way შემაერთებელი კოროზიულ, ტერმინალები არა მოხრილი, გავრცელება, ან ფხვიერი; და არ არსებობს დაზიანება შემაერთებელი სხეულის.
  4. გაზომეთ შორის დაპირისპირებას 38-Way Connector Pin 35 და Pin 37. ჩანაწერების მოსმენით(s).Fuller ტრანსმისია აღკაზმულობა და სარკინიგზო საავტომობილო წინააღმდეგობის ტესტი
  5. გაზომეთ შორის დაპირისპირებას 38-Way Connector Pin 35 და ადგილზე. Record readings. სათანადო წინააღმდეგობის გადამცემი აღკაზმულობა და სარკინიგზო საავტომობილო ტესტი Eaton Fuller გადაცემები
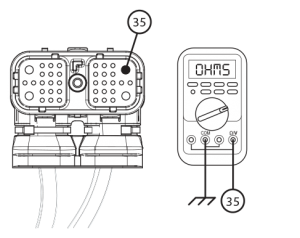
  6. შეადარეთ ჩაწერილი მოსმენით(s).
    • თუ კითხვა(s) არის რიგი, შეცვლის X-Y Shifter. წასვლა ნაბიჯი 13.
    • თუ კითხვა(s) გარეთ სპექტრი, წასვლა ნაბიჯი 12.

[/fusion_content_box][/fusion_content_boxes][fusion_content_boxes layout=clean-horizontalcolumns=”1″ title_size=”18pxheading_size=”3″ title_color=”#ffffffbody_color=”#ffffffbackgroundcolor=”#4f4f4ficon=”” iconflip=”” iconrotate=”” iconspin=noiconcolor=”” icon_circle=”” icon_circle_radius=”” circlecolor=”” circlebordersize=”” circlebordercolor=”” outercirclebordersize=”” outercirclebordercolor=”” icon_size=”” icon_hover_type=”” hover_accent_color=”” image=”” image_id=”” image_width=”” image_height=”” link_type=”” button_span=”” link_area=”” link_target=”” icon_align=leftanimation_type=”” animation_delay=”” animation_offset=”” animation_direction=leftanimation_speed=”0.3″ margin_top=”” margin_bottom=”” hide_on_mobile=small-visibility,medium-visibility,large-visibilityclass=”” id=””][fusion_content_box title=STEP 12.Verify შიდა წინააღმდეგობის X-Y Shifter Rail Motor და გადამოწმების საავტომობილო არ shorted რომ მიწაზე.backgroundcolor=”” icon=”” iconflip=”” iconrotate=”” iconspin=noiconcolor=”” circlecolor=”” circlebordersize=”” circlebordercolor=”” outercirclebordersize=”” outercirclebordercolor=”” image=”” image_id=”” image_width=”” image_height=”” link=”” linktext=”Წაიკითხე მეტი” link_target=”” animation_type=”” animation_direction=leftanimation_speed=”0.3″ animation_offset=””]

  1. ძირითადი off.
  2. Disconnect 38-Way ტრანსმისია აღკაზმულობა Connector გადამცემი აღკაზმულობა.
  3. შემოწმება, რომ 2-Way შემაერთებელი კოროზიულ, ტერმინალები არა მოხრილი, გავრცელება, ან ფხვიერი; და არ არსებობს დაზიანება შემაერთებელი სხეულის.
  4. Measure resistance between 2-Way Connector Pin A and Pin B. ჩანაწერების მოსმენით(s).Shifter Rail Motor და გადამოწმების საავტომობილო არ shorted რომ მიწაზე ტესტი
  5. გაზომეთ შორის დაპირისპირებას 2-Way Connector ამოძრავებთ და ადგილზე. Record readings. Eaton Fuller ტრანსმისია Rail Motor Circuit 2-Way Connector ამოძრავებთ
  6. შეადარეთ ჩაწერილი მოსმენით(s).
    • თუ კითხვა(s) არის რიგი, შეცვლის ტრანსმისია აღკაზმულობა. წასვლა ნაბიჯი 13.
    • თუ კითხვა(s) გარეთ სპექტრი, შეცვლის X-Y Shifter. წასვლა ნაბიჯი 13.

[/fusion_content_box][/fusion_content_boxes][fusion_content_boxes layout=clean-horizontalcolumns=”1″ title_size=”18pxheading_size=”3″ title_color=”#ffffffbody_color=”#ffffffbackgroundcolor=”#4f4f4ficon=”” iconflip=”” iconrotate=”” iconspin=noiconcolor=”” icon_circle=”” icon_circle_radius=”” circlecolor=”” circlebordersize=”” circlebordercolor=”” outercirclebordersize=”” outercirclebordercolor=”” icon_size=”” icon_hover_type=”” hover_accent_color=”#f41000image=”” image_id=”” image_width=”” image_height=”” link_type=”” button_span=”” link_area=”” link_target=”” icon_align=leftanimation_type=”” animation_delay=”” animation_offset=”” animation_direction=leftanimation_speed=”0.3″ margin_top=”” margin_bottom=”” hide_on_mobile=small-visibility,medium-visibility,large-visibilityclass=”” id=””][fusion_content_box title=STEP 3. გადაამოწმოს სარემონტო.backgroundcolor=”” icon=”” iconflip=”” iconrotate=”” iconspin=noiconcolor=”” circlecolor=”” circlebordersize=”” circlebordercolor=”” outercirclebordersize=”” outercirclebordercolor=”” image=”” image_id=”” image_width=”” image_height=”” link=”” linktext=”Წაიკითხე მეტი” link_target=”” animation_type=”” animation_direction=leftanimation_speed=”0.3″ animation_offset=””]

  1. ძირითადი off.
  2. ხელახლა ყველა კონექტორები და უარყოფითი ბატარეის კაბელი.
  3. გასაღები ძრავის off.
  4. წმინდა კოდები, ვხედავ წმინდა უმოქმედო ხარვეზებით.
  5. მანქანა მანქანა და ცდილობენ აღადგინოთ კოდი ან დუბლიკატი საკითხი.
  6. შეამოწმეთ კოდები, ვხედავ ნახეთ აქტიური და არააქტიური ხარვეზებით.
    • თუ არ კოდები, ტესტი სრული.
    • თუ ბრალია კოდი 61 როგორც ჩანს,, მოვძებნოთ შეცდომა ტესტირება, წასვლა ნაბიჯი 1.
    • თუ კოდი გარდა 61 როგორც ჩანს,, ვხედავ ბრალია კოდი ინდექსი სია.

[/fusion_content_box][/fusion_content_boxes][/fusion_builder_column][/fusion_builder_row][/fusion_builder_container][fusion_global id=”13788″]