[fusion_builder_container hundred_percent=”no” hundred_percent_height=”no” hundred_percent_height_scroll=”no” hundred_percent_height_center_content=”yes” equal_height_columns=”no” menu_anchor=”” hide_on_mobile=”small-visibility,medium-visibility,large-visibility” status=”published” publish_date=”” class=”” id=”” background_color=”” background_image=”” background_position=”center center” background_repeat=”no-repeat” fade=”no” background_parallax=”none” enable_mobile=”no” parallax_speed=”0.3″ video_mp4=”” video_webm=”” video_ogv=”” video_url=”” video_aspect_ratio=”16:9″ video_loop=”yes” video_mute=”yes” video_preview_image=”” border_size=”” border_color=”” border_style=”solid” margin_top=”35″ margin_bottom=”” padding_top=”” padding_right=”” padding_bottom=”” padding_left=””][fusion_builder_row][fusion_builder_column type=”1_1″ layout=”1_1″ spacing=”” center_content=”no” link=”” target=”_self” min_height=”” hide_on_mobile=”small-visibility,medium-visibility,large-visibility” class=”” id=”” background_color=”” background_image=”” background_image_id=”” background_position=”left top” background_repeat=”no-repeat” hover_type=”none” border_size=”0″ border_color=”” border_style=”solid” border_position=”all” padding_top=”” padding_right=”” padding_bottom=”” padding_left=”” margin_top=”” margin_bottom=”” animation_type=”” animation_direction=”left” animation_speed=”0.3″ animation_offset=”” last=”no”][fusion_text columns=”” column_min_width=”” column_spacing=”” rule_style=”default” rule_size=”” rule_color=”” hide_on_mobile=”small-visibility,medium-visibility,large-visibility” class=”” id=””]
Eaton फुलर हाइब्रिड ट्रान्समिसन दोष कोड 116 – High Voltage Relays -(MY08 सिस्टम)
[/fusion_text][/fusion_builder_column][/fusion_builder_row][/fusion_builder_container][fusion_builder_container hundred_percent=”no” hundred_percent_height=”no” hundred_percent_height_scroll=”no” hundred_percent_height_center_content=”yes” equal_height_columns=”no” menu_anchor=”” hide_on_mobile=”small-visibility,medium-visibility,large-visibility” status=”published” publish_date=”” class=”” id=”” background_color=”” background_image=”” background_position=”center center” background_repeat=”no-repeat” fade=”no” background_parallax=”none” enable_mobile=”no” parallax_speed=”0.3″ video_mp4=”” video_webm=”” video_ogv=”” video_url=”” video_aspect_ratio=”16:9″ video_loop=”yes” video_mute=”yes” video_preview_image=”” border_size=”” border_color=”” border_style=”solid” margin_top=”” margin_bottom=”” padding_top=”” padding_right=”” padding_bottom=”” padding_left=””][fusion_builder_row][fusion_builder_column type=”1_1″ layout=”1_1″ spacing=”” center_content=”no” link=”” target=”_self” min_height=”” hide_on_mobile=”small-visibility,medium-visibility,large-visibility” class=”” id=”” background_color=”” background_image=”” background_image_id=”” background_position=”left top” background_repeat=”no-repeat” hover_type=”none” border_size=”0″ border_color=”” border_style=”solid” border_position=”all” padding_top=”” padding_right=”” padding_bottom=”” padding_left=”” margin_top=”” margin_bottom=”” animation_type=”” animation_direction=”left” animation_speed=”0.3″ animation_offset=”” last=”no”][fusion_text columns=”” column_min_width=”” column_spacing=”” rule_style=”default” rule_size=”” rule_color=”” hide_on_mobile=”small-visibility,medium-visibility,large-visibility” class=”” id=””]
Eaton हाइब्रिड ड्राइभ सिस्टम मोडेल लागि कोड दोष (MY08) एह-8E306A-यू, EH-8E306A-UPG, एह-8E306A-अप, EH-8E306A-CD, EH-8E306A-T, एह-6E606B-सीडी. Read below to learn how to test, खाली र आफ्नो Freightliner समाधान दोष कोड त्रुटिहरू, Mack, Peterbilt, Kenworth, volvo, अन्तर्राष्ट्रिय, र भारी कर्तव्य ट्रक र उपकरण. The High-Voltage Relays are located inside the Power Electronics Carrier (Pec) रिले बक्स एकाइ मा. There is 1 precharge relay on the positive side, an additional relay on the positive, र 1 on the negative for a total of 3. प्रणाली बन्द हुँदा यी रिले सामान्यतया खुला. यस रिले पलटनेवाला मार्फत नियन्त्रण गर्दै.
कोड दोष 116 – High Voltage Relays Detection
प्रणाली दोष लगािन्छ अघि निम्न preconditions भेट हुनुपर्छ:
- पलटनेवाला ज्वलन भोल्टेज भन्दा ठूलो छ 7 वोल्ट र कम 16 वोल्ट.
नोट: एक निष्क्रिय कोड निवारण जब उल्लेख उत्पादन निदान मोड (पल्स डिजिटल मड्यूलेशन)
अवस्था दोष कोड सक्रिय सेट गर्न
- आईएमएफ 10 is set when the Inverter detects the input voltage measured at the capacitor is less than 210 volts within 3 seconds after the sub-relay closed in the Relay Box.
- आईएमएफ 14 is set when only the negative relay in the Relay Box is on and capacitor voltage decreases less than 10 volts/5 seconds when initial capacitor voltage was greater than 200 volts and motor speed less than 500 min-1, or there is a detect error in the initial check.
निवर्तमान जब दोष कोड 116 is set the following conditions occur:
- अम्बर "जाँच हाइब्रिड" FMI लागि हल्का blinks 10 and remains solid for FMI 14.
- दोष HCM स्मृति भण्डारण गरिएको छ.
- पलटनेवाला उच्च भोल्टेज प्रणाली बन्द बन्द.
- HCM एक डिजेल मात्र मोडमा संकर वाहन नियन्त्रण गर्न जारी.
- प्रसारण पूर्वनिर्धारित सुरु 1st गर्न गियर.
[/fusion_text][fusion_text columns=”” column_min_width=”” column_spacing=”” rule_style=”default” rule_size=”” rule_color=”” hide_on_mobile=”small-visibility,medium-visibility,large-visibility” class=”” id=””]
दोष कोड निष्क्रिय सेट गर्न अवस्था
मात्र निष्क्रिय गल्तीलाई प्रसारण इलेक्ट्रोनिक नियन्त्रण एकाइ देखि खाली गर्न सकिन्छ (TECU) वा HCM इतिहास ServiceRanger प्रयोग. को TECU स्वतः इतिहास देखि गल्तीलाई पछि खाली 200 घण्टा र HCM स्वतः दोष पछि इतिहास देखि गल्तीलाई खाली लागि निष्क्रिय भएको छ 200 घण्टा.
यो दोष कोड निम्न कुनै पनि कारण हुन सक्छ:
- आईएमएफ 10
- Pec
- APG
- पलटनेवाला
- DC high-voltage cable
- DC cable interlock loops
- Inertia स्विच
- सेवा स्विच
- आईएमएफ 14
- पलटनेवाला
- Pec
[/fusion_text][/fusion_builder_column][/fusion_builder_row][/fusion_builder_container][fusion_builder_container hundred_percent=”no” hundred_percent_height=”no” hundred_percent_height_scroll=”no” hundred_percent_height_center_content=”yes” equal_height_columns=”no” menu_anchor=”” hide_on_mobile=”small-visibility,medium-visibility,large-visibility” status=”published” publish_date=”” class=”” id=”” background_color=”” background_image=”” background_position=”center center” background_repeat=”no-repeat” fade=”no” background_parallax=”none” enable_mobile=”no” parallax_speed=”0.3″ video_mp4=”” video_webm=”” video_ogv=”” video_url=”” video_aspect_ratio=”16:9″ video_loop=”yes” video_mute=”yes” video_preview_image=”” border_size=”” border_color=”” border_style=”solid” margin_top=”” margin_bottom=”” padding_top=”” padding_right=”” padding_bottom=”” padding_left=””][fusion_builder_row][fusion_builder_column type=”1_1″ layout=”1_1″ spacing=”” center_content=”no” link=”” target=”_self” min_height=”” hide_on_mobile=”small-visibility,medium-visibility,large-visibility” class=”” id=”” background_color=”” background_image=”” background_image_id=”” background_position=”left top” background_repeat=”no-repeat” hover_type=”none” border_size=”0″ border_color=”” border_style=”solid” border_position=”all” padding_top=”” padding_right=”” padding_bottom=”” padding_left=”” margin_top=”” margin_bottom=”” animation_type=”” animation_direction=”left” animation_speed=”0.3″ animation_offset=”” last=”no”][fusion_text columns=”” column_min_width=”” column_spacing=”” rule_style=”default” rule_size=”” rule_color=”” hide_on_mobile=”small-visibility,medium-visibility,large-visibility” class=”” id=””]
कोड दोष 116 – High Voltage Relays Test
[/fusion_text][/fusion_builder_column][/fusion_builder_row][/fusion_builder_container][fusion_builder_container hundred_percent=”no” hundred_percent_height=”no” hundred_percent_height_scroll=”no” hundred_percent_height_center_content=”yes” equal_height_columns=”no” menu_anchor=”” hide_on_mobile=”small-visibility,medium-visibility,large-visibility” status=”published” publish_date=”” class=”” id=”” background_color=”” background_image=”” background_position=”center center” background_repeat=”no-repeat” fade=”no” background_parallax=”none” enable_mobile=”no” parallax_speed=”0.3″ video_mp4=”” video_webm=”” video_ogv=”” video_url=”” video_aspect_ratio=”16:9″ video_loop=”yes” video_mute=”yes” video_preview_image=”” border_size=”” border_color=”” border_style=”solid” margin_top=”” margin_bottom=”” padding_top=”” padding_right=”” padding_bottom=”” padding_left=””][fusion_builder_row][fusion_builder_column type=”1_1″ layout=”1_1″ spacing=”” center_content=”no” link=”” target=”_self” min_height=”” hide_on_mobile=”small-visibility,medium-visibility,large-visibility” class=”” id=”” background_color=”” background_image=”” background_image_id=”” background_position=”left top” background_repeat=”no-repeat” hover_type=”none” border_size=”0″ border_color=”” border_style=”solid” border_position=”all” padding_top=”” padding_right=”” padding_bottom=”” padding_left=”” margin_top=”” margin_bottom=”” animation_type=”” animation_direction=”left” animation_speed=”0.3″ animation_offset=”” last=”no”][fusion_text columns=”” column_min_width=”” column_spacing=”” rule_style=”default” rule_size=”” rule_color=”” hide_on_mobile=”small-visibility,medium-visibility,large-visibility” class=”” id=””]
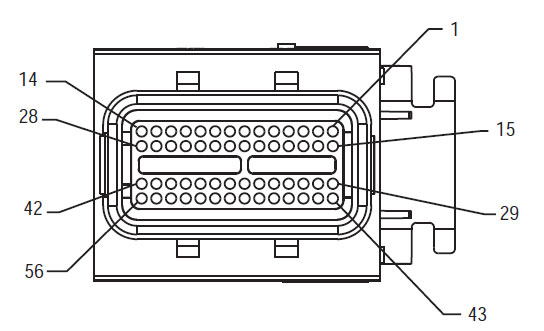
घटक पहिचान MY08 सिस्टम:
[/fusion_text][/fusion_builder_column][/fusion_builder_row][/fusion_builder_container][fusion_builder_container hundred_percent=”yes” hundred_percent_height=”no” hundred_percent_height_scroll=”no” hundred_percent_height_center_content=”yes” equal_height_columns=”no” menu_anchor=”” hide_on_mobile=”small-visibility,medium-visibility,large-visibility” status=”published” publish_date=”” class=”” id=”” background_color=”” background_image=”” background_position=”center center” background_repeat=”no-repeat” fade=”no” background_parallax=”none” enable_mobile=”no” parallax_speed=”0.3″ video_mp4=”” video_webm=”” video_ogv=”” video_url=”” video_aspect_ratio=”16:9″ video_loop=”yes” video_mute=”yes” video_preview_image=”” border_size=”” border_color=”” border_style=”solid” margin_top=”” margin_bottom=”” padding_top=”” padding_right=”10%” padding_bottom=”” padding_left=”10%”][fusion_builder_row][fusion_builder_column type=”1_3″ layout=”1_3″ spacing=”” center_content=”no” link=”” target=”_self” min_height=”” hide_on_mobile=”small-visibility,medium-visibility,large-visibility” class=”” id=”” background_color=”” background_image=”” background_image_id=”” background_position=”left top” background_repeat=”no-repeat” hover_type=”none” border_size=”0″ border_color=”” border_style=”solid” border_position=”all” padding_top=”” padding_right=”” padding_bottom=”” padding_left=”” margin_top=”” margin_bottom=”” animation_type=”” animation_direction=”left” animation_speed=”0.3″ animation_offset=”” last=”no”][fusion_imageframe image_id=”14474|full” max_width=”” style_type=”” blur=”” stylecolor=”” hover_type=”none” bordersize=”” bordercolor=”” borderradius=”” align=”center” lightbox=”no” gallery_id=”” lightbox_image=”” lightbox_image_id=”” alt=”डेल्फी 56-बाटो संभोग कनेक्टर हेर्नुहोस्” link=”” linktarget=”_self” hide_on_mobile=”small-visibility,medium-visibility,large-visibility” class=”” id=”” animation_type=”” animation_direction=”left” animation_speed=”0.3″ animation_offset=””]https://www.globaltransmissionsupply.com/wp-content/uploads/Inverter-56-Way-Mating-Connector-View.jpg[/fusion_imageframe][fusion_text columns=”” column_min_width=”” column_spacing=”” rule_style=”default” rule_size=”” rule_color=”” hide_on_mobile=”small-visibility,medium-visibility,large-visibility” class=”” id=””]
56-बाटो संभोग कनेक्टर हेर्नुहोस्
[/fusion_text][/fusion_builder_column][fusion_builder_column type=”1_3″ layout=”1_3″ spacing=”” center_content=”no” link=”” target=”_self” min_height=”” hide_on_mobile=”small-visibility,medium-visibility,large-visibility” class=”” id=”” background_color=”” background_image=”” background_image_id=”” background_position=”left top” background_repeat=”no-repeat” hover_type=”none” border_size=”0″ border_color=”” border_style=”solid” border_position=”all” padding_top=”” padding_right=”” padding_bottom=”” padding_left=”” margin_top=”” margin_bottom=”” animation_type=”” animation_direction=”left” animation_speed=”0.3″ animation_offset=”” last=”no”][fusion_imageframe image_id=”14635|full” max_width=”” style_type=”” blur=”” stylecolor=”” hover_type=”none” bordersize=”” bordercolor=”” borderradius=”” align=”center” lightbox=”no” gallery_id=”” lightbox_image=”” lightbox_image_id=”” alt=”उच्च भोल्टेज डीसी कनेक्टर हेर्नुहोस् Yazaki कनेक्टर” link=”” linktarget=”_self” hide_on_mobile=”small-visibility,medium-visibility,large-visibility” class=”” id=”” animation_type=”” animation_direction=”left” animation_speed=”0.3″ animation_offset=””]https://www.globaltransmissionsupply.com/wp-content/uploads/High-Voltage-DC-Connector-View.jpg[/fusion_imageframe][fusion_text columns=”” column_min_width=”” column_spacing=”” rule_style=”default” rule_size=”” rule_color=”” hide_on_mobile=”small-visibility,medium-visibility,large-visibility” class=”” id=””]
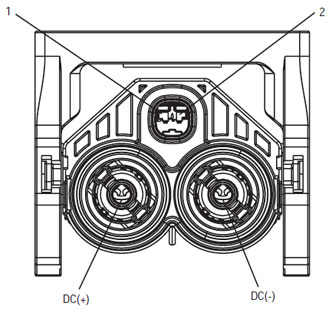
उच्च भोल्टेज डीसी कनेक्टर हेर्नुहोस् Yazaki कनेक्टर

[/fusion_text][/fusion_builder_column][fusion_builder_column type=”1_3″ layout=”1_3″ spacing=”” center_content=”no” link=”” target=”_self” min_height=”” hide_on_mobile=”small-visibility,medium-visibility,large-visibility” class=”” id=”” background_color=”” background_image=”” background_image_id=”” background_position=”left top” background_repeat=”no-repeat” hover_type=”none” border_size=”0″ border_color=”” border_style=”solid” border_position=”all” padding_top=”” padding_right=”” padding_bottom=”” padding_left=”” margin_top=”” margin_bottom=”” animation_type=”” animation_direction=”left” animation_speed=”0.3″ animation_offset=”” last=”no”][fusion_imageframe image_id=”14213|medium” max_width=”” style_type=”” blur=”” stylecolor=”” hover_type=”none” bordersize=”” bordercolor=”” borderradius=”” align=”center” lightbox=”no” gallery_id=”” lightbox_image=”” lightbox_image_id=”” alt=”Mating Connector View Deutsch 19 – बाटो” link=”” linktarget=”_self” hide_on_mobile=”small-visibility,medium-visibility,large-visibility” class=”” id=”” animation_type=”” animation_direction=”left” animation_speed=”0.3″ animation_offset=””]https://www.globaltransmissionsupply.com/wp-content/uploads/Eaton-Fuller-Harness-Connector-View-300×289.jpg[/fusion_imageframe][fusion_text columns=”” column_min_width=”” column_spacing=”” rule_style=”default” rule_size=”” rule_color=”” hide_on_mobile=”small-visibility,medium-visibility,large-visibility” class=”” id=””]
Mating Connector View Deutsch 19 – बाटो
[/fusion_text][/fusion_builder_column][/fusion_builder_row][/fusion_builder_container][fusion_builder_container hundred_percent=”no” hundred_percent_height=”no” hundred_percent_height_scroll=”no” hundred_percent_height_center_content=”yes” equal_height_columns=”no” menu_anchor=”” hide_on_mobile=”small-visibility,medium-visibility,large-visibility” status=”published” publish_date=”” class=”” id=”” background_color=”” background_image=”” background_position=”center center” background_repeat=”no-repeat” fade=”no” background_parallax=”none” enable_mobile=”no” parallax_speed=”0.3″ video_mp4=”” video_webm=”” video_ogv=”” video_url=”” video_aspect_ratio=”16:9″ video_loop=”yes” video_mute=”yes” video_preview_image=”” border_size=”” border_color=”” border_style=”solid” margin_top=”” margin_bottom=”” padding_top=”” padding_right=”” padding_bottom=”” padding_left=””][fusion_builder_row][fusion_builder_column type=”1_1″ layout=”1_1″ spacing=”” center_content=”no” link=”” target=”_self” min_height=”” hide_on_mobile=”small-visibility,medium-visibility,large-visibility” class=”” id=”” background_image_id=”” background_color=”#000000″ background_image=”” background_position=”left top” undefined=”” background_repeat=”no-repeat” hover_type=”none” border_size=”0″ border_color=”” border_style=”solid” border_position=”all” padding_top=”” padding_right=”” padding_bottom=”” padding_left=”” margin_top=”” margin_bottom=”” animation_type=”” animation_direction=”left” animation_speed=”0.3″ animation_offset=”” last=”no”][fusion_text columns=”” column_min_width=”” column_spacing=”” rule_style=”default” rule_size=”” rule_color=”” hide_on_mobile=”small-visibility,medium-visibility,large-visibility” class=”” id=””]
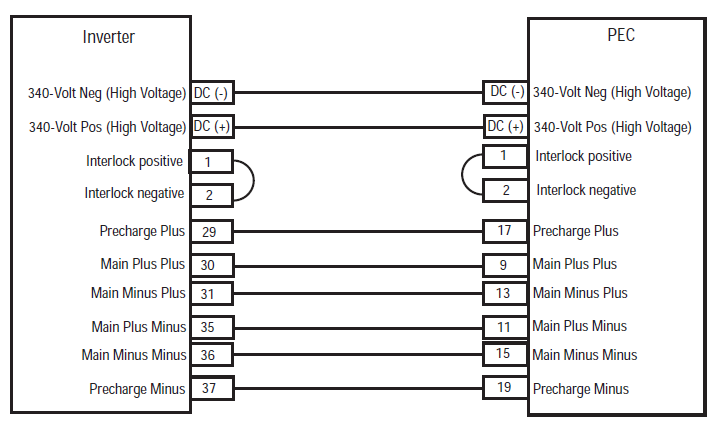
नोट: को उल्लेख Eaton हाइब्रिड घटक र कनेक्टर स्थान MY08 सिस्टम मा कनेक्टर स्थान को लागि
[/fusion_text][/fusion_builder_column][fusion_builder_column type=”1_1″ layout=”1_1″ spacing=”” center_content=”no” link=”” target=”_self” min_height=”” hide_on_mobile=”small-visibility,medium-visibility,large-visibility” class=”” id=”” background_color=”” background_image=”” background_image_id=”” background_position=”left top” background_repeat=”no-repeat” hover_type=”none” border_size=”0″ border_color=”” border_style=”solid” border_position=”all” padding_top=”” padding_right=”” padding_bottom=”” padding_left=”” margin_top=”” margin_bottom=”” animation_type=”” animation_direction=”left” animation_speed=”0.3″ animation_offset=”” last=”no”][fusion_imageframe image_id=”14666|full” max_width=”” style_type=”” blur=”” stylecolor=”” hover_type=”none” bordersize=”” bordercolor=”” borderradius=”” align=”center” lightbox=”no” gallery_id=”” lightbox_image=”” lightbox_image_id=”” alt=”Inverter PEC connectors Eaton Fuller Hybrid transmission” link=”” linktarget=”_self” hide_on_mobile=”small-visibility,medium-visibility,large-visibility” class=”” id=”” animation_type=”” animation_direction=”left” animation_speed=”0.3″ animation_offset=””]https://www.globaltransmissionsupply.com/wp-content/uploads/Inverter-PEC-connectors.png[/fusion_imageframe][/fusion_builder_column][/fusion_builder_row][/fusion_builder_container][fusion_builder_container hundred_percent=”no” hundred_percent_height=”no” hundred_percent_height_scroll=”no” hundred_percent_height_center_content=”yes” equal_height_columns=”no” menu_anchor=”” hide_on_mobile=”small-visibility,medium-visibility,large-visibility” status=”published” publish_date=”” class=”” id=”” background_color=”” background_image=”” background_position=”center center” background_repeat=”no-repeat” fade=”no” background_parallax=”none” enable_mobile=”no” parallax_speed=”0.3″ video_mp4=”” video_webm=”” video_ogv=”” video_url=”” video_aspect_ratio=”16:9″ video_loop=”yes” video_mute=”yes” video_preview_image=”” border_size=”” border_color=”” border_style=”solid” margin_top=”” margin_bottom=”” padding_top=”” padding_right=”” padding_bottom=”” padding_left=””][fusion_builder_row][fusion_builder_column type=”1_1″ layout=”1_1″ spacing=”” center_content=”no” link=”” target=”_self” min_height=”” hide_on_mobile=”small-visibility,medium-visibility,large-visibility” class=”” id=”” background_color=”” background_image=”” background_image_id=”” background_position=”left top” background_repeat=”no-repeat” hover_type=”none” border_size=”0″ border_color=”” border_style=”solid” border_position=”all” padding_top=”” padding_right=”” padding_bottom=”” padding_left=”” margin_top=”” margin_bottom=”” animation_type=”” animation_direction=”left” animation_speed=”0.3″ animation_offset=”” last=”no”][fusion_modal name=”warnings_cautions” title=”चेतावनी & होस” size=”large” background=”” border_color=”” show_footer=”yes” class=”” id=””]खतरा: Danger indicates you will be severely injured or killed if do not follow the indicated procedure.
चेतावनी: चेतावनी तुरुन्त जोखिम संकेत, which could result in severe personal injury if you do not follow the indicated procedure.
सावधानी: Caution indicates vehicle or property damage could occur if you do not follow the indicated procedure.
नोट: Note indicates additional detail that will aid in the diagnosis or repair of a component/system.
व्यक्तिगत चोट बच्न सूचित क्रममा निर्दिष्ट प्रक्रिया पालना:
1. यदि उच्च भोल्टेज शंकु वाहन वरिपरि छन् र lockout को Pec मा स्थापित छ, वाहन सुरु गर्न अनुमति पर्छ भनेर मात्र व्यक्ति lockout ट्याग हस्ताक्षर गर्ने व्यक्ति हो.
2. एक वाहन काम वा ट्याक्सी जानु अगाडि गर्दा इन्जिन चलिरहेको छ, के तपाईं "N" मा पारी लीवर ठाँउ गर्नुपर्छ पार्किङ ब्रेक सेट, र पाङ्ग्रा ब्लक.
3. सुरक्षा कारणहरूले, सधैं पूर्व "एन" बाट गियर स्थितिहरू चयन गर्न सेवा ब्रेक संलग्न
4. शुरू वाहन सधैं चालक सिटमा विराजमान हुन अघि, "N" चयन गर्नुहोस् पारी नियन्त्रण मा, र पार्किङ ब्रेक सेट.
5. मा ePTO संग वाहन, इन्जिन र / वा
मोटर / सर्जक ePTO मोडमा सुरु गर्न सक्नुहुन्छ. कुनै पनि मर्मतका कहिल्यै प्रदर्शन वा वाहन मा काम, जबकि यो मोडमा.
6. 12-वाल्ट ब्याट्री सकारात्मक (+) र नकारात्मक (-) कुनै पनि हाइब्रिड सुसज्जित वाहन कुनै पनि वेल्डिंग पहिला जडान विच्छेद हुनुपर्छ.
सावधानी: उपकरण इनकार वा क्षति बच्न सूचित क्रममा निर्दिष्ट प्रक्रिया पालना.
सावधानी: Do not release the parking brake or attempt to select a gear until the air pressure is at the correct level.
सावधानी: To avoid damage to the transmission during towing place the shift lever in “N” and lift the drive wheels off the ground or disconnect the driveline.
उच्च-भोल्टेज चेतावनी & होस
- CO2 वा सुख्खा रासायनिक अग्निशामक प्रयोग.
- उच्च-भोल्टेज ताराहरु सुन्तला इन्सुलेशन वा convoluted टयूबिंग समेटिएका र connectors मा चेतावनी लेबल चिनो लगाइएको छ.
- सबै Eaton® हाइब्रिड डीजल / इलेक्ट्रिक वाहन मार्क गरिनेछ 'हाइब्रिड’ वाहन को बाहिर मा, को ड्यास मा पारी लेबल संग.
- चेसिस माउन्ट संकर घटक को विशिष्ट स्थान लागि OEM उल्लेख.
- नहीं सुन्तला उच्च भोल्टेज केबल मा कटौती गर्छन्.
- मा Pec काट्न वा गर्छन् खोल्न.
- मा कटौती वा गर्छन् डीसी / डीसी कंवर्टर खोल्न.
- मा कटौती वा गर्छन् पलटनेवाला खोल्न.
एक बफर क्षेत्र अप सेट गर्नुपर्छ र उच्च-भोल्टेज रबर पन्जा अछूता (वर्ग 0 छाला संरक्षक संग) उच्च-भोल्टेज काम गर्न पूर्व आवश्यक. यी निर्देशनहरू पालना गर्न विफलता गंभीर व्यक्तिगत चोट वा मृत्यु हुन सक्छ.
उच्च-भोल्टेज प्रणालीमा काम गर्दा थकित हुनु पर्छ कि रबर-पृथक पन्जा वर्ग हो 0 छाला संरक्षक संग. रबर पन्जा पृष्ठमा "निदान उपकरण / सेवा प्रकाशन" मा पाइने रबर इन्सुलेशन पन्जा परीक्षण प्रक्रिया निम्न हरेक उपयोग गर्नु भन्दा पहिले परीक्षण गर्नुपर्छ 6. यी निर्देशनहरू पालना गर्न विफलता गंभीर व्यक्तिगत चोट वा मृत्यु हुन सक्छ.
को "उच्च-भोल्टेज सेवा बन्द र पावर-अप प्रक्रिया" निरीक्षण वा पृष्ठ कुनै पनि उच्च भोल्टेज केबल वा घटक काम अघि 4 अनुगमन गर्नुपर्छ. यी निर्देशनहरू पालना गर्न विफलता गंभीर व्यक्तिगत चोट वा मृत्यु हुन सक्छ.
को Lockout र Tagout उपकरणहरू मात्र वाहन मा Lockout र Tagout उपकरणहरू राखिएको भन्ने टेक्नीसियन द्वारा हटाइनु पर्छ. यी निर्देशनहरू पालना गर्न विफलता गंभीर व्यक्तिगत चोट वा मृत्यु हुन सक्छ.
उच्च-भोल्टेज रबर पृथक पन्जा (वर्ग 0 छाला संरक्षक संग) कुनै पनि काम गर्दा थकित हुनु पर्छ
उच्च-भोल्टेज केबल. पृष्ठमा "उच्च-भोल्टेज सेवा बन्द र पावर-अप प्रक्रिया" 4 कुनै पनि उच्च भोल्टेज केबल हटाउने पहिला अनुगमन गर्नुपर्छ. यी निर्देशनहरू पालना गर्न विफलता गंभीर व्यक्तिगत चोट वा मृत्यु हुन सक्छ.
उच्च-भोल्टेज केबल र ताराहरु सुन्तला हो र connectors मा एक चेतावनी लेबल समावेश. उच्च-भोल्टेज घटक लेबल संग मार्क. उच्च-भोल्टेज रबर पृथक पन्जा (वर्ग 0 छाला संरक्षक संग) यी घटक कुनै पनि काम गर्दा प्रयोग गरिनुपर्छ. यी निर्देशनहरू पालना गर्न विफलता गंभीर व्यक्तिगत चोट वा मृत्यु हुन सक्छ.
उच्च-भोल्टेज सेवा बन्द प्रक्रिया

1. पछि "उच्च-भोल्टेज कार्य क्षेत्र" प्रक्रिया.
2. को Pec को सामने मा रातो Pec सेवा स्विच पत्ता लगाउन र धक्का बन्द गर्नुहोस्.
3. सेवा स्विच कवर हटाउन र Lockout कोष्ठक स्थापना (J48506).
4. को Lockout कोष्ठक गर्न कस्नु ट्याग.
5. बंद बाट सार्न सक्नुहुन्न Pec सेवा स्विच सुनिश्चित.
6. प्रणाली को न्यूनतम लागि सेट गर्न अनुमति 5 उच्च भोल्टेज निर्वहन मिनेट.
7. ServiceRanger जडान र डाटा मनिटर पीआईडी हेर्न 116 "उच्च-भोल्टेज ब्याट्री क्षमता।" एसपीएन प्रयोग भनिन्छ 520323 J1939 जडान लागि "ब्याट्री भोल्टेज आरबी" (रिले बक्स).
8. भोल्टेज हुनुपर्छ 30 वोल्ट वा कम. यदि भोल्टेज माथि छ 30 वोल्ट, वाहन मा काम छैन र 1-800-826-मदत मा सम्पर्क Eaton® (4357).
9. बन्द ज्वलन प्रमुख र मर्मत गर्न वा समस्या निवारण चरण अगाडि बढ्न.
नोट: भोल्टेज प्रमुख बन्द हुँदा शून्य खस्छ.
उच्च-भोल्टेज सेवा पावर-अप प्रक्रिया
1. आफ्नो लक स्थितिहरु मा सबै उच्च भोल्टेज कनेक्टरों स्थापना.
2. तपाईं यदि व्यक्ति वाहन काम, को Lockout कोष्ठक र ट्याग हटाउन.
3. सेवा स्विच अधिक Lockout कोष्ठक पुन.
4. पुल सेवा बाहिर स्विच गर्नुहोस् र लागि वाहन सेट गरौं 2 मिनेट.
5. Start vehicle when appropriate.[/fusion_modal][fusion_modal name=”component_location” title=”Eaton हाइब्रिड घटक र कनेक्टर स्थान ” size=”large” background=”#ffffff” border_color=”” show_footer=”yes” class=”” id=””]

[/fusion_modal][fusion_modal name=”component_location2″ title=”Eaton हाइब्रिड घटक र कनेक्टर स्थान MY09 सिस्टम” size=”large” background=”#ffffff” border_color=”” show_footer=”yes” class=”” id=””]

[/fusion_modal][/fusion_builder_column][/fusion_builder_row][/fusion_builder_container][fusion_builder_container hundred_percent=”no” hundred_percent_height=”no” hundred_percent_height_scroll=”no” hundred_percent_height_center_content=”yes” equal_height_columns=”no” menu_anchor=”” hide_on_mobile=”small-visibility,medium-visibility,large-visibility” status=”published” publish_date=”” class=”” id=”” background_color=”” background_image=”” background_position=”center center” background_repeat=”no-repeat” fade=”no” background_parallax=”none” enable_mobile=”no” parallax_speed=”0.3″ video_mp4=”” video_webm=”” video_ogv=”” video_url=”” video_aspect_ratio=”16:9″ video_loop=”yes” video_mute=”yes” video_preview_image=”” border_size=”” border_color=”” border_style=”solid” margin_top=”” margin_bottom=”” padding_top=”” padding_right=”” padding_bottom=”” padding_left=””][fusion_builder_row][fusion_builder_column type=”1_1″ layout=”1_1″ spacing=”” center_content=”no” link=”” target=”_self” min_height=”” hide_on_mobile=”small-visibility,medium-visibility,large-visibility” class=”” id=”” background_color=”” background_image=”” background_image_id=”” background_position=”left top” background_repeat=”no-repeat” hover_type=”none” border_size=”0″ border_color=”” border_style=”solid” border_position=”all” padding_top=”” padding_right=”” padding_bottom=”” padding_left=”” margin_top=”” margin_bottom=”” animation_type=”” animation_direction=”left” animation_speed=”0.3″ animation_offset=”” last=”no”][fusion_content_boxes layout=”clean-horizontal” columns=”2″ title_size=”18px” heading_size=”3″ title_color=”#ffffff” body_color=”#ffffff” backgroundcolor=”#4f4f4f” icon=”” iconflip=”” iconrotate=”” iconspin=”no” iconcolor=”” icon_circle=”” icon_circle_radius=”” circlecolor=”” circlebordersize=”” circlebordercolor=”” outercirclebordersize=”” outercirclebordercolor=”” icon_size=”” icon_hover_type=”” hover_accent_color=”” image=”” image_id=”” image_width=”” image_height=”” link_type=”” button_span=”” link_area=”” link_target=”” icon_align=”left” animation_type=”” animation_delay=”” animation_offset=”” animation_direction=”left” animation_speed=”0.3″ margin_top=”” margin_bottom=”” hide_on_mobile=”small-visibility,medium-visibility,large-visibility” class=”” id=””][fusion_content_box title=”चरण 1. FMIs वर्तमान प्रमाणित.” backgroundcolor=”” icon=”” iconflip=”” iconrotate=”” iconspin=”no” iconcolor=”” circlecolor=”” circlebordersize=”” circlebordercolor=”” outercirclebordersize=”” outercirclebordercolor=”” image=”” image_id=”” image_width=”” image_height=”” link=”” linktext=”थप पढ्नुहोस्” link_target=”” animation_type=”” animation_direction=”left” animation_speed=”0.3″ animation_offset=””]
- समीक्षा र पालना चेतावनी & होस.
- 9-बाटो निदान कनेक्टर प्रयोग ServiceRanger सक्रिय कोड र FMIs दोष पुन: प्राप्त.
खतरा: हेर्नुहोस् High-Voltage Service Shutdown and Power-Up Procedures. आघात जोगिन गर्न प्रक्रियाहरु पालना, अनुचित ह्यान्डल उच्च भोल्टेज देखि बाल्न वा मृत्यु. - जो FMIs छैनन्
- दोष कोड भने 116 आईएमएफ 14 सूचीबद्ध छ, चरण जाने 9.
- दोष कोड भने 116 आईएमएफ 10 सूचीबद्ध छ, चरण जाने 2.
- If no Fault Codes are listed, The Service Switch was pushed in. चरण जाने 10.
[/fusion_content_box][fusion_content_box title=”चरण 2. Verify Data Monitor parameters.” backgroundcolor=”” icon=”” iconflip=”” iconrotate=”” iconspin=”no” iconcolor=”” circlecolor=”” circlebordersize=”” circlebordercolor=”” outercirclebordersize=”” outercirclebordercolor=”” image=”” image_id=”” image_width=”” image_height=”” link=”” linktext=”थप पढ्नुहोस्” link_target=”” animation_type=”” animation_direction=”left” animation_speed=”0.3″ animation_offset=””]
- प्रमुख मा.
- को टैक्सी मा 9-बाटो निदान कनेक्टर गर्न ServiceRanger जडान.
- "डेटा मनिटर" विकल्प चयन.
- View the Battery Pack Voltage (BCU1) पीआईडी 118 in the high- voltage Battery list:
- If the Battery Pack Voltage (BCU1) पीआईडी 118 is greater than 200 वोल्ट, चरण जाने 3.
- If the Battery Pack Voltage (BCU1) पीआईडी 118 भन्दा कम छ 200 वोल्ट, पावर इलेक्ट्रनिक्स वाहक प्रतिस्थापन (Pec), त्यसपछि चरण जाने 10.
[/fusion_content_box][/fusion_content_boxes][fusion_content_boxes layout=”clean-horizontal” columns=”2″ title_size=”18px” heading_size=”3″ title_color=”#ffffff” body_color=”#ffffff” backgroundcolor=”#4f4f4f” icon=”” iconflip=”” iconrotate=”” iconspin=”no” iconcolor=”” icon_circle=”” icon_circle_radius=”” circlecolor=”” circlebordersize=”” circlebordercolor=”” outercirclebordersize=”” outercirclebordercolor=”” icon_size=”” icon_hover_type=”” hover_accent_color=”” image=”” image_id=”” image_width=”” image_height=”” link_type=”” button_span=”” link_area=”” link_target=”” icon_align=”left” animation_type=”” animation_delay=”” animation_offset=”” animation_direction=”left” animation_speed=”0.3″ margin_top=”” margin_bottom=”” hide_on_mobile=”small-visibility,medium-visibility,large-visibility” class=”” id=””][fusion_content_box title=”चरण 3. Verify continuity of Inverter connector circuits.” backgroundcolor=”” icon=”” iconflip=”” iconrotate=”” iconspin=”no” iconcolor=”” circlecolor=”” circlebordersize=”” circlebordercolor=”” outercirclebordersize=”” outercirclebordercolor=”” image=”” image_id=”” image_width=”” image_height=”” link=”” linktext=”थप पढ्नुहोस्” link_target=”” animation_type=”” animation_direction=”left” animation_speed=”0.3″ animation_offset=””]
- प्रमुख बन्द.
- If the vehicle is not equipped with a DC/DC Converter or APG, skip this step.
- Using ASTM Class 0 electrical insulating rubber gloves with leather protectors, disconnect the DC cable for the DC/DC Converter and APG at the PEC.
- With the key off, temporarily remove the Lockout Bracket and pull the Service Switch out.
- प्रमुख मा.
- दोष कोड छ 116 आईएमएफ 10 still Active in ServiceRanger?
- दोष कोड भने 116 आईएमएफ 10 is Active with the DC/DC Converter and APG disconnected, चरण जाने 4.
- दोष कोड भने 116 आईएमएफ 10 is no longer Active with the DC/DC Converter and APG disconnected, key off and reinstall the Lockout Bracket on the PEC. Replace the Power Electronics Carrier (Pec), त्यसपछि चरण जाने 10.
[/fusion_content_box][fusion_content_box title=”चरण 4. Verify continuity of PEC connector circuits to ground.” backgroundcolor=”” icon=”” iconflip=”” iconrotate=”” iconspin=”” iconcolor=”” circlecolor=”” circlebordersize=”” circlebordercolor=”” outercirclebordersize=”” outercirclebordercolor=”” image=”” image_id=”” image_width=”” image_height=”” link=”” linktext=”” link_target=”” animation_type=”” animation_direction=”left” animation_speed=”0.3″ animation_offset=””]
- प्रमुख बन्द.
- को Pec 19-बाटो कनेक्टर विच्छेद.
- Temporarily remove the Lockout Bracket and pull the Service Switch out.
नोट: Ensure the Key Switch is off. - Measure resistance at the PEC 19-Way Connector Terminal at the following pins:
- पिन 17 पिन गर्न 19
- पिन 9 पिन गर्न 11
- पिन 13 पिन गर्न 15
- If the resistance between Pins 17 र पिन 19 112-122 ohms र पिन देखि प्रतिरोध छ 9 पिन गर्न 11 र पिन 13 पिन गर्न 15 प्रत्येक 33-37 ohms छन्, चरण जाने 5.
- प्रतिरोध दायरा बाहिर छ भने, चरण जाने 6.
[/fusion_content_box][/fusion_content_boxes][fusion_content_boxes layout=”clean-horizontal” columns=”2″ title_size=”18px” heading_size=”3″ title_color=”#ffffff” body_color=”#ffffff” backgroundcolor=”#4f4f4f” icon=”” iconflip=”” iconrotate=”” iconspin=”no” iconcolor=”” icon_circle=”” icon_circle_radius=”” circlecolor=”” circlebordersize=”” circlebordercolor=”” outercirclebordersize=”” outercirclebordercolor=”” icon_size=”” icon_hover_type=”” hover_accent_color=”” image=”” image_id=”” image_width=”” image_height=”” link_type=”” button_span=”” link_area=”” link_target=”” icon_align=”left” animation_type=”” animation_delay=”” animation_offset=”” animation_direction=”left” animation_speed=”0.3″ margin_top=”” margin_bottom=”” hide_on_mobile=”small-visibility,medium-visibility,large-visibility” class=”” id=””][fusion_content_box title=”चरण 5. Verify continuity of Inverter connector circuits to ground.” backgroundcolor=”” icon=”” iconflip=”” iconrotate=”” iconspin=”no” iconcolor=”” circlecolor=”” circlebordersize=”” circlebordercolor=”” outercirclebordersize=”” outercirclebordercolor=”” image=”” image_id=”” image_width=”” image_height=”” link=”” linktext=”थप पढ्नुहोस्” link_target=”” animation_type=”” animation_direction=”left” animation_speed=”0.3″ animation_offset=””]
- प्रमुख बन्द.
- Reconnect the PEC 19-Way Connector.
- पलटनेवाला 56-बाटो कनेक्टर विच्छेद.
- Inspect the connector pins for damaged, corroded and/or loose wires.
- Measure resistance between the Inverter 56-Way Connector at the following pins:
- पिन 29 पिन गर्न 37
- पिन 30 पिन गर्न 35
- पिन 31 पिन गर्न 36 नोट: प्रतिरोध मान अनुगमन गर्दा धीरे कनेक्टर नजिकै इन्वर्टर 56-बाटो कनेक्टर उपयोगी फ्लेक्स.
- यदि पिन बीच प्रतिरोध 29 र पिन 37 112-122 ohms र पिन देखि प्रतिरोध छ 30 पिन गर्न 35 र पिन 31 पिन गर्न 36 प्रत्येक 33-37 ohms छन्, push the Service Switch on the PEC and reinstall the Lockout Bracket. चरण जाने 8.
- प्रतिरोध दायरा बाहिर छ भने, repair the Hybrid Harness between the PEC and Inverter, त्यसपछि चरण जाने 10.
[/fusion_content_box][fusion_content_box title=”चरण 6. Verify continuity of PEC connector circuits.” backgroundcolor=”” icon=”” iconflip=”” iconrotate=”” iconspin=”” iconcolor=”” circlecolor=”” circlebordersize=”” circlebordercolor=”” outercirclebordersize=”” outercirclebordercolor=”” image=”” image_id=”” image_width=”” image_height=”” link=”” linktext=”” link_target=”” animation_type=”” animation_direction=”left” animation_speed=”0.3″ animation_offset=””]
- प्रमुख बन्द.
- Remove the Air Filter Cover and Air Filter from the PEC. Refer to TRSM1000 for procedures.*
- An Inertia Switch is located at the front of the PEC inside the box and viewable when the Air Filter is removed.
- Using ASTM Class 0 electrical insulating rubber gloves with leather protectors, press the button on the top of the Inertia Switch until heard or felt a click. This switch must be depressed a set distance to reset the switch.
- Measure resistance at the PEC 19-Way Connector Terminal at the following pins:
- पिन 17 पिन गर्न 19
- पिन 9 पिन गर्न 11
- पिन 13 पिन गर्न 15
- qIf the resistance between Pin 17 र पिन 19 112-122 ohms र पिन देखि प्रतिरोध छ 9 पिन गर्न 11 र पिन 13 पिन गर्न 15 प्रत्येक 33-37 ohms छन्, the Inertia Switch was tripped. Test is complete. चरण जाने 10.
- प्रतिरोध दायरा बाहिर छ भने, push in the Service Switch on the PEC and reinstall the Lockout Bracket, त्यसपछि चरण जाने 7.
[/fusion_content_box][/fusion_content_boxes][fusion_content_boxes layout=”clean-horizontal” columns=”2″ title_size=”18px” heading_size=”3″ title_color=”#ffffff” body_color=”#ffffff” backgroundcolor=”#4f4f4f” icon=”” iconflip=”” iconrotate=”” iconspin=”no” iconcolor=”” icon_circle=”” icon_circle_radius=”” circlecolor=”” circlebordersize=”” circlebordercolor=”” outercirclebordersize=”” outercirclebordercolor=”” icon_size=”” icon_hover_type=”” hover_accent_color=”” image=”” image_id=”” image_width=”” image_height=”” link_type=”” button_span=”” link_area=”” link_target=”” icon_align=”left” animation_type=”” animation_delay=”” animation_offset=”” animation_direction=”left” animation_speed=”0.3″ margin_top=”” margin_bottom=”” hide_on_mobile=”small-visibility,medium-visibility,large-visibility” class=”” id=””][fusion_content_box title=”चरण 7. Verify continuity of Inverter connector circuits.” backgroundcolor=”” icon=”” iconflip=”” iconrotate=”” iconspin=”no” iconcolor=”” circlecolor=”” circlebordersize=”” circlebordercolor=”” outercirclebordersize=”” outercirclebordercolor=”” image=”” image_id=”” image_width=”” image_height=”” link=”” linktext=”थप पढ्नुहोस्” link_target=”” animation_type=”” animation_direction=”left” animation_speed=”0.3″ animation_offset=””]
- प्रमुख बन्द.
- Disconnect the DC High-Voltage Cable at the PEC Bulkhead and at the Inverter Bulkhead.
- Measure resistance between the Low-Voltage Interlock Pins on the PEC side of the DC High-Voltage Cable:
नोट: The Interlock Pins are the two small spade terminals located in the same opening.- If the resistance is 0–0.3 ohms between the Interlock Loop Pins, पावर इलेक्ट्रनिक्स वाहक प्रतिस्थापन (Pec), त्यसपछि चरण जाने 10.
- प्रतिरोध दायरा बाहिर छ भने, डीसी उच्च भोल्टेज केबल प्रतिस्थापन, त्यसपछि चरण जाने 10.
[/fusion_content_box][fusion_content_box title=”चरण 8. Verify continuity of DC Cable from PEC to Inverter Connector circuits.” backgroundcolor=”” icon=”” iconflip=”” iconrotate=”” iconspin=”” iconcolor=”” circlecolor=”” circlebordersize=”” circlebordercolor=”” outercirclebordersize=”” outercirclebordercolor=”” image=”” image_id=”” image_width=”” image_height=”” link=”” linktext=”” link_target=”” animation_type=”” animation_direction=”left” animation_speed=”0.3″ animation_offset=””]
- प्रमुख बन्द.
- Disconnect the DC High-Voltage Cable at the PEC Bulkhead and the Inverter Bulkhead.
- Measure the resistance of each high-voltage circuit on the cable:
- If the resistance of each high-voltage circuit in the cable is 1 ओम वा कम, पलटनेवाला प्रतिस्थापन, त्यसपछि चरण जाने 10.
- प्रतिरोध दायरा बाहिर छ भने, replace the DC High-Voltage Cable, त्यसपछि चरण जाने 10.
[/fusion_content_box][/fusion_content_boxes][fusion_content_boxes layout=”clean-horizontal” columns=”2″ title_size=”18px” heading_size=”3″ title_color=”#ffffff” body_color=”#ffffff” backgroundcolor=”#4f4f4f” icon=”” iconflip=”” iconrotate=”” iconspin=”no” iconcolor=”” icon_circle=”” icon_circle_radius=”” circlecolor=”” circlebordersize=”” circlebordercolor=”” outercirclebordersize=”” outercirclebordercolor=”” icon_size=”” icon_hover_type=”” hover_accent_color=”#f41000″ image=”” image_id=”” image_width=”” image_height=”” link_type=”” button_span=”” link_area=”” link_target=”” icon_align=”left” animation_type=”” animation_delay=”” animation_offset=”” animation_direction=”left” animation_speed=”0.3″ margin_top=”” margin_bottom=”” hide_on_mobile=”small-visibility,medium-visibility,large-visibility” class=”” id=””][fusion_content_box title=”चरण 9. Verify Data Monitor parameters.” backgroundcolor=”” icon=”” iconflip=”” iconrotate=”” iconspin=”” iconcolor=”” circlecolor=”” circlebordersize=”” circlebordercolor=”” outercirclebordersize=”” outercirclebordercolor=”” image=”” image_id=”” image_width=”” image_height=”” link=”” linktext=”” link_target=”” animation_type=”” animation_direction=”left” animation_speed=”0.3″ animation_offset=””]
- को टैक्सी मा 9-बाटो निदान कनेक्टर गर्न ServiceRanger जडान.
- "डेटा मनिटर" विकल्प चयन.
- View the following parameters in the High-Voltage Battery list.
- Battery Pack Voltage (BCU1) पीआईडी 118
- Battery Voltage PID 116
- If the voltage readings on PID 116 र पीआईडी 118 are within 10 वोल्ट प्रत्येक अन्य को, पावर इलेक्ट्रनिक्स वाहक प्रतिस्थापन (Pec), त्यसपछि चरण जाने 10.
- If the voltage readings on PID 116 र पीआईडी 118 are greater than 10 वोल्ट प्रत्येक अन्य को, पलटनेवाला प्रतिस्थापन, त्यसपछि चरण जाने 10.
[/fusion_content_box][fusion_content_box title=”चरण 10. मरम्मत प्रमाणित.” backgroundcolor=”” icon=”” iconflip=”” iconrotate=”” iconspin=”no” iconcolor=”” circlecolor=”” circlebordersize=”” circlebordercolor=”” outercirclebordersize=”” outercirclebordercolor=”” image=”” image_id=”” image_width=”” image_height=”” link=”” linktext=”थप पढ्नुहोस्” link_target=”” animation_type=”” animation_direction=”left” animation_speed=”0.3″ animation_offset=””]
- प्रमुख बन्द.
- सबै connectors र नकारात्मक ब्याट्री केबल पुनः जडान.
- प्रमुख मा.
- कोड स्पष्ट, हेर्न निष्क्रिय गल्तीलाई स्पष्ट.
- वाहन ड्राइभ र कोड रिसेट गर्न प्रयास.
- कोड जाँच, हेर्न सक्रिय र निष्क्रिय गल्तीलाई हेर्न.
- कुनै कोड भने, परीक्षण पूरा.
- दोष कोड भने 116 देखिन्छ, contact Eaton at 1- 800-826-सहयोग (4357). Repeat this Step (चरण 10).
- यदि कोड अन्य भन्दा 116 देखिन्छ, हेर्न कोड सूचकांक सूची दोष.
[/fusion_content_box][/fusion_content_boxes][/fusion_builder_column][/fusion_builder_row][/fusion_builder_container][fusion_global id=”13788″]