[fusion_builder_container hundred_percent=”no” hundred_percent_height=”no” hundred_percent_height_scroll=”no” hundred_percent_height_center_content=”yes” equal_height_columns=”no” menu_anchor=”” hide_on_mobile=”small-visibility,medium-visibility,large-visibility” status=”published” publish_date=”” class=”” id=”” background_color=”” background_image=”” background_position=”center center” background_repeat=”no-repeat” fade=”no” background_parallax=”none” enable_mobile=”no” parallax_speed=”0.3″ video_mp4=”” video_webm=”” video_ogv=”” video_url=”” video_aspect_ratio=”16:9″ video_loop=”yes” video_mute=”yes” video_preview_image=”” border_size=”” border_color=”” border_style=”solid” margin_top=”35″ margin_bottom=”” padding_top=”” padding_right=”” padding_bottom=”” padding_left=””][fusion_builder_row][fusion_builder_column type=”1_1″ layout=”1_1″ spacing=”” center_content=”no” link=”” target=”_self” min_height=”” hide_on_mobile=”small-visibility,medium-visibility,large-visibility” class=”” id=”” background_color=”” background_image=”” background_image_id=”” background_position=”left top” background_repeat=”no-repeat” hover_type=”none” border_size=”0″ border_color=”” border_style=”solid” border_position=”all” padding_top=”” padding_right=”” padding_bottom=”” padding_left=”” margin_top=”” margin_bottom=”” animation_type=”” animation_direction=”left” animation_speed=”0.3″ animation_offset=”” last=”no”][fusion_text columns=”” column_min_width=”” column_spacing=”” rule_style=”default” rule_size=”” rule_color=”” hide_on_mobile=”small-visibility,medium-visibility,large-visibility” class=”” id=””]
Eaton Fuller Hybrid Transmission bilanakóða 116 – High Voltage Relays -(MY08 Systems)
[/fusion_text][/fusion_builder_column][/fusion_builder_row][/fusion_builder_container][fusion_builder_container hundred_percent=”no” hundred_percent_height=”no” hundred_percent_height_scroll=”no” hundred_percent_height_center_content=”yes” equal_height_columns=”no” menu_anchor=”” hide_on_mobile=”small-visibility,medium-visibility,large-visibility” status=”published” publish_date=”” class=”” id=”” background_color=”” background_image=”” background_position=”center center” background_repeat=”no-repeat” fade=”no” background_parallax=”none” enable_mobile=”no” parallax_speed=”0.3″ video_mp4=”” video_webm=”” video_ogv=”” video_url=”” video_aspect_ratio=”16:9″ video_loop=”yes” video_mute=”yes” video_preview_image=”” border_size=”” border_color=”” border_style=”solid” margin_top=”” margin_bottom=”” padding_top=”” padding_right=”” padding_bottom=”” padding_left=””][fusion_builder_row][fusion_builder_column type=”1_1″ layout=”1_1″ spacing=”” center_content=”no” link=”” target=”_self” min_height=”” hide_on_mobile=”small-visibility,medium-visibility,large-visibility” class=”” id=”” background_color=”” background_image=”” background_image_id=”” background_position=”left top” background_repeat=”no-repeat” hover_type=”none” border_size=”0″ border_color=”” border_style=”solid” border_position=”all” padding_top=”” padding_right=”” padding_bottom=”” padding_left=”” margin_top=”” margin_bottom=”” animation_type=”” animation_direction=”left” animation_speed=”0.3″ animation_offset=”” last=”no”][fusion_text columns=”” column_min_width=”” column_spacing=”” rule_style=”default” rule_size=”” rule_color=”” hide_on_mobile=”small-visibility,medium-visibility,large-visibility” class=”” id=””]
Kenna kóða fyrir Eaton Hybrid Drive Systems módel (MY08) EH-8E306A-U, EH-8E306A-UPG, EH-8E306A-UP, EH-8E306A-CD, EH-8E306A-T, EH-6E606B-CD. Lestu hér að neðan til að læra hvernig á að prófa, hreinsa og laga bilanakóða villa fyrir Freightliner þína, Mack, Peterbilt, Kenworth, Volvo, International, og þungur-skylda vörubíll og búnaður. The High-Voltage Relays are located inside the Power Electronics Carrier (PEC) í gengi Box eining. There is 1 precharge relay on the positive side, an additional relay on the positive, og 1 on the negative for a total of 3. Þessar liða eru yfirleitt opnar þegar kerfið er slökkt. Eru liðarnir stjórnað í gegnum Inverter.
villukóðanum 116 – High Voltage Relays Detection
Eftirfarandi forsendur verða að vera uppfyllt áður en kerfið skynjar að kenna:
- Inverter íkveikju spenna er hærri en 7 volt og minna en 16 volt.
Note: Þegar vandræða óvirkur kóða vísa til Vara Diagnostic Mode (PDM)
Skilyrði til Setja bilanakóða Active
- IMF 10 is set when the Inverter detects the input voltage measured at the capacitor is less than 210 volts within 3 seconds after the sub-relay closed in the Relay Box.
- IMF 14 is set when only the negative relay in the Relay Box is on and capacitor voltage decreases less than 10 volts/5 seconds when initial capacitor voltage was greater than 200 volts and motor speed less than 500 min-1, or there is a detect error in the initial check.
Varaleið Þegar Fault Code 116 er sett eftirfarandi skilyrði eiga sér stað:
- Amber "Athuga Hybrid" blikkar fyrir FMI 10 and remains solid for FMI 14.
- Fault er geymt í HCM minni.
- Inverter lokaður hár-spenna kerfi burt.
- HCM áfram að stjórna hybrid ökutæki í dísel eingöngu háttur.
- Sending vanskil byrja gír til 1..
[/fusion_text][fusion_text columns=”” column_min_width=”” column_spacing=”” rule_style=”default” rule_size=”” rule_color=”” hide_on_mobile=”small-visibility,medium-visibility,large-visibility” class=”” id=””]
Skilyrði til Setja bilanakóða óvirkur
Aðeins Óvirk galli er hægt að hreinsast úr Transmission Electronic Control Unit (TECU) eða HCM saga með ServiceRanger. The TECU hreinsar sjálfkrafa galla frá sögunni eftir 200 klukkustundir og HCM hreinsar sjálfkrafa galla úr sögunni eftir að kenna hefur verið óvirk 200 klukkustundir.
Þessi galli kóða getur stafað af einhverju af eftirfarandi:
- IMF 10
- PEC
- APG
- Inverter
- DC high-voltage cable
- DC cable interlock loops
- tregðu Switch
- þjónusta Switch
- IMF 14
- Inverter
- PEC
[/fusion_text][/fusion_builder_column][/fusion_builder_row][/fusion_builder_container][fusion_builder_container hundred_percent=”no” hundred_percent_height=”no” hundred_percent_height_scroll=”no” hundred_percent_height_center_content=”yes” equal_height_columns=”no” menu_anchor=”” hide_on_mobile=”small-visibility,medium-visibility,large-visibility” status=”published” publish_date=”” class=”” id=”” background_color=”” background_image=”” background_position=”center center” background_repeat=”no-repeat” fade=”no” background_parallax=”none” enable_mobile=”no” parallax_speed=”0.3″ video_mp4=”” video_webm=”” video_ogv=”” video_url=”” video_aspect_ratio=”16:9″ video_loop=”yes” video_mute=”yes” video_preview_image=”” border_size=”” border_color=”” border_style=”solid” margin_top=”” margin_bottom=”” padding_top=”” padding_right=”” padding_bottom=”” padding_left=””][fusion_builder_row][fusion_builder_column type=”1_1″ layout=”1_1″ spacing=”” center_content=”no” link=”” target=”_self” min_height=”” hide_on_mobile=”small-visibility,medium-visibility,large-visibility” class=”” id=”” background_color=”” background_image=”” background_image_id=”” background_position=”left top” background_repeat=”no-repeat” hover_type=”none” border_size=”0″ border_color=”” border_style=”solid” border_position=”all” padding_top=”” padding_right=”” padding_bottom=”” padding_left=”” margin_top=”” margin_bottom=”” animation_type=”” animation_direction=”left” animation_speed=”0.3″ animation_offset=”” last=”no”][fusion_text columns=”” column_min_width=”” column_spacing=”” rule_style=”default” rule_size=”” rule_color=”” hide_on_mobile=”small-visibility,medium-visibility,large-visibility” class=”” id=””]
villukóðanum 116 – High Voltage Relays Test
[/fusion_text][/fusion_builder_column][/fusion_builder_row][/fusion_builder_container][fusion_builder_container hundred_percent=”no” hundred_percent_height=”no” hundred_percent_height_scroll=”no” hundred_percent_height_center_content=”yes” equal_height_columns=”no” menu_anchor=”” hide_on_mobile=”small-visibility,medium-visibility,large-visibility” status=”published” publish_date=”” class=”” id=”” background_color=”” background_image=”” background_position=”center center” background_repeat=”no-repeat” fade=”no” background_parallax=”none” enable_mobile=”no” parallax_speed=”0.3″ video_mp4=”” video_webm=”” video_ogv=”” video_url=”” video_aspect_ratio=”16:9″ video_loop=”yes” video_mute=”yes” video_preview_image=”” border_size=”” border_color=”” border_style=”solid” margin_top=”” margin_bottom=”” padding_top=”” padding_right=”” padding_bottom=”” padding_left=””][fusion_builder_row][fusion_builder_column type=”1_1″ layout=”1_1″ spacing=”” center_content=”no” link=”” target=”_self” min_height=”” hide_on_mobile=”small-visibility,medium-visibility,large-visibility” class=”” id=”” background_color=”” background_image=”” background_image_id=”” background_position=”left top” background_repeat=”no-repeat” hover_type=”none” border_size=”0″ border_color=”” border_style=”solid” border_position=”all” padding_top=”” padding_right=”” padding_bottom=”” padding_left=”” margin_top=”” margin_bottom=”” animation_type=”” animation_direction=”left” animation_speed=”0.3″ animation_offset=”” last=”no”][fusion_text columns=”” column_min_width=”” column_spacing=”” rule_style=”default” rule_size=”” rule_color=”” hide_on_mobile=”small-visibility,medium-visibility,large-visibility” class=”” id=””]
Component til auðkenningar MY08 Systems:
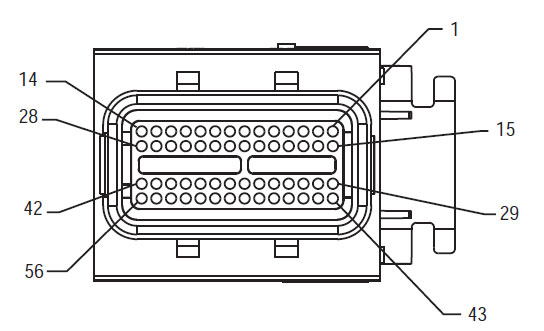
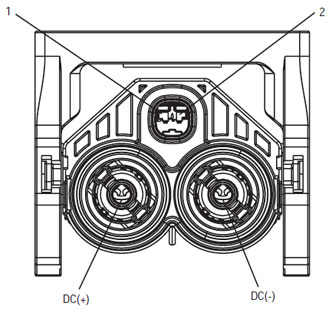
[/fusion_text][/fusion_builder_column][/fusion_builder_row][/fusion_builder_container][fusion_builder_container hundred_percent=”yes” hundred_percent_height=”no” hundred_percent_height_scroll=”no” hundred_percent_height_center_content=”yes” equal_height_columns=”no” menu_anchor=”” hide_on_mobile=”small-visibility,medium-visibility,large-visibility” status=”published” publish_date=”” class=”” id=”” background_color=”” background_image=”” background_position=”center center” background_repeat=”no-repeat” fade=”no” background_parallax=”none” enable_mobile=”no” parallax_speed=”0.3″ video_mp4=”” video_webm=”” video_ogv=”” video_url=”” video_aspect_ratio=”16:9″ video_loop=”yes” video_mute=”yes” video_preview_image=”” border_size=”” border_color=”” border_style=”solid” margin_top=”” margin_bottom=”” padding_top=”” padding_right=”10%” padding_bottom=”” padding_left=”10%”][fusion_builder_row][fusion_builder_column type=”1_3″ layout=”1_3″ spacing=”” center_content=”no” link=”” target=”_self” min_height=”” hide_on_mobile=”small-visibility,medium-visibility,large-visibility” class=”” id=”” background_color=”” background_image=”” background_image_id=”” background_position=”left top” background_repeat=”no-repeat” hover_type=”none” border_size=”0″ border_color=”” border_style=”solid” border_position=”all” padding_top=”” padding_right=”” padding_bottom=”” padding_left=”” margin_top=”” margin_bottom=”” animation_type=”” animation_direction=”left” animation_speed=”0.3″ animation_offset=”” last=”no”][fusion_imageframe image_id=”14474|full” max_width=”” style_type=”” blur=”” stylecolor=”” hover_type=”none” bordersize=”” bordercolor=”” borderradius=”” align=”center” lightbox=”no” gallery_id=”” lightbox_image=”” lightbox_image_id=”” alt=”Delphi 56-Way Mökun Tengi View” link=”” linktarget=”_self” hide_on_mobile=”small-visibility,medium-visibility,large-visibility” class=”” id=”” animation_type=”” animation_direction=”left” animation_speed=”0.3″ animation_offset=””]https://www.globaltransmissionsupply.com/wp-content/uploads/Inverter-56-Way-Mating-Connector-View.jpg[/fusion_imageframe][fusion_text columns=”” column_min_width=”” column_spacing=”” rule_style=”default” rule_size=”” rule_color=”” hide_on_mobile=”small-visibility,medium-visibility,large-visibility” class=”” id=””]
56-Way Pörun Tengi View
[/fusion_text][/fusion_builder_column][fusion_builder_column type=”1_3″ layout=”1_3″ spacing=”” center_content=”no” link=”” target=”_self” min_height=”” hide_on_mobile=”small-visibility,medium-visibility,large-visibility” class=”” id=”” background_color=”” background_image=”” background_image_id=”” background_position=”left top” background_repeat=”no-repeat” hover_type=”none” border_size=”0″ border_color=”” border_style=”solid” border_position=”all” padding_top=”” padding_right=”” padding_bottom=”” padding_left=”” margin_top=”” margin_bottom=”” animation_type=”” animation_direction=”left” animation_speed=”0.3″ animation_offset=”” last=”no”][fusion_imageframe image_id=”14635|full” max_width=”” style_type=”” blur=”” stylecolor=”” hover_type=”none” bordersize=”” bordercolor=”” borderradius=”” align=”center” lightbox=”no” gallery_id=”” lightbox_image=”” lightbox_image_id=”” alt=”High Voltage DC Tengi View Yazaki Tengi” link=”” linktarget=”_self” hide_on_mobile=”small-visibility,medium-visibility,large-visibility” class=”” id=”” animation_type=”” animation_direction=”left” animation_speed=”0.3″ animation_offset=””]https://www.globaltransmissionsupply.com/wp-content/uploads/High-Voltage-DC-Connector-View.jpg[/fusion_imageframe][fusion_text columns=”” column_min_width=”” column_spacing=”” rule_style=”default” rule_size=”” rule_color=”” hide_on_mobile=”small-visibility,medium-visibility,large-visibility” class=”” id=””]
High Voltage DC Tengi View Yazaki Tengi

[/fusion_text][/fusion_builder_column][fusion_builder_column type=”1_3″ layout=”1_3″ spacing=”” center_content=”no” link=”” target=”_self” min_height=”” hide_on_mobile=”small-visibility,medium-visibility,large-visibility” class=”” id=”” background_color=”” background_image=”” background_image_id=”” background_position=”left top” background_repeat=”no-repeat” hover_type=”none” border_size=”0″ border_color=”” border_style=”solid” border_position=”all” padding_top=”” padding_right=”” padding_bottom=”” padding_left=”” margin_top=”” margin_bottom=”” animation_type=”” animation_direction=”left” animation_speed=”0.3″ animation_offset=”” last=”no”][fusion_imageframe image_id=”14213|medium” max_width=”” style_type=”” blur=”” stylecolor=”” hover_type=”none” bordersize=”” bordercolor=”” borderradius=”” align=”center” lightbox=”no” gallery_id=”” lightbox_image=”” lightbox_image_id=”” alt=”Mating Connector View Deutsch 19 – Way” link=”” linktarget=”_self” hide_on_mobile=”small-visibility,medium-visibility,large-visibility” class=”” id=”” animation_type=”” animation_direction=”left” animation_speed=”0.3″ animation_offset=””]https://www.globaltransmissionsupply.com/wp-content/uploads/Eaton-Fuller-Harness-Connector-View-300×289.jpg[/fusion_imageframe][fusion_text columns=”” column_min_width=”” column_spacing=”” rule_style=”default” rule_size=”” rule_color=”” hide_on_mobile=”small-visibility,medium-visibility,large-visibility” class=”” id=””]
Mating Connector View Deutsch 19 – Way
[/fusion_text][/fusion_builder_column][/fusion_builder_row][/fusion_builder_container][fusion_builder_container hundred_percent=”no” hundred_percent_height=”no” hundred_percent_height_scroll=”no” hundred_percent_height_center_content=”yes” equal_height_columns=”no” menu_anchor=”” hide_on_mobile=”small-visibility,medium-visibility,large-visibility” status=”published” publish_date=”” class=”” id=”” background_color=”” background_image=”” background_position=”center center” background_repeat=”no-repeat” fade=”no” background_parallax=”none” enable_mobile=”no” parallax_speed=”0.3″ video_mp4=”” video_webm=”” video_ogv=”” video_url=”” video_aspect_ratio=”16:9″ video_loop=”yes” video_mute=”yes” video_preview_image=”” border_size=”” border_color=”” border_style=”solid” margin_top=”” margin_bottom=”” padding_top=”” padding_right=”” padding_bottom=”” padding_left=””][fusion_builder_row][fusion_builder_column type=”1_1″ layout=”1_1″ spacing=”” center_content=”no” link=”” target=”_self” min_height=”” hide_on_mobile=”small-visibility,medium-visibility,large-visibility” class=”” id=”” background_image_id=”” background_color=”#000000″ background_image=”” background_position=”left top” undefined=”” background_repeat=”no-repeat” hover_type=”none” border_size=”0″ border_color=”” border_style=”solid” border_position=”all” padding_top=”” padding_right=”” padding_bottom=”” padding_left=”” margin_top=”” margin_bottom=”” animation_type=”” animation_direction=”left” animation_speed=”0.3″ animation_offset=”” last=”no”][fusion_text columns=”” column_min_width=”” column_spacing=”” rule_style=”default” rule_size=”” rule_color=”” hide_on_mobile=”small-visibility,medium-visibility,large-visibility” class=”” id=””]
ATHUGIÐ: Vísa til Eaton Hybrid Component og tengi Location fyrir Tengja stöðum í MY08 Systems
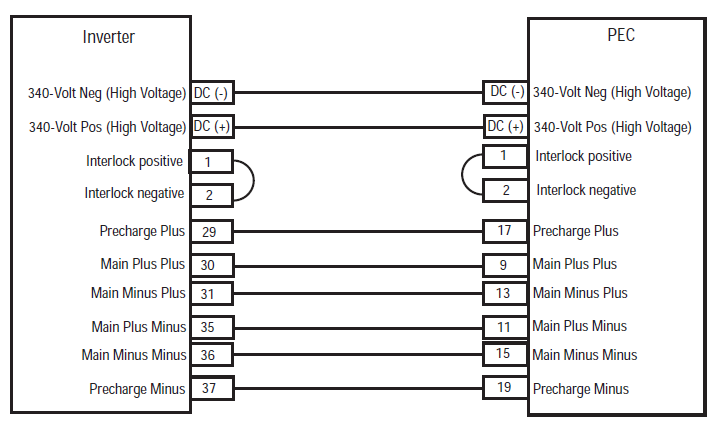
[/fusion_text][/fusion_builder_column][fusion_builder_column type=”1_1″ layout=”1_1″ spacing=”” center_content=”no” link=”” target=”_self” min_height=”” hide_on_mobile=”small-visibility,medium-visibility,large-visibility” class=”” id=”” background_color=”” background_image=”” background_image_id=”” background_position=”left top” background_repeat=”no-repeat” hover_type=”none” border_size=”0″ border_color=”” border_style=”solid” border_position=”all” padding_top=”” padding_right=”” padding_bottom=”” padding_left=”” margin_top=”” margin_bottom=”” animation_type=”” animation_direction=”left” animation_speed=”0.3″ animation_offset=”” last=”no”][fusion_imageframe image_id=”14666|full” max_width=”” style_type=”” blur=”” stylecolor=”” hover_type=”none” bordersize=”” bordercolor=”” borderradius=”” align=”center” lightbox=”no” gallery_id=”” lightbox_image=”” lightbox_image_id=”” alt=”Inverter PEC connectors Eaton Fuller Hybrid transmission” link=”” linktarget=”_self” hide_on_mobile=”small-visibility,medium-visibility,large-visibility” class=”” id=”” animation_type=”” animation_direction=”left” animation_speed=”0.3″ animation_offset=””]https://www.globaltransmissionsupply.com/wp-content/uploads/Inverter-PEC-connectors.png[/fusion_imageframe][/fusion_builder_column][/fusion_builder_row][/fusion_builder_container][fusion_builder_container hundred_percent=”no” hundred_percent_height=”no” hundred_percent_height_scroll=”no” hundred_percent_height_center_content=”yes” equal_height_columns=”no” menu_anchor=”” hide_on_mobile=”small-visibility,medium-visibility,large-visibility” status=”published” publish_date=”” class=”” id=”” background_color=”” background_image=”” background_position=”center center” background_repeat=”no-repeat” fade=”no” background_parallax=”none” enable_mobile=”no” parallax_speed=”0.3″ video_mp4=”” video_webm=”” video_ogv=”” video_url=”” video_aspect_ratio=”16:9″ video_loop=”yes” video_mute=”yes” video_preview_image=”” border_size=”” border_color=”” border_style=”solid” margin_top=”” margin_bottom=”” padding_top=”” padding_right=”” padding_bottom=”” padding_left=””][fusion_builder_row][fusion_builder_column type=”1_1″ layout=”1_1″ spacing=”” center_content=”no” link=”” target=”_self” min_height=”” hide_on_mobile=”small-visibility,medium-visibility,large-visibility” class=”” id=”” background_color=”” background_image=”” background_image_id=”” background_position=”left top” background_repeat=”no-repeat” hover_type=”none” border_size=”0″ border_color=”” border_style=”solid” border_position=”all” padding_top=”” padding_right=”” padding_bottom=”” padding_left=”” margin_top=”” margin_bottom=”” animation_type=”” animation_direction=”left” animation_speed=”0.3″ animation_offset=”” last=”no”][fusion_modal name=”warnings_cautions” title=”Viðvaranir & varar” size=”large” background=”” border_color=”” show_footer=”yes” class=”” id=””]hætta: Hætta táknar að þú munt vera alvarlega slasaður eða drepinn ef ekki fylgja uppgeíhu málsmeðferð.
Viðvörun: Viðvörun bendir strax hættu, sem gæti leitt til alvarlegrar slysa ef þú fylgir ekki gefið til kynna málsmeðferð.
Varúð: Varúð bendir ökutæki eða eignatjóns gæti komið ef þú fylgir ekki gefið til kynna málsmeðferð.
Note: Ath bendir frekari smáatriði sem mun aðstoða við greiningu eða viðgerð á íhluta / kerfi.
Fylgdu tilgreind málsmeðferð í tilgreindu skyni að koma í veg fyrir slys:
1. Ef hár-spenna keilur eru um ökutækið og læsa er uppsett á PEC, sá eini sem ætti að vera heimilt að hefja ökutæki er sá sem undirritað læsa tag.
2. Áður en vinna á ökutæki eða yfirgefa leigubíl á meðan vélin er í gangi, þú ættir að setja vakt lyftistöng í "N" setja í handbremsu, og loka á hjól.
3. Af öryggisástæðum, alltaf stunda þjónustu bremsum fyrir að velja gír stöðu frá "N."
4. Áður en þú byrjar ökutæki ávallt sitja í bílstjórasætinu, velja "N" á vakt stjórn, og setja handbremsu.
5. Í ökutækjum með ePTO, vélin og / eða
Mótor / Generator getur byrjað á ePTO ham. Aldrei framkvæma allt viðhald eða vinna á bifreið, í þessum ham.
6. 12-Volt Battery jákvæð (+) og neikvæð (-) verður að vera ótengdur á undan hvaða suðu á hvaða Hybrid búin ökutæki.
Varúð: Fylgdu tilgreind málsmeðferð í tilgreindu skyni að koma í veg fyrir búnað bilun eða skemmdir.
Varúð: Sleppir ekki handbremsu eða reyna að velja gír fyrr en loftþrýstingur er á réttum vettvangi.
Varúð: Til að koma í veg fyrir skemmdir á sendingu meðan togað stað á vakt lyftistöng í "N" og lyfta hjólin á jörðu eða aftengja Driveline.
High-Voltage Viðvaranir & varar
- Nota CO2 eða duft slökkvitækja.
- The hár-spenna raflögn er fjallað í appelsínugulum einangrun eða undinn slöngu og merkt með viðvarana á tengin.
- Allir Eaton® Hybrid Diesel / Electric ökutæki verða merkt "Hybrid’ utan á ökutækinu, ásamt vakt miðanum á strik.
- Vísað til OEM fyrir tiltekna staðsetningu undirvagn fest blendingur hluti.
- Ekki skera í appelsínugult hár-spenna snúrur.
- Ekki skera í eða opna PEC.
- Ekki skera í eða opna DC / DC breytir.
- Ekki skera í eða opna Inverter.
A biðminni verður að setja upp og hár-spenna einangrun gúmmí hanska (flokkur 0 með leður hlífar) er þörf áður en vinna á háspennu. Bilun að fylgja þessum leiðbeiningum getur leitt til alvarlegs líkamstjóns eða dauða.
The gúmmí einangruð hanska sem verður að nota á meðan að vinna á hár-spenna kerfisins er flokkur 0 með leður hlífar. The gúmmí hanska skal prófa fyrir hverja notkun kjölfar gúmmí einangrun hanska próf málsmeðferð sem finnast í "Diagnostic Tools / Service Publications" á bls 6. Bilun að fylgja þessum leiðbeiningum getur leitt til alvarlegs líkamstjóns eða dauða.
Áður skoðun eða vinna á hvaða hár-spenna snúrur eða íhluti í "High-Voltage Service Lokun og Power-Up" á síðu 4 ætti að fylgja. Bilun að fylgja þessum leiðbeiningum getur leitt til alvarlegs líkamstjóns eða dauða.
Læsa og Tagout tæki ætti að fjarlægja með tæknimaður sem sett læsa og Tagout tæki á ökutækinu. Bilun að fylgja þessum leiðbeiningum getur leitt til alvarlegs líkamstjóns eða dauða.
High-spenna gúmmí einangruð hanska (flokkur 0 með leður hlífar) skal nota þegar vinna á einhverju
hár-spenna snúrur. The "High-Voltage Service Lokun og Power-Up Framkvæmd" á bls 4 Fylgja verður áður að fjarlægja allar hár-spenna snúrur. Bilun að fylgja þessum leiðbeiningum getur leitt til alvarlegs líkamstjóns eða dauða.
High-spenna snúrur og tengi eru appelsínugul og innihalda viðvörun merki á the tengi. High-spenna þættir eru merktir með merkimiða. High-spenna gúmmí einangruð hanska (flokkur 0 með leður hlífar) verður að nota þegar vinna á einhverjum af þessum hlutum. Bilun að fylgja þessum leiðbeiningum getur leitt til alvarlegs líkamstjóns eða dauða.
High-Voltage Service Lokun Verklagsreglur

1. Fylgja "High-Voltage Work Area" aðferð.
2. Finndu rauða PEC Service kveikja á the andlit af the PEC og ýta slökkva.
3. Taktu Þjónusta Switch Cover og setja verkbann sviga (J48506).
4. Festið tag til Læsa Bracket.
5. Tryggja PEC Service rofi getur ekki fært frá burt stöðu.
6. Leyfa kerfinu að setja að lágmarki 5 mínútur til að sinna mikil spenna.
7. Tengjast ServiceRanger og skoða gögn Monitor kennitölu 116 kallast "High-Voltage Rafhlaða Möguleiki". Nota SPN 520323 fyrir J1939 tengsl "rafhlaða spennu RB" (Relay Box).
8. Spennan á að vera 30 volt eða minna. Ef spenna er fyrir ofan 30 volt, virka ekki á ökutækinu og hafðu Eaton® á 1-800-826-HELP (4357).
9. Snúa kveikjulykil burt og halda áfram að gera eða vandræða skref.
Note: Spenna fer niður í núll þegar lykillinn er slökkt.
High-Voltage Service Power-Up Framkvæmd
1. Setja öll hár-spenna tengi í læstum stöðum sínum.
2. Ef þú ert manneskja að vinna á ökutækinu, fjarlægja læsa sviga og merki.
3. Setja læsa sviga yfir Service Switch.
4. Dragðu þjónustu Switch út og láta ökutæki sett fyrir 2 mínútur.
5. Start vehicle when appropriate.[/fusion_modal][fusion_modal name=”component_location” title=”Eaton Hybrid Component og tengi Location ” size=”large” background=”#ffffff” border_color=”” show_footer=”yes” class=”” id=””]

[/fusion_modal][fusion_modal name=”component_location2″ title=”Eaton Hybrid Component og tengi Location MY09 Systems” size=”large” background=”#ffffff” border_color=”” show_footer=”yes” class=”” id=””]

[/fusion_modal][/fusion_builder_column][/fusion_builder_row][/fusion_builder_container][fusion_builder_container hundred_percent=”no” hundred_percent_height=”no” hundred_percent_height_scroll=”no” hundred_percent_height_center_content=”yes” equal_height_columns=”no” menu_anchor=”” hide_on_mobile=”small-visibility,medium-visibility,large-visibility” status=”published” publish_date=”” class=”” id=”” background_color=”” background_image=”” background_position=”center center” background_repeat=”no-repeat” fade=”no” background_parallax=”none” enable_mobile=”no” parallax_speed=”0.3″ video_mp4=”” video_webm=”” video_ogv=”” video_url=”” video_aspect_ratio=”16:9″ video_loop=”yes” video_mute=”yes” video_preview_image=”” border_size=”” border_color=”” border_style=”solid” margin_top=”” margin_bottom=”” padding_top=”” padding_right=”” padding_bottom=”” padding_left=””][fusion_builder_row][fusion_builder_column type=”1_1″ layout=”1_1″ spacing=”” center_content=”no” link=”” target=”_self” min_height=”” hide_on_mobile=”small-visibility,medium-visibility,large-visibility” class=”” id=”” background_color=”” background_image=”” background_image_id=”” background_position=”left top” background_repeat=”no-repeat” hover_type=”none” border_size=”0″ border_color=”” border_style=”solid” border_position=”all” padding_top=”” padding_right=”” padding_bottom=”” padding_left=”” margin_top=”” margin_bottom=”” animation_type=”” animation_direction=”left” animation_speed=”0.3″ animation_offset=”” last=”no”][fusion_content_boxes layout=”clean-horizontal” columns=”2″ title_size=”18px” heading_size=”3″ title_color=”#ffffff” body_color=”#ffffff” backgroundcolor=”#4f4f4f” icon=”” iconflip=”” iconrotate=”” iconspin=”no” iconcolor=”” icon_circle=”” icon_circle_radius=”” circlecolor=”” circlebordersize=”” circlebordercolor=”” outercirclebordersize=”” outercirclebordercolor=”” icon_size=”” icon_hover_type=”” hover_accent_color=”” image=”” image_id=”” image_width=”” image_height=”” link_type=”” button_span=”” link_area=”” link_target=”” icon_align=”left” animation_type=”” animation_delay=”” animation_offset=”” animation_direction=”left” animation_speed=”0.3″ margin_top=”” margin_bottom=”” hide_on_mobile=”small-visibility,medium-visibility,large-visibility” class=”” id=””][fusion_content_box title=”STEP 1. Staðfesta FMIs staðar.” backgroundcolor=”” icon=”” iconflip=”” iconrotate=”” iconspin=”no” iconcolor=”” circlecolor=”” circlebordersize=”” circlebordercolor=”” outercirclebordersize=”” outercirclebordercolor=”” image=”” image_id=”” image_width=”” image_height=”” link=”” linktext=”Lestu meira” link_target=”” animation_type=”” animation_direction=”left” animation_speed=”0.3″ animation_offset=””]
- Endurskoða og fylgja Viðvaranir & varar.
- Sækja Active kóða kenna og FMIs með ServiceRanger með 9-Way greiningartengisins.
hætta: sjá High-Voltage Service Shutdown and Power-Up Procedures. Fylgdu aðferðir til að koma í veg fyrir lost, brenna eða dauða af óviðeigandi meðhöndluð háspennu. - Sem FMIs eru til staðar
- Ef villukóðanum 116 IMF 14 er skráð, farið í skref 9.
- Ef villukóðanum 116 IMF 10 er skráð, farið í skref 2.
- If no Fault Codes are listed, The Service Switch was pushed in. Farið í skref 10.
[/fusion_content_box][fusion_content_box title=”STEP 2. Verify Data Monitor parameters.” backgroundcolor=”” icon=”” iconflip=”” iconrotate=”” iconspin=”no” iconcolor=”” circlecolor=”” circlebordersize=”” circlebordercolor=”” outercirclebordersize=”” outercirclebordercolor=”” image=”” image_id=”” image_width=”” image_height=”” link=”” linktext=”Lestu meira” link_target=”” animation_type=”” animation_direction=”left” animation_speed=”0.3″ animation_offset=””]
- Key á.
- Tengjast ServiceRanger í 9-Way greiningartengisins í leigubílnum.
- Veldu "Data Monitor" valmöguleikann.
- View the Battery Pack Voltage (BCU1) PID 118 in the high- voltage Battery list:
- If the Battery Pack Voltage (BCU1) PID 118 is greater than 200 volt, farið í skref 3.
- If the Battery Pack Voltage (BCU1) PID 118 er minna en 200 volt, skipta um Power Electronics Carrier (PEC), þá fara í skref 10.
[/fusion_content_box][/fusion_content_boxes][fusion_content_boxes layout=”clean-horizontal” columns=”2″ title_size=”18px” heading_size=”3″ title_color=”#ffffff” body_color=”#ffffff” backgroundcolor=”#4f4f4f” icon=”” iconflip=”” iconrotate=”” iconspin=”no” iconcolor=”” icon_circle=”” icon_circle_radius=”” circlecolor=”” circlebordersize=”” circlebordercolor=”” outercirclebordersize=”” outercirclebordercolor=”” icon_size=”” icon_hover_type=”” hover_accent_color=”” image=”” image_id=”” image_width=”” image_height=”” link_type=”” button_span=”” link_area=”” link_target=”” icon_align=”left” animation_type=”” animation_delay=”” animation_offset=”” animation_direction=”left” animation_speed=”0.3″ margin_top=”” margin_bottom=”” hide_on_mobile=”small-visibility,medium-visibility,large-visibility” class=”” id=””][fusion_content_box title=”STEP 3. Verify continuity of Inverter connector circuits.” backgroundcolor=”” icon=”” iconflip=”” iconrotate=”” iconspin=”no” iconcolor=”” circlecolor=”” circlebordersize=”” circlebordercolor=”” outercirclebordersize=”” outercirclebordercolor=”” image=”” image_id=”” image_width=”” image_height=”” link=”” linktext=”Lestu meira” link_target=”” animation_type=”” animation_direction=”left” animation_speed=”0.3″ animation_offset=””]
- Key burt.
- If the vehicle is not equipped with a DC/DC Converter or APG, skip this step.
- Using ASTM Class 0 electrical insulating rubber gloves with leather protectors, disconnect the DC cable for the DC/DC Converter and APG at the PEC.
- With the key off, temporarily remove the Lockout Bracket and pull the Service Switch out.
- Key á.
- Er Fault Code 116 IMF 10 still Active in ServiceRanger?
- Ef villukóðanum 116 IMF 10 is Active with the DC/DC Converter and APG disconnected, farið í skref 4.
- Ef villukóðanum 116 IMF 10 is no longer Active with the DC/DC Converter and APG disconnected, key off and reinstall the Lockout Bracket on the PEC. Replace the Power Electronics Carrier (PEC), þá fara í skref 10.
[/fusion_content_box][fusion_content_box title=”STEP 4. Verify continuity of PEC connector circuits to ground.” backgroundcolor=”” icon=”” iconflip=”” iconrotate=”” iconspin=”” iconcolor=”” circlecolor=”” circlebordersize=”” circlebordercolor=”” outercirclebordersize=”” outercirclebordercolor=”” image=”” image_id=”” image_width=”” image_height=”” link=”” linktext=”” link_target=”” animation_type=”” animation_direction=”left” animation_speed=”0.3″ animation_offset=””]
- Key burt.
- Aftengið PEC 19-Way Tengja.
- Temporarily remove the Lockout Bracket and pull the Service Switch out.
Note: Ensure the Key Switch is off. - Measure resistance at the PEC 19-Way Connector Terminal at the following pins:
- Pin 17 að pinna 19
- Pin 9 að pinna 11
- Pin 13 að pinna 15
- If the resistance between Pins 17 og Pin 19 er 112-122 ohm og viðnámið frá: Pin 9 að pinna 11 og Pin 13 að pinna 15 eru hvor 33-37 ohm, farið í skref 5.
- Ef viðnám er utan sviðs, farið í skref 6.
[/fusion_content_box][/fusion_content_boxes][fusion_content_boxes layout=”clean-horizontal” columns=”2″ title_size=”18px” heading_size=”3″ title_color=”#ffffff” body_color=”#ffffff” backgroundcolor=”#4f4f4f” icon=”” iconflip=”” iconrotate=”” iconspin=”no” iconcolor=”” icon_circle=”” icon_circle_radius=”” circlecolor=”” circlebordersize=”” circlebordercolor=”” outercirclebordersize=”” outercirclebordercolor=”” icon_size=”” icon_hover_type=”” hover_accent_color=”” image=”” image_id=”” image_width=”” image_height=”” link_type=”” button_span=”” link_area=”” link_target=”” icon_align=”left” animation_type=”” animation_delay=”” animation_offset=”” animation_direction=”left” animation_speed=”0.3″ margin_top=”” margin_bottom=”” hide_on_mobile=”small-visibility,medium-visibility,large-visibility” class=”” id=””][fusion_content_box title=”STEP 5. Verify continuity of Inverter connector circuits to ground.” backgroundcolor=”” icon=”” iconflip=”” iconrotate=”” iconspin=”no” iconcolor=”” circlecolor=”” circlebordersize=”” circlebordercolor=”” outercirclebordersize=”” outercirclebordercolor=”” image=”” image_id=”” image_width=”” image_height=”” link=”” linktext=”Lestu meira” link_target=”” animation_type=”” animation_direction=”left” animation_speed=”0.3″ animation_offset=””]
- Key burt.
- Reconnect the PEC 19-Way Connector.
- Aftengið Inverter 56-Way Tengja.
- Inspect the connector pins for damaged, corroded and/or loose wires.
- Measure resistance between the Inverter 56-Way Connector at the following pins:
- Pin 29 að pinna 37
- Pin 30 að pinna 35
- Pin 31 að pinna 36 Note: sveigja varlega Inverter 56-Way Connector beisla nálægt tengið á meðan fylgjast með viðnám gildi.
- Ef mótstöðu frá pinna 29 og Pin 37 er 112-122 ohm og viðnámið frá: Pin 30 að pinna 35 og Pin 31 að pinna 36 eru hvor 33-37 ohm, push the Service Switch on the PEC and reinstall the Lockout Bracket. Farið í skref 8.
- Ef viðnám er utan sviðs, repair the Hybrid Harness between the PEC and Inverter, þá fara í skref 10.
[/fusion_content_box][fusion_content_box title=”STEP 6. Verify continuity of PEC connector circuits.” backgroundcolor=”” icon=”” iconflip=”” iconrotate=”” iconspin=”” iconcolor=”” circlecolor=”” circlebordersize=”” circlebordercolor=”” outercirclebordersize=”” outercirclebordercolor=”” image=”” image_id=”” image_width=”” image_height=”” link=”” linktext=”” link_target=”” animation_type=”” animation_direction=”left” animation_speed=”0.3″ animation_offset=””]
- Key burt.
- Remove the Air Filter Cover and Air Filter from the PEC. Refer to TRSM1000 for procedures.*
- An Inertia Switch is located at the front of the PEC inside the box and viewable when the Air Filter is removed.
- Using ASTM Class 0 electrical insulating rubber gloves with leather protectors, press the button on the top of the Inertia Switch until heard or felt a click. This switch must be depressed a set distance to reset the switch.
- Measure resistance at the PEC 19-Way Connector Terminal at the following pins:
- Pin 17 að pinna 19
- Pin 9 að pinna 11
- Pin 13 að pinna 15
- qIf the resistance between Pin 17 og Pin 19 er 112-122 ohm og viðnámið frá: Pin 9 að pinna 11 og Pin 13 að pinna 15 eru hvor 33-37 ohm, the Inertia Switch was tripped. Test is complete. Farið í skref 10.
- Ef viðnám er utan sviðs, push in the Service Switch on the PEC and reinstall the Lockout Bracket, þá fara í skref 7.
[/fusion_content_box][/fusion_content_boxes][fusion_content_boxes layout=”clean-horizontal” columns=”2″ title_size=”18px” heading_size=”3″ title_color=”#ffffff” body_color=”#ffffff” backgroundcolor=”#4f4f4f” icon=”” iconflip=”” iconrotate=”” iconspin=”no” iconcolor=”” icon_circle=”” icon_circle_radius=”” circlecolor=”” circlebordersize=”” circlebordercolor=”” outercirclebordersize=”” outercirclebordercolor=”” icon_size=”” icon_hover_type=”” hover_accent_color=”” image=”” image_id=”” image_width=”” image_height=”” link_type=”” button_span=”” link_area=”” link_target=”” icon_align=”left” animation_type=”” animation_delay=”” animation_offset=”” animation_direction=”left” animation_speed=”0.3″ margin_top=”” margin_bottom=”” hide_on_mobile=”small-visibility,medium-visibility,large-visibility” class=”” id=””][fusion_content_box title=”STEP 7. Verify continuity of Inverter connector circuits.” backgroundcolor=”” icon=”” iconflip=”” iconrotate=”” iconspin=”no” iconcolor=”” circlecolor=”” circlebordersize=”” circlebordercolor=”” outercirclebordersize=”” outercirclebordercolor=”” image=”” image_id=”” image_width=”” image_height=”” link=”” linktext=”Lestu meira” link_target=”” animation_type=”” animation_direction=”left” animation_speed=”0.3″ animation_offset=””]
- Key burt.
- Disconnect the DC High-Voltage Cable at the PEC Bulkhead and at the Inverter Bulkhead.
- Measure resistance between the Low-Voltage Interlock Pins on the PEC side of the DC High-Voltage Cable:
Note: The Interlock Pins are the two small spade terminals located in the same opening.- If the resistance is 0–0.3 ohms between the Interlock Loop Pins, skipta um Power Electronics Carrier (PEC), þá fara í skref 10.
- Ef viðnám er utan sviðs, í stað DC hár-spenna snúru, þá fara í skref 10.
[/fusion_content_box][fusion_content_box title=”STEP 8. Verify continuity of DC Cable from PEC to Inverter Connector circuits.” backgroundcolor=”” icon=”” iconflip=”” iconrotate=”” iconspin=”” iconcolor=”” circlecolor=”” circlebordersize=”” circlebordercolor=”” outercirclebordersize=”” outercirclebordercolor=”” image=”” image_id=”” image_width=”” image_height=”” link=”” linktext=”” link_target=”” animation_type=”” animation_direction=”left” animation_speed=”0.3″ animation_offset=””]
- Key burt.
- Disconnect the DC High-Voltage Cable at the PEC Bulkhead and the Inverter Bulkhead.
- Measure the resistance of each high-voltage circuit on the cable:
- If the resistance of each high-voltage circuit in the cable is 1 óm eða minna, skipta um Inverter, þá fara í skref 10.
- Ef viðnám er utan sviðs, replace the DC High-Voltage Cable, þá fara í skref 10.
[/fusion_content_box][/fusion_content_boxes][fusion_content_boxes layout=”clean-horizontal” columns=”2″ title_size=”18px” heading_size=”3″ title_color=”#ffffff” body_color=”#ffffff” backgroundcolor=”#4f4f4f” icon=”” iconflip=”” iconrotate=”” iconspin=”no” iconcolor=”” icon_circle=”” icon_circle_radius=”” circlecolor=”” circlebordersize=”” circlebordercolor=”” outercirclebordersize=”” outercirclebordercolor=”” icon_size=”” icon_hover_type=”” hover_accent_color=”#f41000″ image=”” image_id=”” image_width=”” image_height=”” link_type=”” button_span=”” link_area=”” link_target=”” icon_align=”left” animation_type=”” animation_delay=”” animation_offset=”” animation_direction=”left” animation_speed=”0.3″ margin_top=”” margin_bottom=”” hide_on_mobile=”small-visibility,medium-visibility,large-visibility” class=”” id=””][fusion_content_box title=”STEP 9. Verify Data Monitor parameters.” backgroundcolor=”” icon=”” iconflip=”” iconrotate=”” iconspin=”” iconcolor=”” circlecolor=”” circlebordersize=”” circlebordercolor=”” outercirclebordersize=”” outercirclebordercolor=”” image=”” image_id=”” image_width=”” image_height=”” link=”” linktext=”” link_target=”” animation_type=”” animation_direction=”left” animation_speed=”0.3″ animation_offset=””]
- Tengjast ServiceRanger í 9-Way greiningartengisins í leigubílnum.
- Veldu "Data Monitor" valmöguleikann.
- View the following parameters in the High-Voltage Battery list.
- Battery Pack Voltage (BCU1) PID 118
- Battery Voltage PID 116
- If the voltage readings on PID 116 og PID 118 are within 10 volt hvor öðrum, skipta um Power Electronics Carrier (PEC), þá fara í skref 10.
- If the voltage readings on PID 116 og PID 118 are greater than 10 volt hvor öðrum, skipta um Inverter, þá fara í skref 10.
[/fusion_content_box][fusion_content_box title=”STEP 10. Staðfestu viðgerð.” backgroundcolor=”” icon=”” iconflip=”” iconrotate=”” iconspin=”no” iconcolor=”” circlecolor=”” circlebordersize=”” circlebordercolor=”” outercirclebordersize=”” outercirclebordercolor=”” image=”” image_id=”” image_width=”” image_height=”” link=”” linktext=”Lestu meira” link_target=”” animation_type=”” animation_direction=”left” animation_speed=”0.3″ animation_offset=””]
- Key burt.
- Endurtengja alla tengi og neikvæð rafhlaða snúru.
- Key á.
- Hreinsa númer, sjá Hreinsa Óvirk Gallar.
- Aka ökutækinu og reyna að endurstilla kóða.
- Athugaðu að númerum, sjá Skoða virkar og óvirkar Gallar.
- Ef engin númerum, prófun er lokið.
- Ef villukóðanum 116 birtist, contact Eaton at 1- 800-826-HJÁLP (4357). Repeat this Step (Step 10).
- Ef kóða annar en 116 birtist, sjá Kenna Code Index Listi.
[/fusion_content_box][/fusion_content_boxes][/fusion_builder_column][/fusion_builder_row][/fusion_builder_container][fusion_global id=”13788″]