[fusion_builder_container hundred_percent=nohundred_percent_height=nohundred_percent_height_scroll=nohundred_percent_height_center_content=yesequal_height_columns=nomenu_anchor=”” hide_on_mobile=small-visibility,medium-visibility,large-visibilitystatus=publishedpublish_date=”” class=”” id=”” background_color=”” background_image=”” background_position=center centerbackground_repeat=no-repeatfade=nobackground_parallax=noneenable_mobile=noparallax_speed=”0.3″ video_mp4=”” video_webm=”” video_ogv=”” video_url=”” video_aspect_ratio=”16:9″ video_loop=yesvideo_mute=yesvideo_preview_image=”” border_size=”” border_color=”” border_style=solidmargin_top=”35″ margin_bottom=”” padding_top=”” padding_right=”” padding_bottom=”” padding_left=””][fusion_builder_row][fusion_builder_column type=”1_1layout=”1_1spacing=”” center_content=nolink=”” target=_selfmin_height=”” hide_on_mobile=small-visibility,medium-visibility,large-visibilityclass=”” id=”” background_color=”” background_image=”” background_image_id=”” background_position=left topbackground_repeat=no-repeathover_type=noneborder_size=”0″ border_color=”” border_style=solidborder_position=allpadding_top=”” padding_right=”” padding_bottom=”” padding_left=”” margin_top=”” margin_bottom=”” animation_type=”” animation_direction=leftanimation_speed=”0.3″ animation_offset=”” last=no”][fusion_text columns=”” column_min_width=”” column_spacing=”” rule_style=defaultrule_size=”” rule_color=”” hide_on_mobile=small-visibility,medium-visibility,large-visibilityclass=”” id=””]

Eaton फुलर हाइब्रिड ट्रान्समिसन दोष कोड 111 – पलटनेवाला CAN सन्देश दोष (HCM)

[/fusion_text][/fusion_builder_column][/fusion_builder_row][/fusion_builder_container][fusion_builder_container hundred_percent=nohundred_percent_height=nohundred_percent_height_scroll=nohundred_percent_height_center_content=yesequal_height_columns=nomenu_anchor=”” hide_on_mobile=small-visibility,medium-visibility,large-visibilitystatus=publishedpublish_date=”” class=”” id=”” background_color=”” background_image=”” background_position=center centerbackground_repeat=no-repeatfade=nobackground_parallax=noneenable_mobile=noparallax_speed=”0.3″ video_mp4=”” video_webm=”” video_ogv=”” video_url=”” video_aspect_ratio=”16:9″ video_loop=yesvideo_mute=yesvideo_preview_image=”” border_size=”” border_color=”” border_style=solidmargin_top=”” margin_bottom=”” padding_top=”” padding_right=”” padding_bottom=”” padding_left=””][fusion_builder_row][fusion_builder_column type=”1_1layout=”1_1spacing=”” center_content=nolink=”” target=_selfmin_height=”” hide_on_mobile=small-visibility,medium-visibility,large-visibilityclass=”” id=”” background_color=”” background_image=”” background_image_id=”” background_position=left topbackground_repeat=no-repeathover_type=noneborder_size=”0″ border_color=”” border_style=solidborder_position=allpadding_top=”” padding_right=”” padding_bottom=”” padding_left=”” margin_top=”” margin_bottom=”” animation_type=”” animation_direction=leftanimation_speed=”0.3″ animation_offset=”” last=no”][fusion_text columns=”” column_min_width=”” column_spacing=”” rule_style=defaultrule_size=”” rule_color=”” hide_on_mobile=small-visibility,medium-visibility,large-visibilityclass=”” id=””]

Eaton हाइब्रिड ड्राइभ सिस्टम मोडेल लागि कोड दोष (MY09) एह-8E406A-यू / पी, एह-8E406A-अप, एह-8E406A-UPG, एह-8E406A-सीडी, एह-8E406A-CDG, एह-8E406A-सीडीआर, एह-8E406A-टी, एह-6E706B-सीडी, एह-6E706B-पी र एह-6E706B-UPG. Read below to learn how to test, खाली र आफ्नो Freightliner समाधान दोष कोड त्रुटिहरू, Mack, Peterbilt, Kenworth, volvo, अन्तर्राष्ट्रिय, र भारी कर्तव्य ट्रक र उपकरण. पलटनेवाला को ब्याट्री नियन्त्रण एकाइ संग संचार (BCU) को Pec र हाइब्रिड नियन्त्रण मोड्युल स्थित (HCM) को CAN उच्च गतिको स्वामित्व डाटा लिंक मा. The data link is a two wire twisted pair with two 120 लिङ्क मा स्थित ओम प्रतिरोधों.

कोड दोष 111 – पलटनेवाला CAN सन्देश दोष (HCM) पत्ता लगाउने

प्रणाली दोष लगािन्छ अघि निम्न preconditions भेट हुनुपर्छ:.

  • को HCM CAN डाटा लिंक दोष सक्रिय छैन. (MY09)

नोट: एक निष्क्रिय कोड निवारण जब उल्लेख उत्पादन निदान मोड (पल्स डिजिटल मड्यूलेशन)

अवस्था दोष कोड सक्रिय सेट गर्न)

  • आईएमएफ 9 को HCM लागि इन्वर्टर सन्देश प्राप्त गरेको छैन जब सेट गरिएको छ 30 लगातार सन्देश चक्र.
  • आईएमएफ 2 मात्र उत्पादन निदान मोड मा सक्रिय छ र यदि सेट गर्नेछ 3 लगातार इन्वर्टर सन्देशहरू HCM प्राप्त छैन.

निवर्तमान जब दोष कोड 111 is set the following conditions occur:

  • अम्बर "जाँच हाइब्रिड" प्रकाश illuminates.
  • दोष हाइब्रिड नियन्त्रण मोड्युल भण्डारण गरिएको छ (HCM) स्मृति.
  • उच्च-भोल्टेज मोटर / सर्जक सहायक उपलब्ध छ, तर एक कम रकम.

[/fusion_text][fusion_text columns=”” column_min_width=”” column_spacing=”” rule_style=defaultrule_size=”” rule_color=”” hide_on_mobile=small-visibility,medium-visibility,large-visibilityclass=”” id=””]

दोष कोड निष्क्रिय सेट गर्न अवस्था

मात्र निष्क्रिय गल्तीलाई प्रसारण इलेक्ट्रोनिक नियन्त्रण एकाइ देखि खाली गर्न सकिन्छ (TECU) वा HCM इतिहास ServiceRanger प्रयोग. को TECU स्वतः इतिहास देखि गल्तीलाई पछि खाली 200 घण्टा र HCM स्वतः दोष पछि इतिहास देखि गल्तीलाई खाली लागि निष्क्रिय भएको छ 200 घण्टा.

यो दोष कोड निम्न कुनै पनि कारण हुन सक्छ:

  • आईएमएफ 2 ,9:
    • CAN डाटा लिंक
    • कुनै शक्ति वा जमीन इन्वर्टर गर्न
    • HCM
    • पलटनेवाला

[/fusion_text][/fusion_builder_column][/fusion_builder_row][/fusion_builder_container][fusion_builder_container hundred_percent=nohundred_percent_height=nohundred_percent_height_scroll=nohundred_percent_height_center_content=yesequal_height_columns=nomenu_anchor=”” hide_on_mobile=small-visibility,medium-visibility,large-visibilitystatus=publishedpublish_date=”” class=”” id=”” background_color=”” background_image=”” background_position=center centerbackground_repeat=no-repeatfade=nobackground_parallax=noneenable_mobile=noparallax_speed=”0.3″ video_mp4=”” video_webm=”” video_ogv=”” video_url=”” video_aspect_ratio=”16:9″ video_loop=yesvideo_mute=yesvideo_preview_image=”” border_size=”” border_color=”” border_style=solidmargin_top=”” margin_bottom=”” padding_top=”” padding_right=”” padding_bottom=”” padding_left=””][fusion_builder_row][fusion_builder_column type=”1_1layout=”1_1spacing=”” center_content=nolink=”” target=_selfmin_height=”” hide_on_mobile=small-visibility,medium-visibility,large-visibilityclass=”” id=”” background_color=”” background_image=”” background_image_id=”” background_position=left topbackground_repeat=no-repeathover_type=noneborder_size=”0″ border_color=”” border_style=solidborder_position=allpadding_top=”” padding_right=”” padding_bottom=”” padding_left=”” margin_top=”” margin_bottom=”” animation_type=”” animation_direction=leftanimation_speed=”0.3″ animation_offset=”” last=no”][fusion_text columns=”” column_min_width=”” column_spacing=”” rule_style=defaultrule_size=”” rule_color=”” hide_on_mobile=small-visibility,medium-visibility,large-visibilityclass=”” id=””]

कोड दोष 111 – पलटनेवाला CAN सन्देश दोष (HCM) परीक्षण

[/fusion_text][/fusion_builder_column][/fusion_builder_row][/fusion_builder_container][fusion_builder_container hundred_percent=nohundred_percent_height=nohundred_percent_height_scroll=nohundred_percent_height_center_content=yesequal_height_columns=nomenu_anchor=”” hide_on_mobile=small-visibility,medium-visibility,large-visibilitystatus=publishedpublish_date=”” class=”” id=”” background_color=”” background_image=”” background_position=center centerbackground_repeat=no-repeatfade=nobackground_parallax=noneenable_mobile=noparallax_speed=”0.3″ video_mp4=”” video_webm=”” video_ogv=”” video_url=”” video_aspect_ratio=”16:9″ video_loop=yesvideo_mute=yesvideo_preview_image=”” border_size=”” border_color=”” border_style=solidmargin_top=”” margin_bottom=”” padding_top=”” padding_right=”” padding_bottom=”” padding_left=””][fusion_builder_row][fusion_builder_column type=”1_1layout=”1_1spacing=”” center_content=nolink=”” target=_selfmin_height=”” hide_on_mobile=small-visibility,medium-visibility,large-visibilityclass=”” id=”” background_color=”” background_image=”” background_image_id=”” background_position=left topbackground_repeat=no-repeathover_type=noneborder_size=”0″ border_color=”” border_style=solidborder_position=allpadding_top=”” padding_right=”” padding_bottom=”” padding_left=”” margin_top=”” margin_bottom=”” animation_type=”” animation_direction=leftanimation_speed=”0.3″ animation_offset=”” last=no”][fusion_text columns=”” column_min_width=”” column_spacing=”” rule_style=defaultrule_size=”” rule_color=”” hide_on_mobile=small-visibility,medium-visibility,large-visibilityclass=”” id=””]

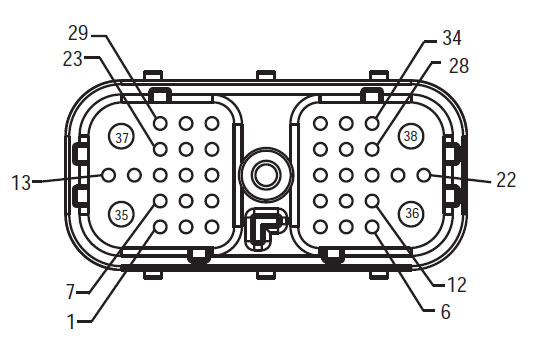
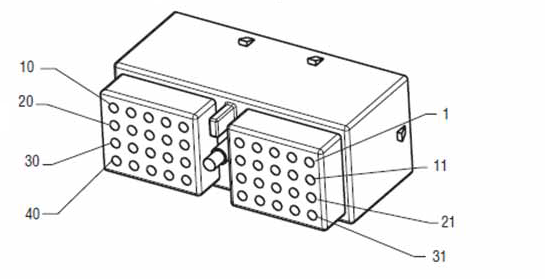
घटक पहिचान MY09 Sytems:

[/fusion_text][/fusion_builder_column][fusion_builder_column type=”1_2layout=”1_2spacing=”” center_content=nolink=”” target=_selfmin_height=”” hide_on_mobile=small-visibility,medium-visibility,large-visibilityclass=”” id=”” background_color=”” background_image=”” background_image_id=”” background_position=left topbackground_repeat=no-repeathover_type=noneborder_size=”0″ border_color=”” border_style=solidborder_position=allpadding_top=”” padding_right=”” padding_bottom=”” padding_left=”” margin_top=”” margin_bottom=”” animation_type=”” animation_direction=leftanimation_speed=”0.3″ animation_offset=”” last=no”][fusion_imageframe image_id=”14061|fullmax_width=”” style_type=”” blur=”” stylecolor=”” hover_type=nonebordersize=”” bordercolor=”” borderradius=”” align=centerlightbox=nogallery_id=”” lightbox_image=”” lightbox_image_id=”” alt=”HCM सवारी साधन इन्टरफेस कनेक्टर” link=”” linktarget=_selfhide_on_mobile=small-visibility,medium-visibility,large-visibilityclass=”” id=”” animation_type=”” animation_direction=leftanimation_speed=”0.3″ animation_offset=””]https://www.globaltransmissionsupply.com/wp-content/uploads/Fuller-Front-Harness-View-HCM.jpg[/fusion_imageframe][fusion_text columns=”” column_min_width=”” column_spacing=”” rule_style=defaultrule_size=”” rule_color=”” hide_on_mobile=small-visibility,medium-visibility,large-visibilityclass=”” id=””]

दोहन ​​अगाडिकोदृश्य
(HCM सवारी साधन इन्टरफेस कनेक्टर)
[/fusion_text][/fusion_builder_column][fusion_builder_column type=”1_2layout=”1_2spacing=”” center_content=nolink=”” target=_selfmin_height=”” hide_on_mobile=small-visibility,medium-visibility,large-visibilityclass=”” id=”” background_color=”” background_image=”” background_image_id=”” background_position=left topbackground_repeat=no-repeathover_type=noneborder_size=”0″ border_color=”” border_style=solidborder_position=allpadding_top=”” padding_right=”” padding_bottom=”” padding_left=”” margin_top=”” margin_bottom=”” animation_type=”” animation_direction=leftanimation_speed=”0.3″ animation_offset=”” last=no”][fusion_imageframe image_id=”14476|fullmax_width=”” style_type=”” blur=”” stylecolor=”” hover_type=nonebordersize=”” bordercolor=”” borderradius=”” align=centerlightbox=nogallery_id=”” lightbox_image=”” lightbox_image_id=”” alt=”Duetsch 40-तरिका संभोग कनेक्टर दृश्य” link=”” linktarget=_selfhide_on_mobile=small-visibility,medium-visibility,large-visibilityclass=”” id=”” animation_type=”” animation_direction=leftanimation_speed=”0.3″ animation_offset=””]https://www.globaltransmissionsupply.com/wp-content/uploads/Duetsch-40-way-mating-connector-view.png[/fusion_imageframe][fusion_text columns=”” column_min_width=”” column_spacing=”” rule_style=defaultrule_size=”” rule_color=”” hide_on_mobile=small-visibility,medium-visibility,large-visibilityclass=”” id=””]

Duetsch 40-बाटो संभोग कनेक्टर
(पलटनेवाला – कम भोल्टेज कनेक्टर)

[/fusion_text][/fusion_builder_column][fusion_builder_column type=”1_1layout=”1_1spacing=”” center_content=nolink=”” target=_selfmin_height=”” hide_on_mobile=small-visibility,medium-visibility,large-visibilityclass=”” id=”” background_image_id=”” background_color=”#000000″ background_image=”” background_position=left topundefined=”” background_repeat=no-repeathover_type=noneborder_size=”0″ border_color=”” border_style=solidborder_position=allpadding_top=”” padding_right=”” padding_bottom=”” padding_left=”” margin_top=”20″ margin_bottom=”20″ animation_type=”” animation_direction=leftanimation_speed=”0.3″ animation_offset=”” last=no”][fusion_text columns=”” column_min_width=”” column_spacing=”” rule_style=defaultrule_size=”” rule_color=”” hide_on_mobile=small-visibility,medium-visibility,large-visibilityclass=”” id=””]

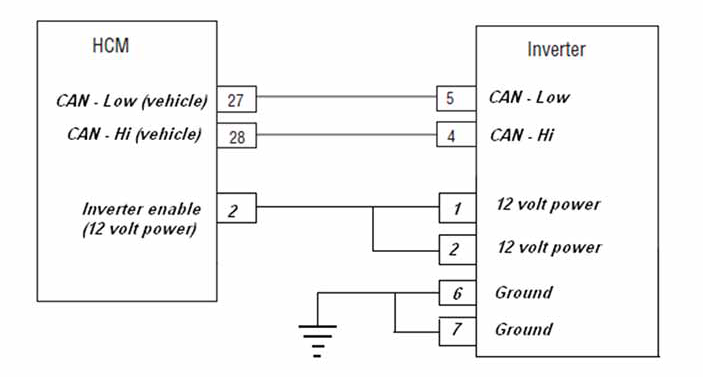
नोट: को उल्लेख Eaton हाइब्रिड घटक र कनेक्टर स्थान MY09 सिस्टम मा कनेक्टर स्थान को लागि.
[/fusion_text][/fusion_builder_column][fusion_builder_column type=”1_1layout=”1_1spacing=”” center_content=nolink=”” target=_selfmin_height=”” hide_on_mobile=small-visibility,medium-visibility,large-visibilityclass=”” id=”” background_color=”” background_image=”” background_image_id=”” background_position=left topbackground_repeat=no-repeathover_type=noneborder_size=”0″ border_color=”” border_style=solidborder_position=allpadding_top=”” padding_right=”” padding_bottom=”” padding_left=”” margin_top=”” margin_bottom=”” animation_type=”” animation_direction=leftanimation_speed=”0.3″ animation_offset=”” last=no”][fusion_imageframe image_id=”14477|fullmax_width=”” style_type=”” blur=”” stylecolor=”” hover_type=nonebordersize=”” bordercolor=”” borderradius=”” align=centerlightbox=nogallery_id=”” lightbox_image=”” lightbox_image_id=”” alt=”HCM पलटनेवाला जडान ” link=”” linktarget=_selfhide_on_mobile=small-visibility,medium-visibility,large-visibilityclass=”” id=”” animation_type=”” animation_direction=leftanimation_speed=”0.3″ animation_offset=””]https://www.globaltransmissionsupply.com/wp-content/uploads/HCM-Inverter-MY09.png[/fusion_imageframe][/fusion_builder_column][/fusion_builder_row][/fusion_builder_container][fusion_builder_container hundred_percent=nohundred_percent_height=nohundred_percent_height_scroll=nohundred_percent_height_center_content=yesequal_height_columns=nomenu_anchor=”” hide_on_mobile=small-visibility,medium-visibility,large-visibilitystatus=publishedpublish_date=”” class=”” id=”” background_color=”” background_image=”” background_position=center centerbackground_repeat=no-repeatfade=nobackground_parallax=noneenable_mobile=noparallax_speed=”0.3″ video_mp4=”” video_webm=”” video_ogv=”” video_url=”” video_aspect_ratio=”16:9″ video_loop=yesvideo_mute=yesvideo_preview_image=”” border_size=”” border_color=”” border_style=solidmargin_top=”” margin_bottom=”” padding_top=”” padding_right=”” padding_bottom=”” padding_left=””][fusion_builder_row][fusion_builder_column type=”1_1layout=”1_1spacing=”” center_content=nolink=”” target=_selfmin_height=”” hide_on_mobile=small-visibility,medium-visibility,large-visibilityclass=”” id=”” background_color=”” background_image=”” background_image_id=”” background_position=left topbackground_repeat=no-repeathover_type=noneborder_size=”0″ border_color=”” border_style=solidborder_position=allpadding_top=”” padding_right=”” padding_bottom=”” padding_left=”” margin_top=”” margin_bottom=”” animation_type=”” animation_direction=leftanimation_speed=”0.3″ animation_offset=”” last=no”][fusion_modal name=warnings_cautionstitle=”चेतावनी & होस” size=largebackground=”” border_color=”” show_footer=yesclass=”” id=””]खतरा: Danger indicates you will be severely injured or killed if do not follow the indicated procedure.
चेतावनी: चेतावनी तुरुन्त जोखिम संकेत, which could result in severe personal injury if you do not follow the indicated procedure.
सावधानी: Caution indicates vehicle or property damage could occur if you do not follow the indicated procedure.

नोट: Note indicates additional detail that will aid in the diagnosis or repair of a component/system.

व्यक्तिगत चोट बच्न सूचित क्रममा निर्दिष्ट प्रक्रिया पालना:

1. यदि उच्च भोल्टेज शंकु वाहन वरिपरि छन् र lockout को Pec मा स्थापित छ, वाहन सुरु गर्न अनुमति पर्छ भनेर मात्र व्यक्ति lockout ट्याग हस्ताक्षर गर्ने व्यक्ति हो.
2. एक वाहन काम वा ट्याक्सी जानु अगाडि गर्दा इन्जिन चलिरहेको छ, के तपाईं "N" मा पारी लीवर ठाँउ गर्नुपर्छ पार्किङ ब्रेक सेट, र पाङ्ग्रा ब्लक.
3. सुरक्षा कारणहरूले, सधैं पूर्व "एन" बाट गियर स्थितिहरू चयन गर्न सेवा ब्रेक संलग्न
4. शुरू वाहन सधैं चालक सिटमा विराजमान हुन अघि, "N" चयन गर्नुहोस् पारी नियन्त्रण मा, र पार्किङ ब्रेक सेट.
5. मा ePTO संग वाहन, इन्जिन र / वा
मोटर / सर्जक ePTO मोडमा सुरु गर्न सक्नुहुन्छ. कुनै पनि मर्मतका कहिल्यै प्रदर्शन वा वाहन मा काम, जबकि यो मोडमा.
6. 12-वाल्ट ब्याट्री सकारात्मक (+) र नकारात्मक (-) कुनै पनि हाइब्रिड सुसज्जित वाहन कुनै पनि वेल्डिंग पहिला जडान विच्छेद हुनुपर्छ.

सावधानी: उपकरण इनकार वा क्षति बच्न सूचित क्रममा निर्दिष्ट प्रक्रिया पालना.
सावधानी: Do not release the parking brake or attempt to select a gear until the air pressure is at the correct level.
सावधानी: To avoid damage to the transmission during towing place the shift lever in “N” and lift the drive wheels off the ground or disconnect the driveline.

उच्च-भोल्टेज चेतावनी & होस

  • CO2 वा सुख्खा रासायनिक अग्निशामक प्रयोग.
  • उच्च-भोल्टेज ताराहरु सुन्तला इन्सुलेशन वा convoluted टयूबिंग समेटिएका र connectors मा चेतावनी लेबल चिनो लगाइएको छ.
  • सबै Eaton® हाइब्रिड डीजल / इलेक्ट्रिक वाहन मार्क गरिनेछ 'हाइब्रिड’ वाहन को बाहिर मा, को ड्यास मा पारी लेबल संग.
  • चेसिस माउन्ट संकर घटक को विशिष्ट स्थान लागि OEM उल्लेख.
  • नहीं सुन्तला उच्च भोल्टेज केबल मा कटौती गर्छन्.
  • मा Pec काट्न वा गर्छन् खोल्न.
  • मा कटौती वा गर्छन् डीसी / डीसी कंवर्टर खोल्न.
  • मा कटौती वा गर्छन् पलटनेवाला खोल्न.

एक बफर क्षेत्र अप सेट गर्नुपर्छ र उच्च-भोल्टेज रबर पन्जा अछूता (वर्ग 0 छाला संरक्षक संग) उच्च-भोल्टेज काम गर्न पूर्व आवश्यक. यी निर्देशनहरू पालना गर्न विफलता गंभीर व्यक्तिगत चोट वा मृत्यु हुन सक्छ.
उच्च-भोल्टेज प्रणालीमा काम गर्दा थकित हुनु पर्छ कि रबर-पृथक पन्जा वर्ग हो 0 छाला संरक्षक संग. रबर पन्जा पृष्ठमा "निदान उपकरण / सेवा प्रकाशन" मा पाइने रबर इन्सुलेशन पन्जा परीक्षण प्रक्रिया निम्न हरेक उपयोग गर्नु भन्दा पहिले परीक्षण गर्नुपर्छ 6. यी निर्देशनहरू पालना गर्न विफलता गंभीर व्यक्तिगत चोट वा मृत्यु हुन सक्छ.
को "उच्च-भोल्टेज सेवा बन्द र पावर-अप प्रक्रिया" निरीक्षण वा पृष्ठ कुनै पनि उच्च भोल्टेज केबल वा घटक काम अघि 4 अनुगमन गर्नुपर्छ. यी निर्देशनहरू पालना गर्न विफलता गंभीर व्यक्तिगत चोट वा मृत्यु हुन सक्छ.
को Lockout र Tagout उपकरणहरू मात्र वाहन मा Lockout र Tagout उपकरणहरू राखिएको भन्ने टेक्नीसियन द्वारा हटाइनु पर्छ. यी निर्देशनहरू पालना गर्न विफलता गंभीर व्यक्तिगत चोट वा मृत्यु हुन सक्छ.
उच्च-भोल्टेज रबर पृथक पन्जा (वर्ग 0 छाला संरक्षक संग) कुनै पनि काम गर्दा थकित हुनु पर्छ
उच्च-भोल्टेज केबल. पृष्ठमा "उच्च-भोल्टेज सेवा बन्द र पावर-अप प्रक्रिया" 4 कुनै पनि उच्च भोल्टेज केबल हटाउने पहिला अनुगमन गर्नुपर्छ. यी निर्देशनहरू पालना गर्न विफलता गंभीर व्यक्तिगत चोट वा मृत्यु हुन सक्छ.
उच्च-भोल्टेज केबल र ताराहरु सुन्तला हो र connectors मा एक चेतावनी लेबल समावेश. उच्च-भोल्टेज घटक लेबल संग मार्क. उच्च-भोल्टेज रबर पृथक पन्जा (वर्ग 0 छाला संरक्षक संग) यी घटक कुनै पनि काम गर्दा प्रयोग गरिनुपर्छ. यी निर्देशनहरू पालना गर्न विफलता गंभीर व्यक्तिगत चोट वा मृत्यु हुन सक्छ.

उच्च-भोल्टेज सेवा बन्द प्रक्रिया

उच्च-भोल्टेज सेवा बन्द र पावर-अप प्रक्रिया1. पछि "उच्च-भोल्टेज कार्य क्षेत्र" प्रक्रिया.
2. को Pec को सामने मा रातो Pec सेवा स्विच पत्ता लगाउन र धक्का बन्द गर्नुहोस्.
3. सेवा स्विच कवर हटाउन र Lockout कोष्ठक स्थापना (J48506).
4. को Lockout कोष्ठक गर्न कस्नु ट्याग.
5. बंद बाट सार्न सक्नुहुन्न Pec सेवा स्विच सुनिश्चित.
6. प्रणाली को न्यूनतम लागि सेट गर्न अनुमति 5 उच्च भोल्टेज निर्वहन मिनेट.
7. ServiceRanger जडान र डाटा मनिटर पीआईडी ​​हेर्न 116 "उच्च-भोल्टेज ब्याट्री क्षमता।" एसपीएन प्रयोग भनिन्छ 520323 J1939 जडान लागि "ब्याट्री भोल्टेज आरबी" (रिले बक्स).
8. भोल्टेज हुनुपर्छ 30 वोल्ट वा कम. यदि भोल्टेज माथि छ 30 वोल्ट, वाहन मा काम छैन र 1-800-826-मदत मा सम्पर्क Eaton® (4357).
9. बन्द ज्वलन प्रमुख र मर्मत गर्न वा समस्या निवारण चरण अगाडि बढ्न.
नोट: भोल्टेज प्रमुख बन्द हुँदा शून्य खस्छ.

उच्च-भोल्टेज सेवा पावर-अप प्रक्रिया

1. आफ्नो लक स्थितिहरु मा सबै उच्च भोल्टेज कनेक्टरों स्थापना.
2. तपाईं यदि व्यक्ति वाहन काम, को Lockout कोष्ठक र ट्याग हटाउन.
3. सेवा स्विच अधिक Lockout कोष्ठक पुन.
4. पुल सेवा बाहिर स्विच गर्नुहोस् र लागि वाहन सेट गरौं 2 मिनेट.
5. Start vehicle when appropriate.[/fusion_modal][fusion_modal name=component_locationtitle=”Eaton हाइब्रिड घटक र कनेक्टर स्थान ” size=largebackground=”#ffffffborder_color=”” show_footer=yesclass=”” id=””]

Eaton हाइब्रिड घटक र कनेक्टर स्थान MY08 सिस्टम

[/fusion_modal][fusion_modal name=component_location2title=”Eaton हाइब्रिड घटक र कनेक्टर स्थान MY09 सिस्टम” size=largebackground=”#ffffffborder_color=”” show_footer=yesclass=”” id=””]

Eaton हाइब्रिड घटक र कनेक्टर स्थान MY09 सिस्टम

[/fusion_modal][/fusion_builder_column][/fusion_builder_row][/fusion_builder_container][fusion_builder_container hundred_percent=nohundred_percent_height=nohundred_percent_height_scroll=nohundred_percent_height_center_content=yesequal_height_columns=nomenu_anchor=”” hide_on_mobile=small-visibility,medium-visibility,large-visibilitystatus=publishedpublish_date=”” class=”” id=”” background_color=”” background_image=”” background_position=center centerbackground_repeat=no-repeatfade=nobackground_parallax=noneenable_mobile=noparallax_speed=”0.3″ video_mp4=”” video_webm=”” video_ogv=”” video_url=”” video_aspect_ratio=”16:9″ video_loop=yesvideo_mute=yesvideo_preview_image=”” border_size=”” border_color=”” border_style=solidmargin_top=”” margin_bottom=”” padding_top=”” padding_right=”” padding_bottom=”” padding_left=””][fusion_builder_row][fusion_builder_column type=”1_1layout=”1_1spacing=”” center_content=nolink=”” target=_selfmin_height=”” hide_on_mobile=small-visibility,medium-visibility,large-visibilityclass=”” id=”” background_color=”” background_image=”” background_image_id=”” background_position=left topbackground_repeat=no-repeathover_type=noneborder_size=”0″ border_color=”” border_style=solidborder_position=allpadding_top=”” padding_right=”” padding_bottom=”” padding_left=”” margin_top=”” margin_bottom=”” animation_type=”” animation_direction=leftanimation_speed=”0.3″ animation_offset=”” last=no”][fusion_content_boxes layout=clean-horizontalcolumns=”1″ title_size=”18pxheading_size=”3″ title_color=”#ffffffbody_color=”#ffffffbackgroundcolor=”#4f4f4ficon=”” iconflip=”” iconrotate=”” iconspin=noiconcolor=”” icon_circle=”” icon_circle_radius=”” circlecolor=”” circlebordersize=”” circlebordercolor=”” outercirclebordersize=”” outercirclebordercolor=”” icon_size=”” icon_hover_type=”” hover_accent_color=”” image=”” image_id=”” image_width=”” image_height=”” link_type=”” button_span=”” link_area=”” link_target=”” icon_align=leftanimation_type=”” animation_delay=”” animation_offset=”” animation_direction=leftanimation_speed=”0.3″ margin_top=”” margin_bottom=”” hide_on_mobile=small-visibility,medium-visibility,large-visibilityclass=”” id=””][fusion_content_box title=चरण 1. सक्रिय वा निष्क्रिय दोष कोड स्थिति जाँच र विद्युत पूर्वपरीक्षण प्रदर्शन.backgroundcolor=”” icon=”” iconflip=”” iconrotate=”” iconspin=noiconcolor=”” circlecolor=”” circlebordersize=”” circlebordercolor=”” outercirclebordersize=”” outercirclebordercolor=”” image=”” image_id=”” image_width=”” image_height=”” link=”” linktext=”थप पढ्नुहोस्” link_target=”” animation_type=”” animation_direction=leftanimation_speed=”0.3″ animation_offset=””]

  1. समीक्षा र पालना चेतावनी & होस.
  2. Key off or two minutes.
  3. प्रमुख मा.
  4. Retrieve Active fault codes and FMIs with ServiceRanger using the 9-Way Diagnostic Connector or manually.
  5. खतरा: हेर्नुहोस् High-Voltage Service Shutdown and Power-Up Procedures. आघात जोगिन गर्न प्रक्रियाहरु पालना, अनुचित ह्यान्डल उच्च भोल्टेज देखि बाल्न वा मृत्यु.
  6. विद्युत पूर्वपरीक्षण र हाइब्रिड विद्युत पूर्वपरीक्षण प्रदर्शन:
    • यदि कुनै मुद्दा या त बिजुली परीक्षण भेटिए छन्, चरण जाने 2.
    • मुद्दा त बिजुली परीक्षण समयमा मरम्मत थियो भने, चरण जाने 8.

[/fusion_content_box][/fusion_content_boxes][fusion_content_boxes layout=clean-horizontalcolumns=”1″ title_size=”18pxheading_size=”3″ title_color=”#ffffffbody_color=”#ffffffbackgroundcolor=”#4f4f4ficon=”” iconflip=”” iconrotate=”” iconspin=noiconcolor=”” icon_circle=”” icon_circle_radius=”” circlecolor=”” circlebordersize=”” circlebordercolor=”” outercirclebordersize=”” outercirclebordercolor=”” icon_size=”” icon_hover_type=”” hover_accent_color=”” image=”” image_id=”” image_width=”” image_height=”” link_type=”” button_span=”” link_area=”” link_target=”” icon_align=leftanimation_type=”” animation_delay=”” animation_offset=”” animation_direction=leftanimation_speed=”0.3″ margin_top=”” margin_bottom=”” hide_on_mobile=small-visibility,medium-visibility,large-visibilityclass=”” id=””][fusion_content_box title=चरण 2. FMIs वर्तमान प्रमाणित.backgroundcolor=”” icon=”” iconflip=”” iconrotate=”” iconspin=noiconcolor=”” circlecolor=”” circlebordersize=”” circlebordercolor=”” outercirclebordersize=”” outercirclebordercolor=”” image=”” image_id=”” image_width=”” image_height=”” link=”” linktext=”थप पढ्नुहोस्” link_target=”” animation_type=”” animation_direction=leftanimation_speed=”0.3″ animation_offset=””]

  1. 1. Which FMIs are present for Active Fault Code 111?
     If any FMIs other than 2 वा 9 is set, check ServiceRanger HCM configurations. Inverter type should have 40-Pin selected. If 56-Pin is selected, change to 40-Pin, त्यसपछि चरण जाने 3.

[/fusion_content_box][/fusion_content_boxes][fusion_content_boxes layout=clean-horizontalcolumns=”1″ title_size=”18pxheading_size=”3″ title_color=”#ffffffbody_color=”#ffffffbackgroundcolor=”#4f4f4ficon=”” iconflip=”” iconrotate=”” iconspin=noiconcolor=”” icon_circle=”” icon_circle_radius=”” circlecolor=”” circlebordersize=”” circlebordercolor=”” outercirclebordersize=”” outercirclebordercolor=”” icon_size=”” icon_hover_type=”” hover_accent_color=”” image=”” image_id=”” image_width=”” image_height=”” link_type=”” button_span=”” link_area=”” link_target=”” icon_align=leftanimation_type=”” animation_delay=”” animation_offset=”” animation_direction=leftanimation_speed=”0.3″ margin_top=”” margin_bottom=”” hide_on_mobile=small-visibility,medium-visibility,large-visibilityclass=”” id=””][fusion_content_box title=चरण 2. FMIs वर्तमान प्रमाणित.backgroundcolor=”” icon=”” iconflip=”” iconrotate=”” iconspin=noiconcolor=”” circlecolor=”” circlebordersize=”” circlebordercolor=”” outercirclebordersize=”” outercirclebordercolor=”” image=”” image_id=”” image_width=”” image_height=”” link=”” linktext=”थप पढ्नुहोस्” link_target=”” animation_type=”” animation_direction=leftanimation_speed=”0.3″ animation_offset=””]

  1. 1. Which FMIs are present for Active Fault Code 111?
     If any FMIs other than 2 वा 9 is set, check ServiceRanger HCM configurations. Inverter type should have 40-Pin selected. If 56-Pin is selected, change to 40-Pin, त्यसपछि चरण जाने 3.

[/fusion_content_box][/fusion_content_boxes][fusion_content_boxes layout=clean-horizontalcolumns=”2″ title_size=”18pxheading_size=”3″ title_color=”#ffffffbody_color=”#ffffffbackgroundcolor=”#4f4f4ficon=”” iconflip=”” iconrotate=”” iconspin=noiconcolor=”” icon_circle=”” icon_circle_radius=”” circlecolor=”” circlebordersize=”” circlebordercolor=”” outercirclebordersize=”” outercirclebordercolor=”” icon_size=”” icon_hover_type=”” hover_accent_color=”” image=”” image_id=”” image_width=”” image_height=”” link_type=”” button_span=”” link_area=”” link_target=”” icon_align=leftanimation_type=”” animation_delay=”” animation_offset=”” animation_direction=leftanimation_speed=”0.3″ margin_top=”” margin_bottom=”” hide_on_mobile=small-visibility,medium-visibility,large-visibilityclass=”” id=””][fusion_content_box title=चरण 4. Verify ground to Inverter.backgroundcolor=”” icon=”” iconflip=”” iconrotate=”” iconspin=noiconcolor=”” circlecolor=”” circlebordersize=”” circlebordercolor=”” outercirclebordersize=”” outercirclebordercolor=”” image=”” image_id=”” image_width=”” image_height=”” link=”” linktext=”थप पढ्नुहोस्” link_target=”” animation_type=”” animation_direction=leftanimation_speed=”0.3″ animation_offset=””]

  1. Measure CAN to ground resistance on Inverter OEM Connector Pin 1 to Inverter Case and Pin 2 प्रकरण इन्वर्टर गर्न:
    • If resistance is 7K ohms, चरण जाने 5.
    • If resistance is 0–100 ohms, repair shorted CAN Link Circuit, त्यसपछि चरण जाने 5.

[/fusion_content_box][fusion_content_box title=चरण 5. Verify CAN terminals are in the correct location.backgroundcolor=”” icon=”” iconflip=”” iconrotate=”” iconspin=noiconcolor=”” circlecolor=”” circlebordersize=”” circlebordercolor=”” outercirclebordersize=”” outercirclebordercolor=”” image=”” image_id=”” image_width=”” image_height=”” link=”” linktext=”थप पढ्नुहोस्” link_target=”” animation_type=”” animation_direction=leftanimation_speed=”0.3″ animation_offset=””]

  1. इन्वर्टर 40-बाटो कनेक्टर पिन बीच प्रतिरोध मापन 4 and Dash 9-Way Diagnostic Connector Pin H (if Pin H is not populated, find 3- Way Connector near the 9-Way or Terminating Resistor Pin 1 near the 9-Way):
    • प्रतिरोध 0-0.3 ohms छ भने, चरण जाने 6.
    • यदि प्रतिरोध छ 60 ohms, मरम्मत ताराहरु सक्नुहुन्छ (नमस्ते र कम गलत तार छन्), त्यसपछि चरण जाने 6.

[/fusion_content_box][/fusion_content_boxes][fusion_content_boxes layout=clean-horizontalcolumns=”2″ title_size=”18pxheading_size=”3″ title_color=”#ffffffbody_color=”#ffffffbackgroundcolor=”#4f4f4ficon=”” iconflip=”” iconrotate=”” iconspin=noiconcolor=”” icon_circle=”” icon_circle_radius=”” circlecolor=”” circlebordersize=”” circlebordercolor=”” outercirclebordersize=”” outercirclebordercolor=”” icon_size=”” icon_hover_type=”” hover_accent_color=”#f41000image=”” image_id=”” image_width=”” image_height=”” link_type=”” button_span=”” link_area=”” link_target=”” icon_align=leftanimation_type=”” animation_delay=”” animation_offset=”” animation_direction=leftanimation_speed=”0.3″ margin_top=”” margin_bottom=”” hide_on_mobile=small-visibility,medium-visibility,large-visibilityclass=”” id=””][fusion_content_box title=चरण 6. Verify power and ground to Inverter.backgroundcolor=”” icon=”” iconflip=”” iconrotate=”” iconspin=”” iconcolor=”” circlecolor=”” circlebordersize=”” circlebordercolor=”” outercirclebordersize=”” outercirclebordercolor=”” image=”” image_id=”” image_width=”” image_height=”” link=”” linktext=”” link_target=”” animation_type=”” animation_direction=leftanimation_speed=”0.3″ animation_offset=””]

  1. प्रमुख मा (with Inverter 40-Way Connector still removed).
  2. Measure voltage on OEM 40-Way Connector Pin 1 पिन गर्न 6 र पिन 2 पिन गर्न 7:
    • If battery voltage is present, पलटनेवाला प्रतिस्थापन. TRSM2000 मा MY09 इन्वर्टर हटाउने र स्थापना प्रक्रिया हेर्नुहोस्, त्यसपछि चरण जाने 9.
    • If battery voltage is not present, चरण जाने 7.

[/fusion_content_box][fusion_content_box title=चरण 7. Verify ground to Inverter.backgroundcolor=”” icon=”” iconflip=”” iconrotate=”” iconspin=noiconcolor=”” circlecolor=”” circlebordersize=”” circlebordercolor=”” outercirclebordersize=”” outercirclebordercolor=”” image=”” image_id=”” image_width=”” image_height=”” link=”” linktext=”थप पढ्नुहोस्” link_target=”” animation_type=”” animation_direction=leftanimation_speed=”0.3″ animation_offset=””]

  1. 1. Measure resistance between OEM 40-Way Connector Pin 6 वा 7 भुइँमा:
    • If resistance to ground is 0–0.3 ohms, चरण जाने 8.
    • If resistance is higher than 0.3 ohms, इन्वर्टर गर्न OEM जमीन सर्किट मर्मत, त्यसपछि चरण जाने 9.

[/fusion_content_box][/fusion_content_boxes][fusion_content_boxes layout=clean-horizontalcolumns=”2″ title_size=”18pxheading_size=”3″ title_color=”#ffffffbody_color=”#ffffffbackgroundcolor=”#4f4f4ficon=”” iconflip=”” iconrotate=”” iconspin=noiconcolor=”” icon_circle=”” icon_circle_radius=”” circlecolor=”” circlebordersize=”” circlebordercolor=”” outercirclebordersize=”” outercirclebordercolor=”” icon_size=”” icon_hover_type=”” hover_accent_color=”#f41000image=”” image_id=”” image_width=”” image_height=”” link_type=”” button_span=”” link_area=”” link_target=”” icon_align=leftanimation_type=”” animation_delay=”” animation_offset=”” animation_direction=leftanimation_speed=”0.3″ margin_top=”” margin_bottom=”” hide_on_mobile=small-visibility,medium-visibility,large-visibilityclass=”” id=””][fusion_content_box title=चरण 8. Verify power from HCMbackgroundcolor=”” icon=”” iconflip=”” iconrotate=”” iconspin=”” iconcolor=”” circlecolor=”” circlebordersize=”” circlebordercolor=”” outercirclebordersize=”” outercirclebordercolor=”” image=”” image_id=”” image_width=”” image_height=”” link=”” linktext=”” link_target=”” animation_type=”” animation_direction=leftanimation_speed=”0.3″ animation_offset=””]

  1. प्रमुख बन्द.
  2. Remove HCM 38-Way System Connector.
  3. Measure resistance on HCM 38-Way OEM Connector Pin 2 to Inverter 40-Way Connector Pin 1:
    • प्रतिरोध 0-0.3 ohms छ भने, को HCM प्रतिस्थापन, त्यसपछि चरण जाने 9.
    • If resistance is OL or more than 0.3 ohms, repair OEM Harness between HCM and Inverter, त्यसपछि चरण जाने 9.

[/fusion_content_box][fusion_content_box title=चरण 9. मरम्मत प्रमाणित.backgroundcolor=”” icon=”” iconflip=”” iconrotate=”” iconspin=noiconcolor=”” circlecolor=”” circlebordersize=”” circlebordercolor=”” outercirclebordersize=”” outercirclebordercolor=”” image=”” image_id=”” image_width=”” image_height=”” link=”” linktext=”थप पढ्नुहोस्” link_target=”” animation_type=”” animation_direction=leftanimation_speed=”0.3″ animation_offset=””]

  1. प्रमुख बन्द.
  2. सबै connectors र नकारात्मक ब्याट्री केबल पुनः जडान.
  3. प्रमुख मा.
  4. कोड स्पष्ट, हेर्न निष्क्रिय गल्तीलाई स्पष्ट.
  5. वाहन ड्राइभ र कोड रिसेट गर्न प्रयास.
  6. कोड जाँच, हेर्न सक्रिय र निष्क्रिय गल्तीलाई हेर्न.
    • कुनै कोड भने, परीक्षण पूरा.
    • यदि दोष कोड 111 देखिन्छ, फेला परीक्षणमा त्रुटि, चरण जाने 1.
    • यदि कोड अन्य भन्दा 111 देखिन्छ, हेर्न कोड सूचकांक सूची दोष.

[/fusion_content_box][/fusion_content_boxes][/fusion_builder_column][/fusion_builder_row][/fusion_builder_container][fusion_global id=”13788″]