[fusion_builder_container hundred_percent=”no” hundred_percent_height=”no” hundred_percent_height_scroll=”no” hundred_percent_height_center_content=”yes” equal_height_columns=”no” menu_anchor=”” hide_on_mobile=”small-visibility,medium-visibility,large-visibility” status=”published” publish_date=”” class=”” id=”” background_color=”” background_image=”” background_position=”center center” background_repeat=”no-repeat” fade=”no” background_parallax=”none” enable_mobile=”no” parallax_speed=”0.3″ video_mp4=”” video_webm=”” video_ogv=”” video_url=”” video_aspect_ratio=”16:9″ video_loop=”yes” video_mute=”yes” video_preview_image=”” border_size=”” border_color=”” border_style=”solid” margin_top=”35″ margin_bottom=”” padding_top=”” padding_right=”” padding_bottom=”” padding_left=””][fusion_builder_row][fusion_builder_column type=”1_1″ layout=”1_1″ spacing=”” center_content=”no” link=”” target=”_self” min_height=”” hide_on_mobile=”small-visibility,medium-visibility,large-visibility” class=”” id=”” background_color=”” background_image=”” background_image_id=”” background_position=”left top” background_repeat=”no-repeat” hover_type=”none” border_size=”0″ border_color=”” border_style=”solid” border_position=”all” padding_top=”” padding_right=”” padding_bottom=”” padding_left=”” margin_top=”” margin_bottom=”” animation_type=”” animation_direction=”left” animation_speed=”0.3″ animation_offset=”” last=”no”][fusion_text columns=”” column_min_width=”” column_spacing=”” rule_style=”default” rule_size=”” rule_color=”” hide_on_mobile=”small-visibility,medium-visibility,large-visibility” class=”” id=””]
Eaton Fuller Hibrid Tarchuir Cód Locht 116 – High Voltage Relays -(Córais MY08)
[/fusion_text][/fusion_builder_column][/fusion_builder_row][/fusion_builder_container][fusion_builder_container hundred_percent=”no” hundred_percent_height=”no” hundred_percent_height_scroll=”no” hundred_percent_height_center_content=”yes” equal_height_columns=”no” menu_anchor=”” hide_on_mobile=”small-visibility,medium-visibility,large-visibility” status=”published” publish_date=”” class=”” id=”” background_color=”” background_image=”” background_position=”center center” background_repeat=”no-repeat” fade=”no” background_parallax=”none” enable_mobile=”no” parallax_speed=”0.3″ video_mp4=”” video_webm=”” video_ogv=”” video_url=”” video_aspect_ratio=”16:9″ video_loop=”yes” video_mute=”yes” video_preview_image=”” border_size=”” border_color=”” border_style=”solid” margin_top=”” margin_bottom=”” padding_top=”” padding_right=”” padding_bottom=”” padding_left=””][fusion_builder_row][fusion_builder_column type=”1_1″ layout=”1_1″ spacing=”” center_content=”no” link=”” target=”_self” min_height=”” hide_on_mobile=”small-visibility,medium-visibility,large-visibility” class=”” id=”” background_color=”” background_image=”” background_image_id=”” background_position=”left top” background_repeat=”no-repeat” hover_type=”none” border_size=”0″ border_color=”” border_style=”solid” border_position=”all” padding_top=”” padding_right=”” padding_bottom=”” padding_left=”” margin_top=”” margin_bottom=”” animation_type=”” animation_direction=”left” animation_speed=”0.3″ animation_offset=”” last=”no”][fusion_text columns=”” column_min_width=”” column_spacing=”” rule_style=”default” rule_size=”” rule_color=”” hide_on_mobile=”small-visibility,medium-visibility,large-visibility” class=”” id=””]
Locht cód le haghaidh Eaton Hibrid samhlacha Córais Drive (MY08) EH-8E306A-U, EH-8E306A-UPG, EH-8E306A-UP, EH-8E306A-CD, EH-8E306A-T, EH-6E606B-CD. Léigh thíos chun foghlaim conas tástáil a dhéanamh, soiléir agus a shocrú earráidí cód locht ar do Freightliner, Mack, Peterbilt, Kenworth, Volvo, Idirnáisiúnta, agus trucail dualgas trom-agus trealamh. The High-Voltage Relays are located inside the Power Electronics Carrier (PEC) san aonad Leaschraolacháin Bosca. There is 1 precharge relay on the positive side, an additional relay on the positive, agus 1 on the negative for a total of 3. Tá na rásanna sealaíochta oscailte de ghnáth nuair atá an córas as. Na rásanna sealaíochta á rialú tríd an Inverter.
locht Cód 116 – High Voltage Relays Detection
Ní mór na réamhchoinníollacha seo a leanas a chomhlíonadh sula bhraitheann ar an gcóras an locht:
- Is é voltas Inverter adhainte níos mó ná 7 volta agus níos lú ná 16 volta.
Nóta: Nuair a fabhtcheartaithe ar cód Neamhghníomhach a tharchur chuig an Táirge Mód Diagnóiseacha (PDM)
Coinníollacha a Socraigh Locht Cód Gníomhach
- CAI 10 is set when the Inverter detects the input voltage measured at the capacitor is less than 210 volts within 3 seconds after the sub-relay closed in the Relay Box.
- CAI 14 is set when only the negative relay in the Relay Box is on and capacitor voltage decreases less than 10 volts/5 seconds when initial capacitor voltage was greater than 200 volts and motor speed less than 500 min-1, or there is a detect error in the initial check.
Fallback Nuair Locht Cód 116 leagtha na coinníollacha seo a leanas a tharlaíonn:
- Amber "Seiceáil Hibrid" blinks éadrom le haghaidh FMI 10 and remains solid for FMI 14.
- Tá Lochtanna stóráiltear i gcuimhne HCM.
- shuts Inverter Córas ardvoltais uaire.
- Leanann HCM chun rialú a dhéanamh ar an bhfeithicil hibrideach i modh díosail-amháin.
- mainneachtainí tarchurtha tús fearas go dtí 1.
[/fusion_text][fusion_text columns=”” column_min_width=”” column_spacing=”” rule_style=”default” rule_size=”” rule_color=”” hide_on_mobile=”small-visibility,medium-visibility,large-visibility” class=”” id=””]
Coinníollacha a Socraigh Locht Cód Neamhghníomhach
Ní féidir ach lochtanna neamhghníomhacha a ghlanadh as an tAonad um Rialú Leictreonach Tarchurtha (TECU) nó HCM Stair ag baint úsáide as ServiceRanger. An TECU nglanann go huathoibríoch ar an lochtanna ó stair i ndiaidh 200 uair an chloig agus an HCM nglanann go huathoibríoch ar an lochtanna ó stair tar éis an t locht a bhí Neamhghníomhach le 200 uaireanta.
Is féidir é seo cód locht a ba chúis leis aon cheann díobh seo a leanas:
- CAI 10
- PEC
- APG
- inverter
- DC high-voltage cable
- DC cable interlock loops
- táimhe Athraigh
- Athraigh seirbhís
- CAI 14
- inverter
- PEC
[/fusion_text][/fusion_builder_column][/fusion_builder_row][/fusion_builder_container][fusion_builder_container hundred_percent=”no” hundred_percent_height=”no” hundred_percent_height_scroll=”no” hundred_percent_height_center_content=”yes” equal_height_columns=”no” menu_anchor=”” hide_on_mobile=”small-visibility,medium-visibility,large-visibility” status=”published” publish_date=”” class=”” id=”” background_color=”” background_image=”” background_position=”center center” background_repeat=”no-repeat” fade=”no” background_parallax=”none” enable_mobile=”no” parallax_speed=”0.3″ video_mp4=”” video_webm=”” video_ogv=”” video_url=”” video_aspect_ratio=”16:9″ video_loop=”yes” video_mute=”yes” video_preview_image=”” border_size=”” border_color=”” border_style=”solid” margin_top=”” margin_bottom=”” padding_top=”” padding_right=”” padding_bottom=”” padding_left=””][fusion_builder_row][fusion_builder_column type=”1_1″ layout=”1_1″ spacing=”” center_content=”no” link=”” target=”_self” min_height=”” hide_on_mobile=”small-visibility,medium-visibility,large-visibility” class=”” id=”” background_color=”” background_image=”” background_image_id=”” background_position=”left top” background_repeat=”no-repeat” hover_type=”none” border_size=”0″ border_color=”” border_style=”solid” border_position=”all” padding_top=”” padding_right=”” padding_bottom=”” padding_left=”” margin_top=”” margin_bottom=”” animation_type=”” animation_direction=”left” animation_speed=”0.3″ animation_offset=”” last=”no”][fusion_text columns=”” column_min_width=”” column_spacing=”” rule_style=”default” rule_size=”” rule_color=”” hide_on_mobile=”small-visibility,medium-visibility,large-visibility” class=”” id=””]
locht Cód 116 – High Voltage Relays Test
[/fusion_text][/fusion_builder_column][/fusion_builder_row][/fusion_builder_container][fusion_builder_container hundred_percent=”no” hundred_percent_height=”no” hundred_percent_height_scroll=”no” hundred_percent_height_center_content=”yes” equal_height_columns=”no” menu_anchor=”” hide_on_mobile=”small-visibility,medium-visibility,large-visibility” status=”published” publish_date=”” class=”” id=”” background_color=”” background_image=”” background_position=”center center” background_repeat=”no-repeat” fade=”no” background_parallax=”none” enable_mobile=”no” parallax_speed=”0.3″ video_mp4=”” video_webm=”” video_ogv=”” video_url=”” video_aspect_ratio=”16:9″ video_loop=”yes” video_mute=”yes” video_preview_image=”” border_size=”” border_color=”” border_style=”solid” margin_top=”” margin_bottom=”” padding_top=”” padding_right=”” padding_bottom=”” padding_left=””][fusion_builder_row][fusion_builder_column type=”1_1″ layout=”1_1″ spacing=”” center_content=”no” link=”” target=”_self” min_height=”” hide_on_mobile=”small-visibility,medium-visibility,large-visibility” class=”” id=”” background_color=”” background_image=”” background_image_id=”” background_position=”left top” background_repeat=”no-repeat” hover_type=”none” border_size=”0″ border_color=”” border_style=”solid” border_position=”all” padding_top=”” padding_right=”” padding_bottom=”” padding_left=”” margin_top=”” margin_bottom=”” animation_type=”” animation_direction=”left” animation_speed=”0.3″ animation_offset=”” last=”no”][fusion_text columns=”” column_min_width=”” column_spacing=”” rule_style=”default” rule_size=”” rule_color=”” hide_on_mobile=”small-visibility,medium-visibility,large-visibility” class=”” id=””]
Comhpháirt Córais MY08 Aithint:
[/fusion_text][/fusion_builder_column][/fusion_builder_row][/fusion_builder_container][fusion_builder_container hundred_percent=”yes” hundred_percent_height=”no” hundred_percent_height_scroll=”no” hundred_percent_height_center_content=”yes” equal_height_columns=”no” menu_anchor=”” hide_on_mobile=”small-visibility,medium-visibility,large-visibility” status=”published” publish_date=”” class=”” id=”” background_color=”” background_image=”” background_position=”center center” background_repeat=”no-repeat” fade=”no” background_parallax=”none” enable_mobile=”no” parallax_speed=”0.3″ video_mp4=”” video_webm=”” video_ogv=”” video_url=”” video_aspect_ratio=”16:9″ video_loop=”yes” video_mute=”yes” video_preview_image=”” border_size=”” border_color=”” border_style=”solid” margin_top=”” margin_bottom=”” padding_top=”” padding_right=”10%” padding_bottom=”” padding_left=”10%”][fusion_builder_row][fusion_builder_column type=”1_3″ layout=”1_3″ spacing=”” center_content=”no” link=”” target=”_self” min_height=”” hide_on_mobile=”small-visibility,medium-visibility,large-visibility” class=”” id=”” background_color=”” background_image=”” background_image_id=”” background_position=”left top” background_repeat=”no-repeat” hover_type=”none” border_size=”0″ border_color=”” border_style=”solid” border_position=”all” padding_top=”” padding_right=”” padding_bottom=”” padding_left=”” margin_top=”” margin_bottom=”” animation_type=”” animation_direction=”left” animation_speed=”0.3″ animation_offset=”” last=”no”][fusion_imageframe image_id=”14474|full” max_width=”” style_type=”” blur=”” stylecolor=”” hover_type=”none” bordersize=”” bordercolor=”” borderradius=”” align=”center” lightbox=”no” gallery_id=”” lightbox_image=”” lightbox_image_id=”” alt=”Delphi 56-Way cúplála nascóirí View” link=”” linktarget=”_self” hide_on_mobile=”small-visibility,medium-visibility,large-visibility” class=”” id=”” animation_type=”” animation_direction=”left” animation_speed=”0.3″ animation_offset=””]https://www.globaltransmissionsupply.com/wp-content/uploads/Inverter-56-Way-Mating-Connector-View.jpg[/fusion_imageframe][fusion_text columns=”” column_min_width=”” column_spacing=”” rule_style=”default” rule_size=”” rule_color=”” hide_on_mobile=”small-visibility,medium-visibility,large-visibility” class=”” id=””]
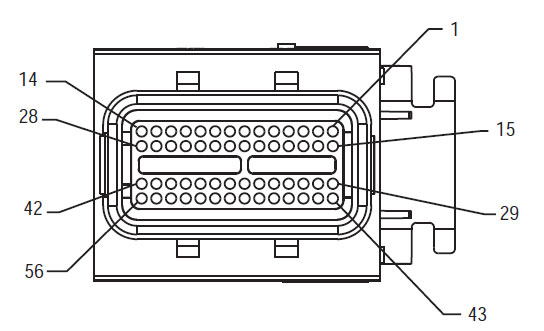
56-Way Cúplála nascóirí View
[/fusion_text][/fusion_builder_column][fusion_builder_column type=”1_3″ layout=”1_3″ spacing=”” center_content=”no” link=”” target=”_self” min_height=”” hide_on_mobile=”small-visibility,medium-visibility,large-visibility” class=”” id=”” background_color=”” background_image=”” background_image_id=”” background_position=”left top” background_repeat=”no-repeat” hover_type=”none” border_size=”0″ border_color=”” border_style=”solid” border_position=”all” padding_top=”” padding_right=”” padding_bottom=”” padding_left=”” margin_top=”” margin_bottom=”” animation_type=”” animation_direction=”left” animation_speed=”0.3″ animation_offset=”” last=”no”][fusion_imageframe image_id=”14635|full” max_width=”” style_type=”” blur=”” stylecolor=”” hover_type=”none” bordersize=”” bordercolor=”” borderradius=”” align=”center” lightbox=”no” gallery_id=”” lightbox_image=”” lightbox_image_id=”” alt=”Voltage DC nascóirí View Yazaki nascóirí” link=”” linktarget=”_self” hide_on_mobile=”small-visibility,medium-visibility,large-visibility” class=”” id=”” animation_type=”” animation_direction=”left” animation_speed=”0.3″ animation_offset=””]https://www.globaltransmissionsupply.com/wp-content/uploads/High-Voltage-DC-Connector-View.jpg[/fusion_imageframe][fusion_text columns=”” column_min_width=”” column_spacing=”” rule_style=”default” rule_size=”” rule_color=”” hide_on_mobile=”small-visibility,medium-visibility,large-visibility” class=”” id=””]
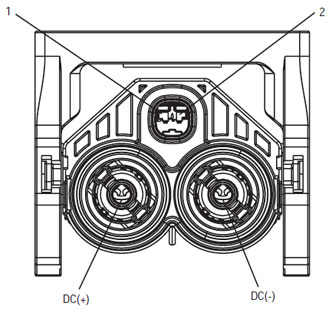
Voltage DC nascóirí View Yazaki nascóirí

[/fusion_text][/fusion_builder_column][fusion_builder_column type=”1_3″ layout=”1_3″ spacing=”” center_content=”no” link=”” target=”_self” min_height=”” hide_on_mobile=”small-visibility,medium-visibility,large-visibility” class=”” id=”” background_color=”” background_image=”” background_image_id=”” background_position=”left top” background_repeat=”no-repeat” hover_type=”none” border_size=”0″ border_color=”” border_style=”solid” border_position=”all” padding_top=”” padding_right=”” padding_bottom=”” padding_left=”” margin_top=”” margin_bottom=”” animation_type=”” animation_direction=”left” animation_speed=”0.3″ animation_offset=”” last=”no”][fusion_imageframe image_id=”14213|medium” max_width=”” style_type=”” blur=”” stylecolor=”” hover_type=”none” bordersize=”” bordercolor=”” borderradius=”” align=”center” lightbox=”no” gallery_id=”” lightbox_image=”” lightbox_image_id=”” alt=”Mating Connector View Deutsch 19 – Way” link=”” linktarget=”_self” hide_on_mobile=”small-visibility,medium-visibility,large-visibility” class=”” id=”” animation_type=”” animation_direction=”left” animation_speed=”0.3″ animation_offset=””]https://www.globaltransmissionsupply.com/wp-content/uploads/Eaton-Fuller-Harness-Connector-View-300×289.jpg[/fusion_imageframe][fusion_text columns=”” column_min_width=”” column_spacing=”” rule_style=”default” rule_size=”” rule_color=”” hide_on_mobile=”small-visibility,medium-visibility,large-visibility” class=”” id=””]
Mating Connector View Deutsch 19 – Way
[/fusion_text][/fusion_builder_column][/fusion_builder_row][/fusion_builder_container][fusion_builder_container hundred_percent=”no” hundred_percent_height=”no” hundred_percent_height_scroll=”no” hundred_percent_height_center_content=”yes” equal_height_columns=”no” menu_anchor=”” hide_on_mobile=”small-visibility,medium-visibility,large-visibility” status=”published” publish_date=”” class=”” id=”” background_color=”” background_image=”” background_position=”center center” background_repeat=”no-repeat” fade=”no” background_parallax=”none” enable_mobile=”no” parallax_speed=”0.3″ video_mp4=”” video_webm=”” video_ogv=”” video_url=”” video_aspect_ratio=”16:9″ video_loop=”yes” video_mute=”yes” video_preview_image=”” border_size=”” border_color=”” border_style=”solid” margin_top=”” margin_bottom=”” padding_top=”” padding_right=”” padding_bottom=”” padding_left=””][fusion_builder_row][fusion_builder_column type=”1_1″ layout=”1_1″ spacing=”” center_content=”no” link=”” target=”_self” min_height=”” hide_on_mobile=”small-visibility,medium-visibility,large-visibility” class=”” id=”” background_image_id=”” background_color=”#000000″ background_image=”” background_position=”left top” undefined=”” background_repeat=”no-repeat” hover_type=”none” border_size=”0″ border_color=”” border_style=”solid” border_position=”all” padding_top=”” padding_right=”” padding_bottom=”” padding_left=”” margin_top=”” margin_bottom=”” animation_type=”” animation_direction=”left” animation_speed=”0.3″ animation_offset=”” last=”no”][fusion_text columns=”” column_min_width=”” column_spacing=”” rule_style=”default” rule_size=”” rule_color=”” hide_on_mobile=”small-visibility,medium-visibility,large-visibility” class=”” id=””]
NÓTA: Déan tagairt do na Eaton Hibrid Comhpháirt agus Ceanglóir Suíomh do Áiteanna nascóirí i gCórais MY08
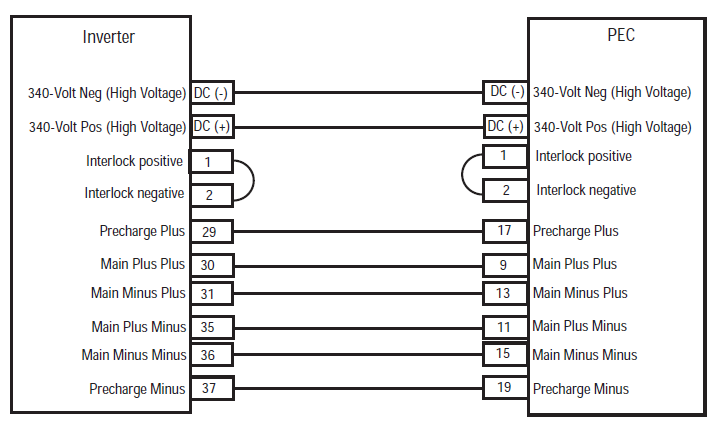
[/fusion_text][/fusion_builder_column][fusion_builder_column type=”1_1″ layout=”1_1″ spacing=”” center_content=”no” link=”” target=”_self” min_height=”” hide_on_mobile=”small-visibility,medium-visibility,large-visibility” class=”” id=”” background_color=”” background_image=”” background_image_id=”” background_position=”left top” background_repeat=”no-repeat” hover_type=”none” border_size=”0″ border_color=”” border_style=”solid” border_position=”all” padding_top=”” padding_right=”” padding_bottom=”” padding_left=”” margin_top=”” margin_bottom=”” animation_type=”” animation_direction=”left” animation_speed=”0.3″ animation_offset=”” last=”no”][fusion_imageframe image_id=”14666|full” max_width=”” style_type=”” blur=”” stylecolor=”” hover_type=”none” bordersize=”” bordercolor=”” borderradius=”” align=”center” lightbox=”no” gallery_id=”” lightbox_image=”” lightbox_image_id=”” alt=”Inverter PEC connectors Eaton Fuller Hybrid transmission” link=”” linktarget=”_self” hide_on_mobile=”small-visibility,medium-visibility,large-visibility” class=”” id=”” animation_type=”” animation_direction=”left” animation_speed=”0.3″ animation_offset=””]https://www.globaltransmissionsupply.com/wp-content/uploads/Inverter-PEC-connectors.png[/fusion_imageframe][/fusion_builder_column][/fusion_builder_row][/fusion_builder_container][fusion_builder_container hundred_percent=”no” hundred_percent_height=”no” hundred_percent_height_scroll=”no” hundred_percent_height_center_content=”yes” equal_height_columns=”no” menu_anchor=”” hide_on_mobile=”small-visibility,medium-visibility,large-visibility” status=”published” publish_date=”” class=”” id=”” background_color=”” background_image=”” background_position=”center center” background_repeat=”no-repeat” fade=”no” background_parallax=”none” enable_mobile=”no” parallax_speed=”0.3″ video_mp4=”” video_webm=”” video_ogv=”” video_url=”” video_aspect_ratio=”16:9″ video_loop=”yes” video_mute=”yes” video_preview_image=”” border_size=”” border_color=”” border_style=”solid” margin_top=”” margin_bottom=”” padding_top=”” padding_right=”” padding_bottom=”” padding_left=””][fusion_builder_row][fusion_builder_column type=”1_1″ layout=”1_1″ spacing=”” center_content=”no” link=”” target=”_self” min_height=”” hide_on_mobile=”small-visibility,medium-visibility,large-visibility” class=”” id=”” background_color=”” background_image=”” background_image_id=”” background_position=”left top” background_repeat=”no-repeat” hover_type=”none” border_size=”0″ border_color=”” border_style=”solid” border_position=”all” padding_top=”” padding_right=”” padding_bottom=”” padding_left=”” margin_top=”” margin_bottom=”” animation_type=”” animation_direction=”left” animation_speed=”0.3″ animation_offset=”” last=”no”][fusion_modal name=”warnings_cautions” title=”Rabhaidh & rabhaidh” size=”large” background=”” border_color=”” show_footer=”yes” class=”” id=””]Danger: Tugann an chontúirt le fios go ndéanfar díobháil mhór duit nó go marófar thú mura leantar an nós imeachta a luaitear.
rabhadh: Léiríonn Rabhadh guais láithreach, a d’fhéadfadh díobháil thromchúiseach phearsanta a bheith mar thoradh air mura leanann tú an nós imeachta sonraithe.
rabhadh: Tugann rabhadh le fios go bhféadfadh damáiste d’fheithicil nó do mhaoin tarlú mura leanann tú an nós imeachta sonraithe.
Nóta: Léiríonn an nóta sonraí breise a chuideoidh le diagnóis nó deisiú comhpháirte/córais.
Lean na nósanna imeachta a bheidh sonraithe san ordú atá léirithe gcás díobhála pearsanta dóibh sheachaint:
1. Má tá na cóin ardvoltais ar fud na feithicle agus tá an frithdhúnadh suiteáilte ar an PEC, Is é an t-aon duine chóir a cheadú chun tús a chur leis an bhfeithicil an duine a shínigh an chlib Frithdhúnadh.
2. Sula ag obair ar fheithicil nó ag fágáil an chábáin cé go bhfuil an t-inneall ag rith, ba chóir duit a chur ar an luamhán athrú i "N" a leagtar ar an coscán páirceála, agus bloc na rothaí.
3. Ar chúiseanna sábháilteachta, i gcónaí i ngleic na coscáin seirbhíse roimh roghnú poist fearas ó "N."
4. Sula ag tosú feithicil a bheith ina shuí i gcónaí i suíochán an tiománaí, roghnaigh "N" maidir le rialú athrú, agus leag na coscáin páirceála.
5. I feithiclí a bhfuil ePTO, an t-inneall agus / nó
Motor / Is féidir le Gineadóir tosú i mód ePTO. Ná dhéanamh aon chothabháil nó ag obair ar fheithicil, agus sa mhodh.
6. 12-Volt Battery dearfach (+) agus diúltacha (-) Ní mór a dhícheangal roimh aon táthú ar aon fheithicil Hybrid feistithe.
rabhadh: Lean na nósanna imeachta a bheidh sonraithe san ordú atá léirithe a sheachaint mífheidhmiú trealamh nó damáiste.
rabhadh: Ná scaoil an coscán páirceála nó déan iarracht fearas a roghnú go dtí go bhfuil an brú aeir ag an leibhéal ceart.
rabhadh: Chun damáiste don tarchur a sheachaint le linn tarraingthe cuir an luamhán aistrithe i “N” agus ardaigh na rothaí tiomána den talamh nó dínasc an líne tiomána.
Rabhaidh Ard-Voltage & rabhaidh
- Bain úsáid as CO2 nó Tirim Chemical Fire Extinguishers.
- Is é an sreangú ardvoltais clúdaithe sa insliú oráiste nó feadánra convoluted agus marcáilte le lipéid rabhaidh ar na chónaisc.
- Beidh gach Eaton® Hibrid Díosal feithiclí / leictreacha a mharcáil 'Hibrid’ ar an taobh amuigh den fheithicil, chomh maith leis an lipéad athrú ar an Fleasc.
- Déan tagairt do OEM do shuíomh ar leith de chassis suite comhpháirteanna hibrideach.
- NÁ gearrtha isteach na cáblaí ardvoltais oráiste.
- NÁ gearrtha isteach nó a oscailt an PEC.
- NÁ gearrtha isteach nó a oscailt an Tiontaire DC / DC.
- NÁ gearrtha isteach nó a oscailt an Inverter.
Ní mór crios maolánach a chur ar bun agus ardvoltais inslithe lámhainní rubair (rang 0 le cosantóirí leathair) Ceanglaítear sula ag obair ar ardvoltais. Má theipeann a leanúint na treoracha seo mar thoradh díobháil phearsanta tromchúiseach nó bás.
Is iad na lámhainní rubair-inslithe nach mór a chaitheamh agus iad ag obair ar an gcóras ardvoltais aicme 0 le cosantóirí leathair. Ba cheart na lámhainní rubair a thástáil sula GACH úsáid tar éis an nós imeachta rubair lámhainní inslithe tástáil le fáil i "Tools Diagnóiseacha / Foilseacháin Seirbhís" ar leathanach 6. Má theipeann a leanúint na treoracha seo mar thoradh díobháil phearsanta tromchúiseach nó bás.
Sula iniúchadh nó ag obair ar aon cháblaí ardvoltais nó comhpháirteanna an "Múchadh Seirbhís Ard-Voltage agus Cumhachta-Up Imeachta" ar leathanach 4 a leanúint. Má theipeann a leanúint na treoracha seo mar thoradh díobháil phearsanta tromchúiseach nó bás.
Ba cheart na feistí Frithdhúnadh agus Tagout a chur as oifig ach amháin ag an teicneoir a chuir na feistí Frithdhúnadh agus Tagout ar an bhfeithicil. Má theipeann a leanúint na treoracha seo mar thoradh díobháil phearsanta tromchúiseach nó bás.
Ardvoltais rubair inslithe lámhainní (rang 0 le cosantóirí leathair) Ní mór a chaitheamh agus iad ag obair ar bith
cáblaí ardvoltais. An "Múchadh Ard-Voltage Seirbhís agus Cumhachta-Up Imeachta" ar leathanach 4 Ní mór a leanúint sula a bhaint aon cháblaí ardvoltais. Má theipeann a leanúint na treoracha seo mar thoradh díobháil phearsanta tromchúiseach nó bás.
Tá cáblaí ardvoltais agus sreangú oráiste agus ina bhfuil lipéad rabhaidh ar na chónaisc. Comhpháirteanna ardvoltais atá marcáilte le lipéad. Ardvoltais rubair inslithe lámhainní (rang 0 le cosantóirí leathair) Ní mór a úsáid agus iad ag obair ar aon cheann de na comhpháirteanna. Má theipeann a leanúint na treoracha seo mar thoradh díobháil phearsanta tromchúiseach nó bás.
Ard-Voltage Nósanna Imeachta Shutdown Seirbhís

1. Follow "Ard-Voltage Limistéar Oibre" nós imeachta.
2. Aimsigh an dearg Téigh Seirbhís PEC ar thaobh tosaigh an PEC agus a bhrú a mhúchadh.
3. Bain an Clúdach Athraigh Seirbhíse agus a shuiteáil an Lúibín Frithdhúnadh (J48506).
4. tag Fasten don Lúibín Frithdhúnadh.
5. A chinntiú Athraigh Seirbhís PEC ní féidir a bhogadh ón suíomh amach.
6. Lig don chóras a shocrú ar a laghad 5 nóiméad a ardvoltais urscaoileadh.
7. Ceangail ServiceRanger agus féachaint ar an Sonraí Monatóireacht a dhéanamh ar PID 116 ar a dtugtar "Ard-Voltage Battery Poitéinseal." Úsáid SPN 520323 maidir le nascadh J1939 "Battery Voltage RB" (Relay Box).
8. Ba chóir an voltas a bheith 30 volta nó níos lú. Má tá an voltas thuas 30 volta, nach obair ar an bhfeithicil agus teagmháil a dhéanamh Eaton® ag 1-800-826-HELP (4357).
9. Cas eochair adhainte thalamh agus ar aghaidh go dtí dheisiú nó trealamh céime fabhtcheartaithe.
Nóta: titeann an voltas a náid nuair a bhíonn an eochair as.
Ard-Voltage Seirbhís Cumhacht-Up Nós imeachta
1. Suiteáil na chónaisc ardvoltais isteach ar a seasaimh faoi ghlas.
2. Má tá tú ag an duine atá ag obair ar an bhfeithicil, bain an Lúibín Lockout agus tag.
3. Reinstall an Lúibín Frithdhúnadh thar an Athraigh Seirbhís.
4. Tarraing an tSeirbhís Téigh amach agus lig a leagtar feithicle le haghaidh 2 nóiméad.
5. Start vehicle when appropriate.[/fusion_modal][fusion_modal name=”component_location” title=”Eaton Hibrid Comhpháirt agus Ceanglóir Suíomh ” size=”large” background=”#ffffff” border_color=”” show_footer=”yes” class=”” id=””]

[/fusion_modal][fusion_modal name=”component_location2″ title=”Eaton Hibrid Comhpháirt agus Ceanglóir Suíomh MY09 Córais” size=”large” background=”#ffffff” border_color=”” show_footer=”yes” class=”” id=””]

[/fusion_modal][/fusion_builder_column][/fusion_builder_row][/fusion_builder_container][fusion_builder_container hundred_percent=”no” hundred_percent_height=”no” hundred_percent_height_scroll=”no” hundred_percent_height_center_content=”yes” equal_height_columns=”no” menu_anchor=”” hide_on_mobile=”small-visibility,medium-visibility,large-visibility” status=”published” publish_date=”” class=”” id=”” background_color=”” background_image=”” background_position=”center center” background_repeat=”no-repeat” fade=”no” background_parallax=”none” enable_mobile=”no” parallax_speed=”0.3″ video_mp4=”” video_webm=”” video_ogv=”” video_url=”” video_aspect_ratio=”16:9″ video_loop=”yes” video_mute=”yes” video_preview_image=”” border_size=”” border_color=”” border_style=”solid” margin_top=”” margin_bottom=”” padding_top=”” padding_right=”” padding_bottom=”” padding_left=””][fusion_builder_row][fusion_builder_column type=”1_1″ layout=”1_1″ spacing=”” center_content=”no” link=”” target=”_self” min_height=”” hide_on_mobile=”small-visibility,medium-visibility,large-visibility” class=”” id=”” background_color=”” background_image=”” background_image_id=”” background_position=”left top” background_repeat=”no-repeat” hover_type=”none” border_size=”0″ border_color=”” border_style=”solid” border_position=”all” padding_top=”” padding_right=”” padding_bottom=”” padding_left=”” margin_top=”” margin_bottom=”” animation_type=”” animation_direction=”left” animation_speed=”0.3″ animation_offset=”” last=”no”][fusion_content_boxes layout=”clean-horizontal” columns=”2″ title_size=”18px” heading_size=”3″ title_color=”#ffffff” body_color=”#ffffff” backgroundcolor=”#4f4f4f” icon=”” iconflip=”” iconrotate=”” iconspin=”no” iconcolor=”” icon_circle=”” icon_circle_radius=”” circlecolor=”” circlebordersize=”” circlebordercolor=”” outercirclebordersize=”” outercirclebordercolor=”” icon_size=”” icon_hover_type=”” hover_accent_color=”” image=”” image_id=”” image_width=”” image_height=”” link_type=”” button_span=”” link_area=”” link_target=”” icon_align=”left” animation_type=”” animation_delay=”” animation_offset=”” animation_direction=”left” animation_speed=”0.3″ margin_top=”” margin_bottom=”” hide_on_mobile=”small-visibility,medium-visibility,large-visibility” class=”” id=””][fusion_content_box title=”STEP 1. Fíoraigh FMIs láthair.” backgroundcolor=”” icon=”” iconflip=”” iconrotate=”” iconspin=”no” iconcolor=”” circlecolor=”” circlebordersize=”” circlebordercolor=”” outercirclebordersize=”” outercirclebordercolor=”” image=”” image_id=”” image_width=”” image_height=”” link=”” linktext=”Leigh Nios mo” link_target=”” animation_type=”” animation_direction=”left” animation_speed=”0.3″ animation_offset=””]
- Athbhreithniú agus lean na Rabhaidh & rabhaidh.
- Aisghabh lochtchód Ghníomhach agus FMIs leis ServiceRanger ag baint úsáide as an 9-Way Diagnóiseacha nascóirí.
Danger: Féach Nósanna Imeachta um Mhúchadh Seirbhíse Ardvoltais agus Cumhachta Suas. Lean na nósanna imeachta turraing a sheachaint, sruthán nó bás ó go míchuí láimhseáil ardvoltais. - Cad iad na FMIs i láthair
- Má Locht Cód 116 CAI 14 Is é atá liostaithe, téigh go dtí Céim 9.
- Má Locht Cód 116 CAI 10 Is é atá liostaithe, téigh go dtí Céim 2.
- If no Fault Codes are listed, The Service Switch was pushed in. Téigh go dtí Céim 10.
[/fusion_content_box][fusion_content_box title=”STEP 2. Verify Data Monitor parameters.” backgroundcolor=”” icon=”” iconflip=”” iconrotate=”” iconspin=”no” iconcolor=”” circlecolor=”” circlebordersize=”” circlebordercolor=”” outercirclebordersize=”” outercirclebordercolor=”” image=”” image_id=”” image_width=”” image_height=”” link=”” linktext=”Leigh Nios mo” link_target=”” animation_type=”” animation_direction=”left” animation_speed=”0.3″ animation_offset=””]
- Déanfar príomhfhaisnéis ar.
- Ceangail ServiceRanger leis an 9-Way Diagnóiseacha nascóirí i an chábáin.
- Roghnaigh an "Sonraí Monatóireacht" rogha.
- View the Battery Pack Voltage (BCU1) PID 118 in the high- voltage Battery list:
- If the Battery Pack Voltage (BCU1) PID 118 is greater than 200 volta, téigh go dtí Céim 3.
- If the Battery Pack Voltage (BCU1) PID 118 Is lú ná 200 volta, in ionad an Iompróir Power Electronics (PEC), ansin téigh go dtí Céim 10.
[/fusion_content_box][/fusion_content_boxes][fusion_content_boxes layout=”clean-horizontal” columns=”2″ title_size=”18px” heading_size=”3″ title_color=”#ffffff” body_color=”#ffffff” backgroundcolor=”#4f4f4f” icon=”” iconflip=”” iconrotate=”” iconspin=”no” iconcolor=”” icon_circle=”” icon_circle_radius=”” circlecolor=”” circlebordersize=”” circlebordercolor=”” outercirclebordersize=”” outercirclebordercolor=”” icon_size=”” icon_hover_type=”” hover_accent_color=”” image=”” image_id=”” image_width=”” image_height=”” link_type=”” button_span=”” link_area=”” link_target=”” icon_align=”left” animation_type=”” animation_delay=”” animation_offset=”” animation_direction=”left” animation_speed=”0.3″ margin_top=”” margin_bottom=”” hide_on_mobile=”small-visibility,medium-visibility,large-visibility” class=”” id=””][fusion_content_box title=”STEP 3. Verify continuity of Inverter connector circuits.” backgroundcolor=”” icon=”” iconflip=”” iconrotate=”” iconspin=”no” iconcolor=”” circlecolor=”” circlebordersize=”” circlebordercolor=”” outercirclebordersize=”” outercirclebordercolor=”” image=”” image_id=”” image_width=”” image_height=”” link=”” linktext=”Leigh Nios mo” link_target=”” animation_type=”” animation_direction=”left” animation_speed=”0.3″ animation_offset=””]
- Key off.
- If the vehicle is not equipped with a DC/DC Converter or APG, skip this step.
- Using ASTM Class 0 electrical insulating rubber gloves with leather protectors, disconnect the DC cable for the DC/DC Converter and APG at the PEC.
- With the key off, temporarily remove the Lockout Bracket and pull the Service Switch out.
- Déanfar príomhfhaisnéis ar.
- Is Locht Cód 116 CAI 10 still Active in ServiceRanger?
- Má Locht Cód 116 CAI 10 is Active with the DC/DC Converter and APG disconnected, téigh go dtí Céim 4.
- Má Locht Cód 116 CAI 10 is no longer Active with the DC/DC Converter and APG disconnected, key off and reinstall the Lockout Bracket on the PEC. Replace the Power Electronics Carrier (PEC), ansin téigh go dtí Céim 10.
[/fusion_content_box][fusion_content_box title=”STEP 4. Verify continuity of PEC connector circuits to ground.” backgroundcolor=”” icon=”” iconflip=”” iconrotate=”” iconspin=”” iconcolor=”” circlecolor=”” circlebordersize=”” circlebordercolor=”” outercirclebordersize=”” outercirclebordercolor=”” image=”” image_id=”” image_width=”” image_height=”” link=”” linktext=”” link_target=”” animation_type=”” animation_direction=”left” animation_speed=”0.3″ animation_offset=””]
- Key off.
- Dícheangail an PEC 19-Way nascóirí.
- Temporarily remove the Lockout Bracket and pull the Service Switch out.
Nóta: Ensure the Key Switch is off. - Measure resistance at the PEC 19-Way Connector Terminal at the following pins:
- Pin 17 go Pin 19
- Pin 9 go Pin 11
- Pin 13 go Pin 15
- If the resistance between Pins 17 agus Pin 19 Is 112-122 ohms agus an fhriotaíocht ó Pin 9 go Pin 11 agus Pin 13 go Pin 15 Tá gach 33-37 ohms, téigh go dtí Céim 5.
- Má tá friotaíocht as raon, téigh go dtí Céim 6.
[/fusion_content_box][/fusion_content_boxes][fusion_content_boxes layout=”clean-horizontal” columns=”2″ title_size=”18px” heading_size=”3″ title_color=”#ffffff” body_color=”#ffffff” backgroundcolor=”#4f4f4f” icon=”” iconflip=”” iconrotate=”” iconspin=”no” iconcolor=”” icon_circle=”” icon_circle_radius=”” circlecolor=”” circlebordersize=”” circlebordercolor=”” outercirclebordersize=”” outercirclebordercolor=”” icon_size=”” icon_hover_type=”” hover_accent_color=”” image=”” image_id=”” image_width=”” image_height=”” link_type=”” button_span=”” link_area=”” link_target=”” icon_align=”left” animation_type=”” animation_delay=”” animation_offset=”” animation_direction=”left” animation_speed=”0.3″ margin_top=”” margin_bottom=”” hide_on_mobile=”small-visibility,medium-visibility,large-visibility” class=”” id=””][fusion_content_box title=”STEP 5. Verify continuity of Inverter connector circuits to ground.” backgroundcolor=”” icon=”” iconflip=”” iconrotate=”” iconspin=”no” iconcolor=”” circlecolor=”” circlebordersize=”” circlebordercolor=”” outercirclebordersize=”” outercirclebordercolor=”” image=”” image_id=”” image_width=”” image_height=”” link=”” linktext=”Leigh Nios mo” link_target=”” animation_type=”” animation_direction=”left” animation_speed=”0.3″ animation_offset=””]
- Key off.
- Reconnect the PEC 19-Way Connector.
- Dhícheangal an Inverter 56-Way nascóirí.
- Inspect the connector pins for damaged, corroded and/or loose wires.
- Measure resistance between the Inverter 56-Way Connector at the following pins:
- Pin 29 go Pin 37
- Pin 30 go Pin 35
- Pin 31 go Pin 36 Nóta: Go réidh flex an Inverter 56-Way nascóirí Leas a bhaint as in aice leis an Nascóirí agus monatóireacht na luachanna friotaíochta.
- Má tá an friotaíocht idir Pin 29 agus Pin 37 Is 112-122 ohms agus an fhriotaíocht ó Pin 30 go Pin 35 agus Pin 31 go Pin 36 Tá gach 33-37 ohms, push the Service Switch on the PEC and reinstall the Lockout Bracket. Téigh go dtí Céim 8.
- Má tá friotaíocht as raon, repair the Hybrid Harness between the PEC and Inverter, ansin téigh go dtí Céim 10.
[/fusion_content_box][fusion_content_box title=”STEP 6. Verify continuity of PEC connector circuits.” backgroundcolor=”” icon=”” iconflip=”” iconrotate=”” iconspin=”” iconcolor=”” circlecolor=”” circlebordersize=”” circlebordercolor=”” outercirclebordersize=”” outercirclebordercolor=”” image=”” image_id=”” image_width=”” image_height=”” link=”” linktext=”” link_target=”” animation_type=”” animation_direction=”left” animation_speed=”0.3″ animation_offset=””]
- Key off.
- Remove the Air Filter Cover and Air Filter from the PEC. Refer to TRSM1000 for procedures.*
- An Inertia Switch is located at the front of the PEC inside the box and viewable when the Air Filter is removed.
- Using ASTM Class 0 electrical insulating rubber gloves with leather protectors, press the button on the top of the Inertia Switch until heard or felt a click. This switch must be depressed a set distance to reset the switch.
- Measure resistance at the PEC 19-Way Connector Terminal at the following pins:
- Pin 17 go Pin 19
- Pin 9 go Pin 11
- Pin 13 go Pin 15
- qIf the resistance between Pin 17 agus Pin 19 Is 112-122 ohms agus an fhriotaíocht ó Pin 9 go Pin 11 agus Pin 13 go Pin 15 Tá gach 33-37 ohms, the Inertia Switch was tripped. Test is complete. Téigh go dtí Céim 10.
- Má tá friotaíocht as raon, push in the Service Switch on the PEC and reinstall the Lockout Bracket, ansin téigh go dtí Céim 7.
[/fusion_content_box][/fusion_content_boxes][fusion_content_boxes layout=”clean-horizontal” columns=”2″ title_size=”18px” heading_size=”3″ title_color=”#ffffff” body_color=”#ffffff” backgroundcolor=”#4f4f4f” icon=”” iconflip=”” iconrotate=”” iconspin=”no” iconcolor=”” icon_circle=”” icon_circle_radius=”” circlecolor=”” circlebordersize=”” circlebordercolor=”” outercirclebordersize=”” outercirclebordercolor=”” icon_size=”” icon_hover_type=”” hover_accent_color=”” image=”” image_id=”” image_width=”” image_height=”” link_type=”” button_span=”” link_area=”” link_target=”” icon_align=”left” animation_type=”” animation_delay=”” animation_offset=”” animation_direction=”left” animation_speed=”0.3″ margin_top=”” margin_bottom=”” hide_on_mobile=”small-visibility,medium-visibility,large-visibility” class=”” id=””][fusion_content_box title=”STEP 7. Verify continuity of Inverter connector circuits.” backgroundcolor=”” icon=”” iconflip=”” iconrotate=”” iconspin=”no” iconcolor=”” circlecolor=”” circlebordersize=”” circlebordercolor=”” outercirclebordersize=”” outercirclebordercolor=”” image=”” image_id=”” image_width=”” image_height=”” link=”” linktext=”Leigh Nios mo” link_target=”” animation_type=”” animation_direction=”left” animation_speed=”0.3″ animation_offset=””]
- Key off.
- Disconnect the DC High-Voltage Cable at the PEC Bulkhead and at the Inverter Bulkhead.
- Measure resistance between the Low-Voltage Interlock Pins on the PEC side of the DC High-Voltage Cable:
Nóta: The Interlock Pins are the two small spade terminals located in the same opening.- If the resistance is 0–0.3 ohms between the Interlock Loop Pins, in ionad an Iompróir Power Electronics (PEC), ansin téigh go dtí Céim 10.
- Má tá friotaíocht as raon, in ionad an DC cábla ardvoltais, ansin téigh go dtí Céim 10.
[/fusion_content_box][fusion_content_box title=”STEP 8. Verify continuity of DC Cable from PEC to Inverter Connector circuits.” backgroundcolor=”” icon=”” iconflip=”” iconrotate=”” iconspin=”” iconcolor=”” circlecolor=”” circlebordersize=”” circlebordercolor=”” outercirclebordersize=”” outercirclebordercolor=”” image=”” image_id=”” image_width=”” image_height=”” link=”” linktext=”” link_target=”” animation_type=”” animation_direction=”left” animation_speed=”0.3″ animation_offset=””]
- Key off.
- Disconnect the DC High-Voltage Cable at the PEC Bulkhead and the Inverter Bulkhead.
- Measure the resistance of each high-voltage circuit on the cable:
- If the resistance of each high-voltage circuit in the cable is 1 Ohm nó níos lú, in ionad an Inverter, ansin téigh go dtí Céim 10.
- Má tá friotaíocht as raon, replace the DC High-Voltage Cable, ansin téigh go dtí Céim 10.
[/fusion_content_box][/fusion_content_boxes][fusion_content_boxes layout=”clean-horizontal” columns=”2″ title_size=”18px” heading_size=”3″ title_color=”#ffffff” body_color=”#ffffff” backgroundcolor=”#4f4f4f” icon=”” iconflip=”” iconrotate=”” iconspin=”no” iconcolor=”” icon_circle=”” icon_circle_radius=”” circlecolor=”” circlebordersize=”” circlebordercolor=”” outercirclebordersize=”” outercirclebordercolor=”” icon_size=”” icon_hover_type=”” hover_accent_color=”#f41000″ image=”” image_id=”” image_width=”” image_height=”” link_type=”” button_span=”” link_area=”” link_target=”” icon_align=”left” animation_type=”” animation_delay=”” animation_offset=”” animation_direction=”left” animation_speed=”0.3″ margin_top=”” margin_bottom=”” hide_on_mobile=”small-visibility,medium-visibility,large-visibility” class=”” id=””][fusion_content_box title=”STEP 9. Verify Data Monitor parameters.” backgroundcolor=”” icon=”” iconflip=”” iconrotate=”” iconspin=”” iconcolor=”” circlecolor=”” circlebordersize=”” circlebordercolor=”” outercirclebordersize=”” outercirclebordercolor=”” image=”” image_id=”” image_width=”” image_height=”” link=”” linktext=”” link_target=”” animation_type=”” animation_direction=”left” animation_speed=”0.3″ animation_offset=””]
- Ceangail ServiceRanger leis an 9-Way Diagnóiseacha nascóirí i an chábáin.
- Roghnaigh an "Sonraí Monatóireacht" rogha.
- View the following parameters in the High-Voltage Battery list.
- Battery Pack Voltage (BCU1) PID 118
- Battery Voltage PID 116
- If the voltage readings on PID 116 agus PID 118 are within 10 volta chéile, in ionad an Iompróir Power Electronics (PEC), ansin téigh go dtí Céim 10.
- If the voltage readings on PID 116 agus PID 118 are greater than 10 volta chéile, in ionad an Inverter, ansin téigh go dtí Céim 10.
[/fusion_content_box][fusion_content_box title=”STEP 10. Fíoraigh dheisiú.” backgroundcolor=”” icon=”” iconflip=”” iconrotate=”” iconspin=”no” iconcolor=”” circlecolor=”” circlebordersize=”” circlebordercolor=”” outercirclebordersize=”” outercirclebordercolor=”” image=”” image_id=”” image_width=”” image_height=”” link=”” linktext=”Leigh Nios mo” link_target=”” animation_type=”” animation_direction=”left” animation_speed=”0.3″ animation_offset=””]
- Key off.
- Reconnect na naisc agus an cábla ceallraí diúltach.
- Déanfar príomhfhaisnéis ar.
- cóid Clear, féach Luchtanna neamhghníomhacha Glan.
- Céide an fheithicil agus iarracht a athshocrú an cód.
- Seiceáil do cóid, féach Féach ar Lochtanna Ghníomhach agus Neamhghníomhach.
- Mura bhfuil cóid, Is tástála a chomhlánú.
- Má Locht Cód 116 Is cosúil, contact Eaton at 1- 800-826-CABHRÚ (4357). Repeat this Step (Céim 10).
- Má cód seachas 116 Is cosúil, féach Locht Liosta Innéacs Cód.
[/fusion_content_box][/fusion_content_boxes][/fusion_builder_column][/fusion_builder_row][/fusion_builder_container][fusion_global id=”13788″]